Use self-managed object storage with MinIO
Harness Self-Managed Enterprise Edition enables you to configure self-managed object storage with MinIO. MinIO is an object storage server designed for large-scale private cloud infrastructure. It aggregates persistent volumes into scalable distributed object storage using Amazon S3 REST APIs.
You can install MinIO on your preferred VMs and provide the endpoint in your Harness Helm charts. This topic describes how to set up 4 MinIO servers.
Retention policies for MinIO buckets are now supported and can be configured through bootstrap overrides to automatically delete older pipeline logs, helping manage storage costs and prevent disk space issues.
This feature is disabled by default and must be explicitly enabled. By default, enabling it will delete logs older than 1 year. You can customize the retention period as needed. Changes may take up to 24 hours to apply due to MinIO’s internal scheduling. Always ensure you have appropriate backups to avoid accidental data loss.
Enable Default 1-Year Deletion Policy
To enable with the default 1-year expiration, no need to specify the duration:
database:
  minio:
    provisioning:
      enabled: true
Customize the Retention Period
To extend the retention period (e.g., 2 years), update the override as follows:
database:
  minio:
    provisioning:
      enabled: true
      buckets:
        - name: "logs"
          lifecycle:
            - id: LogServiceRetentionPolicy
              expiry:
                days: 720  # 2 years
MinIO prerequisites
Make sure to meet the MinIO prerequisites before you set up self-managed object storage. For prerequisites, go to Object Storage for Linux in the MinIO documentation.
MinIO hardware requirements
- 4 VMs
- 4 cores per VM
- 8 GB memory per VM
- 100 GB disk per VM (SSD preferred)
- 1GB/s minimum network bandwidth
- Ubuntu 20.04 LTS operating system
Nginx hardware requirements
- 1 VM
- 4 cores per VM
- 8 GB memory per VM
- 1GB/s minimum network bandwidth
- Ubuntu 20.04 LTS operating system
Example passwords used in this tutorial are for instructional purposes only. Replace the examples with your own secure passwords. Harness recommends following your organization's standards for password security, including the use of strong passwords. Strong passwords are:
- At least 12 characters long. Longer passwords are more secure.
- Any combination of uppercase letters, lowercase letters, numbers, and symbols.
- Not a word in the dictionary of any language or the name of a person, place, character, or organization.
- Unique for each account.
Create an Nginx LoadBalancer VM
To set up MinIO, you must first create a VM for the Nginx LoadBalancer with the above hardware requirements.
To create a new VM instance for the Nginx load balancer, do the following:
-
Select the machine type based on the hardware requirements for Nginx.
-
Change the boot disk to Ubuntu 20.04 LTS.
-
Reserve an internal static IP address.
-
Reserve an external static IP address.
Create the MinIO server VMs
Next, you must create 4 VMs with the MinIO hardware requirements.
To create the MinIO server VMs, do the following:
-
Create a new VM instance with the following configuration.
-
Select the machine type based on the hardware requirements.
-
Change the boot disk to Ubuntu 20.04 LTS.
-
Reserve an internal static IP address.
-
Attach an additional disk to the VM.
Set up the Nginx load balancer
Next, set up the Nginx load balancer.
To set up the Nginx load balancer, do the following:
-
SSH into the Nginx VM, and install Nginx. For installation instructions, go to Linux packages in the Nginx documentation.
-
Add the sequential hostnames for your MinIO server instances to your
/etc/hostsfile (internal IPs should be MinIO instances).10.123.0.23 minio1.internal
10.123.0.24 minio2.internal
10.123.0.25 minio3.internal
10.123.0.36 minio4.internal -
Add the following to the
/etc/nginx/sites-enabled/minio.conffile.upstream minio_s3 {
least_conn;
server minio1.internal:9000;
server minio2.internal:9000;
server minio3.internal:9000;
server minio4.internal:9000;
}
upstream minio_console {
least_conn;
server minio1.internal:9001;
server minio2.internal:9001;
server minio3.internal:9001;
server minio4.internal:9001;
}
server {
listen 80;
listen [::]:80;
server_name <external-ip-of-VM>;
# Allow special characters in headers
ignore_invalid_headers off;
# Allow any size file to be uploaded.
# Set to a value such as 1000m; to restrict file size to a specific value
client_max_body_size 0;
# Disable buffering
proxy_buffering off;
proxy_request_buffering off;
location / {
proxy_set_header Host $http_host;
proxy_set_header X-Real-IP $remote_addr;
proxy_set_header X-Forwarded-For $proxy_add_x_forwarded_for;
proxy_set_header X-Forwarded-Proto $scheme;
proxy_connect_timeout 300;
# Default is HTTP/1, keepalive is only enabled in HTTP/1.1
proxy_http_version 1.1;
proxy_set_header Connection "";
chunked_transfer_encoding off;
proxy_pass http://minio_s3; # This uses the upstream directive definition to load balance
}
location /minio/ui/ {
rewrite ^/minio/ui/(.*) /$1 break;
proxy_set_header Host $http_host;
proxy_set_header X-Real-IP $remote_addr;
proxy_set_header X-Forwarded-For $proxy_add_x_forwarded_for;
proxy_set_header X-Forwarded-Proto $scheme;
proxy_set_header X-NginX-Proxy true;
# This is necessary to pass the correct IP to be hashed
real_ip_header X-Real-IP;
proxy_connect_timeout 300;
# To support websockets in MinIO versions released after January 2023
proxy_http_version 1.1;
proxy_set_header Upgrade $http_upgrade;
proxy_set_header Connection "upgrade";
chunked_transfer_encoding off;
proxy_pass http://minio_console; # This uses the upstream directive definition to load balance
}
} -
Run the following to start Nginix.
nginx sudo nginx -s reload
Set up MinIO servers
Now you are ready to set up your MinIO servers.
To configure your MinIO servers, do the following:
-
SSH into one of your MinIO VMs.
-
Create a
minio-useruser and group.sudo groupadd -r minio-user
sudo useradd -M -r -g minio-user minio-user -
Attach the disk device name to the VM using
sudo lsblk. For example: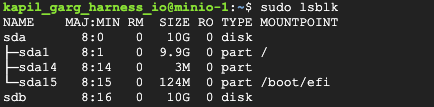
-
Run the following to format the disk.
sudo mkfs.ext4 -m 0 -E lazy_itable_init=0,lazy_journal_init=0,discard /dev/sdb -
Run the following to mount the disk.
sudo mkdir -p /mnt/disks/disk1
sudo mount -o discard,defaults /dev/sdb /mnt/disks/disk1 -
Change the disk permissions and user.
sudo chmod a+w /mnt/disks/disk1/
sudo chown -R minio-user:minio-user /mnt/disks/disk1/ -
Add hostnames in sequential order in your
/etc/hostsfile.10.128.0.23 minio1.internal
10.128.0.24 minio2.internal
10.128.0.25 minio3.internal
10.128.0.36 minio4.internal -
Download and install MinIO.
wget https://dl.min.io/server/minio/release/linux-amd64/archive/minio_20230831153116.0.0_amd64.deb -O minio.deb

sudo dpkg -i minio.deb -
Add the following to your
/etc/default/miniofile.# Set the hosts and volumes MinIO uses at startup
# The command uses MinIO expansion notation {x...y} to denote a
# sequential series.
#
# The following example covers four MinIO hosts
# with 4 drives each at the specified hostname and drive locations.
# The command includes the port that each MinIO server listens on
# (default 9000)
MINIO_VOLUMES="http://minio{1...4}.internal:9000/mnt/disks/disk1"
# Set all MinIO server options
#
# The following explicitly sets the MinIO Console listen address to
# port 9001 on all network interfaces. The default behavior is dynamic port selection.
MINIO_OPTS="--console-address :9001"
# Set the root username. This user has unrestricted permissions to
# perform S3 and administrative API operations on any resource in the deployment.
#
# Defer to your organizations requirements for superadmin user name.
MINIO_ROOT_USER=minioadmin
# Set the root password
#
# Use a long, random, unique string that meets your organizations
# requirements for passwords.
MINIO_ROOT_PASSWORD=Te$tp@ssw0rD#@
# Set to the URL of the load balancer for the MinIO deployment
# This value *must* match across all MinIO servers. If you do
# not have a load balancer, set this value to to any *one* of the
# MinIO hosts in the deployment as a temporary measure.
MINIO_SERVER_URL="http://<external-ip-of-nginx-vm>"
MINIO_BROWSER=on
MINIO_BROWSER_REDIRECT_URL="http://<external-ip-of-nginx-vm>/minio/ui" -
Start the MinIO service.
sudo systemctl start minio.service
- Check the MinIO status.
sudo systemctl status minio.service
- Repeat the process for your other three VMs.
Test MinIO connectivity
To test your MinIO connectivity, do the following:
-
Go to
http://<NGINX_VM_EXTERNAL_IP>, and sign in using the username and password in your/etc/default/miniofile. -
Create a bucket and upload a test file.
-
SSH into one of your MinIO VMs.
-
Check the contents in the
/mnt/disks/disk1/disk.
Configure your Harness environment and Helm chart
Now you're ready to configure your Harness Self-Managed Enterprise Edition environment and Helm chart.
To configure your Harness environment and Helm chart, do the following:
-
Create a secret in the namespace where Harness is installed with the following data.
data:
  root-user: <MINIO_USERNAME>
root-password: <MINIO_PASSWORD> -
Set the following overrides for your installed MinIO with Harness.
platform:
  log-service:
    s3:
      endpoint: "http://<NGINX_VM_EXTERNAL_IP>"
    logServiceS3AccessKeyID:
      name: minio
      key: root-user
    logServiceS3SecretAccessKey:
      name: minio
      key: root-password