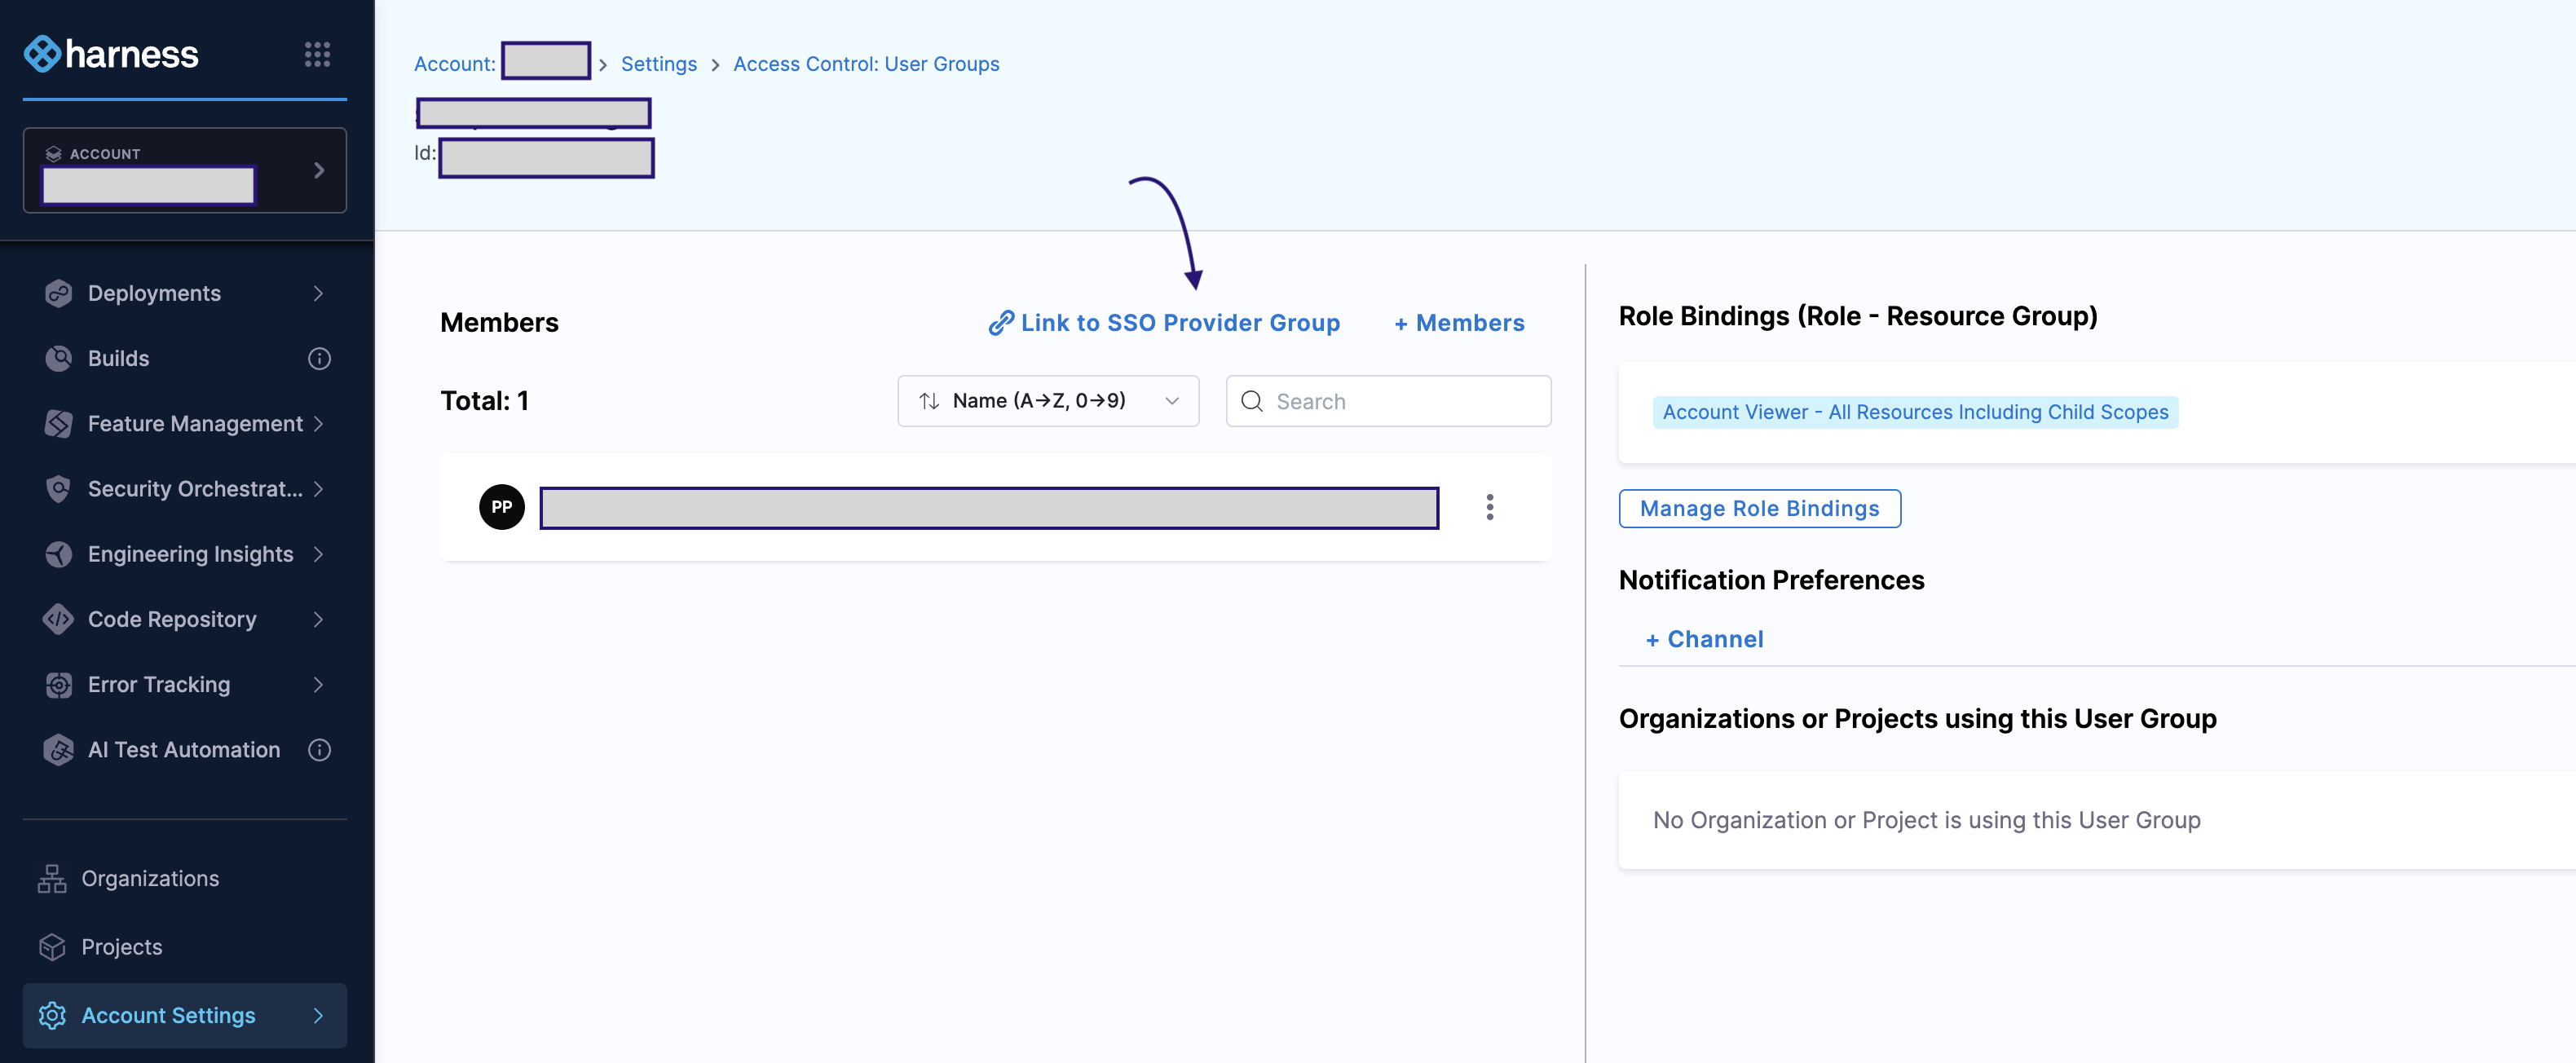
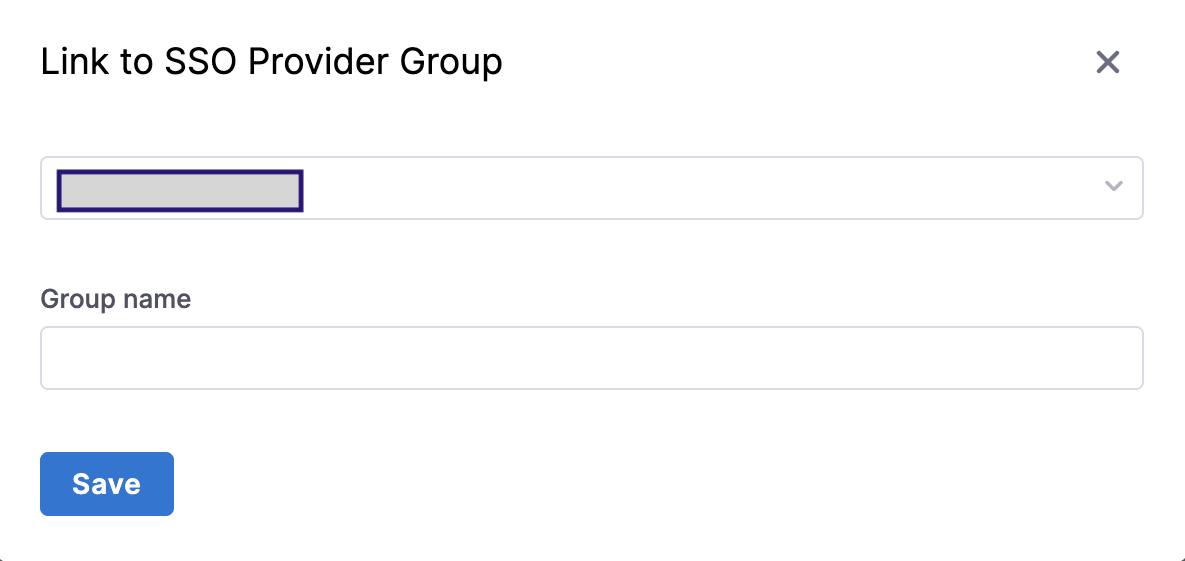
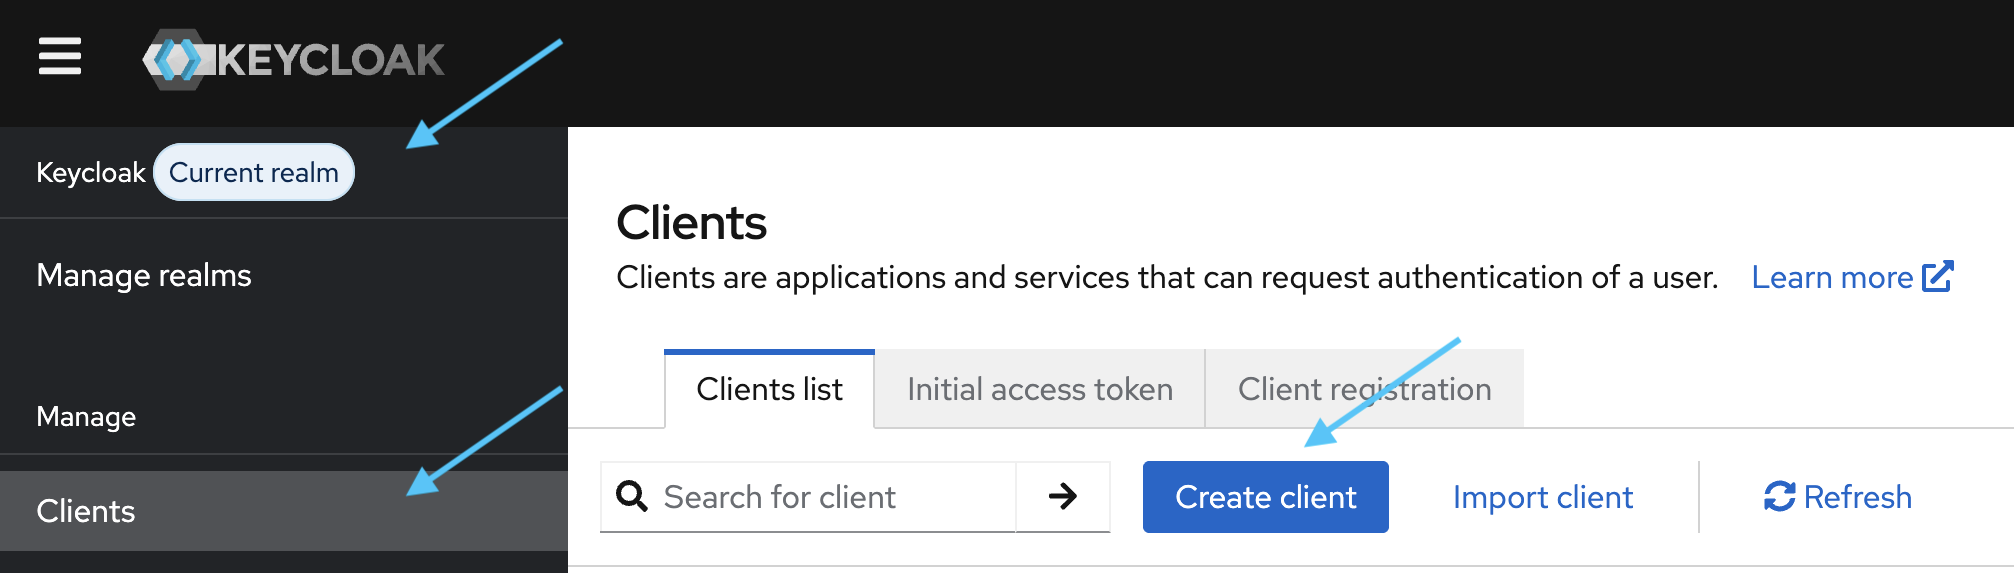
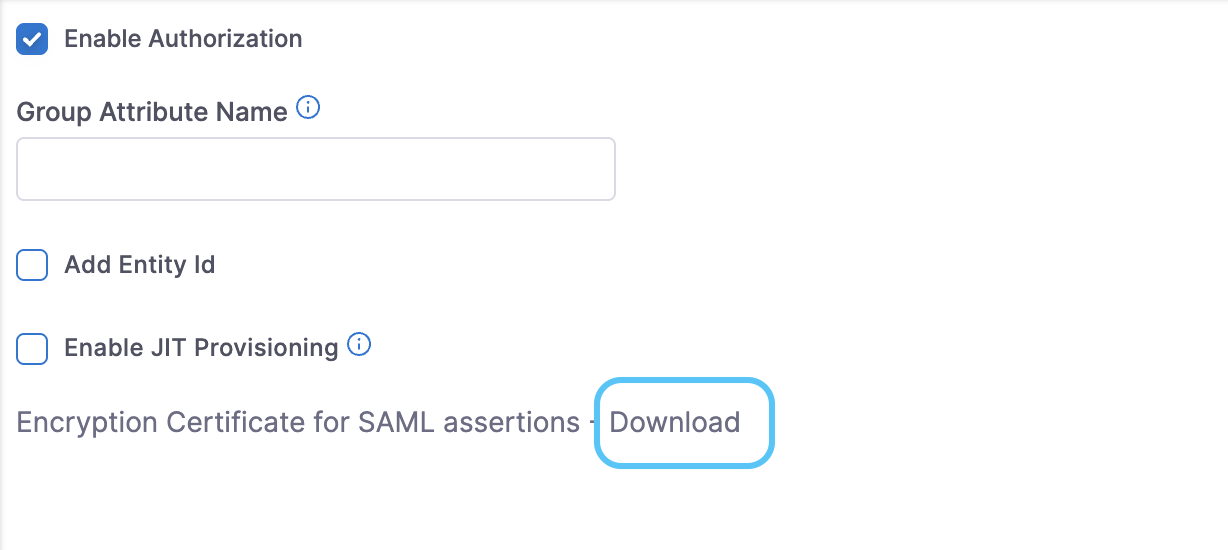
Learn intelligent software delivery skills at your own pace and in one place. Step-by-step tutorials, videos, and reference docs to help you create and deliver software.
MODULES
***
### Delivery
Continuous Delivery
Deploy to any environment using pipelines or GitOps workflows.
Learn intelligent software delivery skills through Instructor-Led Training and test your knowledge through Certifications. Courses, guides, videos, and reference docs to help you create and deliver software.
Code Repository
1 Certifications Instructor-Led Training Available Self Paced Training Available
Securely host Git repositories and collaborate with advanced governance.
3 Certifications Instructor-Led Training Available Self Paced Training Available
Continuous Integration focuses on building and testing your code. Your Continuous Integration pipeline should provide a bird's-eye view and analyze the root causes of issues.
2 Certifications Instructor-Led Training Available Self Paced Training Available
Save time, reduce effort, and save on your cloud and AI bill with intelligent cloud cost automation. Detect and stop cloud cost anomalies as they occur, to avoid unpleasant biling surprises with a FinOps approach.
{% @harness-feedback/feedback module="home" pagePath="home/readme" %}
# Provider logos
Every provider logo the package selector can resolve in this space. This page exists so Git Sync imports the files; it is not meant to be read.
The package selector resolves a card's `logo` by filename against the files uploaded to this space. Git Sync only imports an asset that a page references, so an SVG committed to `.gitbook/assets/` and referenced nowhere never reaches the space, and every card using it falls back to its label.
This page is that reference. It is hidden from navigation and carries no content of its own.
**Adding a logo:** commit the SVG to `.gitbook/assets/` and add a row below. Both steps, or the selector will not find it.
36 logos, homepage space `YFmsAYQ8SLrgE99q8tur`:
| Logo | Filename |
| -------------------------------------------------------------------------------------------------------------------------------------------------------------------------------------------------------------------------------------------------------------------------------- | ----------------------------- |
| | `alpine-logo.svg` |
| | `aws-cloud-provider-logo.svg` |
| | `aws-logo.svg` |
| | `azure-logo.svg` |
| | `cdk-logo.svg` |
| | `conan-logo.svg` |
| | `conda-logo.svg` |
| | `cran-logo.svg` |
| | `dart-logo.svg` |
| | `debian-logo.svg` |
| | `docker-logo.svg` |
| | `gcp-cloud-provider-logo.svg` |
| | `gcp-logo.svg` |
| | `generic-logo.svg` |
| | `github-logo.svg` |
| | `go-logo.svg` |
| | `harness-code-logo.svg` |
| | `helm-http-logo.svg` |
| | `helm-logo.svg` |
| | `hugging-face-logo.svg` |
| | `kubernetes-logo.svg` |
| | `maven-logo.svg` |
| | `npm-logo.svg` |
| | `nuget-logo.svg` |
| | `opentofu-logo.svg` |
| | `php-composer-logo.svg` |
| | `puppet-logo.svg` |
| | `python-logo.svg` |
| | `reddit-logo.svg` |
| | `rpm-logo.svg` |
| | `ruby-logo.svg` |
| | `rust-logo.png` |
| | `swift-logo.svg` |
| | `terraform-logo.svg` |
| | `terragrunt-logo.svg` |
| | `wolfi-logo.svg` |
{% @harness-feedback/feedback module="home" pagePath="home/provider-logos" %}
# Platform
Harness Platform provides the shared foundation for all Harness modules. Manage user access, authentication, secrets, delegates, governance, and audit trails from a single control plane. With built-in role-based access control (RBAC), single sign-on (SSO), and policy enforcement, Harness Platform gives your organization the security and visibility it needs to scale DevOps across teams and environments.
Knowledge BaseRelease Notes
### Get started with Harness Platform
Overview
A conceptual reference to the core building blocks of Harness Platform- accounts, RBAC, delegates, connectors, pipelines, secrets, and governance.
{% @harness-feedback/feedback module="harness-ai" pagePath="harness-ai/readme" %}
# Overview
Learn key concepts and overview of the Harness Platform including accounts, organizations, projects, delegates, connectors, pipelines, and RBAC.
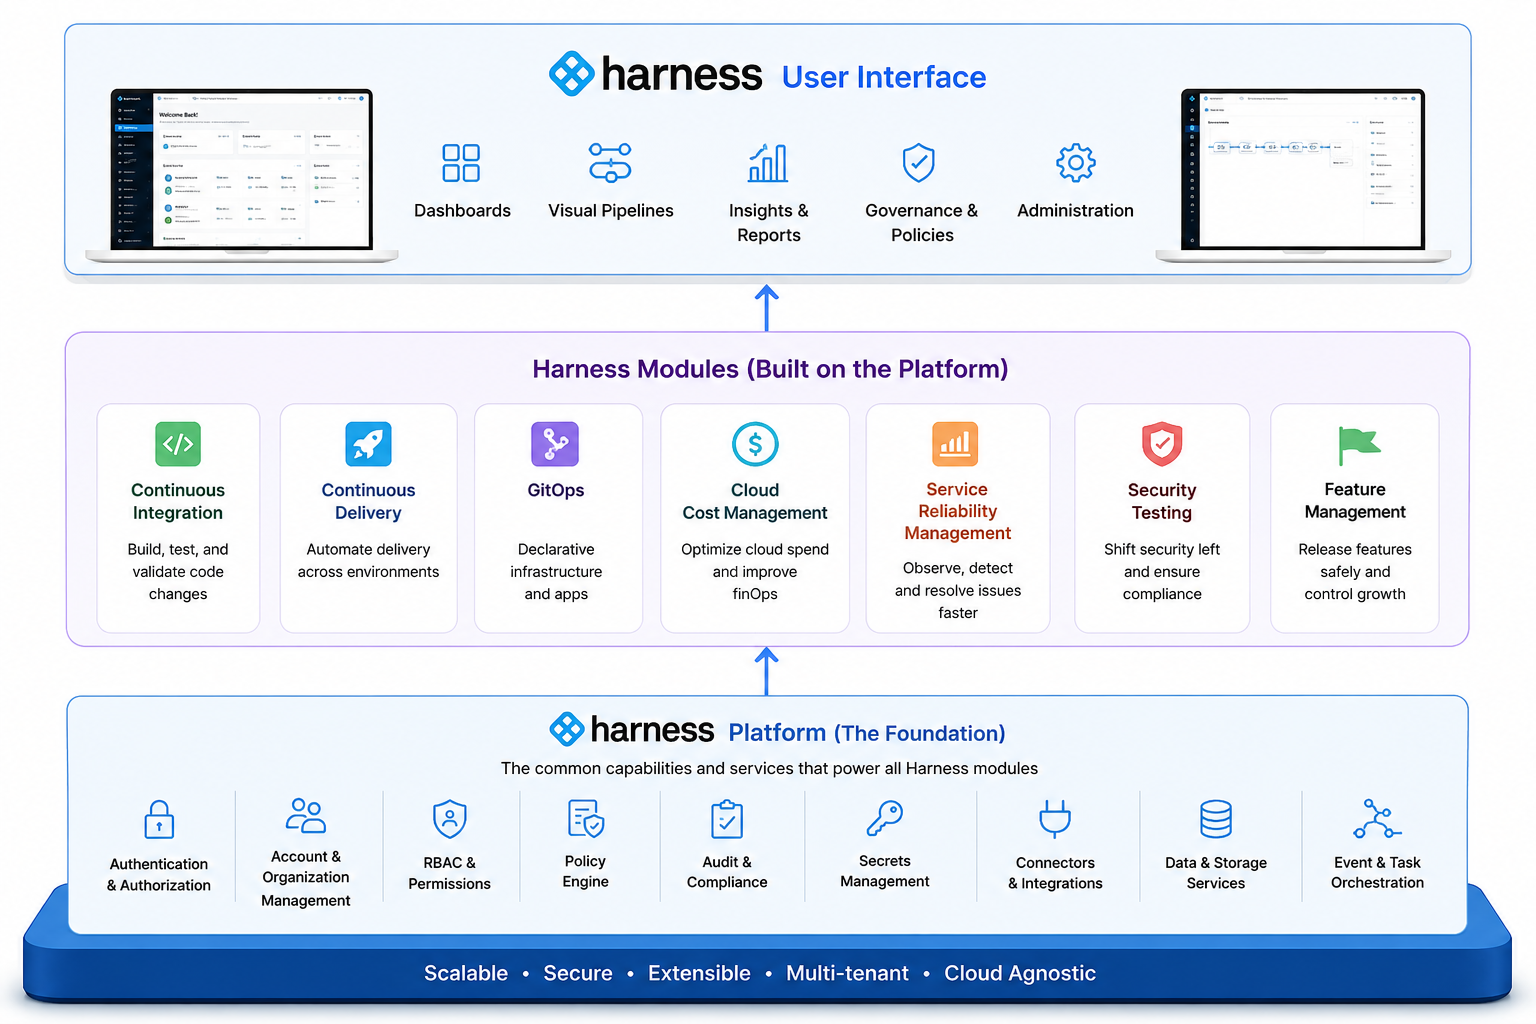
The Harness Platform is the foundation that everything else in Harness is built on. Think of it as the common layer that handles all the shared capabilities your teams need- user management, access control, secrets, connectors, auditing, and notifications. You define these capabilities once and reuse them everywhere.
On top of this foundation sit the Harness modules, such as Continuous Integration, Continuous Delivery and GitOps, Feature Flags, and more. Because these modules run on the platform, they automatically inherit all platform capabilities.
Click to view full size image
For example, when you set up authentication, permissions, or notifications at the platform level, those settings apply consistently across all modules you use.
Harness Platform is also referred to as **Harness Manager**. It is the web UI where you sign in, create projects, set up pipelines, and manage your configurations.
***
### What you will learn in this topic
By the end of this topic, you will be able to understand:
* How Harness Platform structures your work using the [Account](#account) → [Organization → Project](#organizations-and-projects) hierarchy.
* How [RBAC](#role-based-access-control-rbac) uses roles, resource groups, and principals to control who can do what, and where.
* What [Delegates](#delegates) and [Connectors](#connectors) are.
* How Harness stores and references sensitive data securely using [secrets management](#secrets-management).
***
### Before you begin
* **Know basic DevOps concepts:** What CI/CD means, what a pipeline is in general terms, and why access control matters in engineering teams.
* **What an identity provider (IdP) is (optional):** Helps understand the [authentication and RBAC sections](/harness-platform/3.0/harness-platform-resources/authentication/authentication-overview).
* **Git basics (optional):** The [Git Experience](/service-reliability-management/new-to-srm/get-started/key-concepts#git-experience) section assumes familiarity with repos and YAML.
{% hint style="info" %}
**NEW TO DEVOPS?**
Do not worry if you do not recognize a term. Check the [Harness Glossary ](/database-devops/3.0/use-db-devops/reference/glossary)as you read.
{% endhint %}
***
### Account
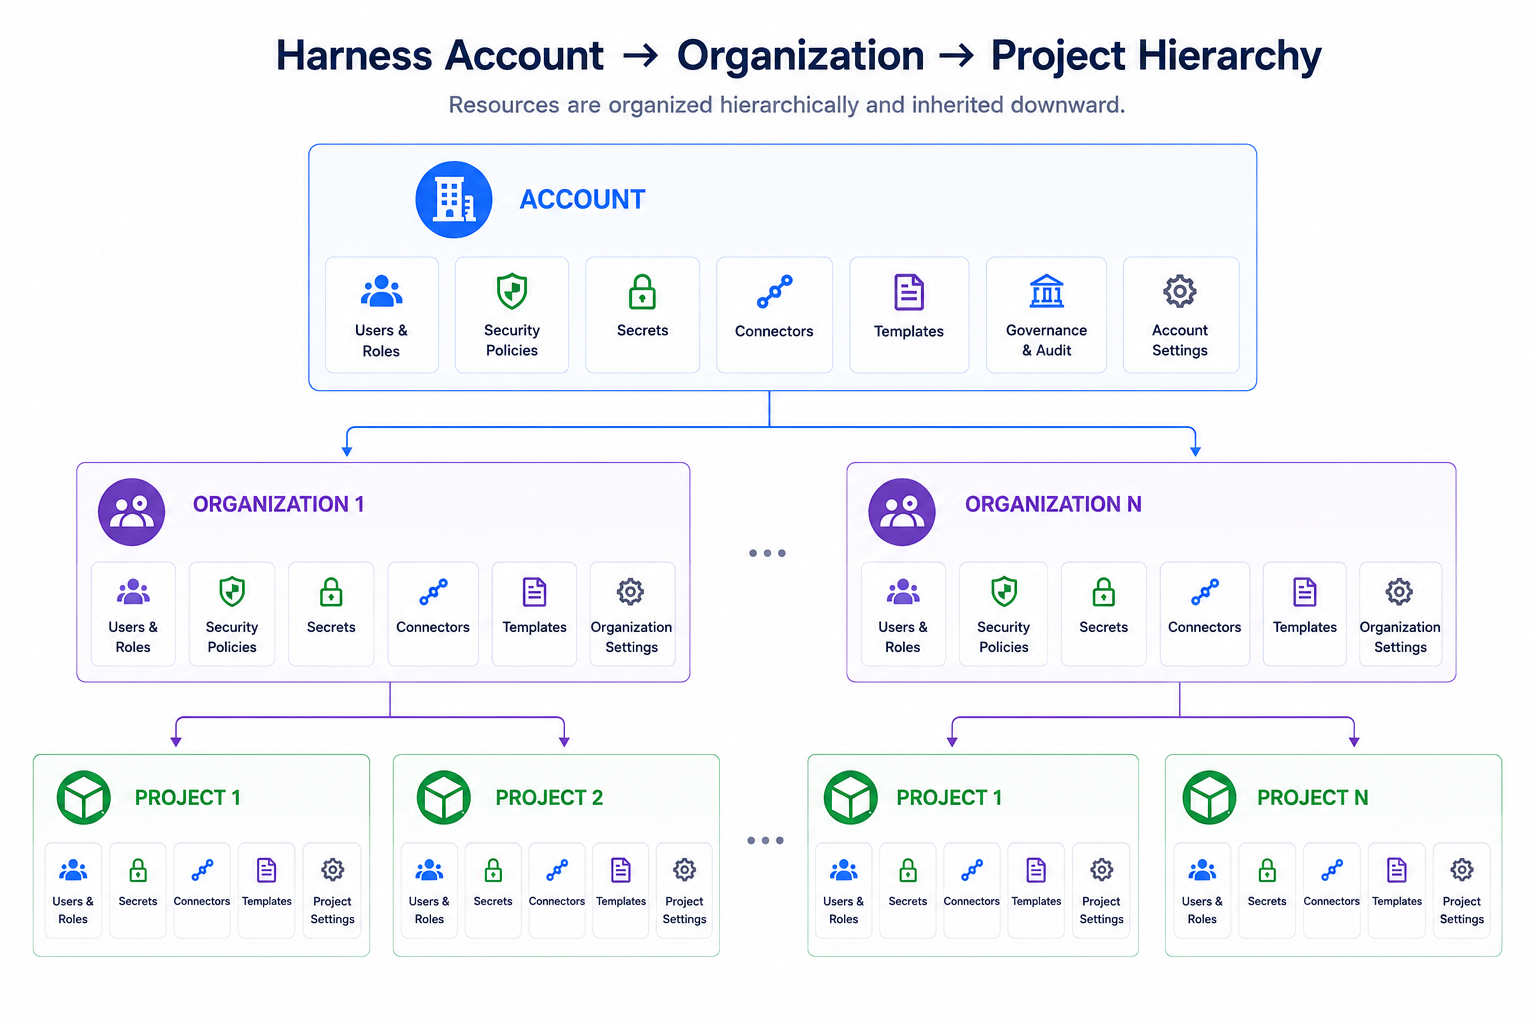
A Harness account is the highest level for all operations you perform in Harness. It is where you define your organizational structure, manage global settings, and control access across all users and projects. Within an account, you create **organizations and projects**. This hierarchy helps teams work independently while still following shared security, governance, and access rules set at the account level.
To set up your account and get started, see the [Platform onboarding guide](/harness-ai/new-to-harness-platform/get-started).
Click to view full size image
***
Within a Harness account, you organize your work using organizations and projects. This structure helps teams collaborate effectively while keeping ownership, access, and configuration clearly defined.
### Organizations
A Harness organization (or *org*) groups together projects that share a common purpose or business goal. Organizations are often used to represent higher-level groupings in a company, such as:
* Business units
* Product lines
* Departments
Go to [Organizations](/harness-ai/use-harness-platform/organizations-and-projects#organizations) to know more about creating and managing organizations.
### Projects
A Harness project is where teams do their day-to-day work.
Projects typically represent:
* Application or service teams
* Platform or infrastructure teams
* Individual workloads within an organization
Go to [Projects](/harness-ai/use-harness-platform/organizations-and-projects#projects) to know more about creating and managing projects.
***
### Harness SaaS versus SMP offerings
Harness is offered as **Software as a Service (SaaS)** and **Self-Managed** (on-premises) editions. **This documentation covers the SaaS edition.** If you are using the Self-Managed Enterprise Edition (SMP), see the [SMP documentation](https://developer.harness.io/self-managed-enterprise-edition/).
| | **SaaS** | **Self-Managed Enterprise Edition (SMP)** |
| ------------------- | -------------------------------------------------------------------------------------------------------------------------------------------------------------------------------------------------------------------------------------------------------- | ---------------------------------------------------------------------------------------------------------------------------------------------------------------------------------------------------- |
| **What it is** | Fully managed, cloud-hosted version of Harness. No infrastructure setup required. | Kubernetes-native deployment that runs on your own public or private cloud infrastructure. See [SMP overview](/self-managed-enterprise-edition/new-to-self-managed-enterprise-edition/smp-overview). |
| **Plans/licensing** | Free, Team, and Enterprise. See [Subscriptions and licenses](/harness-ai/subscriptions-and-licenses/subscriptions). | Requires a valid SMP license key and access to download the Harness SMP software. |
| **Get access** | [Sign up with the Free plan](https://app.harness.io/auth/#/signup/?module=cd\&utm_medium=harness-developer-hub), then [sign in](https://app.harness.io/auth/#/signin). Team/Enterprise accounts are created by invitation from an Account Administrator. | Contact [Harness Support](mailto:support@harness.io) to obtain your license key and software download access. |
| **Setup** | None. Harness manages the infrastructure. | Follow the [installation instructions](/self-managed-enterprise-edition/use-self-managed-enterprise-edition/smp-installationupgrade), then sign in at `http://YOUR_DOMAIN_NAME/auth/#/signin`. |
***
### Role-based access control (RBAC)
Role-based access control (RBAC) describes **who** is allowed to perform **what** actions and **where**.
With RBAC, you can delegate administrative responsibility at the organization and project levels instead of managing everything at the account level.
For example, assigning the **Project Admin** role makes a user responsible for managing access, resources, and settings within a specific project.
Once ownership is delegated:
* Organization and project admins can invite and manage users.
* Teams can independently manage pipelines, modules, and platform resources.
* Changes made in one project or organization do not affect others.
This approach reduces dependency on account administrators and allows teams to move faster while maintaining strong governance and security boundaries.
#### How RBAC works in Harness
Harness RBAC has three core components:
* **Principals**: The people or systems that need access; users, user groups, or service accounts.
* **Roles**: What actions they can take; for example, create pipelines or view secrets.
* **Resource groups**: Where they can do it; for example, only within a specific project.
You grant access by combining a **role** and a **resource group** and assigning them to a **principal**.
Harness RBAC applies across all scopes, from the account level to individual resources such as projects, pipelines, and services.
For detailed setup, see the [Harness RBAC documentation](/harness-platform/3.0/harness-platform-resources/platform-access-control/rbac-in-harness).
#### User and group management
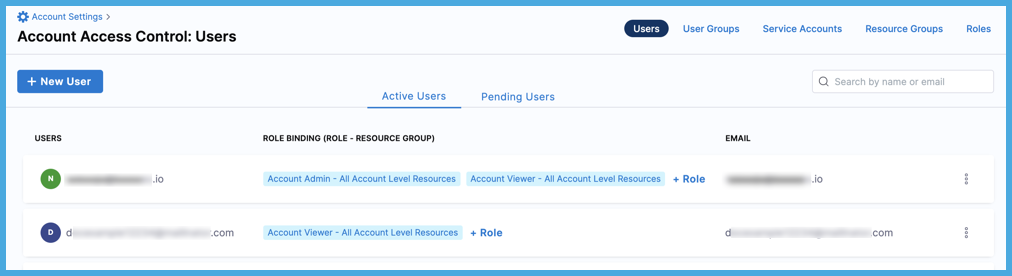
A Harness user is anyone with an account, identified by their email address. You can add users manually or set up automatic provisioning using System for Cross-domain Identity Management (SCIM), which is a standard protocol for automating user provisioning. Some tools are:
* Okta SCIM
* Microsoft Entra ID SCIM
* OneLogin SCIM
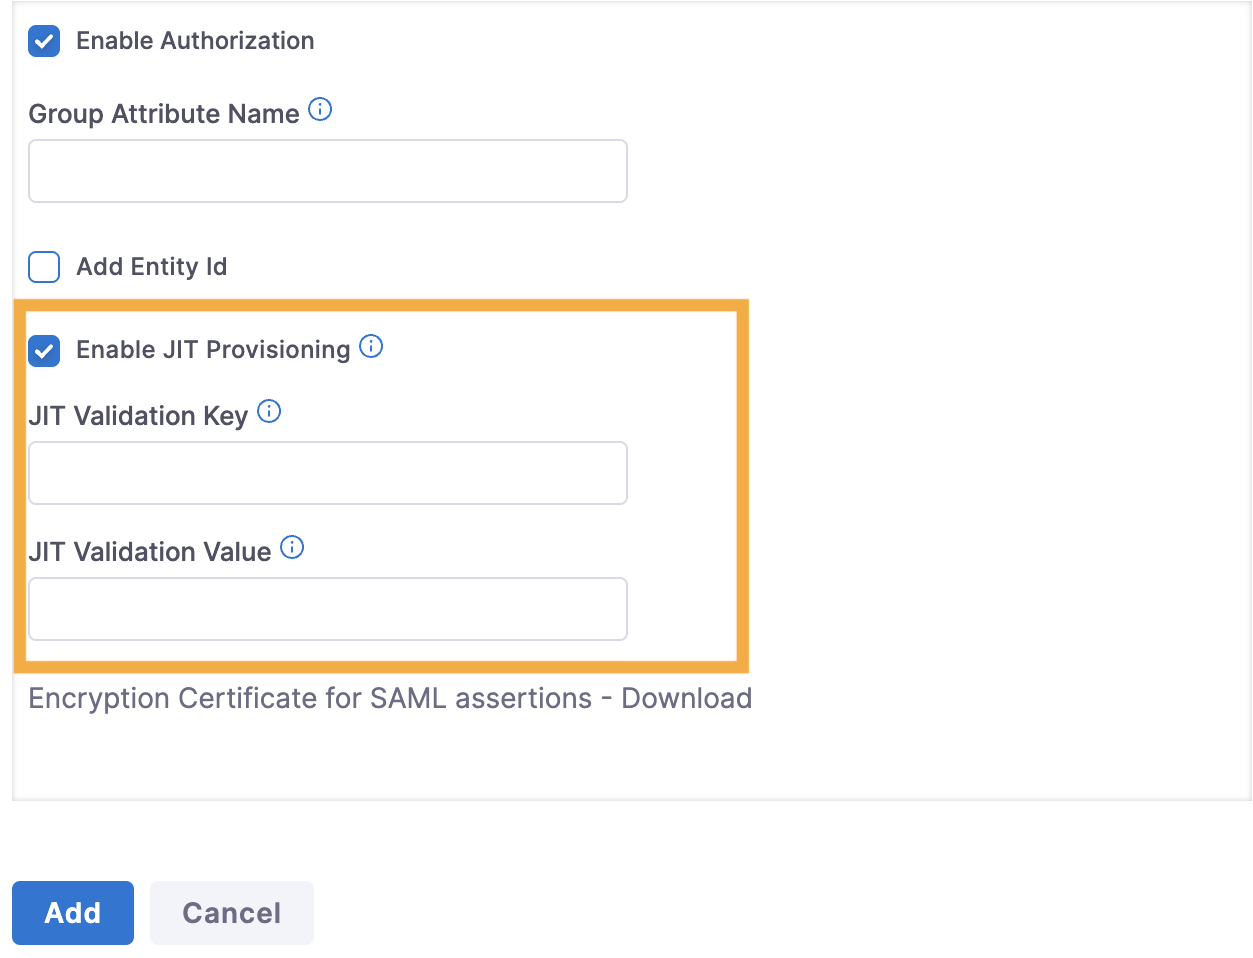
* Just-In-Time (JIT) provisioning with Security Assertion Markup Language (SAML).
Harness supports multiple [authentication methods](/harness-platform/3.0/harness-platform-resources/authentication/authentication-overview), allowing you to choose what best fits your organization’s security and compliance requirements:
* Username and password
* Public OAuth providers, including Google, GitHub, GitLab, LinkedIn, Azure, and Bitbucket
* Enterprise Single Sign-On (SSO) providers (Security Assertion Markup Language (SAML) providers such as Microsoft Entra ID, Okta, OneLogin)
* Lightweight Directory Access Protocol (LDAP)
#### User groups
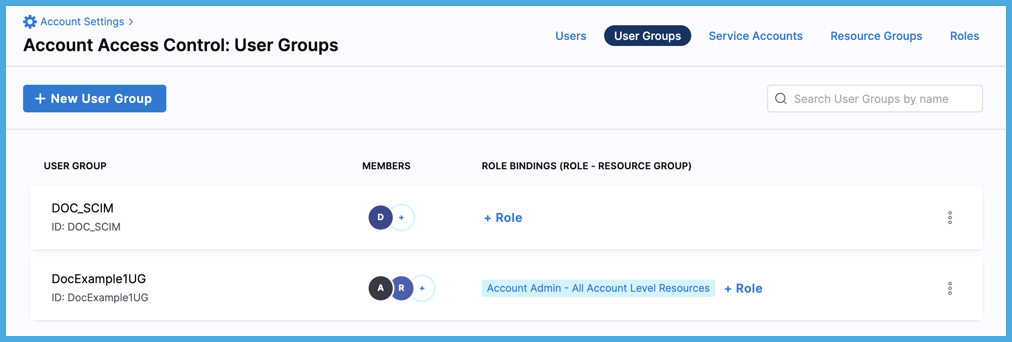
Instead of setting permissions for each person individually, you can create [user groups](/harness-ai/use-harness-platform/platform-access-control/add-user-groups) and assign [roles](/harness-ai/use-harness-platform/platform-access-control/add-manage-roles) and [resource groups](/harness-platform/3.0/harness-platform-resources/platform-access-control/add-resource-groups) to a user group. Everyone in the group automatically gets those permissions.
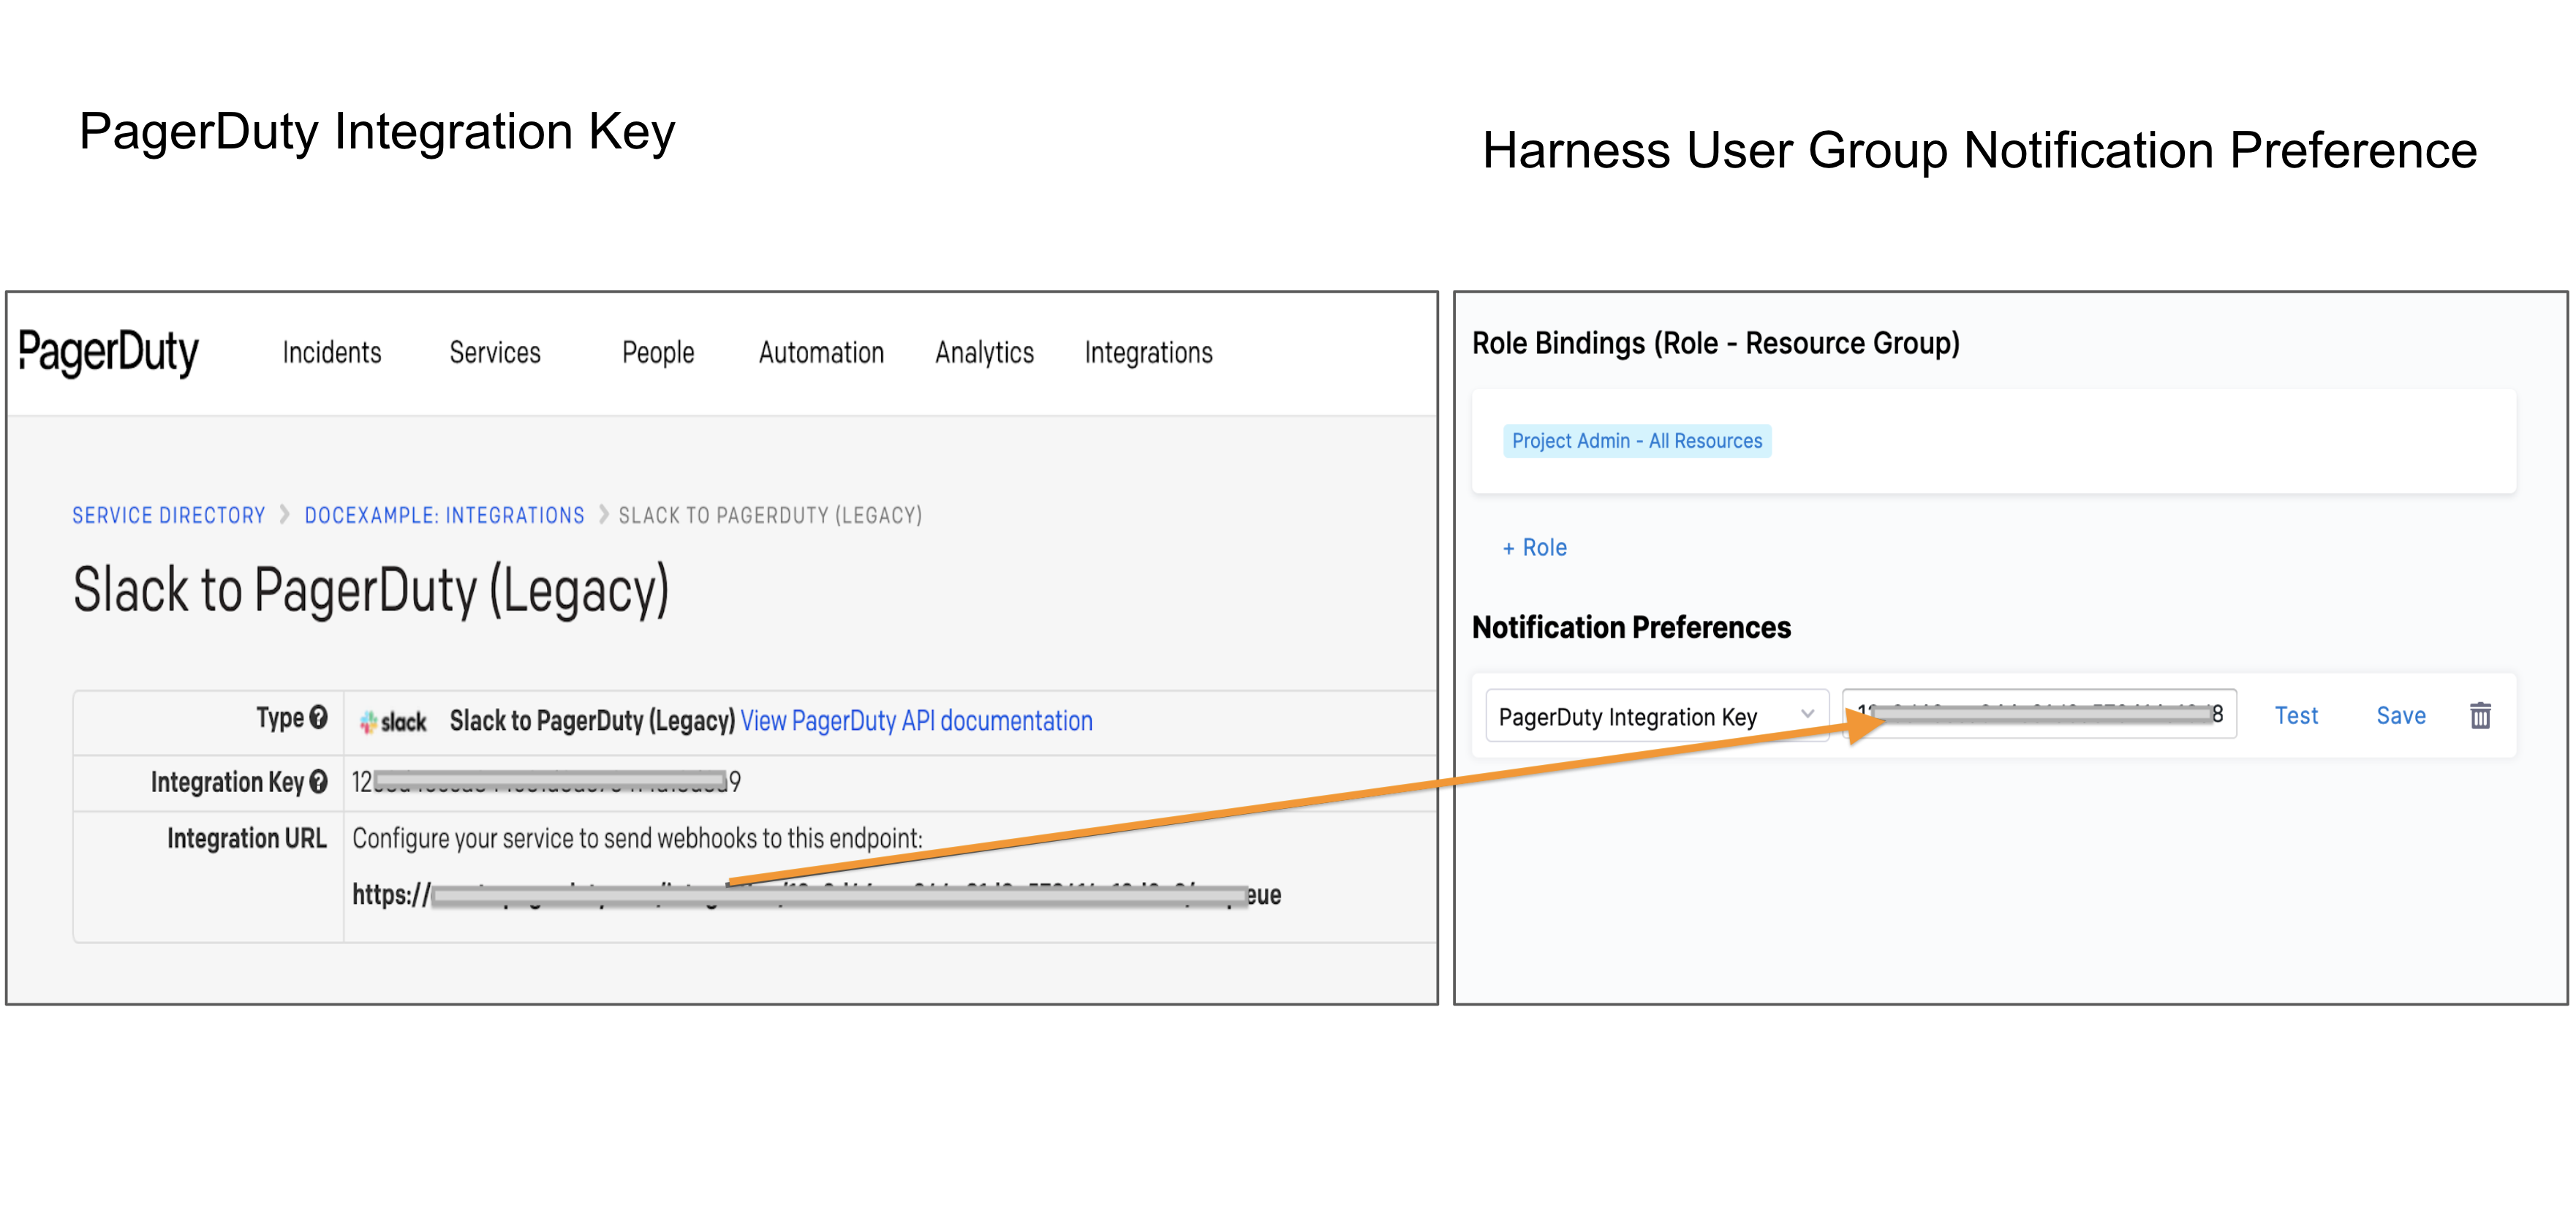
User groups also control notifications, so you can send alerts to a group via email, Slack, Microsoft Teams, or PagerDuty.
This approach helps you manage access and notifications consistently while reducing administrative overhead.
#### Service accounts
Service accounts are like user accounts but for scripts and automated workflows. They are non-human identities. For example, a CI/CD pipeline might use a service account to deploy code without needing someone's personal login.
You give service accounts the same roles and resource groups as regular users to control what they can access.
* Assign **roles** to define what actions the service account can perform
* Assign **resource groups** to define where those actions can be performed
This allows you to apply the same RBAC controls and governance policies to automation as you do to human users. Using service accounts helps improve security and maintainability by avoiding reliance on personal user credentials for automation.
#### API keys and tokens
API keys and tokens let external tools authenticate with Harness without a browser login. These keys and tokens can only perform actions that the associated user or service account has permission to perform.
* **API key for a service account**: Use this for automation and integrations. The key inherits all permissions granted to that service account.
* **Personal access token (PAT) for a user**: Use this for your own local development or testing. The token inherits your user permissions.
***
### Governance using policy as code
Harness lets you enforce governance and compliance using policy as code, powered by Open Policy Agent (OPA).
Policies act as guardrails that automatically evaluate configurations and actions across the platform. You can use them to ensure teams follow standards.
For example, if you want to make sure nobody accidentally deploys to production, you can write a rule (a "policy") that Harness checks automatically before every deployment. If the rule fails, the deployment is blocked.
You can start quickly by using built-in sample policies or create custom policies tailored to your organization’s needs. Learn more in the [Harness governance overview](/harness-ai/use-harness-platform/governance/policy-as-code/harness-governance-overview).
***
### Secrets management
Harness includes built-in support for secrets management to securely store and manage sensitive data such as API keys, passwords, and tokens.
Harness encrypts your secrets so you can reference them safely across your account without exposing their values. In addition to the built-in secret manager, Harness integrates with popular external secret managers, allowing you to continue using existing security tools and workflows.
For details, see the [Harness secrets management overview](/harness-ai/use-harness-platform/secrets/secrets-management/harness-secret-manager-overview).
***
### Delegates
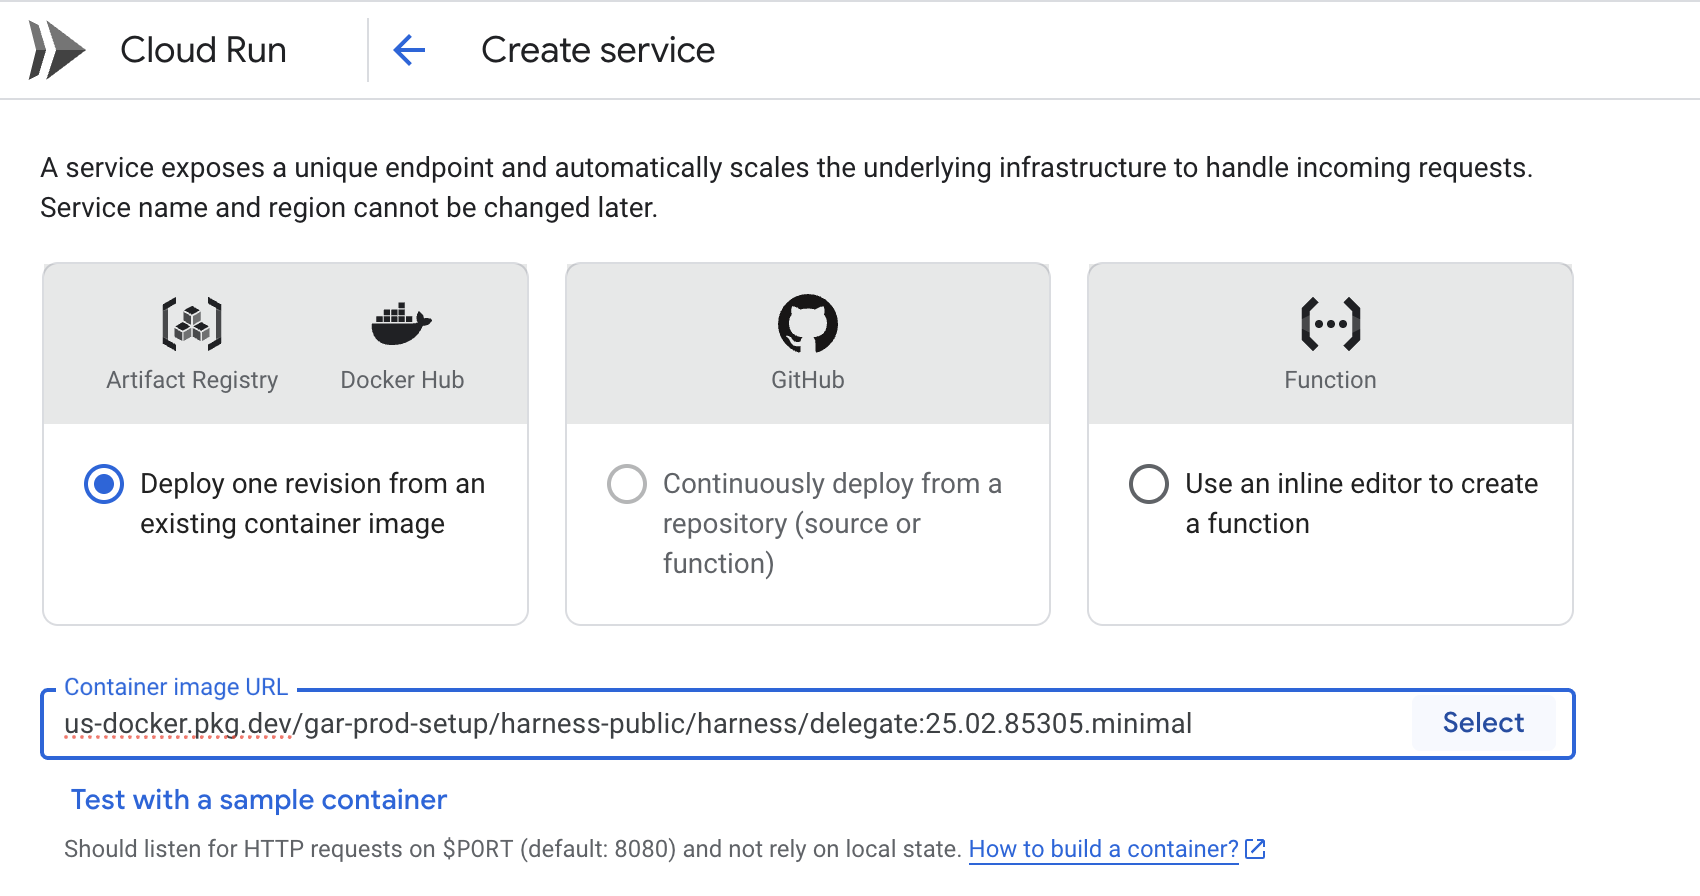
Harness Delegates are lightweight workers that you install in your environment, such as a Kubernetes cluster or virtual machine, to securely execute tasks on behalf of the Harness Platform.
Delegates connect to Harness Manager using **outbound-only HTTP/HTTPS**, so you don’t need any inbound network access. When you run a pipeline, Harness Manager tells the Delegate what to do, and the Delegate performs the actual operations — such as deploying to a cluster or pulling an artifact — within your network.
Delegates are essential for enabling Harness to perform actions in your infrastructure, but you don’t need to install one immediately. You can set up a Delegate when configuring pipelines or connectors, and the platform guides you through the installation process.
Harness Delegate architecture diagram
#### Harness GitOps Agent
The Harness GitOps Agent is similar to the Harness Delegate, but it is purpose-built to support **GitOps-based workflows and management**.
GitOps is part of **Harness Continuous Delivery (CD)**. To get started, see [Install a Harness GitOps Agent](/continuous-delivery/use-gitops/gitops-entities/agents/install-a-harness-git-ops-agent). For a deeper understanding of how Delegates and GitOps Agents work together, refer to the [Delegate and GitOps Agent strategy](https://www.harness.io/blog/delegates-and-agents-onramp-to-scale-with-harness).
The following video provides an overview of the Harness Delegate and GitOps Agent strategy.
{% embed url="" %}
***
### Connectors
[Harness connectors](/harness-ai/use-harness-platform/connectors) contain the information necessary to integrate and work with third-party tools. For example, a GitHub connector authenticates with a GitHub account and repo and fetches files as part of a build or deploy stage in a pipeline.
Harness offers many types of connectors, including:
* [Code repo connectors](/harness-ai/use-harness-platform/connectors/code-repositories)
* [Artifact repo connectors](/harness-ai/use-harness-platform/connectors/artifact-repositories)
* [Cloud provider connectors](/harness-ai/use-harness-platform/connectors/cloud-providers)
* [Monitoring and logging system connectors](/harness-ai/use-harness-platform/connectors/monitoring-and-logging-systems/connect-to-monitoring-and-logging-systems)
* [Ticketing system connectors](/harness-platform/3.0/harness-platform-resources/connectors/ticketing-systems)
***
### Pipelines
A pipeline represents a workflow and includes pipeline-level settings, [stages](#stages), and [steps](#steps-and-step-groups). Pipelines can cover integration, delivery, operations, testing, deployment, real-time changes, and monitoring.
For example, a pipeline can use the CI module to build, test, and push code, and then a CD module to deploy the artifact to your production infrastructure.
You can trigger pipelines manually in the Harness Platform or automatically in response to Git events, schedules, new artifacts, and so on.
#### Pipeline Studio
In Harness, you can write pipelines in YAML or build pipelines visually in the Pipeline Studio.
* The **Visual editor** provides a GUI experience to easily configure settings, add and remove steps and stages, and drag-and-drop steps and stages to rearrange them. It also helps organize steps in parallel, or add or remove them from step groups.
* The **YAML editor** provides a [text editor experience for creating pipelines](https://app.gitbook.com/s/iHCl4N3pQkjhOYjQoOs7/harness-platform-resources/pipelines/harness-yaml-quickstart). You can also use the [Harness Git Experience](#git-experience) to manage your Harness YAML entities from your Git repos.
You can freely switch between the two editors. When editing a pipeline in Harness, use the selector at the top of the Pipeline Studio to switch between the Visual and YAML editors.
#### Stages
A [stage](/harness-ai/use-harness-platform/pipelines/add-a-stage) is a subset of a pipeline that contains the logic to perform one major segment of the pipeline process. Stages are based on the different milestones of your pipeline, such as building, approving, and delivering.
Some stages, like a deploy stage, use strategies that automatically add the necessary steps.
#### Steps and step groups
A step is an individual operation in a stage. Harness offers many steps, from specialized steps to generic scripting steps.
Steps can run sequentially or in parallel. You can also organize related steps into step groups.
Usually, a step group is a collection of steps that share the same logic, such as the same rollback strategy.
For more information, go to [Run Steps in a Step Group](/continuous-delivery/use-continuous-delivery/cd-building-blocks/cd-steps/step-groups) and [Organize steps in step groups](/harness-ai/use-harness-platform/pipelines/use-step-groups).
#### Templates
[Templates](/harness-ai/use-harness-platform/templates/template) let you define a step, stage, or pipeline once and reuse it across multiple projects, thereby saving setup time and keeping workflows consistent.
This reduces onboarding time and enforces standardization across teams.
***
### Automation
Imagine you want to onboard a new team. Without automation, you would need to manually create their user accounts, assign roles, create a project, and configure connectors, one click at a time in the UI.
Harness offers several approaches for automating management of Harness entities in your account:
* [Terraform Provider](/harness-ai/use-harness-platform/automation/terraform-provider): Define projects, roles, and connectors in a `.tf` file and apply it in one command — reproducible and version-controlled.
* [Harness API](/harness-ai/use-harness-platform/automation/api): Invite users in bulk and assign them to projects programmatically.
* [Harness CLI](/harness-ai/use-harness-platform/automation/cli): Trigger pipelines or manage resources directly from your terminal or CI scripts.
***
### Git Experience
With the [Harness Git Experience](/harness-ai/use-harness-platform/git-experience/git-experience-overview), you can store and manage your Harness configurations such as pipelines, templates, and input sets directly in your Git repository.
Instead of making changes only in the UI, you can edit YAML files in Git and have those changes automatically reflected in Harness. This means your Harness configurations go through the same pull request reviews, version history, and branching workflows as your application code.
***
### Feature lifecycle
Learn about recent and upcoming changes to the Harness Platform and modules.
* [Release notes](https://developer.harness.io/release-notes/)
* [Product roadmap](https://developer.harness.io/roadmap)
* [Feature availability](/release-notes/features)
Beta, Limited GA, and GA definitions
Harness releases features and modules that may be in various states of development, including **Beta**, **Limited GA**, and **GA**.
A **Beta** feature or module:
* Requires a feature flag to access.
* May have bugs or performance issues.
* May include functionality not carried forward to the GA release.
* May be unstable or affect existing features.
* May not have documentation.
* May not be production-ready.
* May be incomplete.
A **Limited GA** feature or module:
* Requires a feature flag to access.
* Has basic documentation.
* May work for specific production environments.
A **GA** feature or module:
* Is production-ready.
* Has complete documentation.
* Has a stable UI.
***
### Cross-module capabilities
The Harness Platform provides several capabilities that work across all modules. You do not need to configure them separately for each module.
* [Approvals](/harness-ai/use-harness-platform/approvals/approvals-tutorial): Pause a pipeline at any stage and require a manual or automated sign-off before it continues.
* [Dashboards](/harness-ai/use-harness-platform/harness-dashboards/dashboard-legacy/dashboards-overview): View real-time data on deployments, builds, and resource usage across your account.
* [Global default settings](/harness-ai/use-harness-platform/settings/default-settings): Set account-wide defaults for timeouts, behaviors, and configurations so every team starts with a consistent baseline.
* [Governance](/harness-ai/use-harness-cli/harness-cli/harness-cli-commands/governance-commands): Enforce policies using Open Policy Agent (OPA) to block non-compliant configurations before they are applied.
* [Harness AI](/harness-ai/use-harness-ai/harness-ai): Use AI-assisted features to troubleshoot failures, generate pipelines, and get contextual recommendations directly in the platform.
* [Notifications](/harness-ai/use-harness-platform/notifications-alerts-and-banners/notifications/notifications-overview): Send pipeline and approval alerts to Slack, Microsoft Teams, email, or PagerDuty.
* [Templates](/harness-ai/use-harness-platform/templates/template): Define steps, stages, or pipelines once and reuse them across multiple projects.
* [Triggers](/harness-ai/use-harness-platform/triggers/triggers-overview): Automatically start pipelines in response to Git events, schedules, or new artifact versions.
* [Variables, expressions, and runtime input](/harness-ai/use-harness-platform/variables-and-expressions/runtime-inputs): Pass dynamic values into pipelines at runtime or reference shared values across steps and stages.
***
### Next steps
* [What's supported](/harness-ai/new-to-harness-platform/platform-whats-supported)
* [Get started with Harness Platform](/harness-ai/new-to-harness-platform/get-started)
{% @harness-feedback/feedback module="harness-ai" pagePath="harness-ai/new-to-harness-platform/overview" %}
# Getting started with Harness Platform
A self-service onboarding guide for Harness Platform
Use this guide to set up Harness Platform so your teams can start using any Harness module.
### What you will learn in this topic
By the end of this topic, you will be able to:
* [Access a Harness account](#step-1-access-your-harness-account).
* [Create organization](#create-an-organization), [projects](#create-a-project) and [invite collaborators](#invite-collaborators).
* [Manage users](#step-3-manage-users) and [shared resources](#step-4-manage-shared-resources).
* Understand the path to become a [Harness certified expert](#become-a-harness-certified-expert).
***
### Before you begin
Before you set up Harness Platform, ensure you have an understanding of the following:
* [Harness Platform overview: The foundation layer on top of which all modules are built.](/harness-ai/new-to-harness-platform/overview)
* [Harness UI overview: The interaction layer between Harness Platform and you.](https://github.com/harness/harness-developer-hub/tree/main/docs/platform/new-to-harness-platform/get-started/harness-ui-overview.md)
***
### Set up the Harness Platform
Follow the steps below to understand the platform and complete the initial setup so you can start using other Harness modules.
#### Step 1: Access your Harness account
[Sign up for a free account](https://app.harness.io/auth/#/signup/&?utm_source=website\&utm_medium=harness-developer-hub\&utm_campaign=plt-plg\&utm_content=get-started) or sign in to your existing Harness account to get started.
If you have signed up for a free account, go to [Account license limits ](/harness-ai/use-harness-platform/account-license-limits)to know the limitations on actions that you can perform.
After you log in to your account, select a module and you are redirected to the platform user interface.
***
#### Step 2: Create organization, project, and invite collaborators
Once you have created an account, you can begin creating organizations and projects. If you are part of a team account, contact your administrator to get the necessary permissions to create organizations and projects.
* With a free account, a default organization and project are already created for you.
* You **cannot** create another new organization. However, you can create multiple projects within the default organization, and invite collaborators into the default organization.
**Create an organization**
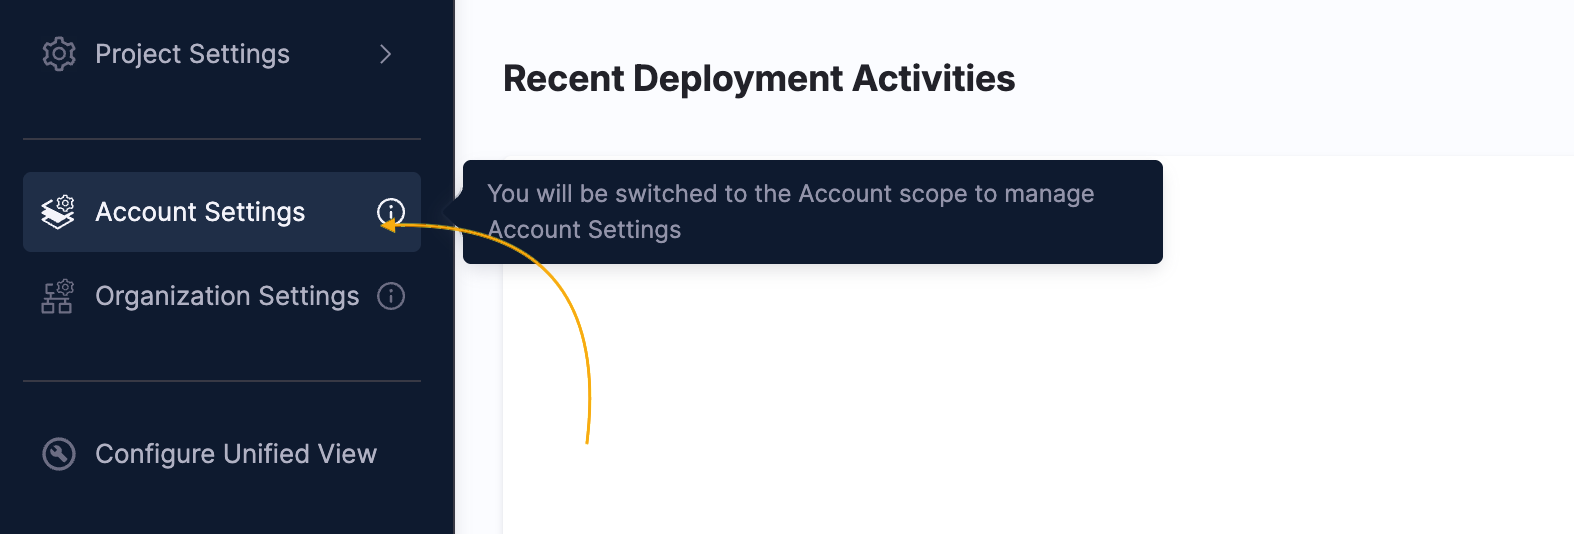
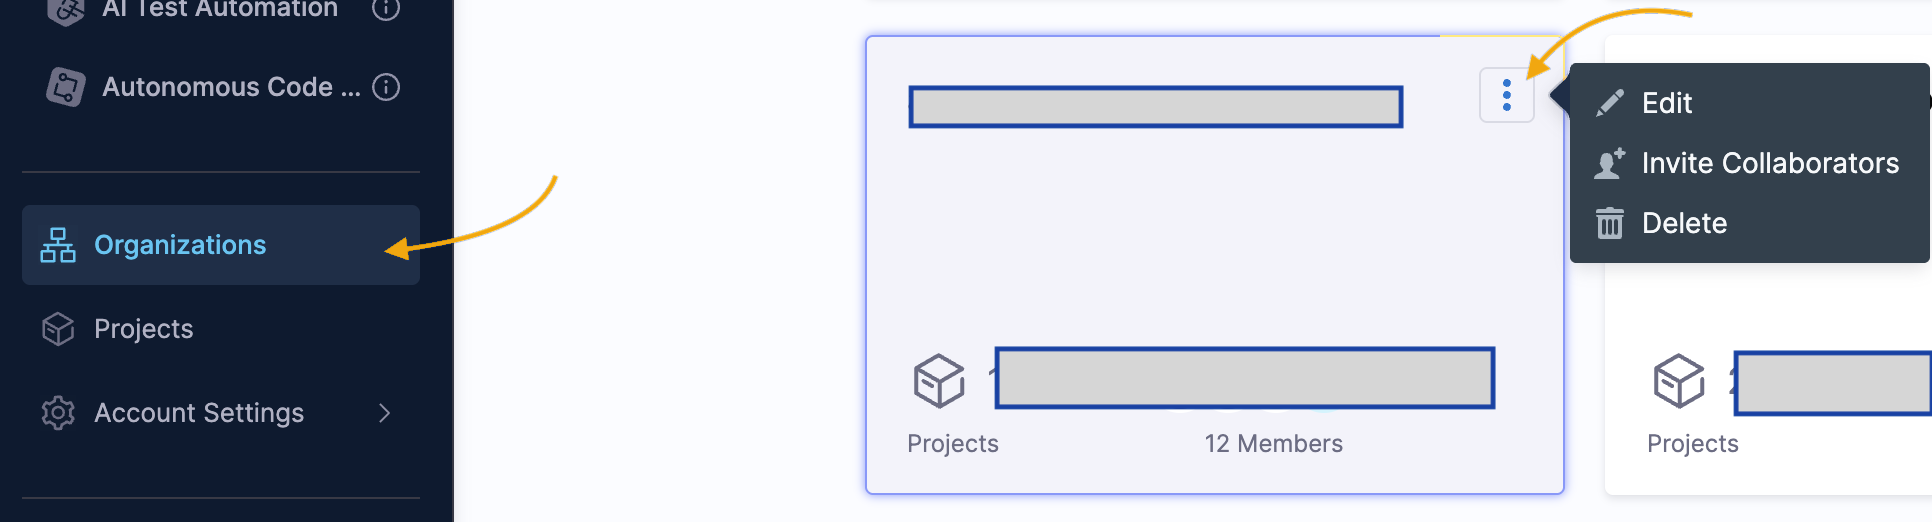
1. In Harness, select **Account Settings** to switch to account scope.
The **Organizations** tab appears on top of **Account Settings**. Click **Organizations**.
Click to view full size image
**(OR)**
1. Click the **Account**, select **Organizations**, click **View All Orgs**, and click **Organizations**.
Click to view full size image
2. Click **+New Organization**.
The new organization settings appear.
3. In **Name**, enter a name for your organization. Enter **Description**, and [Tags](/harness-ai/use-harness-platform/tags/overview) for your new org. Click **Save and Continue**.
The organization is created and you can now invite collaborators.
**Invite collaborators**
You do not have to add the same members to an org and its projects. You can add org-level members, and then add project-level members later when you set up or edit a project.
The org and any projects added to the org are used by their members only.
1. Click **Organizations**, and then select the three-dot menu (**⋮**) of the org you want to invite people to.
Click to view full size image
2. Select **Invite People to Collaborate**, type a member's name and select it.
3. In **Role**, select the role the member will have in this org, such as Organization Admin or Organization Member.\
You can select multiple people and assign **Role**.
4. Click **Add**.
Members receive invites via their email addresses.
You can invite more members from within the org later.
5. Click **Finish**.
The org is added to the list under **Organizations**.
**Create a project**
You can create projects from the **Projects** section or from within the organization. You will set up user permissions in the next step.
The following steps show you how to create a project from the **Project** section:
1. Click Projects and click **+New Project**.
2. Name the project, and select a color(default-blue). Harness automatically generates the project ID. See [Harness Entity Reference](/harness-ai/use-harness-platform/references/harness-entity-reference).
3. In **Organization**, select the org you created.
4. Add a Description and Tags if required.
5. Click **Save and Continue**.
To invite collaborators, follow the steps from [Invite Collaborators](#invite-collaborators).
The project will be listed under **Projects**.
You can create additional organizations and projects to represent your business units and product development initiatives.
{% hint style="info" %}
* Harness recommends creating a sample project with a few pilot users to get familiar with the Platform.
* Once your initial setup is ready, choose a module from the left navigation bar.
{% endhint %}
***
#### Step 3: Manage users
To control user access at a granular level, configure [authentication](/harness-platform/3.0/harness-platform-resources/authentication/authentication-overview) and [role-based access control (RBAC)](/harness-platform/3.0/harness-platform-resources/platform-access-control/rbac-in-harness) for your Harness account.
You can also automate user provisioning from external sources, including user group memberships and role assignments. The following methods are supported:
* [Okta](/harness-ai/use-harness-platform/platform-access-control/provision-users-with-okta-scim)
* [Microsoft Entra ID](/harness-ai/use-harness-platform/platform-access-control/provision-users-and-groups-using-azure-ad-scim)
* [OneLogin](/harness-ai/use-harness-platform/platform-access-control/provision-users-and-groups-with-one-login-scim)
* [Just-in-time user provisioning](/harness-platform/3.0/harness-platform-resources/platform-access-control/provision-use-jit)
To add users manually, go to [add users manually](/harness-ai/use-harness-platform/platform-access-control/add-users#add-users-manually).
***
#### Step 4: Manage shared resources
Shared resources are the connections between Harness and your infrastructure. Most modules require at least one delegate and a connector to function.
* **Delegate**: A lightweight worker you install in your environment (Kubernetes, Docker, virtual machine (VM)). It executes tasks on behalf of Harness using outbound-only HTTPS. You do not need one immediately, but you will need one when running pipelines. For more information, go to [Delegates](/harness-ai/use-harness-platform/delegates/delegate/delegate-concepts/delegate-overview).
* **Connector**: Stores credentials and connection information for third-party tools like GitHub, AWS, GCP, and DockerHub. For more information, go to [connectors](/harness-ai/use-harness-platform/connectors).
* **Secret**: An encrypted storage for sensitive values like API keys and passwords. Harness has a built-in secret manager and integrates with Vault, AWS Secrets Manager, and others. For more information, go to [secrets](/harness-ai/use-harness-platform/secrets/secrets-management/harness-secret-manager-overview).
As an administrator, you can configure shared resources at the account, organization, or project scope, depending on how you want to facilitate their availability.
{% hint style="info" %}
* For teams managing Harness at scale, you can automate the configuration of shared resources using the Harness Terraform Provider or REST API.
* Shared resources created at the account scope are available to all organizations and projects in your account.
{% endhint %}
***
### Explore Harness modules
Once the platform is set up, you can start using Harness modules to automate your software delivery lifecycle. Each module is built for a specific part of the software delivery lifecycle (SDLC) and can be used independently or together.
| If you want to | Start with |
| ------------------------------------- | --------------------------------------------------------------------------------------------- |
| Build and test code automatically | [Continuous Integration (CI)](https://app.gitbook.com/s/qKtVmwAGTfGQS1MVC97G/README) |
| Deploy services to any environment | [Continuous Delivery & GitOps (CD)](https://app.gitbook.com/s/y1JhZ4oKIppwY7d5AhPj/README) |
| Manage cloud infrastructure costs | [Cloud Cost Management (CCM)](https://app.gitbook.com/s/O2HVWkYMptNUG08jo8hr/README) |
| Safely roll out features with flags | [Feature Flags (FF)](https://app.gitbook.com/s/8hMqy7cgSxMJvSqtZuUT/README) |
| Find and fix security vulnerabilities | [Security Testing Orchestration (STO)](https://app.gitbook.com/s/na57sNwixrWxOX8cOMRg/README) |
| Run chaos experiments on your systems | [Chaos Engineering (CE)](https://app.gitbook.com/s/lSkpbpeYJ3rfGUkIrcyQ/README) |
| Track engineering metrics and DORA | [Software Engineering Insights (SEI)](https://app.gitbook.com/s/EYDRcFDt1JPlcws7L5VL/README) |
***
### Become a Harness Certified Expert
For an interactive onboarding experience with additional use cases and features, check out [Harness University](https://developer.harness.io/university).
***
### Next steps
* [Authentication in Harness Platform](/harness-ai/use-harness-platform/authentication)
* [Platform access control](/harness-ai/use-harness-platform/platform-access-control)
* [Supported platforms and technologies](/harness-ai/new-to-harness-platform/platform-whats-supported)
* [Automate configuring shared resources using Terraform](/harness-ai/use-harness-platform/automation/terraform-provider/harness-terraform-provider-overview)
* [Automate configuring shared resources using REST API](/harness-ai/use-harness-platform/automation/api/api-quickstart)
{% @harness-feedback/feedback module="harness-ai" pagePath="harness-ai/new-to-harness-platform/get-started" %}
# What's Supported by Harness Platform
Technologies supported by Harness Platform
This topic provides an overview of the technologies, features, and integrations supported by Harness to deploy and verify applications.
For more information about **What's Supported** for other Harness modules, see their respective documentation below:
* [Code Repository](/code-repository/troubleshooting-and-resources/code-supported)
* [Continuous Delivery and GitOps](/continuous-delivery/new-to-continuous-delivery/cd-integrations)
* [Continuous Integration](/continuous-integration/troubleshooting-and-resources/ci-supported-platforms)
* [Continuous Verification](/continuous-delivery/use-continuous-delivery/verify-deployments/cv-whats-supported)
* [Cloud Cost Management](/cloud-cost-management/resources/whats-supported)
* [Chaos Engineering](/resilience-testing/chaos-engineering/new-to-chaos-engineering/whats-supported)
* [Continuous Error Tracking](/continuous-error-tracking/whats-supported)
* [Feature Flags](/feature-flags/new-to-feature-flags/ff-supported-platforms)
* [Feature Management Experimentation](/feature-management-experimentation/troubleshooting-and-resources/whats-supported)
* [Infrastructure As Code Management](/infrastructure-as-code-management/troubleshooting-and-resources/whats-supported)
* [Internal Developer Portal](/internal-developer-portal/new-to-idp/whats-supported)
* [Security Testing Orchestration](/security-testing-orchestration/new-to-sto/sto-whats-supported/sto-deployments)
* [Service Reliability Management](/service-reliability-management/new-to-srm/srm-whats-supported)
* [AI DLC Insights](/software-engineering-insights/troubleshooting-and-resources/sei-supported-platforms)
* [Supply Chain Security](/software-supply-chain-assurance/new-to-scs/ssca-supported)
To see supported technologies and features for the **Self-Managed Enterprise Edition**, refer to the following resources:
* [Overview](/self-managed-enterprise-edition/new-to-self-managed-enterprise-edition/smp-overview)
* [What's Supported](/self-managed-enterprise-edition/new-to-self-managed-enterprise-edition/smp-supported-platforms)
***
### Authentication
Authentication is the process of verifying a user’s identity before granting access to an account. In Harness, administrators can configure authentication settings to control how users sign in and manage access to the organization’s account.
For additional details, refer to the [Authentication Overview](/harness-ai/use-harness-platform/authentication).
| SSO Type | SSO Providers | Authentication Supported | Authorization Supported (Group Linking) | SCIM Provisioning |
| ------------------------------------------------------------------------------------------ | ------------------ | ------------------------ | --------------------------------------- | ----------------- |
| [SAML 2.0](/harness-ai/use-harness-platform/authentication/single-sign-on-saml) | Okta | Yes | Yes | Yes |
| | Microsoft Entra ID | Yes | Yes | Yes |
| | Others | Yes | Yes | No |
| | OneLogin | Yes | Yes | Yes |
| [OAuth 2.0](/harness-ai/use-harness-platform/authentication/single-sign-on-sso-with-oauth) | Github | Yes | No | N/A |
| | GitLab | Yes | No | N/A |
| | Bitbucket | Yes | No | N/A |
| | Google | Yes | No | N/A |
| | Azure | Yes | No | N/A |
| | LinkedIn | Yes | No | N/A |
| LDAP (Delegate connectivity needed) | Active Directory | Coming soon | Coming soon | N/A |
| | Open LDAP | Coming soon | Coming soon | N/A |
| | Oracle LDAP | Coming soon | Coming soon | N/A |
***
### Delegates
The Delegate is a lightweight worker process packaged and distributed by Harness using different image types. Each Delegate image is identified by a delegate name, and the image type is specified using a tag.
| Image Type | Image Tag | Image Description |
| -------------------------------------------------------------------------------------------------------------------------------------------------------------------------------------------------------------------------------- | -------------------------- | --------------------------------------------------------------------------------------------------------------------------------------------------------- |
| DELEGATE | `yy.mm.xxxxx` | The release year, month, and version in dot-separated format. Supported on both NextGen and FirstGen Harness Platform. |
| DELEGATE-MINIMAL | `yy.mm.xxxxx.minimal` | The **minimal** tag is appended to the release year, month, and version in dot-separated format. Supported on both NextGen and FirstGen Harness Platform. |
| DELEGATE FIPS | `yy.mm.xxxxx-fips` | The release year, month, and version in dot-separated format. |
| FIPS (Federal Information Processing Standard) compliant images compatible only with [FIPS SMP](https://developer.harness.io/docs/self-managed-enterprise-edition/smp-fips-overview) and is not supported for SaaS environments. | | |
| DELEGATE FIPS-MINIMAL | `yy.mm.xxxxx.minimal-fips` | The **minimal-fips** tag is appended to the release year, month, and version in dot-separated format. |
| FIPS (Federal Information Processing Standard) compliant images compatible only with [FIPS SMP](https://developer.harness.io/docs/self-managed-enterprise-edition/smp-fips-overview) and is not supported for SaaS environments. | | |
| DELEGATE-LEGACY | `latest` | Delegate that auto upgrades with no flexibility to turn off auto upgrade (DEPRECATED) |
**SDKs installed with Harness Delegate**
The Harness Delegate includes binaries for the SDKs that are required for deployments with Harness-supported integrations. These include binaries for Helm, ChartMuseum, `kubectl`, Kustomize, and so on.
1. **Kubernetes Deployments**: The following SDKs and tools are certified for Kubernetes deployments.
| Manifest Type | Required Tool/SDK | Certified Version |
| ----------------------------------- | ----------------- | ------------------ |
| Kubernetes | kubectl | v1.29.2 |
| | go-template | v0.4.1 |
| Helm | kubectl | v1.27.0 |
| | helm | v3.11.0 |
| Helm (chart is stored in GCS or S3) | kubectl | v1.27.0 |
| | helm | v3.11 |
| | chartmuseum | v0.8.2 and v0.12.0 |
| Kustomize | kubectl | v1.27.0 |
| | kustomize | v5.0.4 |
| OpenShift | kubectl | v1.27.0 |
| | oc | v4 |
2. **Native Helm deployments**: The following SDKs and tools are certified for [native helm deployments](/continuous-delivery/use-continuous-delivery/deploy-services-on-different-platforms/helm/native-helm-quickstart)
* `helm` v3.11
* `kubectl` v.1.27.0
`kubectl` is required if Kubernetes version is 1.16 or later.
3. **Install a delegate with custom SDK and third party tool binaries**
To support customization, Harness provides a Delegate image that excludes all third-party SDK binaries. This image is referred to as the **No Tools Image**. Using the No Tools Image along with the Delegate `YAML`, you can install the required SDK versions using an initialization script defined in the `INIT_SCRIPT` environment variable in the Delegate YAML.
To use the No Tools Delegate image and install specific SDK versions, see [Install a Delegate with third party custom tool binaries](/harness-ai/use-harness-platform/delegates/delegate/install-delegates/install-a-delegate-with-3-rd-party-tool-custom-binaries).
For additional information about the Delegate, refer to the following documentation:
* [Delegate image types](/harness-ai/use-harness-platform/delegates/delegate/delegate-concepts/delegate-image-types)
* [Deploy Delegate on Kubernetes](/harness-ai/use-harness-platform/delegates/delegate/install-delegates/overview)
* [Deploy Delegate on Docker](/harness-ai/use-harness-platform/delegates/delegate/install-delegates/overview)
* [Install Delegate minimal image without SDKs](/harness-ai/use-harness-platform/delegates/delegate/install-delegates/build-custom-delegate-images-with-third-party-tools)
* [Build custom Delegate images with third-party tools](/harness-ai/use-harness-platform/delegates/delegate/install-delegates/build-custom-delegate-images-with-third-party-tools)
***
### Git Experience
[Harness Git Experience](/harness-ai/use-harness-platform/git-experience/git-experience-overview) allows you to store your resource configurations, such as pipelines and input sets, in Git. You can use Git as the single source of truth and modify your configurations using your Git credentials.
Supported Git providers for Harness Git Sync include:
* GitHub
* Bitbucket Cloud
* Bitbucket Server
* Azure Repos
* GitLab
Supported Harness resources (entities) in Git using Harness Git Experience:
* Pipelines
* Input sets
* Templates
* Services
* Environments
* Infrastructure Definitions
{% hint style="info" %}
Artifact Source templates are not supported with Git Experience.
{% endhint %}
***
### Notifications and collaboration
Notifications are used to alert your team of new, resurfaced, or critical events. With notifications, you can ensure your team is aware of important events that require action.
Supported notifications methods and collaboration tools:
* [Slack](/harness-ai/use-harness-platform/notifications-alerts-and-banners/notifications/send-notifications-using-slack)
* [Email](/harness-ai/use-harness-platform/notifications-alerts-and-banners/notifications/add-smtp-configuration)
* [Microsoft Teams](/harness-ai/use-harness-platform/notifications-alerts-and-banners/notifications/send-notifications-to-microsoft-teams).
* [PagerDuty](/harness-ai/use-harness-platform/notifications-alerts-and-banners/notifications/notifications-overview)
* [Webhook](/harness-ai/use-harness-platform/notifications-alerts-and-banners/notifications/notifications-overview)
Harness supports approvals for these collaboration tools:
* [Jira](/harness-ai/use-harness-platform/approvals/adding-jira-approval-stages): Supports on-premise version < 9.0.
To enable support for Jira on-premise version 9.0 or later, turn on the feature flag SPG_USE_NEW_METADATA.
* [ServiceNow](/harness-ai/use-harness-platform/approvals/service-now-approvals): Supports [Utah](https://docs.servicenow.com/bundle/utah-release-notes/page/release-notes/family-release-notes.html) version and earlier.
For other providers, you can use [custom approvals](/harness-ai/use-harness-platform/approvals/custom-approvals) or [manual approvals](/harness-ai/use-harness-platform/approvals/adding-harness-approval-stages)
***
### Software Bill of Materials (SBOM) and Open Source Software (OSS) components
The Harness Software Bill of Materials (SBOM) provides detailed information about all the packages used to build Harness software. SBOMs are available in CycloneDX format and include key details for each package, such as:
* **Name**: The package or component name.
* **Version**: The specific version used.
* **Licenses**: Licensing information for the package.
* **Supplier**: The vendor or source of the package.
* **Relationships**: Dependencies and connections between packages.
This information helps organizations understand the composition of Harness software, assess licensing, and manage security or compliance requirements effectively.
For detailed information about the SBOM/OSS component list used by Harness, visit the [Harness Trust Center](https://trust.harness.io/).
***
### Role-based access control (RBAC)
Role-based access control (RBAC) lets you control who can access your resources and what actions they can perform on the resources. To do this, a Harness account administrator assigns resource-related permissions to members of user groups.
Harness supports managing Role-Based Access Control (RBAC) through SCIM (System for Cross-Domain Identity Management). This allows you to automate the provisioning and de-provisioning of users and groups from your identity provider, ensuring that access permissions stay up-to-date and consistent across your organization.
* [Okta](/harness-ai/use-harness-platform/platform-access-control/provision-users-with-okta-scim)
* [Microsoft Entra ID](/harness-ai/use-harness-platform/platform-access-control/provision-users-and-groups-using-azure-ad-scim)
* [OneLogin](/harness-ai/use-harness-platform/platform-access-control/provision-users-and-groups-with-one-login-scim)
For more information, see [Role-Based Access Control (RBAC) in Harness](/harness-ai/use-harness-platform/platform-access-control) .
***
### Resource hierarchy
The Harness Platform is structured hierarchically with three levels of access: Account, Organization (Org), and Project. Each level can have its own set of permissions configured, allowing for delegation of responsibilities to various teams. This approach facilitates efficient organization and management of resources, enabling granular access control that is both scalable and easy to manage.
#### Scopes
* **Account** is the highest level. It is your Harness account, and it encompasses all the resources within your Harness subscription.
* **Organization** encompasses projects, resources, and users in a specific domain or business unit. This allows for the management of resources and permissions unique to an organization, separate from other areas of the account.
* **Project** contains related resources, such as apps, pipelines, and environments. This allows for the management of resources and permissions specific to a particular project, separate from the larger org (business unit) and account.
The scope at which you create a resource determines its availability and visibility.
* **Account scope**: Resources are available to all organizations and projects within the account.
* **Organization scope**: Resources are available only to that organization and its projects, not to other organizations or the account as a whole.
Choosing the appropriate scope helps you control access and prevent unauthorized use. For more information, see [Create organizations and projects](/harness-ai/new-to-harness-platform/get-started).
#### Resources across scopes
The table below lists resources and their availability at different scopes in Harness:
| **Resources** | **Account** | **Org** | **Project** |
| ---------------------- | ----------- | ------- | ----------- |
| **Pipeline** | No | No | Yes |
| **Services** | Yes | Yes | Yes |
| **Environments** | Yes | Yes | Yes |
| **Git Management** | No | No | Yes |
| **Connectors** | Yes | Yes | Yes |
| **Secrets** | Yes | Yes | Yes |
| **SMTP Configuration** | Yes | No | No |
| **Templates** | Yes | Yes | Yes |
| **Audit Trail** | Yes | Yes | No |
| **Delegates** | Yes | Yes | Yes |
| **Governance** | Yes | Yes | Yes |
***
### Secrets management
Harness offers a built-in Secret Management feature for securely storing and using encrypted secrets. Additionally, the platform supports cloud provider secret management services, as shown in the table below.
| Provider Name | Key Encryption Support | Encrypted Data Stored with Harness | Support for Referencing Existing Secrets |
| ----------------------------------------------------------------------------------------------------------- | ---------------------- | ---------------------------------- | ---------------------------------------- |
| [AWS KMS](/harness-ai/use-harness-platform/secrets/secrets-management/add-an-aws-kms-secrets-manager) | Yes | Yes | No |
| [AWS Secret Manager](/harness-ai/use-harness-platform/secrets/secrets-management/add-an-aws-secret-manager) | Yes | No | Yes |
| [Hashicorp Vault](/harness-ai/use-harness-platform/secrets/secrets-management/add-hashicorp-vault) | Yes | No | Yes |
| [Azure Key Vault](/harness-ai/use-harness-platform/secrets/secrets-management/azure-key-vault) | Yes | No | Yes |
| [Google KMS](/harness-ai/use-harness-platform/secrets/secrets-management/add-google-kms-secrets-manager) | Yes | Yes | No |
For more information, see [Secrets Management overview](/harness-ai/use-harness-platform/secrets/secrets-management/harness-secret-manager-overview).
***
### Supported browsers
The following desktop browsers are supported:
* **Chrome**: latest version
* **Firefox**: latest version
* **Safari**: latest version
* All Chromium-based browsers.
Mobile browsers are not supported.
***
### Supported screen resolution
Minimum supported screen resolution is **1440x900**.
***
### The Update Framework (TUF)
The Update Framework (TUF) is an open source specification for that provides instructions on how to organize, sign, and interact with metadata to secure package managers.
Harness provides native **TUF (The Update Framework)** support through the following capabilities:
* **Deployment Templates**
* [Deployment Templates](/continuous-delivery/use-continuous-delivery/deploy-services-on-different-platforms/custom/custom-deployment-tutorial) use shell scripts to connect to target platforms, gather host information, and execute deployment steps.
* Deployment Templates can obtain the metadata required for TUF, and generate and validate signatures throughout the software lifecycle.
* **OCI Image Registry Support**
* TUF recommends using an OCI-compliant container registry. Harness supports this via the [OCI registry for Helm charts](/continuous-delivery/use-continuous-delivery/deploy-services-on-different-platforms/helm/native-helm-quickstart#options-for-connecting-to-a-helm-chart-store).
* **Secrets and Key Management**
* Harness enforces token and key rotation as part of best practices for secrets management. See [rotating API tokens](/harness-ai/use-harness-platform/automation/api/add-and-manage-api-keys#rotate-tokens).
* **Continuous Verification**
* TUF recommends verifying deployments to ensure integrity. Harness supports this via [Continuous Verification](/continuous-delivery/use-continuous-delivery/verify-deployments/verify-deployments-with-the-verify-step).
***
### Active Platform feature flags
Few Harness Platform features are released behind feature flags to gather feedback from specific customers before a general release. Feature development status is categorized as [Beta, GA, or Limited GA](/harness-ai/new-to-harness-platform/overview#beta-limited-ga-and-ga-definitions).
{% hint style="info" %}
To enable a feature flag in your Harness account, contact [Harness Support](mailto:support@harness.io).
{% endhint %}
The following table describes active feature flags relevant to Harness Platform.
| Flag | Description |
| --------------------------------------------------------------------------------------------------------------------- | -------------------------------------------------------------------------------------------------------------------------------------------------------------------------------------------------------------------------------------------------------------------------------------------------------------------------------------------------------------------------------------------------------------------------------------------------------------------------------------------------------- |
| `PL_NO_EMAIL_FOR_SAML_ACCOUNT_INVITES` | When activated, it prevents sending email invitations to users of accounts using SSO for authentication during onboarding. |
| `PL_LDAP_PARALLEL_GROUP_SYNC` | Enable User Group sync operation to fetch data from the LDAP server in parallel. Only enable this if the LDAP server can handle the load. |
| `PL_NEW_SCIM_STANDARDS` | Enabling the `PL_NEW_SCIM_STANDARDS` feature flag ensures compliance with SCIM 2.0 standards by including the meta fields `createdAt`, `lastUpdated`, `version`, and `resourceType` in CRUD operation responses on users or user groups. |
| `PL_USE_CREDENTIALS_FROM_DELEGATE_FOR_GCP_SM` | Enabling this Feature Flag will let you use delegate credentials to access the Google Cloud Platform Secret Manager. |
| `PL_DELEGATE_TASK_CAPACITY_CHECK` | When enabled, account tasks will be broadcasted until timeout. The default behavior is to broadcast tasks up to 3 times to delegates. |
| `PL_FAVORITES` | Allows you to set the frequently accessed projects and connectors as favorites. For more information, go to [Set favorites](/harness-ai/use-harness-platform/favorites/set-favorites). |
| `PL_ALLOW_TO_SET_PUBLIC_ACCESS` | Allows pipeline executions marked for access to public view without authentication. You can share execution URLs, including console logs, without requiring users to sign in. For more information, go to [Allow public access to pipeline executions](/harness-ai/use-harness-platform/pipelines/executions-and-logs/allow-public-access-to-executions). |
| `PL_HIDE_ACCOUNT_LEVEL_MANAGED_ROLE`, `PL_HIDE_ORGANIZATION_LEVEL_MANAGED_ROLE`, `PL_HIDE_PROJECT_LEVEL_MANAGED_ROLE` | This feature flag is used to hide managed roles at various levels: account level, organization level, and project level. Existing role bindings for managed roles will still exist for users, but new role bindings with managed roles won't be allowed when the feature flag is enabled. The managed roles won't show up in the list of roles available at the respective scopes. For more information, go to [Manage Roles](/harness-ai/use-harness-platform/platform-access-control/add-manage-roles) |
{% @harness-feedback/feedback module="harness-ai" pagePath="harness-ai/new-to-harness-platform/platform-whats-supported" %}
# Authentication
Configure authentication methods, password policies, session timeouts, and audit login events in Harness.
Authentication in Harness controls who can access your account and how. The first layer of Harness access control includes:
* **Authentication:** Checks who you are.
* **Authorization:** Checks what you can do.
* **Auditing:** Logs what you do.
If you are in an Administrator group, you can use Authentication Settings to restrict access to an organization's Harness account. The options you choose apply to all account users.
This page covers ***authentication***. For information about ***authorization***, go to [RBAC in Harness](/harness-platform/3.0/harness-platform-resources/platform-access-control/rbac-in-harness).
***
### What you will learn in this topic
By the end of this topic, you will be able to understand:
* How to [configure authentication](#configure-authentication) methods for your Harness account, including [Harness login, OAuth](#enable-public-oauth-providers), Security Assertion Markup Language (SAML), and Lightweight Directory Access Protocol (LDAP).
* How to [enforce password policies](#enforce-password-policies), including [password strength requirements](#enforce-password-strength), [expiration intervals](#enforce-password-expiration), and [lockout rules](#enforce-lockout-after-failed-logins) after failed login attempts.
* How to set up [session timeouts](#set-inactive-session-timeout) (inactive) and [absolute session timeout](#set-absolute-session-timeout) to automatically log you out after inactivity or after an absolute time limit.
* How to restrict account access by [whitelisting specific email domains](#restrict-email-domains) and [enabling two-factor authentication](#enforce-two-factor-authentication) account-wide.
* [Audit logs for authentication events](#audit-logs-for-authentication), including how to identify and troubleshoot failed login attempts across all supported auth methods.
***
### Before you begin
* **Basic Harness navigation:** [Sign up or sign in to your Harness account](/harness-ai/new-to-harness-platform/get-started#step-1-access-your-harness-account).
* **Harness account hierarchy:** Authentication settings are configured at the account level and apply to all users. Understand the [account](/service-reliability-management/new-to-srm/get-started/key-concepts#account)/[organization/project](/service-reliability-management/new-to-srm/get-started/key-concepts#organizations-and-projects) hierarchy before proceeding.
* **Admin-level permissions:** Permission to create, edit, and delete Authentication Settings. Contact your administrator to get the required permissions.
* **RBAC concepts:** A general [understanding](https://www.harness.io/blog/user-role-management) of role-based access control, since authentication is one of the three aspects of Harness access control, and how [RBAC works in Harness](/service-reliability-management/new-to-srm/get-started/key-concepts#how-rbac-works-in-harness).
* **SSO familiarity:** Basic knowledge of what SAML, LDAP, and OAuth are, so you can choose the right method for your organization.
***
### Configure authentication
To configure authentication, follow the steps below:
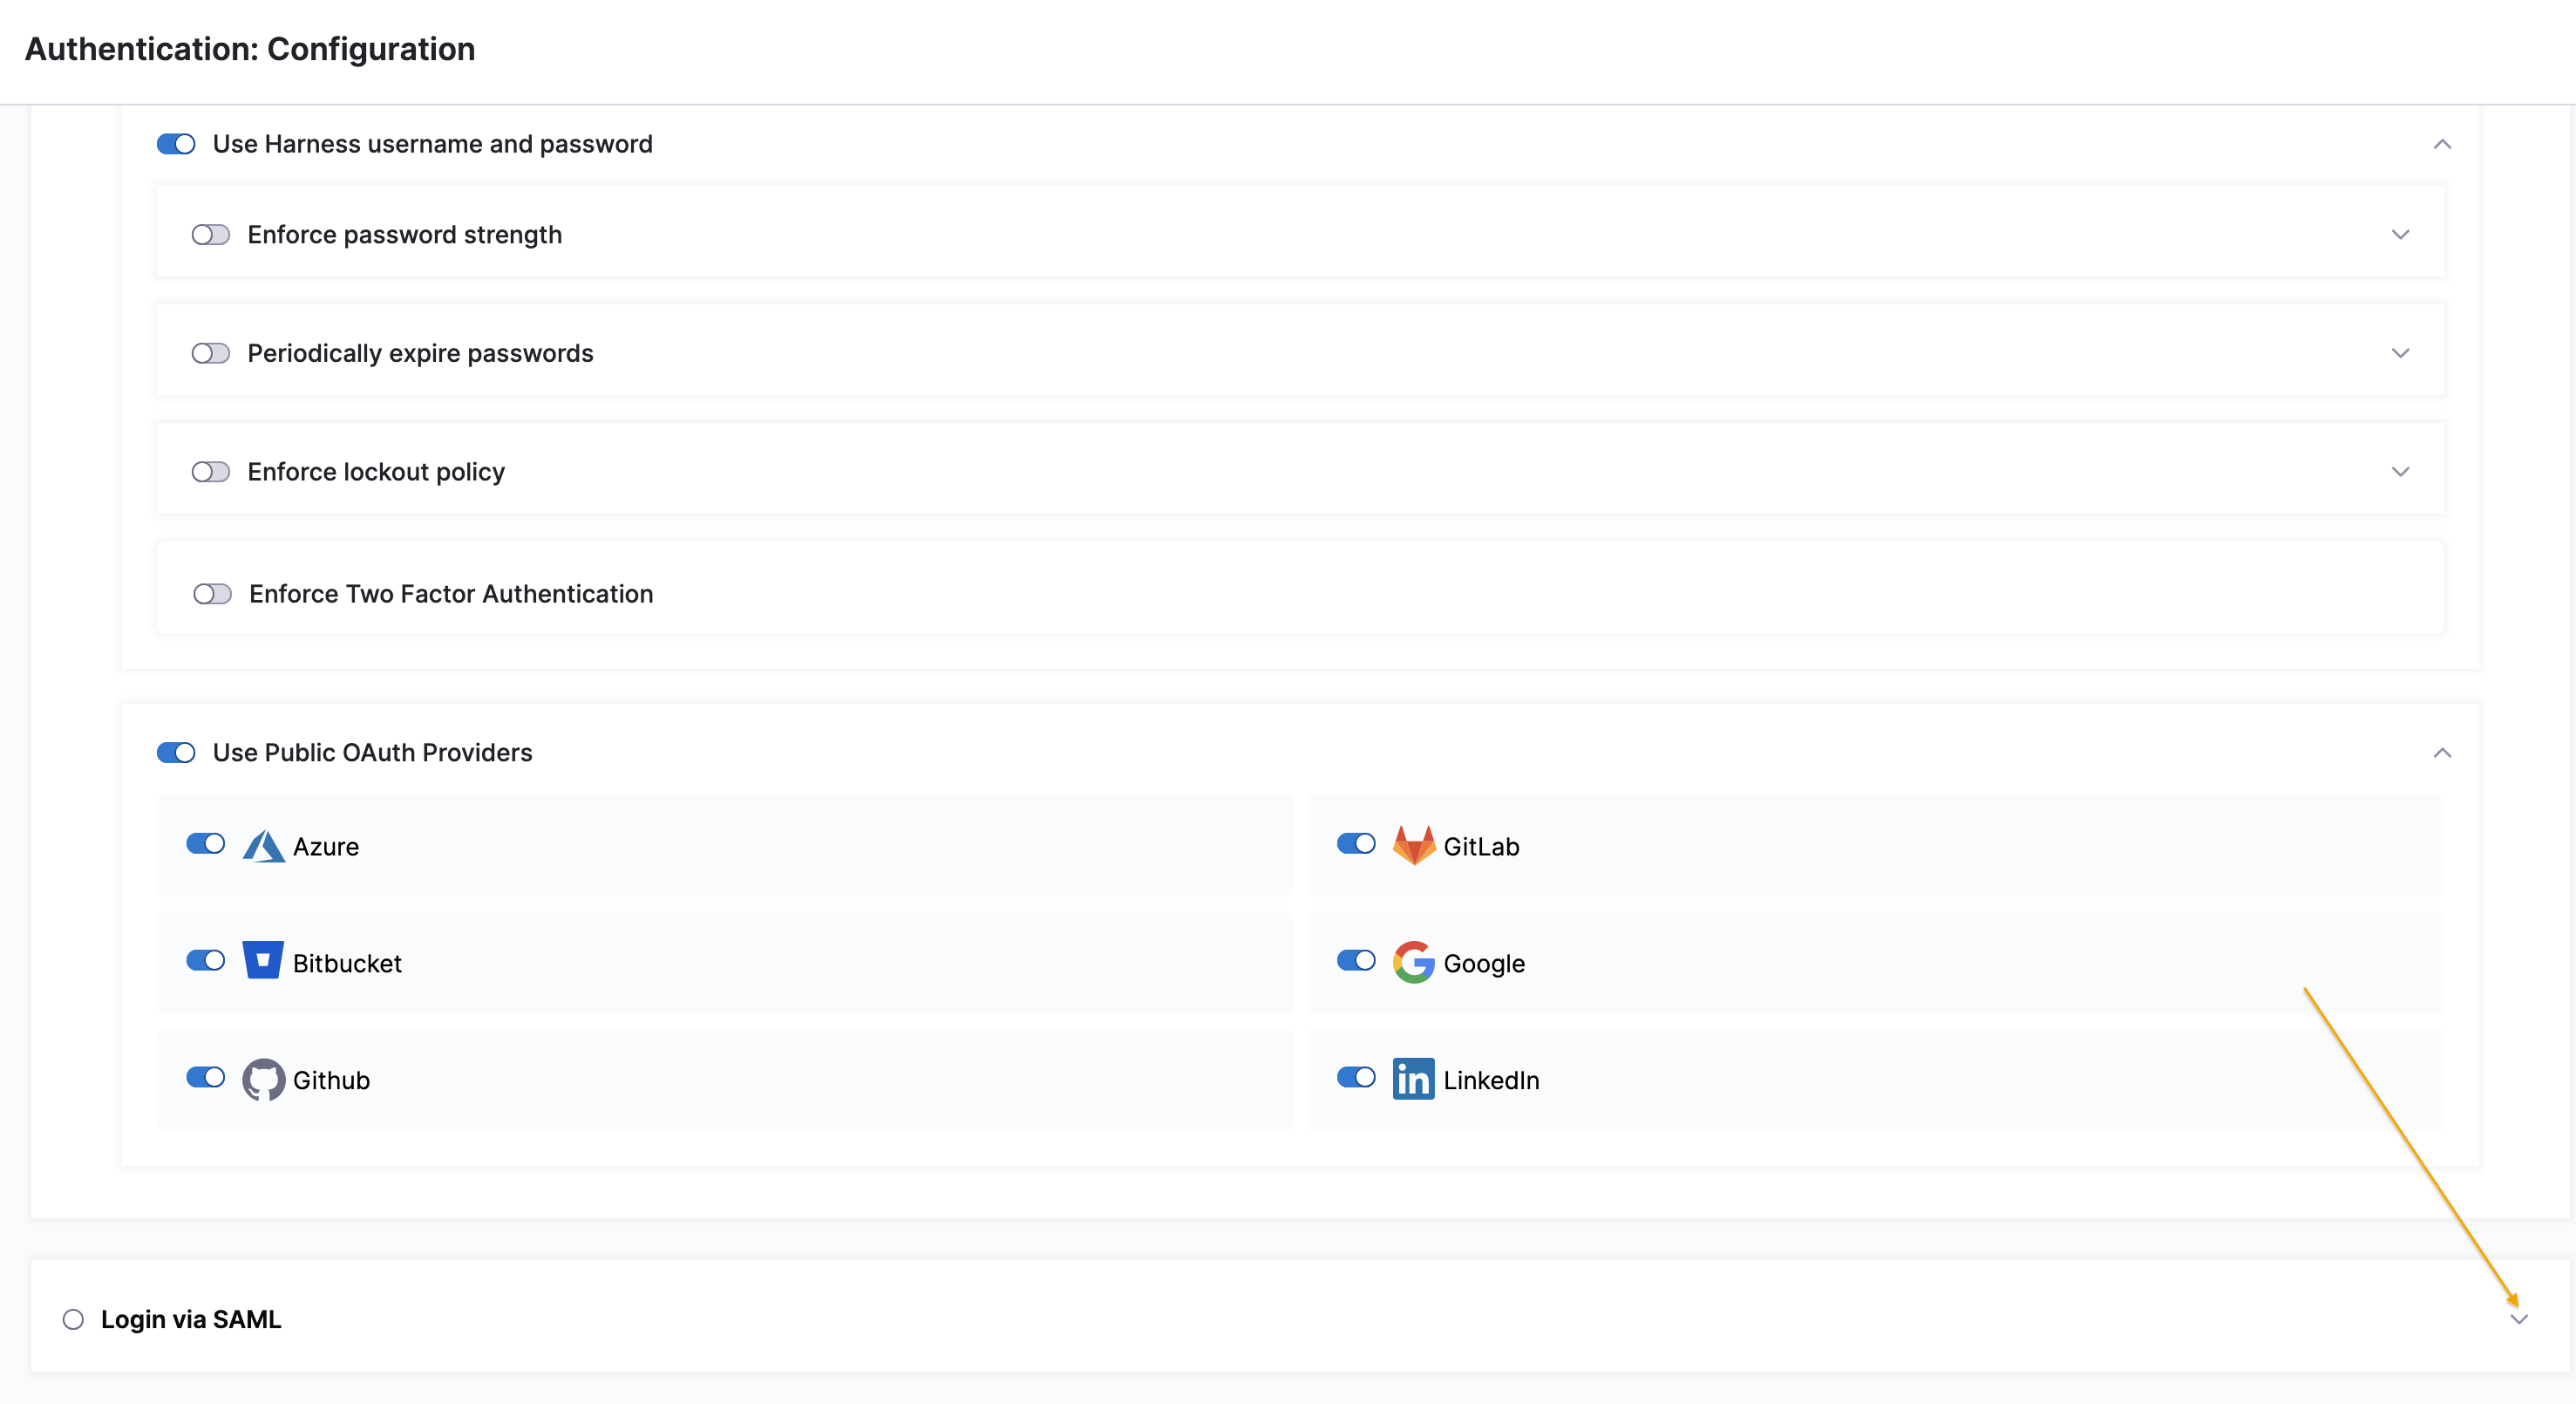
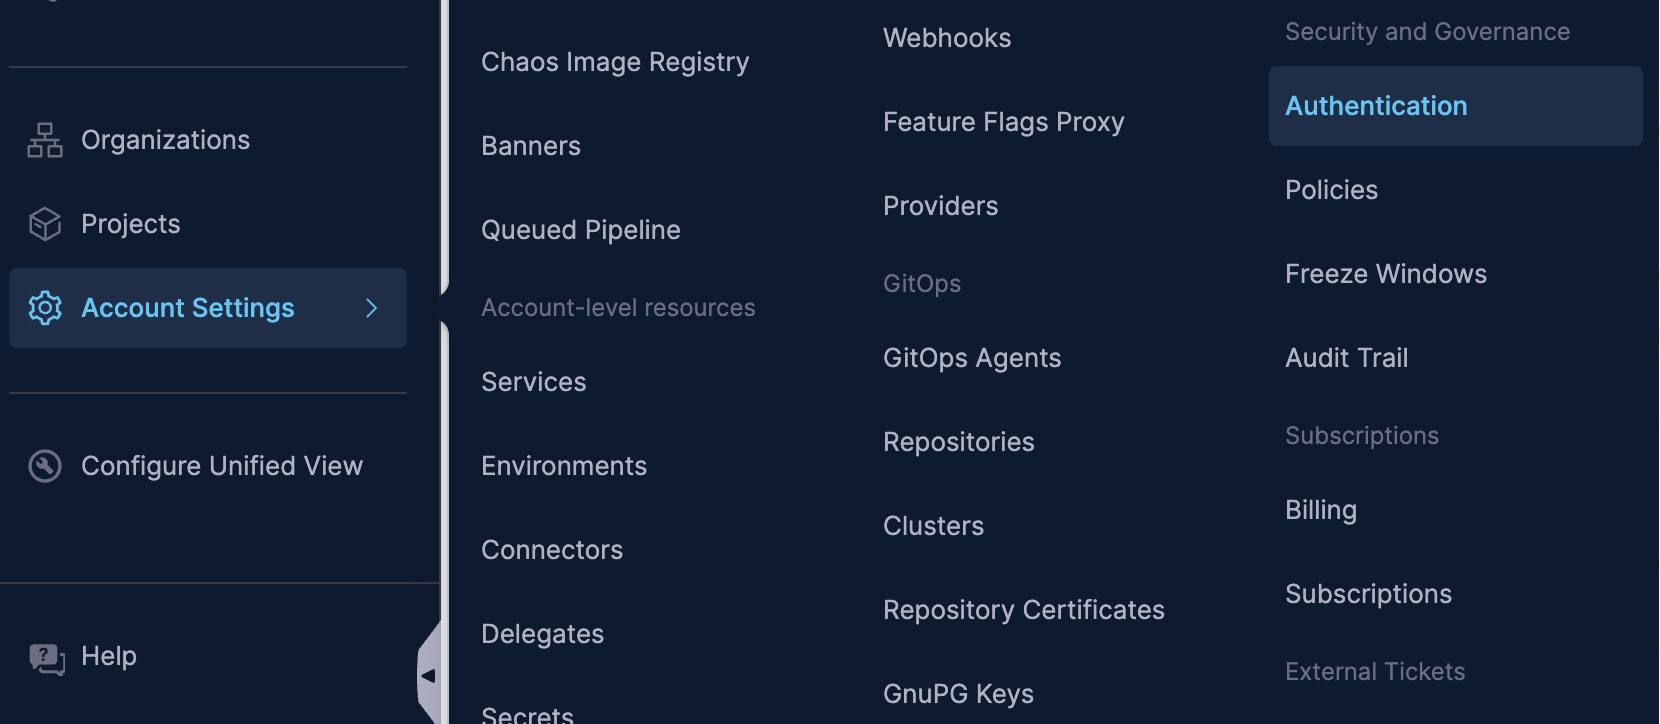
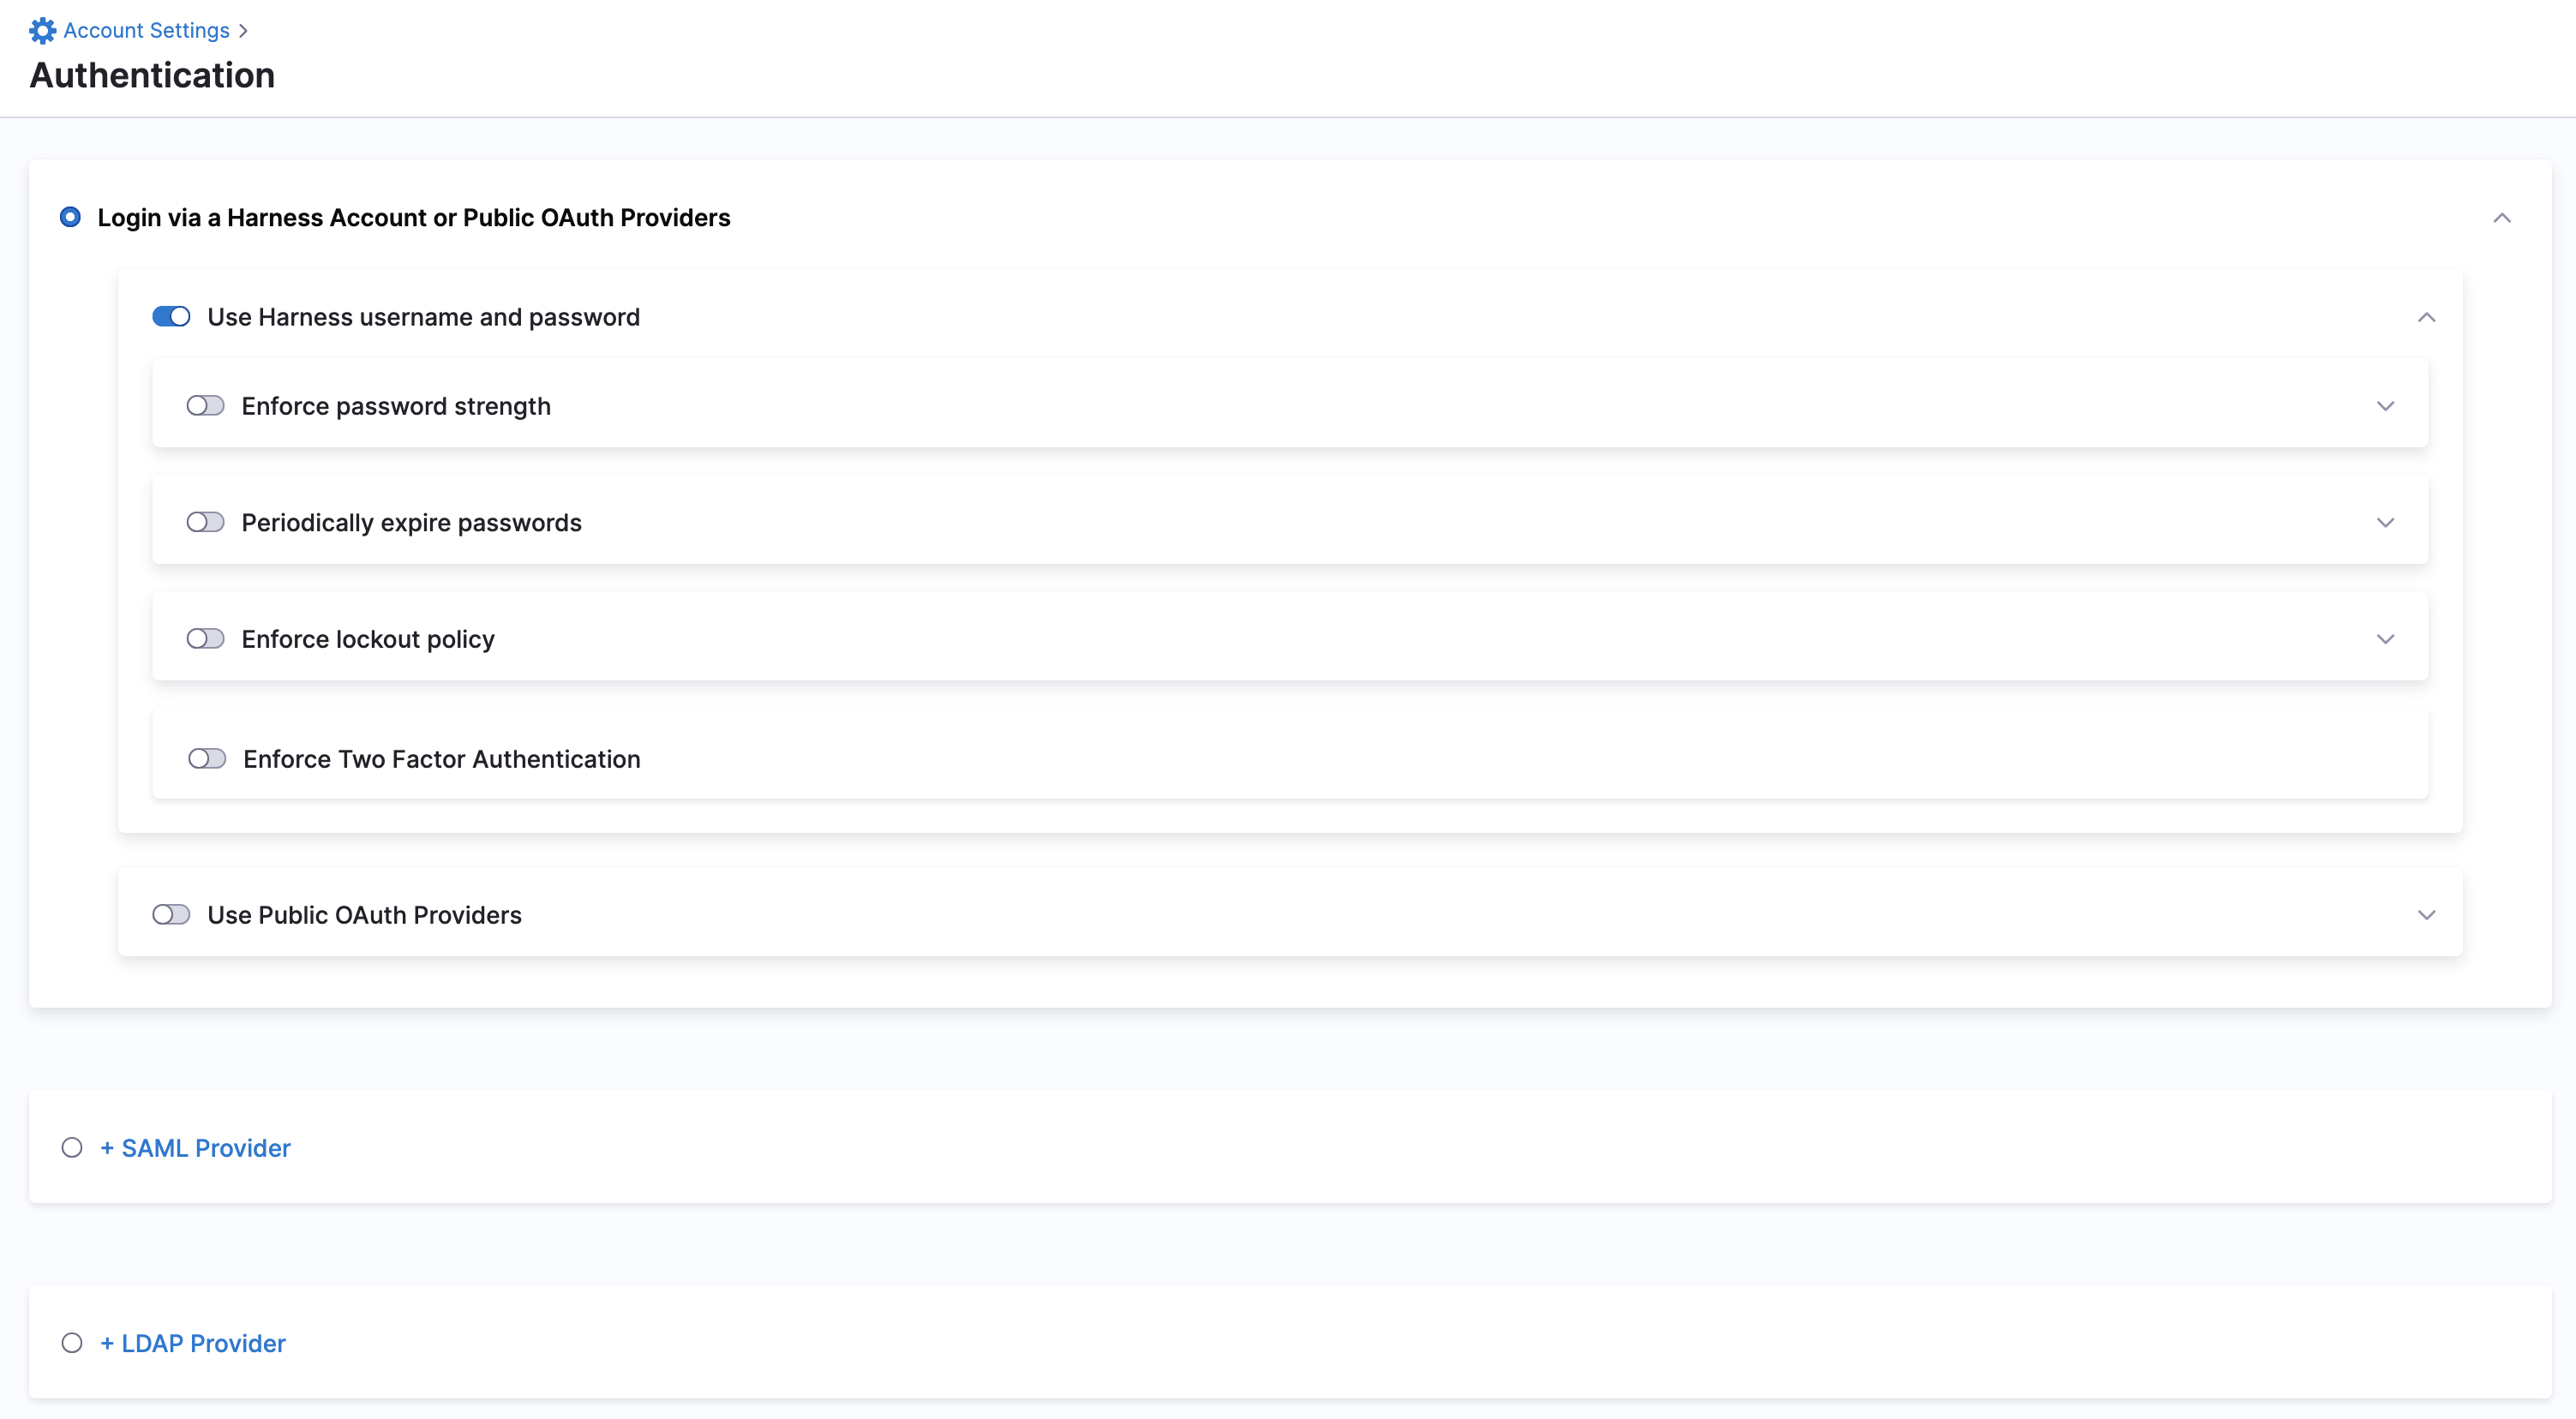
1. In **Home**, select **Account Settings**, and then select **Authentication**.
The **Authentication** page opens.
Click to view full size image
2. Select one of the following authentication methods to follow its configuration:
* [Login via a Harness Account or Public OAuth Providers](/harness-platform/3.0/harness-platform-resources/authentication/authentication-overview#enable-public-oauth-providers): Authenticate using a Harness username/password or a connected OAuth provider such as GitHub, GitLab, Azure, and so on.
* [Login via SAML](/harness-platform/3.0/harness-platform-resources/authentication/authentication-overview#enable-multiple-identity-providers): Authenticate through your organization's identity provider using SAML-based single sign-on.
* [Login via LDAP](/harness-ai/use-harness-platform/authentication/single-sign-on-sso-with-ldap#add-ldap-sso-provider): Authenticate using your organization's LDAP directory service with your corporate username and password.
***
### Enable public OAuth providers
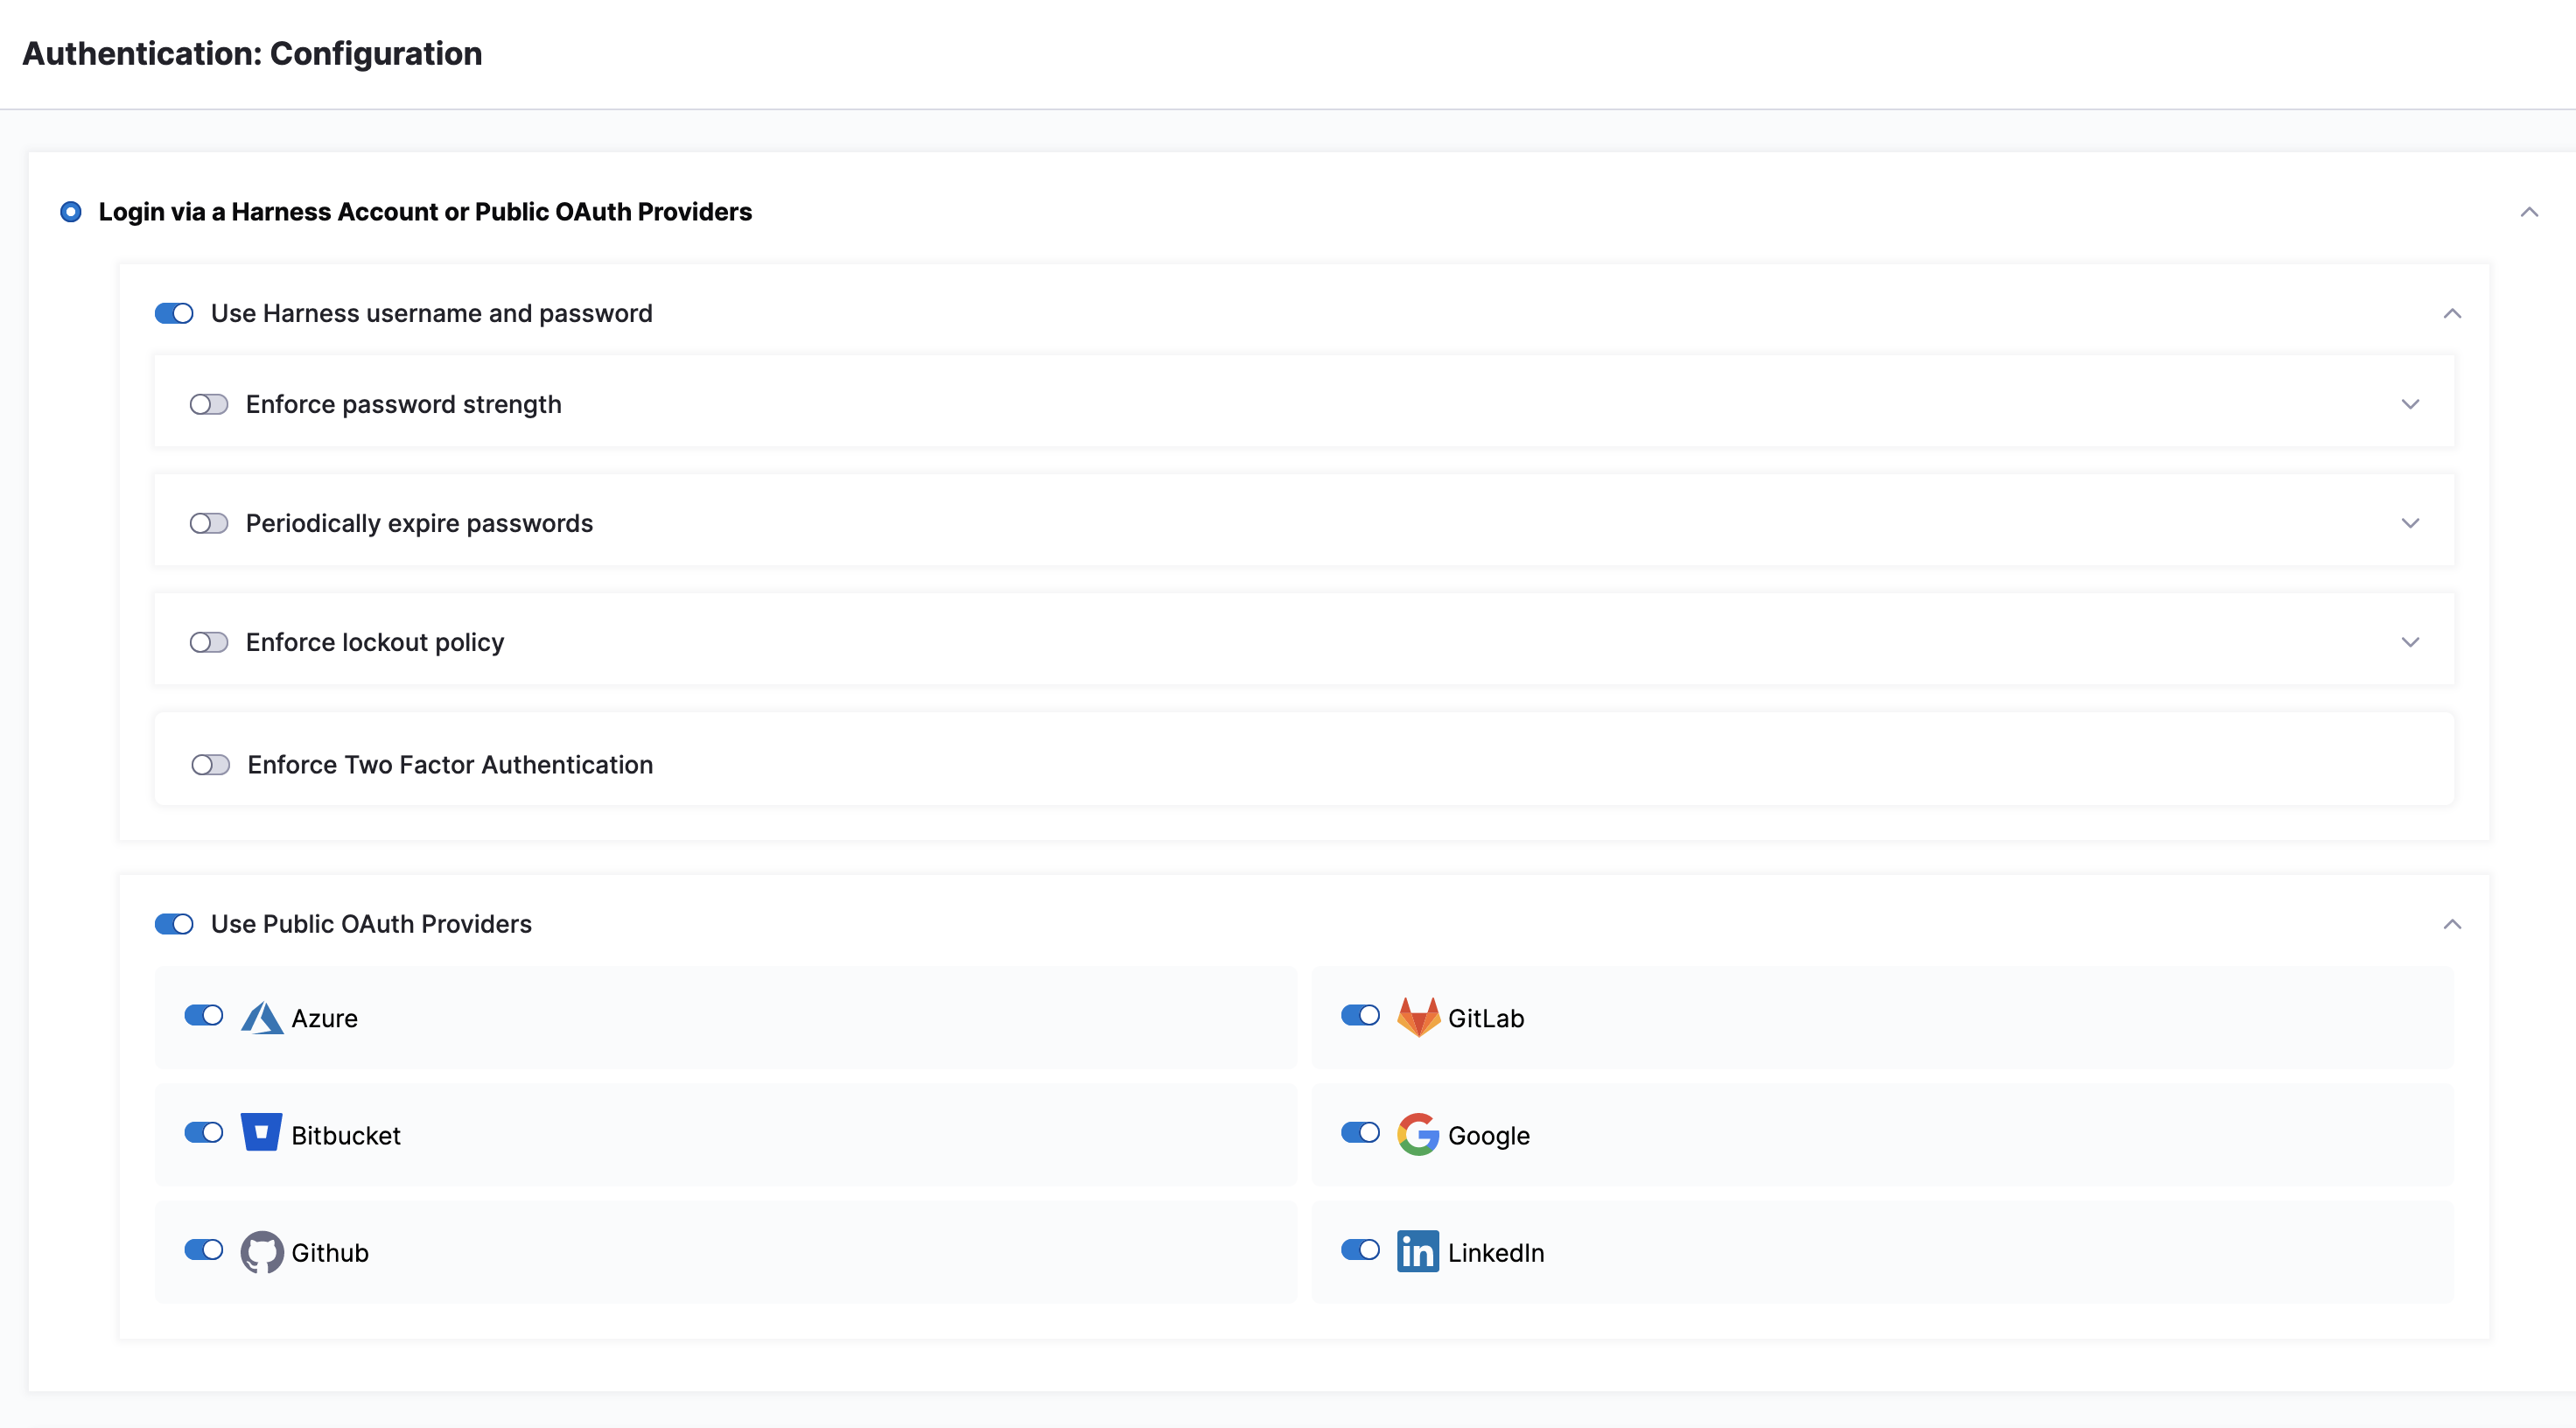
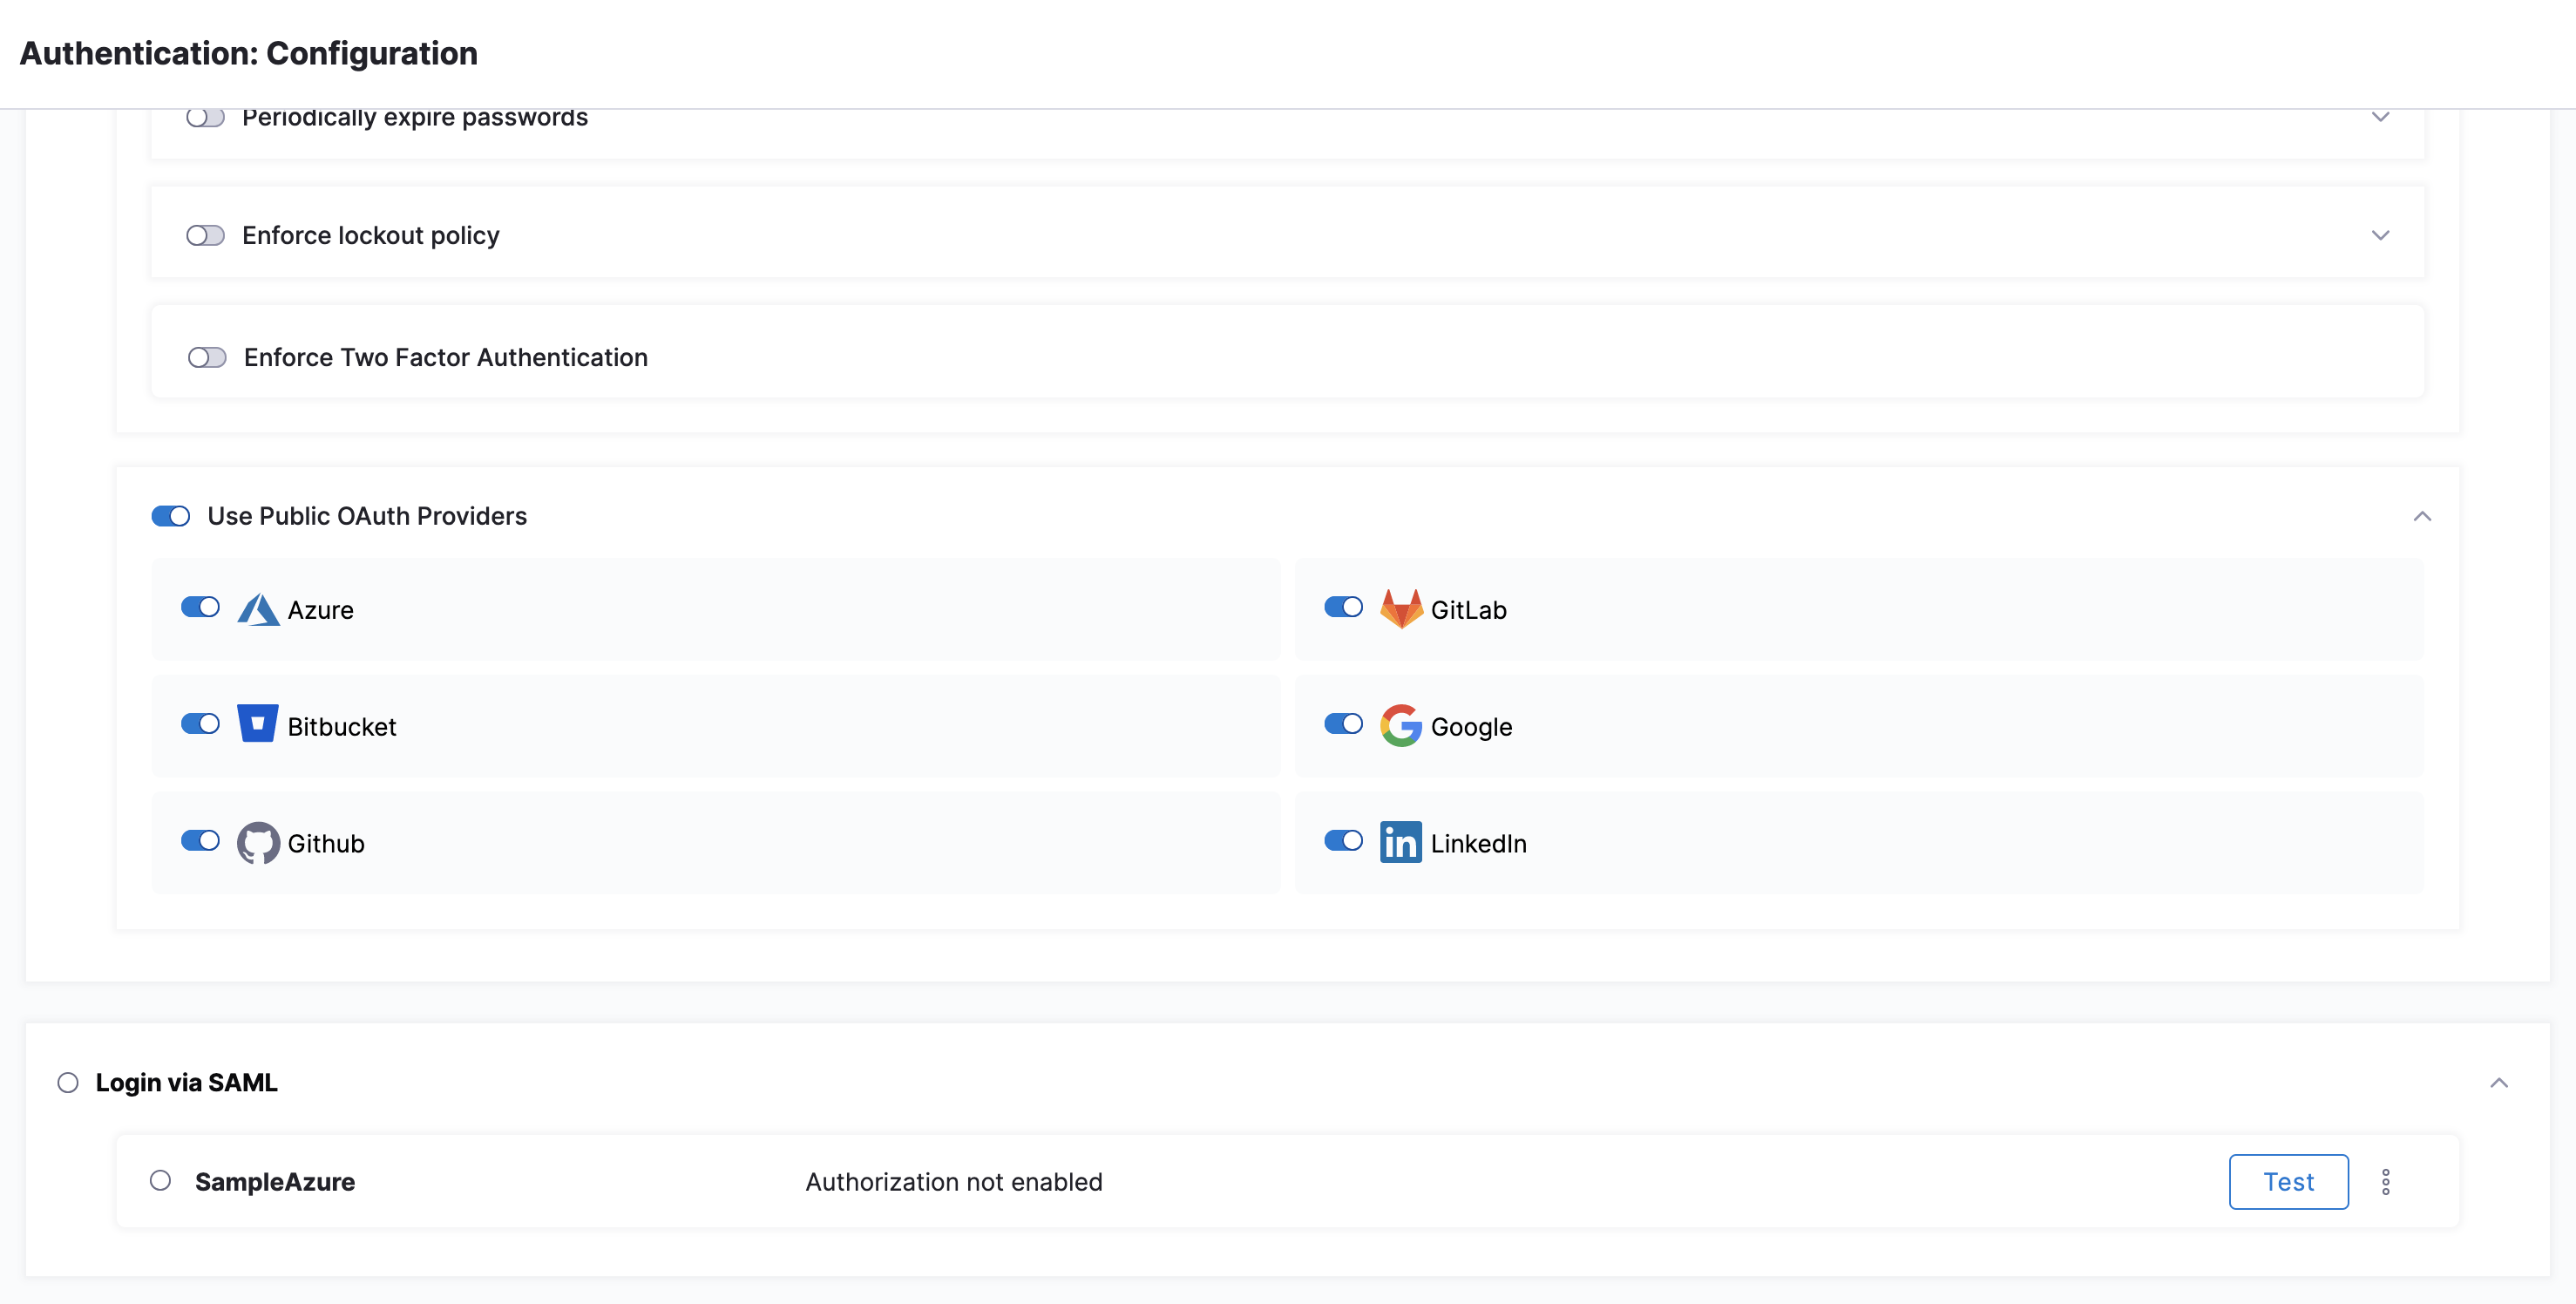
You can use Harness logins with different single sign-on mechanisms by enabling the **Use Public OAuth Providers** under **Login via a Harness Account or Public OAuth Providers** and selecting individual OAuth partners (such as Azure, Bitbucket, GitLab, Github, and so on).
For more information, go to [Single Sign-On with OAuth](/harness-ai/use-harness-platform/authentication/single-sign-on-sso-with-oauth).
Click to view full size image
#### Enforce password policies
Under **Password Policies**, configure the following requirements:
* **Enforce password strength:** Set minimum length and character requirements.
* **Periodically expire passwords:** Define how often passwords must be refreshed.
* **Enforce Two Factor Authentication:** Require 2FA as part of password policy enforcement.
#### Enforce password strength
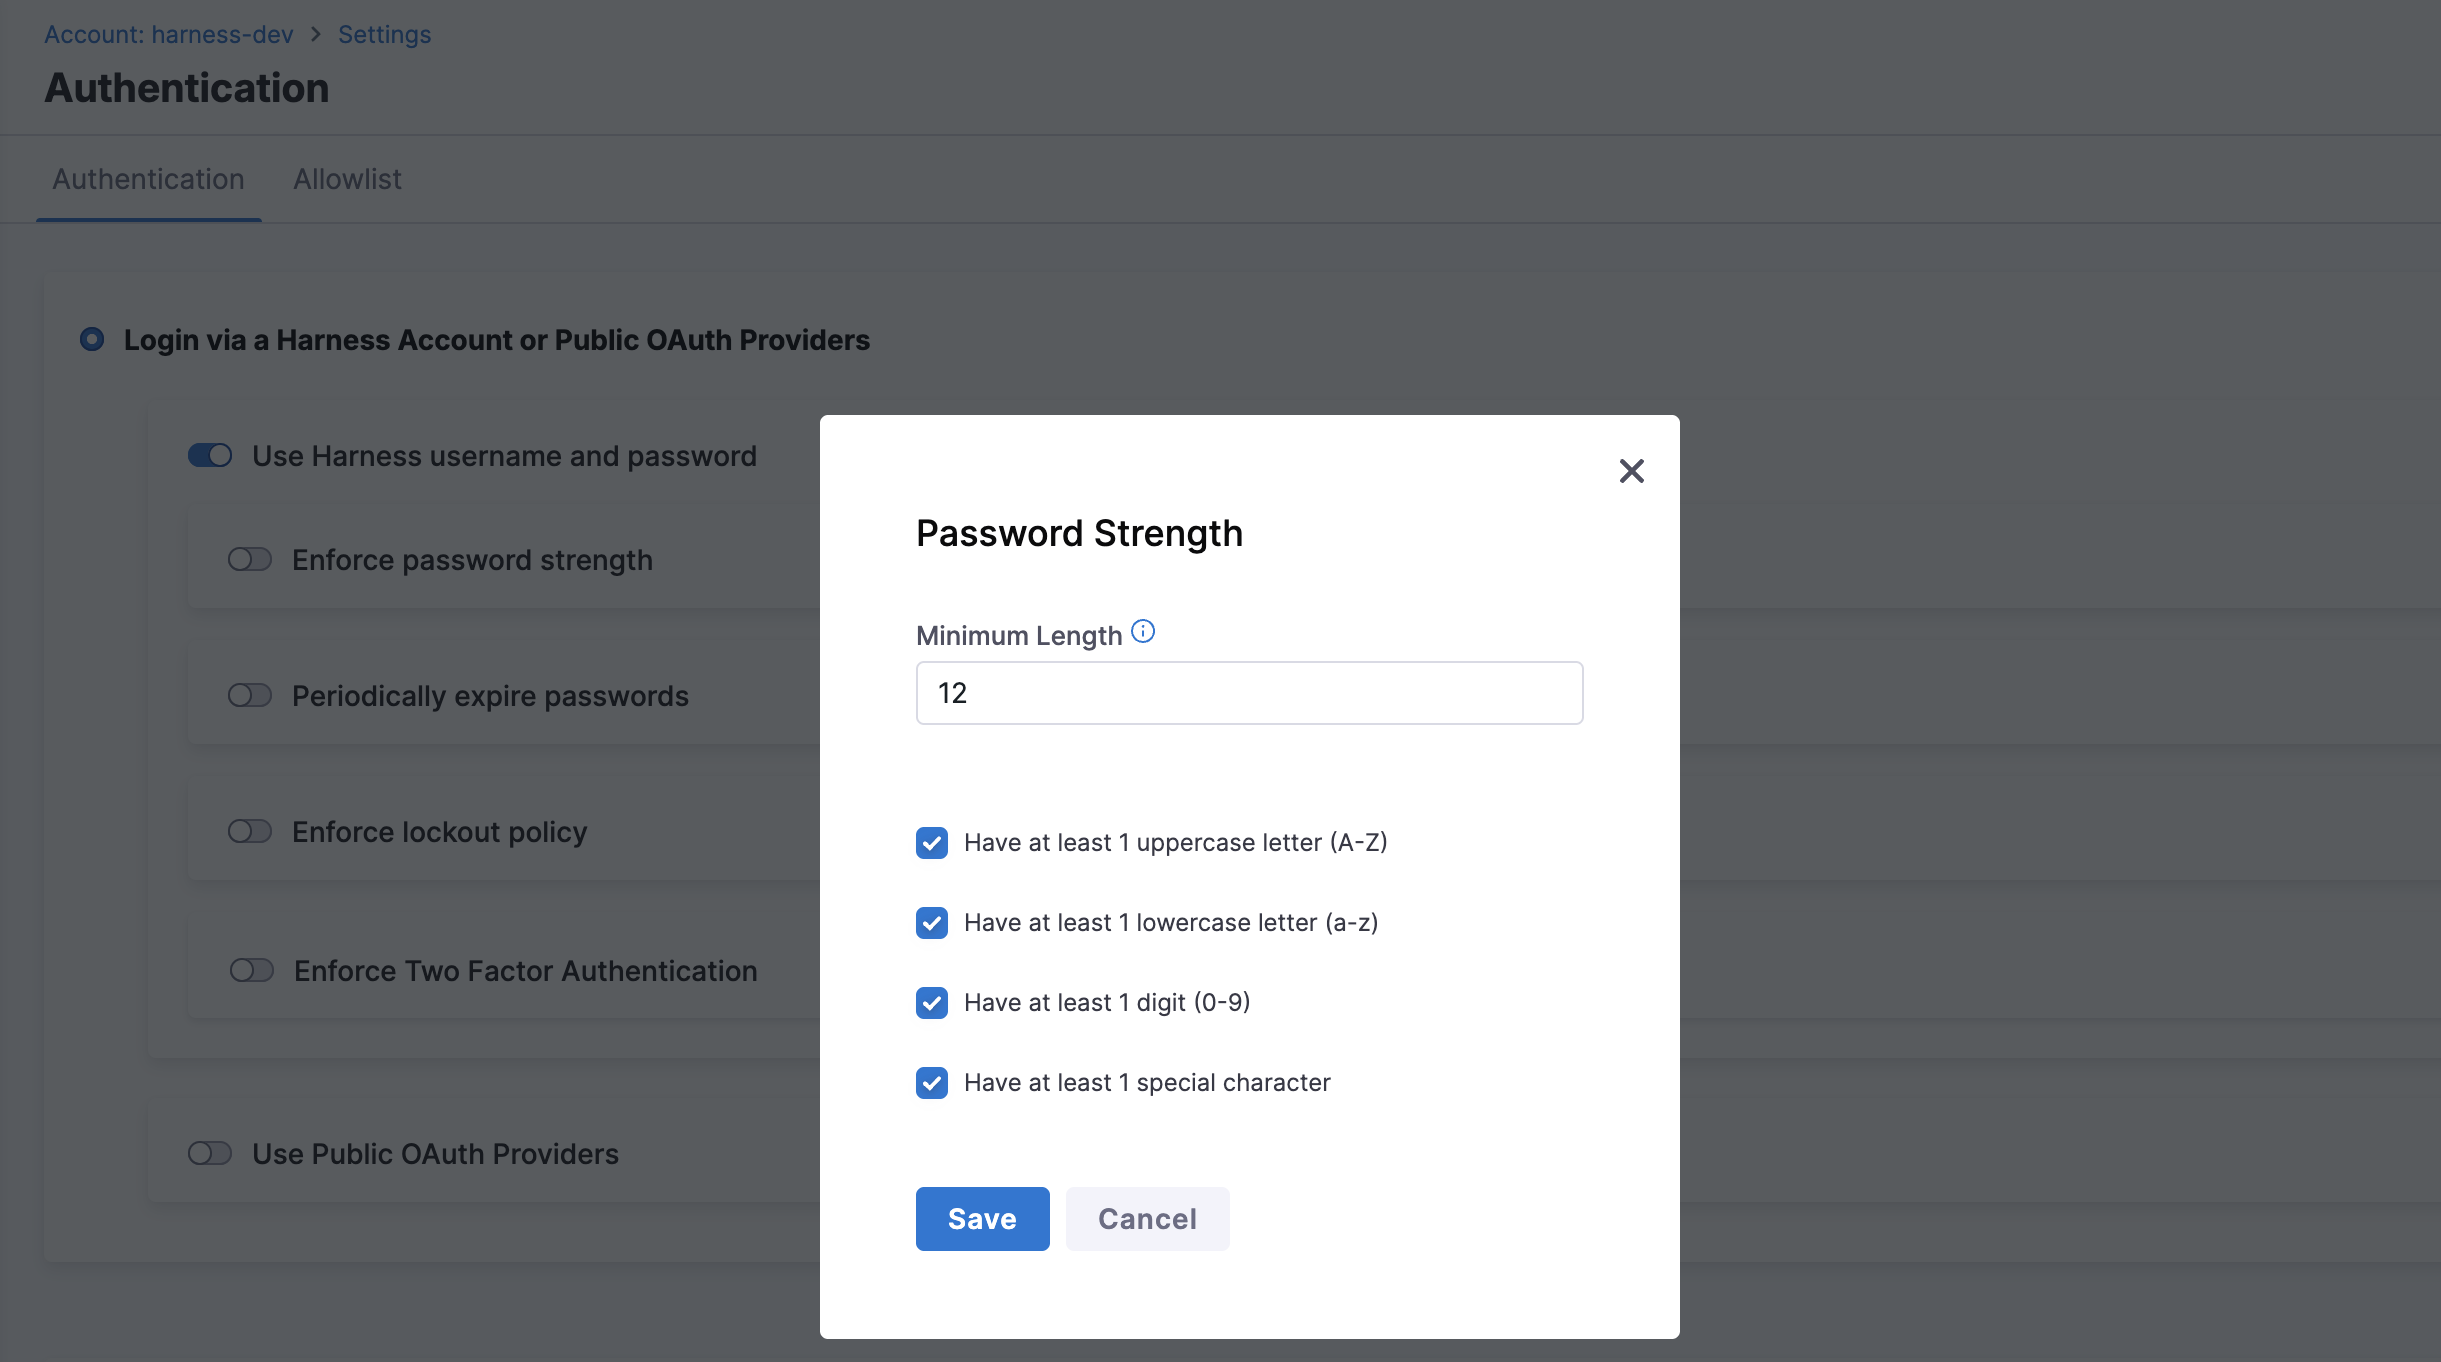
1. Select **Enforce password strength** to open the dialog.
Click to view full size image
2. Specify and enforce any of the following options:
* **Minimum password length:** Set the minimum number of characters required.
* **Include at least one uppercase letter:** Require at least one capital letter.
* **Include at least one lowercase letter:** Require at least one lowercase letter.
* **Include at least one digit:** Require at least one number.
* **Include at least one special character:** Require one or more of the following: `! @ # $ % ^ & * ( ) - _ = + \ | [ ] { } ; : / ? . >`
#### Enforce password expiration
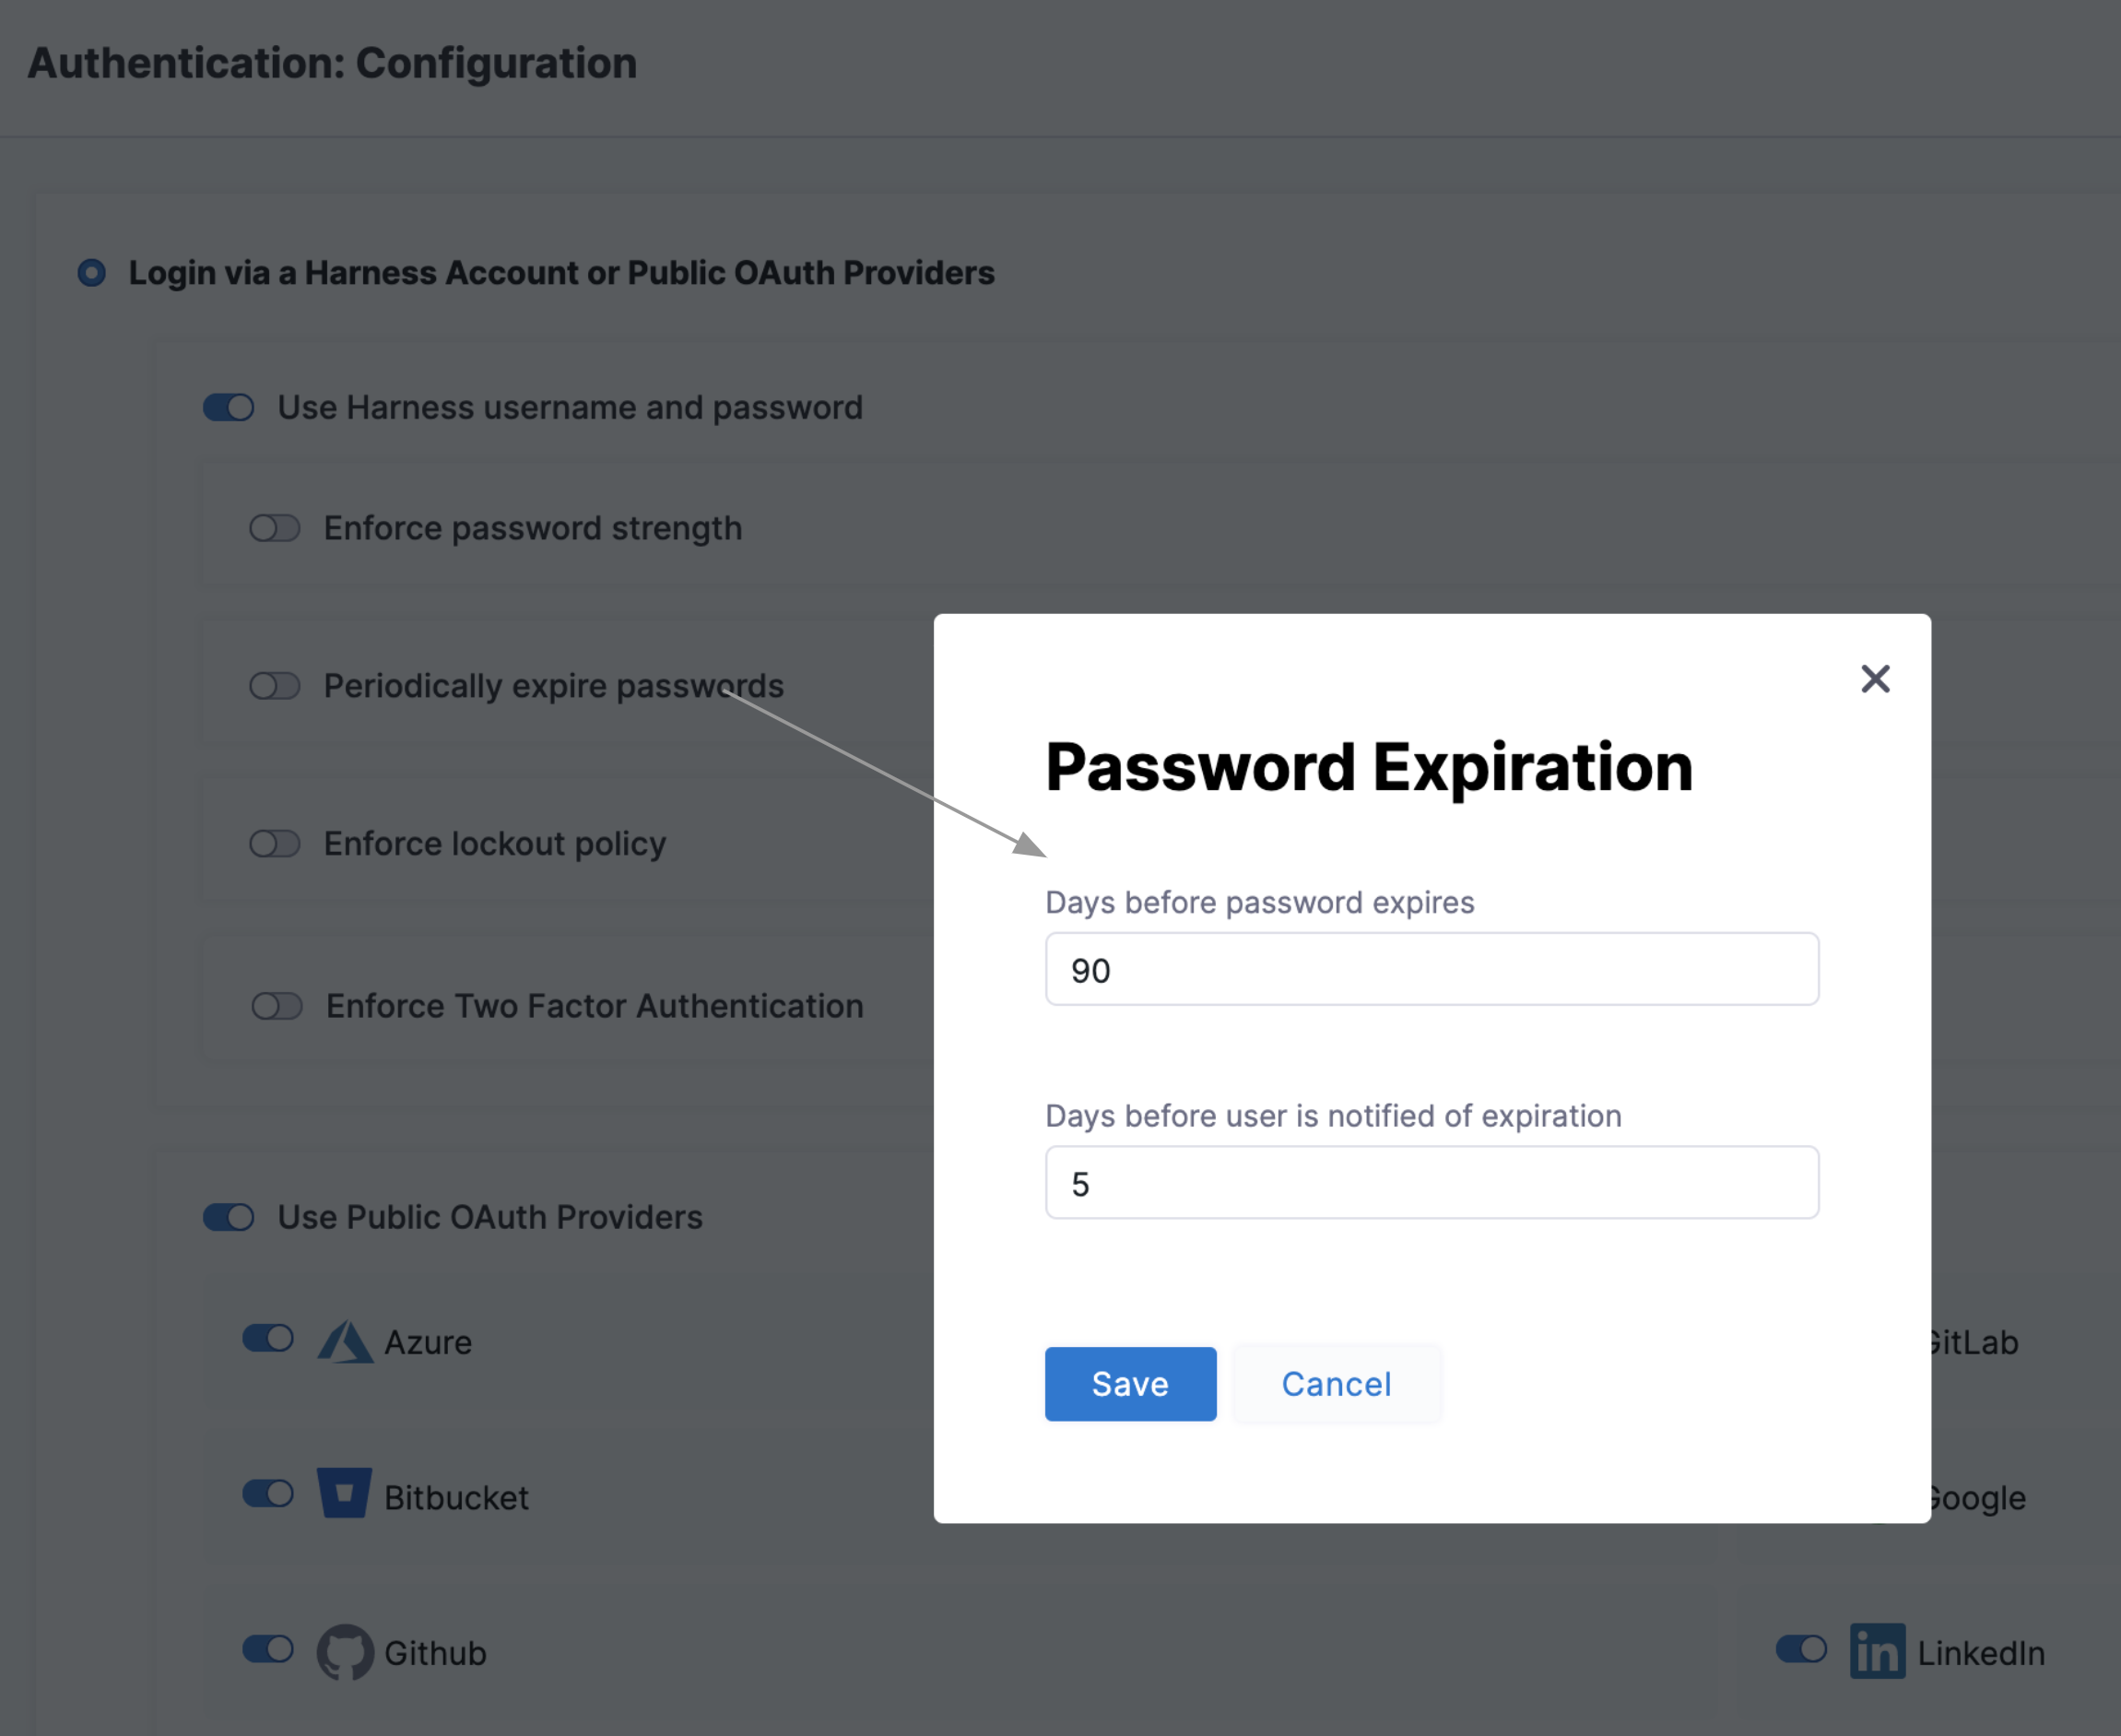
Select **Periodically expire passwords** to set an interval at which you must refresh your Harness passwords. In the same dialog, you can also set an advance notification interval.
Click to view full size image
#### Enforce lockout after failed logins
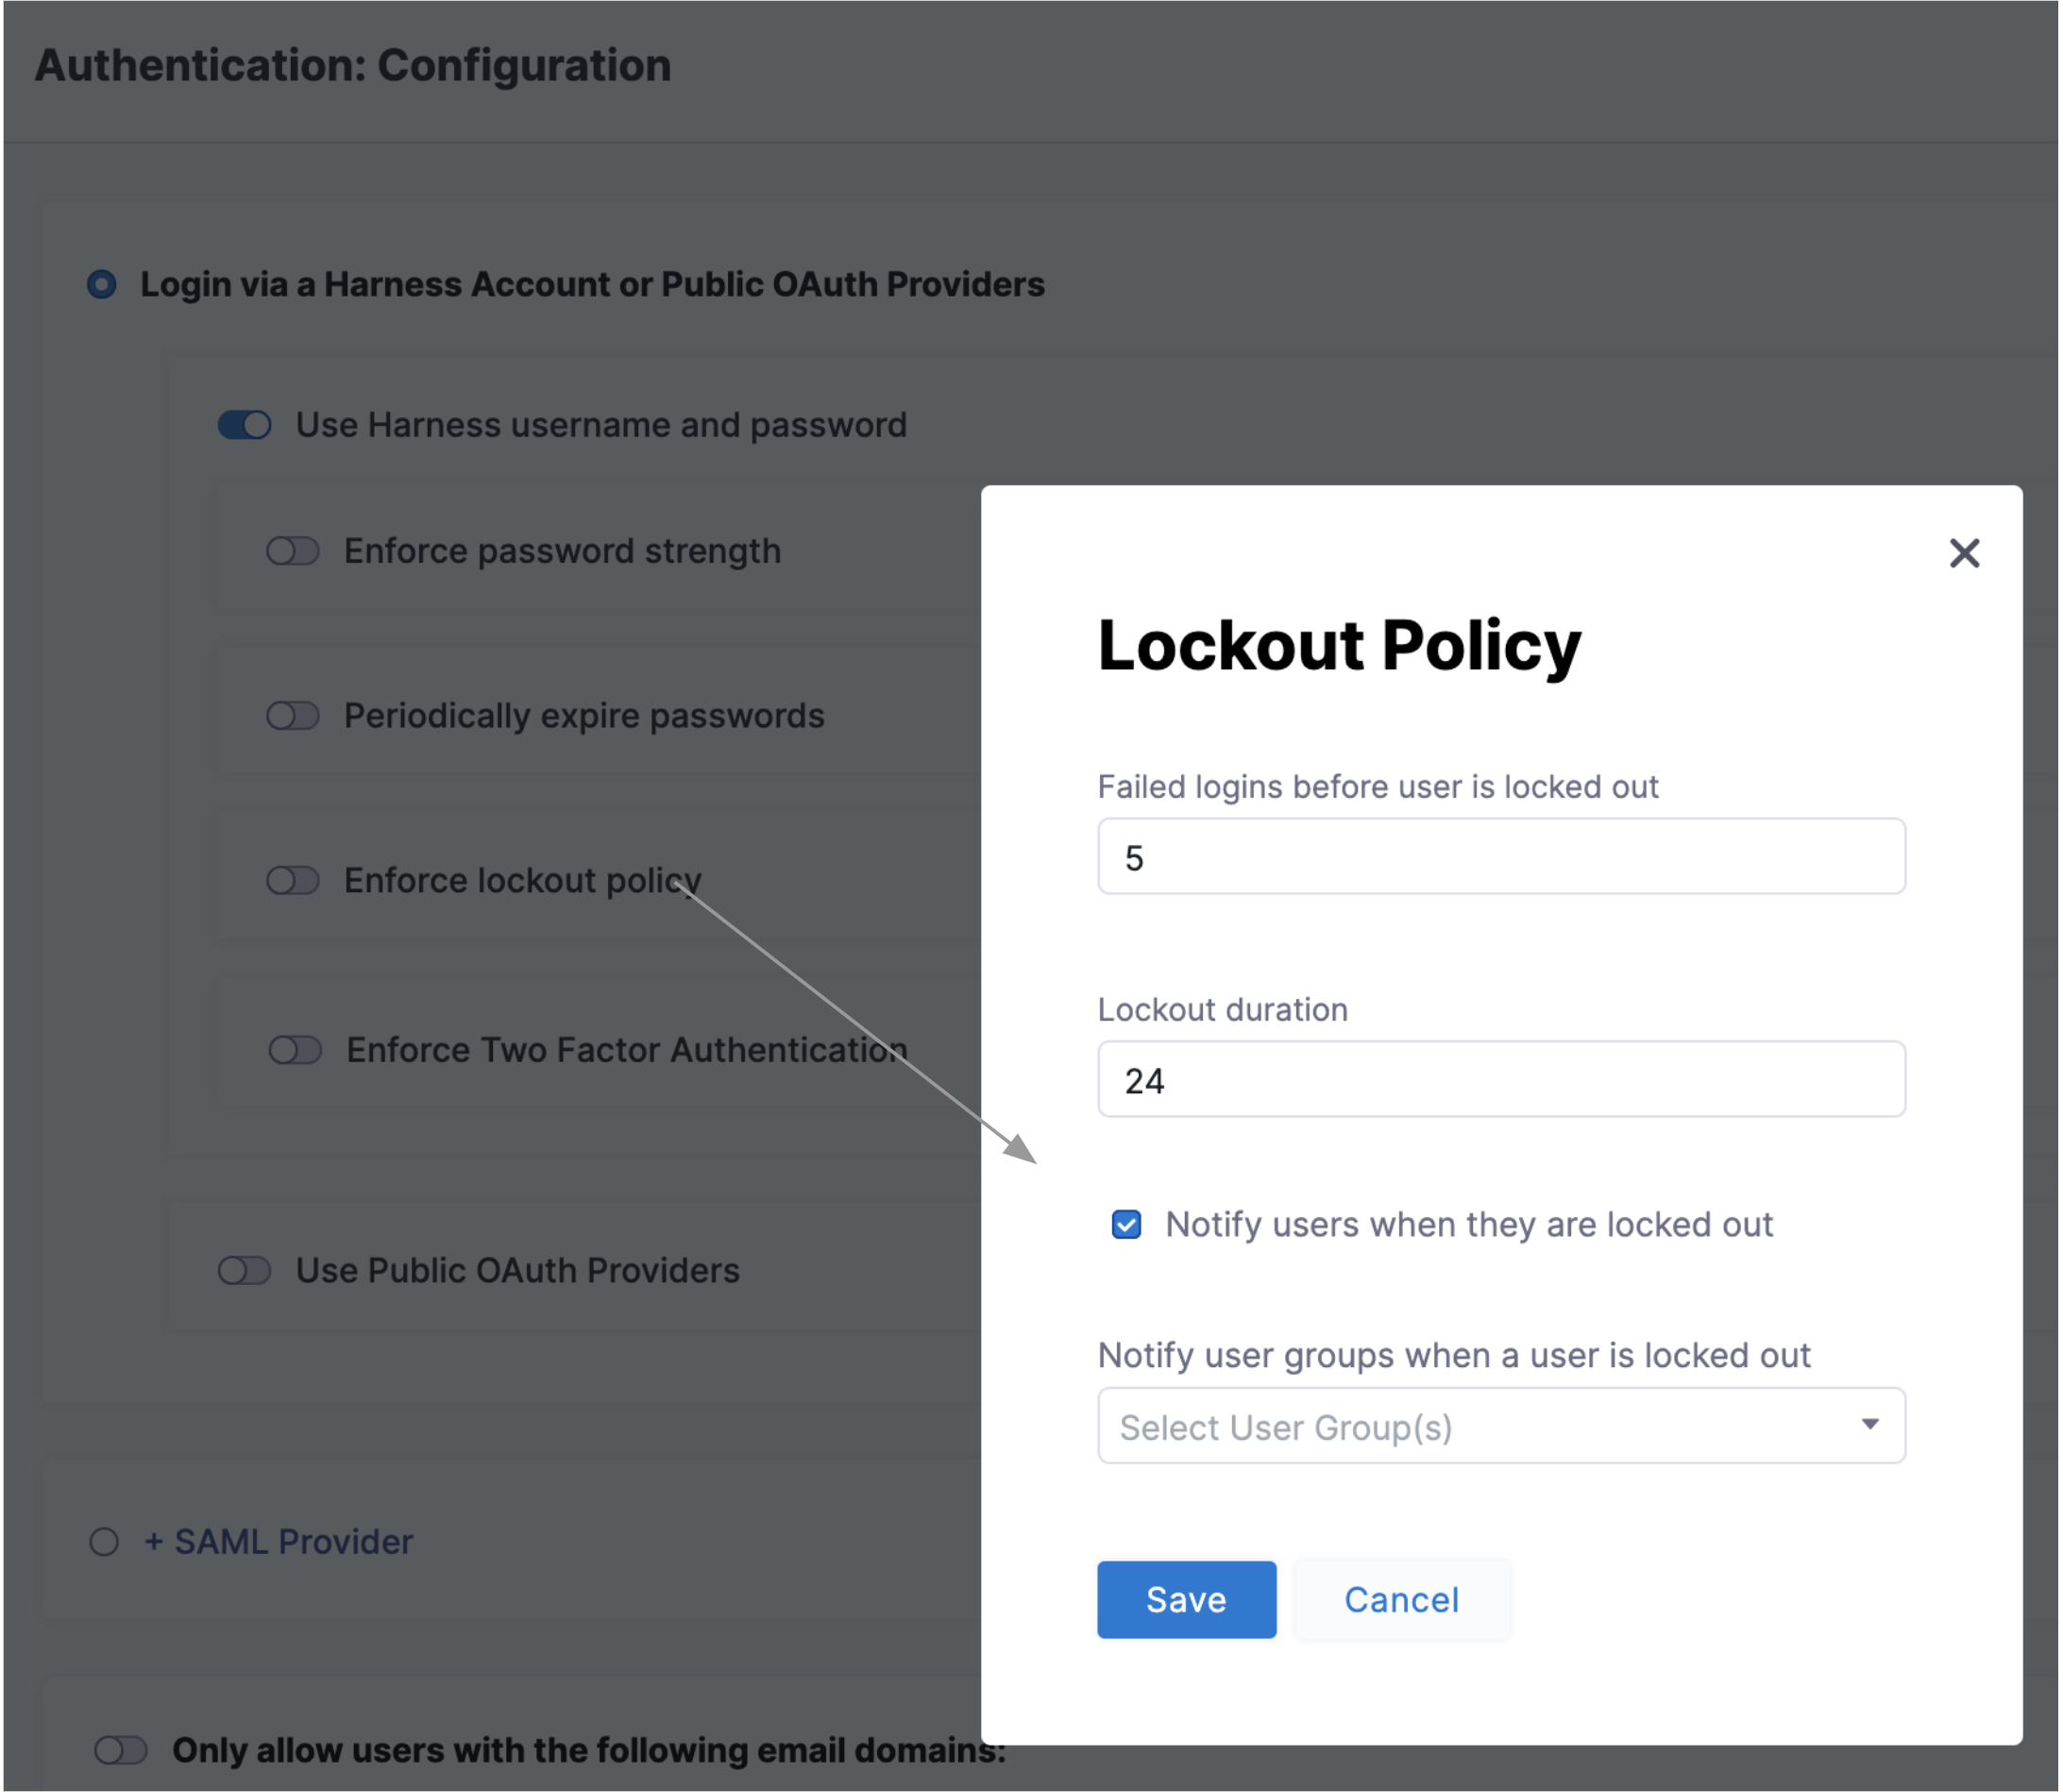
Select **Enforce lockout policy** to open the dialog. Use the dialog to configure the lockout trigger (how many failed logins), lockout time (in days), and notifications to locked-out users and Harness user groups.
Click to view full size image
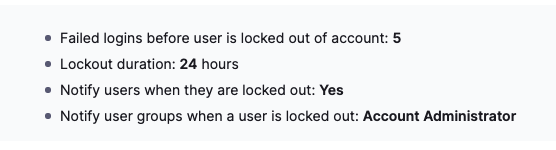
A summary appears on the main Authentication page:
Click to view full size image
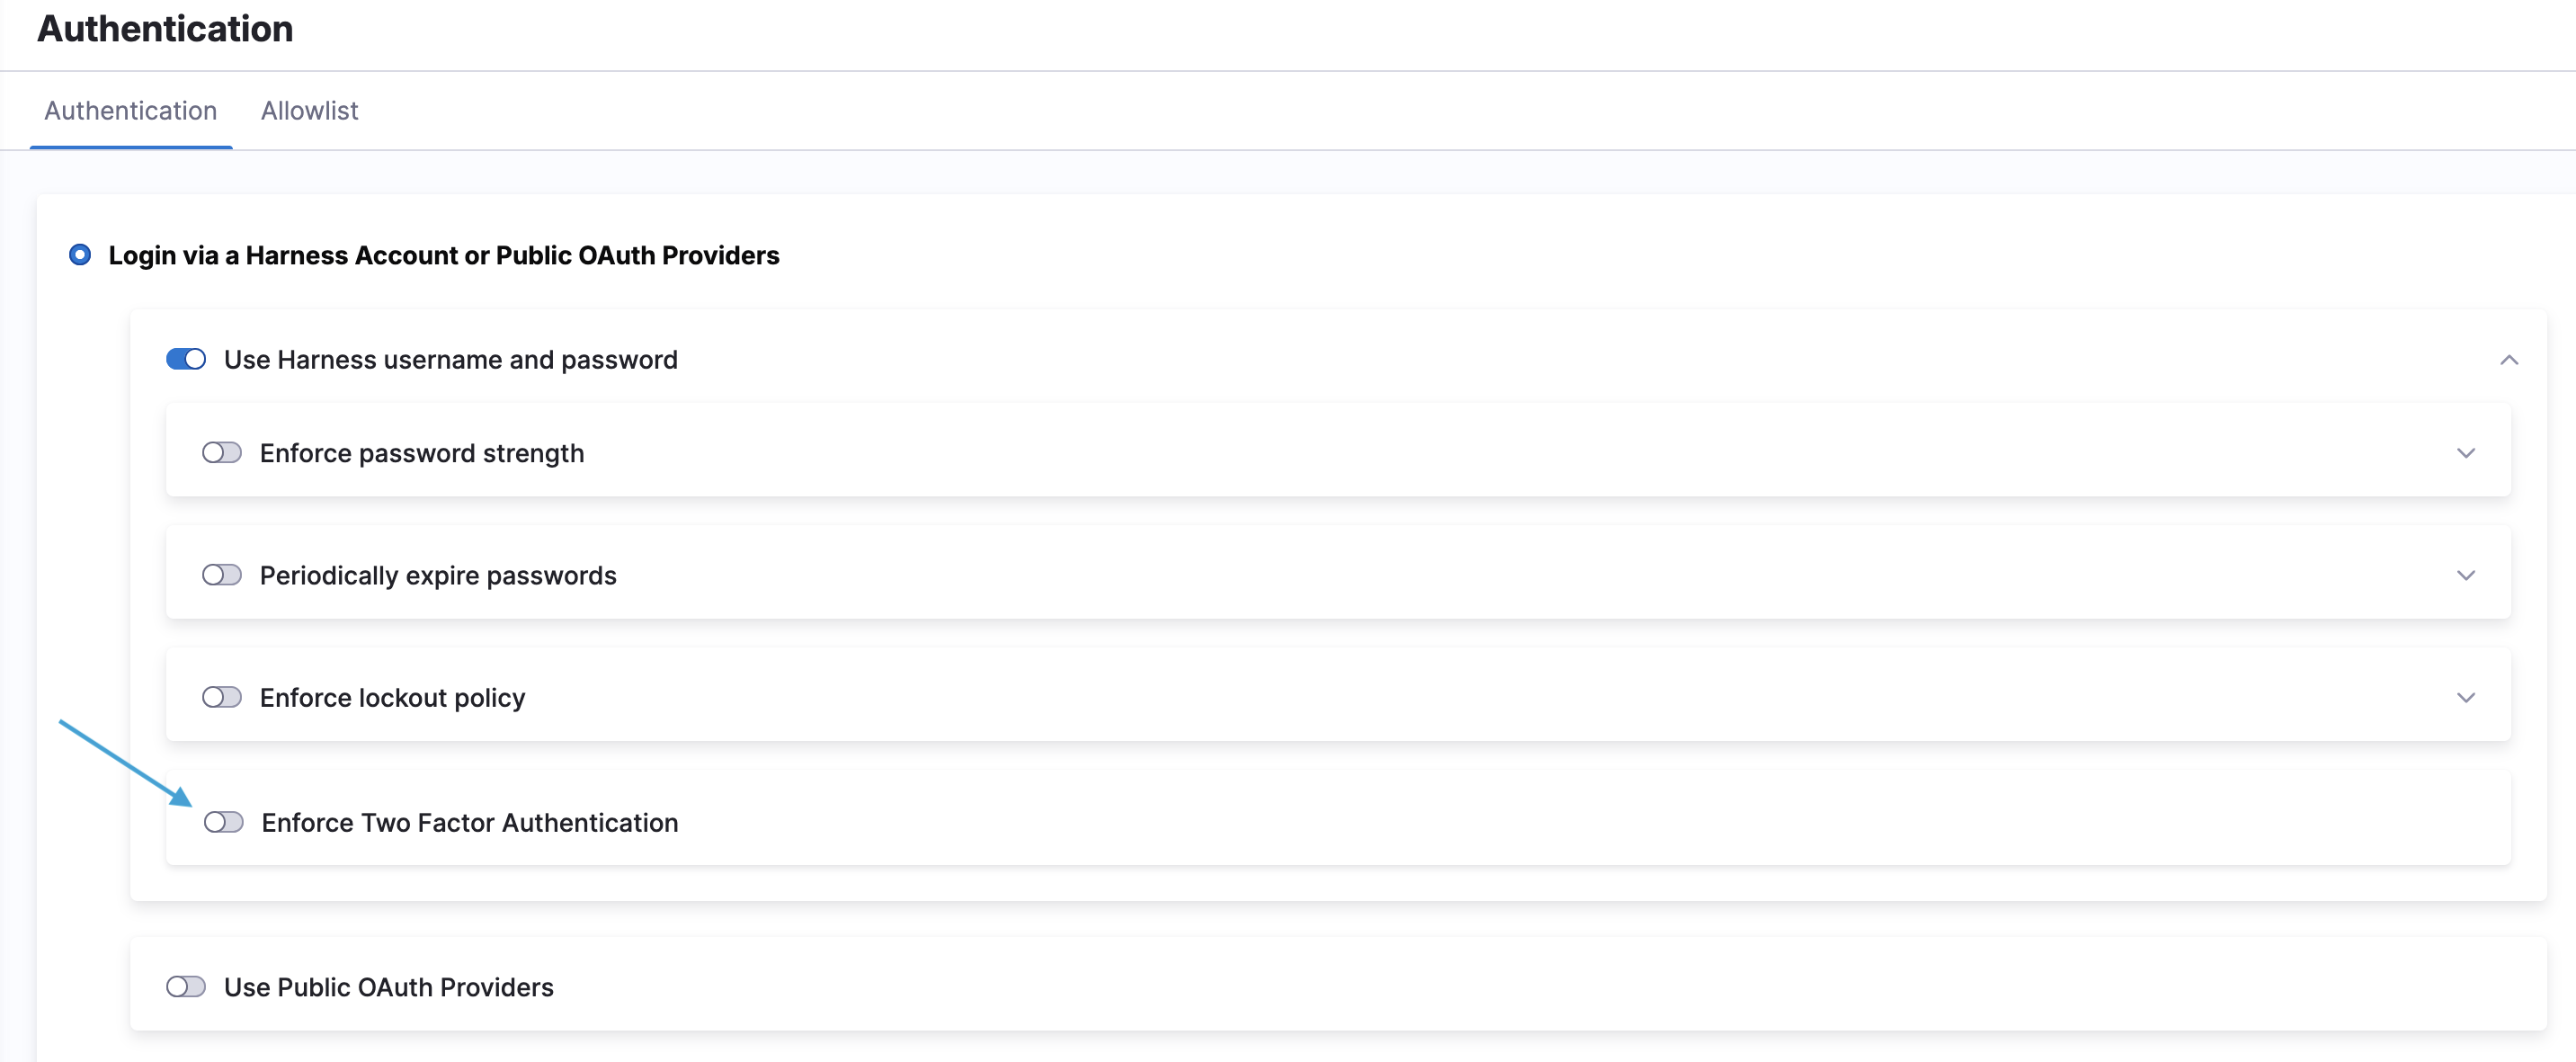
#### Enforce two factor authentication
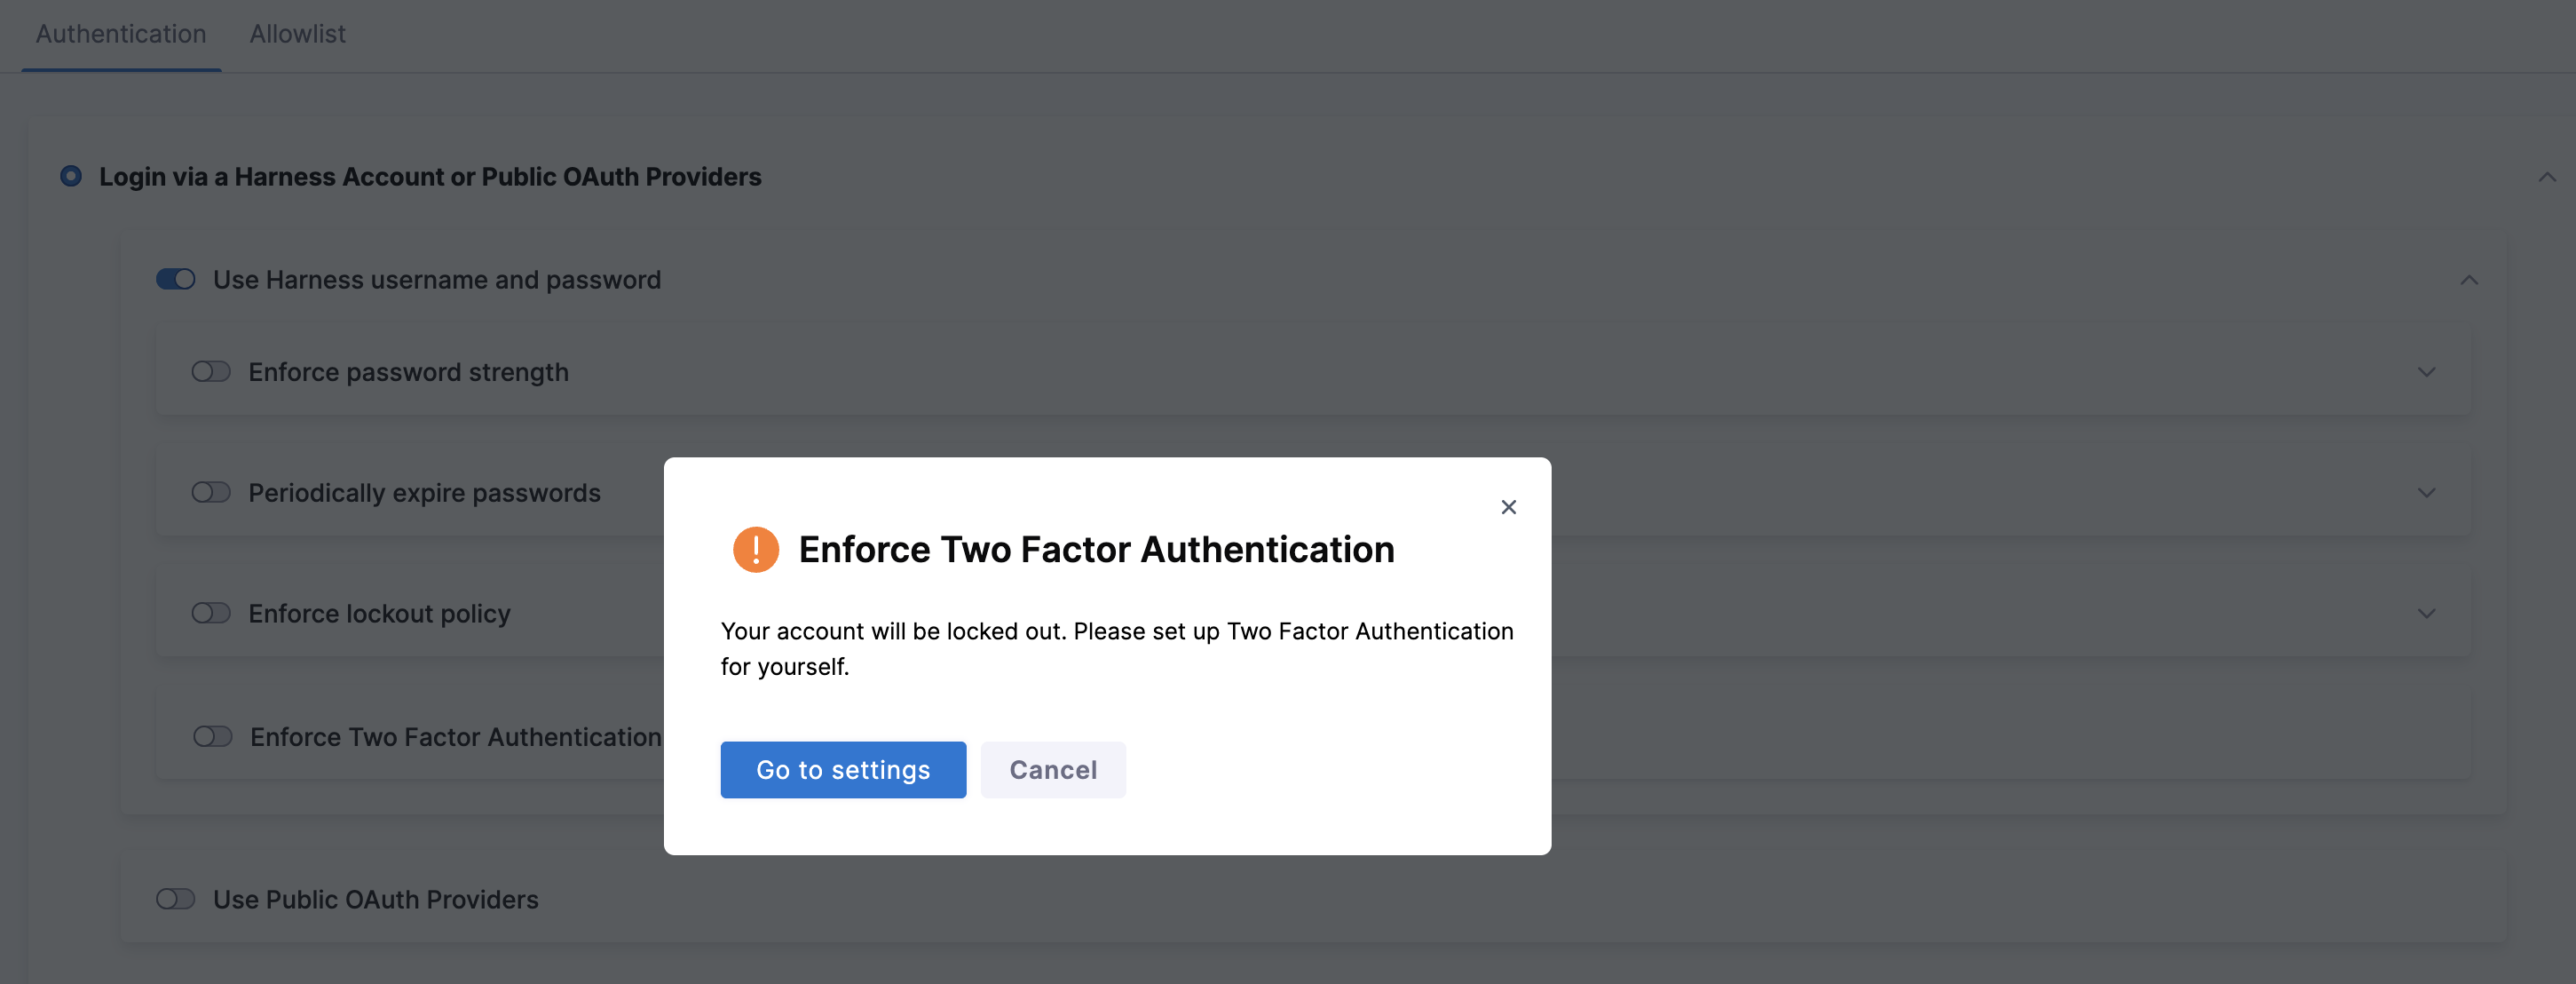
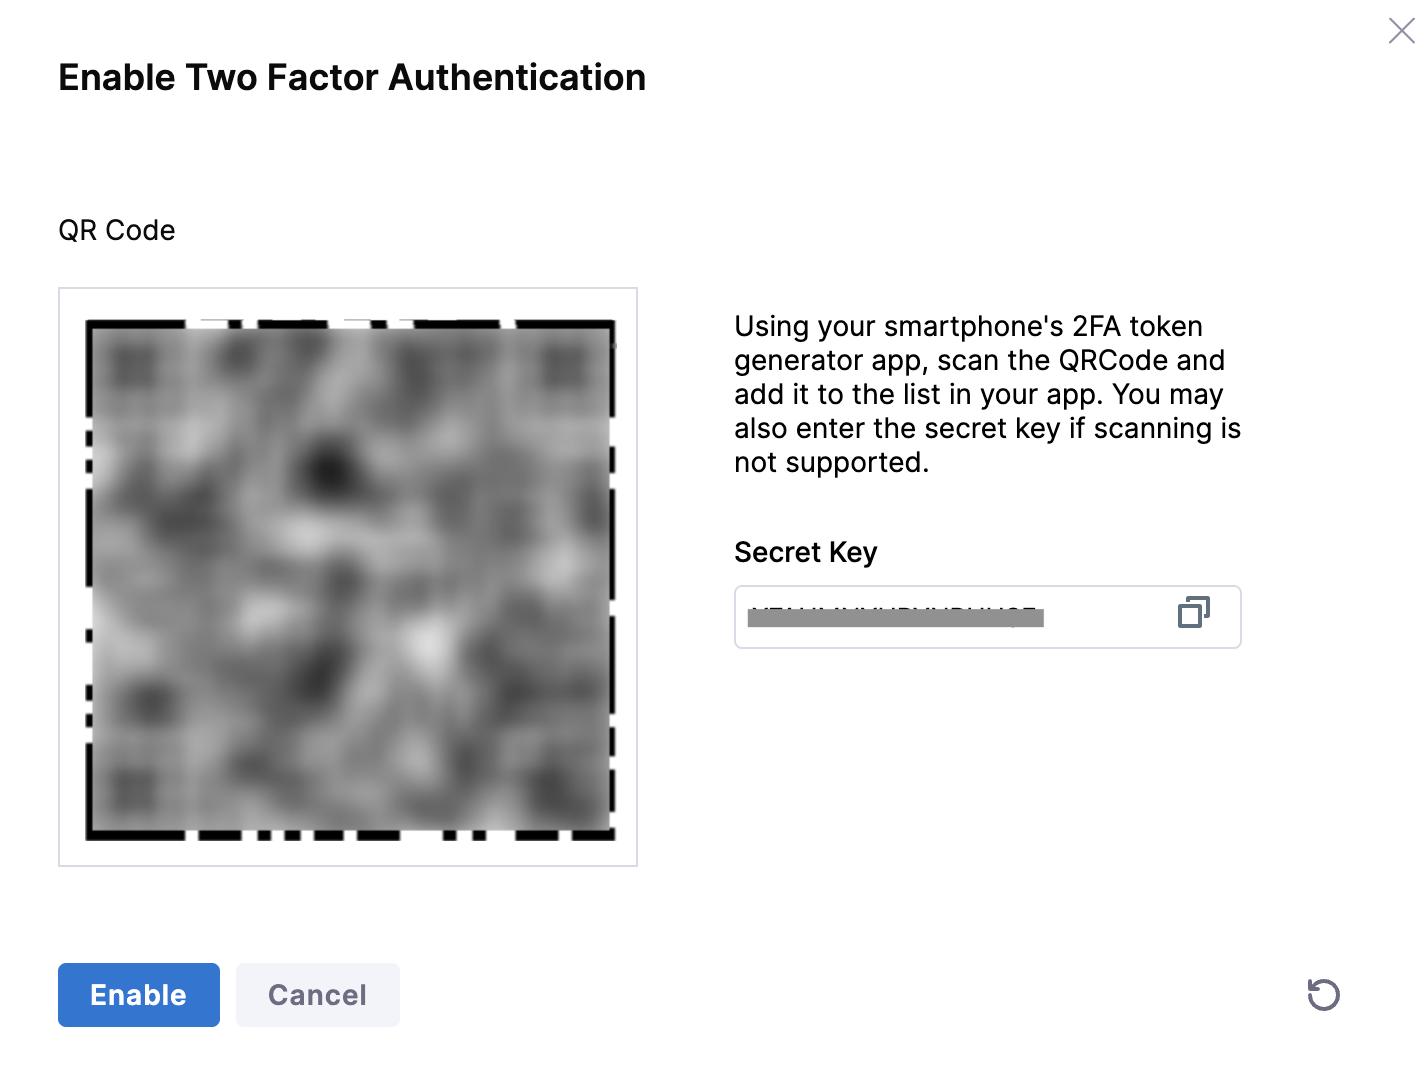
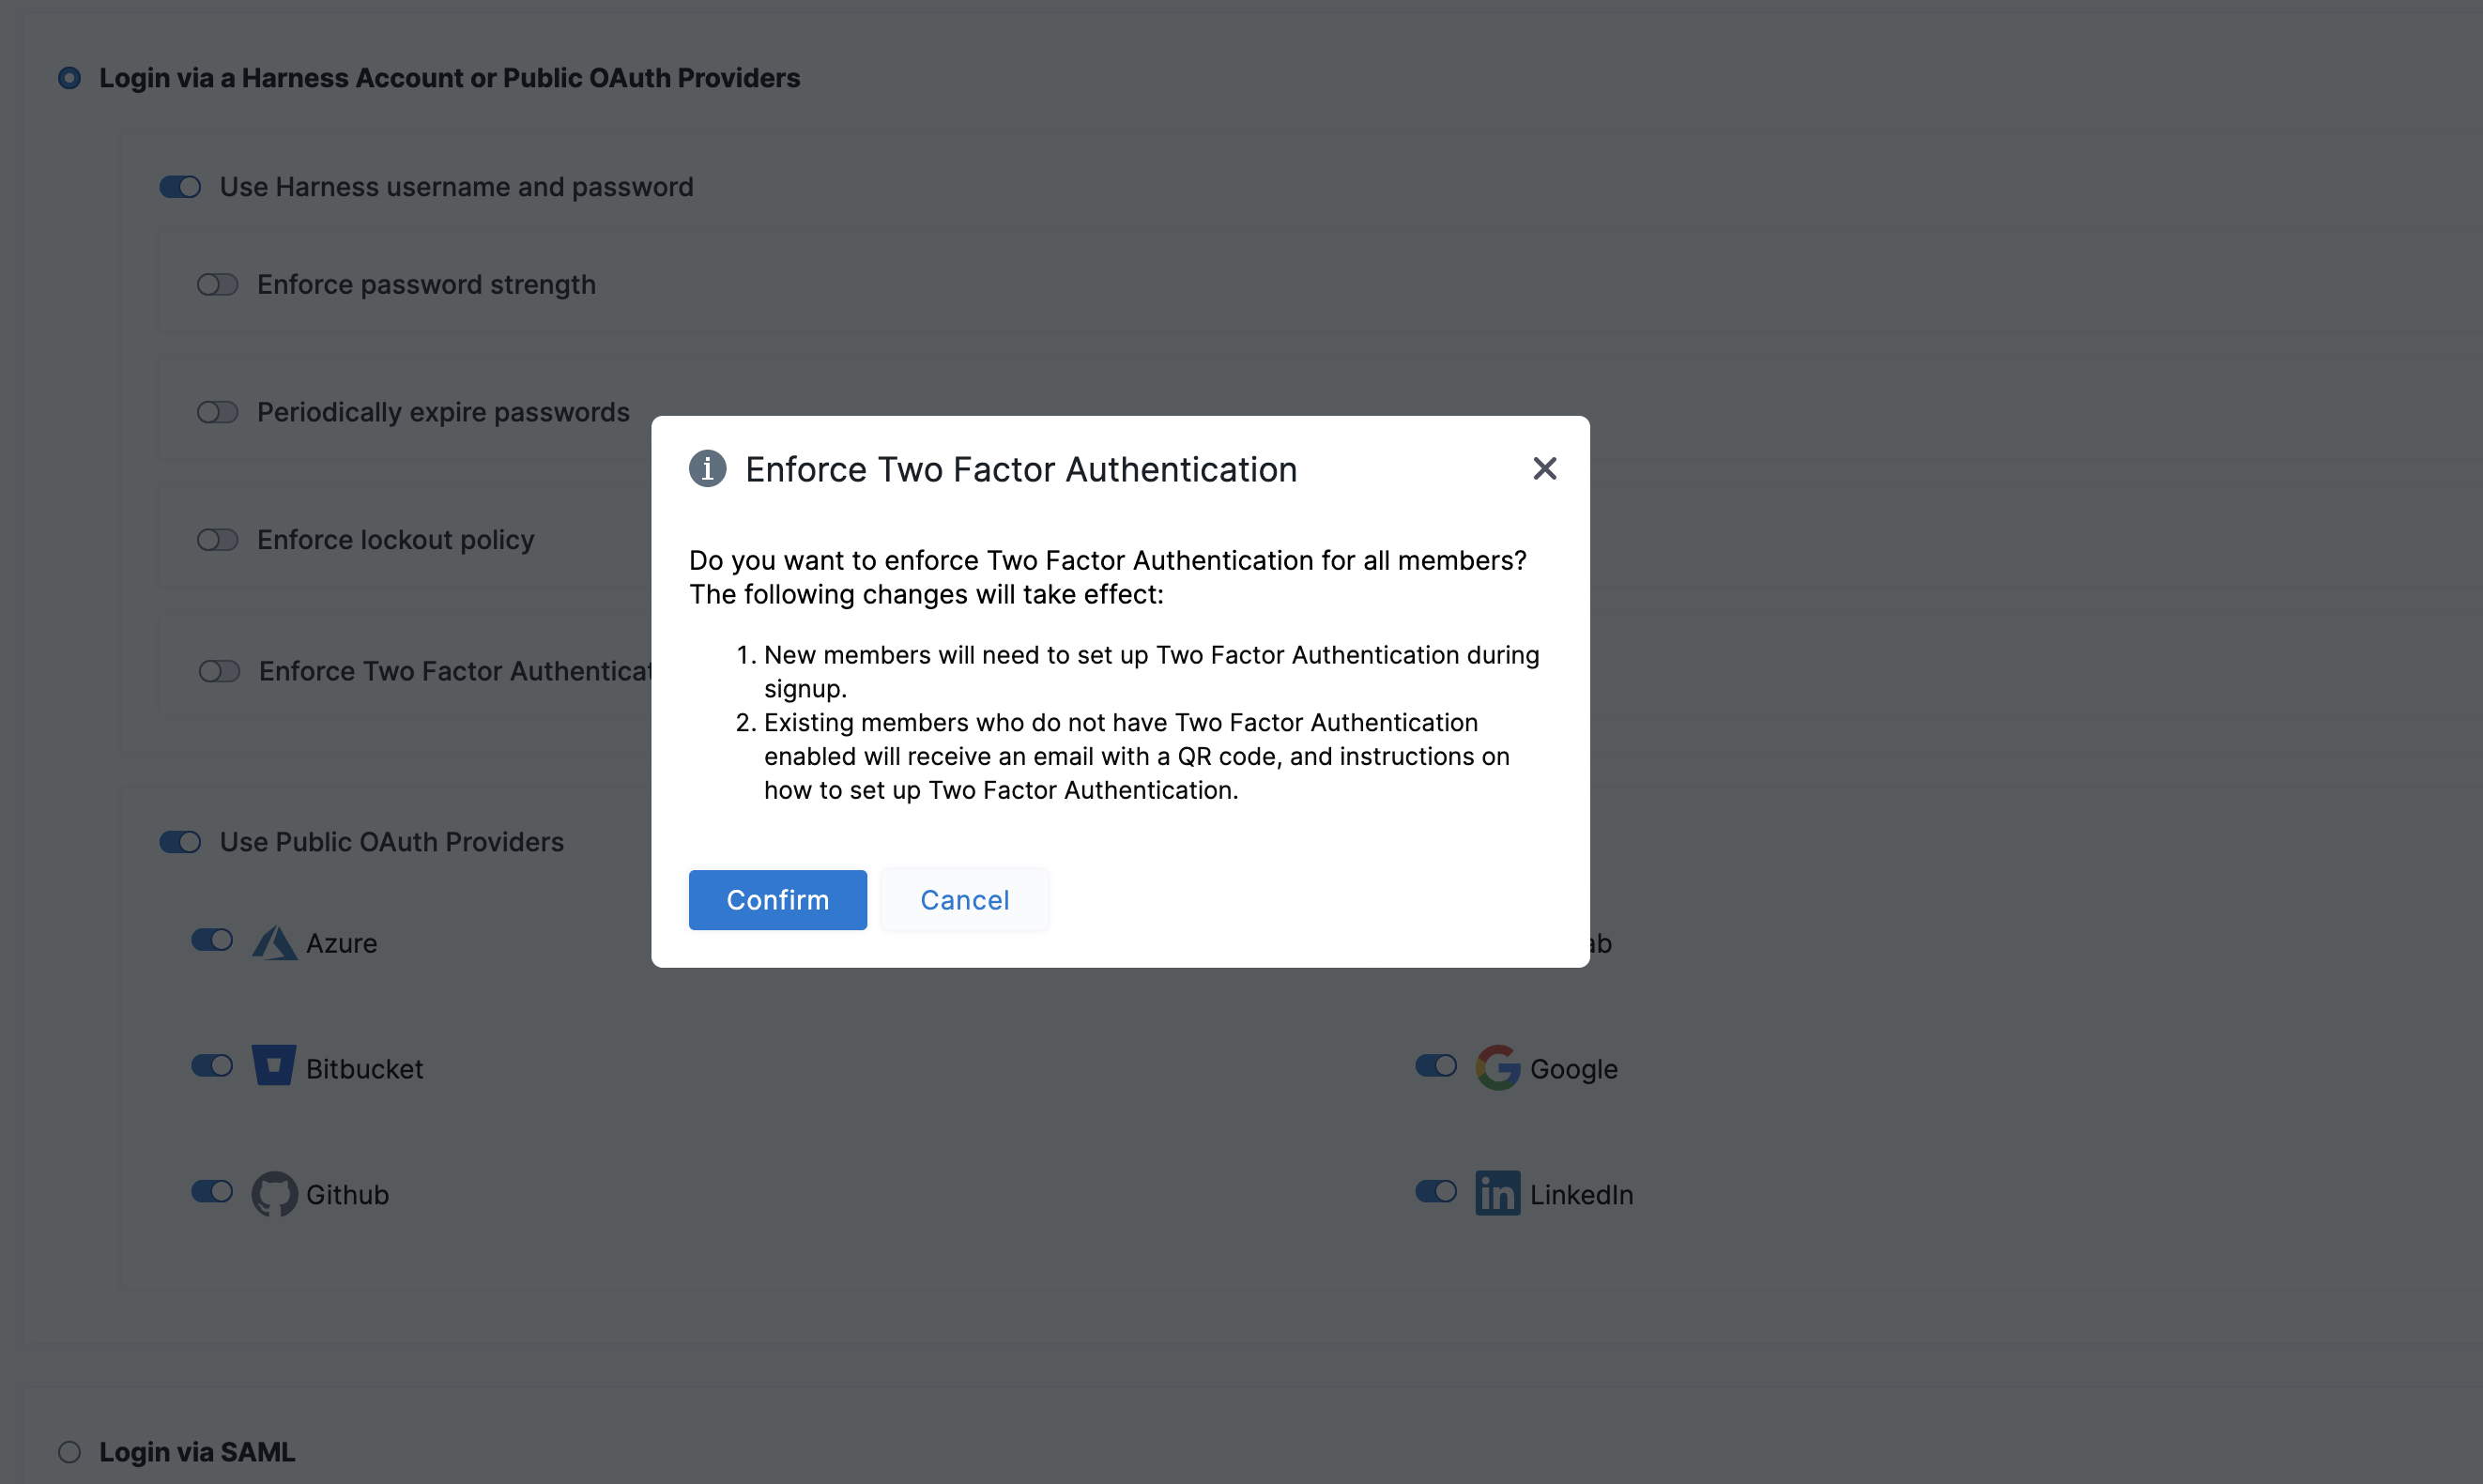
Select **Enforce Two Factor Authentication** to enforce 2FA for all users in Harness. This option governs all logins - whether through SSO providers or Harness username/password combinations. For more information, go to [Two-factor authentication](/harness-ai/use-harness-platform/authentication/two-factor-authentication).
Click to view full size image
***
### Enable multiple identity providers
Harness supports multiple identity providers (IdPs) for user authentication using SAML. You can configure a variety of SAML providers and enable or disable them for user authentication.
{% hint style="info" %}
Currently, this feature is behind the feature flag `PL_ENABLE_MULTIPLE_IDP_SUPPORT`. Contact [Harness Support](mailto:support@harness.io) to enable it.
{% endhint %}
Before configuring your SAML provider in Harness, you must first set up the integration on the provider side and download the **Identity Provider metadata XML** file. You will upload this file into Harness in step 3c below.
Follow the setup guide for your provider:
* [SAML SSO with Okta](/harness-ai/use-harness-platform/authentication/single-sign-on-saml/okta)
* [SAML SSO with Microsoft Entra ID](/harness-ai/use-harness-platform/authentication/single-sign-on-saml/microsoft-entra-id)
* [SAML SSO with OneLogin](/harness-ai/use-harness-platform/authentication/single-sign-on-saml/onelogin)
* [SAML SSO with Keycloak](/harness-ai/use-harness-platform/authentication/single-sign-on-saml/keycloak)
To configure multiple SAML providers in Harness, follow the steps below:
1. In Harness UI, select **Account Settings**, and then select **Authentication**.
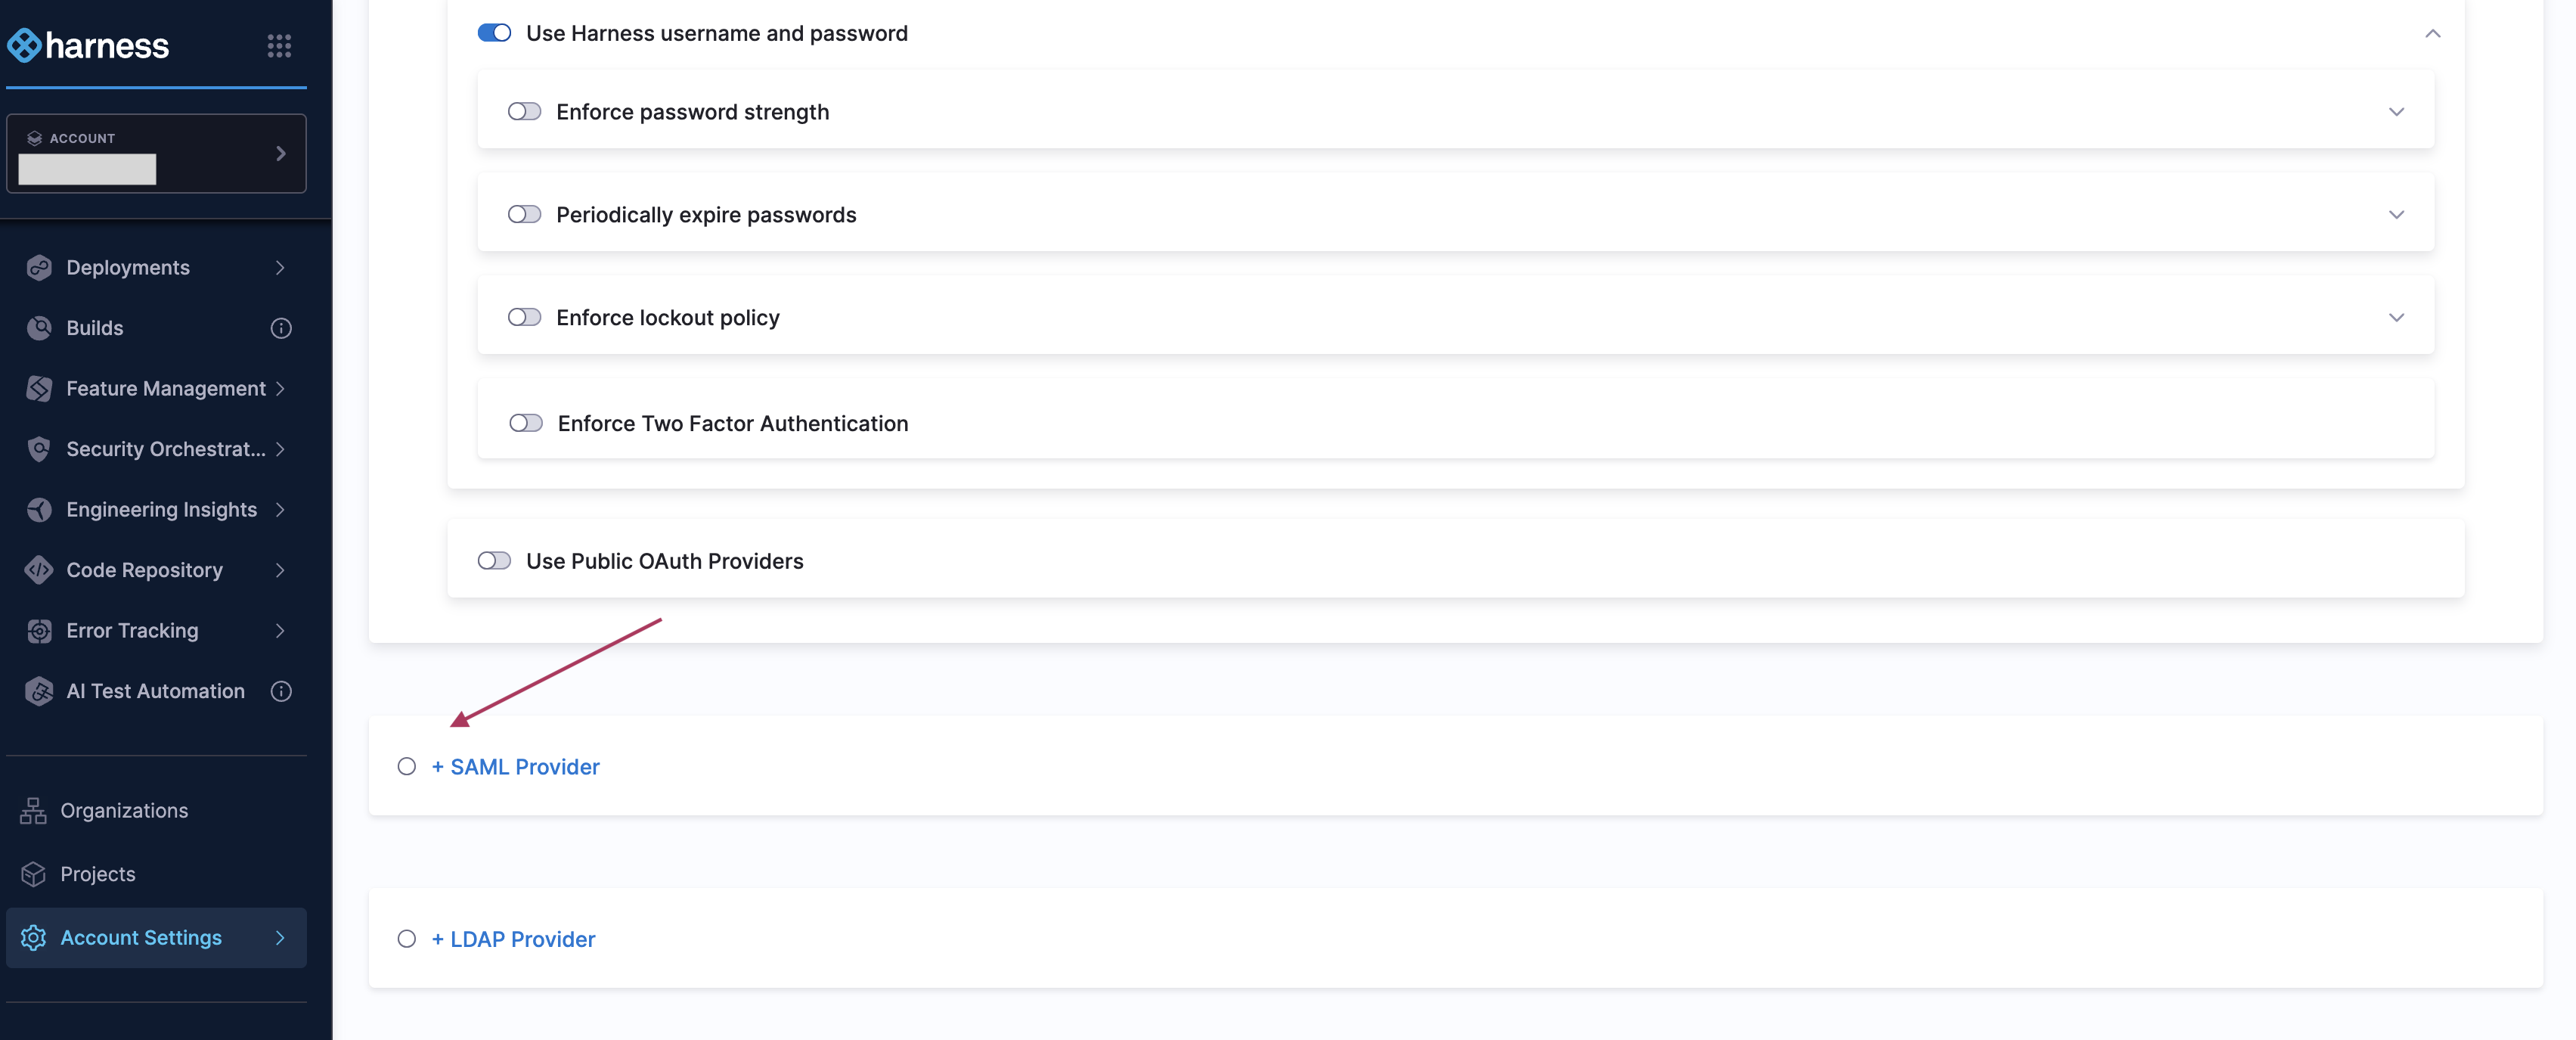
2. If you are configuring SAML for the first time and no SAML providers are configured, your screen appears as shown below. Select **+SAML Provider** and jump to step 3b. If SAML provider is configured but not enabled, jump to step 3.
Click to view full size image
3. Select **Login via SAML** and add the SAML providers you need.
a. If SAML providers are configured but not enabled for the account, enable the one you want. If you want to create a new one, select **Add SAML Provider**.
Click to view full size image
The SAML Provider settings appear.
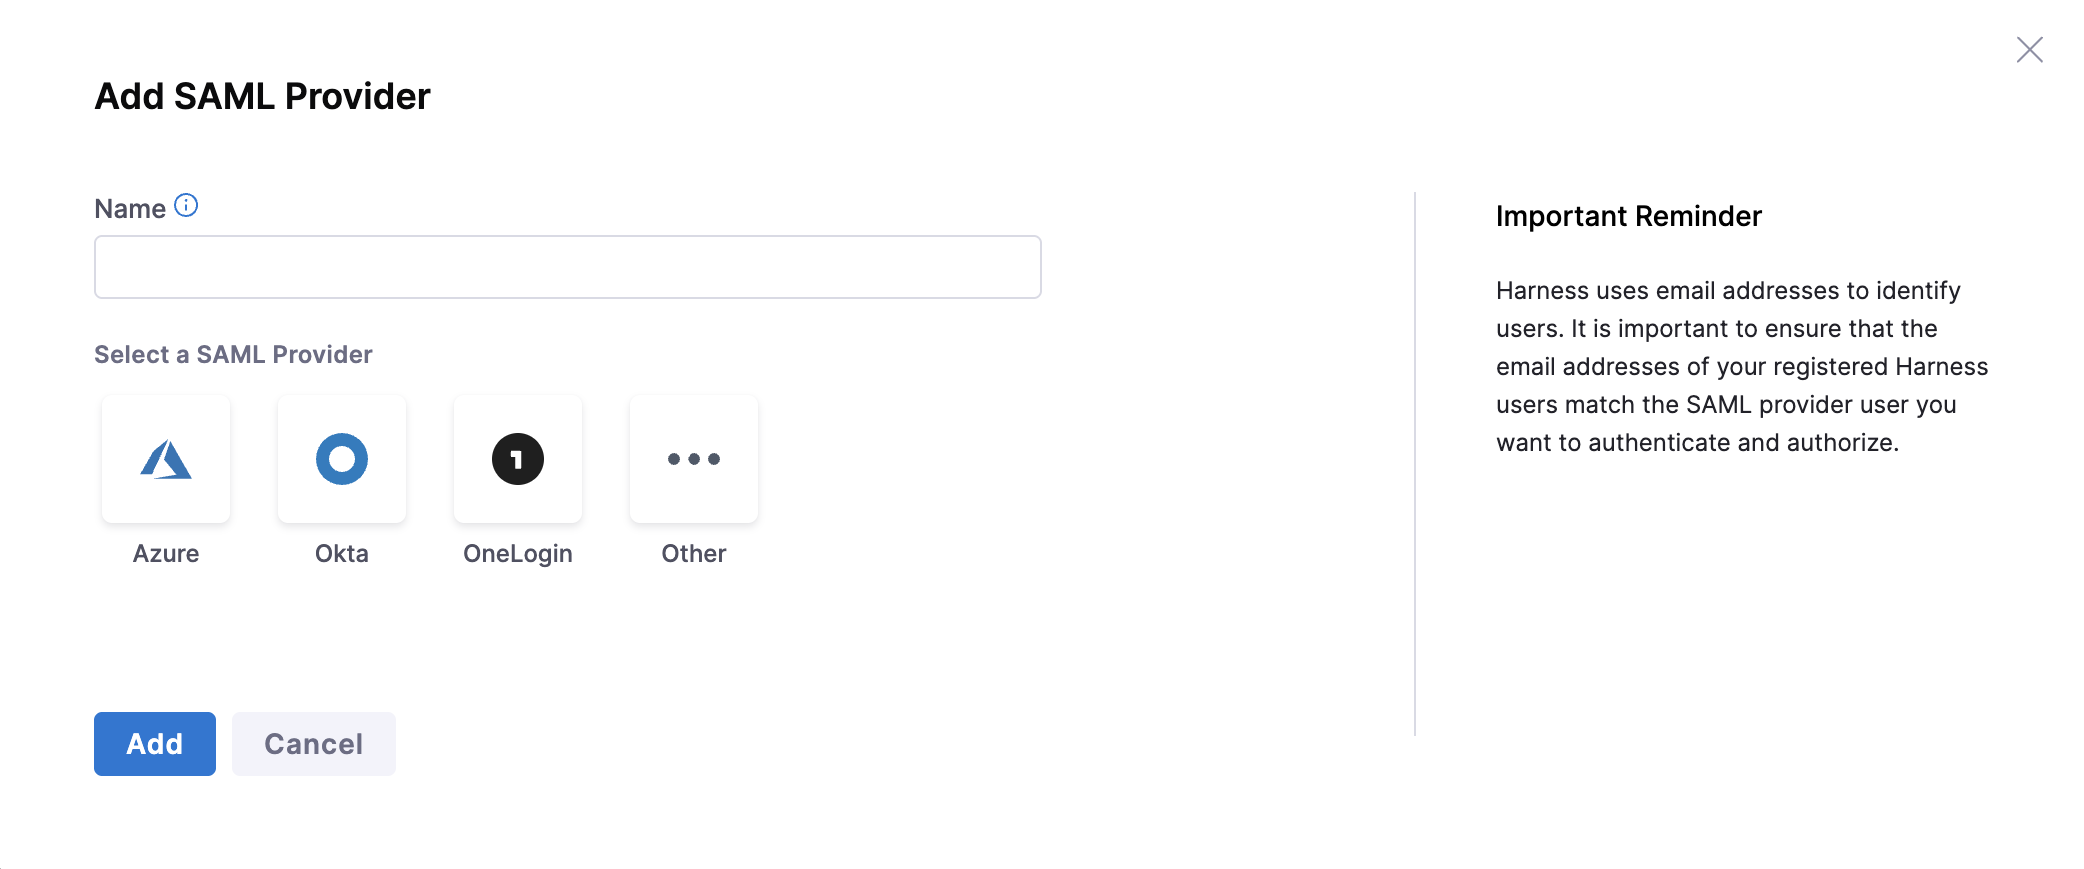
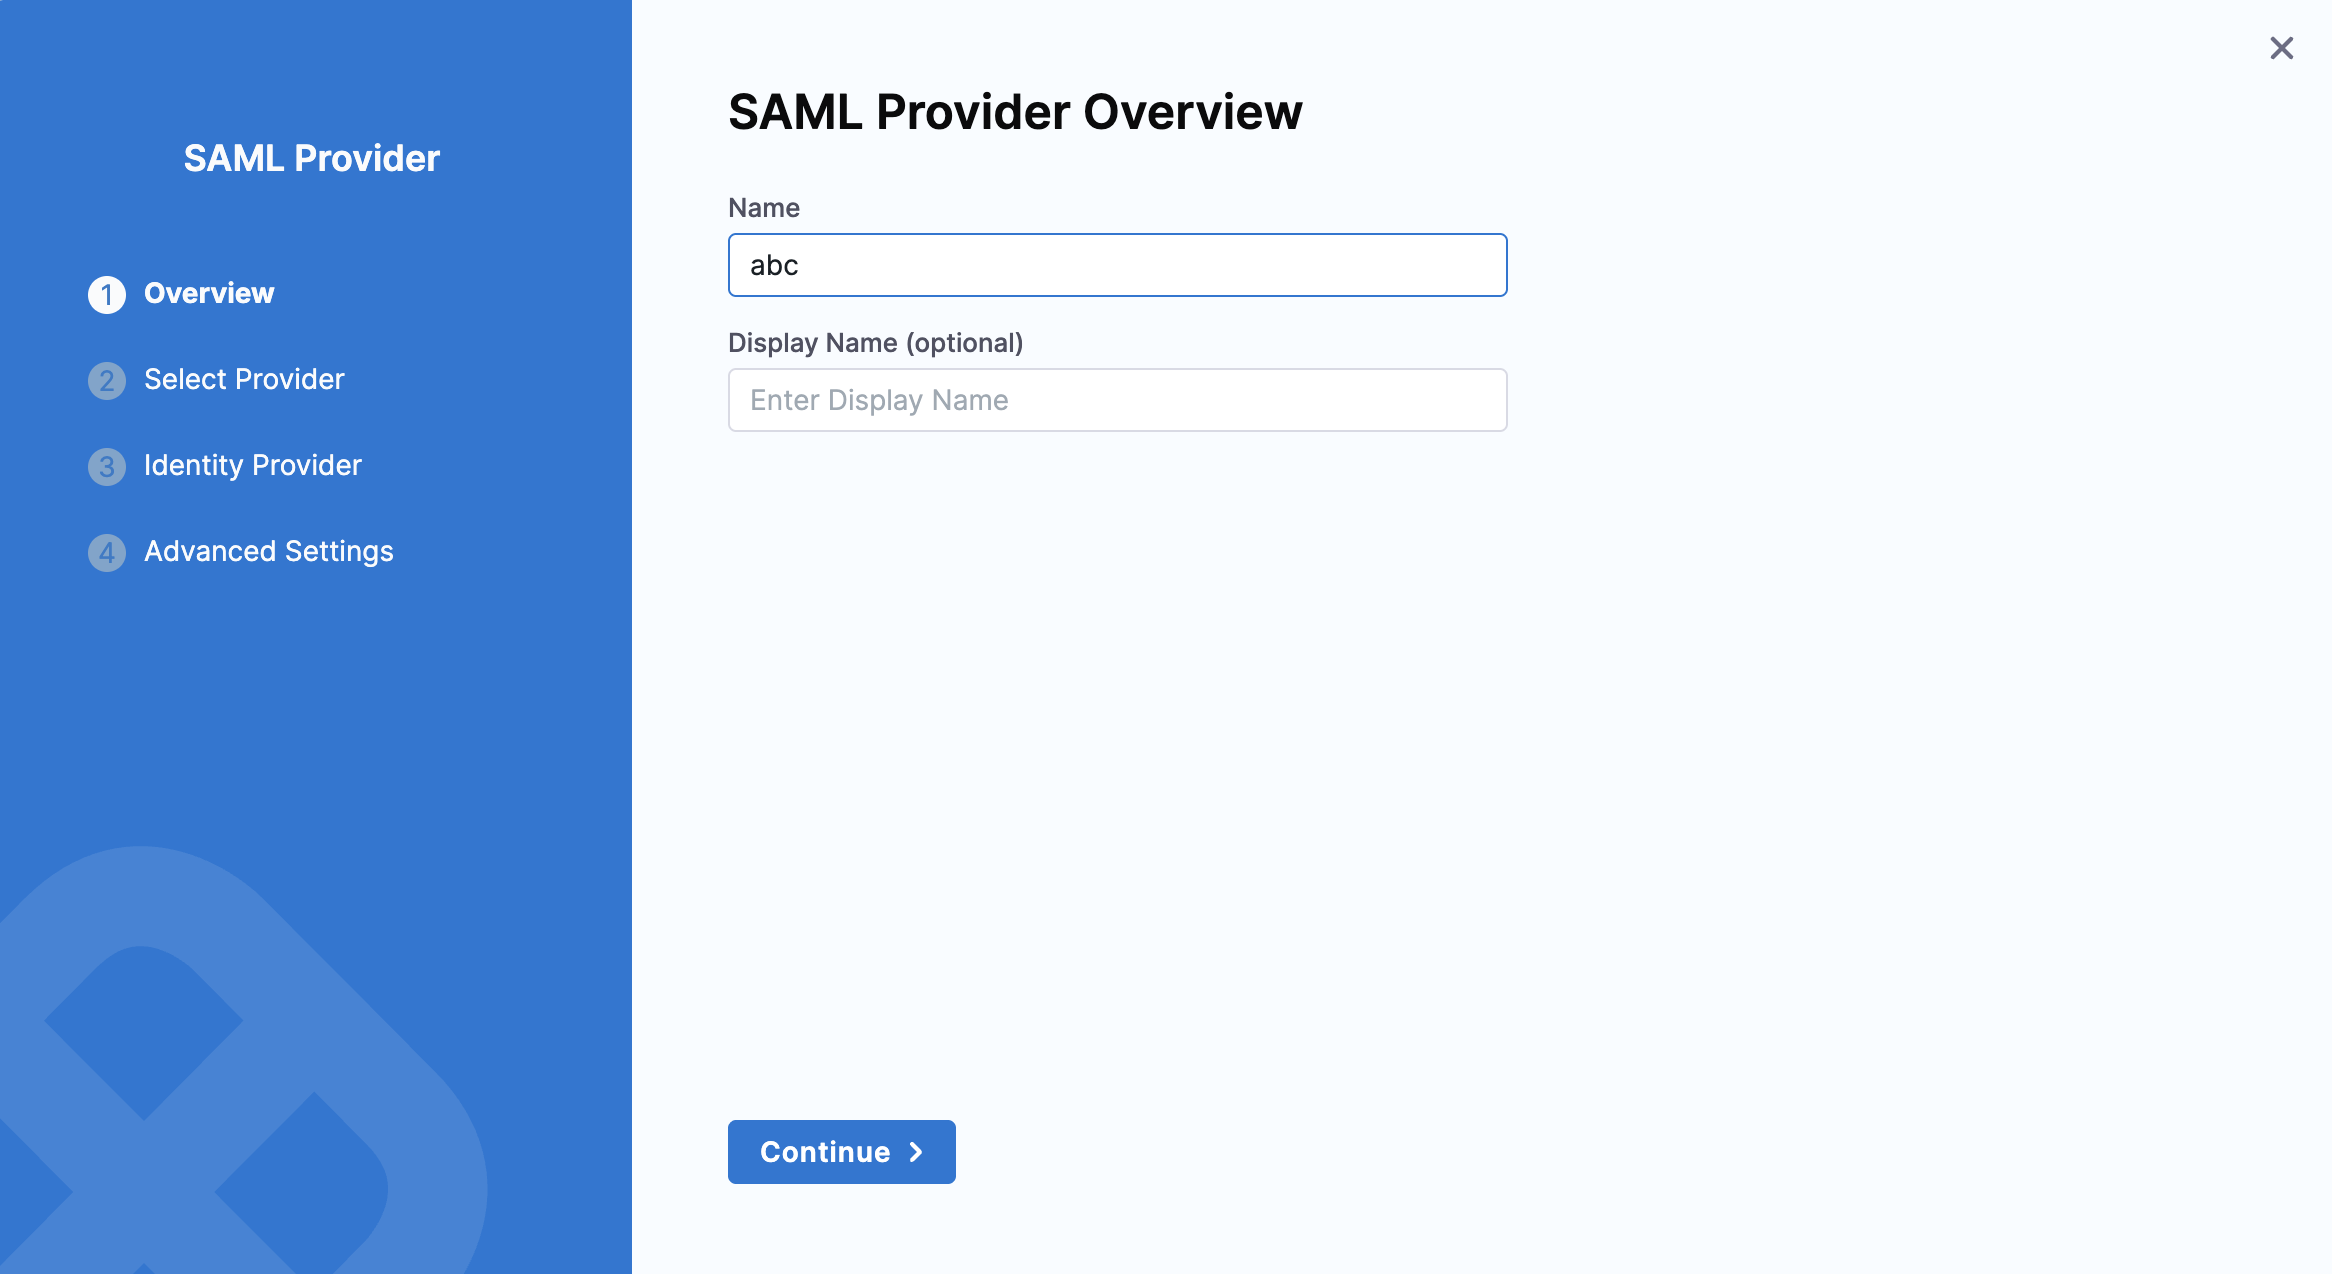
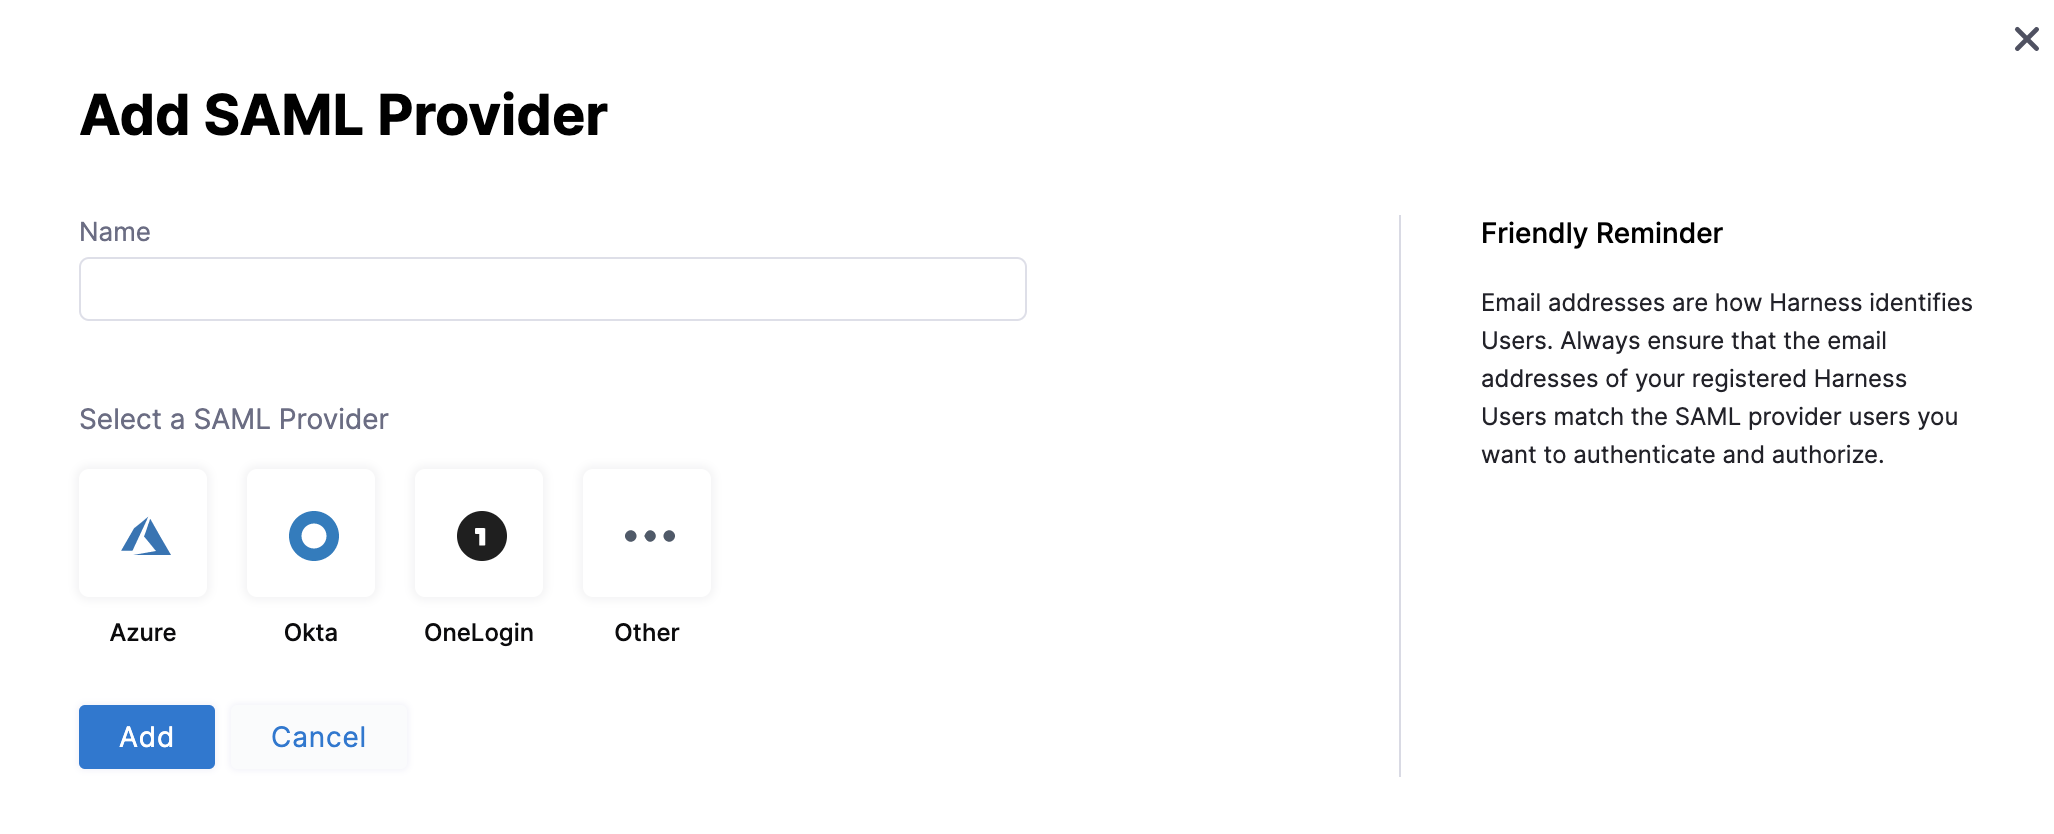
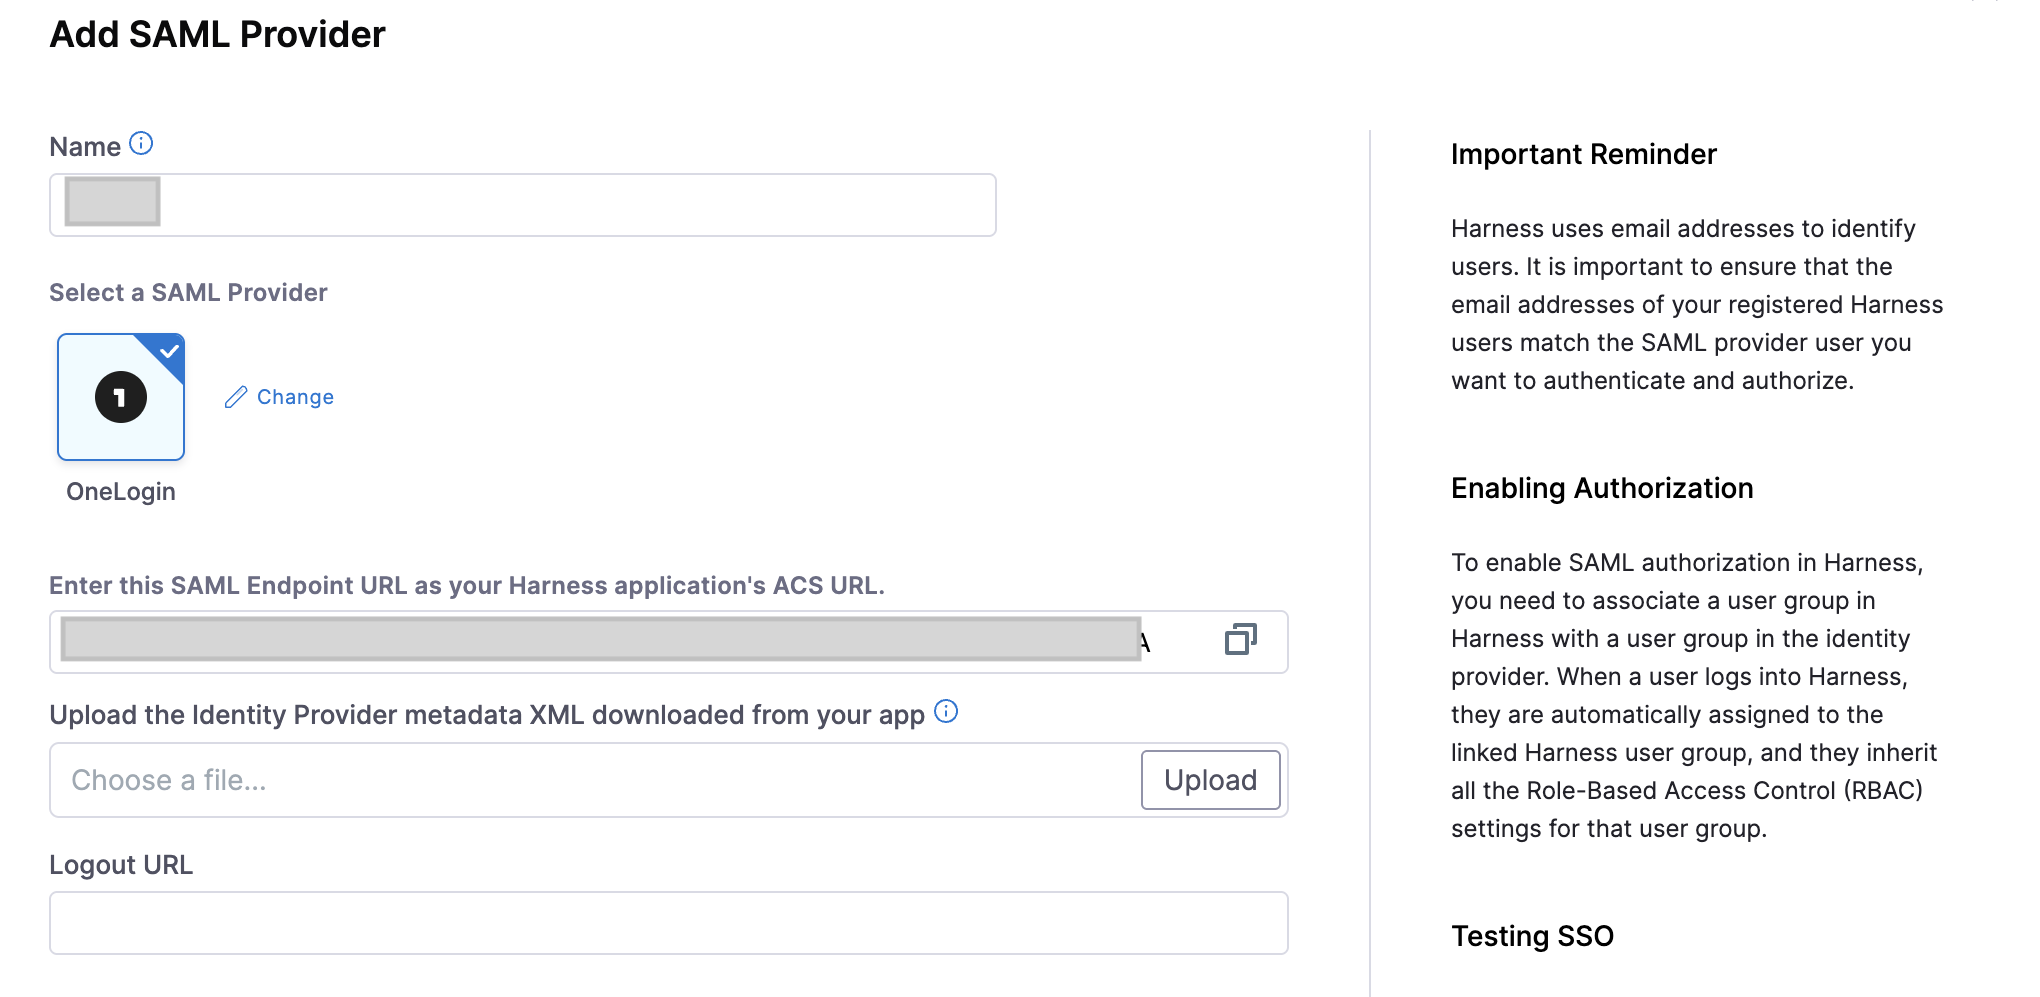
b. In the **Name** field, enter a name for the SAML provider. Names can only contain alphanumeric characters, `_`, `-`, `.`, and spaces. Select a SAML provider from the list. Select **Add**.
Click to view full size image
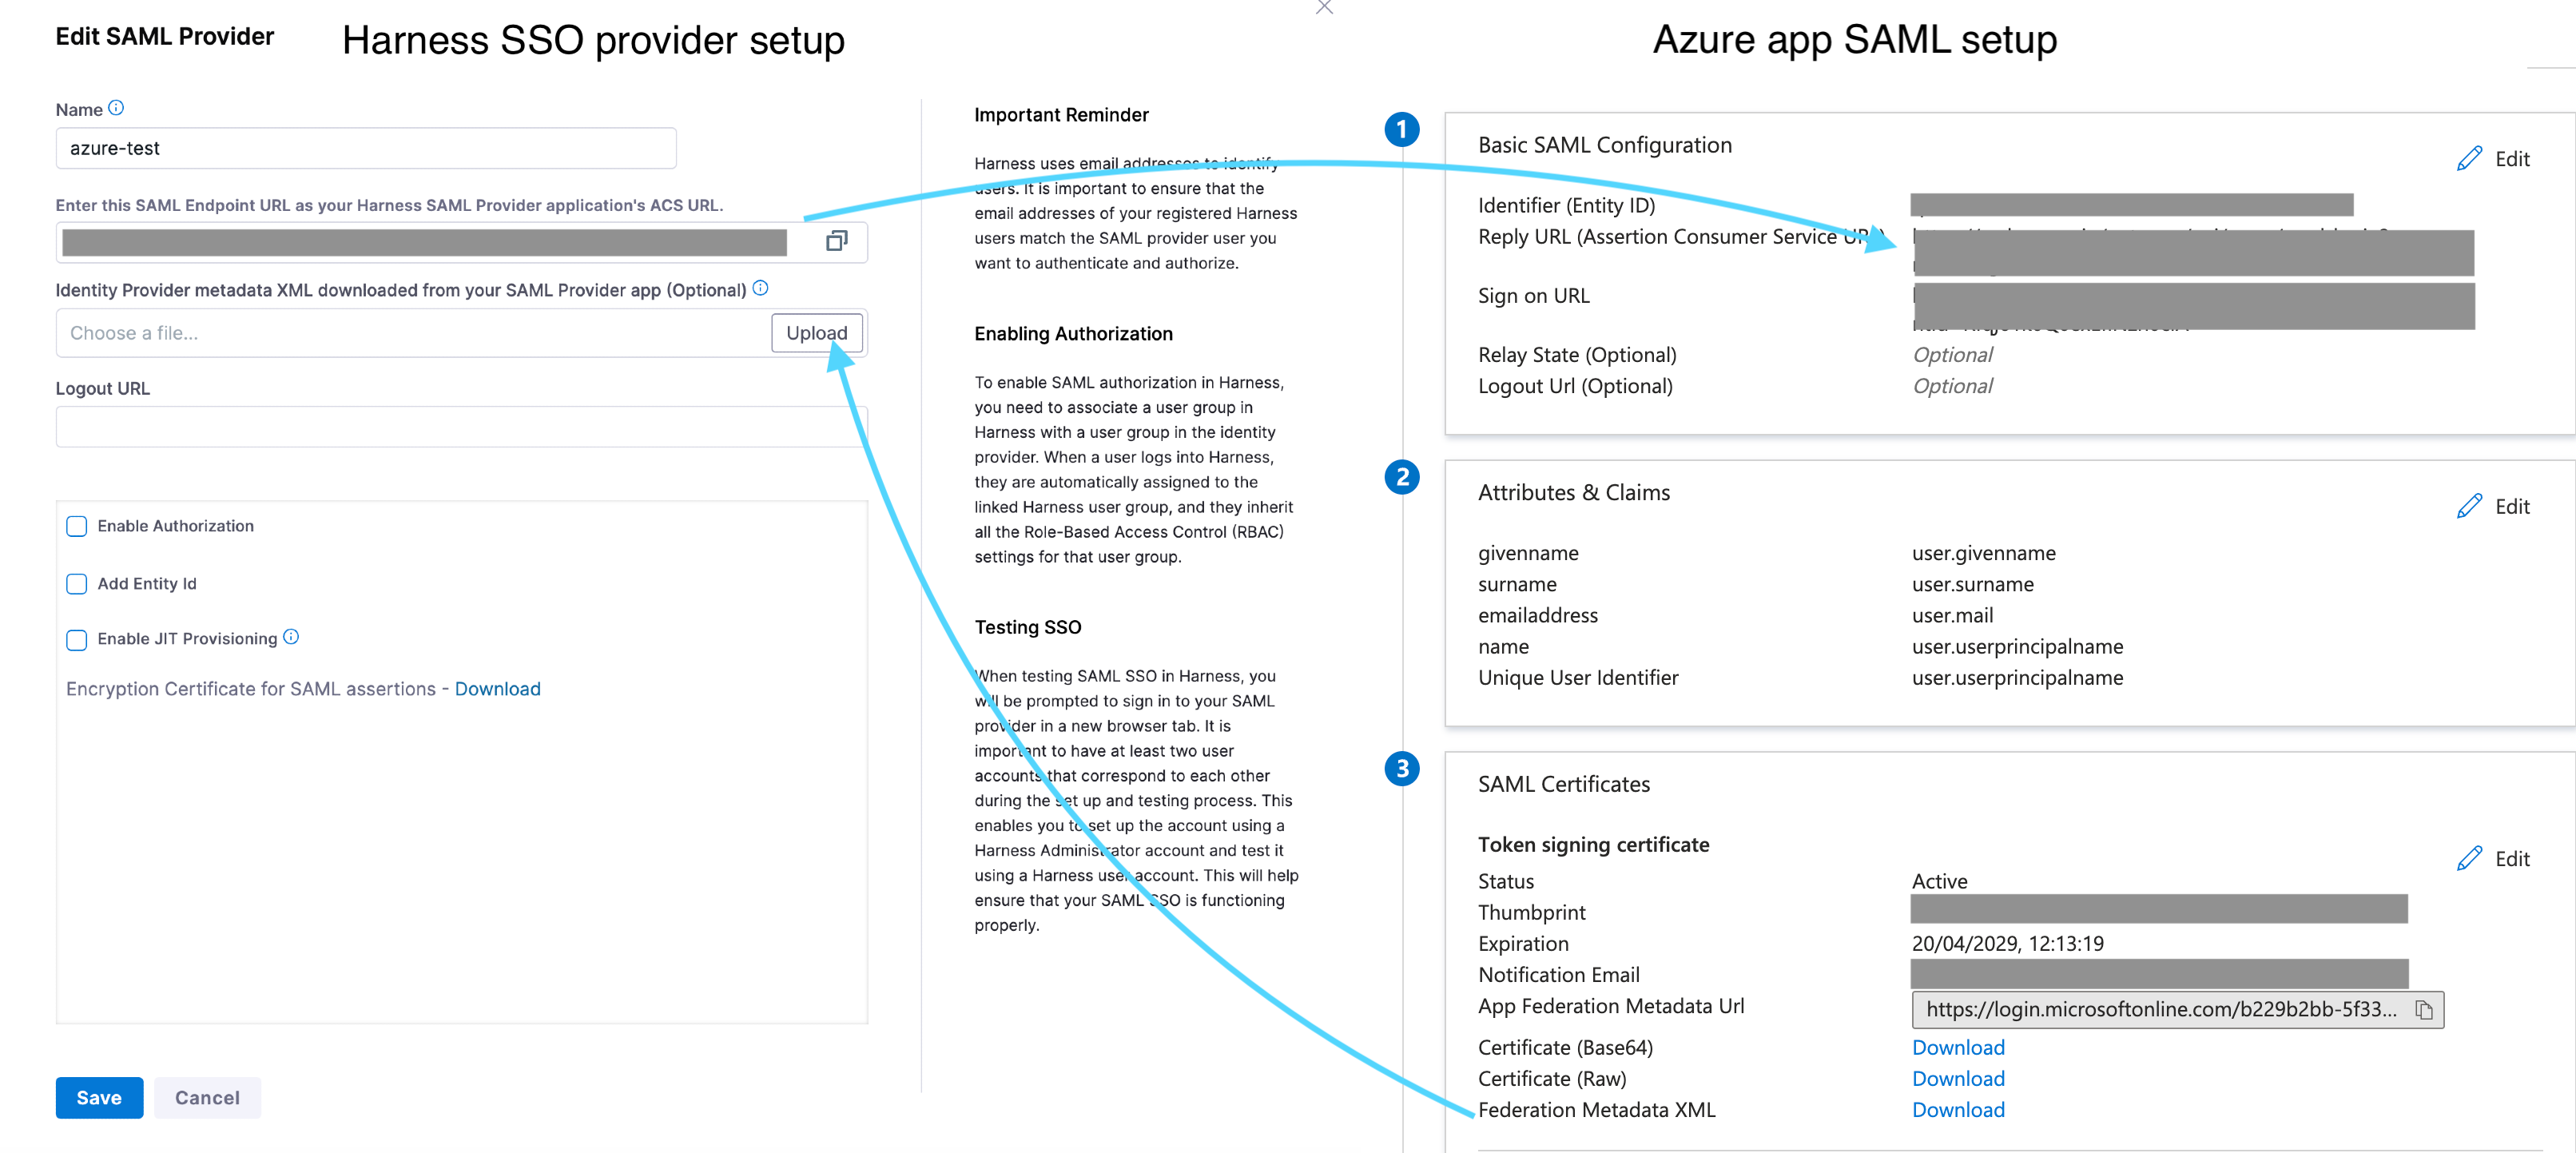
c. Copy the SAML Endpoint URL. Upload the **Identity Provider metadata XML** file you downloaded from your SAML provider. Deselect **Enable Authorization** for now. You can enable this after completing the provider setup. Select **Add**.
Click to view full size image
Harness supports the following SAML providers. Based on the SAML provider you select, refer to one of the following:
* [SAML SSO with Okta](/harness-ai/use-harness-platform/authentication/single-sign-on-saml/okta)
* [SAML SSO with Microsoft Entra ID](/harness-ai/use-harness-platform/authentication/single-sign-on-saml/microsoft-entra-id)
* [SAML SSO with OneLogin](/harness-ai/use-harness-platform/authentication/single-sign-on-saml/onelogin)
* [SAML SSO with Keycloak](/harness-ai/use-harness-platform/authentication/single-sign-on-saml/keycloak)
The SAML provider is now listed under **Login via SAML**.
Click to view full size image
Before enabling SAML, disable any configured public OAuth providers. For more information, go to [Single Sign-On with SAML](/harness-ai/use-harness-platform/authentication/single-sign-on-saml).
#### Enable login via SAML
[Enable one or more SAML providers](#enable-multiple-identity-providers) and follow the steps to enable SAML login for your account .
1. Login to your Harness account and select **Login via SAML**.
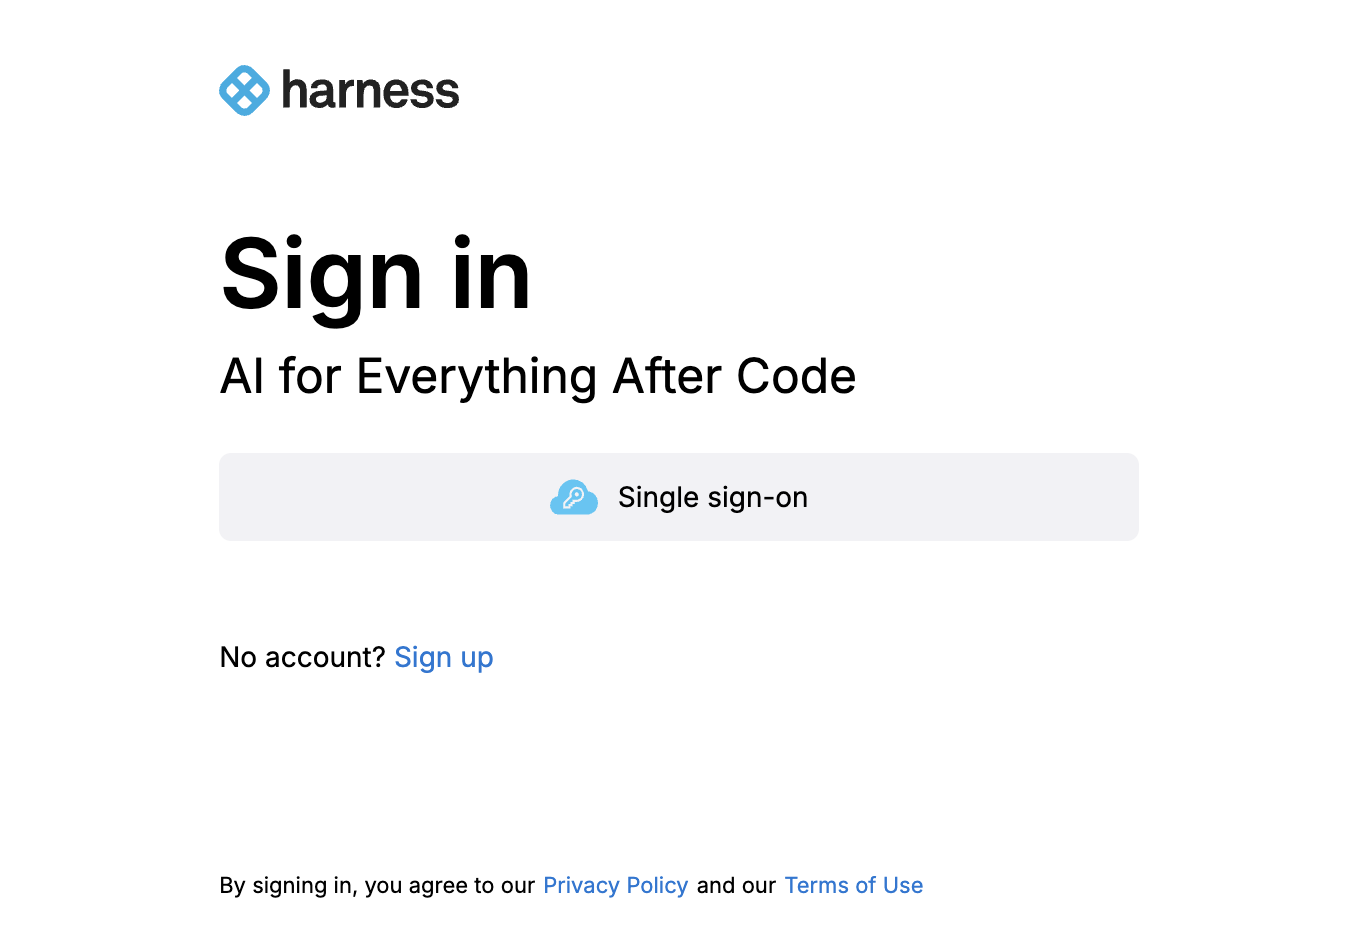
2. Choose your organization's SAML provider. When you click **Single sign-on**, you will be redirected to your selected provider's login page to complete authentication.
Click to view full size image
***
### Set up vanity URL
You can access `app.harness.io` using your own unique subdomain URL.
The subdomain URL is in the following format, with `{company}` being the name of your account:
`https://{company}.harness.io`
Contact [Harness Support](mailto:support@harness.io) to set up your account's subdomain URL. The subdomain URL cannot be changed later. Harness automatically detects your Account ID from the subdomain URL and redirects you to the account's login mechanism.
***
### Restrict email domains
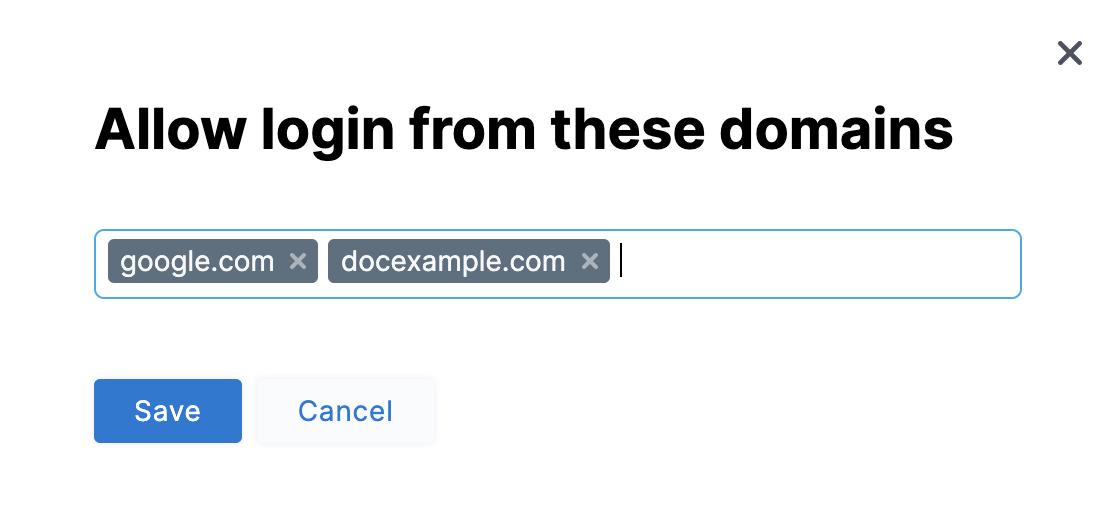
Select **Only allow users with the following email domains:** to allow (whitelist) only certain domains as usable in login credentials. In the dialog, enter your chosen domains into the **Domains** multi-select field.
Click to view full size image
Click **Save**. The success message **Domain restrictions have been updated successfully** appears at the top of the page, indicating that certain domains were added to the allowlist.
Click to view full size image
The allowlist filters logins to Harness via both SSO providers and username/passwords. To modify your domain selections, select the Edit icon.
Click to view full size image
***
### Allow public access to resources
You can use this feature to grant unauthenticated access to view Harness resources without requiring login. Once enabled, you can allow public access to your pipelines. For more information, go to [Allow public access to executions](/harness-ai/use-harness-platform/pipelines/executions-and-logs/allow-public-access-to-executions).
{% hint style="info" %}
* Currently, this feature is behind the feature flag `PL_ALLOW_TO_SET_PUBLIC_ACCESS`. Contact [Harness Support](mailto:support@harness.io) to enable the feature.
{% endhint %}
### Set inactive session timeout
Harness logs you out after a period of inactivity.
To configure your account's session inactivity timeout, follow the steps below:
1. In your Harness account, select **Account Settings** and select **Authentication**.
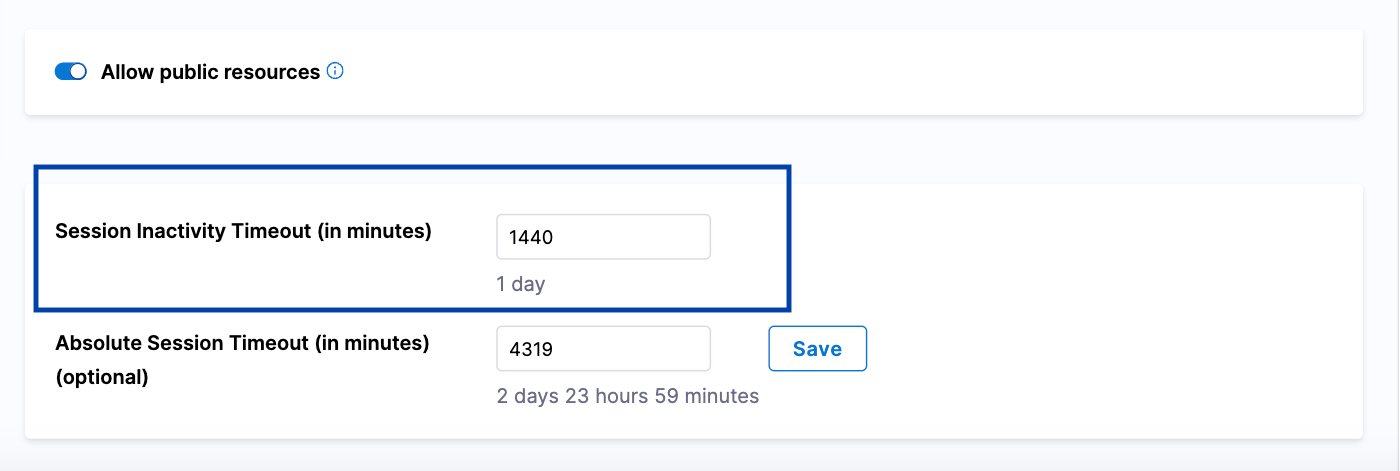
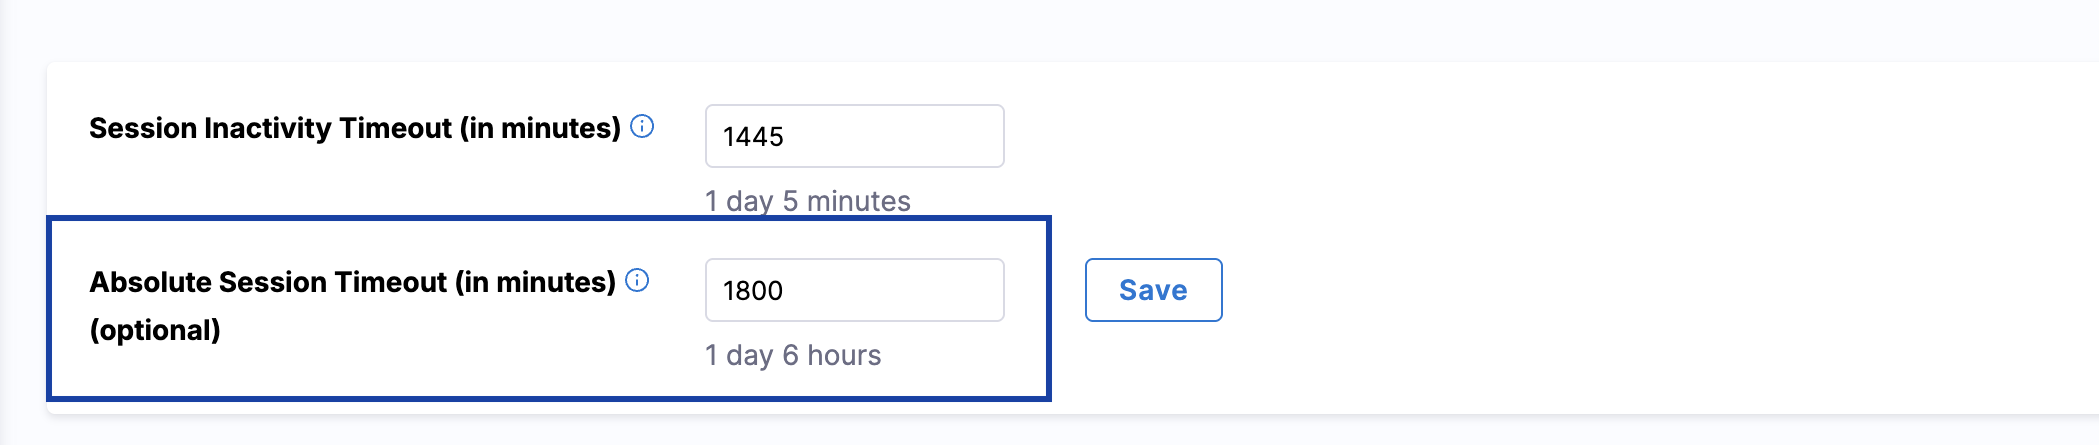
2. In **Session Inactivity Timeout (in minutes)**, enter the time in minutes to set the session inactivity timeout.
The default session inactivity timeout value is 1440 minutes (1 day).
You can set this to a minimum of 30 minutes and a maximum of 4320 minutes (3 days). The field automatically converts the minutes you enter to higher units of time and displays the result under the field. For example, if you enter 1440, the UI shows **1 day** below the field.
Click to view full size image
3. Click **Save**.
***
### Set absolute session timeout
When you set the **Absolute Session Timeout (in minutes)**, Harness logs you out after the configured timeout, regardless of any activity.
To configure your account's absolute session timeout, follow the steps below:
1. In your Harness account, select **Account Settings** and select **Authentication**.
2. In **Absolute Session Timeout (in minutes)**, enter the time in minutes to set the absolute session timeout.
The default absolute session timeout is 0, which means it is not set.
You can set this to a maximum of 4320 minutes (3 days). The field automatically converts the minutes you enter to higher units of time and displays the result under the field. For example, if you enter 1440, the UI shows **1 day** below the field.
Click to view full size image
3. Click **Save**.
{% hint style="info" %}
When both the session inactivity timeout and the absolute session timeout are set, whichever condition is met first takes precedence.
{% endhint %}
***
### Audit logs for authentication
Harness audit trails record login attempts across all supported authentication methods. These audit events help administrators monitor authentication activity and investigate both successful and failed login attempts. Audit logs are generated for the following methods:
* [LDAP](#ldap-authentication)
* [SAML](#saml-authentication)
* [Two-Factor Authentication (2FA)](#two-factor-authentication-2fa)
* [Password-based authentication](#usernamepassword-authentication)
Each audit entry shows **how the login was attempted**, whether it was successful or failed, and the reason for failure, if applicable. Audit logs are only created for users who exist in your Harness account and are associated with a valid email address. No audit log is generated for login attempts by users who do not exist in the account.
While successful login events are common, pay closer attention to unsuccessful attempts. You may encounter the following failure reasons in the audit trail or in the JSON output when audit streaming is enabled for your account.
#### LDAP authentication
Unsuccessful login attempts can occur for the following reasons:
* **Domain not whitelisted:** Your email domain is not permitted for the account.
* **LDAP not configured for the account:** LDAP authentication is not set up.
* **Invalid credentials:** The username or password provided is incorrect.
* **Unable to fetch LDAP configuration:** Harness could not retrieve LDAP settings due to an internal error.
* **LDAP not configured:** LDAP authentication is not configured for this account.
* **LDAP authentication error:** An unexpected error occurred during the LDAP authentication process.
**Example JSON:**
```json
{
"module": "CORE",
"resource": {
"type": "USER",
"identifier": "demouser@harness.io",
"labels": {
"resourceName": "Demo Test",
"userId": "68xLsmP7RzOJ_F3M_LBBHw"
}
},
"action": "UNSUCCESSFUL_LOGIN",
"auditEventData": {
"type": "UnsuccessfulLoginEventData",
"loginType": "LDAP",
"failureReason": "Invalid LDAP credentials"
}
}
```
#### SAML authentication
Unsuccessful login attempts can occur for the following reasons:
* **Domain not in allowlist:** Your email domain is not included in the account's allowed domain list.
* **Replay attack:** A previously used SAML login request was detected and blocked for security reasons.
**Example JSON:**
```json
{
"module": "CORE",
"resource": {
"type": "USER",
"identifier": "demouser@harness.io",
"labels": {
"resourceName": "Demo Test",
"userId": "jWF23r4XQjyRTLVsAS_mVw"
}
},
"action": "UNSUCCESSFUL_LOGIN",
"auditEventData": {
"type": "UnsuccessfulLoginEventData",
"loginType": "SAML",
"failureReason": "Domain not whitelisted"
}
}
```
#### Two-Factor Authentication (2FA)
Unsuccessful login attempts can occur for the following reasons:
* **Invalid two-factor configuration:** Two-factor authentication is not properly set up for your account.
* **Invalid TOTP token:** The one-time password provided is incorrect or has expired.
* **Two-factor authentication failed:** The security code could not be verified.
**Example JSON:**
```json
{
"module": "CORE",
"resource": {
"type": "USER",
"identifier": "demouser@harness.io",
"labels": {
"resourceName": "Demo Test",
"userId": "jWF23r4XQjyRTLVsAS_mVw"
}
},
"action": "UNSUCCESSFUL_LOGIN",
"auditEventData": {
"type": "UnsuccessfulLoginEventData",
"loginType": "TWOFA",
"failureReason": "Invalid TOTP token"
}
}
```
#### Username/password authentication
Failed login attempts using username/password occur when:
* Your credentials are incorrect.
* Your account is temporarily locked or deactivated, or your access has been revoked.
{% hint style="info" %}
The JSON response for username/password failures follows a different schema than the audit event entries above. This is an API error response.
{% endhint %}
**Example JSON:**
```json
{
"metaData": null,
"resource": null,
"responseMessages": [
{
"code": "INVALID_CREDENTIAL",
"level": "ERROR",
"message": "Invalid credentials: INVALID_CREDENTIAL"
}
]
}
```
***
### Next steps
* [RBAC in Harness](/harness-platform/3.0/harness-platform-resources/platform-access-control/rbac-in-harness) - learn how authorization and permissions work with authentication.
* [Single Sign-On with SAML](/harness-ai/use-harness-platform/authentication/single-sign-on-saml) - configure SAML-based SSO for your organization.
* [Two-factor authentication](/harness-ai/use-harness-platform/authentication/two-factor-authentication) - set up and enforce 2FA for your account.
{% @harness-feedback/feedback module="harness-ai" pagePath="harness-ai/use-harness-platform/authentication" %}
# Single sign-on with SAML
Overview of SAML-based single sign-on (SSO) in Harness, including key concepts, supported formats, and SCIM integration settings.
Harness supports Single Sign-On (SSO) with SAML by integrating with your SAML SSO provider to enable you to log your users into Harness as part of your SSO infrastructure. This section explains how to set up SAML authentication.
{% hint style="info" %}
**NOTE**
If you use [Harness Self-Managed Enterprise Edition](/self-managed-enterprise-edition/new-to-self-managed-enterprise-edition/smp-overview), your instance must be accessed via an HTTPS load balancer. SAML authentication will fail over HTTP.
{% endhint %}
***
### What you will learn in this topic
By the end of this topic, you will be able to understand:
* How Harness supports SAML-based single sign-on and how to enable it as the default authentication method.
* XML SAML file format requirements used with Harness.
* How to use the System for Cross-domain Identity Management (SCIM) protocol with Harness to keep user group memberships continuously up to date.
* Key integration components required to integrate SAML SSO.
***
### Before you begin
Before you begin working with SAML-based single sign-on (SSO) in Harness, ensure you have the following:
* **A Harness account with admin permissions:** Required to manage Authentication Settings. Go to Authentication overview for details.
* **A SAML identity provider (IdP):** Such as Okta, Microsoft Entra ID, OneLogin, or Keycloak, with admin access to configure a new application integration.
* **Matching user accounts:** Users must exist in both Harness and the SAML provider with the same email address before SSO can be enabled.
* **At least two user accounts for testing:** One Harness Administrator account to configure SSO and one regular user account to test the login flow.
***
### Supported formats
The XML SAML file used with Harness must use UTF-8.
UTF-8 BOM is not supported. Some text editors like Notepad++ save in UTF-8 BOM by default.
{% hint style="info" %}
**NOTE**
When integrating users through any SAML provider, users added to an external SAML provider are not automatically synchronized with Harness user groups. Synchronization occurs upon the first login by the user belonging to a specific provider's user group into Harness. Only at this point will the newly added user, having logged in through SAML, inherit all permissions and access rights associated with the Harness group linked to the SAML-provider's user group.
{% endhint %}
***
### Use System for Cross-domain Identity Management (SCIM) protocol
To ensure continuous and real-time synchronization of user group bindings and access controls, Harness recommends that you utilize the System for Cross-domain Identity Management (SCIM) protocol. SCIM enables real-time syncing of user additions with Harness user groups, ensuring that user permissions and access rights are consistently applied and maintained.
For implementation details on provisioning users with SCIM, go to Okta SCIM, Microsoft Entra SCIM, or OneLogin SCIM based on your SAML provider.
#### SCIM API integration settings
If you provision users and groups via SCIM API, use the following settings for your SAML integration.
* **SCIM connector base URL:** `https://app.harness.io/gateway/ng/api/scim/account/[YOUR_ACCOUNT_ID]`. enter the appropriate URL for your cluster:
The base URL format will follow the following base format: `https://app.harness.io/gateway/ng/api/scim/account/[YOUR_ACCOUNT_ID]`, (e.g `https://app.harness.io/gateway/ng/api/scim/account/9999aaaa9999AA`)
However, this will need to be modified depending on which cluster your account exists within. You can verify this by going to your Account Settings -> Account Details, in the Harness Cluster Field.
| Cluster | URL Format |
| ----------- | ----------------------------------------------------------------------------- |
| Prod1 | `https://app.harness.io/gateway/ng/api/scim/account/[YOUR_ACCOUNT_ID]` |
| Prod2 | `https://app.harness.io/gateway/gratis/ng/api/scim/account/[YOUR_ACCOUNT_ID]` |
| Prod3 | `https://app3.harness.io/gateway/ng/api/scim/account/[YOUR_ACCOUNT_ID]` |
| Prod0/Prod4 | `https://accounts.harness.io/gateway/ng/api/scim/account/[YOUR_ACCOUNT_ID]` |
| EU clusters | `https://accounts.eu.harness.io/ng/api/scim/account/[YOUR_ACCOUNT_ID]` |
Please note that if customers select the incorrect cluster, the changes will not show up within their environment, even if there is a successful response from Harness.
If you environment is On-Prem (SMP) the URL will use your custom domain name and omits `gateway`. For example, if your On-Prem domain name is `harness.mycompany.com`, then your SCIM base URL would become `https://harness.mycompany.com/ng/api/scim/account/[YOUR_ACCOUNT_ID]`.
* **Unique identifier:** `userName`
* **Authentication Mode:** HTTP Header
* **Authorization:** ``
You must also do the following:
* Enable provisioning to Harness.
* Assign your user groups.
* Push your groups to Harness.
***
### SAML SSO with Harness
To set up SAML SSO with Harness, you add a SAML SSO provider to your Harness account and enable it as the default authentication method.
The following elements are required to successfully connect Harness to your SAML provider:
* **Harness User email addresses:** Users are invited to Harness using their email addresses. Once they log into Harness, their email addresses are registered with Harness as Harness Users. To use SAML SSO, Harness Users must use the same email addresses to register in Harness and the SAML provider.
{% hint style="info" %}
**NOTE**
Ensure that you have at least two corresponding user accounts when setting up and testing SAML SSO in Harness. This allows you to set up the account with a Harness Administrator account and test it with a Harness user account.
{% endhint %}
* **SAML provider user email addresses:** To use the SAML provider to verify Harness Users, the email addresses used in the SAML provider must match the email addresses for the registered Harness Users you want to verify.
* **Harness SAML Endpoint URL:** This URL is where the SAML provider will post the SAML authentication response to your Harness account. This URL is provided by Harness in the **Single Sign-On (SSO) Provider** dialog. You enter this URL in your SAML SSO provider app to integrate it with Harness.
* **SAML metadata file:** This file is provided by your SAML provider app. You upload this file into the Harness **Single Sign-On (SSO) Provider** dialog to integrate the app with Harness.
***
### Just-In-Time (JIT) provisioning
Harness supports SAML configuration with or without JIT user provisioning. JIT provisioning automatically creates user accounts in Harness on first successful SAML login, eliminating the need to manually invite users before they can log in.
Go to [Just-In-Time (JIT) provisioning](/harness-platform/3.0/harness-platform-resources/platform-access-control/provision-use-jit) to understand how Harness creates users on first SAML login when JIT is enabled.
**Without JIT**, follow the steps below to add new users:
1. In Harness, add the users you want to set up for SAML SSO by inviting them to Harness using the same email addresses that they use in your SAML provider.
2. In the SAML provider (such as Okta, Microsoft Entra ID, OneLogin, and so on), add the users and make sure they are in scope for the client you create in the configuration steps below.
**With JIT**, when you add users to different SAML providers (such as Okta, Microsoft Entra ID, OneLogin, and so on), they are automatically added to Harness on first successful SAML login.
***
### Next steps
* SAML SSO with Microsoft Entra ID - Configure Microsoft Entra ID as a SAML SSO provider in Harness.
* SAML SSO with Okta - Create an SAML integration in Okta for Harness.
* [SAML SSO with Okta (OIN app)](/harness-ai/use-harness-platform/authentication/single-sign-on-saml/okta-oin-app) - Add the Harness app from the Okta Integration Network catalog instead of creating a custom SAML app.
* SAML SSO with Keycloak - Configure Harness to use Keycloak SAML client as an SSO provider.
* SAML SSO with OneLogin - Configure OneLogin as a SAML SSO provider in Harness.
{% @harness-feedback/feedback module="harness-ai" pagePath="harness-ai/use-harness-platform/authentication/single-sign-on-saml" %}
# Okta
Use Okta as a SAML SSO provider to let your users log into Harness with their Okta credentials.
Okta acts as a SAML identity provider (IdP) for Harness, so your users authenticate with their existing Okta credentials. This page walks you through creating an Okta app integration, exchanging the SAML metadata with Harness, and enabling group-based authorization so Okta group members map automatically to Harness user groups.
When a user attempts to log in to Harness, Harness redirects them to Okta for authentication. After successful authentication, Okta sends a signed SAML assertion containing user attributes back to Harness, which validates it and grants access. Optionally, Okta includes group membership information in the SAML assertion through group attribute statements, so Harness assigns users to corresponding Harness user groups for role-based access control (RBAC).
{% hint style="info" %}
Adding the Harness app from the Okta Integration Network (OIN) instead? Okta (OIN app) covers the catalog install path, where the SAML endpoints, audience URI, and signing settings are pre-configured and you supply only the ACS URL. This page covers building the SAML 2.0 app manually.
{% endhint %}
***
### What you will learn in this topic
By the end of this topic, you will be able to:
* [Create a SAML app integration in Okta](#step-2-create-app-integration-in-okta) for Harness.
* [Configure Harness to use Okta](#step-3-okta-saml-metadata-file) as a SAML SSO provider.
* [Enable and test](#step-4-enable-sso-with-okta) SSO Okta login.
* Set up [SAML authorization](#step-5-saml-authorization-with-okta) using Okta.
* Use [Just-in-Time (JIT) provisioning](#just-in-time-jit-provisioning) to automatically create users on first login.
***
### Before you begin
Before you configure Okta as the SAML identity provider for Harness, ensure you have the following:
* **Harness account access**: A Harness account with Account Admin permissions.
* **Okta account access**: An Okta account with admin access.
* **Provisioned Okta users**: Users already provisioned in Okta, with the same email addresses they use in Harness.
***
### Set up your workspace
Prepare both applications before you configure SAML so you can copy values between them without losing your place. Use two browser windows or tabs for this process: open Okta in one tab and Harness in the other.
In your Harness tab, [add a SAML provider](/harness-platform/3.0/harness-platform-resources/authentication/authentication-overview#enable-multiple-identity-providers).
{% hint style="info" %}
If you use [Harness Self-Managed Enterprise Edition](/self-managed-enterprise-edition/new-to-self-managed-enterprise-edition/smp-overview), your instance must be accessed through an HTTPS load balancer, otherwise SAML authentication fails over HTTP.
* Users are not created as part of the SAML SSO integration. Okta user accounts must exist before you exchange information between your Okta account and Harness.
* Users are invited to Harness using their email addresses. After they log into Harness, their email addresses are registered as Harness users. For more information on user registration, see [Single sign-on with SAML](/harness-ai/use-harness-platform/authentication).
{% endhint %}
***
### Step 1: Set up user accounts in Okta and Harness
To set up SAML support in your Okta Harness app, ensure that the app has corresponding users in Harness:
1. In Harness, add the users you want to set up for SAML SSO by inviting them to Harness using the same email addresses that they use in your SAML provider.
2. In Okta, assign those users to your Harness SAML app. Do this after you create the app in [Step 2](#step-2-create-app-integration-in-okta):
1. Open the Harness app and select the **Assignments** tab.
2. Click **Assign**, and then select **Assign to People** or **Assign to Groups**.
3. Find the user or group that needs access to Harness, and then click **Assign**. For a group, no further fields appear and the assignment is complete.
4. For a person, confirm the **Username**. It defaults to the user's Okta email address, which must match the email address of the corresponding Harness user. Click **Save and Go Back**.
5. Repeat for each user or group you want to assign, and then click **Done**.
{% hint style="info" %}
* The only user property that must match between a Harness user and its corresponding SAML provider user account is its **email address**.
* Sometimes users have mixed case email addresses in Okta. In these situations, Harness converts the email address to lowercase when adding them to Harness.
{% endhint %}
***
### Step 2: Create app integration in Okta
Create the SAML app integration in Okta to establish the trust between Okta and Harness.
1. Sign in to your Okta administrator account, and select **Applications and Resources** > **Applications**.
2. Click **Create App Integration**.
Click to view full size image
The **Create a new app integration** dialog opens.
3. Select **SAML 2.0**, and then click **Next**.
Click to view full size image
4. In **General Settings**, enter a name in the **Application label** field, and then click **Next**.
Click to view full size image
5. On the **Configure SAML** tab, enter the Harness SAML endpoint URL in the **Single sign on URL** field. To get the SAML endpoint URL from Harness:
1. If you are not already on the **Add SAML Provider** panel in Harness, open a new browser tab and navigate there. Sign in to Harness, navigate to **Account Settings**, select **Authentication**, and select **SAML Provider**. Enter a **Name** for the SAML configuration, and then under **Select a SAML Provider** select **Okta**. The panel expands to show the rest of the configuration.
Click to view full size image
2. Copy the endpoint URL from **Enter this SAML Endpoint URL as your Harness application's ACS URL**. This is the URL you paste in the **Single sign on URL** field in Okta.
Click to view full size image
3. Leave the **Add SAML Provider** panel open, and do not click **Add** yet. You return to this panel in [Step 3](#step-3-okta-saml-metadata-file) to upload the Okta metadata and submit the configuration.
The Add SAML Provider panel starts collapsed. It shows only a Name field and the provider tiles, offering Azure, Okta, OneLogin, and Other. Selecting a provider expands the panel to show the SAML endpoint URL, the metadata upload control, and the authorization options, and the tile you chose then shows a checkmark and a Change link, so you can switch providers without starting over. The Add button at the bottom of the panel submits the whole configuration, so leave it until last.
6. In **Audience URI (SP Entity ID)**, enter `app.harness.io`. The SAML application identifier is always `app.harness.io`.
7. In **Default RelayState**, leave the field blank. Harness uses this to exchange additional information between the IdP SAML provider (Okta) and the Service Provider (Harness), by sending Custom RelayState information.
8. In **Name ID format**, enter the username format you are sending in the SAML Response. The default format is **Unspecified**.
9. In **Application username**, enter the default username.
10. Click **Next**, and then click **Finish**.
11. Navigate to the **Sign On** tab, and in the **Settings** card, click **Edit**.
Click to view full size image
12. Expand **Attributes (Optional)**. Under **Attribute Statements (optional)**, enter a name in the **Name** field, select **Name format** as **Basic**, and select the **Value** as **user.email**. To add more attribute statements, click **Add Another**.
The **Attributes (Optional)** section is collapsed by default, and **Name format** defaults to **Unspecified**.
When you create a new SAML integration or modify an existing one, you can define custom attribute statements. These statements are inserted into the SAML assertions shared with your app. For more information on custom attribute statements, see the Okta documentation on [defining attribute statements](https://help.okta.com/oie/en-us/content/topics/apps/define-attribute-statements.htm).
Click to view full size image
13\. Under **Group Attribute Statements (optional)**, enter a name in the **Name** field, select **Name format** as **Basic**, change the **Filter** from its **Starts with** default to an appropriate filter, and enter its value.
If your Okta org uses groups to categorize users, you can add group attribute statements to the SAML assertion shared with your app. For more information on group attribute statements, see the Okta documentation on [defining group attribute statements](https://help.okta.com/oie/en-us/content/topics/apps/define-group-attribute-statements.htm).
14. Click **Save**.
{% hint style="info" %}
Below the attribute statements is **Disable Force Authentication**, which is selected by default and means Okta never prompts the user to re-authenticate. Clear it if your organization requires users to re-authenticate with Okta each time they start a Harness session.
{% endhint %}
***
### Step 3: Okta SAML metadata file
Download the **Identity Provider metadata** XML from your Okta app and upload it into the expanded **Add SAML Provider** panel to complete the trust exchange.
1. In your Harness Okta app, navigate to the **Sign On** tab, and then click **Edit**.
Click to view full size image
2. Click **Copy** to copy that data into a file, and save it with an `.xml` extension.
Click to view full size image
3. In Harness, on the **Add SAML Provider** panel, in **Upload the Identity Provider metadata XML downloaded from your app**, click **Choose a file** or **Upload**, and select the SAML metadata file you downloaded from your Okta app.
Click to view full size image
4. Optionally, enter a **Logout URL**.
5. Leave **Enable Authorization** cleared. It is cleared by default, and selecting it reveals a **Group Attribute Name** field beneath the checkbox. Authorization depends on the group attribute statement you configured in [Step 2](#step-2-create-app-integration-in-okta) and on a Harness user group linked to an Okta group, so you enable it in [Step 5](#step-5-saml-authorization-with-okta) once SSO is working.
6. The default entity ID is `app.harness.io`. To use a different one, select **Add Entity Id** and enter your custom entity ID.
7. To have Harness create a user account automatically the first time someone signs in through Okta, select **Enable JIT Provisioning**. For more information, see [Just-in-time (JIT) provisioning](#just-in-time-jit-provisioning).
8. Click **Add** to save the SAML provider configuration.
{% hint style="info" %}
**Enable Authorization**, **Add Entity Id**, and **Enable JIT Provisioning** are grouped together in a box at the bottom of the panel, below **Logout URL**, and all three are cleared by default. If you have already configured the group attribute statement and linked a Harness user group, you can select **Enable Authorization** and enter the **Group Attribute Name** here instead of returning in [Step 5](#step-5-saml-authorization-with-okta). This page enables it later so that you confirm SSO works before authorization is in play.
{% endhint %}
{% hint style="info" %}
The **Add SAML Provider** panel also offers **Encryption Certificate for SAML assertions - Download**. Download this certificate if you want Okta to encrypt the SAML assertions it sends to Harness.
{% endhint %}
Your Okta configuration appears under **Login via SAML**.
Click to view full size image
***
### Step 4: Enable SSO with Okta
Now that Okta is set up in Harness as a SAML SSO provider, enable and test it.
1. In Harness, navigate to **Account Settings**, and then select **Authentication**.
2. Select **Login via SAML**.
3. On the **Enable SAML Provider** confirmation window, click **Test** to verify the connection.
Click to view full size image
A new browser tab opens where you log in to **Okta**.
If the connection test succeeds, Harness displays a **SAML test successful** banner.
4. Click **Confirm** to enable Okta SAML SSO in Harness.
{% hint style="info" %}
Keep at least two accounts available while you set this up: a Harness Administrator account to configure and, if needed, roll back SSO, and an ordinary Harness user account to test with. That way a failed test never locks you out.
{% endhint %}
#### Test SSO configuration
To test the SSO configuration, log into Harness through a different user account. Do this in a separate private browsing (Incognito) window so you can disable SSO in your Harness Administrator account if there are any errors.
If you get locked out of Harness due to an SSO issue, you can log into Harness through local login.
1. In a private browsing window, navigate to Harness.
2. Log in using a Harness user account that has a corresponding email address registered in Okta. If successful, Harness redirects you to the Okta log in page.
3. On the Okta log in page, enter the email address associated with the Harness user account. The Harness account and Okta account can have different passwords. If successful, you are returned to Harness.
If you belong to multiple accounts, confirm the default account is set before attempting to use Harness Local Login.
***
### Step 5: SAML authorization with Okta
Once you have enabled Harness SSO with your Okta app, set up and enable Okta SAML authorization in Harness.
To set up SAML authorization in Harness, link a Harness user group to an Okta user group. When an Okta user in that Okta user group logs in to Harness, Harness adds them automatically to the associated Harness user group, and the user inherits all permissions and access assigned to that group. For more information on permissions, see [RBAC in Harness](/harness-platform/3.0/harness-platform-resources/platform-access-control/rbac-in-harness).
1. Set up SAML SSO in Harness as described in [Set up user accounts in Okta and Harness](#step-1-set-up-user-accounts-in-okta-and-harness).
When you enable SAML authorization, Harness authorizes the same Harness users that are authenticated using your SAML provider.
Harness uses email addresses to match Harness user accounts with Okta user accounts. Make sure the email addresses of your registered Harness users match the Okta users you want to authenticate and authorize.
2. In Okta, create a user group and add users to the group, if you do not already have one.
a. Sign in to Okta using an admin account. b. Under **Directory**, select **Groups**, and then click **Add Group**.
Click to view full size image
The **Add Group** dialog opens.
c. Enter a **Name** and **Group Description** for your group. Click **Save**.
Click to view full size image
d. Okta redirects you to the **Groups** page. Search for the group you created, and then select it. e. Click **Assign People**. Find and add members to your group. Click **Done**.
Click to view full size image
3. Make note of the Okta group name. You need it later to link the Okta group to a Harness user group.
4. Make sure the Okta user group is assigned to the same Okta SAML provider app you use for Harness SAML SSO.
1. In Okta, under **Directory**, select **Groups**.
2. Find and select your Okta user group.
3. Click **Assign applications**. Find your Harness Okta app and click **Assign**.
4. Click **Done**.
5. Under **Applications and Resources**, select **Applications**.
6. Find and select your Harness Okta app.
7. On the **Assignments** tab, select **Groups**, and make sure your Okta user group is listed there.
5. Configure the group attribute statements in your Okta app. Later, you use the name configured under **Group Attribute Statements (optional)** to enable SAML authorization in Harness.
a. In Okta, under **Applications and Resources**, select **Applications**, and then select your Harness Okta SAML SSO app.
b. On the **Sign On** tab, click **Edit** in the **Settings** card, and then expand **Attributes (Optional)**. For details, see steps 11 to 14 in [create app integration](#step-2-create-app-integration-in-okta).
c. Under **Group Attribute Statements (optional)**, ensure that the **Filter** is set to **Matches regex** and is set to the **.**\* value. Click **Save**.
Click to view full size image
The `Group Attribute Name` is different from an `Okta Group Name`. Your company might have many groups set up in Okta, and the Group Attribute Name filters the groups that you want to authenticate to Harness.
6. In Harness, navigate to **Account Settings**, and select **Authentication**.
7. Select the arrow to expand the **Login via SAML** section.
Click to view full size image
8. Select **More options** (⋮) next to your Okta provider configuration, and then select **Edit**.
Click to view full size image
9. On the **Edit SAML Provider** page, select **Enable Authorization**. A **Group Attribute Name** field appears beneath the checkbox.
10. Enter the **Group Attribute Name**.
Click to view full size image
11. Click **Add**. Your Okta configuration now uses the Group Attribute Name for authorization.
12. Link your Okta user group to a corresponding Harness user group. You can create a user group or use an existing group if your Harness user account is a member and your user account is registered under the same email address as in Okta.
1. In Harness, navigate to **Account Settings**, and select **Access Control**.
2. Select **User Groups** in the header, and locate the user group that you want to connect to your Okta user group.
3. Select **Link to SSO Provider Group**.
Click to view full size image
4. In **Search SSO Settings**, select your Okta SAML SSO configuration.
5. Enter the Okta **Group Name**, and click **Save**.
Click to view full size image
6. Repeat these steps if you need to connect more user groups.
#### Test SAML authorization
To test the SAML authorization configuration, log into Harness through a different user account.
1. Follow the steps mentioned in [test configuration](#test-sso-configuration).
2. In your other browser window (where you are logged in to your admin account), make sure the user appears in the Harness user group. Navigate to **Account Settings**, select **Access Control**, select **User Groups** in the header, select the user group you linked to Okta, and make sure the user you just logged in with is listed as a member.
By being a member of this user group, the user receives the permissions and access granted to that group. For more information on group permissions, see [RBAC in Harness](/harness-platform/3.0/harness-platform-resources/platform-access-control/rbac-in-harness).
***
### Just-in-time (JIT) provisioning
Harness supports SAML configuration [with or without JIT user provisioning](/harness-ai/use-harness-platform/authentication#just-in-time-jit-provisioning). To turn it on, select **Enable JIT Provisioning** on the **Add SAML Provider** panel in [Step 3](#step-3-okta-saml-metadata-file). For more information on how Harness creates users on first SAML login when JIT is enabled, see [Just-in-Time (JIT) user provisioning](/harness-platform/3.0/harness-platform-resources/platform-access-control/provision-use-jit).
***
### Delink groups
If you no longer want a Harness user group to be connected with an Okta user group, delink the groups without losing group members.
Delinking groups is required to remove a SAML SSO provider configuration from Harness. You cannot delete the SAML SSO provider from Harness until you have delinked all associated Harness user groups.
1. In Harness, navigate to **Account Settings**, and select **Access Control**.
2. Select **User Groups** in the header, and locate the user group that you want to delink.
3. Select **Delink Group**.
Click to view full size image
4. On the **Delink Group** window, select **Retain all members in the user group** to keep the users (as local Harness user accounts) in the Harness user group. If unselected, the groups are delinked and the group members who were authenticated through Okta are removed from the Harness user group.
Click to view full size image
5. Click **Save**.
***
### Troubleshooting SAML assertion validation failed when signing in to Harness with Okta
Ensure the SAML Endpoint URL from Harness is entered in the Single sign-on URL field in Okta. Verify the Audience URI (SP Entity ID) is set to app.harness.io. Confirm users or groups are assigned to the Harness application on the Assignments tab.
The user signs in to Okta but is not recognized as a Harness user
On the Assignments tab of your Harness Okta app, check the Username set for that user. It must match the email address the user is registered with in Harness. Harness converts mixed case email addresses to lowercase when adding users.
Users sign in but are not added to their Harness user groups
On the Sign On tab of your Harness Okta app, click Edit in the Settings card and expand Attributes (Optional). This section is collapsed by default and is easy to miss, so confirm a group attribute statement exists, that its Filter is set to Matches regex rather than the default Starts with, and that the name matches the Group Attribute Name entered in Harness. Then confirm Enable Authorization is selected on the Edit SAML Provider page in Harness, because it is cleared by default, and that the Group Attribute Name field beneath it is filled in.
***
### Related articles
* Okta (OIN app): Add the Harness app from the Okta Integration Network catalog instead of creating a custom SAML app.
* SAML SSO with Microsoft Entra ID: Configure Microsoft Entra ID as a SAML SSO provider in Harness.
* SAML SSO with OneLogin: Configure OneLogin as a SAML SSO provider in Harness.
* SAML SSO with Keycloak: Configure Harness to use Keycloak SAML client as an SSO provider.
* Advanced SAML configuration: Configure advanced SAML options in Harness.
{% @harness-feedback/feedback module="harness-ai" pagePath="harness-ai/use-harness-platform/authentication/single-sign-on-saml/okta" %}
# Okta (OIN app)
Use the Harness app integration from the Okta Integration Network (OIN) to let your users log in to Harness with their Okta credentials.
Because the Harness integration is published in the OIN, you add it directly from the Okta app catalog instead of building a custom SAML app. The SAML endpoints, audience URI, and signing settings are pre-configured, so the only value you supply is the ACS URL from your Harness account.
Okta acts as a SAML identity provider (IdP) for Harness. When a user attempts to log in to Harness, Harness redirects them to Okta for authentication. After successful authentication, Okta sends a signed SAML assertion containing user attributes back to Harness, which validates it and grants access. Optionally, Okta includes group membership information in the SAML assertion through group attribute statements, so Harness assigns users to corresponding Harness user groups for role-based access control (RBAC).
{% hint style="info" %}
Looking for the custom SAML app setup instead? [Okta (custom SAML app)](/harness-ai/use-harness-platform/authentication/single-sign-on-saml/okta) explains how to create and configure a SAML 2.0 app integration manually. Keep whichever path matches how your Okta org adds the Harness app.
{% endhint %}
***
### What you will learn in this topic
By the end of this topic, you will be able to:
* [Add the Harness OIN app integration in Okta](#step-3-add-the-harness-oin-app-in-okta).
* [Add the Harness ACS URL to the app](#step-4-add-the-acs-url-to-the-app).
* [Assign Okta users and groups](#step-5-assign-users-and-groups-to-the-app) to the Harness app.
* [Configure SAML attribute statements](#step-6-configure-attribute-statements).
* [Configure Harness to use Okta](#step-7-add-the-okta-saml-metadata-to-harness) as a SAML SSO provider.
* [Enable and test](#step-8-enable-and-test-sso-with-okta) Okta SSO login.
* Set up [SAML authorization](#step-9-saml-authorization-with-okta) using Okta groups.
***
### Before you begin
Before you configure the Harness OIN app as the SAML identity provider for Harness, ensure you have the following:
* **Harness account access**: A Harness account with Account Admin permissions.
* **Okta account access**: An Okta account with admin access.
* **Provisioned Okta users**: Users already provisioned in Okta, with the same email addresses they use in Harness.
{% hint style="info" %}
If you use [Harness Self-Managed Enterprise Edition](/self-managed-enterprise-edition/new-to-self-managed-enterprise-edition/smp-overview), your instance must be accessed through an HTTPS load balancer, otherwise SAML authentication fails over HTTP.
* Users are not created as part of the SAML SSO integration. Okta user accounts must exist before you exchange information between your Okta account and Harness.
* Users are invited to Harness using their email addresses. After they log into Harness, their email addresses are registered as Harness users.
{% endhint %}
***
### Set up your workspace
Prepare both applications before you configure SAML so you can copy values between them without losing your place. Use two browser windows or tabs for this process: open Okta in one tab and Harness in the other.
***
### Step 1: Set up user accounts in Okta and Harness
To set up SAML support in the Harness OIN app, ensure that the app has corresponding users in Harness:
1. In Harness, add the users you want to set up for SAML SSO by inviting them to Harness using the same email addresses that they use in Okta.
2. In Okta, assign them to the Harness app integration. You do this in [Step 5](#step-5-assign-users-and-groups-to-the-app), after the app is added.
{% hint style="info" %}
* The only user property that must match between a Harness user and its corresponding Okta user account is its **email address**.
* Sometimes users have mixed case email addresses in Okta. In these situations, Harness converts the email address to lowercase when adding them to Harness.
{% endhint %}
***
### Step 2: Copy the SAML endpoint (ACS) URL from Harness
The Harness SAML endpoint URL is the only value you enter manually in the OIN app, so copy it first.
The **Add SAML Provider** panel starts collapsed. It shows only a name field and the provider tiles until you select a provider, and then it expands to show the SAML endpoint URL, the metadata upload control, and the authorization options.
1. In Harness, navigate to **Account Settings**, and then select **Authentication**.
2. Select **SAML Provider**, and then select **Add SAML Provider**. The **Add SAML Provider** panel opens with a **Name** field and the **Select a SAML Provider** tiles.
3. Enter a **Name** for the SAML configuration, and then under **Select a SAML Provider** select **Okta**. The panel expands to show the rest of the configuration.
Click to view full size image
4. Copy the endpoint URL from **Enter this SAML Endpoint URL as your Harness application's ACS URL**. Use the copy icon at the end of the field.
5. Leave the **Add SAML Provider** panel open, and do not click **Add** yet. You return to this panel in [Step 7](#step-7-add-the-okta-saml-metadata-to-harness) to upload the Okta metadata and submit the configuration.
{% hint style="info" %}
**Select a SAML Provider** offers **Azure**, **Okta**, **OneLogin**, and **Other**. Once you select a tile, it shows a checkmark and a **Change** link, so you can switch providers without starting over. The **Add** button at the bottom of the panel submits the whole configuration, so leave it until last.
{% endhint %}
***
### Step 3: Add the Harness OIN app in Okta
Add the Harness integration from the Okta app catalog and give it a label. You add the ACS URL separately in [Step 4](#step-4-add-the-acs-url-to-the-app).
1. Sign in to your Okta administrator account, and select **Applications and Resources** > **Applications**.
2. Click **Browse App Catalog**. The **Browse App Integration Catalog** page opens.
Click to view full size image
3. In the catalog search field, enter `harness`, and then select **Harness** from the results. The integration is tagged **SAML** and **SCIM**.
4. Click **Add Integration**.
Click to view full size image
5. On the **General Settings** tab, specify the following:
* **Application label**: Enter a name for the app, for example `Harness`. This label displays under the app on the Okta dashboard.
* **Application Visibility**: Optionally select **Do not display application icon to users**.
6. Click **Done**. Okta creates the Harness app instance in your org and opens the app, where the **General**, **Sign On**, **Provisioning**, **Import**, **Assignments**, and **Push Groups** tabs are available.
{% hint style="info" %}
Because the Harness integration comes from the OIN, the SAML endpoints, **Audience URI (SP Entity ID)** (`app.harness.io`), **Name ID format** (`Unspecified`), and signing settings are pre-configured. The ACS URL is the only SAML value you enter, and it is not on the **General Settings** tab. You add it in [Step 4](#step-4-add-the-acs-url-to-the-app).
{% endhint %}
{% hint style="info" %}
The Harness integration also supports SCIM provisioning, which you configure on the **Provisioning** tab of the app. SCIM provisioning is separate from SAML SSO and is not covered on this page.
{% endhint %}
***
### Step 4: Add the ACS URL to the app
The **ACS URL** field is not on the **General Settings** tab. Add it in the advanced sign-on settings of the app.
1. In Okta, open the Harness app and select the **Sign On** tab.
2. In the **Settings** card, click **Edit**.
3. Scroll to **Advanced Sign-on Settings**, and in **ACS URL**, paste the Harness SAML endpoint URL you copied in [Step 2](#step-2-copy-the-saml-endpoint-acs-url-from-harness).
4. Click **Save**.
{% hint style="info" %}
The attribute statements in [Step 6](#step-6-configure-attribute-statements) are on this same edit screen, so you can set the ACS URL and the attribute statements together and save once.
{% endhint %}
{% hint style="info" %}
**Advanced Sign-on Settings** also contains **Credentials Details**, where **Application username format** is set to **Okta username**. That setting is what supplies the default **Username** value when you assign people in [Step 5](#step-5-assign-users-and-groups-to-the-app). Password reveal is unavailable because the app uses SAML with no password.
{% endhint %}
***
### Step 5: Assign users and groups to the app
Only assigned users and groups can authenticate to Harness through the app.
1. In Okta, open the Harness app and select the **Assignments** tab.
2. Click **Assign**, and then select **Assign to People** or **Assign to Groups**.
3. Find the user or group that needs access to Harness, and then click **Assign**.
* For a group, no further fields appear. The group is assigned as soon as you click **Assign**.
* For a person, confirm the **Username**. It defaults to the user's Okta email address, which must match the email address of the corresponding Harness user. Click **Save and Go Back**.
4. Repeat for each user or group you want to assign. The **Assign** action changes to **Assigned** for each one.
5. Click **Done**.
{% hint style="info" %}
When you assign people, if the **Username** does not match the email address the user is registered with in Harness, SSO succeeds in Okta but the user is not matched to their Harness account.
{% endhint %}
***
### Step 6: Configure attribute statements
Attribute statements tell Okta which user and group values to include in the SAML assertion sent to Harness. They live in a collapsed **Attributes (Optional)** section on the same edit screen as the ACS URL.
1. In Okta, open the Harness app and select the **Sign On** tab.
2. In the **Settings** card, click **Edit**.
3. Expand **Attributes (Optional)**.
4. Under **Attribute Statements (optional)**, enter a **Name**, for example `email`, set **Name format** to `Basic`, and select the **Value** as `user.email`. To add more attribute statements, click **Add Another**.
5. Under **Group Attribute Statements (optional)**, enter a **Name**, for example `groups`, set **Name format** to `Basic`, set **Filter** to `Matches regex`, and enter `.*` as the filter value.
6. Click **Save**.
{% hint style="info" %}
Both sections default **Name format** to `Unspecified`, and **Group Attribute Statements (optional)** defaults **Filter** to `Starts with`. Set these explicitly rather than accepting the defaults.
{% endhint %}
{% hint style="info" %}
Below the attribute statements is **Disable Force Authentication**, which is selected by default and means Okta never prompts the user to re-authenticate. Clear it if your organization requires users to re-authenticate with Okta each time they start a Harness session.
{% endhint %}
Make a note of the group attribute name. This is the **Group Attribute Name** you use to enable SAML authorization in [Step 9](#step-9-saml-authorization-with-okta).
{% hint style="info" %}
The `Group Attribute Name` is different from an `Okta Group Name`. Your company might have many groups set up in Okta, and the Group Attribute Name filters the groups that you want to authenticate to Harness.
{% endhint %}
For more information on custom attribute statements, see the Okta documentation on [defining attribute statements](https://help.okta.com/oie/en-us/content/topics/apps/define-attribute-statements.htm) and [defining group attribute statements](https://help.okta.com/oie/en-us/content/topics/apps/define-group-attribute-statements.htm).
***
### Step 7: Add the Okta SAML metadata to Harness
Download the **Identity Provider metadata** XML from the Harness app in Okta and upload it into the expanded **Add SAML Provider** panel to complete the trust exchange.
1. In the Harness app in Okta, navigate to the **Sign On** tab and locate the SAML signing certificate and metadata details.
2. Copy the Identity Provider metadata into a file, and save it with an `.xml` extension.
3. In Harness, on the **Add SAML Provider** panel, in **Upload the Identity Provider metadata XML downloaded from your app**, click **Choose a file** or **Upload**, and select the metadata file.
Click to view full size image
4. Optionally, enter a **Logout URL**.
5. Leave **Enable Authorization** cleared. It is cleared by default, and selecting it reveals a **Group Attribute Name** field beneath the checkbox. Authorization depends on the group attribute statement from [Step 6](#step-6-configure-attribute-statements) and on a Harness user group linked to an Okta group, so you enable it in [Step 9](#step-9-saml-authorization-with-okta) once SSO is working.
6. The default entity ID is `app.harness.io`. To use a different one, select **Add Entity Id** and enter your custom entity ID.
7. To have Harness create a user account automatically the first time someone signs in through Okta, select **Enable JIT Provisioning**. For more information, see [Just-in-time (JIT) provisioning](#just-in-time-jit-provisioning).
8. Click **Add** to save the SAML provider configuration.
{% hint style="info" %}
**Enable Authorization**, **Add Entity Id**, and **Enable JIT Provisioning** are grouped together in a box at the bottom of the panel, below **Logout URL**, and all three are cleared by default. If you have already configured the group attribute statement and linked a Harness user group, you can select **Enable Authorization** and enter the **Group Attribute Name** here instead of returning in [Step 9](#step-9-saml-authorization-with-okta). This page enables it later so that you confirm SSO works before authorization is in play.
{% endhint %}
{% hint style="info" %}
The **Add SAML Provider** panel also offers **Encryption Certificate for SAML assertions - Download**. Download this certificate if you want Okta to encrypt the SAML assertions it sends to Harness.
{% endhint %}
Your Okta configuration appears under **Login via SAML**.
Click to view full size image
***
### Step 8: Enable and test SSO with Okta
Now that the Harness OIN app is set up in Harness as a SAML SSO provider, enable and test it.
1. In Harness, navigate to **Account Settings**, and then select **Authentication**.
2. Select **Login via SAML**.
3. On the **Enable SAML Provider** confirmation window, click **Test** to verify the connection. A new browser tab opens where you log in to Okta. If the connection test succeeds, Harness displays a **SAML test successful** banner.
Click to view full size image
4. Click **Confirm** to enable Okta SAML SSO in Harness.
{% hint style="info" %}
Keep at least two accounts available while you set this up: a Harness Administrator account to configure and, if needed, roll back SSO, and an ordinary Harness user account to test with. That way a failed test never locks you out.
{% endhint %}
#### Test SSO configuration
To test the SSO configuration, log into Harness through a different user account. Do this in a separate private browsing (Incognito) window so you can disable SSO in your Harness Administrator account if there are any errors.
If you get locked out of Harness due to an SSO issue, you can log into Harness through [local login](/harness-ai/use-harness-platform/authentication/single-sign-on-saml/advanced-saml-configuration#harness-local-login).
1. In a private browsing window, navigate to Harness.
2. Log in using a Harness user account that has a corresponding email address registered in Okta. If successful, Harness redirects you to the Okta login page.
3. On the Okta login page, enter the email address associated with the Harness user account. The Harness account and Okta account can have different passwords. If successful, you are returned to Harness.
If you belong to multiple accounts, confirm the default account is set before attempting to use Harness Local Login.
***
### Step 9: SAML authorization with Okta
Once you have enabled Harness SSO with the Harness OIN app, set up and enable Okta SAML authorization in Harness.
To set up SAML authorization in Harness, link a Harness user group to an Okta user group. When an Okta user in that Okta user group logs in to Harness, Harness adds them automatically to the associated Harness user group, and the user inherits all permissions and access assigned to that group. For more information on permissions, see [RBAC in Harness](/harness-platform/3.0/harness-platform-resources/platform-access-control/rbac-in-harness).
1. In Okta, create a user group and add users to the group, if you do not already have one.
1. Sign in to Okta using an admin account.
2. Under **Directory**, select **Groups**, and then click **Add Group**.
Click to view full size image
3. Enter a **Name** and group description. Click **Save**.
Click to view full size image
4. Search for the group you created, and then select it.
5. Click **Assign People**. Find and add members to your group. Click **Done**.
Click to view full size image
2. Make a note of the Okta group name. You need it later to link the Okta group to a Harness user group.
3. Make sure the Okta user group is assigned to the Harness app.
1. In Okta, under **Directory**, select **Groups**. Find and select your Okta user group.
2. Click **Assign applications**. Find the Harness app and click **Assign**. Click **Done**.
3. Under **Applications and Resources**, select **Applications**. Find and select the Harness app. On the **Assignments** tab, select **Groups**, and make sure your Okta user group is listed there.
4. In the Harness app, on the **Sign On** tab, click **Edit** in the **Settings** card, expand **Attributes (Optional)**, and confirm that the **Group Attribute Statements (optional)** **Filter** is set to `Matches regex` with the `.*` value.
5. In Harness, navigate to **Account Settings**, and select **Authentication**.
6. Select the arrow to expand the **Login via SAML** section.
Click to view full size image
7. Select **More options** (⋮) next to your Okta provider configuration, and then select **Edit**.
Click to view full size image
8. On the **Edit SAML Provider** page, select **Enable Authorization**. A **Group Attribute Name** field appears beneath the checkbox.
9. Enter the **Group Attribute Name** from [Step 6](#step-6-configure-attribute-statements).
Click to view full size image
10. Click **Add**. Your Okta configuration now uses the Group Attribute Name for authorization.
11. Link your Okta user group to a corresponding Harness user group. You can create a user group or use an existing group if your Harness user account is a member and your user account is registered under the same email address as in Okta.
1. In Harness, navigate to **Account Settings**, and select **Access Control**.
2. Select **User Groups** in the header, and locate the user group that you want to connect to your Okta user group.
3. Select **Link to SSO Provider Group**.
Click to view full size image
4. In **Search SSO Settings**, select your Okta SAML SSO configuration. Enter the Okta **Group Name**, and click **Save**.
Click to view full size image
5. Repeat these steps if you need to connect more user groups.
#### Test SAML authorization
To test the SAML authorization configuration, log into Harness through a different user account.
1. Follow the steps mentioned in [test SSO configuration](#test-sso-configuration).
2. In your other browser window (where you are logged in to your admin account), make sure the user appears in the Harness user group. Navigate to **Account Settings**, select **Access Control**, select **User Groups** in the header, select the user group you linked to Okta, and make sure the user you just logged in with is listed as a member.
By being a member of this user group, the user receives the permissions and access granted to that group.
***
### OIN app field reference
The following table lists the values you set or see when you add the Harness app from the Okta catalog.
| Field | Value | Where you set it |
| -------------------------------- | ---------------------------------------------------------- | ------------------------------------------------------------------------------------------------------------------------------------------------------------------ |
| **Application label** | Any name, for example `Harness` | **General Settings** tab when you add the integration. Display name on the Okta dashboard. |
| **Application Visibility** | Optional | **General Settings** tab. Select to hide the app icon from end users. |
| **ACS URL** | The Harness SAML endpoint URL | **Sign On** tab > **Edit** > **Advanced Sign-on Settings** ([Step 4](#step-4-add-the-acs-url-to-the-app)). Copied from the **Add SAML Provider** panel in Harness. |
| **Attribute Statements** | For example `email` = `user.email` | **Sign On** tab > **Edit** > **Attributes (Optional)** ([Step 6](#step-6-configure-attribute-statements)). |
| **Group Attribute Statements** | For example `groups`, **Filter** `Matches regex` with `.*` | **Sign On** tab > **Edit** > **Attributes (Optional)**. The name you enter here is the **Group Attribute Name** in Harness. |
| **Disable Force Authentication** | Selected by default | **Sign On** tab > **Edit**, below the attribute statements. Clear it to make Okta prompt users to re-authenticate. |
| **Username** | The user's Okta email address | **Assignments** tab, per person when you use **Assign to People**. Must match the user's Harness email address. Group assignments have no such field. |
| **Audience URI (SP Entity ID)** | `app.harness.io` | Pre-configured by the OIN integration. No action needed. |
| **Name ID format** | `Unspecified` | Pre-configured by the OIN integration. No action needed. |
***
### Just-in-time (JIT) provisioning
Harness supports SAML configuration [with or without JIT user provisioning](/harness-ai/use-harness-platform/authentication/single-sign-on-saml#just-in-time-jit-provisioning). To turn it on, select **Enable JIT Provisioning** on the **Add SAML Provider** panel in [Step 7](#step-7-add-the-okta-saml-metadata-to-harness). For more information on how Harness creates users on first SAML login when JIT is enabled, see [Just-in-Time (JIT) user provisioning](/harness-platform/3.0/harness-platform-resources/platform-access-control/provision-use-jit).
***
### Delink groups
If you no longer want a Harness user group to be connected with an Okta user group, delink the groups without losing group members.
Delinking groups is required to remove a SAML SSO provider configuration from Harness. You cannot delete the SAML SSO provider from Harness until you have delinked all associated Harness user groups.
1. In Harness, navigate to **Account Settings**, and select **Access Control**.
2. Select **User Groups** in the header, and locate the user group that you want to delink.
3. Select **Delink Group**.
Click to view full size image
4. On the **Delink Group** window, select **Retain all members in the user group** to keep the users (as local Harness user accounts) in the Harness user group. If unselected, the groups are delinked and the group members who were authenticated through Okta are removed from the Harness user group.
Click to view full size image
5. Click **Save**.
***
### Troubleshooting SAML assertion validation failed when signing in to Harness with Okta
Ensure the SAML endpoint URL from Harness is entered in the ACS URL field of the Harness OIN app in Okta. The ACS URL field is on the Sign On tab, under Advanced Sign-on Settings, and is not visible until you click Edit. Verify the Audience URI (SP Entity ID) is app.harness.io. Confirm users or groups are assigned to the Harness app on the Assignments tab.
The user signs in to Okta but is not recognized as a Harness user
On the Assignments tab of the Harness app, check the Username set for that user. It must match the email address the user is registered with in Harness. Harness converts mixed case email addresses to lowercase when adding users.
Users sign in but are not added to their Harness user groups
On the Sign On tab of the Harness app, click Edit and expand Attributes (Optional). The Group Attribute Statements section is collapsed by default and is easy to miss, so confirm a group attribute statement exists, that its Filter is set to Matches regex rather than the default Starts with, and that the name matches the Group Attribute Name entered in Harness. Then confirm Enable Authorization is selected on the Edit SAML Provider page in Harness, because it is cleared by default, and that the Group Attribute Name field beneath it is filled in.
***
### Related articles
* [Okta (custom SAML app)](/harness-ai/use-harness-platform/authentication/single-sign-on-saml/okta): Create a SAML 2.0 app integration in Okta manually instead of using the OIN app.
* [SAML SSO with Microsoft Entra ID](/harness-ai/use-harness-platform/authentication/single-sign-on-saml/microsoft-entra-id): Configure Microsoft Entra ID as a SAML SSO provider in Harness.
* [SAML SSO with OneLogin](/harness-ai/use-harness-platform/authentication/single-sign-on-saml/onelogin): Configure OneLogin as a SAML SSO provider in Harness.
* [SAML SSO with Keycloak](/harness-ai/use-harness-platform/authentication/single-sign-on-saml/keycloak): Configure Harness to use Keycloak SAML client as an SSO provider.
* [Advanced SAML configuration](/harness-ai/use-harness-platform/authentication/single-sign-on-saml/advanced-saml-configuration): Configure advanced SAML options in Harness.
{% @harness-feedback/feedback module="harness-ai" pagePath="harness-ai/use-harness-platform/authentication/single-sign-on-saml/okta-oin-app" %}
# Microsoft Entra ID
Configure Microsoft Entra ID as a SAML SSO provider in Harness.
Microsoft Entra ID acts as a SAML identity provider for Harness, allowing users to authenticate with their existing Microsoft credentials. When a user attempts to log in to Harness, they are redirected to Microsoft Entra ID for authentication. After successful authentication, Entra ID sends a signed SAML assertion containing user attributes back to Harness, which validates it and grants access. Optionally, Entra ID can send group membership information in the SAML token, allowing Harness to automatically assign users to the appropriate Harness User Groups for role-based access control.
***
### What you will learn in this topic
By the end of this topic, you will be able to:
* [Configure Microsoft Entra ID as a SAML SSO provider in Harness](#endpoint-url-for-azure).
* [Set up authentication and user attribute mapping](#user-attributes-and-claims).
* [Enable and test SAML authorization with Azure](#enable-and-test-sso-with-azure).
* [Use Just-in-Time (JIT) provisioning](#just-in-time-jit-provisioning) to automatically create users on first login.
***
### Before you begin
Before you configure Microsoft Entra ID app to be the SAML identity provider for Harness, ensure you have the following:
* A Harness account with Account Admin permissions.
* A Microsoft Entra ID tenant with permissions to create and configure enterprise applications.
* Users provisioned in Microsoft Entra ID with the same email addresses they use in Harness.
* At least two user accounts in both Harness and your Azure app; one Harness Administrator and one standard user.
***
Users are not created as part of the SAML SSO integration. They are invited to Harness using their email addresses, and once they log in, Harness registers their email addresses. For more information, go to [Overview of SAML SSO with Harness](/harness-ai/use-harness-platform/authentication/single-sign-on-saml).
For detailed steps on adding SAML SSO with Microsoft Entra ID, follow Microsoft's tutorial on [Microsoft Entra single sign-on (SSO) integration with Harness](https://docs.microsoft.com/en-us/azure/active-directory/saas-apps/harness-tutorial).
{% hint style="info" %}
**NOTE**
If you use [Harness Self-Managed Enterprise Edition](/self-managed-enterprise-edition/new-to-self-managed-enterprise-edition/smp-overview), your instance must be accessed via an HTTPS load balancer, otherwise SAML authentication will fail over HTTP.
{% endhint %}
The following diagram shows how Harness and Microsoft Entra ID exchange information during SAML SSO setup:
Click to view full size image
***
### Azure user accounts
To set up and test SAML SSO, you need at least two accounts each in Harness and in your Azure app. This allows you to set up an administrator and test it with a user.
These user accounts should share the same email address so you can configure SSO without locking yourself out and verify it works for a regular user.
The following image shows a Harness User Group with two users and their corresponding Azure accounts:
Click to view full size image
***
Use two browser windows or tabs for the following steps. Open Azure app in one tab and Harness in the other.
### Step 1. Add entity ID in Harness
You must enter the **Harness SAML Endpoint URL** from Harness in your Azure app **Reply URL**. The **Reply URL** tells Azure where to send the SAML response after user authentication. Without it, Azure has no destination to redirect the user to after login.
1. In your Azure app, select **Single sign-on**. The SSO settings for the Azure app are displayed.
Click to view full size image
2. In **Basic SAML Configuration**, select the edit icon (pencil).
3. Enter a unique identifier in the **Identifier (Entity ID)** field. When your tenant only has one SAML application, this can be `app.harness.io`. If there are several SAML applications in the same tenant, this should be a unique identifier. While setting up SAML in Harness, the same identifier should be configured in the **Entity ID** field. Keep this tab open.
Click to view full size image
{% hint style="info" %}
**NOTE**
For [Harness Self-Managed Enterprise Edition](/self-managed-enterprise-edition/new-to-self-managed-enterprise-edition/smp-overview), replace **app.harness.io** with your custom URL. For example, if you use a custom Harness subdomain in any Harness version, such as **example.harness.io**, use that URL.
{% endhint %}
***
### Step 2. Fetch Harness SAML endpoint URL
Next, use the **SAML SSO Provider** settings in Harness to set up your Azure app **Single sign-on**. 4. In Harness, under **Account Settings**, select **Authentication**. The authentication configuration page appears. 5. Select **SAML Provider**. The **Add SAML Provider** page opens.
Click to view full size image
6\. In **Name**, enter a name for the SAML SSO Provider. 7. Under **Select a SAML Provider**, select **Azure**. The settings for Azure setup are displayed:
Click to view full size image
***
### Step 3. Add endpoint URL in Azure
8. Copy the **Harness SAML Endpoint URL** from the **Add SAML Provider** dialog, and paste it in the **Reply URL** in your Azure app.
Click to view full size image
9. Click **Save** on the Azure App SAML Settings page.
***
### Step 4: User attributes and claims
To ensure that Harness Users' email addresses are identified when they log in via Azure, set up the **Single sign-on** section of your Azure app to use the **User name** email address as the method to identify users. This step ensures Azure sends the right email as the unique identifier so Harness can match the incoming SAML assertion to the correct Harness account. The Azure users that are added to your Azure app must have their email addresses listed as their **User name.** To set this **User name** email address as the method for identifying users, in the Azure app **Single sign-on** section, the Azure app must use the **user.userprincipalname** as the **Unique User Identifier**, and **user.userprincipalname** must use **Email address** as the **name identifier format**.
{% hint style="info" %}
**NOTE**
* If **user.userprincipalname** cannot use an email address as the **Name ID format**, then **user.mail** should be used as the unique identifier in the **Identifier (Entity ID)** field.
* If your Azure users are set up with their email addresses in some field other than **User name**, ensure that the field is mapped to the **Unique User Identifier** in the Azure app and the **name identifier format** is **Email address**.
{% endhint %}
To set this up in your Azure app, do the following:
1. In your Azure app, in the **Single sign-on** blade, in **User Attributes & Claims**, click the edit icon (pencil). The **User Attributes & Claims** settings appear.
Click to view full size image
2. For **Unique User identifier value**, select the edit icon. The **Manage claims** settings appear.
Click to view full size image
3. Select **Choose name identifier format**, and select **Email address**.
4. In **Source attribute**, select **user.userprincipalname**.
5. Click **Save**, and then close **User Attributes & Claims**.
***
### Step 5: Azure SAML metadata file
The Federation Metadata XML contains Azure's signing certificate and endpoint URLs. Harness needs this file to validate that the SAML responses it receives actually came from your Azure tenant and have not been tampered with. Download the **Federation Metadata XML** from your Azure app to upload the file into Harness.
1. Download the **Federation Metadata XML** from your Azure app and upload it using **Upload the identity Provider metadata xml downloaded from your Azure App** in the **Add SAML Provider** settings in Harness.
Click to view full size image
2. Select **Add Entity ID** and enter your custom Entity ID. The default Entity ID is **app.harness.io**. The value you enter here overrides the default Entity ID.
3. Select **Add**. The new Azure SAML Provider is added under **Login via SAML**.
Click to view full size image
***
### Step 6: Enable and test SSO with Azure
Now that Azure is set up in Harness as a SAML SSO provider, you can enable and test it. Testing before you enforce SSO for all users prevents lockouts. You can test the Azure app SSO from within Azure if you are logged into Azure using an Azure user account that has the following:
* A Harness user with the same email address as your Azure user.
* Your Azure user added to the Azure app **Users and groups**.
* Global Administrator Directory role assigned to your Azure user. To test Azure SSO using Azure, do the following:
1. In the Azure app, select **Single sign-on**, and at the bottom of the **Single sign-on** settings, select **Test**.
Click to view full size image
2. In the **Test** panel, select **Sign in as current user**. If the settings are correct, you are logged into Harness. If you cannot log into Harness, the **Test** panel provides debugging information. For more information, go to [Debug SAML-based single sign-on to applications](https://learn.microsoft.com/en-us/entra/identity/enterprise-apps/debug-saml-sso-issues?WT.mc_id=UI_AAD_Enterprise_Apps_Testing_Experience) from Microsoft Entra ID.
To test Azure SSO using Harness, do the following:
1. In **Harness**, in **Account Settings** > **Authentication**, select **Login via SAML**, to enable SAML SSO using the Azure provider.
2. Open a new Chrome Incognito window to test the SSO login using a Harness User account other than the one you are currently logged in with.
3. Sign into Harness using one of the user account email addresses shared by Harness and Azure. When you sign into Harness, you are prompted with the Microsoft Sign in dialog.
4. Enter the Azure username (most often, the email address), enter the Azure password, and select **Sign in**.
***
### SAML authorization with Azure
Once you have enabled Harness SSO with your Azure app, you can set up and enable SAML authorization in Harness using Azure.
To set up SAML authorization in Harness, you link a Harness User Group to a user group assigned to your Azure app. When a user from your Azure app logs into Harness, they are automatically added to the linked Harness User Group and inherit all the RBAC settings for that Harness User Group.
**Authentication** confirms who the user is and **authorization** determines what they can access.
Below are the Harness SAML settings you need from Azure to set up SAML authorization in Harness:
* **Group Attribute Name** - In Azure, this value is obtained from the **Group Claims** in the Azure app **User Attributes & Claims** settings. For Harness **Group Attribute Name**, here is the Harness **SAML Provider** setting on the left and their corresponding Azure **Group Claims** settings on the right:
Click to view full size image
To set up Azure Authorization in Harness, do the following:
1. In Azure, add the **Group Claim** (Name and Namespace) to the Azure app.
1. In your Azure app, select **Single sign-on**, and then select edit (pencil icon) for **Attributes & Claims**.
Click to view full size image
2. Select **Add a group claim**. The **Group Claims** settings appear.
3. Select the **All groups** option and expand the **Advanced options** and enable **Customize the name of the group claim**.
Click to view full size image
4. In **Name**, enter a name to use to identify the Harness Group Attribute Name.
5. In **Namespace**, enter a namespace name.
6. Click **Save**. **User Attributes & Groups** now display the group claim you created.
7. Close **User Attributes & Groups**.
2. In Harness, enter the Group Claim name and namespace in the SAML SSO Provider **Group Attribute Name** field.
1. Open the SAML SSO Provider dialog, and enable the **Enable Authorization** setting. You must turn on **Enable Authorization** to link this SSO Provider to a Harness User Group for authorization.
2. Enter the Group Claim name and namespace in the **Group Attribute Name** field in the same format as a Claim Name (`namespace/name`). The SAML SSO Provider dialog looks something like this:
Click to view full size image
3. Click **Save**. Authorization and the Group Attribute Name are set up. Next, set up your Azure and Harness groups.
3. In Azure, ensure the Azure users with corresponding Harness accounts belong to an Azure group. Here is an Azure group named **ExampleAzureGroup** with two members:
Click to view full size image
4. Ensure that the Azure group is assigned to the Azure app. Here you can see the **ExampleAzureGroup** group in the Azure app's **Users and groups**.
Click to view full size image
5. Link the Harness User Group to the Azure group using the Azure group Object ID.
1. In Azure, copy the Azure group **Object ID**.
Click to view full size image
2. In Harness, create a new User Group or open an existing User Group.
3. In **Account Settings**, select **User Groups** and then select the User Group you want to link the SAML SSO Provider to.
4. Select **Link to SSO Provider Group**.
Click to view full size image
5. In the **Link to SSO Provider Group** dialog, in **SSO Provider**, select the Azure SSO Provider you set up, and in **Group Name**, paste the Object ID you copied from Azure. When you are done, the dialog will look something like this:
Click to view full size image
6. Click **Save**. The User Group is now linked to the SAML SSO Provider and Azure group Object ID.
6. Test Authorization.
1. Open a new Chrome Incognito window to test the authorization using a Harness User account other than the one you are currently logged in with.
2. Log into Harness using the user email address, and sign in using the Azure username and password. If you are already logged into Azure in Chrome, you might be logged into Harness automatically.
3. In the linked Harness User Group, confirm that the Harness user account appears in the group. The Harness User is now added and the RBAC settings for the Harness User Group are applied to its account. For more information, go to [Manage User Groups](/harness-ai/use-harness-platform/platform-access-control/add-user-groups).
***
### Users in over 150 groups
When a user logs in via SAML SSO, Microsoft Entra ID sends Harness a token. A token is a packet of information about who the user is and what groups they belong to. That token has a size limit.
When a user has more than 150 group memberships, the number of groups listed in the token can grow the token size. Microsoft Entra ID limits the number of groups it will emit in a token to 150 for SAML assertions. Instead of sending the group list, Microsoft Entra ID just sends a link to fetch the group information from this API endpoint.
Harness uses those groups to map the user to the right Harness User Groups (for RBAC). If the group list is missing from the token, Harness cannot map a user to the Harness User Group. Harness invokes Microsoft's API directly to get the full list.
To configure Harness to handle users in more than 150 groups, do the following:
1. In your Azure account, go to **App registrations**.
2. Select your app. Copy the **Application (client) ID** and paste it in the **Client ID** field in your Harness account.
3. Select **Certificates & secrets** > **New Client Secret**, add a description, and select **Add**.
4. Copy the secret value immediately as Azure only shows it once. Save it as an encrypted text secret in Harness. For details, go to [Use encrypted text secrets](/harness-ai/use-harness-platform/secrets/add-use-text-secrets).
5. Select the secret reference in the **Client Secret** field in your Harness account.
Click to view full size image
6. In your Azure app, go to **Manage** > **API Permissions**.
7. Select **Add a permission** > **Microsoft Graph** > **Application permissions**.
8. Add the following permissions. You must enable each for both **Delegated permissions** and **Application permissions**:
* `Directory.Read.All`
* `Group.Read.All`
* `GroupMember.Read.All`
* `User.Read.All` For more information on Azure application permissions, go to [Application permissions](https://learn.microsoft.com/en-us/graph/permissions-reference#application-permissions-93) in the Azure documentation.
***
### Just-In-Time (JIT) provisioning
Harness supports SAML configuration [with or without JIT user provisioning](/harness-ai/use-harness-platform/authentication/single-sign-on-saml#just-in-time-jit-provisioning). Go to [Just-in-Time (JIT) user provisioning](/harness-platform/3.0/harness-platform-resources/platform-access-control/provision-use-jit) to understand how Harness creates users on first SAML login when JIT is enabled.
***
### Troubleshooting SAML authentication fails with Microsoft Entra ID (Azure AD)
Ensure the Harness SAML Endpoint URL is added as a Reply URL (Assertion Consumer Service URL) in the Azure app's Basic SAML Configuration. Verify the Identifier (Entity ID) is set to app.harness.io. If multiple SAML applications exist in the same tenant, use a unique identifier instead. Ensure the Federated Metadata XML downloaded from Entra ID has been uploaded to Harness.
***
### Related articles
* [SAML SSO with Okta](/harness-ai/use-harness-platform/authentication/single-sign-on-saml/okta): Set up Harness with Okta as a SAML SSO provider
* [SAML SSO with OneLogin](/harness-ai/use-harness-platform/authentication/single-sign-on-saml/onelogin): Set up Harness with OneLogin as a SAML SSO provider
* [SAML SSO with Keycloak](/harness-ai/use-harness-platform/authentication/single-sign-on-saml/keycloak): Set up Harness with Keycloak as a SAML SSO provider
* [Advanced SAML configuration](/harness-ai/use-harness-platform/authentication/single-sign-on-saml/advanced-saml-configuration): Use local login and encrypted SAML with Harness
{% @harness-feedback/feedback module="harness-ai" pagePath="harness-ai/use-harness-platform/authentication/single-sign-on-saml/microsoft-entra-id" %}
# OneLogin
This document explains how you can use OneLogin as a SAML identity provider for Harness.
OneLogin acts as a SAML identity provider for Harness, enabling users to authenticate with their existing OneLogin credentials. When a user attempts to log in to Harness, they are redirected to OneLogin for authentication. After successful authentication, OneLogin sends a signed SAML assertion back to Harness, which validates it and grants access. Optionally, OneLogin can include role information in the SAML assertion through custom parameters, allowing Harness to automatically assign users to corresponding Harness user groups based on their OneLogin roles for role-based access control.
{% hint style="info" %}
**NOTE**
If you use [Harness Self-Managed Enterprise Edition](/self-managed-enterprise-edition/new-to-self-managed-enterprise-edition/smp-overview), your instance must be accessed via an HTTPS load balancer, otherwise SAML authentication will fail over HTTP.
{% endhint %}
***
### What you will learn in this topic
By the end of this topic, you will be able to:
* [Set up the Harness application in OneLogin with SAML configuration](#onelogin-authentication-on-harness).
* [Enable SSO authentication](#enable-onelogin-as-a-harness-sso-provider).
* [Configure OneLogin roles and parameters to sync user permissions with Harness user groups](#assign-roles-to-users).
* [Test and verify OneLogin authentication and authorization](#test-the-integration).
* [Use Just-in-Time (JIT) provisioning](#just-in-time-jit-provisioning) to automatically create users on first login.
***
### Before you begin
Before you configure OneLogin as the SAML identity provider for Harness, ensure you have the following:
* A Harness account with Account Admin permissions.
* An existing OneLogin account with admin access to create and configure applications.
* A [user group ](/harness-ai/use-harness-platform/platform-access-control/add-user-groups#create-user-groups-manually)in Harness to link to OneLogin.
* Understand [SAML SSO with Harness ](/harness-ai/use-harness-platform/authentication/single-sign-on-saml).
***
### OneLogin authentication on Harness
Enabling OneLogin authentication on Harness requires configuration on both Harness and OneLogin.
Use two browser windows or tabs for this process. Open OneLogin in one tab and Harness in the other.
#### Step 1: Obtain SAML endpoint URL
To get the SAML Endpoint URL from Harness to configure OneLogin:
1. In Harness, go to **Account Settings** and select **Authentication**.
Click to view full size image
The Authentication page appears.
2. Click **+ SAML Provider** (if you are configuring SAML for the first time) or **Login via SAML** (if you have already configured SAML providers). Select **Add SAML Provider**.
Click to view full size image
3. In **Name**, enter a name for the SAML SSO Provider. Select **Continue**.
4. Select **OneLogin** under **Select a SAML Provider**. Select **Continue**.
The settings to configure OneLogin setup are displayed.
5. Copy the URL provided under **Enter the SAML Endpoint URL, as your Harness OneLogin application's ACS URL**, to clipboard.
Click to view full size image
```
After copying the URL in step 5, keep the tab open, and [Add Harness app to OneLogin](#add-harness-app-to-onelogin).
```
#### Step 2: Add Harness app to OneLogin
Add the **Harness** app (for SaaS setup) (or **Harness (On Prem)** app for Harness Self-Managed Enterprise Edition setup) and configure it inside OneLogin so OneLogin knows where to send SAML metadata.
1. Log in to OneLogin. Under the **Applications** tab, click **Applications**.
Click to view full size image
2. Select **Add App**.
Click to view full size image
3. Find **Harness** or **Harness (On Prem)** based on your setup, and then select it.
Click to view full size image
4. In **Configuration**, paste this URL into the **SCIM Base URL** field. Skip all other **Application Details** fields, and click **Save**.
Click to view full size image
5. Navigate to **SSO** tab. At the upper right corner, select **More Actions** and then select **SAML Metadata**. This downloads the .xml authentication file that you'll need to upload to Harness when you [enable OneLogin as a Harness SSO provider](#enable-onelogin-as-a-harness-sso-provider).
Click to view full size image
#### Step 3: Assign users to roles
To provide a OneLogin user access to the Harness application to authenticate via SSO:
1. In OneLogin, under **Users** tab, select **Users**.
Click to view full size image
2. Search for a user that you want to add to Harness. Select the user.
Click to view full size image
3. The **Users** page appears. Click the **Applications** tab. Click the **+** button at the upper right to assign an Application.
Click to view full size image
4. Select the Application, then select **Continue**.
Click to view full size image
5. Repeat this section for other users (or groups) that you want to add to Harness.
#### Step 4: Assign users to groups
If you have multiple users requiring OneLogin access, you can (optionally) create a group and add multiple users into it. To create a group:
1. In OneLogin, under **Users**, select **Groups**.
2. Select **New Group** on upper right to create a group.
3. Provide a **Name**, select the green check mark. Click **Save**.
4. Under **Users** tab, select **Users** and select the user you want to add to a group. Go to **Authentication** tab and select the group from the dropdown, and select **Save User**.
Click to view full size image
#### Step 5: Enable OneLogin as a Harness SSO provider
To upload the OneLogin metadata into Harness and activate the SAML connection to complete the authentication setup:
Return to the Harness browser tab you left open in step 5 of [Obtain SAML endpoint URL from Harness](#obtain-saml-endpoint-url).
1. Select **Upload** to upload the .xml file that you obtained from OneLogin.
2. Deselect **Enable Authorization**. Select **Add Entity ID** and enter your custom Entity ID. The default Entity ID is **app.harness.io**. The value you enter here overrides the default Entity ID. Select **Add**.
Click to view full size image
```
This configures a new OneLogin provider that you can use to log in to Harness.
```
3\. To enable the new provider that you configured, click **Login via SAML** toggle.
4. In the resulting **Enable SAML Provider** dialog, click **Test** to verify the SAML connection you've configured.
Click to view full size image
5. Once the test is successful, select **Confirm** to finish setting up OneLogin authentication.
***
### OneLogin authorization on Harness
Once you've enabled [OneLogin authentication](#onelogin-authentication-on-harness) on Harness, refer to the below sections to enable authorization between the two platforms to control what users can do inside Harness.
#### Step 1: Assign roles to users
Harness' SAML authorization replicates [**OneLogin Roles**](https://onelogin.service-now.com/support?id=kb_article\&sys_id=cc2e602a973b2150c90c3b0e6253af3c\&kb_category=566ffd6887332910695f0f66cebb3556) as **Harness User Groups**.
**Harness User Groups** is a collection of multiple Harness users. You assign roles and resource groups to a user group, and the permissions and access granted by those assignments are automatically applied to all members of the group. For more information, go to [Manage Harness Groups](/harness-ai/use-harness-platform/platform-access-control/add-user-groups).
Follow the steps below to map these entities:
1. From OneLogin's menu, under **Users** tab, select **Users**.
2. Find and select a user that is assigned to Harness, to assign appropriate OneLogin Roles. Select the **Applications** tab of the user you selected. Select the specific Roles you want to assign to this user. Select **Save User** at the upper right.
Click to view full size image
Repeat this section for other users to whom you want to assign Roles.
#### Step 2: Define parameters
Before defining parameters, enable provisioning in your OneLogin application. Go to **Applications** → your application → **Provisioning**, and under **Workflows**, select the **Enable provisioning** checkbox.
Once provisioning is enabled, define a parameter to include role information in the SAML assertion so Harness can map users to the correct User Groups.
1. Under **Applications**, select your application.
Click to view full size image
Your application page appears in OneLogin.
2. Select the **Parameters** tab in your application, then select the `+` button to add a new Parameter.
3. In the resulting **New Field** dialog, assign a **Field name** (for example **Groups**).
Click to view full size image
4. Select **Include in SAML assertion** and **Multi-value parameter**. Then click **Save**.
5. Back on the **Parameters** tab, select your new **Groups** field.
6. In the resulting **Edit Field Groups** dialog, set **Default if no value selected** to **User Roles**. Below that, select **Semicolon Delimited input (Multi-value output)**. Click **Save**.
Click to view full size image
7. Click **Save** again at the **Parameters** page's upper right.
#### Step 3: Sync users in Harness
Configure Harness to recognize the OneLogin group and link it to a Harness user group so permissions are inherited on login.
1. In **Account Settings**, select **Authentication**.
2. Click to expand the **Login via SAML** section.
3. You can see the SSO Provider you have set up listed in this section. Select the vertical ellipsis (**︙**) next to the SSO Provider you have set up for SSO authentication, and select **Edit**.
Click to view full size image
4. In the **Edit SAML Provider** dialog, enable **Enable Authorization**. In **Group Attribute Name**, enter the name of the **Field Group** you configured in OneLogin. Click **Save**.
5. Under **Account Settings**, under **Users**, select **User Groups**.
Click to view full size image
6. Click on the **User Group** that you want to link the SAML SSO Provider to. To create a new user group, go to [Create User Groups manually ](/harness-ai/use-harness-platform/platform-access-control/add-user-groups#create-user-groups-manually).
7. Select **Link to SSO Provider Group**.
Click to view full size image
8. In the **Link to SSO Provider Group** dialog, in **Search SSO Settings**, select the SAML SSO Provider you have set up. In the **Group Name**, enter the name of the **Field Groups** you configured in OneLogin. Click **Save**.
Click to view full size image
#### Step 4: Test the integration
After you've synced Users between OneLogin and Harness, users will be assigned to the designated Harness User Group upon your next login to Harness. To test whether OneLogin authentication and authorization on Harness are fully functional do the following:
1. In Chrome, open an Incognito window, and navigate to Harness.
2. Log into Harness using the email address of a Harness User that is also used in the SAML provider group linked to the Harness User Group.
**Result:** When the user submits their email address in Harness Manager, the user is redirected to the SAML provider to log in.
3. Log into the SAML provider using the same email that the user is registered with, within Harness.
**Result:** Once the user logs in, the user is redirected to Harness and logged into Harness using the SAML credentials.
4. In your Harness account in the other browser window, check the User Group you linked with your SAML provider.
**Result:** The user that logged in is now added to the User Group, receiving the authorization associated with that User Group.
{% hint style="info" %}
**NOTE**
You cannot delete a SAML SSO Provider from Harness that is linked to a Harness Group. You must first remove the link to the SSO Provider from the Group.
{% endhint %}
***
### Just-In-Time (JIT) provisioning
Harness supports SAML configuration [with or without JIT user provisioning](/harness-ai/use-harness-platform/authentication/single-sign-on-saml#just-in-time-jit-provisioning). Go to [Just-in-Time (JIT) user provisioning](/harness-platform/3.0/harness-platform-resources/platform-access-control/provision-use-jit) to understand how Harness creates users on first SAML login when JIT is enabled.
***
### Troubleshooting SAML authentication fails with OneLogin
Ensure the SAML Endpoint URL from Harness is pasted into the SCIM Base URL field in OneLogin's Configuration tab. Verify the SAML Metadata XML file has been downloaded from OneLogin's SSO tab and uploaded to Harness.
***
### Related articles
* [SAML SSO with Okta](/harness-ai/use-harness-platform/authentication/single-sign-on-saml/okta)
* [SAML SSO with Microsoft Entra ID](/harness-ai/use-harness-platform/authentication/single-sign-on-saml/microsoft-entra-id)
* [SAML SSO with Keycloak](/harness-ai/use-harness-platform/authentication/single-sign-on-saml/keycloak)
* [Advanced SAML configuration](/harness-ai/use-harness-platform/authentication/single-sign-on-saml/advanced-saml-configuration)
{% @harness-feedback/feedback module="harness-ai" pagePath="harness-ai/use-harness-platform/authentication/single-sign-on-saml/onelogin" %}
# Keycloak
Connect Keycloak to Harness with SAML to sign in with existing credentials, and optionally sync groups for access control.
This guide walks you through using Keycloak as the SAML identity provider for Harness. This allows Keycloak users to log in to Harness with their existing credentials.
Keycloak acts as a SAML identity provider for Harness, allowing users to authenticate with their existing Keycloak credentials. When a user attempts to log in to Harness, they are redirected to Keycloak for authentication. After successful authentication, Keycloak sends a signed SAML assertion back to Harness, which validates it and grants access. Optionally, Keycloak can sync user group memberships to Harness for role-based access control, and supports Just-in-Time (JIT) provisioning to automatically create users on their first login.
{% hint style="info" %}
**NOTE**
If you use [Harness Self-Managed Enterprise Edition](/self-managed-enterprise-edition/new-to-self-managed-enterprise-edition/smp-overview), your instance must be accessed via an HTTPS load balancer, otherwise SAML authentication will fail over HTTP.
{% endhint %}
***
### What you will learn in this topic
By the end of this topic, you will be able to:
* [Set up a Keycloak SAML client](#set-up-a-client-in-keycloak).
* [Configure Harness to use Keycloak SAML client as an SSO provider](#set-up-keycloak-saml-sso-in-harness).
* [Enable group-based authorization](#optional-add-group-membership-in-saml).
* [Use Just-in-Time (JIT) provisioning to automatically create users](#just-in-time-jit-provisioning).
***
### Before you begin
Before you configure Keycloak as the SAML identity provider for Harness, check that you have:
* A Harness account with Account Admin permissions.
* An existing Keycloak instance with admin access to create and configure SAML clients.
***
### Step 1: Set up a client in Keycloak
To register Harness as a SAML service provider in Keycloak, follow the steps below:
1. Sign in to the Keycloak admin console.
2. Switch to your target Realm, then select **Clients**.
Click to view full size image
The **General Settings** page appears.
3. Select **Create client**. Set **Client type** to **SAML** and **Client ID** to `app.harness.io`, then select **Next**.
Replace `` with your Harness account ID.
* **Root URL:** `https://app.harness.io/`
* **Home URL:** `https://app.harness.io/ng/account//main-dashboard`
* **Valid post logout redirect URIs:** `https://app.harness.io/ng/account//main-dashboard`
* **Master SAML processing URL:** `https://app.harness.io/gateway/api/users/saml-login?accountId=`
4. Click **Save**.
{% hint style="info" %}
**VANITY HOSTNAMES**
If your Harness account uses a vanity URL, replace `https://app.harness.io` with your base URL in every field above. Example ACS URL shape: `https:///gateway/api/users/saml-login?accountId=`.
{% endhint %}
***
### Step 2: Configure client settings
Apply the following settings on the client you just created.
5. Under **Settings** tab, navigate to **Signature and Encryption** section, and enter the following values:
* **Name ID format:** `email`
* **Force POST binding:** On
* **Include AuthnStatement:** On
* **All other toggles in this block:** Off
6. Under **Settings**, open **Signature and encryption** and set:
* **Sign documents:** On
* **Sign assertions:** On
* **Signature algorithm:** `RSA_SHA256`
* **SAML signature key name:** `NONE`
* **Canonicalization method:** `EXCLUSIVE`
7. Under the **Keys** tab, set **'Client signature required'** to Off.
8. Open the **Advanced** tab, then **Fine grain SAML endpoint configuration**. Set **'Assertion consumer service POST binding URL'** to `https://app.harness.io/gateway/api/users/saml-login?accountId=` (or the same path on your vanity host).
9. Click **Save**.
#### Step 3: Download IdP metadata for Harness
Harness imports Keycloak as an IdP from a metadata XML file.
1. In the left nav, under **Configure**, select **Realm settings**.
2. In the **Endpoints** section, select **SAML 2.0 Identity Provider Metadata**. A new tab opens with XML data.
3. Save that document as an `.xml` file. Upload this file when you add the provider in Harness.
Click to view full size image
***
### Optional: Add group membership in SAML
To automatically sync group memberships in Harness based on group memberships in Keycloak, perform the following steps:
1. Under **Manage** tab, select **Clients**.
2. Select your newly-created Client, and then select the **Client Scopes** tab.
3. In the first row, select the value in the **Assigned client scope** field.
4. Select **Mappers** tab, and then select **Configure a new mapper**.
5. Select **Group list** and configure the following settings:
* **Name**: grouplist
* **Group attribute name**: member
* **SAML Attribute NameFormat**: Basic
* **Single Group Attribute**: On
* **Full group path**: Off
6. Select **Save**.
***
### Step 4: Set up Keycloak SAML SSO in Harness
Once you have the client set up in Keycloak, configure and enable Keycloak as an SAML provider in Harness. This way, Keycloak users can use the same credentials to sign in to Harness.
1. In your Harness account, go to **Account Settings**, and then select **Authentication**.
2. In **Identity Provider metadata XML downloaded from your app (Optional)**, select **Upload**, then select the XML file you added when you set your Keycloak configuration steps.
3. Select **+ SAML Provider**, then enter the following values:
* **Name**: Keycloak
* **Select an SAML Provider**: Other
* **Enable Authorization**: *Enable if you want to automatically sync group memberships in Harness based on group memberships in Keycloak*
* **Group Attribute Name**: member *(only available if Enable Authorization is selected)*
* **Add Entity Id**: *Enabled*
* **Entity Id**: app.harness.io
* **Enable JIT Provisioning**: *Enable if Just In Time user provisioning is desired*
4. Select **Add**.
You should see the new provider under **Login via SAML**; you might need to expand this section using the arrow on the right-hand side of the screen..
***
### Step 5: Enable and test SSO
Enable your SSO configuration and verify users can authenticate successfully by following the steps below:
1. Under **Account Settings** in Harness, select **Authentication**, and then open **Login via SAML** for the Keycloak provider.
2. In the **Enable SAML provider** dialog, select **Test** so Harness validates the exchange.
3. When the test passes, Harness shows **SAML test successful** banner at the top.
4. Select **Confirm** to enable the provider for sign-in.
***
### Just-In-Time (JIT) provisioning
Harness supports SAML configuration [with or without JIT user provisioning](/harness-ai/use-harness-platform/authentication/single-sign-on-saml#just-in-time-jit-provisioning). Go to [Just-in-Time (JIT) user provisioning](/harness-platform/3.0/harness-platform-resources/platform-access-control/provision-use-jit) to understand how Harness creates users on first SAML login when JIT is enabled.
***
### Troubleshooting SAML authentication fails with Keycloak
Ensure the Client ID is set to app.harness.io and Client type is set to SAML when creating the Keycloak client. Verify the Master SAML processing URL is set to . If using a vanity URL or Harness Self-Managed Enterprise Edition, replace with your custom base URL in all fields.
***
### Related articles
* [SAML SSO with Okta](/harness-ai/use-harness-platform/authentication/single-sign-on-saml/okta) - Create an SAML integration in Okta for Harness.
* [SAML SSO with Microsoft Entra ID](/harness-ai/use-harness-platform/authentication/single-sign-on-saml/microsoft-entra-id) - Configure Microsoft Entra ID as a SAML SSO provider in Harness.
* [SAML SSO with OneLogin](/harness-ai/use-harness-platform/authentication/single-sign-on-saml/onelogin) - Configure OneLogin as a SAML SSO provider in Harness.
* [Advanced SAML configuration](/harness-ai/use-harness-platform/authentication/single-sign-on-saml/advanced-saml-configuration) - Configure advanced SAML options in Harness.
{% @harness-feedback/feedback module="harness-ai" pagePath="harness-ai/use-harness-platform/authentication/single-sign-on-saml/keycloak" %}
# Advanced SAML configuration
This document explains advanced SAML configuration.
Once SAML SSO is in place, additional configuration may be required to meet security requirements. For example, an identity provider (IdP) outage can lock users out of Harness, unencrypted SAML assertions may not adhere to your organization's compliance policies, and teams with different workflows may need to land on different parts of the product after login.
This page covers advanced SAML configuration options in Harness, including local login fallback, encrypted SAML assertions, and setting the default UI experience for your users.
{% hint style="info" %}
**NOTE**
If you use [Harness Self-Managed Enterprise Edition](/self-managed-enterprise-edition/new-to-self-managed-enterprise-edition/smp-overview), your instance must be accessed via an HTTPS load balancer. SAML authentication will fail over HTTP.
{% endhint %}
### What you will learn in this topic
By the end of this topic, you will be able to:
* [Use Harness local login](#harness-local-login) as a fallback when your IdP is unavailable.
* [Enable encrypted SAML assertions](#use-encrypted-saml) to meet compliance requirements for assertions in transit.
* [Rotate your IdP signing certificate](#rotate-your-idp-signing-certificate) without a login gap.
* [Configure the default landing page](#set-the-default-experience) so teams land on relevant product after login.
***
### Before you begin
Before you begin, ensure you have:
* A Harness account with Account Admin permissions to modify authentication settings.
* An active SAML SSO provider already configured in Harness (such as [Okta](/harness-ai/use-harness-platform/authentication/single-sign-on-saml/okta), [Microsoft Entra ID](/harness-ai/use-harness-platform/authentication/single-sign-on-saml/microsoft-entra-id)).
***
### Harness Local Login
To prevent lockouts or in the event of OAuth downtime, you can use the local login URL `https://app.harness.io/auth/#/local-login` to sign in to your default account and update the OAuth settings.
You can use the local login URL only if you have the admin role assigned on **All Account Level Resources** or **All Resources Including Child Scopes**.
Local login authenticates against a Harness-native username and password, not your SSO identity provider. Your IdP is never contacted for this sign-in, which is why local login continues to work during an OAuth or SAML outage.
For example, for the Harness production cluster `prod-3`, the local login URL is `https://app3.harness.io/auth/#/local-login`. Once you login, you can change the settings to enable users to log in.
#### Disable local login
To disable Local login, use the `DISABLE_LOCAL_LOGIN` feature flag. Contact [Harness Support](mailto:support@harness.io) to enable the feature flag.
***
### Use encrypted SAML
To use encrypted SAML with Harness, you download the encryption certificate from the Harness UI and upload it to your identity provider (IdP) settings to support the encrypted SAML flow.
To download your encryption certificate and upload it to your IdP settings, do the following:
1. In your Harness account, go to **Account Settings**, and then select **Authentication**.
2. Assuming you have a SAML provider set up, select your provider. Under **Enable Authorization**, click the **Download** button.
Click to view full size image
This downloads the Harness encryption certificate required for SAML assertions. 3. Sign in to your IdP (identity providers, such as Okta, Microsoft Entra ID). 4. To edit your SAML integration in the IdP:
1. Enable assertion encryption.
2. Select your encryption algorithm.
3. Upload the encrypted certificate file you downloaded from the Harness UI in step 2 above.
When you sign in to Harness via SAML, the operation is completed using encrypted assertions.
***
### Rotate your IdP signing certificate
Harness reads your IdP's signing certificate from the metadata XML file you upload when you [set up your SAML provider](/harness-ai/use-harness-platform/authentication/single-sign-on-saml/okta). When your IdP rotates its signing certificate, re-upload the current metadata XML to Harness to pick up the new certificate.
To avoid a login gap during rotation, Harness supports uploading metadata that lists more than one signing certificate: it validates a SAML response against any signing certificate present in the metadata. If your IdP's metadata carries both the current and next certificate during an overlap window, you can upload that metadata to Harness ahead of the cutover so logins keep working through the rotation.
***
### Set the default experience
When you log in through SAML, Harness redirects you to a default landing page. If your organization has teams that work in different modules (for example, developers in CI and operations in CD), account administrators or environment administrators (that is, users who have all the permissions required to work with environments) can set the default landing experience so each user lands on the relevant part of the product after login.
The following diagram shows the permissions required for environment administrator access.
Click to view full size image
To set the default landing page, follow the steps below:
1. In your Harness account, go to **Account Settings** and select **Account Details**.
2. Under **Default Experience**, select the experience you want users to see when they log in (First generation or next generation).
3. Click **Save**. For more information on account-level settings, go to [Account details](/harness-ai/subscriptions-and-licenses/view-account-info-and-subscribe-to-alerts#account-details).
***
### Related articles
* [Single sign-on with LDAP](/harness-ai/use-harness-platform/authentication/single-sign-on-sso-with-ldap) - Set up LDAP server with Harness.
* [Single sign-on with OAuth](/harness-ai/use-harness-platform/authentication/single-sign-on-sso-with-oauth) - Set up OAuth 2.0 identity provider with Harness.
* [Single sign-on with OIDC](/harness-ai/use-harness-platform/authentication/single-sign-on-sso-with-oidc) - Set up custom OIDC (OpenID Connect) provider with Harness.
{% @harness-feedback/feedback module="harness-ai" pagePath="harness-ai/use-harness-platform/authentication/single-sign-on-saml/advanced-saml-configuration" %}
# Single Sign-On with LDAP
Configure single sign-on with Lightweight Directory Access Protocol (LDAP) in Harness, including Active Directory and OpenLDAP.
Harness supports single sign-on (SSO) with [Lightweight Directory Access Protocol (LDAP)](https://ldap.com/) implementations, including Active Directory and OpenLDAP. When you integrate your Harness account with an LDAP directory, your LDAP users can log into Harness using their existing LDAP email addresses and passwords.
You can link a Harness user group to your LDAP directory. Harness automatically synchronizes the users and groups. After you enable LDAP SSO, Harness verifies each user's credentials against the LDAP provider at login.
***
### What you will learn in this topic
By the end of this topic, you will be able to:
* Add an LDAP provider and configure connection settings.
* Link Harness user groups to LDAP directory groups for automatic user synchronization.
* Enable LDAP SSO method and verify user login.
* Configure sync schedules and delink user groups.
***
### Before you begin
Before you integrate your Harness account with an LDAP directory, ensure you have the following:
* **Active Harness delegate**: An active delegate for Harness to communicate with your LDAP server. Go to [Delegate overview](/harness-ai/use-harness-platform/delegates/delegate/delegate-concepts/delegate-overview) to install and verify a delegate.
* **LDAP server access**: Access to your LDAP server (Active Directory or OpenLDAP) with the hostname, port, and a Bind DN (distinguished name) account that has read permissions to the directory.
* **Account administrator permissions**: Account administrator access in Harness to configure SSO providers and manage user groups. Go to [RBAC in Harness](/harness-platform/3.0/harness-platform-resources/platform-access-control/rbac-in-harness) to review roles and permissions.
#### Required ports
Confirm that the required ports are open and that the LDAP account has the necessary permissions and network access for the Harness delegate to reach your LDAP server on the required ports.
The Harness delegate connects to your LDAP server using the following ports:
| Protocol | Port |
| ----------------------- | ---- |
| **HTTPS** | 443 |
| **LDAP (without SSL)** | 389 |
| **Secure LDAP (LDAPS)** | 636 |
{% hint style="info" %}
**SECURE LDAP TRAFFIC**
By default, LDAP transmits traffic without encryption. For Windows Active Directory, you can secure LDAP traffic using SSL/TLS by installing a certificate from a Microsoft certification authority (CA) or a non-Microsoft CA.
{% endhint %}
#### Required permissions
Authentication with an LDAP server uses the [Bind operation](https://ldap.com/the-ldap-bind-operation/), which exchanges credentials between the LDAP client (Harness delegate) and your LDAP server. The security semantics of this operation are defined in [RFC 4513](https://www.rfc-editor.org/info/rfc4513).
When you configure Harness with LDAP, you enter a Bind DN (distinguished name) for the LDAP directory account used to authenticate. The permissions required depend on your directory service:
* **Windows Active Directory**: By default, all Active Directory users in the Authenticated Users group have read permissions to the entire Active Directory infrastructure. If you have restricted this, assign **Read MemberOf** rights on **User** objects to the account that connects Harness to Active Directory. Go to [Configure User Access Control and Permissions](https://docs.microsoft.com/en-us/windows-server/manage/windows-admin-center/configure/user-access-control) to review Microsoft documentation.
* **OpenLDAP**: The default access control policy allows read access for all clients. If you have changed this default, grant the Authenticated Users entity to the account that connects Harness to OpenLDAP. Go to [Access Control](https://www.openldap.org/doc/admin24/access-control.html) to review OpenLDAP documentation.
#### Test LDAP connectivity
Before configuring Harness, query your LDAP directory to verify connectivity and discover the correct configuration values. This optional (but recommended) step helps you:
* Test network connectivity between the Harness delegate and your LDAP server.
* Identify Base DNs for users and groups.
* Discover attribute names (email, group membership, and display names).
* Validate search filters before entering them in Harness.
* Troubleshoot connection failures during setup.
Use one of the following tools to query your directory:
* **Linux/Mac**: `ldapsearch` command-line tool
* **Windows**: [LDAP Admin](http://www.ldapadmin.org/), `dsquery` command-line tool, Active Directory Users and Computers, or [Windows PowerShell](https://docs.microsoft.com/en-us/previous-versions/windows/it-pro/windows-server-2008-R2-and-2008/ee617195\(v=technet.10\))
**Example queries:**
* The following `ldapsearch` example queries an Active Directory LDAP directory on an AWS EC2 instance and returns LDAP Data Interchange Format (LDIF) output:
```bash
ldapsearch -h example.com -p 389 -x -b "DC=example,DC=com"
```
```
The output includes the distinguished names, object classes, and canonical names for objects in the directory.
```
* The same query using `dsquery` for Active Directory is:
```bash
dsquery * -limit 0 >>all-objects.txt
```
* To query for all users using `dsquery`:
```bash
dsquery * -limit 0 -filter "&(objectClass=User)(objectCategory=Person)" -attr * >>all-users.txt
```
***
### Set up LDAP SSO in Harness
The following diagram shows the high-level setup flow.
Click to view full size image
To set up Harness SSO with LDAP, complete the following steps:
1. Add LDAP as an SSO provider in Harness. This involves connecting to your LDAP server and defining user and group queries.
2. Link a Harness user group to your LDAP directory for automatic synchronization.
3. Enable LDAP as the SSO provider in Harness.
4. Verify login using a synchronized LDAP user account.
#### Step 1: Add LDAP as SSO provider
In this step, you establish a connection from the Harness delegate to your LDAP directory and define how Harness queries for users and groups.
If you experience frequent delegate timeout errors, set the LDAP response timeout to 2 minutes and set the sync interval to the default value of 1 hour.
To add your LDAP directory as a Harness SSO provider, do the following:
1. In your Harness account, go to **Account Settings** -> **Authentication**.
The **Authentication** configuration page appears.
2. Select **LDAP Provider**.
The LDAP Provider settings appear.
Click to view full size image
3. Enter a name for your LDAP provider in the **Name** field.
4. To synchronize LDAP users into linked Harness user groups, select **Enable Authorization**. Harness synchronizes LDAP users into the user group only when authorization is enabled.
5. Click **Continue**.
The **Connection Settings** page appears.
#### Step 2: Configure connection
To configure connection settings, do the following:
1. In **Host**, enter the hostname for the LDAP server. Harness uses DNS to resolve the hostname. You can also use the public IP address of the host.
2. In **Port**, enter `389` for standard LDAP. To connect over Secure LDAP (LDAPS), enter `636` and enable the **Use SSL** setting.
3. Select **Enable Referrals** if you have referrals configured for your LDAP authentication.
4. In **Max Referral Hops**, enter the number of referral hops.
5. In **Connection Timeout**, enter the timeout in milliseconds. For example, `5000` equals 5 seconds.
6. To disable nested LDAP queries and optimize group sync performance, clear the **Recursive Membership Search** checkbox. Harness then performs a flat group search instead of a nested query.
7. In **Response Time**, enter the response timeout in milliseconds. For example, `5000` equals 5 seconds.
8. In **Bind DN**, enter the distinguished name of the directory object used for the Bind operation. This is typically the administrator user object. For example:
```
cn=Administrator,CN=Users,DC=example,DC=com
```
Harness uses this account for all LDAP queries.
9. In **Password**, enter the password associated with the Bind DN account.
Click to view full size image
10. Select **Test Connection**.
11. After the connection succeeds, select **Continue**.
The **Delegates Setup** page appears.
12. Select **Only use Delegates with all of the following tags** and select the delegate that you have set up earlier.
Click to view full size image
13. Click **Save and Continue**.
The **User Queries (Optional)** page appears.
#### Step 3: Configure a user query
The user query defines the scope within which Harness searches for users in your LDAP directory. Harness adds the matching users.
1. In the **User Queries (Optional)** page, select **New User Query**.
2. In **Base DN**, enter the relative distinguished name (RDN) for the Users object in the directory.
If you are logged into the Active Directory server, run `dsquery user` at the command line to see a user distinguished name such as:
```
CN=John Doe,CN=Users,DC=mycompany,DC=com
```
The Base DN is the portion after the user common name (CN). Typically, enter:
```
CN=Users,DC=mycompany,DC=com
```
To verify that this Base DN returns the expected user attributes, run:
```bash
dsquery user dc=mycompany,dc=com | dsget user -samid -fn -ln -dn
```
3. In **Search Filter**, enter the filter for the attribute used to find users in the Base DN. Typically, this is `(objectClass=user)` or `(objectClass=person)`.
To verify the correct filter in `dsquery`, run:
```bash
dsquery * -filter "(objectClass=user)"
```
4. In **Name Attribute**, enter the common name attribute for the users in your LDAP directory. Typically, this is `cn`.
To list all attributes for a specific user, run:
```bash
dsquery * "CN=users,DC=mycompany,DC=com" -filter "(samaccountname=*user_name*)" -attr *
```
5. In **Email Attribute**, enter the LDAP attribute that contains user email addresses. Harness uses email addresses to identify users. Typical values are `userPrincipalName` (most common), `email`, or `mail`.
6. In **Group Membership Attribute**, enter `memberOf` to return a list of all groups each user belongs to.
To query group memberships for a specific user (for example, john.doe), run:
```bash
dsquery user -samid john.doe | dsget user -memberof | dsget group -samid
```
7. Select **Test**.
Click to view full size image
8. After the test succeeds, select **Continue**.
The **Group Queries (Optional)** page appears.
#### Step 4: Configure a group query
The group query defines the scope within which Harness searches for user groups in your LDAP directory.
1. In **Base DN**, enter the distinguished name of the LDAP group you want to add. This group should contain the users you defined in the user query.
To list all groups in your LDAP directory, run:
```bash
dsquery group -o dn DC=mycompany,DC=com
```
To verify that the group contains the expected members, run:
```bash
dsget group "CN=Group_Name,CN=Users,DC=mycompany,DC=com" -members | dsget user -samid -upn -desc
```
Typically, set the Base DN to the Users group for a wide search scope. For example:
```
CN=Users,DC=mycompany,DC=com
```
When you search for LDAP groups later (while linking group members to Harness), the search runs within the scope of this Base DN.
2. In **Search Filter**, enter `(objectClass=group)`.
3. In **Name Attribute**, enter `cn`.
4. In **Description Attribute**, enter `description` to sync the LDAP group description.
To view group descriptions in your LDAP directory, run:
```bash
dsquery * -Filter "(objectCategory=group)" -attr sAMAccountName description
```
5. Select **Test**.
Click to view full size image
6. After the test succeeds, click **Continue**.
The **LDAP User Sync Schedule** page appears.
#### Step 5: Configure an LDAP user sync schedule
The default LDAP user synchronization interval is 1 hour. You can customize this interval using a cron expression.
The page displays a tabular breakdown of the cron expression for verification. The **Cron expression** field indicates whether the expression is valid.
**Supported cron format**
The **Cron Expression** field accepts a Quartz CronTrigger string consisting of six or seven subexpressions (fields). Unix cron expressions with five subexpressions are not supported.
Sample Quartz expression:
```
0 0 4 7 ? 2014
| | | | | |
| | | | | \-------- YEAR (2014)
| | | | \----------- DAY_OF_WEEK (NOT_SPECIFIED)
| | | \------------- MONTH (JULY)
| | \--------------- DAY_OF_MONTH (4th)
| \----------------- HOUR (0 - MIDNIGHT LOCAL TIME)
\------------------- MINUTE (0)
```
Go to [Cron Expressions](https://docs.oracle.com/cd/E12058_01/doc/doc.1014/e12030/cron_expressions.htm) to review the Oracle documentation on Quartz cron syntax.
1. To configure a synchronization schedule, modify the default cron expression in the **Enter a custom cron expression** field.
2. Click **Save**. Review the LDAP User Sync Schedule and click **Confirm**.
Your new LDAP provider appears in the SSO Providers list.
Click to view full size image
#### Step 6: Link a Harness user group to LDAP
After you configure the LDAP SSO provider, create a Harness user group and link it to your LDAP directory for automatic synchronization.
If you do not enable authorization now, Harness does not synchronize LDAP users into linked user groups periodically, and the manual synchronization option is unavailable. You can enable authorization later.
To link a Harness user group to LDAP, do the following:
1. In your Harness account, go to **Account Settings** -> **Access Control**.
2. Select **User Groups** -> **New User Group**.
3. Enter a name for the user group.
4. Select **Save**.
The user group appears in the User Groups list.
5. Select your user group.
6. Select **Link to SSO Provider Group**.
7. Search for and select your LDAP provider.
8. In **LDAP Group Search Query**, search for your LDAP group.
Click to view full size image
LDAP group names are case-sensitive. For example, "QA", "Qa", and "qA" each create separate groups in Harness.
9. Select your LDAP group from the list.
10. Select **Save**.
Users added to the LDAP-linked Harness user group are also added as Harness users.
NOTE
Synchronization begins immediately but may take a few minutes to complete. Harness synchronizes with the LDAP server at the interval you configured. New users added to your LDAP directory appear in Harness at the next scheduled synchronization.
#### Step 7: Enable LDAP SSO in Harness
After you link a user group to LDAP, enable LDAP as the SSO method in Harness.
Before you enable LDAP SSO and log out to test, confirm that your LDAP users have the passwords associated with their email addresses. If they do not, they are locked out of Harness. Active Directory stores passwords using non-reversible encryption.
To test safely, add a new user to your LDAP group, record the password, wait for the next LDAP sync interval, and then log in with that user.
Contact Harness Support at if a lockout occurs.
To enable the LDAP provider, do the following:
1. In your Harness account, go to **Account Settings** -> **Authentication**.
2. Select **Login via LDAP**.
3. In **Verify and Enable LDAP Configuration**, enter your email address and password.
4. Select **Test**.
5. After the test succeeds, select **Enable**.
After you enable LDAP SSO and users in this group log into Harness, Harness verifies their email addresses and passwords against the LDAP provider.
**Single LDAP provider limit**: After you set up and enable LDAP in Harness, you cannot add a second LDAP SSO entry. Harness disables the option to add LDAP in the UI.
**LDAP-provisioned users and SAML**: Users provisioned through LDAP are added at the account scope and receive an email invitation to log into Harness. If SAML is also configured, these users can log in through SAML. Go to [Single sign-on (SSO) with SAML](/harness-ai/use-harness-platform/authentication/single-sign-on-saml) to review SAML configuration.
After you enable LDAP SSO, users in the linked LDAP group can log into Harness using their LDAP credentials.
***
### Synchronize LDAP users manually
Harness provides an option to synchronize LDAP users with a Harness user group on demand. The user group must be linked to the LDAP SSO configuration before you synchronize.
To synchronize LDAP users manually, do the following:
1. In your Harness account, go to **Account Settings** -> **Authentication**.
2. In the **Login via LDAP** section, select the three-dot menu on the LDAP SSO configuration.
3. Select **Synchronize User Groups**.
4. To verify the synchronization, go to **Account Settings** -> **Access Control** -> **User Groups**.
5. Select the user group linked to the LDAP SSO configuration and confirm that the LDAP users appear in the group.
***
### Delink a user group from LDAP
To delink a Harness user group from its linked LDAP provider, do the following:
1. In your Harness account, go to **Account Settings** -> **Access Control** -> **User Groups**.
2. Select the user group you want to delink.
3. Select **Delink Group**.
The delink confirmation dialog appears.
Click to view full size image
4. To keep the existing members in the Harness user group, select **Retain all members in the User Group**.
If LDAP SSO is enabled, these users can still log into Harness. If LDAP SSO is disabled, they cannot log in.
5. Select **Save**.
Delinking a user group removes users from the LDAP-linked group but does not delete user accounts from Harness. These users remain in Harness with the following behavior:
* Harness continues to verify their credentials against the LDAP provider at login.
* You can add them to other Harness user groups.
* To delete a user permanently, go to **Account Settings** -> **Access Control** -> **Users** and delete the individual user account.
***
### Harness local login
To prevent lockouts, a user in the Harness Administrators group can use the [local login URL](/harness-ai/use-harness-platform/authentication/single-sign-on-saml/advanced-saml-configuration#harness-local-login) to log in and update LDAP settings.
***
### Related articles
* [Authentication overview](/harness-platform/3.0/harness-platform-resources/authentication/authentication-overview) - Review all supported authentication methods in Harness.
* [Single sign-on (SSO) with SAML](/harness-ai/use-harness-platform/authentication/single-sign-on-saml) - Configure SAML-based SSO for different identity providers such as Okta, Microsoft Entra ID, Keycloak, and OneLogin.
* [Single sign-on (SSO) with OAuth](/harness-ai/use-harness-platform/authentication/single-sign-on-sso-with-oauth) - Configure OAuth-based SSO with supported providers.
* [Two-factor authentication](/harness-ai/use-harness-platform/authentication/two-factor-authentication) - Add an extra layer of security for user logins.
{% @harness-feedback/feedback module="harness-ai" pagePath="harness-ai/use-harness-platform/authentication/single-sign-on-sso-with-ldap" %}
# Single Sign-On (SSO) with OAuth
This document explains single sign-on with various OAuth providers.
Harness supports Single Sign-On (SSO) with OAuth 2.0 identity providers, such as GitHub, Bitbucket, GitLab, LinkedIn, Google, and Microsoft Entra ID. This integration allows you to use an OAuth 2.0 provider to authenticate your Harness Users.
Click to view full size image
Once you enable OAuth 2.0 SSO, users can log into Harness using their GitHub, Google, or other provider's email address.
***
### What you will learn in this topic
By the end of this topic, you will be able to:
* [Set up OAuth 2.0 SSO with your preferred identity provider](#set-up-oauth-20-sso).
* [Configure user access controls and domain restrictions](#restrict-email-domains-for-oauth-sso).
* [Implement security best practices to prevent account lockouts](#harness-local-login).
* [Test user login with OAuth SSO providers](#log-in-with-an-oauth-20-provider).
***
### Before you begin
Before you integrate Harness with OAuth 2.0, ensure you have the following:
* Understanding of [Authentication concepts](/harness-platform/3.0/harness-platform-resources/authentication/authentication-overview).
* Understanding of [Role-based access control (RBAC) in Harness](/harness-platform/3.0/harness-platform-resources/platform-access-control/rbac-in-harness).
* Understanding of [OAuth 2.0](https://aaronparecki.com/oauth-2-simplified/).
* A Harness account that is a member of the Administrator User Group with **Create/Edit**, and **Delete** permissions for Authentication Settings. To check the permissions associated with your account, go to [roles in Harness](/harness-ai/use-harness-platform/platform-access-control/add-manage-roles#manage-roles-in-harness).
* An active OAuth 2.0 provider account (GitHub, Google, Bitbucket, etc.) that uses the same email address as your Harness account. This is also applicable to all users that you wish to invite to Harness after you enable OAuth 2.0 SSO. For example, if a Harness user is registered with Harness using the email address ****, and OAuth SSO is enabled in Harness using Bitbucket as the provider, then the user must also be registered with Bitbucket using ****.
* **GitHub users:** If you use GitHub for OAuth 2.0 SSO, you must use your primary email address for your Harness account and login. GitHub supports [primary](https://docs.github.com/en/github/setting-up-and-managing-your-github-user-account/managing-email-preferences/changing-your-primary-email-address) and secondary email addresses:
Click to view full size image
***
### Set up OAuth 2.0 SSO
To set up OAuth 2.0 SSO, do the following:
1. Sign in to your Harness account (that has the relevant permissions to configure Authentication Settings). For information on Harness RBAC, go to [RBAC in Harness](/harness-platform/3.0/harness-platform-resources/platform-access-control/rbac-in-harness).
2. Select **Account Settings** and select **Users** under **Access Control**.
The **Access Control** page opens.
Click to view full size image
3. In the **Users** tab, you will see the list of all the **Active Users** and their **Email**.
4. Before you set up SSO, confirm that your users' email addresses registered with Harness are the same email addresses they use to log into the OAuth 2.0 provider you are enabling for Harness SSO.
5. Select **Account Settings** -> **Authentication**.
The **Authentication: Configuration** page appears.
6. If not already enabled, enable **Use Public OAuth Providers**.
7. Enable each public OAuth 2.0 provider you want to use for SSO.
Click to view full size image
***
### Log in with an OAuth 2.0 provider
The first time you log into Harness using OAuth 2.0 SSO, Harness redirects you to the OAuth 2.0 provider. Authenticate using your OAuth provider credentials. The provider then redirects you back to Harness and logs you in automatically.
For all future logins, if you are already logged into your OAuth 2.0 provider in the same browser as Harness, enter your email address in Harness and log in automatically.
The following example demonstrates the OAuth 2.0 login flow for a user registered in Harness and OAuth provider Google:
**ExampleUser** is registered in Harness with the email address ****:
Click to view full size image
The email address **** is also registered with Google:
Click to view full size image
And Google is enabled as the Harness SSO provider.
**ExampleUser** logs into Harness with the email address ****:
Click to view full size image
When **ExampleUser** selects Google as the authentication provider, Harness redirects the browser to the Google sign-in page:
Click to view full size image
The user enters the email address **** and clicks **Next**. The user then enters the password and clicks **Next**.
Google verifies the email address and password and redirects the browser back to Harness, where **ExampleUser** logs in automatically.
Harness OAuth 2.0 login successful!
Each time you use the OAuth provider to log into Harness, you must log into the OAuth provider first. This is the standard OAuth process.
***
### Restrict email domains for OAuth SSO
By default, any member invited to Harness by a Harness Administrator can log in using an OAuth 2.0 SSO identity provider that's enabled on Harness. However, you can limit which email domain names can be used to log into Harness.
For example, you might set up Google as a Harness OAuth 2.0 SSO provider, but you want only users who have **example.io** in their (login) email address to be able to log in via Google.
To restrict which email domains can access Harness via OAuth, go to [Restrict email domains](/harness-platform/3.0/harness-platform-resources/authentication/authentication-overview#restrict-email-domains).
***
### Harness local login
In the case of lockouts or OAuth downtime, go to [Harness Local login](/harness-ai/use-harness-platform/authentication/single-sign-on-saml/advanced-saml-configuration#harness-local-login).
***
### Prevent lockouts
The following steps help you prevent lockouts when setting up SSO in Harness:
* When you enable OAuth 2.0 SSO, use a Harness user account that is a member of the Administrator Group and remain logged in until you have tested SSO using a separate user account. If there is any error, you can disable OAuth 2.0 SSO.
* Ensure that one or more Harness users in the Administrators Group are registered with Harness using the same email address they use to log into the OAuth 2.0 provider you plan to use for SSO. Repeat this test for each enabled OAuth 2.0 provider.
If you accidentally get locked out of Harness, email , call 855-879-7727, or contact [Harness Sales](https://harness.io/company/contact-sales).
***
### Set the default experience
For each user to land on the relevant part of the product after login, go to [Set the default experience](/harness-ai/use-harness-platform/authentication/single-sign-on-saml/advanced-saml-configuration#set-the-default-experience).
***
### Related articles
* [Two-Factor Authentication](/harness-ai/use-harness-platform/authentication/two-factor-authentication) - Add an extra layer of security to your Harness login.
* [Single Sign-On (SSO) with SAML](/harness-ai/use-harness-platform/authentication/single-sign-on-saml) - Authenticate users with SAML 2.0 identity providers.
* [Single Sign-On (SSO) with LDAP](/harness-ai/use-harness-platform/authentication/single-sign-on-sso-with-ldap) - Integrate Harness with LDAP directory services for authentication.
{% @harness-feedback/feedback module="harness-ai" pagePath="harness-ai/use-harness-platform/authentication/single-sign-on-sso-with-oauth" %}
# Single Sign-On (SSO) with OpenID Connect (OIDC)
This document explains single sign-on with OIDC provider.
Harness supports single sign-on (SSO) with any custom OpenID Connect (OIDC) provider. You can authenticate users and provision user groups through OIDC integration. When you integrate your Harness account with an OIDC provider, your users can log into Harness using their existing identity provider credentials.
Harness OIDC implementation supports the **Authorization Code flow**, which is the most common and secure OAuth 2.0 flow. In this flow, users authenticate with the identity provider, receive a short-lived authorization code, and Harness exchanges that code for an access token to complete the login.
OIDC authentication is only supported for accounts with a configured [Vanity URL](/harness-platform/3.0/harness-platform-resources/authentication/authentication-overview#set-up-vanity-url).
{% hint style="info" %}
**FEATURE AVAILABILITY**
The feature flag `PL_ENABLE_OIDC_AUTHENTICATION` must be enabled. Contact [Harness Support](mailto:support@harness.io) to enable this feature for your account.
{% endhint %}
***
### What you will learn in this topic
By the end of this topic, you will be able to:
* [Configure an OIDC provider in Harness for SSO authentication](#step-1-create-an-app-integration-in-okta).
* [Set up Okta as an OIDC provider with relevant client settings](#step-2-add-an-okta-oidc-provider-in-harness).
* [Enable Just-in-Time (JIT) user provisioning for automatic user creation](#step-4-configure-additional-settings-optional).
* [Link Harness user groups to OIDC provider groups for authorization](#step-6-assign-okta-user-group-to-oidc-app).
* [Test and verify OIDC SSO login](#step-10-test-and-verify-oidc-authorization).
***
### Before you begin
Before you integrate Harness with an OIDC provider, ensure you have the following:
* Familiarity with the [authentication overview](/harness-platform/3.0/harness-platform-resources/authentication/authentication-overview) to understand how SSO works in Harness.
* Understanding of [OpenID Connect (OIDC)](https://openid.net/developers/how-connect-works/) protocol basics.
* A Harness account with a configured [Vanity URL](/harness-platform/3.0/harness-platform-resources/authentication/authentication-overview#set-up-vanity-url). OIDC authentication is only supported for accounts with Vanity URLs.
* Account administrator permissions in Harness to configure SSO providers and manage authentication settings.
* Administrative access to your OIDC identity provider (such as Okta, Auth0, or Azure AD) to create application integrations.
* Ability to generate client ID and client secret from your OIDC provider.
***
### Set up OIDC SSO in Harness
Harness supports the following OIDC features:
* **User authentication** – Authenticate users through your OIDC identity provider.
* **Multiple OIDC providers** – Configure and manage multiple OIDC identity providers within a single Harness account.
* **Just-in-Time (JIT) user provisioning** – Automatically create user accounts in Harness when users log in for the first time through OIDC.
* **User group provisioning** – Automatically add users to Harness user groups based on their OIDC provider group membership.
This guide uses Okta as an example OIDC provider. The same principles apply to other OIDC providers such as Auth0, Azure AD, or any custom OIDC-compliant identity provider.
To configure Harness with Okta for OIDC SSO, exchange the required information between your Okta application and Harness. You will create an application integration in Okta, configure the OIDC provider in Harness with the client credentials from Okta, and optionally enable user group synchronization.
Use two browser windows or tabs for this process. Open Okta in one tab and Harness in the other. In your Harness tab, navigate to **Account Settings** -> **Authentication** -> **Login via OIDC** -> **Add OIDC Provider** to have the configuration page ready as you gather information from Okta.
#### Step 1: Create an app integration in Okta
To create an app integration in Okta, do the following:
1. Log in to your Okta administrator account.
2. Navigate to **Applications** and select **Create App Integration**.
Click to view full size image
3. In the **Create a new app integration** dialog, select **OIDC - OpenID Connect** as the sign-in method and **Web Application** as the application type.
Click to view full size image
4. Click **Next**.
5. Enter a name for the app in **App Integration Name**.
6. Under **Sign-in redirect URIs**, enter your Harness URL followed by `/gateway/user/auth/oidc/callback`.
**Example:** `https://something.harness.io/gateway/user/auth/oidc/callback`
7. Under **Assignments**, select the user groups that should have access to the application. Other details are optional. For more information on the optional fields, go to [Okta OIDC app integration](https://help.okta.com/en-us/content/topics/apps/apps_app_integration_wizard_oidc.htm).
8. Click **Save** to complete the app integration setup.
The following animation demonstrates creating an OIDC app integration in Okta with the required configuration settings.

#### Step 2: Add an Okta OIDC provider in Harness
To add an Okta OIDC provider in Harness, do the following:
1. In your Harness account, go to **Account Settings** -> **Authentication**.
2. Select **Login via OIDC** and select **Add OIDC Provider**.
3. Enter a name for the OIDC configuration.
4. In **OIDC Scope**, the default required values (`openid`, `email`, and `profile`) are pre-selected. You may add additional scopes if needed.
5. Under **Issuer**, enter the Issuer URL from your authorization server (for example, `https://example-123.oktapreview.com`).
6. In the **UID Field**, enter the attribute that contains the user email address. Only email addresses are supported as the unique identifier.
7. Click **Continue**.
Click to view full size image
The following animation demonstrates adding an Okta OIDC provider in Harness with the required configuration details.

#### Step 3: Configure client settings
Client settings include the credentials and endpoints needed for Harness to connect with the OIDC provider.
{% tabs %}
{% tab title="Discovery Enabled (Default)" %}
If **Discovery is enabled** (default behavior), Harness automatically retrieves Identity Provider (IdP) details from the `/.well-known` endpoint (for example, `https://example-123.oktapreview.com/.well-known/openid-configuration`).
Provide the following:
* **Client Identifier** – The Client ID of the previously created Okta application. You can find this under **Client Credentials** in the **General** tab of the application details in Okta.
* **Client Secret** – Store this secret in the [Built-In Harness Secrets Manager](/harness-ai/use-harness-platform/secrets/secrets-management/harness-secret-manager-overview). This is a required part of the configuration.
* **Redirect URL** – Must match the Sign-in Redirect URI from the Okta app setup (for example, `https://something.harness.io/gateway/user/auth/oidc/callback`).
Click to view full size image
{% endtab %}
{% tab title="Discovery Disabled" %}
If **Discovery is disabled**, enter the following additional details in addition to **Client Identifier**, **Client Secret**, and **Redirect URL**:
* **Authorization Endpoint** – URL for user authorization (for example, `https://example-123.oktapreview.com/oauth2/v1/authorize`).
* **Token Endpoint** – URL for retrieving access tokens (for example, `https://example-123.oktapreview.com/oauth2/v1/token`).
* **User Info Endpoint** – URL for obtaining user details (for example, `https://example-123.oktapreview.com/oauth2/v1/userinfo`).
* **JWKS URI** – URL where the token signer publishes its keys (for example, `https://example-123.oktapreview.com/oauth2/v1/keys`).
Click to view full size image
{% endtab %}
{% endtabs %}
Click **Continue**.
#### Step 4: Configure additional settings (optional)
**Enable JIT provisioning**
By default, JIT provisioning is disabled. Without it, SSO login fails if the user does not already exist in Harness. When you enable JIT provisioning, Harness automatically creates users upon their first login, eliminating the need for manual account creation.
Click to view full size image
The **Claim Key** and **Claim Value** fields help control automatic provisioning. If these values match specific attributes in the ID token received from the OIDC provider, Harness automatically creates the user in Harness.
Go to [Okta documentation](https://developer.okta.com/docs/guides/customize-tokens-returned-from-okta/main/) for guidance on customizing Okta tokens with custom claims.
**Enable authorization**
You can enable Okta OIDC authorization in Harness by linking a [Harness user group](/harness-ai/use-harness-platform/platform-access-control/add-user-groups) to an Okta user group. When a user from the linked Okta group logs into Harness, Harness automatically adds them to the corresponding Harness user group. The user inherits the permissions and access assigned to that group.
Go to [RBAC in Harness](/harness-platform/3.0/harness-platform-resources/platform-access-control/rbac-in-harness) for more details on role-based access control.
#### Step 5: Set up authorization for OIDC provider
OIDC authorization allows users authenticated via your OIDC provider to be authorized in Harness.
**Create a user group in Okta**
If you have not already created a user group in Okta, do the following:
1. Log in to your Okta administrator account.
2. Go to **Directory** -> **Groups**, and select **Add group**.
3. In the **Add group** dialog, enter a name and description.
4. Click **Save**.
Make sure to note the Okta group name. You will need it later to link the Okta group to a Harness user group.
Click to view full size image
**Add users to the group**
1. After creating the group, search for it in the **Groups** section.
2. Select the group and select **Assign people**.
3. Search for users and add them to the group.
After adding members, the group displays the list of users added.
The following animation demonstrates creating and configuring user groups in Okta for OIDC authorization.

#### Step 6: Assign Okta user group to OIDC app
For users in the Okta group to authenticate through the OIDC app, you must assign the Okta user group to the same Okta OIDC provider app you created for Harness. Without this assignment, users in the group cannot access the application.
To assign the Okta user group, do the following:
1. In Okta, go to **Directory** -> **Groups** and select your Okta user group.
2. Go to the **Applications** tab and select **Assign applications**. Find the Okta application you created.
3. Select **Assign** and select **Done**.
4. Go to the **Applications** page and select the Okta app you created previously.
5. In the **Assignments** tab, verify that your Okta user group is listed.
Click to view full size image
The following animation demonstrates assigning Okta user groups for OIDC authorization.

#### Step 7: Create a groups claim
A groups claim includes the user group membership information in the ID token that Okta sends to Harness during authentication. Harness uses this information to automatically assign users to the correct Harness user groups. Without a groups claim, Harness cannot map Okta groups to Harness user groups for authorization.
Go to [Okta documentation](https://developer.okta.com/docs/guides/customize-tokens-groups-claim/main/#add-a-groups-claim-for-the-org-authorization-server) for detailed steps on adding a groups claim.
To create a groups claim, do the following:
1. In Okta, go to **Applications** and select your Harness Okta OIDC SSO app.
2. Go to the **Sign On** tab and select **Edit** under the **OpenID Connect ID Token** section.
3. In the **Groups claim filter** section, ensure the name "groups" is present. If it is empty, add it.
4. Set the filter type to **Matches regex** and enter `.*` to return all user groups. The filter allows you to select which groups should be authenticated to Harness.
5. Click **Save** to complete the configuration.
The following animation demonstrates creating a groups claim in Okta to enable user group mapping in Harness.

#### Step 8: Enable group claim authorization in Harness
To enable group claim authorization in Harness, do the following:
1. In your Harness account, go to **Account Settings** -> **Authentication**.
2. Expand the **Login via OIDC** section.
3. Select **More options**\*(⋮) next to your Okta provider configuration and select **Edit**.
Click to view full size image
4. On the **OIDC Provider Overview** page, add **groups** as an additional **OIDC Scope** if using an Org authorization server in Issuer.
Click to view full size image
5. In **Additional Settings**, enable **Authorization**.
6. Set **Group Claim** as `groups`.
7. Select **Submit** to save changes.
Your Okta configuration now uses the group claim for authorization.
Click to view full size image
#### Step 9: Link Okta user group to Harness user group
To link an Okta user group to a Harness user group, do the following:
1. In your Harness account, go to **Account Settings** -> **Access Control**.
2. Select **User Groups** and find the group you want to link with your Okta user group.
3. Select **Link to SSO Provider Group**.
4. In the **Search SSO Settings** window, select your Okta OIDC SSO configuration.
5. Enter the Okta group name and click **Save**.
6. Repeat these steps for any additional user groups you need to connect.
The following animation demonstrates linking an Okta user group to a Harness user group for SSO authorization.

#### Step 10: Test and verify OIDC authorization
To test and verify OIDC authorization in Harness, do the following:
1. Open a private or incognito browsing window and go to Harness.
2. Log in using a Harness user account with an email registered in Okta.
3. If configured correctly, Harness redirects you to the Okta login page.
4. Enter your email address. Passwords for Harness and Okta can be different.
5. If authentication is successful, Okta redirects you back to Harness.
6. In another browser window where you are logged in as an administrator, go to **Account Settings** -> **Access Control**.
7. Select **User Groups** and open the group linked to Okta.
8. Verify that the logged-in user appears as a member of the group.
By being part of this user group, the user inherits all permissions and access assigned to it. Go to [RBAC in Harness](/harness-platform/3.0/harness-platform-resources/platform-access-control/rbac-in-harness) for more details.
The following animation demonstrates testing OIDC authentication by logging in through Okta and verifying automatic user group assignment in Harness.

{% hint style="warning" %}
**PREVENT LOCKOUT**
If the OIDC login test fails due to misconfiguration (such as incorrect client credentials, group claim settings, or user mapping issues), you may be unable to log in. To prevent lockout, keep your administrator session open in another browser window while testing. If you get locked out, you can use the [Harness local login](/harness-ai/use-harness-platform/authentication/single-sign-on-saml/advanced-saml-configuration#harness-local-login) URL to log in with your Harness credentials and disable or fix the OIDC configuration.
{% endhint %}
***
### Related articles
* [Single sign-on (SSO) with LDAP](/harness-ai/use-harness-platform/authentication/single-sign-on-sso-with-ldap) - Configure LDAP-based SSO including Active Directory and OpenLDAP.
* [AWS connector with OIDC](/harness-ai/use-harness-platform/connectors/cloud-providers/ref-cloud-providers/aws-connector-settings-reference#credentials) - Connect your AWS account to Harness using OIDC.
* [GCP connector settings](/harness-ai/use-harness-platform/connectors/cloud-providers/ref-cloud-providers/gcs-connector-settings-reference#use-openid-connect-oidc) - Understand how Harness Delegate communicates with GCP through OIDC.
{% @harness-feedback/feedback module="harness-ai" pagePath="harness-ai/use-harness-platform/authentication/single-sign-on-sso-with-oidc" %}
# Single Sign-On (SSO) for Harness MCP
Learn how to add an additional ACS URL or redirect URI in your Identity Provider to enable Harness MCP login via SAML or OIDC.
{% tabs %}
{% tab title="Manual" %}
1. Sign in to the **Okta Admin Console**.
2. Go to **Applications** > **Applications**.
3. Select your Harness application.
4. On the **General** tab, select **Edit** in the **SAML Settings** section.
5. Select **Next**.
6. Leave the existing **Single sign-on URL** unchanged.
7. Enable **Allow this app to request other SSO URLs**.
8. Under **Other Requestable SSO URLs**, select **Add Another**.
9. Select **Next**, then click **Finish**.
After configuration, your Okta application will have three URLs:
| URL | Source | Purpose |
| ------------------------------------------ | ----------------------------- | ------------------------------------ |
| **SAML Endpoint URL** (index 0) | Copy from Harness SAML config | Harness platform login via HarnessID |
| **Additional Reply URL for MCP** (index 1) | Copy from Harness SAML config | Harness MCP login |
Both URLs are required. Removing the SAML Endpoint URL disables Harness platform login. Removing the MCP URL disables MCP login.
{% endtab %}
{% tab title="Interactive" %}
{% embed url="" %}
{% endtab %}
{% endtabs %}
Harness MCP supports authentication through your existing Single Sign-On (SSO) provider. To enable SSO for MCP, add an Assertion Consumer Service (ACS) URL (for SAML) or redirect URI (for OIDC) to your Identity Provider (IdP).
An ACS URL or redirect URI specifies where your IdP sends authentication responses after a user signs in. Harness MCP requires its own ACS URL or redirect URI because it authenticates through a separate endpoint from the standard Harness platform.
Adding the MCP-specific URL does not affect your existing Harness platform login. You can continue to access both Harness and Harness MCP through the same SSO provider.
***
### What you will learn in this topic
By the end of this topic, you will be able to:
* [Retrieve the MCP-specific ACS URL](#configure-saml-for-harness-mcp) or [redirect URI from Harness](#configure-oidc-for-harness-mcp).
* Add the MCP URL to your [Identity Provider](#configure-saml-for-harness-mcp).
* [Configure SAML](#configure-saml-for-harness-mcp) or [OIDC authentication](#configure-oidc-for-harness-mcp) for Harness MCP.
***
### Before you begin
Before you configure SSO for Harness MCP, ensure you have the following:
* **Account Admin** or **Authentication Settings** permissions in Harness.
* Identity Provider configured for SAML or OIDC authentication with Harness. Go to [Single Sign-On (SSO) with SAML](/harness-ai/use-harness-platform/authentication/single-sign-on-saml) to set this up if needed.
* Administrative access to your Identity Provider.
***
### Configure SAML for Harness MCP
Before you update your Identity Provider, retrieve the MCP ACS URL from your Harness SAML configuration.
{% tabs %}
{% tab title="Manual" %}
1. Sign in to Harness.
2. Go to **Account Settings** > **Security and Governance** > **Authentication**.
3. Locate your SAML provider.
4. Select **⋮** > **Edit**.
5. Copy the value from **Additional Reply URL for MCP (Optional)**.
{% endtab %}
{% tab title="Interactive" %}
{% embed url="" %}
{% endtab %}
{% endtabs %}
Based on your Identity Provider, go to [Microsoft Entra ID](#microsoft-entra-id-azure-ad), [Okta](#okta), or [Ping Identity](#ping-identity-pingone) and add the MCP ACS URL.
#### Microsoft Entra ID (Azure AD)
{% tabs %}
{% tab title="Manual" %}
1. Sign in to the Azure portal.
2. Go to **Microsoft Entra ID** > **Manage** > **Enterprise Applications**.
3. Select your Harness application.
4. Select **Manage** > **Single sign-on**.
5. In **Basic SAML Configuration**, click **Edit**.
6. Under **Reply URL (Assertion Consumer Service URL)**, click **Add reply URL**.
7. Enter the MCP ACS URL copied from Harness.
8. Click **Save**.
{% endtab %}
{% tab title="Interactive" %}
{% embed url="" %}
{% endtab %}
{% endtabs %}
**Troubleshooting**
If you receive the following error:
```bash
AADSTS50011: The reply URL specified in the request does not match the reply URLs configured for the application.
```
Verify that the MCP ACS URL has been added and exactly matches the value displayed in Harness.
***
#### Okta
Okta handles multiple ACS URLs differently from other Identity Providers. Instead of a list of Reply URLs, Okta requires you to enable **Requestable SSO URLs** and add each additional endpoint with an index value. Each URL must have a unique **Index**, and the MCP URL must use a higher index than your Harness platform login URL.
{% tabs %}
{% tab title="Manual" %}
1. Sign in to the **Okta Admin Console**.
2. Go to **Applications** > **Applications**.
3. Select your Harness application.
4. On the **General** tab, select **Edit** in the **SAML Settings** section.
5. Select **Next**.
6. Leave the existing **Single sign-on URL** unchanged. This is your Harness platform login URL, and it occupies index `0`.
7. Enable **Allow this app to request other SSO URLs**.
8. Under **Other Requestable SSO URLs**, select **Add Another**.
9. In **URL**, enter the **Additional Reply URL for MCP** value copied from Harness.
10. In **Index**, change the default value of `0` to `1`.
Okta populates Index with 0 for every new requestable SSO URL. Your Harness platform login URL already uses index 0, so leaving the MCP URL at the default makes the two entries collide and MCP sign-in fails with a 404. Set the MCP URL to a higher index, such as 1, so that the platform login URL keeps priority.
11. Select **Next**, then click **Finish**.
After configuration, your Okta application has the following URLs:
| URL | Index | Source | Purpose |
| -------------------------------- | ----- | ----------------------------- | ------------------------------------ |
| **SAML Endpoint URL** | `0` | Copy from Harness SAML config | Harness platform login via HarnessID |
| **Additional Reply URL for MCP** | `1` | Copy from Harness SAML config | Harness MCP login |
Both URLs are required. Removing the SAML Endpoint URL disables Harness platform login. Removing the MCP URL disables MCP login.
{% endtab %}
{% tab title="Interactive" %}
{% embed url="" %}
{% endtab %}
{% endtabs %}
**Troubleshooting**
If MCP sign-in through Okta returns a **404**, the MCP URL is most likely still at Okta's default **Index** of `0`, which is the same index as your Harness platform login URL. In the Okta Admin Console, go to **SAML Settings** > **Other Requestable SSO URLs** and confirm that:
* The MCP URL's **Index** is set to a value higher than `0`, such as `1`.
* No two URLs share the same **Index**.
* The MCP URL exactly matches the **Additional Reply URL for MCP** value displayed in Harness.
***
#### Ping Identity (PingOne)
PingOne supports multiple ACS URLs for a single SAML application and automatically selects the appropriate URL during authentication.
1. Sign in to the **PingOne Admin Console**.
2. Go to **Applications** > **Applications**.
3. Select your Harness application.
4. Open the **Configuration** tab.
5. Select **Edit**.
6. Under **ACS URLs**, select **Add**.
7. Enter the MCP ACS URL copied from Harness.
8. Click **Save**.
Click to view full size image
Keep your existing ACS URL and add the MCP ACS URL as an additional entry. Both URLs are required to support authentication for the Harness platform and Harness MCP.
Do not modify any other SAML settings, including certificates, Entity IDs, signing configuration, or NameID settings.
***
### Configure OIDC for Harness MCP
This section explains how to add the MCP redirect URI to your Identity Provider for OIDC authentication.
If your Harness account uses OpenID Connect (OIDC), add the MCP redirect URI to your Identity Provider.
{% tabs %}
{% tab title="Manual" %}
1. Sign in to Harness.
2. Go to **Account Settings** > **Authentication**.
3. Locate your OIDC provider under **Login via OIDC**.
4. Select **⋮** > **Edit**.
5. Copy the value from **Additional Reply URL for MCP (Optional)**.
{% endtab %}
{% tab title="Interactive" %}
{% embed url="" %}
{% endtab %}
{% endtabs %}
#### Microsoft Entra ID (Azure AD)
{% tabs %}
{% tab title="Manual" %}
1. Sign in to the Azure portal.
2. Go to **Microsoft Entra ID** > **App registrations**.
3. Select your Harness application.
4. Go to **Authentication** in the left navigation.
5. Under **Redirect URIs**, click **Add URI**.
6. Enter the MCP redirect URL and click **Save**.
{% endtab %}
{% tab title="Interactive" %}
{% embed url="" %}
{% endtab %}
{% endtabs %}
***
#### Okta
1. Sign in to the **Okta Admin Console**.
2. Go to **Applications** > **Applications**.
3. Select your Harness application.
4. On the **General** tab, select **Edit** in the **Login** section.
5. Under **Sign-in redirect URIs**, select **Add URI**.
6. Enter the MCP redirect URL and click **Save**.
***
#### Ping Identity (PingOne)
1. Sign in to the **PingOne Admin Console**.
2. Go to **Applications** > **Applications**.
3. Select your Harness application.
4. Open the **Configuration** tab.
5. Select **Edit**.
6. Under **Redirect URIs**, select **+ Add**.
7. Enter the MCP redirect URL and click **Save**.
Keep your existing redirect URI and add the MCP redirect URI as an additional entry. Both redirect URIs are required to support authentication for the Harness platform and Harness MCP.
***
### Verify the configuration
After you configure SSO for Harness MCP, verify that users can authenticate successfully by signing in to Harness MCP using your Identity Provider.
***
### Frequently asked questions Will adding the MCP URL affect my existing Harness login?
No. Adding the MCP ACS URL or redirect URI does not affect your existing SSO configuration. Users can continue to access both Harness and Harness MCP through the same Identity Provider.
Do I need to update certificates, Entity IDs, or other SSO settings?
No. You only need to add the MCP ACS URL (SAML) or redirect URI (OIDC). No other changes are required.
What happens if I do not add the MCP URL?
Users will not be able to sign in to Harness MCP through SSO. Standard Harness platform login will continue to work.
Why does MCP sign-in return a 404 after I add the MCP URL in Okta?
Okta assigns every new entry under **Other Requestable SSO URLs** a default **Index** of `0`, which is the index already used by your Harness platform login URL. When both URLs share index `0` they collide, and MCP requests return a 404. Edit the MCP URL and set its **Index** to a higher value, such as `1`.
Can my Identity Provider support multiple ACS URLs or redirect URIs?
Most enterprise Identity Providers, including Microsoft Entra ID, Okta, and PingOne, support multiple ACS URLs or redirect URIs for a single application.
Do I need to make this change if I do not use Harness MCP?
No. This update is only required if you use Harness MCP with SSO authentication. If you only use the standard Harness platform login, no action is required.
Do I need to create a separate application in my Identity Provider for Harness MCP?
No. Add the MCP ACS URL or redirect URI to your existing Harness application. You do not need to create a separate application for Harness MCP.
***
### Next steps
* [Single Sign-On (SSO) with SAML](/harness-ai/use-harness-platform/authentication/single-sign-on-saml): Configure SAML-based SSO with your Identity Provider.
* [RBAC in Harness](/harness-platform/3.0/harness-platform-resources/platform-access-control/rbac-in-harness): Understand role-based access control and permissions.
* [Manage service accounts](/harness-ai/use-harness-platform/platform-access-control/add-and-manage-service-account): Configure programmatic access to Harness.
{% @harness-feedback/feedback module="harness-ai" pagePath="harness-ai/use-harness-platform/authentication/single-sign-on-for-harness-mcp" %}
# Two-factor authentication
Set up and enforce two-factor authentication (2FA) for your Harness account or for all users in the account.
Two-factor authentication (2FA) adds a second verification step when you log in to Harness. After you enter your password, Harness prompts you for a time-based code from an authenticator app on your phone. This protects your account even if your password is compromised.
You can enable 2FA for your own profile without impacting other user accounts, or an account administrator can enforce it for all users in the account.
***
### What you will learn in this topic
By the end of this topic, you will know how to:
* Set up 2FA for your user profile.
* Enforce 2FA for all users in the account if you are an account administrator.
* Reset 2FA for a user who has lost access to their authenticator app.
***
### Before you begin
Before you begin, ensure you have the following:
* **Authentication permissions:** To enforce account-wide 2FA, you need a Harness account with **Create/Edit** permissions on Authentication Settings. Go to [Permissions reference](/harness-ai/use-harness-platform/platform-access-control/permissions-reference) to review required permissions.
* **Authenticator app:** Install a 2FA token generator app on your phone, such as Google Authenticator.
***
### Set up 2FA for your profile
To enable 2FA for your own account without affecting other users:
1. Select your **User Profile** icon in the bottom-left corner of the Harness UI.
2. On the Profile page, toggle **Two-Factor Authentication** on. The **Enable Two-Factor Authentication** dialog appears with a QR code.
3. Open your authenticator app and scan the QR code. The app adds **Harness-Inc** to your token list.
CANNOT SCAN THE QR CODE?
The dialog also displays a Secret Key. Enter this key manually in your authenticator app to add the account.
4. Select **Enable**.
The next time you log in, Harness prompts you for the 2FA code from your authenticator app after you enter your password.
***
### Enforce 2FA for all account users
An account administrator or a user with the **Create/Edit** permissions to **Authentication Settings** can enforce 2FA for all users in the account. When an administrator enforces account-wide 2FA:
* **New members** set up 2FA during signup.
* **Existing members** who have not enabled 2FA receive an email with a QR code and setup instructions.
To enforce 2FA for all users:
1. Enable 2FA for your own profile as described in [Set up 2FA for your profile](#set-up-2fa-for-your-profile).
2. Go to **Account Settings** and select **Authentication**. The **Authentication** page appears.
Click to view full size image
3. Toggle **Enforce Two Factor Authentication** on.
If you have not set up 2FA for your own profile, Harness displays a prompt to protect your login first.
Click to view full size image
4. If prompted, select **Go to settings** and complete 2FA setup for your profile. Store the QR code and secret key for your account recovery.
Click to view full size image
5. Return to **Account Settings** and select **Authentication**.
6. Toggle **Enforce Two Factor Authentication** on. Harness displays a confirmation dialog:
Click to view full size image
7. Select **Confirm**.
#### How account-level and user-level 2FA settings interact
Harness evaluates two settings at login:
* The **account-level** 2FA setting
* The **user-level** 2FA setting
Harness sends a 2FA challenge if **one or both** of these settings are enabled. Harness skips the 2FA challenge only when **both** settings are disabled.
* If the 2FA settings is enabled at the account-level, all users receive a 2FA challenge at login, regardless of their user-level setting.
* If the 2FA settings is disabled at the account-level but enabled at the user-level, only that individual user receives a 2FA challenge.
When an administrator enables account-level 2FA, Harness sends 2FA setup emails to users but does not change their individual user-level setting. Users can still enable or disable their own user-level setting independently from their profile.
***
### Reset 2FA for a user
If a user loses access to their authenticator app or QR code, an account administrator can reset 2FA and email them a new QR code and secret key.
To reset 2FA for a user:
1. Go to **Account Settings** and select **Access Control**, then select **Users**.
2. Locate the user and select **More Options** (⋮) next to their name.
Click to view full size image
3. Select **Email new Two Factor Auth secret**. The user receives an email with a new QR code and secret key to reconfigure their authenticator app.
***
### Related articles
* [Authentication overview](/harness-platform/3.0/harness-platform-resources/authentication/authentication-overview): Review all authentication methods available in Harness.
* [Switch account](/harness-ai/use-harness-platform/authentication/switch-account): Switch between multiple Harness accounts and understand re-authentication behavior.
{% @harness-feedback/feedback module="harness-ai" pagePath="harness-ai/use-harness-platform/authentication/two-factor-authentication" %}
# Switch account
Learn how to switch between multiple Harness accounts and understand when re-authentication is required.
If you belong to more than one Harness account, you may need to switch between accounts to manage resources or configure settings in a different account. Instead of signing out and back in, you can switch between accounts directly from the Harness UI. If the target account uses a different authentication method, Harness asks you to re-authenticate to keep access secure.
***
### What you will learn in this topic
By the end of this topic, you will know how to:
* View which Harness accounts you belong to.
* Switch between accounts and set a default account.
* Determine whether switching requires re-authentication based on the authentication settings of each account.
***
### Before you begin
Before you switch accounts, ensure you have the following:
* You belong to at least two Harness accounts. If you only have one account, the **Switch Account** option does not appear.
* You know how each account is set up for authentication (for example, username and password, OAuth, SAML, or LDAP). The authentication method determines whether re-authentication is required when you switch accounts.
***
### View and switch accounts
To view and switch between accounts:
1. Select your **User Profile** icon in the bottom-left corner of the Harness UI. The page with basic information appears.
You can also go to **Account Settings** -> **Account Details** to switch between accounts.
Click to view full size image
2. Select **Switch Account**. Harness displays all the accounts you are a member of.
Click to view full size image
3. Select the account you want to switch to. Click **Switch**.
4. To set a specific account as your default, select **Set as Default** next to the account name. Click **Continue**.
***
### Re-authentication use cases
When you switch accounts, Harness checks the authentication method configured on the target account. If the target account uses a different authentication method or provider than your current account, Harness prompts you to re-authenticate.
The following table summarizes the behavior for each authentication method:
| Current account method | Target account method | Re-authentication required? |
| ----------------------------- | ---------------------------- | --------------------------- |
| Username and Password | Any other method | Yes |
| Username and Password | Username and Password | Yes |
| Username and Password + OAuth | Any method | Yes |
| OAuth (specific providers) | Same OAuth provider set | No |
| OAuth (specific providers) | Different OAuth provider set | Yes |
| SAML (specific SSO config) | Same SAML SSO config | No |
| SAML (specific SSO config) | Different SAML SSO config | Yes |
| LDAP (specific config) | Same LDAP config | No |
| LDAP (specific config) | Different LDAP config | Yes |
| Whitelisted domains | Whitelisted domains | No |
| Whitelisted domains | Any other method | Yes |
| 2FA at Account scope + OAuth | 2FA at Account scope + OAuth | No |
| 2FA at Account scope + OAuth | Any other method | Yes |
***
### Related articles
* [Two-factor authentication](/harness-ai/use-harness-platform/authentication/two-factor-authentication): Add an extra layer of security to your Harness login.
* [Manage public keys](/harness-ai/use-harness-platform/authentication/manage-public-keys): Add and manage GPG and SSH public keys in your Harness profile to verify commit authenticity.
{% @harness-feedback/feedback module="harness-ai" pagePath="harness-ai/use-harness-platform/authentication/switch-account" %}
# Manage public keys
Generate, add, and delete GPG and SSH public keys in your Harness user profile to verify commit authenticity.
When you add a GNU Privacy Guard (GPG) or Secure Shell (SSH) public key to your Harness user profile, Harness uses it to verify that actions like [signing commits](/code-repository/use-harness-code/collaborate-and-develop/signing-commits) actually come from you. This gives your team confidence that commits are authentic and untampered.
***
### What you will learn in this topic
By the end of this topic, you will know how to:
* Generate a GPG or SSH key pair on your local machine.
* Add a GPG or SSH public key to your Harness user profile.
* Delete a key from your profile when it is no longer needed.
***
### Before you begin
Before you manage GPG and SSH public keys, ensure you have the following:
* **Harness account**: An active Harness account. Go to [Onboarding guide](/harness-ai/new-to-harness-platform/get-started) to set up your account.
* **GPG tools (for GPG keys)**: GPG command-line tools installed on your machine.
* **SSH client (for SSH keys)**: An SSH client installed on your machine.
***
### Generate a new GPG key
Before you upload a GPG public key to Harness, generate a GPG key pair on your local machine.
#### Step 1: Install GPG
Download and install the GPG command-line tools for your operating system:
* **macOS**: `brew install gnupg`
* **Windows**: Download [Gpg4win](https://www.gpg4win.org/).
* **Linux**: GPG is usually pre-installed. If not, use your package manager (for example, `sudo apt install gnupg`).
#### Step 2: Generate the key pair
Open a terminal and run:
```bash
gpg --full-generate-key
```
When prompted, provide the following:
1. **Key type**: Select **RSA and RSA**.
2. **Keysize**: Enter `4096` for maximum security.
3. **Expiration**: Press **Enter** for no expiration, or specify an expiration period.
4. **Confirm** your selections.
5. **User ID:** Enter your real name and the email address associated with your Harness account.
6. **Passphrase**: Enter a secure passphrase.
#### Step 3: Find your key ID
List your GPG secret keys:
```bash
gpg --list-secret-keys --keyid-format=long
```
In the output, find the `sec` line. The key ID follows the algorithm and key size. For example, in `sec rsa4096/3AA5C34371567BD2`, the key ID is `3AA5C34371567BD2`.
#### Step 4: Export the public key
Export your public key in ASCII armor format:
```bash
gpg --armor --export
```
Copy the entire output, including the `-----BEGIN PGP PUBLIC KEY BLOCK-----` and `-----END PGP PUBLIC KEY BLOCK-----` lines.
***
### Add a GPG public key to Harness
To add your GPG public key to your Harness profile:
1. In Harness, select your avatar in the bottom-left corner to open your **User Profile**.
2. Under **My Public Keys**, locate the **GPG Keys** section.
3. Select **+ GPG Key**.
4. In the **Add new GPG key** dialog, fill in the following fields:
* **Name** (required): A descriptive name for the key.
* **Id:** An identifier for the key (auto-generated from the name, editable).
* **Description** (optional): A note about the key purpose.
* **Tags** (optional): Key-value pairs for organization.
* **Public Key** (required): Paste the full PGP public key block you exported earlier.
5. Click **Save**.
Harness confirms the key and adds it to your GPG Keys list, showing the key name and fingerprint.
You can now use your GPG key to sign commits. Harness verifies the signature against this public key and marks signed commits as **Verified**, giving your team confidence that the commit is authentic and has not been tampered with.
***
### Delete a GPG key
To delete a GPG key from your profile:
1. Go to your **User Profile** and locate the GPG key under **My Public Keys**.
2. Select **More Options** (⋮) on the key card.
3. Click **Delete**.
4. Confirm the deletion in the dialog.
***
### Generate a new SSH key
Before you upload an SSH public key to Harness, generate an SSH key pair on your local machine.
#### Step 1: Generate the key pair
Open a terminal and run:
```bash
ssh-keygen -t ed25519 -C "your_email@example.com"
```
Replace `your_email@example.com` with the email address associated with your Harness account.
{% hint style="info" %}
**ED25519 NOT SUPPORTED?**
If your system does not support Ed25519, use RSA instead:
```bash
ssh-keygen -t rsa -b 4096 -C "your_email@example.com"
```
{% endhint %}
When prompted, provide the following:
1. **File location:** Press **Enter** to accept the default (`~/.ssh/id_ed25519`).
2. **Passphrase:** Enter a secure passphrase (recommended) or press **Enter** for no passphrase.
#### Step 2: Start the SSH agent
```bash
eval "$(ssh-agent -s)"
```
#### Step 3: Add the key to the SSH agent
**macOS:**
Open or create the `~/.ssh/config` file and add the following lines:
```
cat >> ~/.ssh/config << 'EOF'
Host *
AddKeysToAgent yes
UseKeychain yes
IdentityFile ~/.ssh/id_ed25519
EOF
```
This appends the config lines to the file (and creates it if it does not exist).
Then add the key:
```bash
ssh-add --apple-use-keychain ~/.ssh/id_ed25519
```
**Linux:**
```bash
ssh-add ~/.ssh/id_ed25519
```
**Windows (Git Bash):**
```bash
ssh-add ~/.ssh/id_ed25519
```
#### Step 4: Copy the public key
**macOS:**
```bash
pbcopy < ~/.ssh/id_ed25519.pub
```
**Linux:**
```bash
xclip -selection clipboard < ~/.ssh/id_ed25519.pub
```
**Windows (Git Bash):**
```bash
clip < ~/.ssh/id_ed25519.pub
```
Alternatively, open the file and copy its contents manually:
```bash
cat ~/.ssh/id_ed25519.pub
```
***
### Add an SSH public key to Harness
To add your SSH public key to your Harness profile:
1. In Harness, select your avatar in the bottom-left corner to open your **User Profile**.
2. Under **My Public Keys**, locate the **SSH Keys** section.
3. Select **+ SSH Key**.
4. In the **New SSH Key** dialog, fill in the following fields:
* **Name** (required): A descriptive name for the key.
* **Id:** An identifier for the key (auto-generated from the name, editable).
* **Description** (optional): A note about the key purpose.
* **Tags** (optional): Key-value pairs for organization.
* **Public Key** (required): Paste the SSH public key you copied in [Step 4](#step-4-copy-the-public-key).
5. Click **Save**.
Harness confirms the key and adds it to your SSH Keys list with its fingerprint.
You can now use your SSH key to sign commits. Harness verifies the signature against this public key and marks signed commits as **Verified**, confirming the commit came from you and has not been altered.
***
### Delete an SSH key
To delete an SSH key from your profile:
1. Go to your **User Profile** and locate the SSH key under **My Public Keys**.
2. Select **More Options** (⋮) on the key card.
3. Click **Delete**.
4. Confirm the deletion in the dialog.
***
### Next steps
* [Sign commits](/code-repository/use-harness-code/collaborate-and-develop/signing-commits): Use your GPG or SSH keys to sign commits in Harness Code Repository.
* [Two-factor authentication](/harness-ai/use-harness-platform/authentication/two-factor-authentication): Add a second verification step to your Harness login.
{% @harness-feedback/feedback module="harness-ai" pagePath="harness-ai/use-harness-platform/authentication/manage-public-keys" %}
# Organizations & Projects
Learn how to structure your work in Harness using organizations and projects, including creation, management, and moving projects between organizations.
Within a Harness account, you organize your work using organizations and projects. This structure helps your teams collaborate effectively while keeping ownership, access, and configuration clearly defined.
***
### What you will learn in this topic
By the end of this section, you will be able to:
* Understand the [Account, Organization, and Project hierarchy](#hierarchy-overview) and how it organizes work in Harness.
* [Create and manage organizations](#organizations) to group related projects and teams.
* [Create and manage projects](#projects) where your teams perform their daily work.
***
### Before you begin
* **Harness account basics**: Understand what a [Harness account](/harness-ai/new-to-harness-platform/overview#account) is and how it serves as the top-level container.
* **RBAC fundamentals**: Familiarity with [role-based access control](/harness-platform/3.0/harness-platform-resources/platform-access-control/rbac-in-harness) helps you understand permission boundaries at each level.
* **Admin permissions**: Creating organizations requires account-level permissions. Creating projects requires organization-level permissions. To check your permissions, go to [Manage roles](/harness-ai/use-harness-platform/platform-access-control/add-manage-roles).
***
### Hierarchy overview
Harness uses a three-tier hierarchy to organize your work:
```
Account
└── Organization
└── Project
```
**Account** is the highest level for all operations you perform in Harness. It is where you define your organizational structure, manage global settings, and control access across all users and projects.
**Organization** groups projects that share a common purpose or business goal, such as business units, product lines, or departments.
**Project** is where your teams do their day-to-day work, containing pipelines, services, environments, and module-specific resources.
#### Resource inheritance
You can create resources such as [connectors](/harness-ai/use-harness-platform/connectors) at different levels: **account**, **organization**, or **project**. Resources you define at a higher level are automatically available at lower levels, which reduces duplication and keeps configuration consistent.
* **Account-level resources** are available to all organizations and projects.
* **Organization-level resources** are available only to that organization and its projects.
* **Project-level resources** are only available within that specific project.
***
### Organizations
A Harness organization (or *org*) groups together projects that share a common purpose or business goal. Each organization can contain multiple projects and provides a natural boundary for managing your teams, access, and shared resources.
Organizations represent higher-level groupings, such as:
* **Business units:** Sales Engineering, Customer Success, Product Development
* **Product lines:** Payment Platform, Identity Services, Analytics
* **Departments:** Engineering, Operations, Security
* **Geography:** APAC Operations, EMEA Services, Americas
For more information, go to [Create an organization](/harness-ai/new-to-harness-platform/get-started#step-2-create-organization-project-and-invite-collaborators) and [Invite collaborators](/harness-ai/new-to-harness-platform/get-started#invite-collaborators).
***
### Projects
A Harness project is where your teams do their day-to-day work. Projects contain the users, pipelines, and the resources needed to build, deploy, test, and operate applications.
For example, a project might have a Harness CI pipeline to build code and push an image to a repo and a Harness CD pipeline to pull and deploy that image to a cloud platform.
Common project patterns typically represent:
* **Application or service teams:** Payment API, User Service, Analytics Dashboard
* **Platform or infrastructure teams:** Platform Team, Mobile Team, Data Engineering
* **Individual workloads within an organization:** Microservices Backend, Frontend Web App, Batch Processing
Projects give your teams a shared workspace while allowing them to operate independently. You can add an unlimited number of Harness projects to an organization. All projects in the organization can use the organization's resources.
Much like account-level roles, project members can be assigned Project Admin, Member, and Viewer roles.
The ability to create organizations and projects varies based on your account type. With a free account:
* A default organization and project are already created for you.
* You **cannot** create another new organization. However, you can create multiple projects within the default organization, and invite collaborators into the default organization.
Harness recommends creating a sample project with a few pilot users to get familiar with the Platform.
For more information, go to [Create a project](/harness-ai/new-to-harness-platform/get-started#create-a-project).
***
### Related articles
* [Key Concepts: Organizations and Projects](/service-reliability-management/new-to-srm/get-started/key-concepts#organizations-and-projects) - High-level explanation of the hierarchy.
* [Platform Onboarding Guide](/harness-ai/new-to-harness-platform/get-started) - Step-by-step setup including organizations and project creation.
* [RBAC in Harness](/harness-platform/3.0/harness-platform-resources/platform-access-control/rbac-in-harness) - Understand permissions at account, org, and project scopes.
* [Move Projects Between Organizations](/harness-ai/use-harness-platform/organizations-and-projects/move-projects/move-projects-across-organization) - Transfer projects when ownership changes.
{% @harness-feedback/feedback module="harness-ai" pagePath="harness-ai/use-harness-platform/organizations-and-projects" %}
# Move a project
Overview of moving a project between organizations, including prerequisites, Supported modules and how to request or perform a move.
Harness allows you to move a project from one organization to another within your account. This is useful when you need to transfer project ownership between teams or restructure your organization hierarchy.
This feature is currently in **closed beta** and available for select accounts only. Access is determined based on the currently [supported modules and entities](#supported-modules).
{% hint style="info" %}
**FEATURE AVAILABILITY**
This feature requires the `PL_PROJECT_MOVEMENT_ENABLED` feature flag. Contact [Harness Support](mailto:support@harness.io) to enable it.
{% endhint %}
***
### What you will learn in this topic
By the end of this topic, you will be able to:
* [Understand what happens when you move a project](#what-happens-when-you-move-a-project).
* [Review supported modules and unsupported entities](#supported-modules).
* [Plan your project move with pre-move and post-move guides](#what-happens-when-you-move-a-project).
***
### Before you begin
Before you move a project between organizations, make sure you have:
* **Appropriate permissions**: The `core_project_move` permission to move project from source project and `core_project_create` permission to create projects in destination organization. Go to [RBAC in Harness](/harness-platform/3.0/harness-platform-resources/platform-access-control/rbac-in-harness) to review roles.
* **Review of supported modules**: Confirm that your project uses only supported modules and entities. Go to [Supported modules](#supported-modules) to check compatibility.
* **Pre-move validation**: Review the pre-move checklist to understand what will break during the move. Go to [Pre-move validation checklist](/harness-ai/use-harness-platform/organizations-and-projects/move-projects/pre-move-guide) to prepare.
***
### What happens when you move a project
When you move a project from one organization to another, the following changes occur:
#### Entities move with the project
Entities from the [supported modules](#supported-modules) (such as pipelines, services, and environments) move with the project to the destination organization.
#### Organization-level resources become inaccessible
Resources scoped at the organization level (connectors, secrets, templates, webhooks, and notifications) become inaccessible after the move. You need to recreate these resources in the destination organization and update project references to point to the new resources. Go to [Pre-move validation checklist](/harness-ai/use-harness-platform/organizations-and-projects/move-projects/pre-move-guide) to review what will break.
#### Access control components
* **Organization-level RBAC components**: User groups and service accounts inherited from the organization level do not move with the project. You need to recreate them in the destination organization if your project needs them. Roles reused from the organization level also stay behind. Go to [Create groups by inheritance](/harness-ai/use-harness-platform/platform-access-control/add-user-groups#create-groups-by-inheritance) and [Hierarchical support for service accounts](/harness-ai/use-harness-platform/platform-access-control/heirarchichal-support-for-service-accounts) for details.
* **Project-level access control components**: Project-level access controls (users, service accounts, user groups, role bindings, resource groups, and roles) move with the project asynchronously. Users might temporarily lose access during the move.
#### Audit logs
* **Historical logs**: Audit logs from before the move stay in the source organization. They do not transfer with the project.
* **Broken links**: Links in old audit logs that point to the project will break because they still reference the old organization.
* **New logs**: After the move, new audit logs for the project appear in the destination organization.
Go to [Pre-move validation checklist](/harness-ai/use-harness-platform/organizations-and-projects/move-projects/pre-move-guide) and [Post-move remediation guide](/harness-ai/use-harness-platform/organizations-and-projects/move-projects/post-move-guide) for detailed validation and remediation steps.
***
### Supported modules
Project moves are supported for the following Harness modules:
* [Artifact Registry](https://developer.harness.io/artifact-registry/): Full support.
* [Code Repository](https://developer.harness.io/code-repository/): Full support.
* [Continuous Delivery and GitOps](https://developer.harness.io/continuous-delivery/): Supported except [GitOps](https://developer.harness.io/continuous-delivery/use-gitops/get-started/harness-cd-git-ops-quickstart) and [Continuous Verification](/continuous-delivery/use-continuous-delivery/verify-deployments/verify-deployments-with-the-verify-step) entities.
* [Continuous Integration](https://developer.harness.io/continuous-integration/): Full support.
* [Database DevOps](https://developer.harness.io/database-devops/): Full support.
* [Internal Developer Portal](https://developer.harness.io/internal-developer-portal/): Supported except [Scorecards](/internal-developer-portal/3.0/use-idp/scorecards).
* [Platform](/harness-ai/new-to-harness-platform/overview): Full support.
* [Resilience Testing](https://developer.harness.io/resilience-testing/): Full support.
* [Security Test Orchestration](https://developer.harness.io/security-testing-orchestration/): Full support.
* [Software Supply Chain Assurance (SCS)](https://developer.harness.io/software-supply-chain-assurance/): Full support.
Go to [Harness entity reference](/harness-ai/use-harness-platform/references/harness-entity-reference) for details about all Harness entities.
***
### Related articles
* [Pre-move validation checklist](/harness-ai/use-harness-platform/organizations-and-projects/move-projects/pre-move-guide) - Check dependencies before moving a project.
* [Post-move remediation guide](/harness-ai/use-harness-platform/organizations-and-projects/move-projects/post-move-guide) - Fix issues after moving a project.
* [Create organizations and projects](/harness-ai/use-harness-platform/organizations-and-projects) - Manage organizations and projects in Harness.
* [RBAC in Harness](/harness-platform/3.0/harness-platform-resources/platform-access-control/rbac-in-harness) - Understand roles and permissions.
{% @harness-feedback/feedback module="harness-ai" pagePath="harness-ai/use-harness-platform/organizations-and-projects/move-projects" %}
# Pre-move validation checklist
Validate organization-level dependencies before moving a project across organizations.
Moving a project from one organization to another requires careful planning to maintain service continuity and prevent broken dependencies. This checklist helps you identify what might break during the move so you can plan accordingly.
***
### What you will learn in this topic
By the end of this topic, you will be able to:
* Identify organization-level dependencies that will break during a project move.
* Validate pipelines, connectors, secrets, and access controls before the move.
* Understand important considerations and limitations for project moves.
***
### Before you begin
Before you move a project between organizations, make sure you have:
* **Account Admin or Organization Admin permissions**: You need these permissions to move projects and set up access controls. Go to [RBAC in Harness](/harness-platform/3.0/harness-platform-resources/platform-access-control/rbac-in-harness) to review roles.
* **Access to both organizations**: You need permissions in both the source and destination organizations to check what resources exist and recreate them where needed.
* **Inventory of organization-level resources**: Make a list of all connectors, secrets, templates, policies, and access controls your project uses at the organization level.
* **No running pipelines**: Make sure all pipelines in the project have finished running before you start the move.
***
### Check dependencies before moving a project
Before you move a project, review these items for organization-level dependencies that will break after the move.
This list covers the most common issues. Your project might have additional organization-level dependencies not listed here.
| Category | Dependency | Impact After Move |
| ---------------------- | ------------------------------------ | ------------------------------------------------------------------------------------------------------------------------------------------------------------------------------------------------------------------------------------------------------------------------------------------------------------------------------------------------------------------------------------------------------------------------------------------------------------------------------------------------------------------------------------------------------------------------------ |
| **Pipelines** | Organization-level connectors | Pipelines that use connectors from the organization level will break after the move. |
| | Organization-level secrets | If your pipelines use secrets scoped at the organization level, those secrets will no longer be accessible in the new organization. |
| | Organization-level templates | Templates used to build pipelines might be scoped at the organization level. Make sure these templates exist in the destination organization, or your pipelines will fail to render or execute. |
| | Hardcoded organization identifiers | YAML files might include hardcoded references such as `orgIdentifier`. These will still point to the old organization, but this will not affect pipeline execution. |
| | Pipeline chaining | If you use pipeline chaining, moving the child pipeline will break the chain. Go to [Pipeline chaining](/harness-ai/use-harness-platform/pipelines/pipeline-chaining) for details. |
| | Running pipelines | Any pipelines currently running will fail when the move starts. Finish all pipeline runs before you begin the move. |
| **Notifications** | Organization-level channels | Notification rules that use channels from the organization level will break after the move. |
| | User group notifications | Email notifications that use organization-level user groups will stop working. |
| **Git Experience** | Git file paths | Git file paths will become outdated after the move because they still point to the old organization in URLs and navigation links. |
| **Services** | Manifest and artifact sources | Services that use manifest sources and artifact sources with organization-level connectors will break. |
| **Environments** | Configuration files | Environment configurations, application settings, manifest sources, and connection strings that reference organization-level resources will become unavailable. |
| | Service overrides and infrastructure | Service overrides, infrastructure definitions, and GitOps clusters that reference organization-level resources will break. |
| **Monitored services** | Organization-level resources | Services or environments that reference organization-level resources will become inaccessible after the move. |
| **Webhooks** | Connectors and secrets | Git connectors, generic webhooks, and Slack webhooks that use organization-level connectors or secrets will break. |
| | Custom webhook triggers | Custom webhook triggers will stop working. |
| **Access control** | Organization-level RBAC components | User groups and service accounts inherited from the organization level do not move with the project. You will need to recreate them in the destination organization if your project still needs them. Roles reused from the organization level also stay behind. Go to [Create groups by inheritance](/harness-ai/use-harness-platform/platform-access-control/add-user-groups#create-groups-by-inheritance) and [Hierarchical support for service accounts](/harness-ai/use-harness-platform/platform-access-control/heirarchichal-support-for-service-accounts) for details. |
| | Temporary access restrictions | Project-level access controls (users, service accounts, user groups, role bindings, resource groups, and roles) move with the project, but this happens in the background. Users might temporarily lose access during the move. |
| **Audit logs** | Historical logs | Audit logs from before the move stay in the source organization. They do not transfer with the project. |
| | Broken links | Links in old audit logs that point to the project will break because they still reference the old organization. |
| | New logs | After the move, new audit logs for the project will appear in the destination organization. |
| **Policy management** | Project-level policies | Project-level policies and policy sets move with the project to the destination organization. |
| | Organization-level policies | Organization-level policies referenced by the project will no longer be accessible. You might need to recreate these policies in the destination organization or update your policy sets to use policies that exist there. |
| | Policy set references | Policy sets that reference organization-level policies will break and need to be updated to use policies from the destination organization. |
| **Terraform** | State file inconsistencies | Terraform state and configuration files that reference the project might become inconsistent after the move. |
| | Provider identifiers | Resources created with the Harness Terraform Provider include organization and project identifiers. After the move, these identifiers will not match the new organization. |
{% hint style="info" %}
* **Broken links** - Links that reference the source organization (in pipelines, webhooks, audit logs, bookmarks, or URLs) will stop working after the move. Harness does not redirect these links.
* **Duplicate project identifiers** - You cannot move a project if another project with the same identifier already exists in the destination organization. For example, if you are moving Project P from organization O1 to O2, and O2 already has a project named P, the move will fail.
* **Manual Terraform updates** - Harness does not automatically update Terraform configuration or state files after a move. You need to manually update your Terraform resources and state files.
{% endhint %}
***
### Related articles
* [Post-move remediation guide](/harness-ai/use-harness-platform/organizations-and-projects/move-projects/post-move-guide) - Fix issues after moving a project.
* [Create organizations and projects](/harness-ai/use-harness-platform/organizations-and-projects) - Manage organizations and projects in Harness.
* [RBAC in Harness](/harness-platform/3.0/harness-platform-resources/platform-access-control/rbac-in-harness) - Understand roles and permissions.
{% @harness-feedback/feedback module="harness-ai" pagePath="harness-ai/use-harness-platform/organizations-and-projects/move-projects/pre-move-guide" %}
# Steps to move a project from one organization to another
Step-by-step guide to move a project across organizations.
This page provides step-by-step instructions to move a project from one organization to another within your Harness account. This process includes selecting the destination organization, confirming the move, and verifying the outcome.
Moving a project transfers a project and all its entities from one organization to another within your Harness account. The project retains its identifier, access control settings, and audit history. However, entities that reference organization-level resources (such as connectors, secrets, or templates) may break and require updates after the move.
### Feature availability
* This feature is currently in **closed beta**, and is available for select accounts only. The access is determined based on the currently [supported modules and entities](/harness-ai/use-harness-platform/organizations-and-projects/move-projects#supported-modules).
* This feature requires the `PL_PROJECT_MOVEMENT_ENABLED` feature flag. Contact [Harness support](mailto:support@harness.io) to enable it.
***
### What you will learn in this topic
By the end of this page, you will understand how to:
* Move a project from source to destination.
* Verify the project in its new organization.
***
### Before you begin
Before you move a project across organizations, ensure you have the following:
* **Create and move project permissions**: `core_project_create` and `core_project_move` permissions on the source and destination projects. Go to [RBAC in Harness](/harness-platform/3.0/harness-platform-resources/platform-access-control/rbac-in-harness) to understand how permissions are assigned through roles.
* **Pre-move validation**: Complete the checks in the [pre-move guide](/harness-platform/3.0/harness-platform-resources/organizations-and-projects/move-projects/pre-move-and-post-move-guide) to understand which entities may break after the move.
***
### Move a project across organizations
Follow these steps to move a project from one organization to another:
#### Step 1: Select a project to move
1. Go to one of the following:
* **Project overview page**: `https://app.harness.io/ng/account//all/orgs//projects//overview`
* **Projects listing page**: `https://app.harness.io/ng/account//all/orgs//projects`
2. On the **Projects** page, select the **⋮** (more options) icon. The location depends on which page you are on:
* On the project overview page, select the **⋮** icon in the top right corner.
* On the projects listing page, select the **⋮** icon next to the project you want to move.
3. Select **Move Project**.
Move project modal
#### Step 2: Select destination organization
1. In the Move Project pop-up window, review the warning about potential impacts and the list of entities that may break after the move. This list is not exhaustive. Manually check the entities to understand the full scope of impact.
Move project modal
If needed, view details and select each referenced entity type to explore further. {% embed url="" %}
2. Select the destination organization from the dropdown menu where you want to move the project.
Move project modal
3. Select **Move Project** to proceed.
#### Step 3: Confirm the move
1. Review the confirmation dialog showing potential impacts. Type the **Project identifier** to confirm the move.
2. Select **Confirm Move**.
Move project confirm
After you confirm, Harness moves the project to the destination organization. All project-level access control components (users, service accounts, user groups, role bindings, resource groups, and roles) are moved asynchronously in the background, which may take some time to complete.
After the move completes, you are redirected to the project overview page. The project now appears within the new organization. A banner appears stating: **This project was recently moved from another organization. Some entities may reference resources that no longer exist.**
Move project confirm
***
### Next steps
Follow the [post-move remediation](/harness-ai/use-harness-platform/organizations-and-projects/move-projects/post-move-guide) guide to verify and update any broken references, and ensure the project functions correctly in its new organization. This guide is not exhaustive; you might need additional steps based on your project setup.
{% @harness-feedback/feedback module="harness-ai" pagePath="harness-ai/use-harness-platform/organizations-and-projects/move-projects/move-projects-across-organization" %}
# Post-move remediation guide
Fix broken references and recreate resources after moving a project across organizations.
After moving a project from one organization to another, you need to fix broken references and recreate organization-level resources in the destination organization. This guide walks you through the remediation steps.
***
### What you will learn in this topic
By the end of this topic, you will be able to:
* [Testing and fixing pipelines after a project move](#pipelines).
* [Recreating organization-level connectors, secrets, and templates](#connectors-and-secrets).
* [Updating services, environments, and access controls](#services-and-environments).
* [Handling Terraform pipelines and configuration updates](#pipelines).
***
### Before you begin
Before you start fixing issues after a project move, make sure:
* **The project move completed successfully**: Verify the project appears in the destination organization.
* **You have appropriate permissions**: You need permissions in the destination organization to create connectors, secrets, templates, and configure access controls. Go to [RBAC in Harness](/harness-platform/3.0/harness-platform-resources/platform-access-control/rbac-in-harness) to review roles.
* **You have the pre-move inventory**: Reference the list of organization-level resources you documented before the move. Go to [Pre-move validation checklist](/harness-ai/use-harness-platform/organizations-and-projects/move-projects/pre-move-guide) for details.
***
### Fix issues after moving a project
After the move completes, review the following resources and make any necessary updates. This list covers common issues, but you might need to take additional steps depending on your project setup.
#### Pipelines
* **Test pipelines**: Run all pipelines to find broken references.
* **Update references**: Point pipeline references to connectors and secrets in the destination organization.
* **Recreate templates**: Recreate any organization-level templates in the destination organization.
* **Update identifiers**: Update YAML files that have hardcoded `orgIdentifier` values to match the new organization.
* **Fix pipeline chaining**: Update pipeline chaining references if you also moved the child pipelines.
{% hint style="warning" %}
**PIPELINES USING TERRAFORM MIGHT FAIL**
If a pipeline that uses Terraform fails after the move, re-run it. Failures can happen if the pipeline was running when the move started and it cannot access files from the Terraform Plan step. These files include the inherited plan, exported JSON plan, and exported human-readable plan. Go to [Review Terraform Plan and Apply steps](/continuous-delivery/use-continuous-delivery/provision-infrastructure/terraform-infra/run-a-terraform-plan-with-the-terraform-plan-step#review-terraform-plan-and-apply-steps), [Export JSON representation of Terraform Plan](/continuous-delivery/use-continuous-delivery/provision-infrastructure/terraform-infra/run-a-terraform-plan-with-the-terraform-plan-step#export-json-representation-of-terraform-plan), and [Export human-readable representation of Terraform Plan](/continuous-delivery/use-continuous-delivery/provision-infrastructure/terraform-infra/run-a-terraform-plan-with-the-terraform-plan-step#export-human-readable-representation-of-terraform-plan) for details.
The same issue affects Terragrunt pipelines, except Terragrunt does not use the exported JSON or human-readable plans.
{% endhint %}
#### Connectors and secrets
Recreate organization-level connectors and secrets in the destination organization if your project needs them.
#### Services and environments
* **Update service resources**: Update service manifest sources and artifact sources that reference connectors from the old organization.
* **Update environment configuration**: Update environment configuration files and connection strings as needed.
* **Recreate overrides and infrastructure**: Recreate service overrides and infrastructure definitions that referenced organization-level resources.
#### Notifications and webhooks
* **Update notification rules**: Update notification rules that reference channels from the old organization.
* **Recreate webhook configurations**: Recreate webhook configurations using connectors and secrets from the destination organization.
* **Test custom triggers**: Test and update custom webhook triggers.
#### Access control
Create organization-level RBAC components and assign role bindings to make sure users and service accounts still have the access they need.
#### Monitored services
Update monitored services that still reference resources from the old organization.
#### Policy management
* **Review policy sets**: Check all policy sets in the moved project for references to organization-level policies.
* **Recreate policies**: Recreate organization-level policies in the destination organization if your policy sets need them.
* **Update references**: Update policy sets to reference policies from the destination organization.
* **Verify policy evaluations**: Test that all policy evaluations still work correctly.
#### Update bookmarks and URLs
Update any bookmarks, saved URLs, and runbooks that reference the old organization path.
***
### Related articles
* [Pre-move validation checklist](/harness-ai/use-harness-platform/organizations-and-projects/move-projects/pre-move-guide) - Check dependencies before moving a project.
* [Create organizations and projects](/harness-ai/use-harness-platform/organizations-and-projects) - Manage organizations and projects in Harness.
* [RBAC in Harness](/harness-platform/3.0/harness-platform-resources/platform-access-control/rbac-in-harness) - Understand roles and permissions.
* [Pipeline chaining](/harness-ai/use-harness-platform/pipelines/pipeline-chaining) - Configure pipeline chaining.
{% @harness-feedback/feedback module="harness-ai" pagePath="harness-ai/use-harness-platform/organizations-and-projects/move-projects/post-move-guide" %}
# Platform Access Control
Control access to resources through roles, resource groups, and user assignments across account, organization, and project scopes.
Role-based access control (RBAC) controls who can access your resources and what actions they can perform on those resources. A Harness account administrator assigns resource-related permissions to members of user groups through roles and resource groups.
RBAC helps you ensure users can only access the information and resources necessary to perform their tasks, create systematic and repeatable permissions assignments, increase accountability through audit trails, and comply with regulatory requirements for confidentiality and privacy.
***
### What you will learn in this topic
By the end of this topic, you will be able to:
* [Understand the three-level permissions hierarchy (Account, Organization, Project)](#permissions-hierarchy-scopes).
* [Configure RBAC components (Principals, Resource Groups, Roles)](#rbac-components).
* [Assign roles and resource groups to users, user groups, and service accounts](#role-binding).
* [Apply the additive RBAC model and principle of least privilege](#rbac-is-additive).
* [Extend RBAC with Attribute-Based Access Control for fine-grained control](#extend-rbac-with-abac).
***
### Before you begin
Before you configure RBAC in Harness, ensure you have the following:
* **Harness key concepts**: Understanding of Harness platform fundamentals. Go to [Key concepts](/service-reliability-management/new-to-srm/get-started/key-concepts) for more information on core platform concepts.
* **Organizations and projects**: Knowledge of how to create and manage organizations and projects. Go to [Create an organization](/harness-ai/new-to-harness-platform/get-started#create-an-organization) for more information on organizational structure.
* **Module functionality**: Familiarity with the modules you use in your Harness account (CI, CD, CCM, STO, etc.).
* **Account admin access**: Administrator permissions to configure roles, resource groups, and user assignments at the account level.
{% hint style="info" %}
**RECOMMENDATION**
If you are new to RBAC, review [User and Role Management in the Harness Software Delivery Platform](https://harness.io/blog/continuous-delivery/user-role-management/) for an introduction to RBAC concepts and best practices.
{% endhint %}
***
### Overview video
The video below provides an overview of RBAC in Harness.
{% embed url="" %}
***
### Permissions hierarchy (scopes)
Understand how Harness organizes permissions across three hierarchical levels to provide granular access control.
The Harness Platform has a three-level hierarchical structure. The three levels, or scopes, are **Account**, **Organization** (Org), and **Project**. You can configure permissions for each scope to delegate responsibilities to different teams and efficiently organize and manage your resources.
The **Account** scope is the highest level. It is your Harness account and it encompasses all the resources within your Harness subscription. It provides a way to manage billing, user authentication, and global settings for all the organizations and projects within the account. Users with account-level permissions can manage the account-level settings, including billing, subscription, and SSO configuration. Resources, such as connectors, created at the account scope are available for use in all the organizations and projects within that account.
The **Organization** scope contains related projects, resources, and users within a specific domain or business unit. It provides a way to manage resources and permissions specific to a particular organization, as separate from other areas of the account. Users with org-level permissions can manage organization-level settings, including the creation of projects and user groups in the org, and assigning access policies to those user groups. Resources created at the organization scope are available for use in all projects within that organization, but aren't available outside that org.
The **Project** scope contains related resources, such as apps, pipelines, and environments. It provides a way to manage resources and permissions specific to a particular project, as separate from the larger org (business unit) and account. Users with project-level permissions can manage project-level settings, including the creation of pipelines, environments, and infrastructure definitions. Resources created at the project scope are only available in that project.
```mermaid
flowchart TD
A[Account] --> B(Organization)
A[Account] --> C(Organization)
B --> D[Project]
B --> E[Project]
C --> F[Project]
C --> G[Project]
```
The scope at which you create resources depends on the level of control and visibility you require. For example, if you create a connector at the account scope, it is available to all organizations and projects within the account. However, if you create a connector at the organization scope, it is only available to that organization and any projects under that organization. It is not available at the account scope or to other organizations. This lets you control access to your resources more effectively and prevent unauthorized access.
Go to [Create Organizations and Projects](/harness-ai/new-to-harness-platform/get-started#create-an-organization) for more information on creating and managing organizations and projects.
***
### RBAC components
Control access through three core components: Principals (who), Resource Groups (what), and Roles (actions).
Harness RBAC uses **Principals**, **Resource Groups**, and **Roles** to control access:
* [Principals](#principals) are entities taking action in the system. These include users, user groups, and service accounts.
* [Resource groups](#resource-groups) define what objects can be acted on. Objects include organizations, projects, pipelines, connectors, users, and more.
* [Roles](#roles) define what actions can be taken on objects. Actions include view, create, edit, delete, and so on.
You [assign roles and resource groups to principals](#role-binding). Roles and resource groups assigned to user groups are inherited by the users in those user groups.
```mermaid
flowchart TD
A[Roles & Resource groups]-->C[User groups]
A--->B
A--->E[Service accounts]
C-->B[Users]
```
#### Principals
Principals are entities taking action in the system. You assign permissions and access, through roles and resource groups, to principals. Permissions define what actions a principal can take. Access defines which objects they can act on.
Principals include:
* [Users](/harness-ai/use-harness-platform/platform-access-control/add-users): Individual users in Harness. Each user can belong to many user groups. You can assign roles and resource groups directly to users, or they can inherit these from user groups that they belong to.
* [User Groups](/harness-ai/use-harness-platform/platform-access-control/add-user-groups): User groups contain multiple Harness users. Roles and resource groups are assigned to groups. The permissions and access granted by the assigned roles and resource groups are applied to all group members. You can create user groups at all [scopes](#permissions-hierarchy-scopes).
* [Service Accounts](/harness-ai/use-harness-platform/platform-access-control/add-and-manage-service-account): Service accounts are like API users. You assign roles and resource groups to service accounts. Service accounts also have one or more [API keys](/harness-ai/use-harness-platform/automation/api/add-and-manage-api-keys), which authenticate and authorize remote services attempting to perform operations in Harness through Harness APIs.
#### Resource groups
A resource group is a set of Harness resources that a principal can access. You can create resource groups at all [scopes](#permissions-hierarchy-scopes). Resource groups are assigned along with [roles](#roles) to principals. Roles grant permissions (what actions can be taken) and resource groups grant access (what objects can be acted on).
Resource groups either include **All Resources** (all resources of a given type) or **Named Resources** (specific, individual resources).
Harness has built-in resource groups at each scope, and you can create custom resource groups. Go to [Manage resource groups](/harness-platform/3.0/harness-platform-resources/platform-access-control/add-resource-groups) for more information on creating and managing resource groups.
#### Roles
Roles are sets of [permissions](/harness-ai/use-harness-platform/platform-access-control/permissions-reference) that allow or deny specific operations on objects (resources). Roles are applied together with [resource groups](#resource-groups) to create a complete set of permissions and access.
Harness includes some built-in roles, and you can create your own custom roles, which are useful for limited and fine-grained access control. Go to [Manage roles](/harness-ai/use-harness-platform/platform-access-control/add-manage-roles) for more information on creating and managing roles.
Roles are scope-specific and can be created at all [scopes](#permissions-hierarchy-scopes).
***
### Role binding
Assign roles and resource groups to principals to grant permissions and access at any scope.
Role binding refers to the process of assigning [roles](#roles) and [resource groups](#resource-groups) to [principals](#principals) (users, user groups, and service accounts). Role binding can be configured at all scopes.
```mermaid
flowchart TD
A[Roles & Resource groups]-->C[User groups]
A--->B
A--->E[Service accounts]
C-->B[Users]
```
Built-in role binding configurations
The following table describes the role bindings (permissions and access) that result from some combinations of built-in [roles](#roles) and [resource groups](#resource-groups). This table doesn't include module-specific built-in roles, such as CET Admin or Chaos Admin.
| Role | Resource Group | Resulting role binding |
| ------------------- | ---------------------------------------------- | --------------------------------------------------------------------------------------------------------------------------------------------------------------------------------------------- |
| Account Admin | Account - All Resources Including Child Scopes | All permissions on all resources in the account and resources in organizations and projects under the account. |
| Account Admin | All Account Level Resources | All permissions on all resources at the account level only. |
| Account Viewer | Account - All Resources Including Child Scopes | View resources in the account and resources in organizations and projects under the account. |
| Account Viewer | All Account Level Resources | View resources at the account level only. |
| Organization Admin | Org - All Resources Including Child Scopes | All permissions on all resources in a specific organization and all projects under that organization. |
| Organization Admin | All Organization Level Resources | All permissions on all resources in a specific organization only. |
| Organization Viewer | Org - All Resources Including Child Scopes | View resources in a specific organization and resources in projects under that organization. |
| Organization Viewer | All Organization Level Resources | View resources in a specific organization only. |
| Project Admin | All Project Level Resources | All permissions on all resources within a specific project. |
| Project Viewer | All Project Level Resources | View resources in a specific project. |
| Pipeline Executor | All Project Level Resources |
View resource groups, projects, users, user groups, and roles.
View and access secrets, connectors, environments, and services.
View and execute pipelines.
|
#### RBAC is additive
Apply the principle of least privilege when assigning cumulative permissions.
RBAC is an additive model. Role and resource group assignments in Harness are additive. The total expanse of a principal's permissions and access is the sum of all the roles and resource groups from all user groups they belong to, as well as any roles and resource groups assigned directly to them as an individual user or service account.
{% hint style="warning" %}
**LEAST PRIVILEGE**
It is important to follow the principle of least privilege (PoLP). This is a security principle that means users are granted the absolute minimum access/permissions necessary to complete their tasks and nothing more.
While Harness includes some built-in roles and resource groups, it is a good idea to create your own roles and resource groups as needed to ensure the least privilege.
{% endhint %}
For example, assume a user has these role and resource group assignments:
* **Account Admin** role with **All Resources Including Child Scopes**. This is the most permissive combination of role and resource group. It grants all permissions on all resources throughout the entire account.
* **Organization Viewer** role with **All Resources Including Child Scopes**. This combination, by itself, grants the ability to view resources in a specific organization and resources in the projects under that organization.
Because the **Account Admin** combination includes the **Org Viewer** combination (and more), the user is effectively an account admin throughout the entire account. Assigning the **Org Viewer** role makes no difference to this user's access.
To control this user's access, you could change the resource group for the **Account Admin** role to **All Account Level Resources**. This would limit the **Account Admin** permissions to the resources at the account level only and remove admin access to lower scopes.
***
#### Extend RBAC with ABAC
Apply attribute-based rules for highly refined access control on connectors and environments.
For more fine-grained control over access to connectors and environments, you can use [Attribute-Based Access Control (ABAC)](/harness-ai/use-harness-platform/platform-access-control/attribute-based-access-control) as an extension of RBAC on your resource groups. ABAC provides highly refined control by using rules to restrict access based on combinations of attributes, such as connector and environment type.
{% @harness-feedback/feedback module="harness-ai" pagePath="harness-ai/use-harness-platform/platform-access-control" %}
# Access Policy Analyzer
Learn how to use Access Policy Analyzer to audit permissions, roles, and access across Account, Organization, and Project scopes.
The Access Policy Analyzer allows user to review and troubleshoot permissions across Account, Organization, and Project scopes. It provides a centralized way to see who has access to which resources and with what permissions.
This improves visibility, supports security audits, and helps ensure users have only the access they need.
{% hint style="info" %}
**FEATURE AVAILABILITY**
Access Policy Analyzer feature is currently behind the `PL_ENABLE_POLICY_ANALYZER` feature flag. Contact [Harness Support](mailto:support@harness.io) to enable the feature.
{% endhint %}
#### Using Access Policy Analyzer
1. Navigate to Settings → Access Control at the desired scope, and select Access Policy Analyzer.

2. Select a template to configure the query.

3. **Set the scope for your query**: Currently, only one account can be selected at a time. You can choose the organization and project within that account. You can also refine your query by including the parent scope, child scope, or both, as shown in the image below. Click Next to continue.

4. **Add the parameters for your query**: Now that you have defined the scope, you can specify up to five parameters: Principal, Permission, Resource Group, Role, and Resources. You can use multiple combinations to build queries and explore results based on your requirements. Let’s explore the parameters step by step.
* [**Principal**](/harness-ai/use-harness-platform/platform-access-control#principals): Principals include User, User Group, and Service Account. When choosing a principal, you will have one of these three options to proceed, followed by the selection of the specific entity.

* User: Select the system users whose access you want to analyze.
* User Group: Select groups of users to analyze collective access permissions. Once you have selected User Group, proceed to choose the specific user group for the desired scope, as shown below.
IMPORTANT NOTE:
Ensure that the selected user group contains at least one user. The Access Policy Analyzer requires this to fetch policies correctly.
* Service Account: Choose service accounts to review their access.
* [Permission](/harness-ai/use-harness-platform/platform-access-control#permissions-hierarchy-scopes): Select a permission from the dropdown list; you can choose only one permission at a time.

* [Resource Group](/harness-ai/use-harness-platform/platform-access-control/manage-resource-groups#manage-resource-groups-in-harness): Similar to Permission, you can select only one resource group at a time that includes All account level Resources or All Resources including child scope.

* [Role](/harness-ai/use-harness-platform/platform-access-control/add-manage-roles): Used to limit your query to specific roles across the selected scope.

* [Resource](/harness-ai/use-harness-platform/platform-access-control/manage-resource-groups): This parameter allows you to select resources. It includes a Same As Query Scope option; when disabled, you can choose an organization from the dropdown list. Otherwise, it uses the same scope specified earlier.

5. Advanced Settings (Optional): This option allows additional set of refinement to your search results. It includes options like Expand Role, which breaks down a selected role into individual permissions in the Policy Analyzer results, and Expand Resource Group, which lets you analyze resources at a more granular level.

6. Once you have selected the appropriate options, click Run Query to view your search results.

{% @harness-feedback/feedback module="harness-ai" pagePath="harness-ai/use-harness-platform/platform-access-control/access-policy-analyzer" %}
# Role-based access control (RBAC) in pipelines, templates, and secrets
Configure granular create and edit permissions for pipelines, templates, and secrets using split permission controls in Harness.
Harness provides granular role-based access control (RBAC) for [pipelines](/continuous-delivery/new-to-continuous-delivery/getting-started#step-1-create-your-pipeline), [templates](/harness-ai/use-harness-platform/templates/harness-template-library), and [secrets](/harness-ai/use-harness-platform/secrets/secrets-management/harness-secret-manager-overview). You can manage **create** and **edit** permissions independently for these resources, which gives you fine-grained control over who creates new resources and who modifies existing ones.
When you split the **create** and **edit** permissions, you can assign roles that allow users to create pipelines or secrets without granting them edit access to existing resources, or vice versa. This capability supports compliance requirements and provides better alignment with the principle of least privilege.
For more fine-grained control over access to connectors and environments, you can use [Attribute-Based Access Control (ABAC)](/harness-ai/use-harness-platform/platform-access-control/attribute-based-access-control) as an extension of RBAC on your resource groups. ABAC provides highly refined control by using rules to restrict access based on combinations of attributes, such as connector and environment type.
***
### What you will learn in this topic
By the end of this topic, you will be able to:
* Understand how [split create and edit permissions work](#split-the-create-and-edit-permissions) for pipelines, templates, and secrets.
* Identify the [feature flags](#feature-flags-for-split-permissions) that control migration and enforcement for each resource type.
* Review the [permissions](#permissions-reference) available for pipelines, templates, and secrets.
* [Enable the feature flags](#step-1-enable-the-feature-flags) and [assign](#step-2-assign-split-permissions) independent create and edit permissions to roles.
* [Update automation scripts](#step-3-update-automation-scripts) to work with split permissions.
***
### Before you begin
Before you configure split permissions for pipelines, templates, or secrets, ensure you have the following:
* **Account administrator permissions**: Account administrator access in Harness to configure roles and permissions. Go to [RBAC in Harness](/harness-platform/3.0/harness-platform-resources/platform-access-control/rbac-in-harness) to review roles and permissions.
* **Harness Support contact**: Access to Harness Support to request feature flag enablement. Split permissions do not take effect until Harness Support enables the flags for your account.
* **Automation inventory**: A list of all Terraform scripts, API integrations, and automation workflows that create or edit pipelines, templates, or secrets. These scripts must include explicit create permissions after the feature flags are enabled.
***
### Split the create and edit permissions
Splitting the **create** and **edit** permissions decouples resource creation from resource modification, so you can grant one permission without the other.
* **Create permission**: Allows users to create new pipelines, templates, or secrets.
* **Edit permission**: Allows users to modify existing pipelines, templates, or secrets.
Create and edit are mutually exclusive grants. Users must be explicitly granted both permissions if they need to perform both actions, so a user with only `edit` cannot create a new resource, and a user with only `create` cannot modify an existing one.
***
### Feature flags for split permissions
Each resource type is rolled out in two controlled phases, and the flags must be enabled in order. The migration flag adds the `create` permission to every role that already has `edit`, so no user loses access during the transition. The enforcement flag switches access checks over to the split permissions and shows **Create** and **Edit** as separate checkboxes in the UI.
| Resource type | Migration flag | Enforcement flag |
| ----------------------- | -------------------------------------------------- | ------------------------------------------------ |
| Pipelines and templates | `PIPE_CREATE_EDIT_PERMISSION_SPLIT_MIGRATION` | `PIPE_CREATE_EDIT_PERMISSION_SPLIT` |
| Secrets | `PL_SECRET_CREATE_EDIT_PERMISSION_SPLIT_MIGRATION` | `PL_SECRET_CREATE_EDIT_PERMISSION_SPLIT_ENFORCE` |
Pipelines and templates share a single pair of flags, so enabling them splits the permissions for both resource types at the same time. Secrets use a separate pair of flags, which means you can adopt the split for secrets independently.
{% hint style="info" %}
Currently, this feature is behind the feature flags listed above. Contact [Harness Support](mailto:support@harness.io) to enable it. Onboarding is gated by customer approval per account.
{% endhint %}
***
### Permissions reference
Select a tab to review the permissions for each resource type and how the create and edit grants change with the feature flags.
{% tabs %}
{% tab title="Pipelines" %}
The following permissions are always available:
* `core_pipeline_view`: Permission to view pipelines.
* `core_pipeline_execute`: Permission to execute a pipeline.
* `core_pipeline_abort`: Permission to abort an execution.
* `core_pipeline_delete`: Permission to delete a pipeline.
Create and edit permissions depend on feature flag status:
* **With feature flags enabled**: `core_pipeline_create` creates a pipeline, and `core_pipeline_edit` edits a pipeline.
* **Without feature flags**: `core_pipeline_edit` is a combined permission to create and edit pipelines.
{% endtab %}
{% tab title="Templates" %}
The following permissions are always available:
* `core_template_view`: Permission to view a template.
* `core_template_copy`: Permission to copy a template.
* `core_template_delete`: Permission to delete a template.
* `core_template_access`: General access to the template resource.
Create and edit permissions depend on feature flag status:
* **With feature flags enabled**: `core_template_create` creates a template, and `core_template_edit` edits a template.
* **Without feature flags**: `core_template_edit` is a combined permission to create and edit templates.
{% endtab %}
{% tab title="Secrets" %}
The following permissions are always available:
* `core_secret_view`: Permission to view a secret.
* `core_secret_delete`: Permission to delete a secret.
* `core_secret_access`: Permission to access secrets at runtime.
Create and edit permissions depend on feature flag status:
* **With feature flags enabled**: `core_secret_create` creates a secret, and `core_secret_edit` edits a secret.
* **Without feature flags**: `core_secret_edit` is a combined permission to create and edit secrets.
{% endtab %}
{% endtabs %}
***
### Step 1: Enable the feature flags
Enable the flags in order so that existing roles are migrated before access checks change. Contact Harness Support and request the flags for the resource types you want to split, as listed in [Feature flags for split permissions](#feature-flags-for-split-permissions).
1. Request enablement of the migration flag.
2. After migration completes, typically 24-48 hours, request enablement of the enforcement flag.
During the migration phase, Harness automatically adds the `create` permission to every role that already holds the matching `edit` permission. For example, roles with `core_pipeline_edit` receive `core_pipeline_create`, and roles with `core_secret_edit` receive `core_secret_create`. New and updated roles receive both permissions.
***
### Step 2: Assign split permissions
After both feature flags are enabled, you assign create and edit permissions independently when you create or modify a role.
1. In your Harness account, navigate to **Account Settings** > **Access Control** > **Roles**.
2. Select an existing role, or click **New Role** to create a role.
3. In the **Permissions** section, expand **Pipelines**, **Templates**, or **Secrets**.
4. Select the checkboxes for the permissions you want to assign:
* Select **Create** to allow users to create new resources.
* Select **Edit** to allow users to modify existing resources.
* Select both checkboxes if users need both permissions.
5. Click **Save**.
Users assigned this role now hold the create or edit permissions you configured.
***
### Step 3: Update automation scripts
If you use Terraform, APIs, or other automation tools to manage Harness resources, update your scripts to request the `create` permission explicitly. Without this update, your automation can only edit existing resources and cannot create new ones.
{% tabs %}
{% tab title="Pipelines" %}
Before split permissions, a single permission covered both actions:
```hcl
permissions = ["core_pipeline_edit"]
```
After split permissions, list create and edit explicitly:
```hcl
permissions = [
"core_pipeline_create",
"core_pipeline_edit"
]
```
{% endtab %}
{% tab title="Templates" %}
Before split permissions, a single permission covered both actions:
```hcl
permissions = ["core_template_edit"]
```
After split permissions, list create and edit explicitly:
```hcl
permissions = [
"core_template_create",
"core_template_edit"
]
```
{% endtab %}
{% tab title="Secrets" %}
Before split permissions, a single permission covered both actions:
```hcl
permissions = ["core_secret_edit"]
```
After split permissions, list create and edit explicitly:
```hcl
permissions = [
"core_secret_create",
"core_secret_edit"
]
```
{% endtab %}
{% endtabs %}
***
### Enforcement behavior
Before you enable the enforcement flag, review the following behavior because they change how existing roles and automations resolve access.
* **Create and edit are exclusive**: Users must be explicitly assigned both permissions if they need to perform both actions. A user with only `edit` permission cannot create new resources.
* **Terraform and API scripts must be updated**: Scripts must include `core_pipeline_create`, `core_template_create`, or `core_secret_create` explicitly to perform create operations.
* **Edit-only users cannot delete or execute**: These actions are governed by separate permissions, such as `core_pipeline_delete` and `core_pipeline_execute`.
* **Migration is automatic**: During the migration phase, `create` permissions are added to roles that already have `edit`. Migration is customer-controlled and enabled per account.
***
### Related articles
* [RBAC in Harness](/harness-platform/3.0/harness-platform-resources/platform-access-control/rbac-in-harness): Review the permissions hierarchy and role assignment model in Harness.
* [Permissions reference](/harness-ai/use-harness-platform/platform-access-control/permissions-reference): View the complete list of permissions available for each resource type.
* [Attribute-Based Access Control (ABAC)](/harness-ai/use-harness-platform/platform-access-control/attribute-based-access-control): Extend RBAC on your resource groups with fine-grained attribute-based rules for connectors and environments.
* [Add and manage roles](/harness-ai/use-harness-platform/platform-access-control/add-manage-roles): Create and configure custom roles with specific permissions.
{% @harness-feedback/feedback module="harness-ai" pagePath="harness-ai/use-harness-platform/platform-access-control/rbac-in-pipelines-templates-and-secrets" %}
# Manage roles
Use roles for RBAC in Harness.
Roles are an [RBAC component](/harness-platform/3.0/harness-platform-resources/platform-access-control/rbac-in-harness#rbac-components) that bundle together [permissions](/harness-ai/use-harness-platform/platform-access-control/permissions-reference). They define which actions a user can take on Harness resources, including view, create, edit, and delete operations. When you assign a role to a user, user group, or service account, Harness grants the permissions defined in the role to that principal.
Roles are scope-specific, and you can create them at any [scope](/harness-platform/3.0/harness-platform-resources/platform-access-control/rbac-in-harness#permissions-hierarchy-scopes). For example, a role created at the project scope is available only in that project. Harness provides [built-in roles](#built-in-roles) for common use cases, and you can create [custom roles](#create-a-role) for fine-grained access control.
***
### What you will learn in this topic
By the end of this page, you will be able to:
* View [built-in roles](#built-in-roles) in Harness.
* Create [custom roles](#create-a-role) with specific permissions.
* [Edit](#edit-a-role) and [delete](#delete-a-role) existing roles.
* [Assign roles to users, user groups, and service accounts](#assign-the-role-to-users-at-the-organization-scope) across different scopes.
* [Reuse roles](#reuse-roles-across-scopes) across account, organization, and project scopes.
***
### Before you begin
Before you create or manage roles, ensure you have the following:
* **Harness account access**: Access to the account, organization, or project where you want to manage roles.
* **Appropriate permissions**: A role with permissions to view, create, edit, and delete roles, such as **Account Admin**, **Organization Admin**, or **Project Admin**.
* **RBAC familiarity**: Understanding of RBAC components and permissions hierarchy scopes. Go to [RBAC components](/harness-platform/3.0/harness-platform-resources/platform-access-control/rbac-in-harness#rbac-components) and [permissions hierarchy scopes](/harness-platform/3.0/harness-platform-resources/platform-access-control/rbac-in-harness#permissions-hierarchy-scopes) for more information on these concepts.
#### Navigate to Access Control
Many procedures on this page require you to navigate to **Access Control** at a specific scope:
* **Account scope**: Navigate to **Account Settings** → **Access Control**.
* **Organization scope**: Navigate to **Organizations**, select your organization, and then select **Access Control**.
* **Project scope**: Navigate to **Projects**, select your project, and then select **Access Control**.
***
### Roles and resource groups
Roles work alongside [resource groups](/harness-platform/3.0/harness-platform-resources/platform-access-control/add-resource-groups) to create a complete set of permissions and access. For example, you can:
* Assign the **Organization Admin** role with a resource group that is limited to specific projects or specific organizations.
* Assign the **Pipeline Executor** role with a resource group that allows access only to specific pipelines, rather than all pipelines in the project.
{% hint style="info" %}
**RECOMMENDATION**
Follow the principle of least privilege (PoLP), and give users only the access they need to complete their tasks.
{% endhint %}
RBAC is additive. A user's total permissions come from:
* All roles and resource groups from user groups they are in.
* Any roles and resource groups assigned directly to them.
***
### Built-in roles
Built-in roles provide ready-to-use permission sets, so you do not have to build access control from scratch. Harness pre-configures them with relevant permission sets for common responsibilities, such as admin and viewer, which saves setup time.
Built-in platform roles cover all levels of your hierarchy: **Account**, **Organization**, and **Project**. They give your teams a baseline for access control, which you can complement with custom roles for fine-grained control.
Harness includes several built-in roles. To examine the permissions assigned to these roles, do the following:
1. In Harness, navigate to the [scope](#navigate-to-access-control) where the role exists.
2. Select **Roles** in the header.
3. Select the role you want to view. Go to the [permissions reference](/harness-ai/use-harness-platform/platform-access-control/permissions-reference) for more information on specific permissions.
{% hint style="info" %}
Currently, some built-in roles are behind the feature flags `PL_HIDE_PROJECT_LEVEL_MANAGED_ROLE`, `PL_HIDE_ORGANIZATION_LEVEL_MANAGED_ROLE`, and `PL_HIDE_ACCOUNT_LEVEL_MANAGED_ROLE`. Contact [Harness Support](mailto:support@harness.io) to enable them.
{% endhint %}
{% hint style="info" %}
**RECOMMENDATION**
Harness provides built-in roles and resource groups, but you should:
* Be selective when you assign them. Do not give everyone the **Account Admin** role.
* Create custom roles and resource groups when built-in ones are too broad.
{% endhint %}
#### Platform roles
Platform roles are not specific to any module. Use them for administration and oversight of an entire Harness account, organization, or project. They also provide access to cross-module components, such as dashboards and pipelines.
| Role | Scope |
| ------------------------------------------------------------------------------- | ------------ |
| Account Admin, Account Viewer, Dashboard Admin, Dashboard Viewer, Billing Admin | Account |
| Organization Admin, Organization Viewer | Organization |
| Project Admin, Project Viewer, Pipeline Executor | Project |
#### Module-specific roles
Harness creates these roles for you depending on the modules you use. These roles exist at all [scopes](/harness-platform/3.0/harness-platform-resources/platform-access-control/rbac-in-harness#permissions-hierarchy-scopes).
* **Feature Flag Manage Role**: Manage feature flags, including creating, editing, and targeting flags.
* **CET Admin**: Administer Continuous Error Tracking, including managing monitored services and error events.
* **Chaos Admin**: Administer Chaos Engineering experiments and chaos infrastructure.
* **CCM Admin**: Administer Cloud Cost Management, including viewing costs, creating budgets, and managing cost optimization.
* **CCM Viewer**: View Cloud Cost Management dashboards and reports without editing capabilities.
* **Security Testing AppSec Role**: Manage security testing for application security teams, including reviewing scan results and configuring security policies.
* **Security Testing Developer Role**: View security testing scan results and exemptions for development teams.
* **GitOps Admin Role**: Administer GitOps applications, repositories, clusters, and agents.
* **Code Admin**: Administer Harness Code Repository, including managing repositories, branches, and pull requests.
***
### Manage roles in Harness
To manage roles in Harness, you need a role, such as **Account Admin**, that has [permission](/harness-ai/use-harness-platform/platform-access-control/permissions-reference) to view, create, edit, and delete roles.
Click to view full size image
#### Create a role
1. In Harness, navigate to the [scope](#navigate-to-access-control) where you want to create the role.
2. Select **Roles** in the header, and then click **New Role**.
3. Enter a **Name** for the role. **Description** and **Tags** are optional.
4. Click **Save**.
5. Select the [permissions](/harness-ai/use-harness-platform/platform-access-control/permissions-reference) for the role.
6. Click **Apply Changes**.
#### Edit a role
1. In Harness, navigate to the [scope](#navigate-to-access-control) where the role exists.
2. Select **Roles** in the header.
3. Locate the role you want to edit.
4. Select **More options** (⋮) on the role card, and then select **Edit**.
5. Edit the role's name, description, or tags, if needed, and then click **Save**.
6. Edit the role's permissions, and then click **Apply Changes**. Go to the [permissions reference](/harness-ai/use-harness-platform/platform-access-control/permissions-reference) for more information on specific permissions.
#### Delete a role
1. In Harness, navigate to the [scope](#navigate-to-access-control) where the role exists.
2. Select **Roles** in the header.
3. Locate the role you want to delete.
4. Select **More options** (⋮) on the role card, and then click **Delete**.
***
### Reuse roles across scopes
Reuse roles across scopes to simplify access control configuration across your account, organizations, and projects. When you create a role at the account level, you can assign it to users, user groups, or service accounts at granular levels, such as the organization or project scope.
{% hint style="info" %}
* Currently, this feature is behind the feature flag `PL_ROLE_REUSABILITY_ACROSS_CHILD_SCOPES`. Contact [Harness Support](mailto:support@harness.io) to enable it.
* You can reuse only custom roles across scopes. Built-in roles are not reusable.
{% endhint %}
The following example walks through reusing a role across scopes. The role is created at the account scope, and then assigned to users at the organization and project scopes.
#### Create a role at the account scope
1. In Harness, navigate to **Account Settings** → **Access Control**.
2. Select **Roles** in the header, and then click **New Role**.
3. For **Name**, enter `TEST_ROLE`. **Description** and **Tags** are optional.
4. Click **Save**.
5. Select the following permissions:
* For **Pipelines**, select **Execute**.
6. Click **Apply Changes**.
#### Assign the role to users at the organization scope
1. In Harness, navigate to **Account Settings** → **Organizations**, select the relevant organization, and then select **Access Control**.
2. Select **User Groups** in the header, and then select the user group you want to assign the role to.
3. Select **Manage Role Bindings**.
4. Under **Role Bindings**, click **Add**.
5. Under **Select an Existing Role**, select **Account** in the header, and then select the role you want to assign.
Click to view full size image
6. Click **Apply Selected**.
7. Click **Save**.
***
### View principals assigned to a role
View the principals assigned to a role to audit which users, user groups, and service accounts hold a given set of permissions.
{% hint style="info" %}
Currently, this feature is behind the feature flag `PL_ROLE_REUSABILITY_ACROSS_CHILD_SCOPES`. Contact [Harness Support](mailto:support@harness.io) to enable it.
{% endhint %}
To view the principals assigned to a [specified role](#platform-roles), navigate to the appropriate scope (account, organization, or project) and follow the steps below. The steps use the **Account** scope and **Account Admin** role as an example. You can follow the same steps for the organization and project scopes.
{% tabs %}
{% tab title="Interactive" %}
{% embed url="" %}
{% endtab %}
{% tab title="Manual" %}
1. Navigate to the scope's **Settings** → **Access Control** → **Roles**.
2. Locate or search for the [specific role](#platform-roles).
3. Select the role, and then switch to the **Assigned To** tab.
4. By default, the **Users** list appears for the assigned role. You can also switch to the **User Groups** or **Service Accounts** tabs to view principals for the specified role.
{% endtab %}
{% endtabs %}
***
### Related articles
* [Create resource groups](/harness-platform/3.0/harness-platform-resources/platform-access-control/add-resource-groups): Define access to specific Harness resources.
* [Add users](/harness-ai/use-harness-platform/platform-access-control/add-users): Add users to your Harness account, organization, or project.
* [Create user groups](/harness-ai/use-harness-platform/platform-access-control/add-user-groups): Create user groups and assign roles and resource groups to them.
* [Manage service accounts](/harness-ai/use-harness-platform/platform-access-control/add-and-manage-service-account): Configure programmatic access to Harness.
* [Permissions reference](/harness-ai/use-harness-platform/platform-access-control/permissions-reference): Review detailed information about available permissions.
{% @harness-feedback/feedback module="harness-ai" pagePath="harness-ai/use-harness-platform/platform-access-control/add-manage-roles" %}
# Configure RBAC
Use roles for RBAC in Harness.
Role-based access control (RBAC) in Harness controls who can access your resources and what actions they can perform. This page walks you through the complete workflow to configure RBAC in your Harness account, from creating roles and resource groups to assigning them to users and user groups.
### What you will learn in this topic
By the end of this topic, you will be able to:
* [Set up the required permissions to configure RBAC in Harness](#before-you-begin).
* [Follow the complete RBAC configuration workflow in the correct order](#rbac-configuration-workflow).
* [Create roles, resource groups, and user groups for different scenarios](#rbac-workflow-examples).
* [Assign roles and resource groups to users, user groups, and service accounts](#rbac-workflow-examples).
* [Use automated provisioning to import users and groups from your identity provider](#rbac-configuration-workflow).
***
### Before you begin
Before you configure RBAC in Harness, ensure you have:
* **Admin permissions:** You must be an admin at the account, organization, or project scope where you want to configure RBAC. If your account is new, contact [Harness Support](mailto:support@harness.io) to provision the first admin.
* **RBAC knowledge:** Familiarity with [RBAC components](/harness-ai/use-harness-platform/platform-access-control#rbac-components) (principals, roles, resource groups) and [role binding](/harness-ai/use-harness-platform/platform-access-control#role-binding).
* **Harness hierarchy:** Understanding of the [account, organization, and project hierarchy](/harness-ai/use-harness-platform/platform-access-control#permissions-hierarchy-scopes) and how scope affects permissions.
If you don't have admin permissions, you can still configure some aspects of RBAC with these granular permissions:
* **Users:** Requires **View**, **Manage**, and **Invite** permissions for **Users**
* **User groups:** Requires **View** and **Manage** permissions for **User Groups**
* **Resource groups:** Requires **View**, **Create/Edit**, and **Delete** permissions for **Resource Groups**
* **Roles:** Requires **View**, **Create/Edit**, and **Delete** permissions for **Roles**
***
### RBAC configuration workflow
Configuring RBAC in Harness requires creating roles (which grant permissions), resource groups (which grant access), and principals (users, user groups, or service accounts), then binding them together.
#### Complete RBAC workflow
To configure RBAC in Harness, you must:
1. [Create roles](/harness-ai/use-harness-platform/platform-access-control/add-manage-roles).
2. [Create resource groups](/harness-ai/use-harness-platform/platform-access-control/manage-resource-groups) and, optionally, apply [ABAC](/harness-ai/use-harness-platform/platform-access-control/attribute-based-access-control).
3. [Create user groups](/harness-ai/use-harness-platform/platform-access-control/add-user-groups), [create service accounts](/harness-ai/use-harness-platform/platform-access-control/add-and-manage-service-account), and [add users](/harness-ai/use-harness-platform/platform-access-control/add-users).
4. [Assign roles and resource groups](#role-binding) to users, user groups, and service accounts.
5. If you have not already done so, [configure authentication](/harness-ai/use-harness-platform/authentication).
{% hint style="info" %}
**AUTOMATED PROVISIONING**
You can create users and user groups directly in Harness, and you can use automated provisioning, including:
* [Okta SCIM](/harness-ai/use-harness-platform/platform-access-control/provision-users-with-okta-scim)
* [Microsoft Entra ID SCIM](/harness-ai/use-harness-platform/platform-access-control/provision-users-and-groups-using-azure-ad-scim)
* [OneLogin SCIM](/harness-ai/use-harness-platform/platform-access-control/provision-users-and-groups-with-one-login-scim)
* [Just-in-time provisioning](/harness-ai/use-harness-platform/platform-access-control/just-in-time-user-provisioning)
With automated provisioning, users and user groups are imported from your IdP, and then you [assign roles and resource groups](#role-binding) to the imported [principals](#principals) in Harness. You manage group metadata, group membership, and user profiles in your IdP, and you manage role and resource group assignments in Harness.
You can also create users and user groups directly in Harness, but any users or groups imported from your IdP must be managed in your IdP. For imported users and group, you can only change their role and resource group assignments in Harness.
{% endhint %}
#### RBAC workflow examples
These examples walk through two specific RBAC configuration scenarios.
Example: Configure RBAC for account-level pipeline ownership
This example walks through an RBAC configuration that allows full control of pipelines and related resources (connectors, templates, and so on) across the entire account. This configuration uses a custom user group called *Pipeline Owners*, a custom role called *Pipeline Admin*, and a custom resource group called *All Pipeline Resources*.
The *All Pipeline Resources* resource group exists at the account scope and allows access to pipelines, secrets, connectors, delegates, environments, templates, and variables at the account level and in all organizations and projects under the account.
The *Pipeline Admin* role has the following permissions:
* Pipelines: View, create/edit, delete, and execute
* Secrets: View, create/edit, and access
* Connectors: View, create/edit, delete, and access
* Delegates: View and create/edit
* Environments: View, create/edit, and access
* Templates: View, create/edit, and access
* Variables: View and create/edit
**Create the Pipeline Admin role**
1. In Harness, select **Account Settings**, and then select **Access Control**.
2. Select **Roles** in the header, and then select **New Role**.
3. For **Name**, enter `Pipeline Admin`. **Description** and **Tags** are optional.
4. Select **Save**.
5. Select the following permissions:
* For **Pipelines**, select **View**, **Create/Edit**, **Delete**, and **Execute**.
* For **Environments**, select **View**, **Create/Edit**, and **Access**.
* Under **Shared Resources**, select the following:
* For **Templates**, select **View**, **Create/Edit**, and **Access**.
* For **Secrets**, select **View**, **Create/Edit**, and **Access**.
* For **Connectors**, select **View**, **Create/Edit**, **Delete**, and **Access**.
* For **Variables**, select **View** and **Create/Edit**.
* For **Delegates**, select **View** and **Create/Edit**.
* Under **Policies**, select the following:
* For **Governance Policies**, select **View**, **Edit**, **Create** and **Delete**.
* For **Governance Policy Sets**, select **View**, **Edit**, **Create** and **Delete**.
The video below gives an overview of Policies RBAC in Harness.
6. Select **Apply Changes**.
For more information about roles and permissions, go to [Manage roles](/harness-ai/use-harness-platform/platform-access-control/add-manage-roles) and the [Permissions reference](/harness-ai/use-harness-platform/platform-access-control/permissions-reference).
**Create the custom resource group**
1. In Harness, select **Account Settings**, and then select **Access Control**.
2. Select **Resource Groups** in the header, and then select **New Resource Group**.
3. For **Name**, enter `All Pipeline Resources`. **Description**, **Tags**, and **Color** are optional.
4. Select **Save**.
5. For **Resource Scope**, select **All (including all Organizations and Projects)**. This means the resource group grants access to the specified resources at the account level and in all organizations and projects under the account.
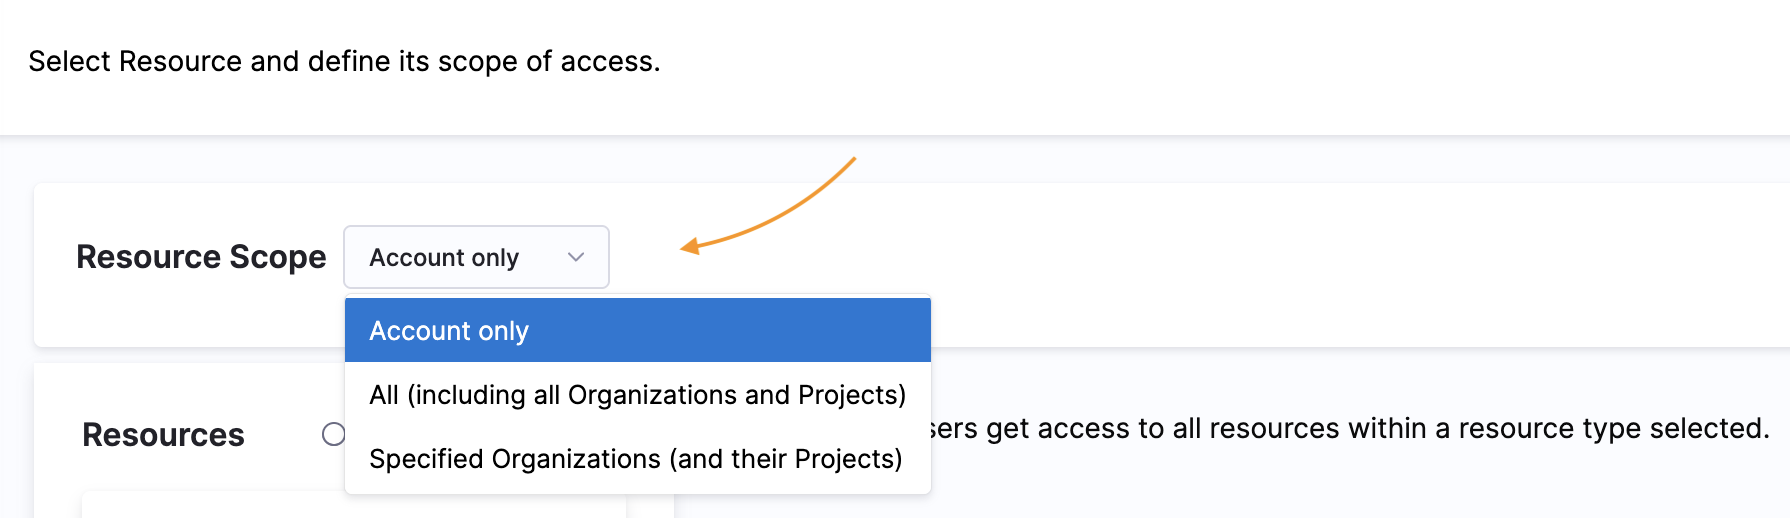
6. For **Resources**, select **Specified**, and then select the following resources:
* Environments
* Variables
* Templates
* Secrets
* Delegates
* Connectors
* Pipelines

7. Select **Save**.
For more information about creating resource groups, go to [Manage resource groups](/harness-ai/use-harness-platform/platform-access-control/manage-resource-groups).
**Create the Pipeline Owners user group**
1. In Harness, select **Account Settings**, and then select **Access Control**.
2. Select **User Groups** in the header, and then select **\*New User Group**.
3. For **Name**, enter `Pipeline Owners`. **Description** and **Tags** are optional.
4. In **Add Users**, select users to add to the group.
5. Select **Save**.
For more information about user groups and users, go to [Manage user groups](/harness-ai/use-harness-platform/platform-access-control/add-user-groups) and [Manage users](/harness-ai/use-harness-platform/platform-access-control/add-users).
{% hint style="info" %}
**AUTOMATED PROVISIONING**
You can create user groups and users directly in Harness, and you can use automated provisioning, including:
* [Okta SCIM](/harness-ai/use-harness-platform/platform-access-control/provision-users-with-okta-scim)
* [Microsoft Entra ID SCIM](/harness-ai/use-harness-platform/platform-access-control/provision-users-and-groups-using-azure-ad-scim)
* [OneLogin SCIM](/harness-ai/use-harness-platform/platform-access-control/provision-users-and-groups-with-one-login-scim)
* [Just-in-time provisioning](/harness-ai/use-harness-platform/platform-access-control/just-in-time-user-provisioning)
When you use automated provisioning, users and user groups are imported from your IdP, and then you assign roles and resource groups to the imported [principals](#principals) in Harness. For imported users and groups, you manage group metadata, group membership, and user profiles in your IdP, and you manage their role and resource group assignments in Harness. You can also create users and user groups directly in Harness, but any users or groups imported from your IdP must be managed in your IdP.
For example, if you use Okta as your IdP, you could create a Pipeline Owners group in Okta and assign users to that group in Okta. When the Pipeline Owners group is first imported into Harness, the group and the group members are not associated with any roles or resource groups. You would [create the pipeline admin role](#create-the-pipeline-admin-role) and [create the custom resource group](#create-the-custom-resource-group) in Harness, and then [assign roles and resource groups](#assign-the-role-and-resource-group-to-the-user-group) to the user group. The group members inherit permissions and access from the role and resource group that is assigned to the user group.
{% endhint %}
**Assign the role and resource group to the user group**
1. Harness, select **Account Settings**, and then select **Access Control**.
2. Select **User Groups** in the header, locate the **Pipeline Owners** group, and select **Manage Roles**.
3. Under **Role Bindings**, select **Add**.
4. For **Role**, select the **Pipeline Admin** role.
5. For **Resource Groups**, select the **All Pipeline Resources** group.
6. Select **Apply**.
For more information about assigning roles and resource groups, go to [Role binding](#role-binding).
Example: Configure RBAC to run pipelines in a specific project
This example walks through an RBAC configuration that provides only the ability to run pipelines in a specific project. This configuration uses a custom user group called *Project Pipeline Runners*, custom role called *Pipeline Runner*, and a custom resource group called *All Project Pipelines and Connectors*.
Because pipelines involve multiple resources, such as connectors, secrets, and variables, the *Pipeline Runner* role requires the following permissions:
* **Execute** permission for pipelines.
* **Access** permission for any resource types used in pipelines.
The *All Project Pipelines and Connectors* resource group exists at the project scope, and it only includes pipelines and resources related to pipelines (such as connectors). This restricts access to these specific resources within a specific project only.
**Create the Pipeline Runner role**
1. In Harness, go to the project where you want to configure RBAC.
To configure RBAC for a specific project, you must navigate to that project first.
2. Select **Project Setup**, and then select **Access Control**.
3. Select **Roles** in the header, and then select **New Role**.
4. For **Name**, enter `Pipeline Runner`. **Description** and **Tags** are optional.
5. Select **Save**.
6. Select the following permissions:
* For **Pipelines**, select **Execute**.
* Under **Shared Resources**, select **Access** for **Connectors** and any other shared resources relevant to your pipelines, such as **Templates**, **Secrets**, **Variables**, or **Delegates**.
7. Select **Apply Changes**.
For more information about roles and permissions, go to [Manage Roles](/harness-ai/use-harness-platform/platform-access-control/add-manage-roles) and the [Permissions reference](/harness-ai/use-harness-platform/platform-access-control/permissions-reference).
**Create the project resource group**
1. In the same Harness project where you [created the Pipeline Runner role](#create-the-pipeline-runner-role), select **Project Setup**, and then select **Access Control**.
2. Select **Resource Groups** in the header, and then select **New Resource Group**.
3. For **Name**, enter `All Project Pipelines and Connectors`. **Description**, **Tags**, and **Color** are optional.
4. Select **Save**.
5. For **Resources**, select **Specified**, and then select **Pipelines**, **Connectors**, and any other shared resources relevant to your pipelines.
After selecting resources, you can customize access further by configuring specific access for each resource type. For example, you can limit access to specific pipelines or connectors only.
6. Select **Save**.
In this example, the **Resource Scope** is locked to **Project only**, which means the resource group can only access the selected resources within this project. If your pipelines use connectors or other resources at a higher scope, you would need to configure RBAC at the account or org scope and then refine access by project. Similarly, if you wanted to create a user group that could run any pipeline in an organization or account, you would need to create the role, resource group, and user group at the account scope (by navigating to **Account Settings** and then selecting **Access Control**). Note that some refinement options, such as selecting specific pipelines, aren't available at higher scopes.
For more information about creating resource groups, go to [Manage resource groups](/harness-ai/use-harness-platform/platform-access-control/manage-resource-groups).
**Configure the user group**
1. In the same Harness project where you [created the Pipeline Runner role](#create-the-pipeline-runner-role), select **Project Setup**, and then select **Access Control**.
2. Select **User Groups** in the header, and then select **\*New User Group**.
3. For **Name**, enter `Project Pipeline Runners`. **Description** and **Tags** are optional.
4. In **Add Users**, select users to add to the group.
5. Select **Save**.
6. Next to the **Project Pipeline Runners** group, select **Manage Roles**
7. Under **Role Bindings**, select **Add**.
8. For **Role**, select the **Pipeline Runner** role.
9. For **Resource Groups**, select the **All Project Pipelines and Connectors** group.
10. Select **Apply**.
For more information about user groups, users, and role/resource group assignments, go to [Manage user groups](/harness-ai/use-harness-platform/platform-access-control/add-user-groups), [Manage users](/harness-ai/use-harness-platform/platform-access-control/add-users), and [Role binding](/harness-ai/use-harness-platform/platform-access-control#role-binding).
***
### Next steps
After you configure RBAC in Harness, you can:
* [Set up authentication](/harness-ai/use-harness-platform/authentication) to control how users sign in to Harness
* [Use attribute-based access control (ABAC)](/harness-ai/use-harness-platform/platform-access-control/attribute-based-access-control) to add conditional access based on user attributes
* [Provision users and groups automatically](/harness-ai/use-harness-platform/platform-access-control/provision-users-with-okta-scim) from your identity provider using SCIM
* Review the [Permissions reference](/harness-ai/use-harness-platform/platform-access-control/permissions-reference) for a complete list of available permissions
* Learn about [resource types](/harness-ai/use-harness-platform/platform-access-control/resource-type-reference) you can include in resource groups
{% @harness-feedback/feedback module="harness-ai" pagePath="harness-ai/use-harness-platform/platform-access-control/configure-rbac" %}
# Manage resource groups
Use resource groups to define which Harness resources users and service accounts can access.
[Resource groups](/harness-platform/3.0/harness-platform-resources/platform-access-control/rbac-in-harness#resource-groups) are an [RBAC component](/harness-platform/3.0/harness-platform-resources/platform-access-control/rbac-in-harness#rbac-components) that define the objects that a user or service account can access. Objects are any Harness resource, including projects, pipelines, connectors, secrets, delegates, environments, users, and more. When you assign a resource group to a user, user group, or service account, the access defined in the resource group is granted to the target user, group, or service account.
Harness includes some [built-in resource groups](#built-in-resource-groups), and you can [create custom resource groups](#create-a-resource-group), which are useful for limited and fine-grained access control.
***
### What you will learn in this topic
By the end of this topic, you will know how to:
* [Use resource groups](#roles-and-resource-groups) to control access to Harness resources.
* Configure [resource scope](#resource-scope-options) options at account, organization, and project levels.
* [Create, edit, and delete](#manage-resource-groups-in-harness) custom resource groups.
* [Apply resource groups and add role bindings](#assign-users-to-custom-resource-groups) for users with custom resource groups.
***
### Before you begin
Before you manage resource groups, ensure you have the following:
* **Account Admin role or equivalent permissions**: You need permissions to view, create, edit, and delete resource groups. Go to [Permissions reference](/harness-ai/use-harness-platform/platform-access-control/permissions-reference) to review required permissions.
* **Understanding of RBAC in Harness**: Familiarity with roles, resource groups, and permission hierarchy. Go to [RBAC in Harness](/harness-platform/3.0/harness-platform-resources/platform-access-control/rbac-in-harness) to learn the basics.
* **Understanding of scopes**: Knowledge of account, organization, and project scopes. Go to [Permissions hierarchy scopes](/harness-platform/3.0/harness-platform-resources/platform-access-control/rbac-in-harness#permissions-hierarchy-scopes) to understand scope levels.
***
### Roles and resource groups
Roles and resource groups work together to define permissions and access in Harness. Roles grant permissions to perform actions, while resource groups define which resources users can access.
[Roles](/harness-ai/use-harness-platform/platform-access-control/add-manage-roles) are applied together with [resource groups](/harness-platform/3.0/harness-platform-resources/platform-access-control/rbac-in-harness#resource-groups) to create a complete set of permissions and access. For example:
* **Organization Admin role with limited scope**: You can assign the **Organization Admin** role with a resource group that is limited to specific projects or specific organizations.
* **Pipeline Executor role with specific pipelines**: You can assign the **Pipeline Executor** role with a resource group that only allows access to specific pipelines, rather than all pipelines in the project.
Harness RBAC is additive and follows the principle of least privilege. Go to [RBAC is additive](/harness-platform/3.0/harness-platform-resources/platform-access-control/rbac-in-harness#rbac-is-additive) to understand how multiple role assignments combine.
***
### Scopes and refinement
Resource groups are scope-specific, and you can create them at any [scope](/harness-platform/3.0/harness-platform-resources/platform-access-control/rbac-in-harness#permissions-hierarchy-scopes). For example, a resource group created at the project scope is only available in that project.
Each resource group you create is tied to the scope where you create it and controls access to resources at that scope and below.
In addition to the scope at which you create the resource group, each resource group includes **Resource Scope** options that control the scope of access *within the resource group's overall scope*. For example, if you create a resource group at the organization level, you can allow access to all projects under that organization, or you can select specific projects.
The scope at which you create a resource group determines which **Resource Scope** options you can apply to that group. For example, if you create a resource group at the project scope, it is impossible to select organization or account **Resource Scopes** for that resource group.
Click to view full size image
***
#### Resource scope options
Resource scope options determine which resources within the resource group's overall scope are accessible to users.
If a resource group includes **All Account/Organization/Project Level Resources**, it provides access to the resources at that specified level and nothing lower. For example, **All Account Level Resources** grants access to the account-level resources but nothing at the organization or project levels.
```mermaid
flowchart TD
subgraph All Account Level Resources
A[Account]-->M[Resource]
end
A--->B[Org]
A--->C[Org]
B-->N[Resource]
C-->F[Resource]
B---->D[Project]
C---->E[Project]
D-->G[Resource]
D-->H[Resource]
E-->I[Resource]
E-->J[Resource]
```
If a resource group includes **All Resources Including Child Scopes**, it provides access to all resources at the specified level and all lower resources. This is an expansive scope comprising many resources. For example, at the organization scope, **All Resources Including Child Scopes** grants access to resources at the organization level, as well as resources in the scope of projects under that organization.
```mermaid
flowchart TD
A[Account]-->M[Resource]
A-->B[Org]
A-->C[Org]
subgraph Organization - All Resources Including Child Scopes
B-->N[Resource]
B--->D[Project]
D-->G[Resource]
D-->H[Resource]
end
C-->F[Resource]
C--->E[Project]
E-->I[Resource]
E-->J[Resource]
```
If a resource group includes **Specified Organizations (and their Projects)**, it provides access to resources in one or more selected organizations, as well as resources in projects under those orgs. This option is available for resource groups created at the account scope, and you can use it to provide multi-organization access without granting access to all orgs in your account.
If a resource group includes **Specified Projects**, it provides access to resources in one or more selected projects. This option is available for resource groups created at the organization scope, and you can use it to provide multi-project access without granting access to all projects under an org.
Go to [Built-in resource groups](#built-in-resource-groups) for more resource scope diagrams.
***
### Built-in resource groups
Harness includes several built-in resource groups. You can use these resource groups as-is or create custom resource groups for more specific access control.
Harness includes several built-in resource groups. Described below are some examples of built-in resource groups at different scopes.
Built-in resource groups at the Account scope
* **All Resources Including Child Scopes**: Includes all resources within the account's scope, as well as those within the scope of orgs and projects under the account. This is the most inclusive resource group possible.
```mermaid
flowchart TD
subgraph Account - All Resources Including Child Scopes
A[Account]--->B[Org]
A-->M[Resource]
A--->C[Org]
B-->N[Resource]
C-->F[Resource]
B---->D[Project]
C---->E[Project]
D-->G[Resource]
D-->H[Resource]
E-->I[Resource]
E-->J[Resource]
end
```
* **All Account Level Resources**: Includes all resources in the account's scope, and excludes resources within the scope of orgs or projects under the account.
```mermaid
flowchart TD
subgraph All Account Level Resources
A[Account]-->M[Resource]
end
A--->B[Org]
A--->C[Org]
B-->N[Resource]
C-->F[Resource]
B---->D[Project]
C---->E[Project]
D-->G[Resource]
D-->H[Resource]
E-->I[Resource]
E-->J[Resource]
```
Built-in resource groups at the organization scope
* **All Resources Including Child Scopes**: Includes all resources within a specific org's scope, as well as those within the scope of projects under that organization. This is set for each org. If you have multiple orgs, you have an **All Resources Including Child Scopes** for each org.
```mermaid
flowchart TD
A[Account]-->M[Resource]
A-->B[Org]
A-->C[Org]
subgraph Organization - All Resources Including Child Scopes
B-->N[Resource]
B--->D[Project]
D-->G[Resource]
D-->H[Resource]
end
subgraph Organization - All Resources Including Child Scopes
C-->F[Resource]
C--->E[Project]
E-->I[Resource]
E-->J[Resource]
end
```
* **All Organization Level Resources**: Includes all resources in a specific org's scope. Excludes resources within the scope of projects under the org. This is set for each org. If you have multiple orgs, you have an **All Organization Level Resources** for each org.
```mermaid
flowchart TD
A[Account]-->M[Resource]
A--->B[Org]
A--->C[Org]
subgraph All Organization Level Resources
B-->N[Resource]
end
B--->D[Project]
D-->G[Resource]
D-->H[Resource]
subgraph All Organization Level Resources
C-->F[Resource]
end
C--->E[Project]
E-->I[Resource]
E-->J[Resource]
```
Built-in resource groups at the Project scope
**All Project Level Resources** includes all resources in the project's scope. This is set for each project. If you have multiple projects, you have an **All Project Level Resources** for each project.
```mermaid
flowchart TD
A[Account]-->M[Resource]
A--->B[Org]
A--->C[Org]
B-->N[Resource]
B--->D[Project]
subgraph All Project Level Resources
D-->G[Resource]
D-->H[Resource]
end
C-->F[Resource]
C--->E[Project]
subgraph All Project Level Resources
E-->I[Resource]
E-->J[Resource]
end
```
***
### Manage resource groups in Harness
You can create, edit, and delete resource groups in Harness at the account, organization, or project scope.
To manage resource groups in Harness, you need a role, such as **Account Admin**, that has [permission](/harness-ai/use-harness-platform/platform-access-control/permissions-reference) to view, create, edit, and delete resource groups.
Go to [scopes and refinement](#scopes-and-refinement) to understand how to work with resource groups.
#### Granular resource access
You can refine resource groups to grant access to specific individual resources within a category, such as specific connectors or pipelines.
For example, to allow access to specific pipelines only, create the resource group at the project level, select the **Pipelines** resource type, select **Specified**, and then choose the specific pipelines.
Click to view full size image
This level of control is not available at all scopes for all resource types. For example, you cannot select specific pipelines for resource groups created at the account or organization scopes.
***
#### Create a resource group
Follow these steps to create a resource group at the account, organization, or project scope:
1. In Harness, go to the [scope](#scopes-and-refinement) where you want to create the resource group.
* **Account scope**: Select **Account Settings**, and then select **Access Control**.
* **Organization scope**: Go to **Account Settings**, select **Organizations**, select the relevant organization, and then select **Access Control**.
* **Project scope**: Go to **Projects**, select the relevant project, and then select **Access Control**.
2. Select **Resource Groups** in the header, and then select **New Resource Group**.
3. Enter a **Name** for your resource group. **Description**, **Tags**, and **Color** are optional.
4. Select **Save**.
5. Select the **Resource Scope**. The available options depend on the scope where you created the resource group.
* **Account/Organization/Project only**: Access to resources at the current scope only.
* **All (including all Organizations and Projects)**: Access to all resources at the current scope and all child scopes.
* **All (including Projects)**: Access to all resources at the current scope and all project scopes below.
* **Specified Organizations (and their Projects)**: Access to selected organizations and their projects.
* **Specified Projects**: Access to selected projects only.
Click to view full size image
6. If you selected **Specified Organization** or **Specified Projects**, click **Edit** and select the specific organizations or projects.
7. For **Resources**, select **All** or **Specified**.
8. If you selected **Specified**, select the resource types to include.
Depending on the scope where you created the resource group, you can further refine your selection by:
* **All**: Include all resources in the given category that are within the **Resource Scope**.
* **By Type**: Include specific types of resources in the given category that are within the **Resource Scope**. Use this option to [configure ABAC](/harness-ai/use-harness-platform/platform-access-control/attribute-based-access-control) for connectors and environments.
* **Specified**: Select specific, named resources in this category that are within the **Resource Scope**, such as specific pipelines.
These configurations are in addition to the **Resource Scope**. For example, if the **Resource Scope** is **Project Only**, and you select **Specified** pipelines, you can only choose from pipelines in the specified project scope. Go to [Scopes and refinement](#scopes-and-refinement) to learn more.
9. Select **Save**.
***
#### Edit a resource group
Follow these steps to edit an existing resource group:
1. In Harness, go to the [scope](#scopes-and-refinement) where the resource group exists.
* **Account scope**: Select **Account Settings**, and then select **Access Control**.
* **Organization scope**: Go to **Account Settings**, select **Organizations**, select the relevant organization, and then select **Access Control**.
* **Project scope**: Go to **Projects**, select the relevant project, and then select **Access Control**.
2. Select **Resource Groups** in the header.
3. Locate the resource group you want to edit.
4. Select **More options** (⋮), and then select **Edit**.
5. Edit the resource group's name, description, tags, or color, if needed, and then select **Save**.
6. Edit the resource group's scope and resource settings, and then select **Save**.
***
#### Delete a resource group
Follow these steps to delete a resource group:
1. In Harness, go to the [scope](#scopes-and-refinement) where the resource group exists.
* **Account scope**: Select **Account Settings**, and then select **Access Control**.
* **Organization scope**: Go to **Account Settings**, select **Organizations**, select the relevant organization, and then select **Access Control**.
* **Project scope**: Go to **Projects**, select the relevant project, and then select **Access Control**.
2. Select **Resource Groups** in the header.
3. Locate the resource group you want to delete.
4. Select **More options** (⋮), and then select **Delete**.
***
### Assign users to custom resource groups
You can bind roles to users and attach users to specific resource groups at the **account**, **project**, or **organization** scope. This allows you to grant users access only to the resources defined in the resource group.
To add new users to a custom resource group with role bindings:
1. In Harness, go to **Account Settings**, **Organization Settings**, or **Project Settings**, depending on the [scope](/harness-platform/3.0/harness-platform-resources/platform-access-control/rbac-in-harness#permissions-hierarchy-scopes) at which you want to add new users to a custom resource group and do role bindings.
2. Under **Access Control**, select **Resource Groups** tab.
3. If you have an existing resource group, go to step 4. If you do not have one, [create a new resource group](#create-a-resource-group), select the desired resource types, and select **Save**.
4. Return to **Account Settings** or to the scope where you want to add new users. Under **Access Control**, select **Users**.
5. Select **New User**, enter the user's email, then, under **Role Bindings**, select **Add**.
6. Under **Roles**, select **Select a role**, then choose **Account Admin** or any custom role with all permissions selected for the resources in the resource group from the dropdown.
7. Under **Resource Groups**, select **All Resources Including** and select your resource group.
8. Click **Apply** to send an invitation to the user's email. After the user accepts the invite, the role-binding process is complete.
The user can now sign in to their account and access only those resources allowed in the resource groups with their **Account Admin** permissions.
To add role bindings to an existing user:
1. In Harness, go to **Account Settings**, **Organization Settings**, or **Project Settings**, depending on the [scope](/harness-platform/3.0/harness-platform-resources/platform-access-control/rbac-in-harness#permissions-hierarchy-scopes) at which you want to add users to a custom resource group and perform role bindings.
2. Under **Access Control**, select **Resource Groups** tab.
3. If you have an existing resource group, go to step 4. If you do not have one, [create a new resource group](#create-a-resource-group), select the desired resource types, and then select **Save**.
4. Return to **Account Settings** or to the scope where you want to add users. Under **Access Control**, select **Users**.
5. Search for the user to whom you want to assign the Account Admin role or any custom role with all permissions selected for the resources in the resource group, and then select the user.
6. Go to the **Role Bindings** tab, then select **Manage Role Bindings**.
7. Under **Role Bindings**, select **Add**.
8. Under **Roles**, select **Select a role**, and then select **Account Admin**.
9. Under **Resource Groups**, select **All Resources Including**, and then select your resource group.
10. Select **Apply**. You will receive a notification stating **Role Assignments updated successfully**, and the role binding process is complete.
The user can now sign in to their account and access only those resources allowed in the resource groups with their **Account Admin** permissions.
***
### Next steps
Creating resource groups is one part of [configuring RBAC in Harness](/harness-platform/3.0/harness-platform-resources/platform-access-control/rbac-in-harness#configure-rbac-in-harness).
* [Manage roles](/harness-ai/use-harness-platform/platform-access-control/add-manage-roles): To create roles that grant permissions.
* [Manage users](/harness-ai/use-harness-platform/platform-access-control/add-users): To add users and assign roles and resource groups.
* [Manage user groups](/harness-ai/use-harness-platform/platform-access-control/add-user-groups): To organize users and apply role bindings at scale.
* [Manage service accounts](/harness-ai/use-harness-platform/platform-access-control/add-and-manage-service-account): To configure programmatic access to Harness.
{% @harness-feedback/feedback module="harness-ai" pagePath="harness-ai/use-harness-platform/platform-access-control/manage-resource-groups" %}
# Attribute-based access control
Attribute-based access control (ABAC) is an optional RBAC extension that grants access to Harness resources based on connector and environment types.
Attribute-based access control (ABAC) grants access to Harness resources based on attributes associated with those resources, such as connector type or environment type. ABAC is an optional extension of [Role-based access control (RBAC)](/harness-platform/3.0/harness-platform-resources/platform-access-control/rbac-in-harness) that uses attribute-based rules to grant access in the context of specific actions. Use ABAC to refine [resource groups](/harness-ai/use-harness-platform/platform-access-control/manage-resource-groups) with an additional dimension of control.
***
### What you will learn in this topic
By the end of this topic, you will be able to:
* Understand [how ABAC works](#how-abac-works) and when to use it to extend RBAC.
* [Configure ABAC](#configure-abac) on a resource group.
* Follow the [next steps](#next-steps) to combine roles with ABAC-enhanced resource groups and complete your RBAC setup.
***
### Before you begin
Before you configure ABAC, ensure you have the following:
* **Harness account access**: **Admin** permissions for the account, organization, or project where you configure ABAC.
* **RBAC knowledge**: Familiarity with roles and resource groups. Go to [RBAC in Harness](/harness-platform/3.0/harness-platform-resources/platform-access-control/rbac-in-harness) to know how roles and resource groups grant access.
* **Existing resource group**: A resource group to refine, or permissions to create one. Go to [Manage resource groups](/harness-ai/use-harness-platform/platform-access-control/manage-resource-groups) to manage existing resource groups.
***
### How ABAC works
RBAC is role-based, which means permissions and access to resources are determined by the roles assigned to users, user groups, and service accounts. ABAC adds a dimension to this model by granting access based on the type of a resource rather than a specific named resource.
ABAC can help you:
* **Simplify management**: Manage role bindings at scale with fewer, broader rules.
* **Refine access**: Provide more fine-grained access control.
* **Reduce overhead**: Reduce the number of role bindings you need to manage.
* **Add business meaning**: Leverage attributes with specific business meanings.
ABAC adds the dimensions of [connector](/harness-ai/use-harness-platform/connectors) and [environment](/continuous-delivery/use-continuous-delivery/cd-building-blocks/environments/environment-overview) types to refine resource groups. For example:
* Grant access to manage pre-production environments but not other types of environments.
* Grant access to manage code repository connectors but not other types of connectors.
***
### Configure ABAC
Configure ABAC on a resource group to scope access by connector and environment type. You configure ABAC while you create or edit a resource group.
1. [Create or edit a resource group](/harness-ai/use-harness-platform/platform-access-control/manage-resource-groups).
2. For **Resources**, select **Specified**.
Click to view full size image
3. Select **Environments** and/or **Connectors**.
ABAC is available for environments and connectors only. These steps focus on configuring ABAC; however, your resource groups can include other resource categories. Go to [Manage resource groups](/harness-ai/use-harness-platform/platform-access-control/manage-resource-groups) to configure other resource categories.
Click to view full size image
4. To apply ABAC to **Connectors** or **Environments**, select **By Type**, and then click **Add**.
For information about the **All** and **Specified** options, go to [Manage resource groups](/harness-ai/use-harness-platform/platform-access-control/manage-resource-groups).
ABAC is in addition to the **Resource Scope**. For example, if the **Resource Scope** is **Project Only**, and you select connectors **By Type**, then the resource group includes all connectors of the selected types that are in the specified project only. Go to [scopes and refinement](/harness-ai/use-harness-platform/platform-access-control/manage-resource-groups#scopes-and-refinement) for more information on how scope and ABAC interact.
5. Select the types to include, and then click **Add**.
For **Environments**, you can choose **Production** or **Pre-Production**.
For **Connectors**, you can choose one or more of the following Harness connector types: **Artifact Repositories**, **Cloud and AI Costs**, **Cloud Providers**, **Code Repositories**, **Communication Tools**, **Documentation**, **Monitoring and Logging Systems**, **Secret Managers**, and **Ticketing Systems**.
6. Click **Save**.
***
### Next steps
Pair your ABAC resource group with a role, then assign both to your users. Because ABAC applies to environments and connectors, choose a role that includes environment or connector permissions.
* [Configure RBAC in Harness](/harness-ai/use-harness-platform/platform-access-control/configure-rbac): Complete the end-to-end workflow that ties resource groups, roles, and assignments together.
* [Roles](/harness-ai/use-harness-platform/platform-access-control/add-manage-roles): Create the role that grants the environment and connector permissions your ABAC resource group needs.
After you configure roles and resource groups, assign them to:
* [Users](/harness-ai/use-harness-platform/platform-access-control/add-users)
* [User groups](/harness-ai/use-harness-platform/platform-access-control/add-user-groups)
* [Service accounts](/harness-ai/use-harness-platform/platform-access-control/add-and-manage-service-account)
{% @harness-feedback/feedback module="harness-ai" pagePath="harness-ai/use-harness-platform/platform-access-control/attribute-based-access-control" %}
# Migrate from manual user management to SCIM
Step-by-step guide for transitioning existing Harness users to SCIM provisioning with Okta or Azure AD without access disruption.
Migrating from manual user management to SCIM (System for Cross-domain Identity Management) lets your identity provider (IdP) automatically provision, update, and deprovision Harness users. This guide walks you through the migration for Okta and Azure AD (Entra ID) without disrupting existing user access.
***
### What you will learn in this topic
By the end of this topic, you will be able to:
* Understand [why SCIM automates user lifecycle management](#why-migrate-to-scim).
* Migrate users to SCIM with [Okta](#migration-steps-for-okta).
* Migrate users to SCIM with [Azure AD (Entra ID)](#migration-steps-for-azure-ad-entra-id).
* [Verify the migration](#verify-the-migration) and resolve common issues.
***
### Why migrate to SCIM?
SCIM automates user lifecycle management in Harness. Instead of manually adding and removing users, your IdP pushes changes to Harness automatically. This is especially valuable when you:
* Have a growing team and need to scale user onboarding.
* Want to enforce consistent access policies across tools.
* Need to ensure offboarded employees lose Harness access immediately.
* Are required to meet compliance standards for user provisioning.
***
### Before you begin
Before you migrate to SCIM, ensure you have the following:
* **Harness Account Admin access**: Permissions to configure SCIM tokens and manage users.
* **IdP admin access**: Admin access to Okta or Azure AD to configure SCIM applications and assign users.
* **A list of existing Harness users**: The users and their email addresses. Export this list from Harness under **Account Settings** > **Access Control** > **Users**.
* **A documented group mapping**: The Harness user groups that map to IdP groups. Document the mapping before you start.
* **Matching email addresses**: User email addresses in your IdP that exactly match the email addresses in Harness. Mismatches cause duplicate accounts.
{% hint style="warning" %}
Back up your current user and group assignments before you start. Screenshot or export the current role bindings and group memberships so you can verify nothing is lost after migration.
{% endhint %}
***
### Migration steps for Okta
Complete these steps to hand Okta control of your existing Harness users through SCIM.
#### Step 1: Add the Harness integration in Okta
1. In the Okta Admin Console, go to **Applications** > **Applications**.
2. Select **Browse App Integration Catalog** and search for **Harness** in the catalog. Select the **Harness** result, which lists **SAML** and **SCIM**.
3. On the Harness integration page, select **Add Integration**.
#### Step 2: Enable API integration for provisioning
1. In the Harness app, go to the **Provisioning** tab and select **Integration** in the left menu.
2. Select **Configure API Integration**.
3. Select **Enable API integration**.
4. In Harness, create an API key token with all **Users** and **User Groups** permissions under **Account Settings** > **Access Control** > **API Keys**. Copy the token.
5. Enter your Harness credentials:
* **Base URL:** The Harness SCIM endpoint URL.
* **API Token:** The Harness API token you copied.
Click to view full size image
6. Leave **Import Groups** selected to import existing groups from Harness.
7. Select **Test API Credentials** to confirm the connection succeeds, and then select **Save**.
8. After the integration is enabled, go to **Provisioning** > **To App** and enable the provisioning features you need: **Create Users**, **Update User Attributes**, and **Deactivate Users**.
#### Step 3: Assign existing users to the Okta app
1. In Okta, go to the Harness application's **Assignments** tab.
Click to view full size image
2. Select **Assign** and assign the users or groups that already exist in Harness. Make sure email addresses match exactly.
3. When you assign users that already exist in Harness, Okta takes over management of those users through SCIM without recreating them.
#### Step 4: Push groups (optional)
1. Go to the **Push Groups** tab in the Okta Harness application.
2. Select **Push Groups** and choose the IdP groups to push to Harness.
3. If a Harness user group with the same name already exists, Okta links to it rather than creating a duplicate.
#### Step 5: Verify user access
1. In Harness, go to **Account Settings** > **Access Control** > **Users** and confirm that migrated users show the SCIM provisioning source.
2. Have a few users log in to verify their access and role assignments are intact.
3. Check that group memberships in Harness match the expected IdP group mappings.
Go to [Provision users with Okta SCIM](/harness-ai/use-harness-platform/platform-access-control/provision-users-with-okta-scim) to complete the detailed Okta SCIM setup.
***
### Migration steps for Azure AD (Entra ID)
Complete these steps to hand Azure AD control of your existing Harness users through SCIM.
#### Step 1: Register the SCIM enterprise application
1. In the [Azure portal](https://portal.azure.com/), go to **Enterprise applications** > **All applications** > **New application**.
2. Search for **Harness**, select it in the results, and select **Add** to add it to your managed applications.
3. Open the Harness application and select **Provisioning**.
4. Set **Provisioning Mode** to **Automatic**.
5. In Harness, create an API key token with all **Users** and **User Groups** permissions under **Account Settings** > **Access Control** > **API Keys**. Copy the token.
6. Under **Admin Credentials**, enter:
* **Tenant URL:** The Harness SCIM base URL for your cluster.
* **Secret Token:** The Harness API token you copied.
7. Select **Test Connection** to confirm Azure AD can reach Harness, and then select **Save**.
#### Step 2: Configure attribute mappings
1. Under **Provisioning** > **Mappings**, enable **Provision Azure Active Directory Users** and **Provision Azure Active Directory Groups**.
2. Open **Provision Azure Active Directory Users** and review the attribute mappings. Confirm that the attribute marked **Matching** (by default `userName`) resolves to the same email address your existing Harness users have. Correct matching is what lets Azure AD link to existing users instead of creating duplicates.
3. Review the group attribute mappings and make any changes your directory requires.
#### Step 3: Assign and provision existing users and groups
1. Go to **Users and groups** in the Harness enterprise application and assign the users and groups that already exist in Harness.
2. Under **Settings**, set the **Scope** to control which users and groups sync.
3. Switch **Provisioning Status** to **On**, and then select **Save** to start the initial provisioning sync.
4. During the first sync, Azure AD matches assigned users to existing Harness users by the matching attribute and links them rather than creating duplicates.
#### Step 4: Verify user access
1. Monitor the sync under **Provisioning** and review the provisioning logs for any errors.
2. In Harness, confirm that users show the SCIM provisioning source.
3. Verify group memberships and role assignments are intact.
Go to [Provision users and groups using Azure AD SCIM](/harness-ai/use-harness-platform/platform-access-control/provision-users-and-groups-using-azure-ad-scim) to complete the detailed Azure AD SCIM setup.
***
### Verify the migration
After you complete the migration steps, verify everything works correctly:
1. **User count check**: Compare the number of active users in Harness with your pre-migration list. No users should be missing.
2. **Provisioning source**: In the Harness Users list, SCIM-managed users display the IdP as their provisioning source.
3. **Login test**: Have representative users from different groups log in and confirm they see the correct projects and resources.
4. **Group membership**: Verify that Harness user groups match the IdP group assignments.
5. **Role bindings**: Confirm that role assignments on resource groups are still intact. SCIM manages users and group membership, not Harness role bindings, so your existing role bindings should be unaffected.
{% hint style="info" %}
SCIM manages user and group membership only. Role bindings and resource group assignments in Harness are not affected by SCIM provisioning. You still manage roles and permissions in Harness.
{% endhint %}
***
### Troubleshooting Duplicate users after migration
If you see duplicate users, the email address in the IdP does not exactly match the email in Harness. To fix this:
1. Delete the duplicate user in Harness (the one without existing role bindings).
2. Correct the email address in the IdP to match the original Harness user.
3. Re-trigger provisioning from the IdP.
Users lost access after migration
If users report losing access:
1. Check that the user is still assigned to the Harness application in the IdP.
2. Verify that the user's group membership in the IdP maps to the correct Harness user group.
3. Confirm that the Harness user group still has the expected role bindings.
Group mapping conflicts
If an IdP group push creates a new Harness user group instead of linking to an existing one:
1. The group names might not match exactly, including case sensitivity.
2. Delete the newly created group in Harness.
3. Rename the IdP group to match the existing Harness group name exactly, and then re-push.
SCIM token expiration
SCIM tokens in Harness have an expiration date. If provisioning stops working:
1. Generate a new SCIM token in Harness.
2. Update the token in your IdP's SCIM application settings.
3. Test the connection to confirm it works.
***
### Related articles
* [Provision users with Okta SCIM](/harness-ai/use-harness-platform/platform-access-control/provision-users-with-okta-scim): Set up SCIM provisioning with Okta.
* [Provision users and groups using Azure AD SCIM](/harness-ai/use-harness-platform/platform-access-control/provision-users-and-groups-using-azure-ad-scim): Set up SCIM provisioning with Azure AD.
* [Manage users](/harness-ai/use-harness-platform/platform-access-control/add-users): Add and manage users in Harness.
* [Manage user groups](/harness-ai/use-harness-platform/platform-access-control/add-user-groups): Create and manage user groups in Harness.
{% @harness-feedback/feedback module="harness-ai" pagePath="harness-ai/use-harness-platform/platform-access-control/scim-migration-guide" %}
# Manage user groups
Create and manage Harness user groups manually, through inheritance, or with automated provisioning, and assign roles and resource groups to control access.
User groups contain multiple Harness users. You can assign [roles](/harness-ai/use-harness-platform/platform-access-control/add-manage-roles) and [resource groups](/harness-platform/3.0/harness-platform-resources/platform-access-control/add-resource-groups) to user groups, and the permissions and access granted by those roles and resource groups will apply to all group members.
You can also assign roles and resource groups to individual users that are not in a group. However, user groups keep your role-based access control (RBAC) organized and make permissions and access easier to manage. Instead of modifying each user individually, you edit the permissions and access for the entire group at once.
Harness includes built-in user groups, and you can create user groups manually, through inheritance, or through automated provisioning. You can create user groups at all [scopes](/harness-platform/3.0/harness-platform-resources/platform-access-control/rbac-in-harness#permissions-hierarchy-scopes): **Account**, **Organization**, and **Project**.
***
### What you will learn in this topic
By the end of this topic, you will be able to:
* Identify the [built-in user groups](#built-in-user-groups) available at each scope.
* Create user groups [manually](#create-user-groups-manually), [by inheritance](#create-groups-by-inheritance), or through [automated provisioning](#use-automated-provisioning).
* [Assign roles and resource groups](#assign-roles-and-resource-groups) to a user group.
* Edit a group's [metadata](#edit-group-metadata), [members](#edit-group-members), and [notification preferences](#edit-notification-preferences).
* [Delete user groups](#delete-user-groups) and apply [split Manage permissions](#split-manage-permissions).
***
### Before you begin
Before you manage user groups, ensure you have the following:
* **Harness account access**: An **Account Admin** role with [permission](/harness-ai/use-harness-platform/platform-access-control/permissions-reference) to view and manage user groups.
* **RBAC familiarity**: Understanding of how roles, resource groups, and scopes work in [RBAC in Harness](/harness-platform/3.0/harness-platform-resources/platform-access-control/rbac-in-harness).
* **Users to add (optional)**: Users invited to the relevant scope, if you want to add members while creating the group.
***
### Built-in user groups
Harness has a built-in user group at each [scope](/harness-platform/3.0/harness-platform-resources/platform-access-control/rbac-in-harness#permissions-hierarchy-scopes), so every user starts with a default group at their scope. This group is called **All Project Users**, **All Organization Users**, or **All Account Users**, depending on the scope. By default, users within a particular scope are in the **All Users** group for that scope.
* **All Account Users**: All users in the **Account** scope.
* **All Organization Users**: All users in an **Organization** scope.
* **All Project Users**: All users in a **Project** scope.
Whenever you [create an organization or project](/harness-ai/use-harness-platform/organizations-and-projects), Harness creates an **All Users** group for the org or project.
Initially, built-in user groups have no role or resource group assignments. You can [assign a role and resource group](#assign-roles-and-resource-groups) to the built-in user group at a specific scope, which becomes the default role and resource group for all users at that scope.
For example, if you add a user to a project, they are added to the **All Project Users** group for that project, and they inherit the role and resource group you assigned to the **All Project Users** group.
Apart from assigning roles and resource groups, you cannot edit or delete the built-in user groups. These groups are created and managed by Harness.
***
### Use automated provisioning
You can provision user groups from an external identity provider (IdP) instead of creating them by hand. You can create users and user groups manually in Harness, as described in [Create user groups manually](#create-user-groups-manually), or import them automatically using one of the following methods:
* [Okta SCIM](/harness-ai/use-harness-platform/platform-access-control/provision-users-with-okta-scim)
* [Azure AD SCIM](/harness-ai/use-harness-platform/platform-access-control/provision-users-and-groups-using-azure-ad-scim)
* [OneLogin SCIM](/harness-ai/use-harness-platform/platform-access-control/provision-users-and-groups-with-one-login-scim)
* [Just-in-time provisioning](/harness-platform/3.0/harness-platform-resources/platform-access-control/provision-use-jit)
#### Manage imported groups
Automated provisioning splits management between two systems. Your IdP remains the source of truth for who belongs to a group, and Harness controls what that group can do.
| What you manage | Where you manage it |
| --------------------------------------------------- | ------------------- |
| Group metadata, group membership, and user profiles | Your IdP |
| Role and resource group assignments | Harness |
You can still create users and user groups directly in Harness. However, once a user or group is imported from your IdP, you must manage it in your IdP.
#### How import works
Imported groups in Harness have no permissions attached, so you grant access as a separate step. For example, if you use Okta as your IdP:
1. In Okta, create a user group and assign users to it.
2. Harness imports the group and its members. At this point, the group and its members are not associated with any roles or resource groups.
3. In Harness, [assign roles and resource groups](#assign-roles-and-resource-groups) to the user group.
The group members then inherit permissions and access from the role and resource group assigned to the user group.
#### Map SCIM group names to Harness identifiers
Harness derives the user group `identifier` from the display name of the user group in your SCIM provider, and applies the following transformations:
| Character in SCIM display name | Result in Harness `identifier` |
| -------------------------------------------------------------- | ------------------------------ |
| `.` (dots) and `-` (dashes) | Replaced with `_` (underscore) |
| Other special characters (`#`, `?`, `%`, and so on) and spaces | Removed |
| Leading digits `0` through `9` and `$` | Removed |
* **Example 1**: An SCIM user group named `Harness.Group?Next#Gen-First` becomes the `identifier` `Harness_GroupNextGen_First`.
* **Example 2**: An SCIM user group named `123#One.$Two.$Three.123` becomes the `identifier` `One_$Two_$Three_123`.
These transformations apply only to the user group `identifier`. The group `name` in Harness retains the special symbols from your SCIM provider. For example, a SCIM user group named `Harness.Group?Next#Gen-First` keeps the same `name` in Harness: `Harness.Group?Next#Gen-First`.
***
### Create user groups manually
Create a user group manually when you are not provisioning from an IdP. To create user groups in Harness, you need a role, such as **Account Admin**, that has [permission](/harness-ai/use-harness-platform/platform-access-control/permissions-reference) to view and manage user groups. Follow the steps below to create a user group manually:
1. In Harness, navigate to the [scope](/harness-platform/3.0/harness-platform-resources/platform-access-control/rbac-in-harness#permissions-hierarchy-scopes) where you want to create the user group.
* To create a user group at the **Account** scope, select **Account Settings**, and then select **Access Control**.
* To create a user group at the **Organization** scope, navigate to **Account Settings**, select **Organizations**, select the relevant organization, and then select **Access Control**.
* To create a user group at the **Project** scope, navigate to **Projects**, select the relevant project, and then select **Access Control**.
2. Select **User Groups** in the header, and then click **New User Group**.
3. On the **Overview** page, enter a **Name** for the user group. Harness generates the **Id** automatically from the name. **Description** and **Tags** are optional.
4. Click **Continue** to move to the next step, or click **Save and end flow** to save the group now.
Click to view full size image
5. On the **Add Users** step, select the users to add to the group. This step is optional. If you have not invited any users yet, you can add them later, as described in [Edit group members](#edit-group-members).
6. Click **Continue** to move to the next step, or click **Save and end flow** to save the group now.
7. On the **Assign Roles and Resources** step, click **Add**, then select a [role](/harness-ai/use-harness-platform/platform-access-control/add-manage-roles) and a [resource group](/harness-platform/3.0/harness-platform-resources/platform-access-control/add-resource-groups). This step is optional, and you can [assign roles and resource groups](#assign-roles-and-resource-groups) later.
8. Click **Save**.
***
### Create groups by inheritance
You can inherit a group from a higher scope to reuse its membership and metadata at a lower scope without recreating it. At the **Organization** and **Project** scopes, you can create groups by inheriting them from higher scopes. Metadata and members of inherited groups are managed at their original scope. When inherited at a lower scope, you can change only the role and resource group assignment at the inherited scope.
You can modify the group at the group's original scope, and those changes are reflected at all scopes where the group is inherited.
| Action | Scope |
| ---------------------------------------------------------- | ------------------------------------------------------------------------------------------------------------------------------------------------------------------------------------------------------------------------------------------------------------------------------------------------------------------------------------------------------------------------------------------------------------------------------------------------------------------------------------------------------------------------------------- |
| Edit group members | Original scope only. The changes are reflected in all scopes where the group is inherited. |
| Edit name, description, tags, and notification preferences | Original scope only. The changes are reflected in all scopes where the group is inherited. |
| Edit roles and resource groups |
You can change the roles and resource groups that were assigned at the current scope only. You cannot make cross-scope modifications.
Original scope: Manage role and resource group assignments for the original scope only. You cannot edit roles or resource groups for inherited scopes.
Inherited scope: Manage role and resource group assignments for the inherited scope only. You cannot edit higher-level roles and resource groups or roles and resource groups in other inherited scopes.
|
| Delete group | Original scope only. If deleted, the group is also removed from all scopes where it was inherited. |
{% hint style="info" %}
When a user group is inherited from the **Account** scope to a **Project** scope, Harness automatically assigns the **Organization Viewer** role to that user group for the organization containing the project. The role assignment is also recorded in the audit logs. If this role assignment is removed, the user group can lose access to the **Organization**.
{% endhint %}
To inherit user groups in Harness, you need the following [permissions](/harness-ai/use-harness-platform/platform-access-control/permissions-reference):
* **View** user groups at the original scope. For example, if the group originates from the **Account** scope, you must have the ability to view user groups at the **Account** scope.
* **Manage** user groups at the inheritance scope. For example, if you want to inherit a group at a **Project** scope, you must have the ability to manage user groups at that **Project** scope.
{% hint style="info" %}
**GRANULAR CONTROL OVER MANAGE PERMISSIONS**
You can split the **Manage** permission into granular permissions to give users access only to the actions they actually need when managing user groups. For more information on how the granular permissions work, see [split Manage permissions](#split-manage-permissions).
{% endhint %}
1. In Harness, navigate to the [scope](/harness-platform/3.0/harness-platform-resources/platform-access-control/rbac-in-harness#permissions-hierarchy-scopes) where you want to inherit the user group.
* To inherit a user group at the **Organization** scope, navigate to **Account Settings**, select **Organizations**, select the relevant organization, and then select **Access Control**.
* To inherit a user group at the **Project** scope, navigate to **Projects**, select the relevant project, and then select **Access Control**.
2. Select **User Groups** in the header, and then click **Assign Roles** next to **New User Group**.
3. On the **Select User Group(s)** step, select the groups to inherit. Use the **All** tab to browse every group available to you, or select a scope tab, such as **Organization** or **Account**, to list only the groups that originate at that scope. If you do not see a particular group, it either exists at a lower scope or you do not have permission to view it.
4. Click **Apply Selected**.
5. On the **Assign Roles and Resource Groups** step, click **+ Add**, and then select a **Role** and a **Resource Group** to [assign to the inherited group](#assign-roles-and-resource-groups) at the inherited scope. This determines the group's permissions and access at the inherited scope. If the group does not already have sufficient permissions and access from the original scope, add the additional permissions and access here.
Click to view full size image
6. Click **Save**.
When you view user groups at higher scopes, you can find a list of **Organizations or Projects using this Group** in the group details. These are the organizations and projects where the group is inherited.
Click to view full size image
***
### Assign roles and resource groups
Assign roles and resource groups to a group to grant its members permissions and access. Initially, user groups have no permissions or access. You can assign [roles](/harness-ai/use-harness-platform/platform-access-control/add-manage-roles) and [resource groups](/harness-platform/3.0/harness-platform-resources/platform-access-control/add-resource-groups) to user groups, and then the permissions and access granted by the assigned roles and resource groups apply to all group members. For more information on how role binding works, see [RBAC in Harness: Role binding](/harness-platform/3.0/harness-platform-resources/platform-access-control/rbac-in-harness#role-binding).
{% hint style="warning" %}
**LEAST PRIVILEGE**
RBAC is additive. The total expanse of a user or service account's permissions and access is the sum of all the roles and resource groups from all user groups they belong to, as well as any roles and resource groups assigned directly to them as an individual user or service account.
Follow the principle of least privilege (PoLP), a security principle that grants users the minimum access and permissions necessary to complete their tasks and nothing more.
While Harness includes some built-in roles and resource groups, to ensure the least privilege, consider:
* Being selective in the way you apply roles and resource groups.
* Creating your own roles and resource groups as needed for refined access control.
{% endhint %}
To manage user groups in Harness, you need a role, such as **Account Admin**, that has [permission](/harness-ai/use-harness-platform/platform-access-control/permissions-reference) to view and manage user groups.
1. In Harness, navigate to the [scope](/harness-platform/3.0/harness-platform-resources/platform-access-control/rbac-in-harness#permissions-hierarchy-scopes) where you want to configure the group's role and resource group assignments.
* To edit a user group at the **Account** scope, select **Account Settings**, and then select **Access Control**.
* To edit a user group at the **Organization** scope, navigate to **Account Settings**, select **Organizations**, select the relevant organization, and then select **Access Control**.
* To edit a user group at the **Project** scope, navigate to **Projects**, select the relevant project, and then select **Access Control**.
2. Select **User Groups** in the header.
3. Locate the group you want to edit and select **Manage Role Bindings**.
4. In **Assign Roles**, click **+Add**, then select a [role](/harness-ai/use-harness-platform/platform-access-control/add-manage-roles) and a [resource group](/harness-platform/3.0/harness-platform-resources/platform-access-control/add-resource-groups).
* To delete a role binding, select the **Delete** icon.
* To add another role binding, click **+Add** again.
5. Click **Save**.
***
### Edit group metadata
Edit a group's metadata to keep its name, description, and tags accurate as your organization changes.
1. In Harness, navigate to the [scope](/harness-platform/3.0/harness-platform-resources/platform-access-control/rbac-in-harness#permissions-hierarchy-scopes) where the user group exists.
* To edit a user group at the **Account** scope, select **Account Settings**, and then select **Access Control**.
* To edit a user group at the **Organization** scope, navigate to **Account Settings**, select **Organizations**, select the relevant organization, and then select **Access Control**.
* To edit a user group at the **Project** scope, navigate to **Projects**, select the relevant project, and then select **Access Control**.
2. Select **User Groups** in the header.
3. Locate the group you want to edit.
4. Select **More options** (⋮), and then select **Edit**.
5. Edit the group's name, description, or tags, and then click **Save**.
***
### Edit group members
Add or remove users to keep a group's membership current. Membership changes take effect at the group's original scope and are reflected wherever the group is inherited.
1. In Harness, navigate to the [scope](/harness-platform/3.0/harness-platform-resources/platform-access-control/rbac-in-harness#permissions-hierarchy-scopes) where the user group exists.
* To edit a user group at the **Account** scope, select **Account Settings**, and then select **Access Control**.
* To edit a user group at the **Organization** scope, navigate to **Account Settings**, select **Organizations**, select the relevant organization, and then select **Access Control**.
* To edit a user group at the **Project** scope, navigate to **Projects**, select the relevant project, and then select **Access Control**.
2. Select **User Groups** in the header.
3. Add users to the group in either of the following ways:
* In the **MEMBERS** column of the user groups list, click **+** on the row for the group. For a group that has no members yet, this control appears as **+ Members**.
* Select the group to open its details, and then click **+ Members** on the **Overview** tab.
4. Select the users to add, and then click **Save**.
5. To remove users from the group, select the group to open its details, locate the user you want to remove, select **More options** (⋮), and then select **Remove**.
{% hint style="info" %}
For a group whose membership is managed at a higher scope, the list shows **Members managed in Account scope** instead. Edit the membership at the group's original scope.
{% endhint %}
***
### Edit notification preferences
You can configure notification channels for Harness to send messages to group members. When you assign an alert notification rule to a group, the channels specified in the group's **Notification Preferences** are used to notify all group members.
1. In Harness, navigate to the [scope](/harness-platform/3.0/harness-platform-resources/platform-access-control/rbac-in-harness#permissions-hierarchy-scopes) where the user group exists.
* To edit a user group at the **Account** scope, select **Account Settings**, and then select **Access Control**.
* To edit a user group at the **Organization** scope, navigate to **Account Settings**, select **Organizations**, select the relevant organization, and then select **Access Control**.
* To edit a user group at the **Project** scope, navigate to **Projects**, select the relevant project, and then select **Access Control**.
2. Select **User Groups** in the header.
3. Select the group you want to edit.
4. Under **Notification Preferences**, click **+Channel**.
5. Configure the notification settings for the preferred channel:
Click to view full size image
* **Email/Alias**: Enter any group email addresses where Harness can send notifications. For more information on configuring email notifications for a user group, see [Send notifications using email](/harness-ai/use-harness-platform/notifications-alerts-and-banners/notifications/add-smtp-configuration#option-send-notifications-for-a-user-group-using-email).
* **Microsoft Teams Webhook URL(s)**: Enter the Microsoft Teams incoming webhook URL. For more information on configuring Microsoft Teams notifications, see [Send notifications to Microsoft Teams](/harness-ai/use-harness-platform/notifications-alerts-and-banners/notifications/send-notifications-to-microsoft-teams).
* **Slack Webhook URL (Optional)**: Enter the Slack channel incoming webhook URL. For more information on configuring Slack notifications, see [Send notifications using Slack](/harness-ai/use-harness-platform/notifications-alerts-and-banners/notifications/send-notifications-using-slack).
* **PagerDuty Integration Key**: Enter the key for a PagerDuty account or service to which Harness can send notifications. You can get this key from the integration details in PagerDuty (navigate to **Services** and then **Service Directory**).
Click to view full size image
* **Datadog (/v1/events API)**: Enter the **Datadog URL** and **Datadog API Key** to send notifications to Datadog. Harness recommends that you create an [encrypted text secret](/harness-ai/use-harness-platform/secrets/add-use-text-secrets) for your Datadog API key and reference it using an expression (for example, `<+secrets.getValue("datadogkey")>`). For more information on obtaining your API key from Datadog, see the [Datadog API keys documentation](https://docs.datadoghq.com/account_management/api_keys/).
* **Webhook**: Enter the webhook URL that Harness calls to send notifications to your external application or service. The webhook receives POST requests with JSON payloads containing notification details. Use expressions to compose the URL if needed (for example, `https://companyurl.notify.com/webhook`).
6. (Optional) Select **Test** to send a test notification and confirm that the channel details are valid.
7. Select **Save**.
***
### Delete user groups
You can delete a user group when it is no longer needed. Deleting a group removes it from all scopes where it is inherited, so confirm that no members rely on it for access before you proceed.
1. In Harness, navigate to the [scope](/harness-platform/3.0/harness-platform-resources/platform-access-control/rbac-in-harness#permissions-hierarchy-scopes) where the user group exists.
* To delete a user group at the **Account** scope, select **Account Settings**, and then select **Access Control**.
* To delete a user group at the **Organization** scope, navigate to **Account Settings**, select **Organizations**, select the relevant organization, and then select **Access Control**.
* To delete a user group at the **Project** scope, navigate to **Projects**, select the relevant project, and then select **Access Control**.
2. Select **User Groups** in the header.
3. Locate the group you want to delete.
4. Select **More options** (⋮), and then select **Delete**.
***
### Split the Manage permissions
Split the broad **Manage** permission into granular permissions so you can grant users access only to the specific user group actions they need.
Harness supports granular permissions for user groups. Instead of a single broad **Manage** permission that grants full control, you can grant access only to the specific actions required.
#### Feature flag rollout process
The permission split rolls out in two stages, and a separate feature flag controls each stage. Enable the flags in the following order:
* `PL_USER_GROUPS_MANAGE_PERMISSION_SPLIT_MIGRATION`: This flag enables migration. Roles are migrated into granular permissions as shown in the [table below](#user-group-permissions).
* `PL_USER_GROUPS_MANAGE_PERMISSION_SPLIT_ENFORCE`: This flag enforces permissions. UI changes and access checks depend on the split permissions.
{% hint style="info" %}
Contact [Harness Support](mailto:support@harness.io) to enable these feature flags.
{% endhint %}
#### User group permissions
The **View** permission remains unchanged and is always available. The **Manage** permission for user groups is split into multiple granular permissions to provide administrators with finer control, as shown below.
The `core_usergroup_manage` permission is no longer available once the feature flag is enabled.
| **Action** | **Permission** | **Description** |
| ----------------------- | -------------------------------------- | ----------------------------------------------------------------------------- |
| Create | `core_usergroup_create` | Permission to create a user group |
| Edit (metadata) | `core_usergroup_editMetadata` | Permission to edit metadata of a user group |
| Delete | `core_usergroup_delete` | Permission to delete a user group |
| Manage Users | `core_usergroup_manageUsers` | Permission to manage users in a user group |
| Manage SSO | `core_usergroup_manageSSO` | Permission to perform SSO-related operations within the scope of a user group |
| Manage SCIM | `core_usergroup_manageSCIM` | Permission to manage a user group through SCIM |
| Manage Notifications | `core_usergroup_manageNotifications` | Permission to manage notification settings for a user group |
| Manage Role Assignments | `core_usergroup_manageRoleAssignments` | Permission to manage role assignments for a user group |
View all user group permissions
The following permissions are always available:
* `core_usergroup_view`: Permission to view a user group.
* `core_usergroup_manage`: Permission to manage a user group.
**With feature flag enabled**:
* `core_usergroup_create`: Permission to create a user group.
* `core_usergroup_editMetadata`: Permission to edit metadata of a user group.
* `core_usergroup_delete`: Permission to delete a user group.
* `core_usergroup_manageUsers`: Permission to manage users in a user group.
* `core_usergroup_manageSSO`: Permission to perform SSO-related operations within the scope of a user group.
* `core_usergroup_manageSCIM`: Permission to manage a user group through SCIM.
* `core_usergroup_manageNotifications`: Permission to manage notification settings for a user group.
* `core_usergroup_manageRoleAssignments`: Permission to manage role assignments for a user group.
{% hint style="warning" %}
When the feature flag is enabled, review your existing permissions carefully to understand how they are used and which additional permissions are required.
* If your automation assigns the `core_usergroup_manage` permission to the user, it now needs to assign the new permissions. Otherwise, users cannot perform the intended operations.
* Any APIs that were previously accessed using the `core_usergroup_manage` permission now require new granular permissions. Review the API calls and add the required permissions for each operation. Otherwise, those API requests fail after the feature flag is enabled.
**New permission behavior**
* **Create a user group**: The `core_usergroup_create` permission is mandatory. If additional permissions (such as `core_usergroup_manageUsers`, `core_usergroup_manageSSO`, or `core_usergroup_manageNotifications`) are missing, the request still succeeds, but only the components covered by the granted permissions are created.
* **Update a user group**: At least one relevant edit or manage permission is required (for example, `core_usergroup_editMetadata`, `core_usergroup_manageUsers`, `core_usergroup_manageSSO`, or `core_usergroup_manageNotifications`).
* If none of these permissions are present, the request fails.
* If some permissions are present, only the components covered by those permissions are updated.
{% endhint %}
***
### Related articles
* [Manage roles](/harness-ai/use-harness-platform/platform-access-control/add-manage-roles): Define the permissions for user group grants.
* [Manage resource groups](/harness-platform/3.0/harness-platform-resources/platform-access-control/add-resource-groups): Control which resources a user group can access.
* [RBAC in Harness](/harness-platform/3.0/harness-platform-resources/platform-access-control/rbac-in-harness): Permissions hierarchy and role binding.
* [Permissions reference](/harness-ai/use-harness-platform/platform-access-control/permissions-reference): Permissions required to manage user groups.
{% @harness-feedback/feedback module="harness-ai" pagePath="harness-ai/use-harness-platform/platform-access-control/add-user-groups" %}
# Manage users
Use Harness RBAC to manage users.
A Harness user is any individual registered with Harness with a unique email address. Users can be associated with multiple Harness accounts, and they can be in multiple user groups. You assign [roles](/harness-ai/use-harness-platform/platform-access-control/add-manage-roles) and [resource groups](/harness-ai/use-harness-platform/platform-access-control/manage-resource-groups) directly to users, or they inherit them from [user groups](/harness-ai/use-harness-platform/platform-access-control/add-user-groups).
***
### What you will learn in this topic
By the end of this topic, you will be able to:
* Import users and groups from your Identity Provider (IdP) through [automated provisioning](#use-automated-provisioning).
* [Add users manually](#add-users-manually) at the account, organization, or project scope.
* [Assign roles and resource groups](#assign-roles-and-resource-groups) to grant permissions and access.
* Review [role bindings](#view-role-bindings) and edit [direct](#edit-direct-assignments) and [inherited](#edit-inherited-assignments) assignments.
* [Delete users](#delete-users) from a Harness scope.
***
### Before you begin
Before you manage users, ensure you have the following:
* **User management permissions**: A role, such as **Account Admin**, that has [permission](/harness-ai/use-harness-platform/platform-access-control/permissions-reference) to invite and manage users.
* **Target scope access**: Access to the [scope](/harness-platform/3.0/harness-platform-resources/platform-access-control/rbac-in-harness#permissions-hierarchy-scopes) where the user belongs, at the **Account**, **Organization**, or **Project** level.
* **Authentication method**: A configured [authentication method](/harness-platform/3.0/harness-platform-resources/authentication/authentication-overview), which determines whether Harness sends invitation emails.
{% hint style="info" %}
**RECOMMENDATION**
You can also create [service accounts](/harness-ai/use-harness-platform/platform-access-control/add-and-manage-service-account) in Harness for programmatic access instead of individual user accounts.
{% endhint %}
***
### Use automated provisioning
You can use automated provisioning to keep Harness users and groups in sync with your Identity Provider (IdP), including:
* [Okta SCIM](/harness-ai/use-harness-platform/platform-access-control/provision-users-with-okta-scim)
* [Microsoft Entra ID SCIM](/harness-ai/use-harness-platform/platform-access-control/provision-users-and-groups-using-azure-ad-scim)
* [OneLogin SCIM](/harness-ai/use-harness-platform/platform-access-control/provision-users-and-groups-with-one-login-scim)
* [Just-in-time provisioning](/harness-ai/use-harness-platform/platform-access-control/just-in-time-user-provisioning)
When you use automated provisioning, users and user groups are imported from your IdP, and then you [assign roles and resource groups](#assign-roles-and-resource-groups) to the imported users and groups in Harness. For imported users and groups, you manage group metadata, group membership, and user profiles in your IdP, and you manage their role and resource group assignments in Harness. You can also create users and user groups directly in Harness, but any users or groups imported from your IdP must be managed in your IdP.
For example, if you use Okta as your IdP, you create a user group in Okta and assign users to that group in Okta. When the user group is first imported into Harness, the group and the group members are not associated with any roles or resource groups. You must assign roles and resource groups to the user group in Harness. The group members then inherit permissions and access from the role and resource group that is assigned to the user group.
***
### Add users manually
Add users manually when you do not use automated provisioning, or when you need to invite an individual outside your IdP sync.
You can add up to 50,000 users in paid plans. Free plans and Harness Community Edition accounts are limited to 1,500 users.
{% hint style="info" %}
When a new user is added to a project, the user is automatically added to the `All Organization Users` user group of the parent organization. However, when a user is removed from a project, they are not removed from the `All Organization Users` user group of the parent organization.
{% endhint %}
1. In Harness, navigate to the [scope](/harness-platform/3.0/harness-platform-resources/platform-access-control/rbac-in-harness#permissions-hierarchy-scopes) where you want to add the user.
* To add a user at the **Account** scope, select **Account Settings**, and then select **Access Control**.
* To add a user at the **Organization** scope, navigate to **Account Settings**, select **Organizations**, select the relevant organization, and then select **Access Control**.
* To add a user at the **Project** scope, navigate to **Projects**, select the relevant project, and then select **Access Control**.
2. Select **New User**.
3. In **Users**, enter the email address that the user will use to log in to Harness.
You can add multiple users at once by entering multiple email addresses.
4. In **User Group(s)**, assign the user to one or more [user groups](/harness-ai/use-harness-platform/platform-access-control/add-user-groups).
When assigned to a user group, the user inherits the [roles and resource groups](#assign-roles-and-resource-groups) assigned to that group.
You can also assign roles and resource groups directly to individual users.
Users are not required to belong to user groups. However, user groups make it easier to manage permissions and access. Instead of modifying each user individually, you can edit the permissions and access for the entire group at once.
5. In **Role**, assign roles and resource groups directly to the new user.
If you selected any **User Groups**, the role and resource group assignments inherited from those groups *are not* listed in **Role**.
If you did not select any user groups, you must select a role. Without a role, either direct or inherited from a user group, the user does not have any permissions or access in Harness.
6. Click **Apply**. Users receive a verification email at the addresses you entered. When the user logs in to Harness, the user creates a password, the email address is verified, and the user's name attribute is updated.
#### Set default landing URL for invited users
Set a default landing URL to direct a new user to a specific page or dashboard when they first log in.
{% hint style="info" %}
Currently, this feature is behind the feature flag `PL_PREFERENCE_LANDING_PAGE_URL`. Contact [Harness Support](mailto:support@harness.io) to enable it.
{% endhint %}
1. In the invitation form, enter the email addresses of the users you want to invite.
2. In the **Default Landing URL** field, specify the URL you want the invited user to be redirected to after they accept the invitation. For example, you set it to `https://app.harness.io/ng/account//module/ssca/projects` for the SCS homepage.
3. Send the invitation.
After the user accepts the invite and logs in, Harness redirects them to the specified URL.
#### Update user preferences
Users update their own default landing URL from their profile settings, which overrides the URL set at invitation.
{% hint style="info" %}
Currently, this feature is behind the feature flag `PL_PREFERENCE_LANDING_PAGE_URL`. Contact [Harness Support](mailto:support@harness.io) to enable it.
{% endhint %}
1. Sign in as the invited user.
2. Navigate to the user profile.
3. Select the **Preferences** tab.
4. Update the **Default Landing URL** to the desired page, such as `https://app.harness.io/ng/account/account//module/cf/home/projects` for the Feature Flags homepage.
5. Save the changes.
The next time the user logs in, Harness redirects them to the updated URL.
#### Invitation emails
Whether a new user receives an invitation email depends on your authentication configuration. When you add a user, Harness checks your [authentication method](/harness-platform/3.0/harness-platform-resources/authentication/authentication-overview) and email invite preferences to determine if an email invitation should be sent:
* **Login via a Harness account or public OAuth providers**: The invited user gets an email invitation. The user is listed on **Pending Users** until the user accepts the invitation.
* **SAML, LDAP, or OAuth with `PL_NO_EMAIL_FOR_SAML_ACCOUNT_INVITES` enabled**: Harness adds the user directly to the **Active Users** list and does not send an email to the user.
* **SAML, LDAP, or OAuth with `AUTO_ACCEPT_SAML_ACCOUNT_INVITES` enabled**: Harness adds the user directly to the **Active Users** list and sends a notification email to the user.
* **SAML, LDAP, or OAuth with both feature flags enabled**: `PL_NO_EMAIL_FOR_SAML_ACCOUNT_INVITES` takes precedence over `AUTO_ACCEPT_SAML_ACCOUNT_INVITES`. Harness adds users directly to the **Active Users** list and does not send invitation emails.
***
### Assign roles and resource groups
Assign roles and resource groups when a user needs permissions and access in Harness. Users inherit roles and resource groups from [group membership](/harness-ai/use-harness-platform/platform-access-control/add-user-groups), or you assign roles and resource groups directly to individual users. Go to [RBAC in Harness: Role binding](/harness-platform/3.0/harness-platform-resources/platform-access-control/rbac-in-harness#role-binding) for more information on assigning roles and resource groups.
To manage users in Harness, you need a role, such as **Account Admin**, that has [permission](/harness-ai/use-harness-platform/platform-access-control/permissions-reference) to manage users.
#### Follow the principle of least privilege
Grant each user the minimum access and permissions necessary to complete their tasks, and nothing more. This is the principle of least privilege (PoLP).
RBAC is additive, so least privilege matters. The total expanse of a user or service account's permissions and access is the sum of all the roles and resource groups from all user groups they belong to, as well as any roles and resource groups assigned directly to them as an individual user or service account.
Harness includes some built-in roles and resource groups. To ensure the least privilege, consider:
* Being selective in the way you apply roles and resource groups.
* Creating your own roles and resource groups as needed for refined access control.
#### View role bindings
Review role bindings to confirm which permissions a user holds and where each assignment originates.
1. In Harness, navigate to the [scope](/harness-platform/3.0/harness-platform-resources/platform-access-control/rbac-in-harness#permissions-hierarchy-scopes) where the user exists.
* To edit a user at the **Account** scope, select **Account Settings**, and then select **Access Control**.
* To edit a user at the **Organization** scope, navigate to **Account Settings**, select **Organizations**, select the relevant organization, and then select **Access Control**.
* To edit a user at the **Project** scope, navigate to **Projects**, select the relevant project, and then select **Access Control**.
2. Select the user you want to view.
3. Switch to the **Role Bindings** tab.
4. Select a [Scope](/harness-platform/3.0/harness-platform-resources/platform-access-control/rbac-in-harness#permissions-hierarchy-scopes).
* **All**: List role bindings across all scopes.
* **Account only**: List role bindings only at the account scope.
* **Organization only**: List role bindings in the scope of a specific organization, but not the projects under that organization.
* **Organization and Projects**: List role bindings in the scope of a specific organization and all projects under that organization.
5. Review the role bindings.
The **Assigned Through** column indicates the source of the role binding. Assignments are either **Direct** or inherited from a user group. If inherited, the user group name is listed.
The **Assigned At** column indicates the scope at which the assignment was made. If assigned at an organization or project scope, the organization and project name are listed.
#### Edit direct assignments
Edit direct assignments to change permissions for a single user without affecting any group. Use these steps to manage directly assigned role bindings.
1. In Harness, navigate to the [scope](/harness-platform/3.0/harness-platform-resources/platform-access-control/rbac-in-harness#permissions-hierarchy-scopes) where the user exists.
* To edit a user at the **Account** scope, select **Account Settings**, and then select **Access Control**.
* To edit a user at the **Organization** scope, navigate to **Account Settings**, select **Organizations**, select the relevant organization, and then select **Access Control**.
* To edit a user at the **Project** scope, navigate to **Projects**, select the relevant project, and then select **Access Control**.
2. Select the user you want to edit.
3. Switch to the **Role Bindings** tab.
4. Select **Manage Role Bindings**.
5. In **Role Bindings**, select **Add**, then select a [role](/harness-ai/use-harness-platform/platform-access-control/add-manage-roles) and a [resource group](/harness-ai/use-harness-platform/platform-access-control/manage-resource-groups). Repeat to add more role bindings.
6. To delete a role binding, select the **Delete** icon.
7. Click **Save**.
#### Edit inherited assignments
Inherited assignments come from user groups, so you change them either through group membership or through the group's own role bindings. There are several ways to edit inherited role bindings:
* Edit group membership through an individual user's profile. This is best for changing group membership for a single user.
* [Edit membership in the user group's settings](/harness-ai/use-harness-platform/platform-access-control/add-user-groups#edit-group-members), rather than editing each user individually. This is useful for adding and removing multiple users at once.
* [Edit role bindings in the user group's settings](/harness-ai/use-harness-platform/platform-access-control/add-user-groups#assign-roles-and-resource-groups). Do this to change inherited role bindings without changing group membership.
* Edit group membership in your IdP. If you [use automated provisioning](#use-automated-provisioning), group membership is managed through your IdP.
To edit group membership through a user's profile:
1. In Harness, navigate to the [scope](/harness-platform/3.0/harness-platform-resources/platform-access-control/rbac-in-harness#permissions-hierarchy-scopes) where the user exists.
* To edit a user at the **Account** scope, select **Account Settings**, and then select **Access Control**.
* To edit a user at the **Organization** scope, navigate to **Account Settings**, select **Organizations**, select the relevant organization, and then select **Access Control**.
* To edit a user at the **Project** scope, navigate to **Projects**, select the relevant project, and then select **Access Control**.
2. Select the user you want to edit.
3. In the **Group Memberships** tab select a [Scope](/harness-platform/3.0/harness-platform-resources/platform-access-control/rbac-in-harness#permissions-hierarchy-scopes).
* **All**: List groups across all scopes.
* **Account only**: List groups only at the account scope.
* **Organization only**: List groups in the scope of a specific organization, but not the projects under that organization.
* **Organization and Projects**: List groups in the scope of a specific organization and all projects under that organization.
4. Select **+ Add to a new User Group**, and then modify the user's group membership by selecting or deselecting groups accordingly.
* To add the user to a group, search for and select the relevant group.
* To remove the user from a group, search for and deselect the relevant group.
5. Click **Apply Selected**.
***
### Delete users
Delete a user to revoke their permissions and access in a Harness scope. Use these steps to delete a user from Harness.
If you [use automated provisioning](#use-automated-provisioning), user accounts are managed by your IdP. Delete or deactivate the user in your IdP to revoke their access to Harness.
When a user is deleted from an account and then added back, their permissions are not restored immediately. It takes 5 to 10 minutes for the user to inherit their previous permissions.
1. Make sure you have a role, such as **Account Admin**, that has [permission](/harness-ai/use-harness-platform/platform-access-control/permissions-reference) to manage users.
2. In Harness, navigate to the [scope](/harness-platform/3.0/harness-platform-resources/platform-access-control/rbac-in-harness#permissions-hierarchy-scopes) where the user exists.
* To delete a user at the **Account** scope, select **Account Settings**, and then select **Access Control**.
* To delete a user at the **Organization** scope, navigate to **Account Settings**, select **Organizations**, select the relevant organization, and then select **Access Control**.
* To delete a user at the **Project** scope, navigate to **Projects**, select the relevant project, and then select **Access Control**.
3. Locate the user you want to delete.
4. Select **More options** (⋮), and then select **Delete**.
***
### Related articles
* [Manage user groups](/harness-ai/use-harness-platform/platform-access-control/add-user-groups): Group users and manage their permissions in bulk.
* [Manage roles](/harness-ai/use-harness-platform/platform-access-control/add-manage-roles): Define the permissions you assign to users.
* [Manage resource groups](/harness-ai/use-harness-platform/platform-access-control/manage-resource-groups): Control which resources a user can access.
* [Manage service accounts](/harness-ai/use-harness-platform/platform-access-control/add-and-manage-service-account): Set up programmatic access instead of individual user accounts.
{% @harness-feedback/feedback module="harness-ai" pagePath="harness-ai/use-harness-platform/platform-access-control/add-users" %}
# User Impersonation
Impersonate a user in your Harness account to troubleshoot issues and verify permissions without needing their password.
User Impersonation lets account administrators temporarily act as another user in the account, including other administrators, without needing that user's password. When user impersonation is in action, you see exactly what the user sees and you can perform actions on their behalf.
Use impersonation is used to reproduce a problem a user reports, or to confirm that a user has the intended set of permissions before you hand off access. Every impersonation session requires a reason, notifies the impersonated user by email, and is recorded in the [Audit Trail](/harness-ai/use-harness-platform/governance/audit-trail/audit-trail).
***
### What you will learn in this topic
By the end of this topic, you will be able to:
* **Start an impersonation session:** Impersonate a user from Access Control and record a reason for the session.
* **Manage the session:** Track the remaining time, end the session early, and restart it when needed.
* **Trace impersonated activity:** Identify the impersonator and the impersonated user in pipeline execution history and in the Audit Trail.
* **Know the boundaries:** Understand which scopes and actions impersonation does not support.
***
### Before you begin
To impersonate a user, ensure you have the following:
* **Account Admin role:** Only a user with the [Account Admin role](/harness-ai/use-harness-platform/platform-access-control/add-manage-roles#platform-roles) can impersonate other users. An administrator assigns this role through [RBAC in Harness](/harness-ai/use-harness-platform/platform-access-control).
* **Account scope access:** Impersonation is available only at the account scope, under **Account Settings** > **Access Control** > **Users**.
* **A target user who has signed in at least once:** Users who have never logged in cannot be impersonated.
***
### Demo video
Watch a walkthrough of an impersonation session before you run one yourself.
{% embed url="" %}
***
### Impersonate a user
Complete the following steps to start an impersonation session and act on behalf of another user.
1. Navigate to **Account Settings**, select **Access Control**, then select **Users**.
2. For the user you want to impersonate, click the **More** icon on the right, then select **Impersonate User**.
Click to view full size
*Select Impersonate User from the More menu next to the user you want to impersonate.*
3. Enter a valid reason for the session, then click **Start Impersonation**. A reason is required for every session.
Click to view full size
*Harness records the reason you enter alongside the impersonation audit events.*
When impersonation starts, Harness sends an email to alert the user being impersonated.
4. Work as the impersonated user. The session lasts 30 minutes, and a banner at the top of the screen shows the remaining time.
Click to view full size
*The banner tracks how much time remains in the 30-minute session.*
***
### End or restart a session
You do not have to wait for the 30 minutes to elapse. Complete the following steps to end a session and decide what happens next.
1. Click **End Session** on the top banner to end the session before it expires.
2. When the session ends, either because you ended it or because it timed out, a prompt appears. Select **Restart Session** to begin a new session for the same user, or select **Quit** to return to your own account context.
Click to view full size
*Restart the session to continue troubleshooting, or quit to return to your own user context.*
***
### View impersonated user info
Actions taken during a session remain traceable to both users. In the pipeline **execution history**, Harness shows the impersonator and the impersonated user, so you can tell who triggered an execution and on whose behalf.
Click to view full size
*Pipeline execution history identifies both the impersonator and the impersonated user.*
***
### Impersonation session audit events
Harness fires a `Start impersonation` audit event at the beginning of a session, and an `End impersonation` audit event when the session concludes or times out.
Every audit event fired during the session is tagged with the impersonator and impersonated user details. Review these events on the [Audit Trail](/harness-ai/use-harness-platform/governance/audit-trail/audit-trail) page. The **Action** column shows the activity, and the **User** column indicates who was impersonated and by whom.
Click to view full size
*The Audit Trail records who was impersonated, by whom, and what they did.*
***
### Limitations
Impersonation is deliberately restricted so it cannot be used to change account-level security settings or credentials.
* **Account scope only:** The **Impersonate User** option is available only at the account scope.
* **First login required:** Only users who have logged in at least once can be impersonated.
* **Self-impersonation is not supported:** You cannot impersonate your own user.
* **Unsupported during a session:** You cannot do the following while you impersonate a user:
* Access [AI DLC Insights](https://app.gitbook.com/s/EYDRcFDt1JPlcws7L5VL/README)
* Create, edit, or delete [API keys or access tokens](/harness-ai/use-harness-platform/automation/api/add-and-manage-api-keys)
* View the list of accounts for the impersonated user
* Switch accounts or change the default account
* Sign out or reset passwords
* Manage [two-factor authentication (2FA)](/harness-ai/use-harness-platform/authentication/two-factor-authentication)
* Change the state of [public access](/harness-ai/use-harness-platform/pipelines/executions-and-logs/allow-public-access-to-executions) or manage the [IP allowlist](/harness-ai/use-harness-platform/security/add-manage-ip-allowlist)
***
### Troubleshooting The Impersonate User option does not appear in the Harness Access Control users list
Confirm you are at the account scope and that your user has the Account Admin role. The option is not available at the organization or project scope.
Harness does not let me impersonate a specific user in my account
The user must have logged in to Harness at least once, and you cannot impersonate your own user.
Harness impersonation session ended unexpectedly before I finished troubleshooting
Impersonation sessions expire after 30 minutes. Select Restart Session on the prompt that appears to start a new session for the same user.
An action fails with a permission error while impersonating a user in Harness
Impersonation grants only the impersonated user's permissions, not your own. Verify the permissions assigned to that user, and check whether the action is on the list of unsupported impersonation actions.
I cannot tell which Harness user actually ran a pipeline during an impersonation session
Pipeline execution history and the Audit Trail both record the impersonator and the impersonated user for every action taken during a session.
***
### Next steps
You can now impersonate a user to reproduce their experience, verify their access, and trace every action back to both users through the Audit Trail.
* [Permissions reference](/harness-ai/use-harness-platform/platform-access-control/permissions-reference): Permissions a user needs for a given action.
* [Manage roles](/harness-ai/use-harness-platform/platform-access-control/add-manage-roles): Adjust the roles assigned to a user after you verify their access.
* [Audit Trail](/harness-ai/use-harness-platform/governance/audit-trail/audit-trail): Review impersonation events across your account.
{% @harness-feedback/feedback module="harness-ai" pagePath="harness-ai/use-harness-platform/platform-access-control/user-impersonation" %}
# Manage service accounts
Create, edit, and delete Harness service accounts, and assign role bindings that API keys inherit for programmatic access.
Service accounts are similar to [users](/harness-ai/use-harness-platform/platform-access-control/add-users) in Harness, but they are not associated with a human user. You assign [roles](/harness-ai/use-harness-platform/platform-access-control/add-manage-roles) and [resource groups](/harness-platform/3.0/harness-platform-resources/platform-access-control/add-resource-groups) to a service account, and then you create [API keys](/harness-ai/use-harness-platform/automation/api/add-and-manage-api-keys) for it. Those API keys authenticate and authorize remote services that perform operations in Harness through Harness APIs, and they inherit the [role bindings](/harness-platform/3.0/harness-platform-resources/platform-access-control/rbac-in-harness#role-binding) assigned to the service account.
***
### What you will learn in this topic
By the end of this topic, you will be able to:
* [Create a service account](#create-a-service-account) at any scope and assign its role bindings.
* [Manage API keys](#manage-api-keys) and tokens that inherit the service account permissions.
* [Edit a service account](#edit-a-service-account) to change its name, description, tags, or role bindings.
* [Delete a service account](#delete-a-service-account) that is no longer required.
***
### Before you begin
Before you create and manage service accounts, ensure you have the following:
* **Harness account access**: A role such as **Account Admin** with view, create or edit, manage, and delete [permissions](/harness-ai/use-harness-platform/platform-access-control/permissions-reference) for service accounts.
* **Target scope access**: Access to the [scope](/harness-platform/3.0/harness-platform-resources/platform-access-control/rbac-in-harness#permissions-hierarchy-scopes) where the service account belongs. You can create service accounts at all scopes.
* **RBAC familiarity**: An understanding of how roles and resource groups combine into role bindings. For more information, see [RBAC in Harness](/harness-platform/3.0/harness-platform-resources/platform-access-control/rbac-in-harness).
***
### Create a service account
You can create a service account when a remote service, script, or integration needs to call Harness APIs without requiring a human user. The service account holds the role bindings, and every API key you generate under it inherits those permissions.
1. In Harness, navigate to the [scope](/harness-platform/3.0/harness-platform-resources/platform-access-control/rbac-in-harness#permissions-hierarchy-scopes) where you want to add the service account.
* To add a service account at the account scope, select **Account Settings**, and then select **Access Control**.
* To add a service account at the organization scope, navigate to **Account Settings**, select **Organizations**, select the relevant organization, and then select **Access Control**.
* To add a service account at the project scope, navigate to **Projects**, select the relevant project, and then select **Access Control**.
2. Select **Service Accounts** in the header.
3. Click **New Service Account**.
4. Enter a **Name** and **Email** for the service account.
5. Click **Save**.
6. Select **Manage Roles** next to the new service account.
7. Click **Add**, and then select a [role](/harness-ai/use-harness-platform/platform-access-control/add-manage-roles) and a [resource group](/harness-platform/3.0/harness-platform-resources/platform-access-control/add-resource-groups). Repeat until you have configured all necessary [role bindings](/harness-platform/3.0/harness-platform-resources/platform-access-control/rbac-in-harness#role-binding) for the service account.
***
### Manage API keys
Create API keys after you create a service account, because the API keys derive their permissions from the service account. Grant the service account the necessary role bindings first, otherwise API calls made with the token fail authorization.
To generate credentials, [create API keys and tokens](/harness-ai/use-harness-platform/automation/api/add-and-manage-api-keys#create-service-account-api-keys-and-tokens) for the service account. These tokens authenticate and authorize remote services that perform operations in Harness through Harness APIs, and they inherit the role bindings assigned to the service account.
For more information, see the [API permissions reference](/harness-ai/use-harness-platform/automation/api/api-permissions-reference#service-accounts).
***
### Edit a service account
You can change the name, description, tags, and role bindings, but the **Id** and **Email** are fixed after creation.
1. In Harness, navigate to the [scope](/harness-platform/3.0/harness-platform-resources/platform-access-control/rbac-in-harness#permissions-hierarchy-scopes) where the service account exists.
* To edit a service account at the account scope, select **Account Settings**, and then select **Access Control**.
* To edit a service account at the organization scope, navigate to **Account Settings**, select **Organizations**, select the relevant organization, and then select **Access Control**.
* To edit a service account at the project scope, navigate to **Projects**, select the relevant project, and then select **Access Control**.
2. Select **Service Accounts** in the header.
3. Locate the service account you want to edit.
4. Click the **More** icon (⋮).
5. Select **Edit** to change the **Name**, **Description**, or **Tags**. You cannot edit the **Id** or **Email**.
6. Select **Edit Role Bindings** to change the roles and resource groups assigned to the service account.
***
### Delete a service account
You can delete a service account when the integration that used it is obsolete. This way, its tokens can no longer authenticate against Harness APIs. Deleting the service account invalidates the API keys and tokens created under it.
1. In Harness, navigate to the [scope](/harness-platform/3.0/harness-platform-resources/platform-access-control/rbac-in-harness#permissions-hierarchy-scopes) where the service account exists.
* To delete a service account at the account scope, select **Account Settings**, and then select **Access Control**.
* To delete a service account at the organization scope, navigate to **Account Settings**, select **Organizations**, select the relevant organization, and then select **Access Control**.
* To delete a service account at the project scope, navigate to **Projects**, select the relevant project, and then select **Access Control**.
2. Select **Service Accounts** in the header.
3. Locate the service account you want to delete.
4. Click the **More** icon (⋮), and then select **Delete**.
***
### FAQ Can a service account created at the project scope be assigned permissions to access an account-level resource?
No. A service account created at the project scope cannot be granted access to account-level resources. Instead, create an account-level service account and then provide project-level role bindings for it that correspond to the project. You can also provide role bindings for account-level templates.
How long is a service account token valid?
The validity depends on how you create the token. If you specify an expiry date, the token expires on that date. If you want the token to never expire, select the **No Expiration** option.
Can you identify which service account a token belongs to by looking at the token?
No. There is no way to determine the associated service account from a service account token such as `sat.w8EaJoerQcqqkZwcb...` by inspecting the token itself.
How do service account tokens differ from personal access tokens?
Personal access tokens are created at the user profile level and are prefixed with `pat.`, while service account tokens are created at the service account level and are prefixed with `sat.`. Harness does not assign permissions directly to tokens. A token inherits permissions from the user or the service account under which it was created.
***
### Related articles
* [Manage API keys](/harness-ai/use-harness-platform/automation/api/add-and-manage-api-keys): Create, rotate, and delete API keys and tokens for a service account.
* [Hierarchical support for service accounts](/harness-ai/use-harness-platform/platform-access-control/heirarchichal-support-for-service-accounts): Inherit account-level service accounts in organizations and projects.
* [RBAC in Harness](/harness-platform/3.0/harness-platform-resources/platform-access-control/rbac-in-harness): Understand scopes, principals, roles, resource groups, and role bindings.
* [API permissions reference](/harness-ai/use-harness-platform/automation/api/api-permissions-reference): Review the permissions available to API keys and service accounts.
{% @harness-feedback/feedback module="harness-ai" pagePath="harness-ai/use-harness-platform/platform-access-control/add-and-manage-service-account" %}
# Get active and inactive users
Run a Python script against the Harness Audit API to identify which users logged in over a specified time period.
Identify which users logged in to your Harness account over a specific time period. This topic provides a Python script that queries the [Harness Audit API](https://apidocs.harness.io/audit) for `LOGIN` events across a date range, compares the results against every user in your account, and categorizes each user as active, inactive, or deleted.
Login activity supports several account management tasks:
* **Compliance and auditing**: Track user access for security and regulatory requirements.
* **License management**: Identify active users to optimize license usage.
* **User lifecycle management**: Find inactive users who may need to be offboarded.
***
### What you will learn in this topic
By the end of this topic, you will be able to:
* [Understand how the script works](#how-the-script-works) and which output files it produces.
* [Run the script](#run-the-script) with a custom date range or environment variables.
* [Review the script parameters](#script-parameters) to control the account and reporting window.
* [Interpret the output](#interpret-the-output) files and count or extract user records.
* [Troubleshoot](#troubleshooting) authentication, permission, and rate limit errors.
***
### Before you begin
Before you run the script, ensure you have the following:
* **Python 3.x**: Installed on the system where you run the script.
* **Python requests library**: Install it with `pip install requests`.
* **API token**: A token with permission to read audit logs and users. For more information, see [Manage API keys](/harness-ai/use-harness-platform/automation/api/add-and-manage-api-keys).
* **Audit log permission**: Permission to view audit logs in your Harness account. For more information, see [Permissions reference](/harness-ai/use-harness-platform/platform-access-control/permissions-reference).
* **Harness account ID**: Available in any Harness URL, for example `https://app.harness.io/ng/account//...`.
***
### How the script works
Understand the output categories before you act on the results, because an empty login record does not always mean the account is safe to delete. The script queries the Harness Audit API for `LOGIN` events within a date range, compares that data against all users in your account, and writes three files.
* **active\_users.ndjson**: Users who logged in during the specified time period.
* **inactive\_users.ndjson**: Users who exist in the account but did not log in during the specified time period.
* **deleted\_users.ndjson**: Users who logged in during the specified time period but no longer exist in the account.
The output files use [NDJSON format](http://ndjson.org/) (newline-delimited JSON), where each line is a valid JSON object representing one user record.
***
### Run the script
Save the [complete script](#complete-script) as `get_inactive_users.py`, then run it from the command line with your environment URL and credentials. By default, the script analyzes the last 30 days of login activity.
```bash
# Using API key (recommended)
python3 get_inactive_users.py \
--env app.harness.io/ng/account// \
--apikey YOUR_API_KEY
# Using Bearer token
python3 get_inactive_users.py \
--env app.harness.io/ng/account// \
--bearer YOUR_BEARER_TOKEN
```
#### Specify a custom date range
Set an explicit window when you report on a fixed audit period, such as a quarter, rather than the trailing 30 days. Pass the `--start` and `--end` parameters:
```bash
python3 get_inactive_users.py \
--env app.harness.io/ng/account// \
--apikey YOUR_API_KEY \
--start "2025-01-01 00:00" \
--end "2025-01-31 23:59"
```
#### Use environment variables
Set credentials as environment variables to keep tokens out of your shell history and process list. The script reads `HARNESS_API_KEY` for an API key and `HARNESS_BEARER` for a Bearer token.
```bash
# Set environment variable
export HARNESS_API_KEY="your_api_key_here"
# Run script without --apikey parameter
python3 get_inactive_users.py \
--env app.harness.io/ng/account// \
--start "2025-01-01 00:00"
```
***
### Script parameters
Use these parameters to control the target account, the authentication method, and the reporting window.
| Parameter | Required | Description | Default | Example |
| ---------- | -------- | ------------------------------------------------------------------------------------ | ------------------------- | ----------------------------------- |
| `--env` | Yes | Harness environment URL in the format `.harness.io/ng/account//` | None | `app.harness.io/ng/account/abc123/` |
| `--apikey` | No\* | Harness API key for authentication | `HARNESS_API_KEY` env var | `pat.abc123.xyz...` |
| `--bearer` | No\* | Bearer token for authentication | `HARNESS_BEARER` env var | `eyJhbGc...` |
| `--start` | No | Start date and time in `YYYY-MM-DD HH:MM` format | 30 days ago | `2025-01-01 00:00` |
| `--end` | No | End date and time in `YYYY-MM-DD HH:MM` format | Current time | `2025-01-31 23:59` |
\* One of `--apikey` or `--bearer` is required, or the corresponding environment variable.
***
### Interpret the output
Read the output files to decide which accounts to offboard and which to retain. The script writes all three NDJSON files to the current directory.
#### active\_users.ndjson
Contains audit log entries for users who logged in during the specified time period. Each line includes:
```json
{
"authenticationInfo": {
"labels": {
"userId": "user123",
"email": "user@example.com"
}
},
"timestamp": 1706745600000,
"action": "LOGIN"
}
```
#### inactive\_users.ndjson
Contains user records for users who exist in the account but did not log in during the specified time period. Each line includes:
```json
{
"uuid": "user456",
"email": "inactive@example.com",
"name": "Inactive User",
"disabled": false,
"locked": false
}
```
#### deleted\_users.ndjson
Contains audit log entries for users who logged in during the specified time period but no longer exist in the account.
#### Analyze the output
Process the NDJSON files with command-line tools when you need a quick count, or with Python when you need to feed the results into another system.
To count the records in each category, use `wc`:
```bash
# Count active users
wc -l active_users.ndjson
# Count inactive users
wc -l inactive_users.ndjson
# Count deleted users
wc -l deleted_users.ndjson
```
To extract email addresses, use `jq`:
```bash
# List active user emails
jq -r '.authenticationInfo.labels.email' active_users.ndjson
# List inactive user emails
jq -r '.email' inactive_users.ndjson
```
To process the records programmatically, read them in Python:
```python
import json
# Read and process active users
with open('active_users.ndjson', 'r') as f:
active_users = [json.loads(line) for line in f]
active_emails = [user['authenticationInfo']['labels']['email'] for user in active_users]
print(f"Active users: {len(active_emails)}")
print(active_emails)
```
For accounts with many users or extensive audit history, the script can take several minutes to complete. It paginates through the data, fetching up to 1000 audit log entries or 100 users per page, and prints progress as it runs.
***
### Complete script
Save the following as `get_inactive_users.py`.
get_inactive_users.py
```python
import argparse
import os
import getpass
import json
from datetime import datetime, timedelta
import requests
import time
import re
def validate_date(date_str):
"""Validate date format (YYYY-MM-DD HH:MM) and return parsed datetime."""
try:
return datetime.strptime(date_str.strip(), "%Y-%m-%d %H:%M")
except ValueError:
raise argparse.ArgumentTypeError(
f"Invalid date format: '{date_str}'. Use YYYY-MM-DD HH:MM (e.g., 2025-08-25 14:30)."
)
def validate_env_url(env_url):
"""Validate Harness environment URL format (e.g., qa.harness.io/ng/account/px7xd_BFRCi-pfWPYXVjvw/)."""
pattern = r"^(https?://)?([a-zA-Z0-9-]+\.harness\.io)/ng/account/([a-zA-Z0-9_-]+)/?$"
match = re.match(pattern, env_url.strip())
if not match:
raise argparse.ArgumentTypeError(
f"Invalid environment URL: '{env_url}'. Expected format: .harness.io/ng/account// (e.g., qa.harness.io/ng/account/px7xd_BFRCi-pfWPYXVjvw/)."
)
return match.group(2), match.group(3) # Return domain and account_id
def to_epoch_ms(date_str: str) -> int:
"""Convert YYYY-MM-DD HH:MM string to epoch milliseconds."""
dt = datetime.strptime(date_str, "%Y-%m-%d %H:%M")
return int(dt.timestamp() * 1000)
def stream_audits(account_id, headers, start_ms, end_ms, out, base_domain):
"""Stream audit logs page by page and save unique active users (NDJSON format)."""
base_url = f"https://{base_domain}/gateway/audit/api/audits/list"
params = {"routingId": account_id, "accountIdentifier": account_id, "pageSize": 1000}
payload = {
"scopes": [{"accountIdentifier": account_id}],
"filterType": "Audit",
"actions": ["LOGIN"],
"startTime": start_ms,
"endTime": end_ms,
}
pageIndex = 0
userId = {}
with open(out, "w", encoding="utf-8") as f:
while True:
params["pageIndex"] = pageIndex
pageIndex += 1
with requests.post(base_url, params=params, headers=headers, json=payload, verify=True) as resp:
resp.raise_for_status()
data = resp.json()["data"]
totalPages = data["totalPages"]
print(f"Processing page {pageIndex}/{totalPages}")
for item in data["content"]:
uid = item["authenticationInfo"]["labels"]["userId"]
if userId.get(uid) is None:
userId[uid] = True
f.write(json.dumps(item, ensure_ascii=False) + "\n")
if pageIndex >= totalPages:
break
return userId
def get_all_inactive_users(account_id, headers, unique_users, out, base_domain):
"""Get all users and mark active ones, writing inactive users in NDJSON format."""
base_url = f"https://{base_domain}/gateway/ng/api/user/batch"
params = {"accountIdentifier": account_id, "pageIndex": 0, "pageSize": 100}
headers_with_content_type = headers.copy()
headers_with_content_type["content-type"] = "application/json"
payload = {}
with open(out, "w", encoding="utf-8") as f:
page_index = 0
while True:
params["pageIndex"] = page_index
page_index += 1
with requests.post(base_url, params=params, headers=headers_with_content_type, json=payload, verify=True) as resp:
resp.raise_for_status()
response = resp.json()
data = response["data"]
totalPages = data["totalPages"]
print(f"Processing page {page_index}/{totalPages}")
for item in data["content"]:
uid = item["uuid"]
if uid in unique_users:
unique_users[uid] = False # mark user as existing
else:
f.write(json.dumps(item, ensure_ascii=False) + "\n")
if page_index >= totalPages:
break
def finalize_deleted_users(unique_users, active_file, deleted_file):
"""Stream active_users.ndjson and move deleted ones into deleted_users.ndjson."""
tmp_file = active_file + ".tmp"
with open(active_file, "r", encoding="utf-8") as f_in, \
open(tmp_file, "w", encoding="utf-8") as f_out, \
open(deleted_file, "w", encoding="utf-8") as f_del:
for line in f_in:
item = json.loads(line)
uid = item["authenticationInfo"]["labels"]["userId"]
if unique_users.get(uid, False): # still True = deleted
f_del.write(json.dumps(item, ensure_ascii=False) + "\n")
else:
f_out.write(json.dumps(item, ensure_ascii=False) + "\n")
os.replace(tmp_file, active_file)
print(f"✅ Finalized active/deleted users. Active={sum(1 for _ in open(active_file))}, Deleted={sum(1 for _ in open(deleted_file))}")
def parse_arguments():
"""Parse and validate command-line arguments."""
parser = argparse.ArgumentParser(
description="Access audit logs and user list to get active, inactive and deleted users for the account.",
epilog="Example: python3 get_inactive_users.py --env qa.harness.io/ng/account/px7xd_BFRCi-pfWPYXVjvw/ --start '2025-08-01 00:00' --apikey abc123"
)
parser.add_argument(
"--env",
help="Harness environment URL (e.g., qa.harness.io/ng/account/px7xd_BFRCi-pfWPYXVjvw/). Required. The account ID is extracted from this URL.",
required=True,
type=validate_env_url
)
parser.add_argument(
"--apikey",
help="Harness API key (use x-api-key header). Provide either this or --bearer (If both are provided, --apikey will be used). Can also be set via HARNESS_API_KEY environment variable."
)
parser.add_argument(
"--bearer",
help="Bearer token (use Authorization header). Provide either this or --apikey (If both are provided, --apikey will be used). Can also be set via HARNESS_BEARER environment variable."
)
parser.add_argument(
"--start",
help="Start date and time for audit logs in YYYY-MM-DD HH:MM format (e.g., 2025-08-01 00:00). Defaults to 30 days prior to current time.",
type=validate_date,
default=(datetime.now() - timedelta(days=30)).strftime("%Y-%m-%d %H:%M")
)
parser.add_argument(
"--end",
help="End date and time for audit logs in YYYY-MM-DD HH:MM format (e.g., 2025-08-25 23:59). Defaults to current time.",
type=validate_date,
default=datetime.now().strftime("%Y-%m-%d %H:%M")
)
args = parser.parse_args()
# Extract domain and account_id from env URL
base_domain, account_id = args.env
# Validate that only one of API key or Bearer token is provided
api_key = args.apikey or os.getenv("HARNESS_API_KEY")
bearer = args.bearer or os.getenv("HARNESS_BEARER")
if not api_key and not bearer:
print("No authentication provided. Please choose one of the following:")
choice = input("Use API key or Bearer token? [api/bearer]: ").strip().lower()
if choice == "api":
api_key = getpass.getpass("Enter API key: ").strip()
if not api_key:
parser.error("API key cannot be empty.")
elif choice == "bearer":
bearer = getpass.getpass("Enter Bearer token: ").strip()
if not bearer:
parser.error("Bearer token cannot be empty.")
else:
parser.error("Invalid choice. Please select 'api' or 'bearer'.")
# Set headers based on authentication method
headers = {}
if api_key:
headers["x-api-key"] = api_key.strip()
elif bearer:
headers["Authorization"] = "Bearer " + bearer.strip()
# Convert dates to epoch milliseconds
start_ms = to_epoch_ms(args.start.strftime("%Y-%m-%d %H:%M"))
end_ms = to_epoch_ms(args.end.strftime("%Y-%m-%d %H:%M"))
if start_ms > end_ms:
parser.error(f"Start time ({args.start.strftime('%Y-%m-%d %H:%M')}) cannot be after end time ({args.end.strftime('%Y-%m-%d %H:%M')})")
return {
"account_id": account_id,
"headers": headers,
"start_ms": start_ms,
"end_ms": end_ms,
"base_domain": base_domain,
"out_active_users": "active_users.ndjson",
"out_inactive_users": "inactive_users.ndjson",
"out_deleted_users": "deleted_users.ndjson"
}
def main():
try:
config = parse_arguments()
account_id = config["account_id"]
headers = config["headers"]
start_ms = config["start_ms"]
end_ms = config["end_ms"]
base_domain = config["base_domain"]
out_active_users = config["out_active_users"]
out_inactive_users = config["out_inactive_users"]
out_deleted_users = config["out_deleted_users"]
start_date = datetime.fromtimestamp(start_ms / 1000).strftime("%Y-%m-%d %H:%M")
end_date = datetime.fromtimestamp(end_ms / 1000).strftime("%Y-%m-%d %H:%M")
print(f"Fetching audit logs for account={account_id}, between {start_date} and {end_date}...")
unique_users = stream_audits(account_id, headers, start_ms, end_ms, out_active_users, base_domain)
print(f"✅ Saved active users to {out_active_users}")
print(f"Fetching all users for account={account_id}...")
get_all_inactive_users(account_id, headers, unique_users, out_inactive_users, base_domain)
print(f"✅ Saved inactive users to {out_inactive_users}")
print("Finalizing deleted users...")
finalize_deleted_users(unique_users, out_active_users, out_deleted_users)
print(f"✅ Saved deleted users to {out_deleted_users}")
except Exception as e:
print(f"Error: {str(e)}")
exit(1)
if __name__ == "__main__":
main()
```
***
### Troubleshooting
Match the error the script prints to the corresponding fix.
401 Unauthorized
**Solution:** Verify that your API key or Bearer token is valid and has the necessary permissions to access audit logs. For more information, see [Manage API keys](/harness-ai/use-harness-platform/automation/api/add-and-manage-api-keys).
403 Forbidden
**Solution:** Your API key or Bearer token does not have permission to view audit logs or user information. Confirm you have the necessary [permissions](/harness-ai/use-harness-platform/platform-access-control/permissions-reference) to access these resources.
Invalid date format
**Solution:** Ensure dates use the format `YYYY-MM-DD HH:MM`, for example `2025-01-01 00:00`.
429 Too Many Requests
**Solution:** The script exceeded the Harness API rate limits. Wait a few minutes and run it again. For more information, see [Rate limits](/harness-ai/use-harness-platform/rate-limits).
***
### Related articles
* [Manage users](/harness-ai/use-harness-platform/platform-access-control/add-users): Add, edit, and delete users, and act on the inactive accounts this script identifies.
* [Audit trail](/harness-ai/use-harness-platform/governance/audit-trail): Review the audit events that this script queries.
* [Manage API keys](/harness-ai/use-harness-platform/automation/api/add-and-manage-api-keys): Create the token the script uses to authenticate.
* [Harness API quickstart](/harness-ai/use-harness-platform/automation/api/api-quickstart): Understand how to authenticate and call Harness APIs.
{% @harness-feedback/feedback module="harness-ai" pagePath="harness-ai/use-harness-platform/platform-access-control/get-active-inactive-users" %}
# Hierarchical Support for Service Accounts
Steps to configure and use account-level service accounts at project level.
{% hint style="info" %}
**FEATURE AVAILABILITY**
This feature is behind the `PL_ENABLE_SERVICE_ACCOUNT_HIERARCHY` feature flag. Contact [Harness Support](mailto:support@harness.io) to enable it.
{% endhint %}
Service accounts can be created at a higher scope and inherited by lower scopes with the necessary permissions, eliminating the need to create separate accounts for each organization or project.
The following example shows how to use an account-level service account in a project. You can apply the same process to use account-level service accounts in organizations.
{% tabs %}
{% tab title="Interactive" %}
{% embed url="" %}
{% endtab %}
{% tab title="Manual" %}
#### Step 1: Create account-level service account
Create a [Service Account](/harness-ai/use-harness-platform/platform-access-control/add-and-manage-service-account#create-a-service-account) at the account level. This service account can then be inherited by organizations or projects.
#### Step 2: Create project-level role and resource group
In your target project:
* Create a [Role](/harness-ai/use-harness-platform/platform-access-control/add-manage-roles#create-a-role) with the required permissions
* Create a [Resource Group](/harness-ai/use-harness-platform/platform-access-control/manage-resource-groups#create-a-resource-group) defining what resources can be accessed
{% hint style="info" %}
Roles and resource groups can only be modified at the scope where they were originally assigned. Inherited roles and resource groups are visible at lower scopes but cannot be edited there.
{% endhint %}
#### Step 3: Inherit and assign permissions
1. Navigate to **Project Settings** → **Access Control** → **Service Accounts**
2. Select **Inherit Service Account & Assign Roles**
3. Choose your account-level service account
4. Assign the project-level role and resource group
5. Select **Apply**
The service account is now available for this project.
{% endtab %}
{% endtabs %}
{% hint style="info" %}
When a service account is inherited from the account scope to a project scope, the system automatically assigns the Organization Viewer role to that service account for the organization containing the project. The role assignment is also recorded in the Audit Logs.
If this role assignment is removed, the service account may lose access to the Organization.
{% endhint %}
### Benefits
* **Centralized Service Account Management**: Reduces the need to create and manage multiple service accounts for each project.
* **Simplified Permissions**: Easily manage permissions at the project level by assigning roles to service accounts created at the account or organization level.
* **Seamless Pipeline Execution**: One or more service accounts can be given the necessary permissions, if required, to execute pipelines from multiple projects.
### Additional Resources
For more information on how to manage service accounts, create roles, and assign permissions in Harness, refer to the following documentation on Harness Developer Hub:
* [Managing Service Accounts](/harness-ai/use-harness-platform/platform-access-control/add-and-manage-service-account)
* [Creating and Managing Roles](/harness-ai/use-harness-platform/platform-access-control/add-manage-roles)
* [Assigning Roles and Permissions](/harness-ai/use-harness-platform/platform-access-control)
{% @harness-feedback/feedback module="harness-ai" pagePath="harness-ai/use-harness-platform/platform-access-control/heirarchichal-support-for-service-accounts" %}
# Manage dashboards
This topic describes how to add and manage access control for dashboards.
[Dashboards](/harness-ai/use-harness-platform/harness-dashboards/dashboard-standard/overview) display key metrics and data related to your builds, deployments, security, cloud costs, and more. You can control who can view, create, edit, and delete dashboards in Harness through role-based access control. This page describes how to assign dashboard roles and configure access to specific dashboard folders.
***
### What you will learn in this topic
By the end of this topic, you will be able to:
* Understand the [Dashboard Editor and Dashboard Viewer roles](#dashboard-roles-and-permissions) and their permissions.
* [Assign the Dashboard Editor role](#add-and-manage-the-dashboard-editor-role-for-users-or-user-groups) to users or user groups.
* [Assign the Dashboard Viewer role](#add-and-manage-the-dashboard-viewer-role-for-users-or-user-groups) to users or user groups.
* [Configure resource groups](#add-and-manage-access-control-for-resource-groups) to limit access to specific dashboards.
* [Restrict project access](#limit-project-access-for-sto-dashboards) for STO dashboards based on RBAC permissions.
***
### Before you begin
Before you manage dashboard access control, ensure you have the following:
* **Account Admin permissions**: Permissions to modify access control settings at the **Account** level. Go to [RBAC in Harness](/harness-platform/3.0/harness-platform-resources/platform-access-control/rbac-in-harness) for more information on role requirements.
* **Understanding of resource groups**: Knowledge of how resource groups work in Harness. Go to [Manage resource groups](/harness-platform/3.0/harness-platform-resources/platform-access-control/add-resource-groups) for more information.
* **Dashboards overview:** Understanding of what dashboards are and how they work in Harness before configuring access control. Go to [Dashboards](/harness-ai/use-harness-platform/harness-dashboards/dashboard-standard/overview) to learn more about it.
***
### Dashboard roles and permissions
Harness provides two built-in roles that control dashboard access. They are described as follows:
* **Dashboard Editor**: To add, edit, and delete dashboards.
* **Dashboard Viewer**: To view all the **By Harness** and **Custom** dashboards.
These roles are scoped to dashboard folders, and they determine what users can do with dashboards.
The following roles control dashboard access and capabilities. Assign these roles to users or user groups based on their responsibilities.
| **Roles** | **Scope** | **Permissions** |
| ---------------- | --------- | ------------------------------------------------------------------------------------------------ |
| Dashboard Editor | Folder |
Add Dashboard
Add Tile
Edit Dashboard
Delete Dashboard
|
| Dashboard Viewer | Folder | View Dashboards |
The **Account Admin** and **Account Viewer** roles include these permissions by default.
***
### Add and manage the Dashboard Editor role for users or user groups
Assign the **Dashboard Editor** role to users or user groups to allow them to create, modify, and delete dashboards.
To add and manage permissions for the **Dashboard Editor** role for users, do the following:
1. In Harness, navigate to **Account Settings**, and then select **Access Control**.
2. Select **Manage Roles** for the user or user group. The **Manage Role Bindings** settings display.
3. Click **Add**.
4. Under **Roles**, select **Dashboard Editor**, and then click **Apply**.
***
### Add and manage the Dashboard Viewer role for users or user groups
Assign the **Dashboard Viewer** role to users or user groups to allow them to view dashboards without editing capabilities.
To add and manage permissions for the **Dashboard Viewer** role for users, do the following:
1. In Harness, navigate to **Account Settings**, and then select **Access Control**.
2. Select **Manage Roles** for the user or user group. The **Manage Role Bindings** settings display.
3. Click **Add**.
4. Under **Roles**, select **Dashboard Viewer**, and then click **Apply**.
***
### Limit project access for STO dashboards
You can restrict the **Project** filter on STO dashboards to only show projects where users have RBAC permissions. This prevents users from viewing entity information from projects they do not have access to.
By default, RBAC for STO custom dashboards is restricted to dashboard entities exclusively. When you grant folder access to a user, they can view all entity information on the dashboard. Therefore, the **Project** filter on dashboards includes all STO projects across your **Organization** by default, regardless of user RBAC project permissions.
You can restrict the projects available in the **Project** filter on STO dashboards to only those where users have RBAC permissions.
{% hint style="info" %}
Currently, this feature is behind the feature flag `CDB_PROJECT_RBAC`. Contact [Harness Support](mailto:support@harness.io) to enable it.
{% endhint %}
***
### Add and manage access control for resource groups
Limit access to specific dashboards by configuring resource groups. This ensures users only see the dashboards relevant to their work.
To limit access to specific dashboards, do the following:
1. Navigate to **Account Settings**, and then select **Access Control**.
2. In **Resource Groups**, select your resource group. Go to [Manage resource groups](/harness-platform/3.0/harness-platform-resources/platform-access-control/add-resource-groups) for more information on adding and managing resource groups.
3. In **Shared Resources**, select **Dashboards**.
By default, **All Dashboards** is selected.
Click to view full size image
4. Select **Specified**, and then click **Add**. The **Add Dashboards** settings display.
5. In **Add Dashboards**, select the folders for which you want to limit the access.
The selected folder may have more than one dashboard. All the dashboards in the selected folders will have the same access.
Click to view full size image
6. Click **Add Folders**.
7. Click **Save**.
***
### Related articles
* [RBAC in Harness](/harness-platform/3.0/harness-platform-resources/platform-access-control/rbac-in-harness): Understand role-based access control and permissions hierarchy.
* [Manage resource groups](/harness-platform/3.0/harness-platform-resources/platform-access-control/add-resource-groups): Learn how to create and configure resource groups.
* [Dashboards overview](/harness-ai/use-harness-platform/harness-dashboards/dashboard-legacy/dashboards-overview): Explore dashboard capabilities and features.
* [Manage users](/harness-ai/use-harness-platform/platform-access-control/add-users): Add and manage users in your Harness **Account**.
{% @harness-feedback/feedback module="harness-ai" pagePath="harness-ai/use-harness-platform/platform-access-control/manage-dashboards" %}
# Provision users and groups with Okta (SCIM)
Provision and manage Harness users and user groups with Okta's SCIM integration.
System for Cross-Domain Identity Management (SCIM) is an open standard protocol for automated user provisioning. In Harness, automated provisioning involves creating users and user groups, assigning users to groups, and managing some user attributes (such as names and email addresses). In addition to creating users and groups, automated provisioning also edits and removes users and user groups as and when required.
If Okta is your identity provider, you can efficiently provision and manage users in your Harness account. Using [Okta's SCIM integration](https://www.okta.com/blog/2017/01/what-is-scim/) with Harness enables Okta to serve as a single identity manager, to add and remove users, and to provision user groups. This is especially efficient for managing users at scale.
This topic describes how to use an Okta SCIM integration for automated provisioning in Harness. To configure this integration, you must take steps in both Okta and Harness.
### Requirements
You need an understanding of:
* System for Cross-domain Identity Management (SCIM).
* [Harness' key concepts](/harness-ai/new-to-harness-platform/overview).
* [RBAC in Harness](/harness-ai/use-harness-platform/platform-access-control).
You must be an Administrator in your Okta account, and you must be an **Account Admin** in Harness.
You need a Harness [API key and unexpired token](/harness-ai/use-harness-platform/automation/api/add-and-manage-api-keys) that has all **Users** and **User Groups** [permissions](/harness-ai/use-harness-platform/automation/api/api-permissions-reference). API keys inherit permissions from the user they are associated with. If you use an API key for a [service account](/harness-ai/use-harness-platform/platform-access-control/add-and-manage-service-account), make sure the service account has all **Users** and **User Groups** permissions.
### Create an Okta app integration
To enable automated provisioning, you must add a Harness app to your Okta administrator account.
1. Log in to your Okta administrator account, select **Applications**, and select **Create App Integration**.

2. On the **Create a new app integration** page, select **SAML 2.0** for the **Sign-on Method**, and then select **Next**.
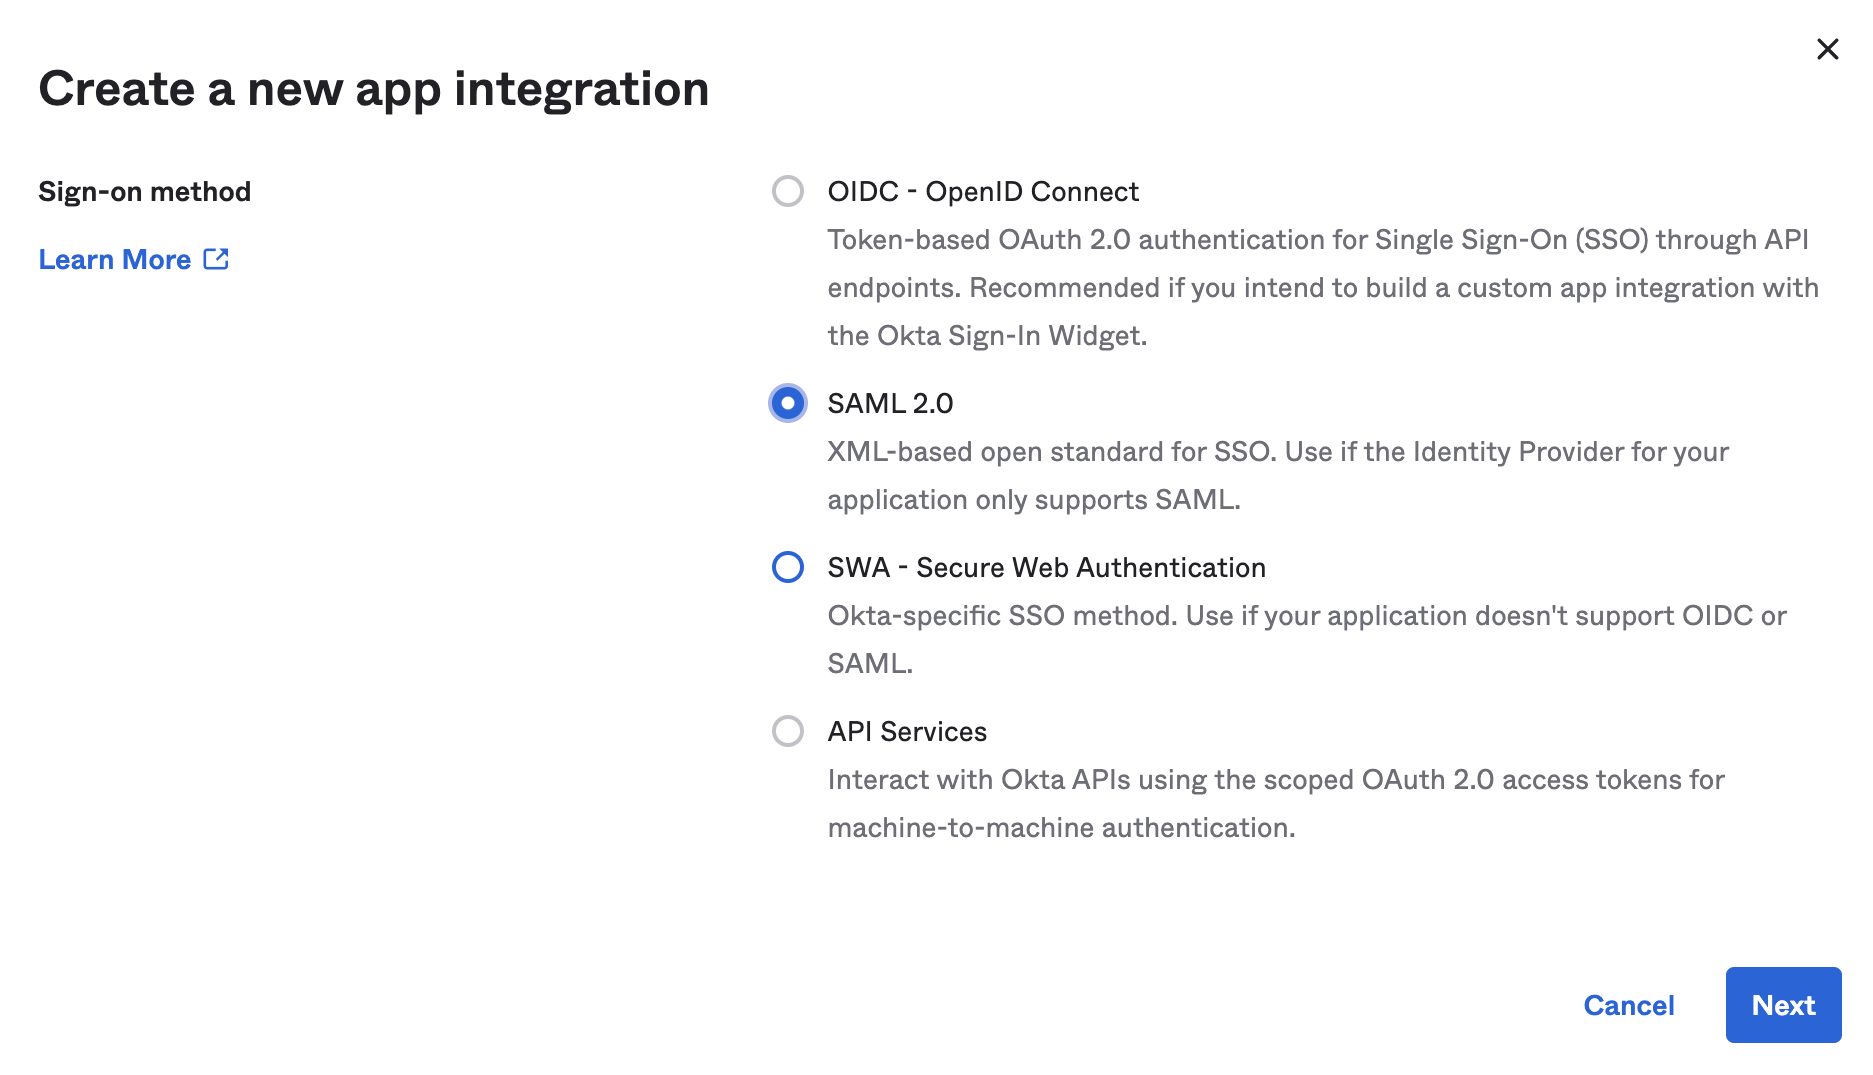
3. In the **General Settings**, enter a name in the **Application label** field, and then select **Next**.
4. In the SAML settings, enter your Harness **Single sign on URL**.
The base URL format will follow the following base format: `https://app.harness.io/gateway/ng/api/scim/account/[YOUR_ACCOUNT_ID]`, (e.g `https://app.harness.io/gateway/ng/api/scim/account/9999aaaa9999AA`)
However, this will need to be modified depending on which cluster your account exists within. You can verify this by going to your Account Settings -> Account Details, in the Harness Cluster Field.
| Cluster | URL Format |
| ----------- | ----------------------------------------------------------------------------- |
| Prod1 | `https://app.harness.io/gateway/ng/api/scim/account/[YOUR_ACCOUNT_ID]` |
| Prod2 | `https://app.harness.io/gateway/gratis/ng/api/scim/account/[YOUR_ACCOUNT_ID]` |
| Prod3 | `https://app3.harness.io/gateway/ng/api/scim/account/[YOUR_ACCOUNT_ID]` |
| Prod0/Prod4 | `https://accounts.harness.io/gateway/ng/api/scim/account/[YOUR_ACCOUNT_ID]` |
| EU clusters | `https://accounts.eu.harness.io/ng/api/scim/account/[YOUR_ACCOUNT_ID]` |
Please note that if customers select the incorrect cluster, the changes will not show up within their environment, even if there is a successful response from Harness.
If you environment is On-Prem (SMP) the URL will use your custom domain name and omits `gateway`. For example, if your On-Prem domain name is `harness.mycompany.com`, then your SCIM base URL would become `https://harness.mycompany.com/ng/api/scim/account/[YOUR_ACCOUNT_ID]`.
6. For **Audience URI (SP Entity ID)**, enter `app.harness.io`.
7. For **Attribute Statements (optional)**, enter a name in the **Name** field, select **Basic** for the **Name Format**, and set the **Value** to **user.email**.
8. For **Group Attribute Statements (optional)**, enter a name in the **Name** field, select **Basic** for the **Name format (optional)**, select an appropriate **Filter**, and enter the appropriate corresponding filter value.
9. Select **Next**.
10. In the **Feedback** options, select the relevant option, and then select **Finish**.

11. In your newly created app, select the **General** tab, and then under **App Settings**, select **Edit**.
12. Select **Enable SCIM provisioning**, and then select **Save**.

### Authorize the Okta integration
Authorize your Okta app with Harness.
1. In your Okta administrator account, go to **Applications**, and then select **Applications**.
2. Find your Harness app, select **Provisioning**, and then select **Integration**.
3. Select **Edit**.
4. For **SCIM connector base URL**, enter the base URL for your API endpoint.
The base URL format is:
```
https://app.harness.io/gateway/ng/api/scim/account/YOUR_ACCOUNT_ID
```
Replace `YOUR_ACCOUNT_ID` with your Harness account ID.
5. In **Unique identifier field for users**, enter `userName`.
6. Select the **Supported provisioning actions**:
* Import new users and profile updates
* Push new users
* Push profile updates
* Push groups
7. For **Authentication Mode**, select **HTTP Header**, and enter your Harness API token in **Bearer**.
For instructions on creating Harness API keys and tokens, go to [Manage API keys](/harness-ai/use-harness-platform/automation/api/add-and-manage-api-keys).
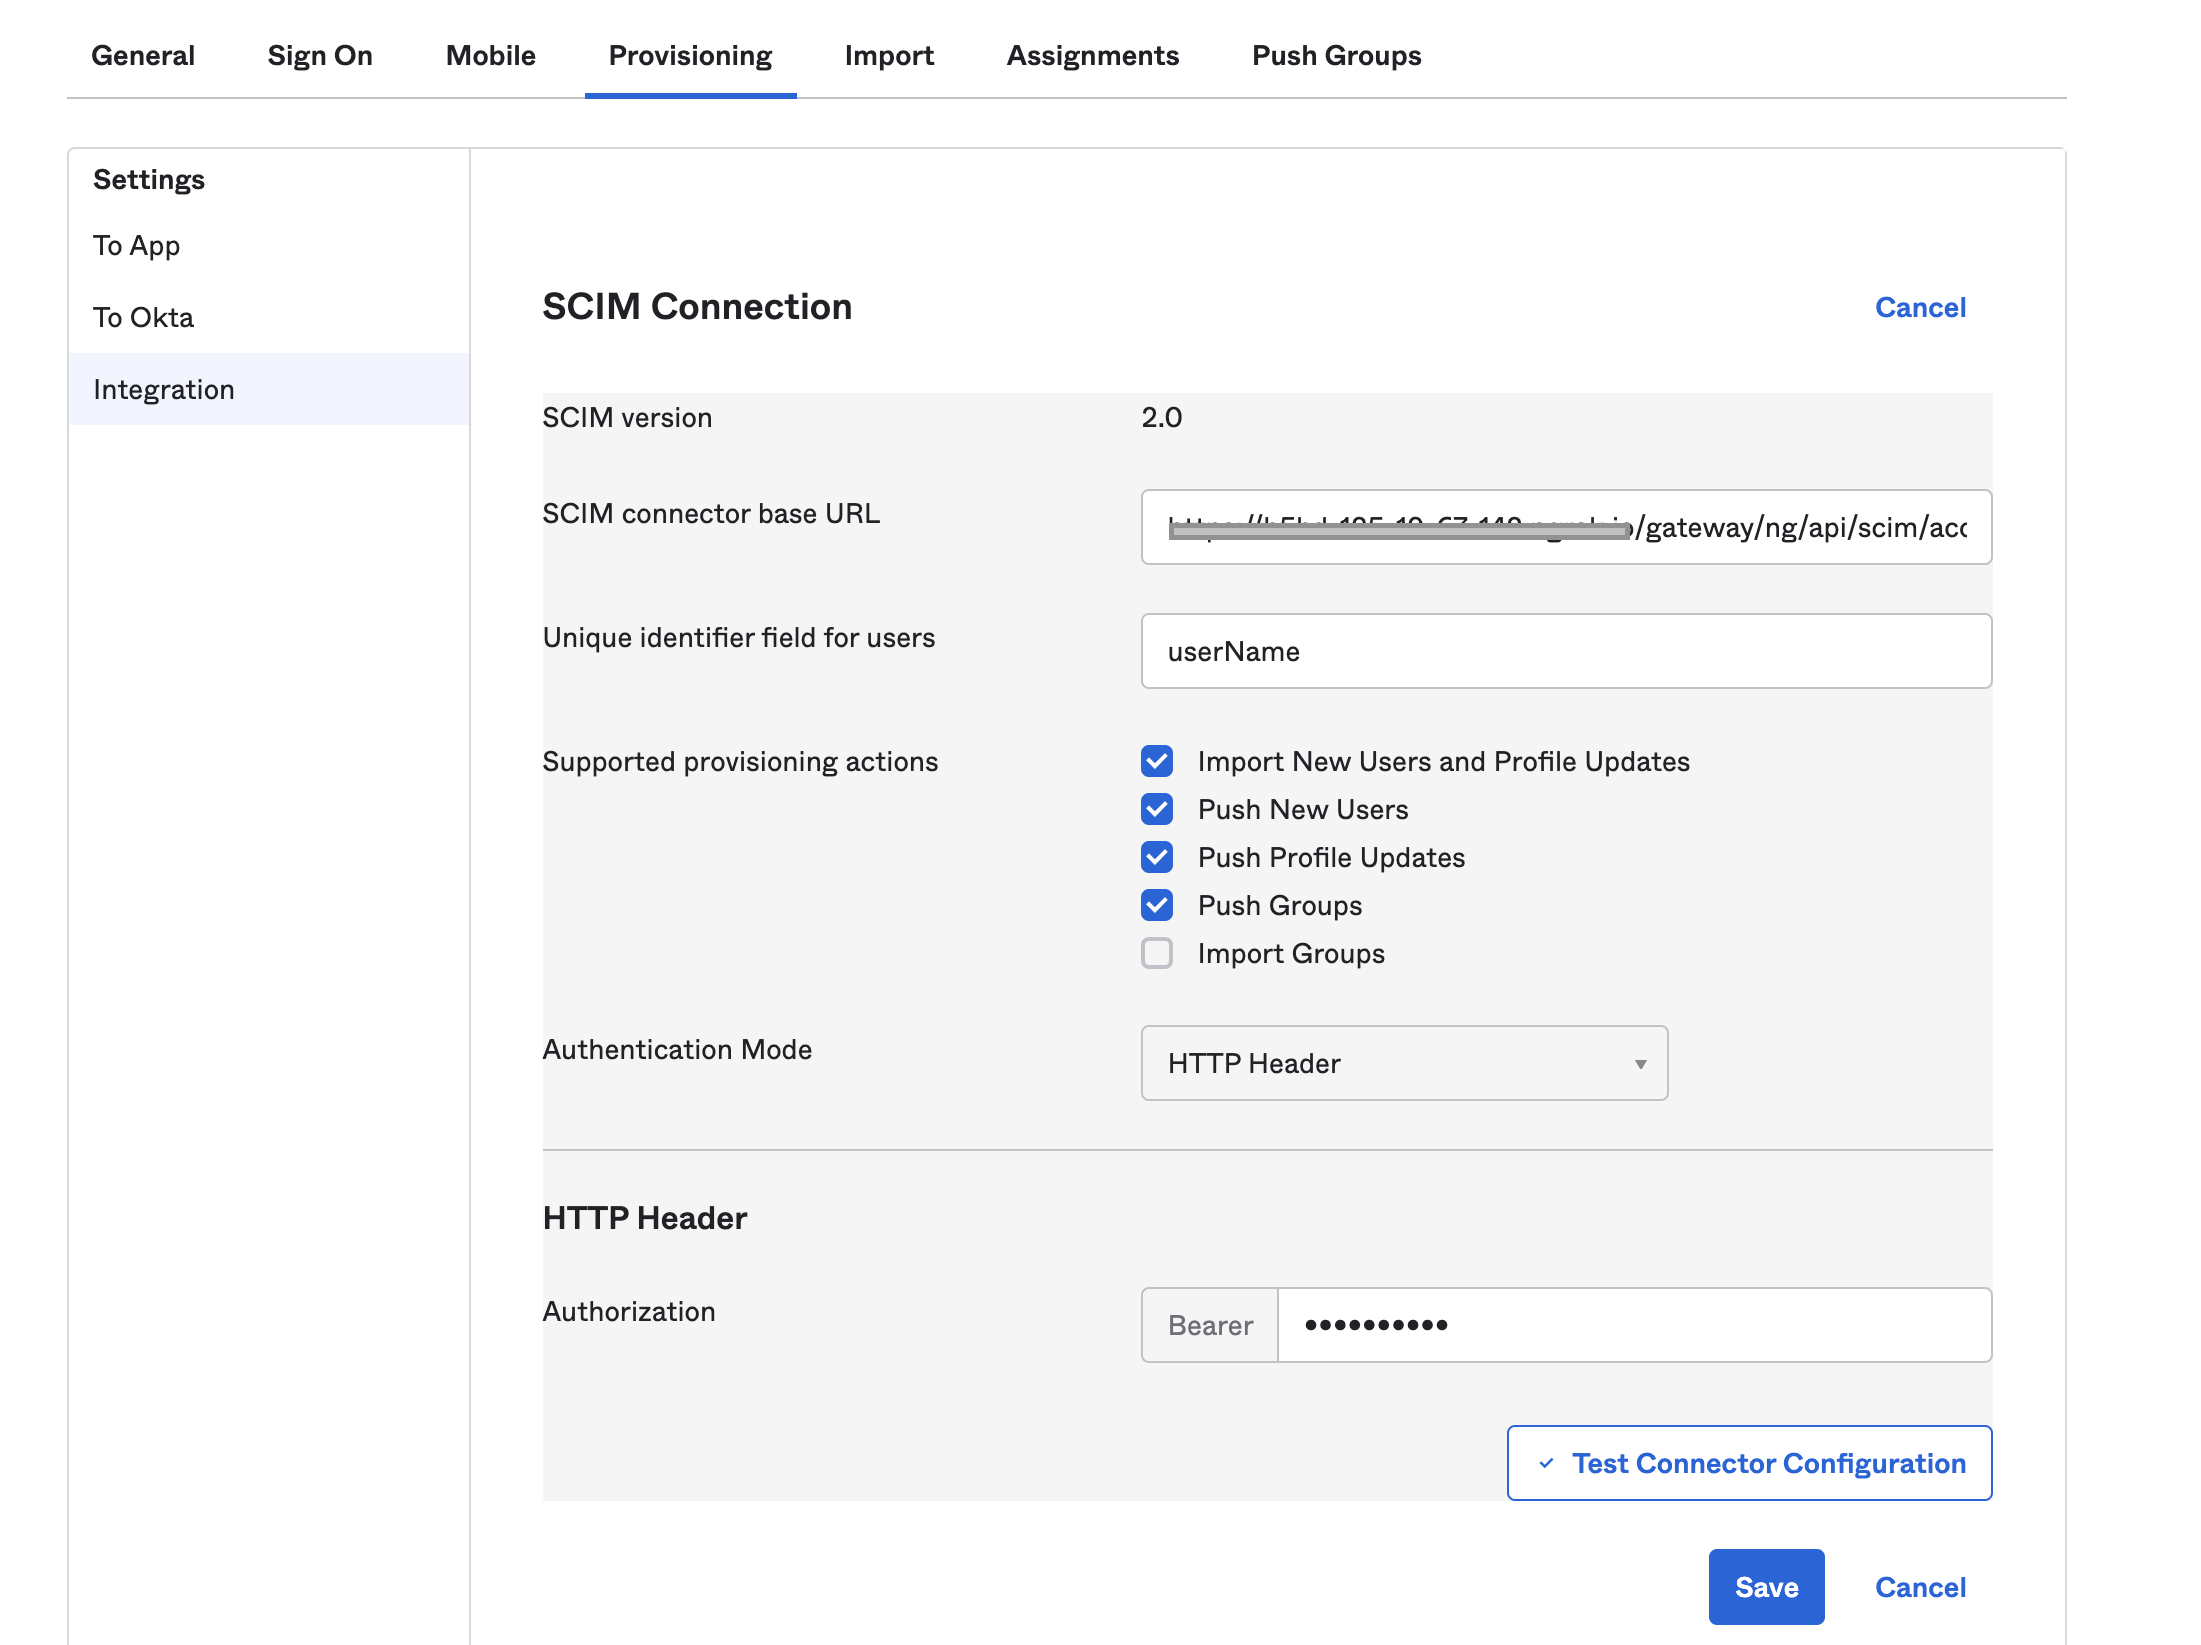
8. Select **Test Connection**.
9. If the test succeeds, select **Save**.
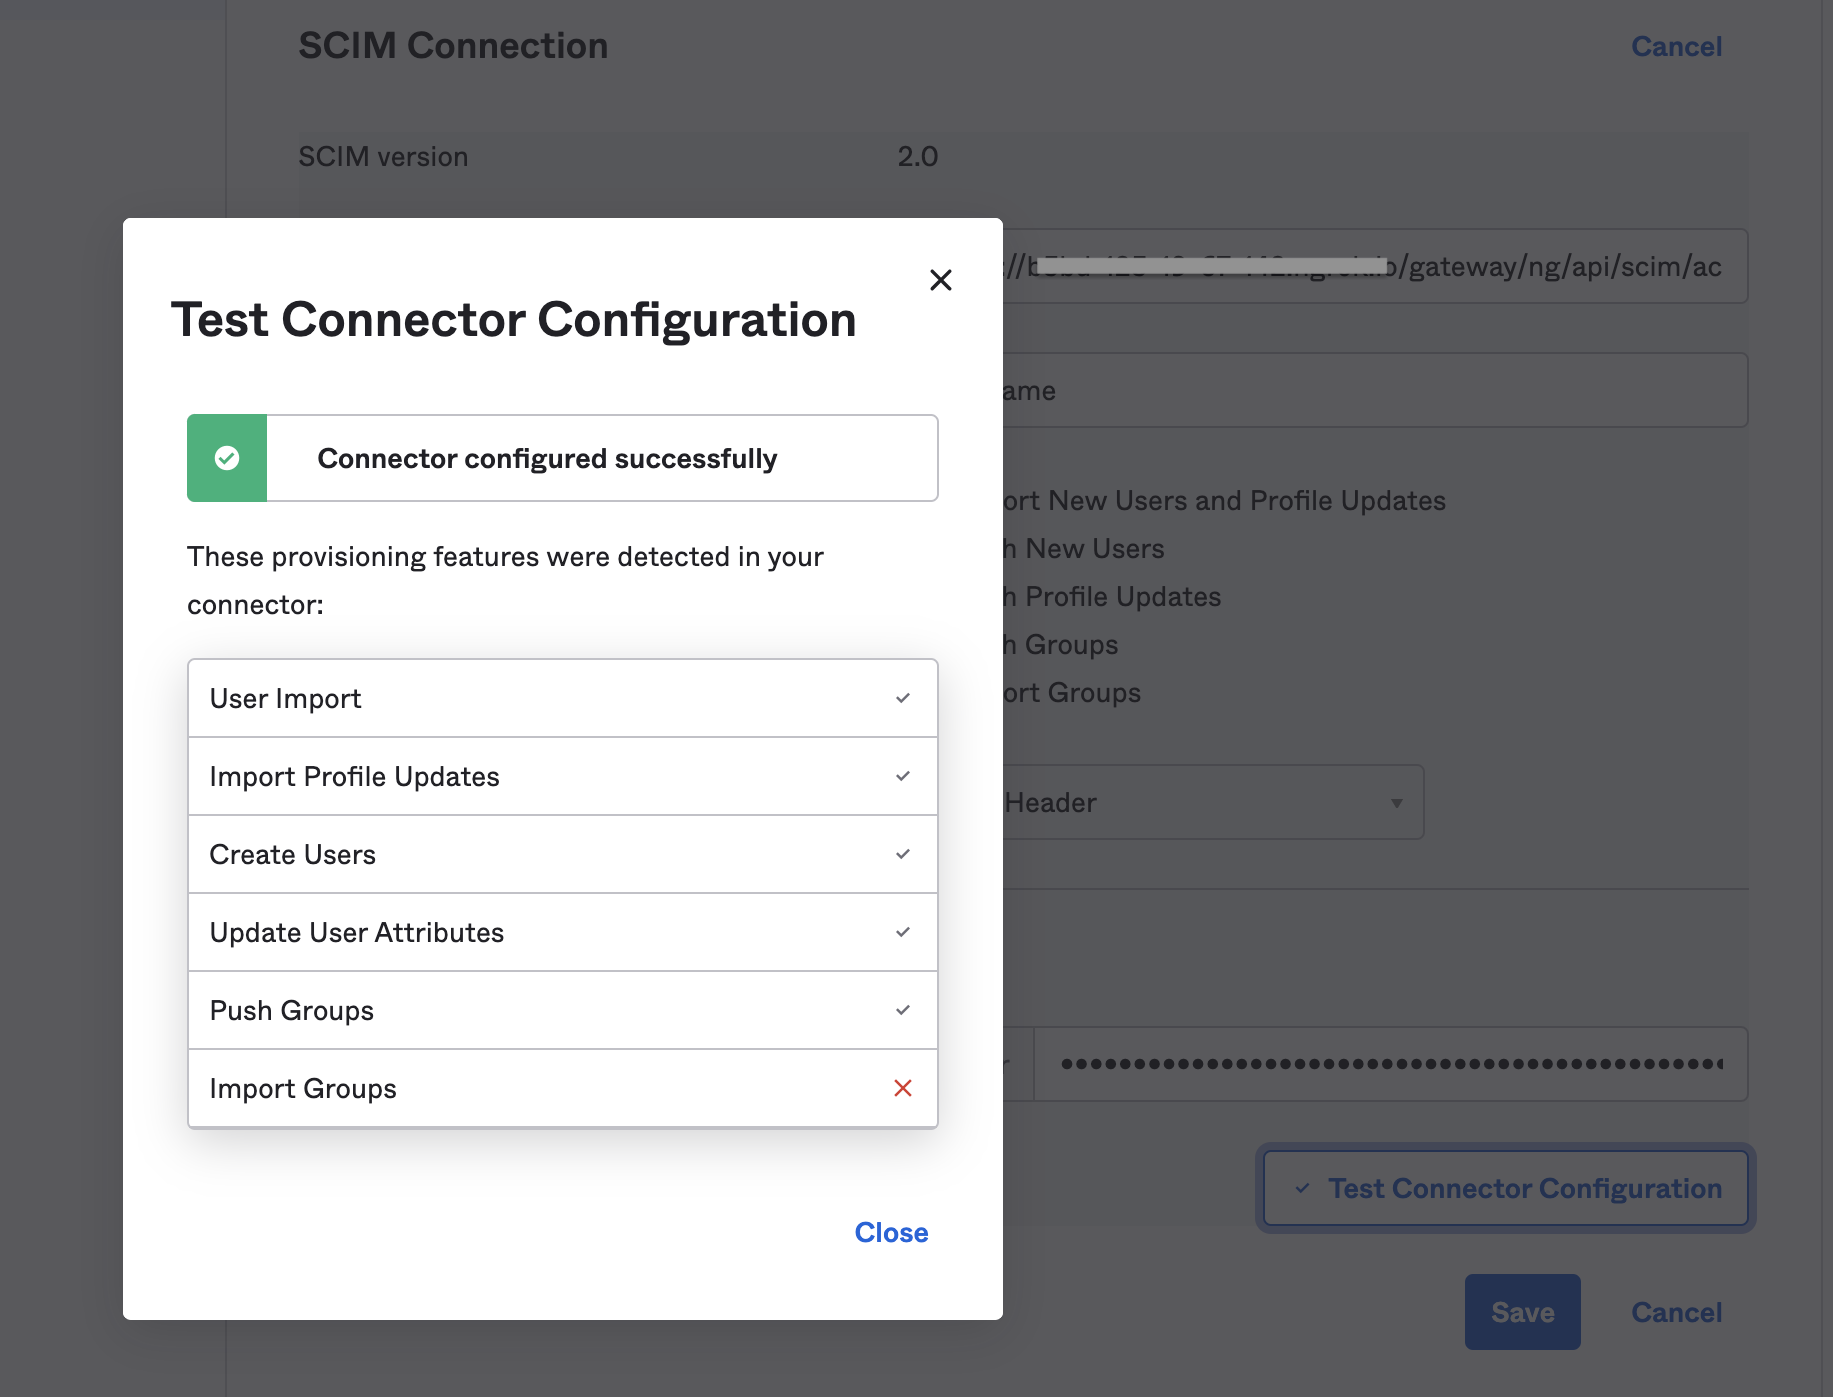
10. Go to the **Provisioning** tab, and select the **To App** settings.
11. Enable **Create Users**, **Update User Attributes**, and **Deactivate Users**.
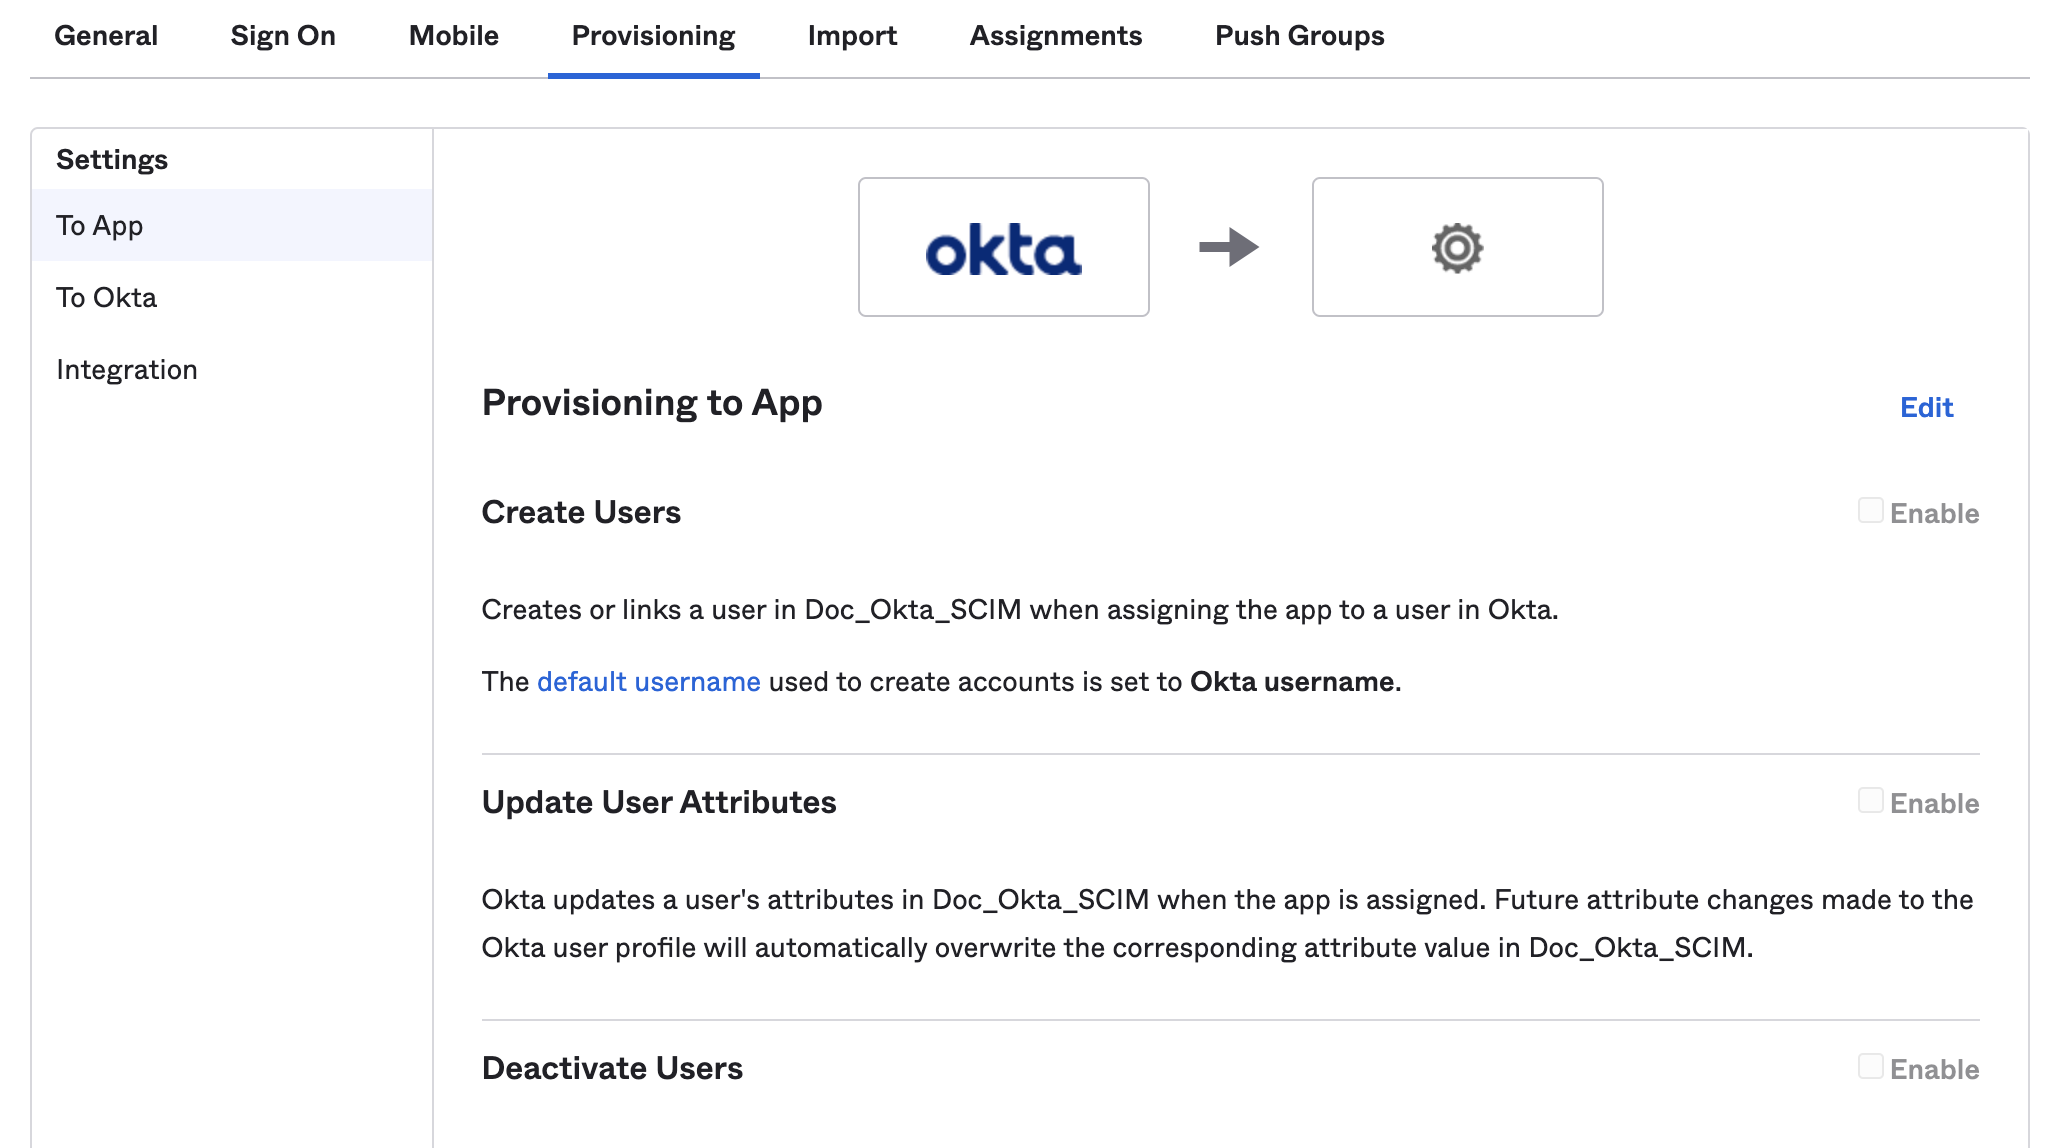
12. Select **Save**.
### Harness user management with Okta SCIM
Using the Okta SCIM integration requires you to manage certain user and user group attributes in Okta, rather than in Harness. This includes:
* Adding, removing, and editing group members. Group membership must be managed in Okta.
* Renaming user groups. Groups can only be renamed in Okta.
* Deleting user groups. Groups can only be deleted in Okta.
* Editing user email addresses, full names, and group assignments.
* You can't edit these user details in Harness if the user was provisioned as part of an Okta-provisioned user group.
* If you need to change a user's group (for example, to change their permissions), you must change the user's group membership in Okta.
* You must use Okta to delete Okta-provisioned users from Harness. To delete an Okta-provisioned user, remove them from the corresponding Okta app.
If an Okta-provisioned user group has the same name as an existing user group in Harness, Harness retains both groups. To prevent confusion, you can rename the existing Harness group.
You can use Okta to provision individual users or groups containing sets of users. If you use Okta to provision individual users directly to Harness, these users initially have no user group assignment in Harness. You must assign them to a group, either in Okta or in Harness. Directly provisioning individual users is the *only* way that you can change an Okta user's group membership in Harness. When provisioned as part of an Okta group, the user's group membership must always be managed through Okta.
Once you have set up the SCIM integration between Okta and Harness, administrators can perform the following Harness user management actions in Okta:
* [Provision individual users](#provision-individual-users).
* [Provision Okta groups in Harness](#provision-groups).
* [Update user attributes](#update-user-attributes).
* [Deactivate or remove users](#deactivate-or-remove-users).
Role and resource group assignments are not controlled in Okta. You must [assign permissions to user groups](#assign-permissions) in Harness.
#### Provision individual users
You can provision individual users, without a group affiliation, in Harness from Okta. Users assigned to groups are [provisioned with their group](#provision-groups).
1. In your Harness Okta app, select **Assignments**.
2. Select **People**.
3. Select **Assign**, and then select **Assign to People**.
4. Select the users you want to provision, and then select **Assign**.
5. Select **Save and Go Back**.
6. Select **Done** after you've finished assigning users.
Users with the Harness app assignment are shown under **People**. You can edit or delete users from here as well.
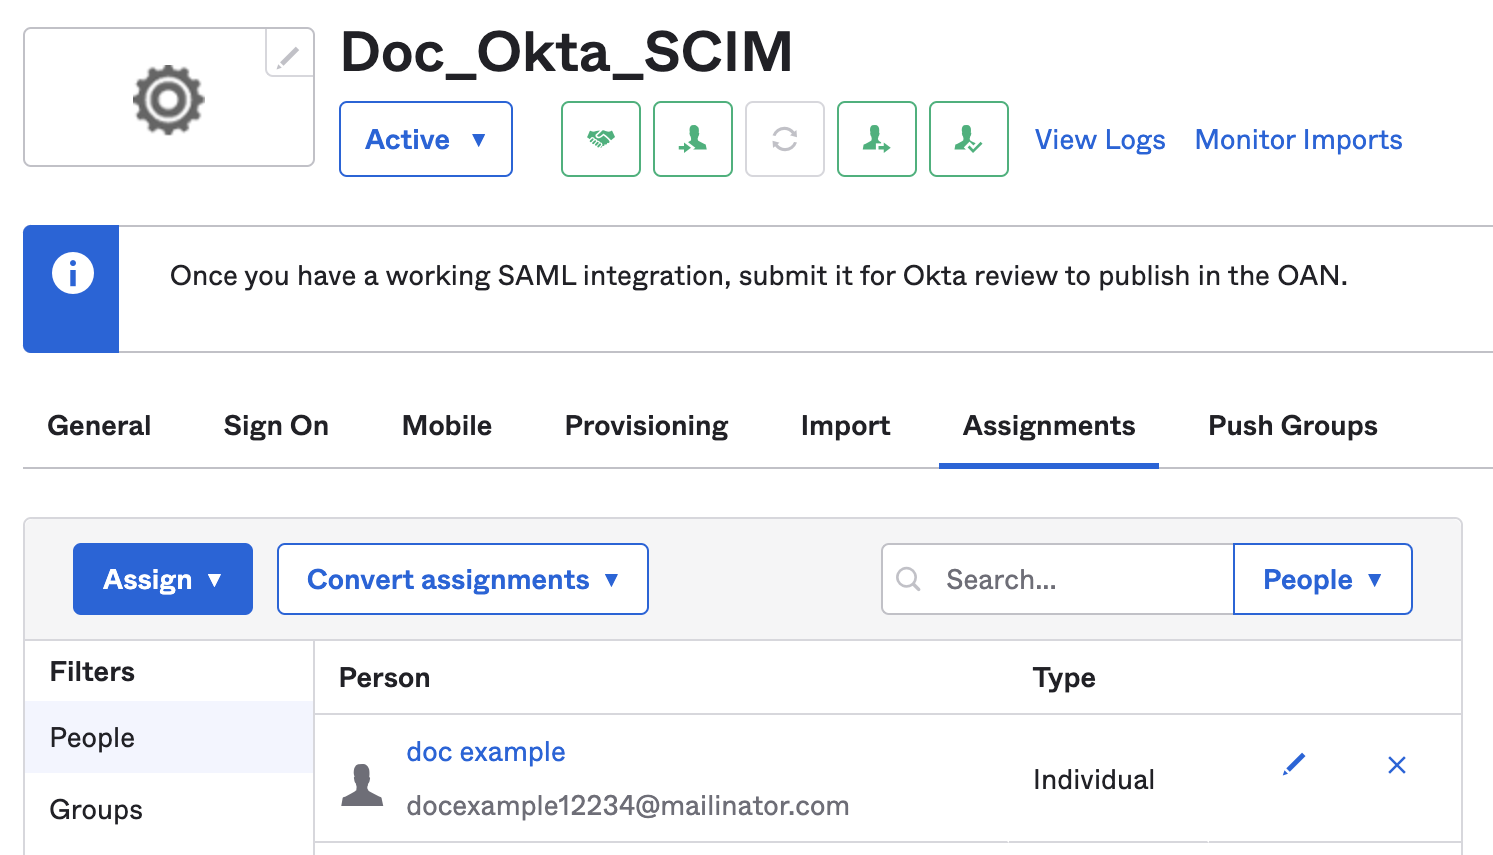
These users are also listed in your Harness account.
You can use Okta to provision individual users or groups containing sets of users. If you use Okta to provision individual users directly to Harness, these users initially have no user group assignment in Harness. You must assign them to a group, either in Okta or in Harness. Directly provisioning individual users is the *only* way that you can change an Okta user's group membership in Harness. When provisioned as part of an Okta group, the user's group membership must always be managed through Okta.
#### Provision groups
You can provision Okta user groups in Harness. To do this, you must assign groups to your Harness Okta app and then push the groups (and the group members) to Harness.
{% hint style="info" %}
**GROUP NAMES**
When provisioning user groups through SCIM, Harness creates IDs for user groups based on the group name in Okta. If the name contains periods, dashes, or spaces, those characters are replaced by underscores in the Harness user group ID. For example, if a group's name is `example-group` in Okta, the group's Harness ID is `example_group`.
If an Okta-provisioned user group has the same name as an existing user group in Harness, Harness retains both groups. To prevent confusion, you can rename the existing Harness group.
{% endhint %}
1. In your Harness Okta app, select **Assignments**.
2. Select **Groups**.
3. Select **Assign**, and then select **Assign to Groups**.
4. Select the groups you want to provision, and then select **Assign**.
5. Select **Save and Go Back**.
6. Select **Done** after you've finished assigning groups.
Groups with the Harness app assignment are shown under **Groups**. You can edit or delete groups from here as well.
7. Next, push your assigned groups to Harness.
* In your Harness Okta app, select **Push Groups**.
* Select **Push Groups**, and then select **Find groups by name** or **Find groups by rule**.
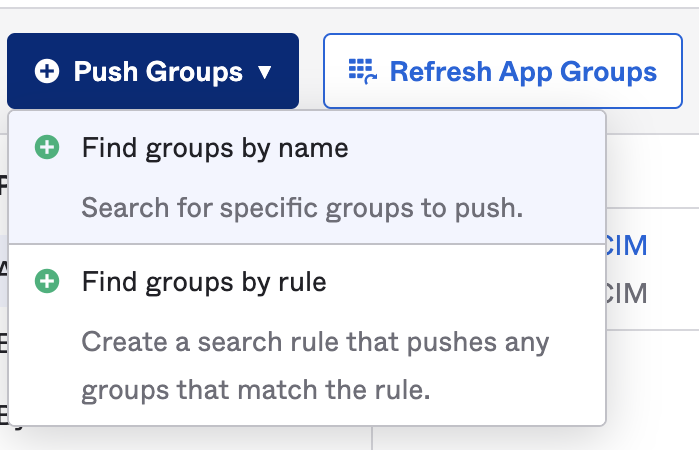
* Find the groups that you want to push.
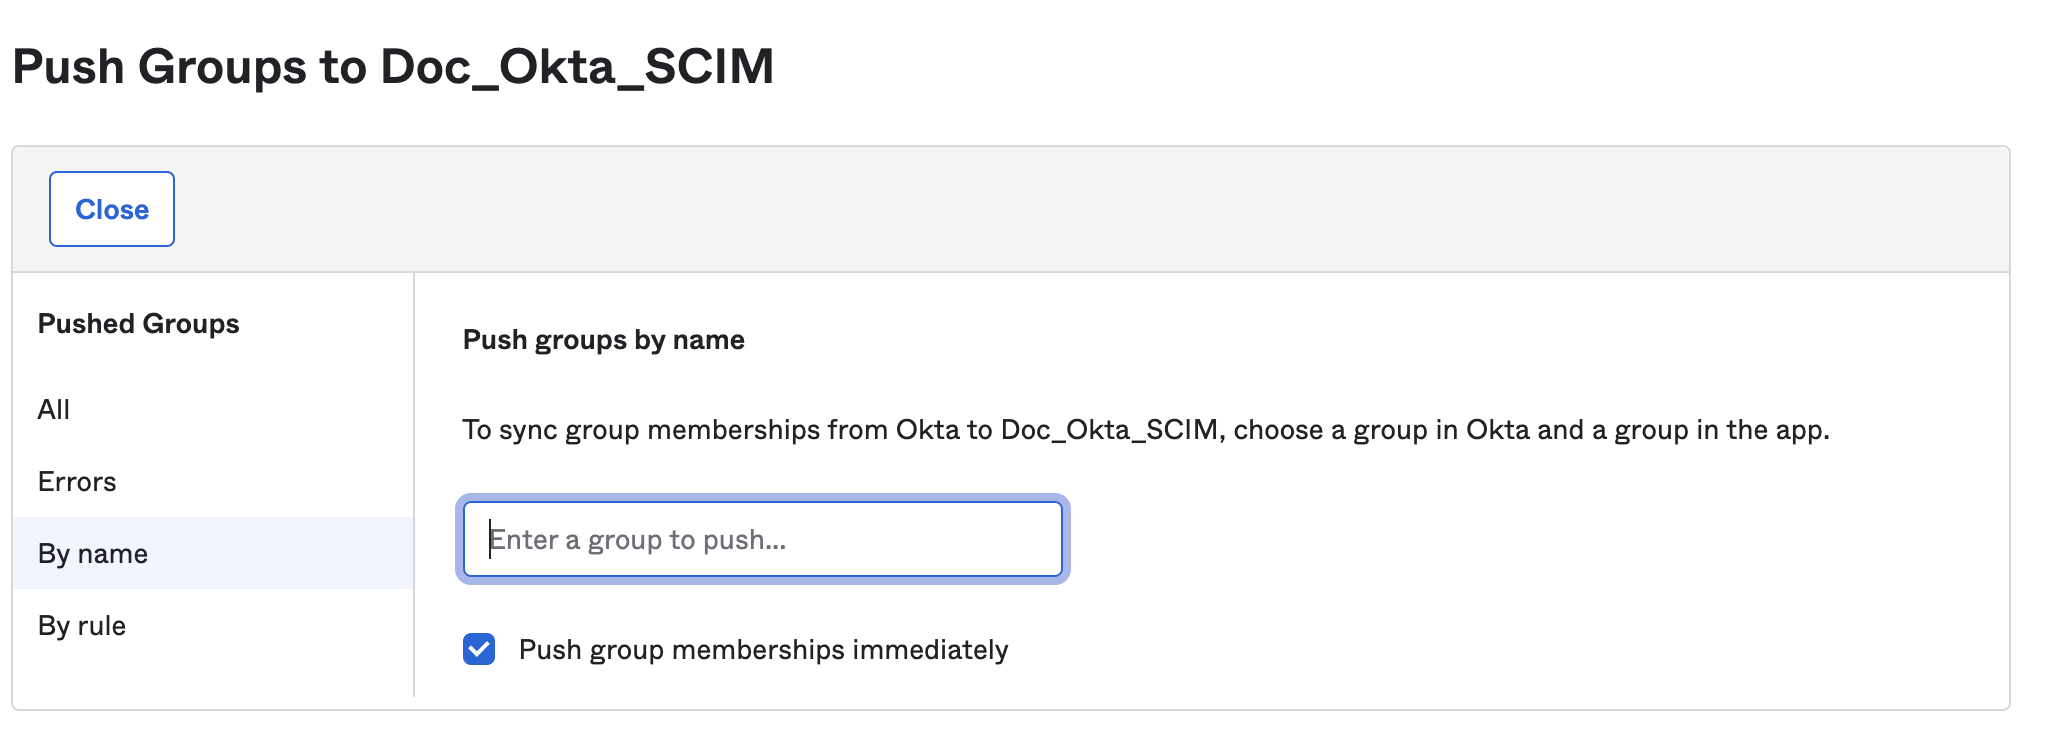
* After you've found all the groups you want to push, select **Save**.
You can check the status of pushed groups in your Harness Okta app.
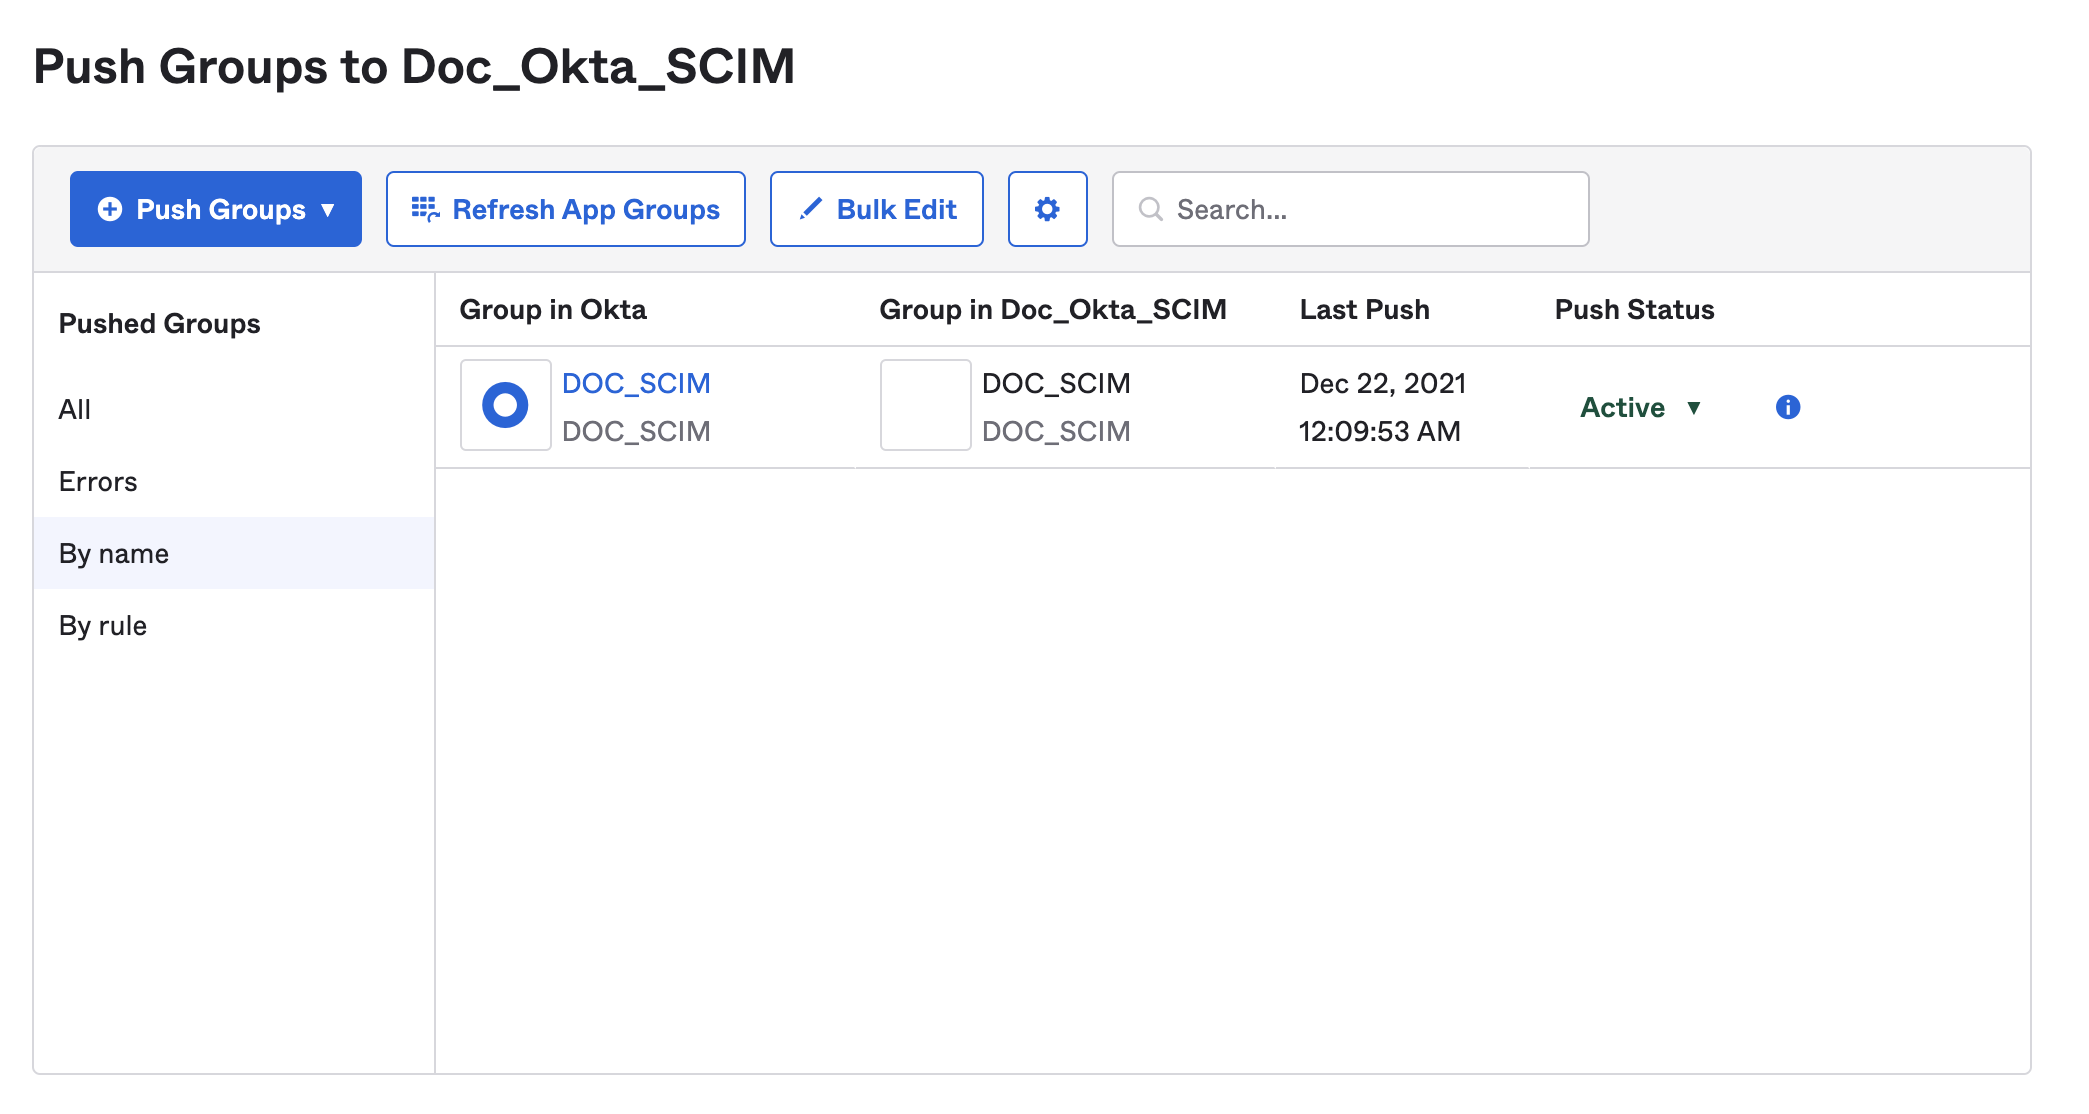
Active and successfully pushed groups are listed in your Harness account. The group members are also provisioned as Harness users when you push the group.
{% hint style="info" %}
If an error prevents adding, deleting, or updating a group member in Harness, you must retry [provisioning the user](#create-users) later, after resolving the issues. For more information, go to the Okta documentation on [Troubleshooting Group Push](https://help.okta.com/en-us/Content/Topics/users-groups-profiles/usgp-group-push-troubleshoot.htm).
{% endhint %}
#### Assign permissions
After user groups are provisioned through SCIM, you can manage [permissions](/harness-ai/use-harness-platform/platform-access-control/permissions-reference) granted to the users in those groups by assigning [roles](/harness-ai/use-harness-platform/platform-access-control/add-manage-roles) and [resource groups](/harness-ai/use-harness-platform/platform-access-control/manage-resource-groups) to user groups in Harness.
Harness roles and resource groups aren't managed in Okta.
If you need to change a user's group (for example, to change their permissions), you must change the user's group membership in Okta.
#### Update user attributes
You can edit the following attributes in a user's Okta profile to update the corresponding values in Harness:
* Given name
* Family name
* Primary email
* Primary email type
* Display name (This is the user's Harness user name)
These are the only field synced to Harness. Editing other fields in a user's Okta profile won't change those fields in Harness, even if an equivalent field exists.
To update user attributes:
1. From your Okta administrator account, select **Directory**, and then select **People**.
2. Locate the user you want to edit, and select their name.
3. Select the **Profile** tab, and then select **Edit**.
4. Update the user's profile, and then select **Save**.
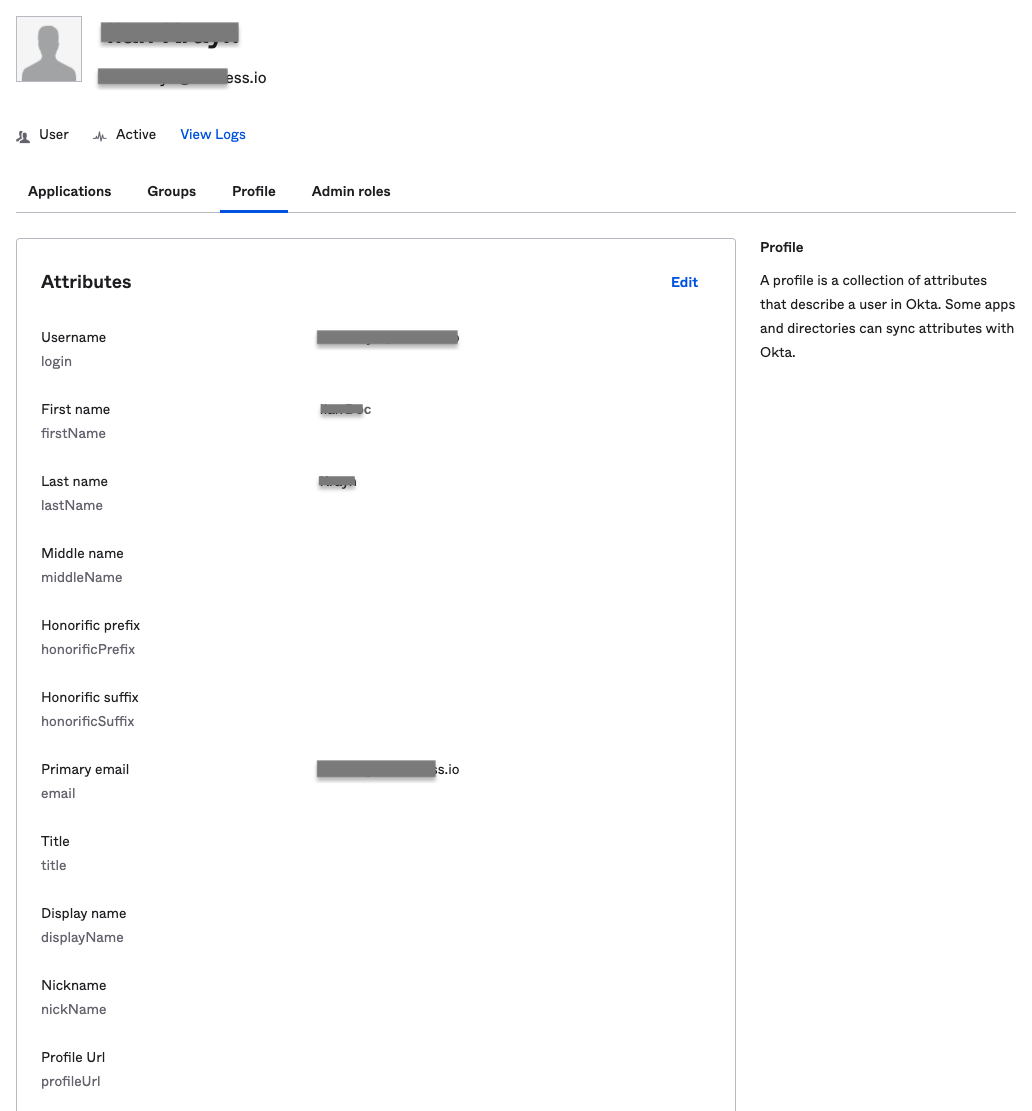
#### Deactivate or remove users
You must use Okta to delete Okta-provisioned users from Harness.
To delete an individual Okta-provisioned user (without a group affiliation), remove them from your Harness Okta app.
To delete a user provisioned through a group, remove them from the group in Okta.
To delete a user from Harness and all other provisioned apps, deactivate the user's Okta profile.
{% hint style="warning" %}
Deactivating a user removes them from *all provisioned apps*, including Harness. While a user account is deactivated, you can't change it.
{% endhint %}
1. From your Okta administrator account, select **Directory**, and then select **People**.
2. Locate the user you want to deactivate, and then select their name.
3. On the user's profile, select **More Actions**, and then select **Deactivate**.
4. Select **Deactivate** on the confirmation dialog.
To reactivate a deactivated user, go to the user's profile, select **More Actions**, and then select **Activate**.
#### Set the default experience
Environment administrators can set the default Harness generation landing page, FirstGen or NextGen, for their users to ensure the correct Harness Experience is provided to each user. For more information, go to [Account details](/harness-ai/subscriptions-and-licenses/view-account-info-and-subscribe-to-alerts#account-details).
### I already have a Harness FirstGen Okta integration
If you currently have a Harness FirstGen App Integration in your IdP, and you want to create one for Harness NextGen, make sure the user information is included in the FirstGen App Integration before attempting to log into Harness NextGen through SSO.
Harness authenticates users using either the FirstGen App Integration or the NextGen App Integration. If you have set up both, Harness continues to use your existing App Integration in FirstGen to authenticate users that attempt to log in using SSO.
For example:
1. An App Integration is already set up for FirstGen with two users as members: `user1@example.com` and `user2@example.com`.
2. You create the App Integration for Harness NextGen, and you add `user1@example.com` and `user_2@example.com` as members.
3. You provision these users to Harness NextGen through SCIM.
4. `user1@example.com` and `user_2@example.com` try to log in to Harness NextGen through SSO.
5. The FirstGen App Integration is used for user authentication through SSO.
* `user1@example.com` is a member of the FirstGen App Integration. They are successfully authenticated and logged in to Harness NextGen.
* `user_2@example.com` is not a member of the FirstGen App Integration. Authentication fails and the user can't log in to Harness NextGen.

{% @harness-feedback/feedback module="harness-ai" pagePath="harness-ai/use-harness-platform/platform-access-control/provision-users-with-okta-scim" %}
# Provision users and groups using Microsoft Entra (SCIM)
Provision and manage Harness users and user groups with Microsoft Entra ID's SCIM integration.
System for Cross-Domain Identity Management (SCIM) is an open standard protocol for automated user provisioning. In Harness, automated provisioning involves creating users and user groups, assigning users to groups, and managing some user attributes (such as names and email addresses). In addition to creating users and groups, automated provisioning also edits and removes users and user groups as and when required.
If Microsoft Entra ID is your identity provider, you can efficiently provision and manage users in your Harness account. Using [Microsoft Entra ID's SCIM integration](https://learn.microsoft.com/en-us/azure/active-directory/architecture/sync-scim) with Harness enables Microsoft Entra ID to serve as a single identity manager, to add and remove users, and to provision user groups. This is especially efficient for managing users at scale.
This topic describes how to use an Microsoft Entra ID SCIM integration for automated provisioning in Harness. To configure this integration, you must take steps in both Microsoft Entra ID and Harness.
### Requirements
You need an understanding of:
* System for Cross-domain Identity Management (SCIM).
* [Harness' key concepts](/harness-ai/new-to-harness-platform/overview).
* [RBAC in Harness](/harness-ai/use-harness-platform/platform-access-control).
You must be an Administrator in your Microsoft Entra ID account, and you must be an **Account Admin** in Harness.
You need a Harness [API key and unexpired token](/harness-ai/use-harness-platform/automation/api/add-and-manage-api-keys) that has all **Users** and **User Groups** [permissions](/harness-ai/use-harness-platform/automation/api/api-permissions-reference). API keys inherit permissions from the user they are associated with. If you use an API key for a [service account](/harness-ai/use-harness-platform/platform-access-control/add-and-manage-service-account), make sure the service account has all **Users** and **User Groups** permissions.
### Add Harness in Microsoft Entra ID
In Microsoft Entra ID, add Harness to your list of managed SaaS applications from the Microsoft Entra ID [Application Gallery](https://learn.microsoft.com/en-us/azure/active-directory/manage-apps/overview-application-gallery).
1. In your [Azure portal](https://portal.azure.com/), under **Azure services**, select **Microsoft Entra ID (formerly Active Directory)**.
2. Select **Enterprise applications**, and then select **All applications**.
3. Select **New application**.
4. Search for `Harness`, select **Harness** in the results list, and then select **Add** to add the application to your list of managed SaaS apps in Microsoft Entra ID.
### Enable Microsoft Entra ID provisioning for Harness
1. In your Azure portal, under **Azure services**, select **Microsoft Entra ID (formerly Active Directory)**.
2. Select **Enterprise Applications**, and then select **All applications**.
3. Select the **Harness** app.
4. Select **Provisioning**.

5. For **Provisioning Mode**, select **Automatic**.
6. Configure the **Admin Credentials** as follows:
1. For **Tenant URL**, enter the appropriate URL for your cluster:
The base URL format will follow the following base format: `https://app.harness.io/gateway/ng/api/scim/account/[YOUR_ACCOUNT_ID]`, (e.g `https://app.harness.io/gateway/ng/api/scim/account/9999aaaa9999AA`)
However, this will need to be modified depending on which cluster your account exists within. You can verify this by going to your Account Settings -> Account Details, in the Harness Cluster Field.
| Cluster | URL Format |
| ----------- | ----------------------------------------------------------------------------- |
| Prod1 | `https://app.harness.io/gateway/ng/api/scim/account/[YOUR_ACCOUNT_ID]` |
| Prod2 | `https://app.harness.io/gateway/gratis/ng/api/scim/account/[YOUR_ACCOUNT_ID]` |
| Prod3 | `https://app3.harness.io/gateway/ng/api/scim/account/[YOUR_ACCOUNT_ID]` |
| Prod0/Prod4 | `https://accounts.harness.io/gateway/ng/api/scim/account/[YOUR_ACCOUNT_ID]` |
| EU clusters | `https://accounts.eu.harness.io/ng/api/scim/account/[YOUR_ACCOUNT_ID]` |
Please note that if customers select the incorrect cluster, the changes will not show up within their environment, even if there is a successful response from Harness.
If you environment is On-Prem (SMP) the URL will use your custom domain name and omits `gateway`. For example, if your On-Prem domain name is `harness.mycompany.com`, then your SCIM base URL would become `https://harness.mycompany.com/ng/api/scim/account/[YOUR_ACCOUNT_ID]`.
2. For **Secret Token**, enter your Harness [Harness API key's token](#requirements) as the SCIM Authentication Token value.
3. Select **Test Connection** to ensure that Microsoft Entra ID can connect to Harness. If the connection fails, make sure your API key has admin permissions, and then try again.

7. Under **Settings**, in **Notification Email**, enter the email address for the person or group that should receive provisioning error notification emails.

8. Select **Save**.
9. Under **Mappings**:
1. Enable **Provision Microsoft Entra ID (formerly Active Directory) Groups** and **Provision Microsoft Entra ID (formerly Active Directory) Users**.

2. Select **Provision Microsoft Entra ID (formerly Active Directory) Users** and review the user **Attribute Mappings**. These user attributes are synchronized from Microsoft Entra ID to Harness. Attributes marked as **Matching** are used to match Harness user accounts with Microsoft Entra ID user accounts when user attributes need to be updated. Make any changes as necessary.
3. Select **Edit Attribute** and make sure **Apply this mapping** is set to **Always** if you want to sync create/update changes for the attribute. If you only want to capture this attribute when it's created, select **Only during object creation**.
4. Exit the user attribute mappings, and select **Provision Microsoft Entra ID (formerly Active Directory) Groups**.
5. Review the group **Attribute Mappings**. These group attributes are synchronized from Microsoft Entra ID to Harness. Attributes marked as **Matching** are used to match Harness user groups with Microsoft Entra ID user groups when group attributes need to be updated. Make any changes as necessary.
10. Under **Settings**, switch **Provisioning Status** to **On** to enable the Microsoft Entra ID provisioning service for Harness.
11. Under **Settings**, for **Scope**, select how you want to sync users and groups to Harness.
{% hint style="info" %}
**SCOPING FILTERS**
If you want to configure scoping filters for your attribute mappings, go to the Microsoft documentation on [Scoping users or groups to be provisioned with scoping filters](https://learn.microsoft.com/en-us/azure/active-directory/app-provisioning/define-conditional-rules-for-provisioning-user-accounts?pivots=app-provisioning).
{% endhint %}
13. Select **Save**.
Saving the configuration in Microsoft Entra ID triggers an initial provisioning sync. The initial sync takes longer to run than subsequent syncs. Syncs occur approximately every 40 minutes if the Microsoft Entra ID provisioning service is running. To monitor sync progress, go to **Synchronization Details** in Microsoft Entra ID. From there you can also find links to provisioning activity reports, which describe all actions performed by the Microsoft Entra ID provisioning service in Harness. For more information about how to read the Microsoft Entra ID provisioning logs, go to the Microsoft documentation on [Reporting on automatic user account provisioning](https://learn.microsoft.com/en-us/azure/active-directory/app-provisioning/check-status-user-account-provisioning).
After enabling Microsoft Entra ID provisioning for Harness, you must [assign permissions to user groups](#assign-permissions) in Harness.
### Harness user management with Microsoft Entra ID SCIM
Using the Microsoft Entra ID SCIM integration requires you to manage users, user groups, and user/group attributes in Microsoft Entra ID, rather than in Harness. Changes are synced from Microsoft Entra ID to Harness approximately every 40 minutes. Data you must manage in Microsoft Entra ID includes:
* Adding, removing, and editing group members. Group membership must be managed in Microsoft Entra ID.
* Renaming user groups. Groups can only be renamed in Microsoft Entra ID.
* Deleting user groups. Groups can only be deleted in Microsoft Entra ID.
* Editing user email addresses, full names, and group assignments.
* You can't edit these user details in Harness if the user was provisioned as part of an Microsoft Entra ID-provisioned user group.
* If you need to change a user's group (for example, to change their permissions), you must change the user's group membership in Microsoft Entra ID.
* You must use Microsoft Entra ID to delete Microsoft Entra ID-provisioned users from Harness.
Role and resource group assignments are not controlled in Microsoft Entra ID. You must [assign permissions to user groups](#assign-permissions) in Harness.
{% hint style="info" %}
**GROUP NAMES**
When provisioning user groups through SCIM, Harness creates IDs for user groups based on the group name in Microsoft Entra ID. If the name contains periods, dashes, or spaces, those characters are replaced by underscores in the Harness user group ID. For example, if a group's name is `example-group` in Microsoft Entra ID, the group's Harness ID is `example_group`.
If an Microsoft Entra ID-provisioned user group has the same name as an existing user group in Harness, Harness retains both groups. To prevent confusion, you can rename the existing Harness group.
{% endhint %}
After [enabling Microsoft Entra ID provisioning for Harness](#enable-azure-ad-provisioning-for-harness), you can use Microsoft Entra ID to [provision individual users](https://learn.microsoft.com/en-us/azure/active-directory/app-provisioning/provision-on-demand?pivots=app-provisioning) or groups containing sets of users. If you use Microsoft Entra ID to provision individual users directly to Harness, these users initially have no user group assignment in Harness. You must assign them to a group, either in Microsoft Entra ID or in Harness. Directly provisioning individual users is the *only* way that you can change an Microsoft Entra ID user's group membership in Harness. When provisioned as part of an Microsoft Entra ID group, the user's group membership must always be managed through Microsoft Entra ID.
#### Provisioning errors
If an error prevents adding, updating, or deleting a user in Harness, Azure retries the operation in the next sync cycle. If it fails again, and admin must check the [provisioning logs in Microsoft Entra ID](https://learn.microsoft.com/en-us/azure/active-directory/reports-monitoring/concept-provisioning-logs?context=azure%2Factive-directory%2Fmanage-apps%2Fcontext%2Fmanage-apps-context) to determine the root cause of the failure and take corrective action. For more information, go to the Microsoft documentation on [Errors and retries in Microsoft Entra ID app provisioning](https://learn.microsoft.com/en-us/azure/active-directory/app-provisioning/how-provisioning-works#errors-and-retries).
#### Assign permissions
After user groups are provisioned through SCIM, you can manage [permissions](/harness-ai/use-harness-platform/platform-access-control/permissions-reference) granted to the users in those groups by assigning [roles](/harness-ai/use-harness-platform/platform-access-control/add-manage-roles) and [resource groups](/harness-ai/use-harness-platform/platform-access-control/manage-resource-groups) to user groups in Harness.
Harness roles and resource groups aren't managed in the Microsoft Entra admin center.
If you need to change a user's group (for example, to change their permissions), you must change the user's group membership in Microsoft Entra ID.
### I already have a Harness FirstGen Microsoft Entra ID integration
If you currently have a Harness FirstGen App Integration in your IdP, and you want to create one for Harness NextGen, make sure the user information is included in the FirstGen App Integration before attempting to log into Harness NextGen through SSO.
Harness authenticates users using either the FirstGen App Integration or the NextGen App Integration. If you have set up both, Harness continues to use your existing App Integration in FirstGen to authenticate users that attempt to log in using SSO.
For example:
1. An App Integration is already set up for FirstGen with two users as members: `user1@example.com` and `user2@example.com`.
2. You create the App Integration for Harness NextGen, and you add `user1@example.com` and `user_2@example.com` as members.
3. You provision these users to Harness NextGen through SCIM.
4. `user1@example.com` and `user_2@example.com` try to log in to Harness NextGen through SSO.
5. The FirstGen App Integration is used for user authentication through SSO.
* `user1@example.com` is a member of the FirstGen App Integration. They are successfully authenticated and logged in to Harness NextGen.
* `user_2@example.com` is not a member of the FirstGen App Integration. Authentication fails and the user can't log in to Harness NextGen.

{% @harness-feedback/feedback module="harness-ai" pagePath="harness-ai/use-harness-platform/platform-access-control/provision-users-and-groups-using-azure-ad-scim" %}
# Provision users and groups with OneLogin (SCIM)
Provision and manage Harness users and user groups with OneLogin's SCIM integration.
System for Cross-Domain Identity Management (SCIM) is an open standard protocol for automated user provisioning. In Harness, automated provisioning involves creating users and user groups, assigning users to groups, and managing some user attributes (such as names and email addresses). In addition to creating users and groups, automated provisioning also edits and removes users and user groups as and when required.
If OneLogin is your identity provider, you can efficiently provision and manage users in your Harness account. Using [OneLogin's SCIM integration](https://developers.onelogin.com/scim) with Harness enables OneLogin to serve as a single identity manager, to add and remove users, and to provision user groups. This is especially efficient for managing users at scale.
This topic describes how to use a OneLogin SCIM integration for automated provisioning in Harness. To configure this integration, you must take steps in both OneLogin and Harness.
{% hint style="warning" %}
With the OneLogin SCIM integration, don't change provisioned users' email addresses in OneLogin. Once a user is provisioned in Harness, the user's email address *must remain the same*. If you change the email address in OneLogin and then try to remove the user from Harness, the removal will fail.
{% endhint %}
### Requirements
You need an understanding of:
* System for Cross-domain Identity Management (SCIM).
* [Harness' key concepts](/harness-ai/new-to-harness-platform/overview).
* [RBAC in Harness](/harness-ai/use-harness-platform/platform-access-control).
You must be an Administrator in your OneLogin account, and you must be an **Account Admin** in Harness.
You need a Harness [API key and unexpired token](/harness-ai/use-harness-platform/automation/api/add-and-manage-api-keys) that has all **Users** and **User Groups** [permissions](/harness-ai/use-harness-platform/automation/api/api-permissions-reference). API keys inherit permissions from the user they are associated with. If you use an API key for a [service account](/harness-ai/use-harness-platform/platform-access-control/add-and-manage-service-account), make sure the service account has all **Users** and **User Groups** permissions.
### Add the Harness app to OneLogin
For more information, go to the OneLogin documentation on [Adding apps](https://www.onelogin.com/getting-started/free-trial-plan/add-apps-manual).
1. In OneLogin, go to **Applications** and select **Add App**.
2. Search for `Harness`, and select the Harness app.
3. Select **Save**.
4. In the Harness OneLogin app settings, in the **SCIM Base URL** field, enter the appropriate URL for your cluster:
The base URL format will follow the following base format: `https://app.harness.io/gateway/ng/api/scim/account/[YOUR_ACCOUNT_ID]`, (e.g `https://app.harness.io/gateway/ng/api/scim/account/9999aaaa9999AA`)
However, this will need to be modified depending on which cluster your account exists within. You can verify this by going to your Account Settings -> Account Details, in the Harness Cluster Field.
| Cluster | URL Format |
| ----------- | ----------------------------------------------------------------------------- |
| Prod1 | `https://app.harness.io/gateway/ng/api/scim/account/[YOUR_ACCOUNT_ID]` |
| Prod2 | `https://app.harness.io/gateway/gratis/ng/api/scim/account/[YOUR_ACCOUNT_ID]` |
| Prod3 | `https://app3.harness.io/gateway/ng/api/scim/account/[YOUR_ACCOUNT_ID]` |
| Prod0/Prod4 | `https://accounts.harness.io/gateway/ng/api/scim/account/[YOUR_ACCOUNT_ID]` |
| EU clusters | `https://accounts.eu.harness.io/ng/api/scim/account/[YOUR_ACCOUNT_ID]` |
Please note that if customers select the incorrect cluster, the changes will not show up within their environment, even if there is a successful response from Harness.
If you environment is On-Prem (SMP) the URL will use your custom domain name and omits `gateway`. For example, if your On-Prem domain name is `harness.mycompany.com`, then your SCIM base URL would become `https://harness.mycompany.com/ng/api/scim/account/[YOUR_ACCOUNT_ID]`.
5. For **SCIM Bearer Token**, enter your [Harness token](#requirements). The SCIM Bearer Token authenticates requests and responses sent between the OneLogin SCIM provisioning service and Harness.
6. Make sure **API Status** is enabled.
7. Go to the app's **Provisioning** settings, and configure the following:
* Select **Enable provisioning**.
* Under **Require admin approval**, select **Create user**, **Delete user**, and **Update user**.
* For **When users are deleted**, select **Delete**.
* For **When user accounts are suspended**, select **Suspend**.

8. Select **Save**.
### Enable SAML SSO with OneLogin
To allow users to log in through your OneLogin SCIM integration, you must also set up [SAML SSO authentication with OneLogin](/harness-ai/use-harness-platform/authentication/single-sign-on-saml#saml-sso-with-onelogin) in Harness.
### Provision individual users
{% hint style="warning" %}
With the OneLogin SCIM integration, don't change a provisioned user's email address in OneLogin. Once a user is provisioned in Harness, the user's email address *must remain the same*. If you change the email address in OneLogin and then try to remove the user from Harness, the removal will fail.
{% endhint %}
To provision users, add them to the Harness OneLogin app. Users are automatically provisioned in Harness if [SAML SSO with OneLogin is enabled](/harness-ai/use-harness-platform/authentication/single-sign-on-saml#saml-sso-with-onelogin).
1. In OneLogin, select **Users**.
2. Add a user or select an existing user.
3. In the **User Info** settings, make sure **First name**, **Last name**, and **Email** are populated.
The Harness OneLogin SCIM integration only accepts the First name, Last name, and Email attributes for users. No other user attributes are permitted. Don't configure any other User Info settings.
4. Save the user settings, and then go to **Applications**.
5. In the **Applications** list, select **Add (+)**.
6. In the **Assign new login** settings, select the Harness OneLogin app, and then select **Continue**.
7. In **NameID**, enter the user's email address. This must match the **Email** from the **User Info** settings.
8. Select **Save**. The user's provisioning state is initially listed as **Pending**.
9. Select **Pending**.
10. In **Create User in Application**, select **Approve**. The user's provisioning state updates to **Provisioned**.
Once the provisioning state updates to **Provisioned**, the user receives an email invite from Harness to log in.
11. In Harness, go to **Account Settings**, and then select **Access Control**.
12. Select **Users** in the header, and make sure the provisioned user is listed.
13. After provisioning users, you must [assign permissions](#assign-permissions).
#### Provisioning errors
If provisioning fails, you might get an error such as `Failed to create user in app. Specified resource (e.g. User) or endpoint does not exist`. The most common cause for this error is an incorrect **SCIM Base URL** or invalid **SCIM Bearer Token** in the [OneLogin app configuration](#add-the-harness-app-to-onelogin)
If an error prevents adding, deleting, or updating an individual user in Harness, resolve the issues that caused the error and then retry provisioning the user in OneLogin. Select the **Failed** state in the user provisioning status table in OneLogin to investigate the error and retry provisioning.
### Provision OneLogin roles as Harness user groups
{% hint style="warning" %}
With the OneLogin SCIM integration, don't change a provisioned user's email address in OneLogin. Once a user is provisioned in Harness, the user's email address *must remain the same*. If you change the email address in OneLogin and then try to remove the user from Harness, the removal will fail.
{% endhint %}
To provision groups of users, you can provision OneLogin roles as Harness user groups. To do this, you must create a OneLogin role, assign OneLogin users to the role, assign your [Harness OneLogin app](#add-the-harness-app-to-onelogin) to users, and then create a rule in your Harness OneLogin app that creates Harness user groups based on the role.
You can create multiple roles. Each role becomes a Harness user group.
1. Make sure none of the intended group members (OneLogin users) have standalone Harness accounts (meaning, accounts not associated with OneLogin). If a user has a separate Harness account, the OneLogin role provisioning will fail. Before provisioning OneLogin roles, make sure you remove these accounts.
2. Add the group parameter to your Harness OneLogin app.
1. In OneLogin, go to your Harness OneLogin app.
2. In the **Parameters** settings, go to **Optional Parameters**, and select **Groups**.
3. In **Edit Field Groups**, select **Include in User Provisioning**, and then select **Save**.
4. Select **Save** again to save the app configuration.
3. Add the OneLogin role and link it to the Harness OneLogin app.
1. Go to **Users**, select **Roles**, and then select **New Role**.
2. Enter a **Name**, and select **Save**. The role name becomes the user group name in Harness.
GROUP NAMES
When provisioning user groups through SCIM, Harness creates names for user groups based on the OneLogin role name. If the role name contains periods, dashes, or spaces, those characters are replaced by underscores in Harness. For example, if a OneLogin role's name is example-group, then the resulting Harness user group's name is example_group.
If a OneLogin-provisioned user group has the same name as an existing user group in Harness, Harness retains both groups. To prevent confusion, you can rename the existing Harness group.
3. Select your new role, and then select **Users**.
4. In **Check existing or add new users to this role**, enter the name of a OneLogin user to add to the role, locate the relevant user, select **Check**, and then select **Add to Role**. Repeat until you have added all users.
5. Select **Save**, select your role again, and go to the **Applications** settings.
6. Select **Add Apps**.
7. In **Select Apps to Add**, select the Harness OneLogin app.
8. Select **Save**.
4. Associate the Harness OneLogin app with each OneLogin user you added to the role.
1. Go to **Users**, and select a user you added to the role.
2. On the user's page, select **Applications**.
3. Select **Add App**.
4. In **Assign new login**, select the Harness OneLogin app, and select **Continue**.
5. In **Groups**, select your OneLogin role, and select **Add**.
6. Select **Save**.
5. Add a rule to the Harness OneLogin app that creates user groups in the Harness based on the OneLogin role.
1. In OneLogin, go to **Applications** and select the Harness OneLogin app.
2. Select **Rules**, and select **Add Rule**.
3. Enter a **Name**.
4. Under **Actions**, select **Set Groups in \[Application Name]**.
5. Select **Map from OneLogin**.
6. Set **For each** to **Role**.
7. Set **With value that matches** to the name of your OneLogin role or enter the regex `.*`.
8. Select **Save** to save the rule.
9. Select **Save** to save the app.
6. Provision the users you linked to the Harness OneLogin app.
1. Go to your Harness OneLogin app, and select **Users**.
2. If you [provisioned users](#provision-individual-users) prior to adding the OneLogin role and rule, select **Reapply Mappings**.
3. For each user listed as **Pending**, select the user and select **Approve**.
7. Once provisioned, confirm the users and groups exist in Harness.
1. In Harness, go to **Account Settings** and select **Access Control**.
2. Select **User Groups** in the header.
3. Select the user group matching the name of your OneLogin role.
4. Make sure all the provisioned users are listed.
8. After provisioning groups and users, you must [assign permissions](#assign-permissions).
### Assign permissions
After user groups are provisioned through SCIM, you can manage [permissions](/harness-ai/use-harness-platform/platform-access-control/permissions-reference) granted to the users in those groups by assigning [roles](/harness-ai/use-harness-platform/platform-access-control/add-manage-roles) and [resource groups](/harness-ai/use-harness-platform/platform-access-control/manage-resource-groups) to user groups in Harness.
Harness roles and resource groups aren't managed in OneLogin.
If you need to change a user's group (for example, to change their permissions), you must change the user's role relationship in OneLogin.
### Remove groups
To remove a user group created by a OneLogin role, you must remove the role from OneLogin and then contact [Harness Support](mailto:support@harness.io) to get the user group removed from Harness.
The OneLogin SCIM integration doesn't currently automatically remove of user groups created from OneLogin roles. In Harness, if you try to manually remove a Harness user group created from a OneLogin role, you'll get the following error: `Cannot Delete Group Imported From SCIM`. This is why you must contact Harness support to finish removing the group after removing the OneLogin role.
### Remove users
Once a OneLogin user is provisioned in Harness, you can't delete the user in Harness. You must delete the user in OneLogin to remove them from Harness.
### I already have a Harness FirstGen OneLogin integration
If you currently have a Harness FirstGen App Integration in your IdP, and you want to create one for Harness NextGen, make sure the user information is included in the FirstGen App Integration before attempting to log into Harness NextGen through SSO.
Harness authenticates users using either the FirstGen App Integration or the NextGen App Integration. If you have set up both, Harness continues to use your existing App Integration in FirstGen to authenticate users that attempt to log in using SSO.
For example:
1. An App Integration is already set up for FirstGen with two users as members: `user1@example.com` and `user2@example.com`.
2. You create the App Integration for Harness NextGen, and you add `user1@example.com` and `user_2@example.com` as members.
3. You provision these users to Harness NextGen through SCIM.
4. `user1@example.com` and `user_2@example.com` try to log in to Harness NextGen through SSO.
5. The FirstGen App Integration is used for user authentication through SSO.
* `user1@example.com` is a member of the FirstGen App Integration. They are successfully authenticated and logged in to Harness NextGen.
* `user_2@example.com` is not a member of the FirstGen App Integration. Authentication fails and the user can't log in to Harness NextGen.

{% @harness-feedback/feedback module="harness-ai" pagePath="harness-ai/use-harness-platform/platform-access-control/provision-users-and-groups-with-one-login-scim" %}
# Just-In-Time (JIT) user provisioning
Automatically provision users in Harness when they first log in via SAML SSO using Just-In-Time provisioning.
Just-In-Time (JIT) provisioning in Harness automatically creates user accounts when users log in for the first time via SAML single sign-on (SSO). JIT provisioning eliminates the need to manually invite each user to Harness by creating user accounts dynamically based on the SAML assertion sent by your identity provider (IdP).
The key principle is that JIT provisioning only handles user creation automatically. Authorization (permissions, group memberships, roles, and resource groups) requires separate configuration through [SAML authorization settings](/harness-ai/use-harness-platform/authentication/single-sign-on-saml) and user group linking. Users only receive permissions if they are placed in Harness user groups that already have role bindings configured.
***
### What you will learn in this topic
By the end of this topic, you will be able to:
* Understand how JIT provisioning works with SAML SSO.
* Enable JIT provisioning in Harness for supported identity providers.
***
### Before you begin
Before you enable JIT provisioning in Harness, ensure you have the following:
* **SAML SSO configured**: An active SAML SSO provider already configured in Harness (Okta, Microsoft Entra ID, OneLogin, or Keycloak). Go to the appropriate SAML SSO guide to configure your provider:
* [Okta](/harness-ai/use-harness-platform/authentication/single-sign-on-saml/okta)
* [Microsoft Entra ID](/harness-ai/use-harness-platform/authentication/single-sign-on-saml/microsoft-entra-id)
* [OneLogin](/harness-ai/use-harness-platform/authentication/single-sign-on-saml/onelogin)
* [Keycloak](/harness-ai/use-harness-platform/authentication/single-sign-on-saml/keycloak)
* **Account administrator permissions**: Account administrator access in Harness to configure authentication settings. Go to [RBAC in Harness](/harness-platform/3.0/harness-platform-resources/platform-access-control/rbac-in-harness) to review roles and permissions.
* **Users assigned in IdP**: Users must exist in your identity provider and be assigned to the Harness SAML application before they can use JIT provisioning.
***
### How JIT provisioning works
This describes the JIT provisioning flow when a user logs in to Harness for the first time via SAML SSO.
When a user attempts to log in to Harness:
1. The user is redirected to your configured identity provider (IdP) for authentication.
2. After successful authentication, the IdP sends a SAML assertion containing user attributes (email, name, groups) back to Harness.
3. Harness checks if the user already exists in the account:
* **If the user exists**: Harness authenticates the user and grants access based on their assigned roles and permissions.
* **If the user does not exist and JIT provisioning is enabled**: Harness validates the SAML assertion against configured JIT validation rules (if any), creates a new user account using the email from the assertion, and grants access.
4. If JIT validation rules are configured, the SAML assertion must contain the specified validation key-value pair for automatic provisioning to occur. If the validation fails, the user is denied access.
***
### Enable JIT provisioning in Harness
To enable JIT provisioning for your SAML SSO provider, do the following:
1. In your Harness account, go to **Account Settings** -> **Authentication**.
2. Select **SAML Provider** to add a new SAML provider, or select **Login via SAML** to edit an existing provider.
3. If creating a new provider, enter a **Name** for the SAML provider and select your IdP (Okta, Microsoft Entra ID, OneLogin, or Other).
4. Select **Enable JIT Provisioning**.
Enable JIT provisioning in Harness
5. (Optional) To control who can get added to Harness on their first login, specify **JIT Validation Key** and **JIT Validation Value**, which serve as the key-value that must be present in the SAML assertions.
6. Complete the remaining SAML provider configuration, such as uploading metadata, configuring entity ID, and enabling authorization if needed.
7. Select **Save** or **Add**.
After you enable JIT provisioning, new users who authenticate via SAML SSO are automatically created in Harness on their first successful login.
***
### User management with JIT provisioning
The following table compares user management workflows with and without JIT provisioning enabled.
| Aspect | Without JIT Provisioning | With JIT Provisioning |
| ---------------------- | ------------------------------------------------------------------------------------------------------------------------------- | ----------------------------------------------------------------------------------------------------------------------------------------------------------------------------------------------------------------------------------- |
| **User invitation** | You must manually invite users to Harness before they can log in via SAML SSO. | You do not need to manually invite users to Harness. |
| **Invitation process** | Users receive an email invitation to join Harness. | No email invitation is required. |
| **First login** | After accepting the invitation and logging in for the first time via SAML SSO, their email addresses are registered in Harness. | On first successful SAML SSO login, Harness automatically creates a user account with the email address from the SAML assertion. |
| **User access** | Users can log in only after accepting the invitation. | The user can immediately log in to Harness. However, roles and resource groups are not assigned automatically. Users only receive permissions if they are placed in Harness user groups that already have role bindings configured. |
| **IdP requirements** | Users must be assigned to the Harness SAML application in your IdP. | Users must be assigned to the Harness SAML application in your IdP. |
| **Group membership** | User groups must be manually assigned in Harness. | If SAML authorization is enabled, the user is automatically added to Harness user groups based on IdP group memberships. |
***
### Troubleshooting Users cannot log in on first attempt after JIT provisioning is enabled
Users must first log in through the SAML SSO application in their identity provider (click the Harness icon in Okta, Microsoft Entra ID, OneLogin, or Keycloak) instead of accessing app.harness.io directly. This provisions the user in Harness. Subsequent logins can be direct to Harness.
Error when updating JIT-provisioned user via SCIM
Choose one provisioning method exclusively. If using SCIM, remove the JIT-provisioned user and re-add them through SCIM. Users should be managed by a single provisioning method (either JIT or SCIM, not both).
JIT-provisioned users have no permissions or group memberships
JIT provisioning only creates the user account. Permissions must be configured separately in Harness. Enable SAML authorization (not just authentication) to sync group memberships from your IdP, then link Harness user groups to SAML SSO provider groups. If SAML authorization is not enabled, manually assign users to user groups.
User loses group access after logging in via SAML
SAML-linked user groups synchronize on every login. If group assignments changed in the IdP or the user was removed from the SAML application group claims, those changes sync to Harness on next login. Verify the user group assignments in your identity provider.
What should I put in JIT Validation Key and JIT Validation Value fields?
These fields are optional. Leave them blank if you want all users assigned to the Harness SAML application in your IdP to be provisioned. Specify a Key (SAML attribute name) and Value if you want to selectively provision users based on a specific attribute in the SAML assertion. Only users whose SAML assertion contains the matching key-value pair will be provisioned.
Does JIT provisioning send confirmation emails to new users?
No, JIT provisioning does not send emails for confirmation or password creation. The user account is created automatically without requiring an invitation or email confirmation.
Can Harness automatically map permissions from my identity provider to Harness roles?
No, Harness does not support automatic permission mapping or inheritance from external systems. User permissions must be explicitly configured within Harness. While JIT provisioning creates user accounts automatically, their permissions and role assignments must be configured separately through SAML authorization and user group linking.
***
### Related articles
* [SAML SSO with Okta](/harness-ai/use-harness-platform/authentication/single-sign-on-saml/okta) - Configure Okta as a SAML SSO provider with JIT provisioning.
* [SAML SSO with Microsoft Entra ID](/harness-ai/use-harness-platform/authentication/single-sign-on-saml/microsoft-entra-id) - Configure Microsoft Entra ID as a SAML SSO provider with JIT provisioning.
* [SAML SSO with OneLogin](/harness-ai/use-harness-platform/authentication/single-sign-on-saml/onelogin) - Configure OneLogin as a SAML SSO provider with JIT provisioning.
* [SAML SSO with Keycloak](/harness-ai/use-harness-platform/authentication/single-sign-on-saml/keycloak) - Configure Keycloak as a SAML SSO provider with JIT provisioning.
* [RBAC in Harness](/harness-platform/3.0/harness-platform-resources/platform-access-control/rbac-in-harness) - Understand roles, permissions, and user group management.
* [Manage user groups](/harness-ai/use-harness-platform/platform-access-control/add-user-groups) - Create and manage user groups for role-based access control.
{% @harness-feedback/feedback module="harness-ai" pagePath="harness-ai/use-harness-platform/platform-access-control/just-in-time-user-provisioning" %}
# Permissions reference
Permissions reference for Harness RBAC.
This topic describes permissions relevant to [RBAC in Harness](/harness-ai/use-harness-platform/platform-access-control). For API permissions, go to the [API permissions reference](/harness-ai/use-harness-platform/automation/api/api-permissions-reference).
{% hint style="info" %}
**Types of permission**
| Status | Description |
| ---------------- | ------------------------------------------------------------------------------------------------------------------------ |
| **EXPERIMENTAL** | Available for role assignment but RBAC will not be enforced, that is the access checks always return true. |
| **ACTIVE** | Available for role assignment with RBAC enforced. |
| **DEPRECATED** | Available for role assignment with RBAC enforced but the permission will be moved to the INACTIVE state after some time. |
This reference lists permissions that are available for role assignment. The **Status** column shows a resource's primary status; when an individual permission has a different status, it is annotated inline after its identifier (for example, `gitops_application_exec`, Experimental).
{% endhint %}
### Administrative Functions
| Resource | Permissions | Status |
| -------------------------- | ----------------------------------------------------------------------------------------------------------------------------------------------------------------------------------------------------------------------------------------------------------------------------------------------------------------------------------------------------------------------------------------------------------------------------------------------------------------------------------------------------------------------------------------------------------------------------------------------------------------------------------------------------------- | ------ |
| Access Policies |
| Active |
#### Load Testing
| Resource | Permissions | Status |
| --------- | ------------------------------------------------------------------------------------------------------------------------------------------------------------------------- | ------ |
| Load Test |
View (load\_loadtest\_view)
Create / Edit (load\_loadtest\_edit)
Delete (load\_loadtest\_delete)
| Active |
{% @harness-feedback/feedback module="harness-ai" pagePath="harness-ai/use-harness-platform/platform-access-control/permissions-reference" %}
# Resource type reference
Resource type reference for Harness RBAC.
This topic lists resource types relevant to [RBAC in Harness](/harness-ai/use-harness-platform/platform-access-control). Each resource type has an identifier used in APIs and YAML, and a permission key used to construct permission strings such as `core_pipeline_view`.
***
### Resource types
Resource types are grouped by the Harness module or platform area that owns them. Platform resource types are available to every module, and module resource types require a license for that module.
#### Harness Platform
These resource types apply across Harness and are not specific to a single module.
| Identifier | Permission key |
| ----------------------------------- | ------------------------------ |
| `ACCOUNT` | account |
| `ORGANIZATION` | organization |
| `PROJECT` | project |
| `CONNECTOR` | connector |
| `DELEGATE` | delegate |
| `DELEGATECONFIGURATION` | delegateconfiguration |
| `SECRET` | secret |
| `AUDIT` | audit |
| `DASHBOARDS` | dashboards |
| `TEMPLATE` | template |
| `TICKET` | ticket |
| `FILE` | file |
| `VARIABLE` | variable |
| `SMTP` | smtp |
| `SETTING` | setting |
| `STREAMING_DESTINATION` | streamingDestination |
| `MODULE` | module |
| `GITX_WEBHOOKS` | gitxWebhooks |
| `CERTIFICATE` | certificate |
| `PROVIDER` | provider |
| `RELEASES` | releases |
| `INPUT_SET` | inputset |
| `BANNER` | banner |
| `OIDC_ID_TOKEN` | oidcIdToken |
| `DATA_SINK` | dataSink |
| `AI_RULES` | rules |
| `BRANDING` | branding |
| `LLM_GATEWAY` | llmgateway |
| `USER` | user |
| `SERVICEACCOUNT` | serviceaccount |
| `USERGROUP` | usergroup |
| `ROLE` | role |
| `RESOURCEGROUP` | resourcegroup |
| `LICENSE` | license |
| `AUTHSETTING` | authsetting |
| `ACCESS_POLICIES` | accessPolicies |
| `NOTIFICATION` | notification |
| `NOTIFICATION_CHANNEL` | notificationchannel |
| `NOTIFICATION_RULE` | notificationrule |
| `DEFAULT_NOTIFICATION_TEMPLATE_SET` | defaultNotificationTemplateSet |
| `GOVERNANCEPOLICY` | governancePolicy |
| `GOVERNANCEPOLICYSETS` | governancePolicySets |
| `NETWORK_MAP` | networkmap |
#### Continuous Delivery and GitOps
These resource types apply to pipelines, deployments, and GitOps.
| Identifier | Permission key |
| ----------------------- | ---------------- |
| `PIPELINE` | pipeline |
| `SERVICE` | service |
| `ENVIRONMENT` | environment |
| `ENVIRONMENT_GROUP` | environmentgroup |
| `GITOPS_AGENT` | agent |
| `GITOPS_APP` | application |
| `GITOPS_REPOSITORY` | repository |
| `GITOPS_CLUSTER` | cluster |
| `GITOPS_GPGKEY` | gpgkey |
| `GITOPS_CERT` | cert |
| `GITOPS_APPLICATIONSET` | applicationset |
| `DEPLOYMENTFREEZE` | deploymentfreeze |
#### Code Repository
These resource types apply to Harness Code Repository.
| Identifier | Permission key |
| ----------------- | -------------- |
| `CODE_REPOSITORY` | repo |
#### Artifact Registry
These resource types apply to Harness Artifact Registry.
| Identifier | Permission key |
| ------------------------------ | ------------------ |
| `ARTIFACT_REGISTRY` | artregistry |
| `ARTIFACT_FIREWALL_EXCEPTIONS` | firewallexceptions |
| `HAR_REGISTRY` | harregistry |
#### Security Testing Orchestration
These resource types apply to Harness STO.
| Identifier | Permission key |
| ---------------- | -------------- |
| `STO_TESTTARGET` | testtarget |
| `STO_EXEMPTION` | exemption |
| `STO_ISSUE` | issue |
| `STO_SCAN` | scan |
| `STO_OVERRIDE` | override |
#### Supply Chain Security
These resource types apply to Harness SCS.
| Identifier | Permission key |
| ---------------------------- | -------------------- |
| `SSCA_REMEDIATION_TRACKER` | remediationtracker |
| `SSCA_ENFORCEMENT_EXEMPTION` | enforcementexemption |
#### Feature Flags
These resource types apply to the Harness Feature Flags module.
| Identifier | Permission key |
| ---------------- | -------------- |
| `FEATUREFLAG` | featureflag |
| `FF_PROXYAPIKEY` | proxyapikey |
| `TARGET` | target |
| `TARGETGROUP` | targetgroup |
#### Feature Management and Experimentation
These resource types apply to Harness FME.
| Identifier | Permission key |
| ------------------- | --------------- |
| `FME_ENVIRONMENT` | fmeenvironment |
| `FME_TRAFFIC_TYPE` | fmetraffictype |
| `FME_FEATURE_FLAG` | fmefeatureflag |
| `FME_SEGMENT` | fmesegment |
| `FME_LARGE_SEGMENT` | fmelargesegment |
| `FME_METRIC` | fmemetric |
| `FME_EXPERIMENT` | fmeexperiment |
| `FME_CONFIG` | fmeconfig |
| `FME_AICONFIG` | fmeaiconfig |
#### Cloud & AI Cost Management
These resource types apply to Harness CACM, including AutoStopping and Cloud Asset Governance.
| Identifier | Permission key |
| --------------------------------------------- | ------------------------------- |
| `CCM_OVERVIEW` | overview |
| `CCM_PERSPECTIVE` | perspective |
| `CCM_FOLDER` | folder |
| `CCM_BUDGET` | budget |
| `CCM_COSTCATEGORY` | costCategory |
| `CCM_UNIT_COST` | unitCost |
| `CCM_AUTOSTOPPINGRULE` | autoStoppingRule |
| `CCM_LOADBALANCER` | loadBalancer |
| `CCM_CURRENCYPREFERENCE` | currencyPreference |
| `CCM_CLOUD_ASSET_GOVERNANCE_RULE` | cloudAssetGovernanceRule |
| `CCM_CLOUD_ASSET_GOVERNANCE_RULE_SET` | cloudAssetGovernanceRuleSet |
| `CCM_CLOUD_ASSET_GOVERNANCE_RULE_ENFORCEMENT` | cloudAssetGovernanceEnforcement |
| `CCM_CLOUD_ASSET_GOVERNANCE_OVERVIEW` | cloudAssetGovernanceOverview |
| `CCM_CLOUD_ASSET_GOVERNANCE_ALERT` | cloudAssetGovernanceAlert |
| `CCM_DATA_SCOPE` | dataScope |
| `CCM_CLUSTER_ORCHESTRATOR` | clusterOrchestrator |
| `CCM_ANOMALIES` | anomalies |
| `CCM_RECOMMENDATIONS` | recommendations |
| `CCM_COMMITMENT_ORCHESTRATOR` | commitmentOrchestrator |
| `CCM_ANOMALIES_WHITELIST_RULE` | anomaliesWhitelistRule |
#### Service Reliability Management
These resource types apply to Harness SRM.
| Identifier | Permission key |
| ------------------ | ---------------- |
| `MONITOREDSERVICE` | monitoredservice |
| `SLO` | slo |
| `DOWNTIME` | downtime |
| `MONITORING_AGENT` | monitoringagent |
| `METRIC_SOURCE` | metricsource |
#### Incident Response
These resource types apply to Harness Incident Response.
| Identifier | Permission key |
| ------------------------------ | ---------------------- |
| `IRO_MANAGER` | iromanager |
| `IRO_ALERT` | alert |
| `IRO_ALERT_RULE` | alertrule |
| `IRO_INCIDENT` | incident |
| `IRO_CONNECT_WORKSPACE` | iroworkspace |
| `IRO_RUNBOOK` | runbook |
| `IRO_SERVICE_DIRECTORY` | servicedirectory |
| `IRO_THIRD_PARTY_INTEGRATIONS` | thirdpartyintegrations |
| `IRO_ESCALATION_POLICY` | iroescalationpolicy |
| `IRO_SCHEDULE` | iroschedule |
| `IRO_SCHEDULE_OVERRIDE` | iroscheduleoverride |
#### Resilience Testing
These resource types apply to Harness Resilience Testing.
| Identifier | Permission key |
| --------------------------- | ----------------------- |
| `CHAOS_HUB` | chaoshub |
| `CHAOS_INFRASTRUCTURE` | chaosinfrastructure |
| `CHAOS_EXPERIMENT` | chaosexperiment |
| `CHAOS_GAMEDAY` | chaosgameday |
| `CHAOS_PROBE` | chaosprobe |
| `CHAOS_FAULT` | chaosfault |
| `CHAOS_ACTION` | chaosaction |
| `CHAOS_IMAGE_REGISTRY` | chaosimageregistry |
| `CHAOS_SECURITY_GOVERNANCE` | chaossecuritygovernance |
#### Continuous Error Tracking
These resource types apply to Harness CET.
| Identifier | Permission key |
| -------------------- | -------------- |
| `CET_AGENT` | agents |
| `CET_TOKEN` | token |
| `CET_CRITICAL_EVENT` | criticalevent |
#### Internal Developer Portal
These resource types apply to Harness IDP.
| Identifier | Permission key |
| ---------------------------- | --------------------- |
| `IDP_CATALOG` | catalog |
| `IDP_ENVIRONMENT` | idpenvironment |
| `IDP_ENVIRONMENT_BLUEPRINT` | environmentblueprint |
| `IDP_WORKFLOW` | workflow |
| `IDP_PLUGIN` | plugin |
| `IDP_SCORECARD` | scorecard |
| `IDP_LAYOUT` | layout |
| `IDP_CATALOG_ACCESS_POLICY` | catalogaccesspolicy |
| `IDP_INTEGRATION` | integration |
| `IDP_ADVANCED_CONFIGURATION` | advancedconfiguration |
| `IDP_AGGREGATION_RULE` | aggregationrule |
#### Infrastructure as Code Management
These resource types apply to Harness IaCM.
| Identifier | Permission key |
| ----------------------- | ---------------- |
| `IAC_WORKSPACE` | workspace |
| `IAC_REGISTRY` | registry |
| `IAC_PROVIDER_REGISTRY` | providerregistry |
| `IAC_VARIABLE_SET` | variableset |
#### AI DLC Insights and Software Engineering Insights
Every resource type in this group uses the `SEI_` identifier prefix and the `sei` permission key prefix, because AI DLC Insights (AIDI) evolved from Software Engineering Insights (SEI). The prefix does not tell you which capability a resource type belongs to, so the following tables separate them.
Note that an identifier does not always match the label you see in the product. For example, `SEI_CANVAS` controls Studio.
**AI DLC Insights**
These resource types apply to Harness AIDI. Go to [Harness RBAC for AI DLC Insights](/ai-dlc-insights/new-to-ai-dlc-insights/get-started/rbac) to review the scopes and out-of-the-box roles that use them.
| Identifier | Permission key | Product label |
| ----------------------- | ------------------- | -------------------------------- |
| `SEI_CANVAS` | seicanvas | Studio |
| `SEI_INSIGHTS_CATEGORY` | seiinsightscategory | Insights Categories |
| `SEI_TEAMS` | seiteams | Teams |
| `SEI_DATA_SETTINGS` | seidatasettings | Data Settings |
| `SEI_DEVELOPERS` | seidevelopers | Data Settings, developer records |
| `SEI_INTEGRATIONS` | seiintegrations | Data Settings, integrations |
| `SEI_PROFILES` | seiprofiles | Profiles |
**Software Engineering Insights**
These resource types apply to Harness SEI 1.0. Go to [SEI roles and permissions](/software-engineering-insights/use-software-engineering-insights/setup-sei/access-control/sei-roles-and-permissions) to review the roles that use them.
| Identifier | Permission key | Product label |
| ---------------------------- | ------------------------ | ---------------------- |
| `SEI_COLLECTIONS` | seicollections | Collections |
| `SEI_INSIGHTS` | seiinsights | Insights |
| `SEI_CONFIGURATION_SETTINGS` | seiconfigurationsettings | Configuration Settings |
The `SEI_PANORAMA` (seipanorama) and `SEI_GOALS` (seigoals) resource types also exist in this namespace.
#### Database DevOps
These resource types apply to Harness Database DevOps.
| Identifier | Permission key |
| ------------- | -------------- |
| `DB_SCHEMA` | schema |
| `DB_INSTANCE` | instance |
#### Cloud Development Environments
These resource types apply to Harness CDE Gitspaces.
| Identifier | Permission key |
| ------------------- | -------------- |
| `CDE_GITSPACE` | gitspace |
| `CDE_INFRAPROVIDER` | infraprovider |
{% @harness-feedback/feedback module="harness-ai" pagePath="harness-ai/use-harness-platform/platform-access-control/resource-type-reference" %}
# Manage pipeline access with tag-based RBAC
Control pipeline permissions using tags to simplify access management at scale.
Tags are metadata that take the form of `key-value` pairs or `key-only` flags. For example:
* **type: prod** - Identifies production pipelines.
* **security: high\_severity** - Marks pipelines with high security criticality.
* **dev\_only** - A key with no value that acts as a flag for development-only pipelines.
You can attach these tags to Harness entities, such as pipelines, services, environments, repositories, etc. They allow you to organize, search, and filter Harness entities. You can add multiple tags to an entity, creating a list of tags.
Tag-based RBAC allows you to control pipeline access using tags instead of manually selecting individual pipelines in resource groups. This approach simplifies permission management when you have multiple pipelines and need to grant consistent access based on environment, criticality, or other criteria.
{% hint style="info" %}
**NOTE**
Currently, this feature is behind the feature flag `PIE_TAG_BASED_ACCESS_TO_PIPELINES`. Contact [Harness Support](mailto:support@harness.io) to enable it.
{% endhint %}
### What you will learn in this topic
By the end of this topic, you will be able to:
* [Apply tags to pipelines](#step-1-apply-tags-to-pipelines) to categorize them by environment, criticality, or other attributes.
* [Create resource groups that grant access to pipelines based on tags](#step-2-configure-the-resource-group-to-use-tag-based-access) rather than explicit pipeline selection.
* [Automatically include new pipelines in resource groups](#step-4-assign-the-resource-group-to-a-user-group) by applying the appropriate tags.
* [Understand tag behavior with Git-stored pipelines](#tag-behavior-with-git-stored-pipelines) and how it impacts resource group membership.
***
### Before you begin
Before you use tags with pipelines, ensure you have the following:
* **Understanding of tags**: Familiarity with how tags work as metadata for organizing Harness entities. Go to [Tags with Pipeline](/harness-ai/use-harness-platform/tags/overview#create-tags-for-pipelines) to learn the basics.
* **Resource group configuration**: Knowledge of how to configure resource groups in Harness. Go to [Manage resource groups](/harness-platform/3.0/harness-platform-resources/platform-access-control/add-resource-groups) to configure resource groups.
* **User group management**: Understanding of creating and managing user groups in Harness. Go to [Manage user groups](/harness-ai/use-harness-platform/platform-access-control/add-user-groups) to create user groups.
***
### Manage environment-based entity access
Take the example of pipelines to understand how tags are used for environment-based access. Suppose you manage three pipelines for different environments: `Dev`, `QA`, and `Production`. You want specific users in each environment to have appropriate access. For example, you want **developers** to have access to all `Dev` and `QA` pipelines, and **DevOps admins** to have `Pipeline Execute` and `Edit` permissions to `Production` pipelines.
Instead of manually adding each pipeline to a resource group and assigning permissions to users individually, you can use a **type: dev\_only** tag to grant **developers** access to all `Dev` and `QA` pipelines.
To access a subset of `Dev` pipelines, you can select specified pipelines or use **By Tag**. If you have multiple pipelines, you can avoid searching through a list of pipelines and select them individually by leveraging **By Tag** option. In addition, when you add new `Dev` pipelines in Harness, you would not have to manually include each new pipeline in the resource group. You can apply the tag to your pipeline, and relevant users will automatically have access to the newly added `Dev` pipelines.
#### Step 1: Apply tags to pipelines
Based on the example in the [previous section](#manage-environment-based-entity-access), tag your [pipelines](/continuous-delivery/new-to-continuous-delivery/getting-started#step-1-create-your-pipeline) that deploy to the `Dev` environment with the tag **type: dev\_only**. Go to [Tags reference](/harness-ai/use-harness-platform/tags/overview#create-tags-for-pipelines) to add tags to pipelines.
#### Step 2: Configure the resource group to use tag-based access
After you select the resources for which you want to provide user access such as **Pipelines**, **Services**, **Environments**, select the **By Tag** option.
Click to view full size image
#### Step 3: Select the tag in the resource group
Provide the tag of the pipelines you want users to have access to. In this case, use the tag **type: dev\_only**.
Click to view full size image
#### Step 4: Assign the resource group to a user group
You can grant users the required access by adding users to a user group and assigning permissions to the resource group. For example, you can create a user group for developers that has `Pipeline Execute` access to this resource group. This ensures that all users in this group have access to pipelines tagged with **type: dev\_only**.
Click to view full size image
***
### Remove tags
If you want to remove a pipeline from the resource group, remove the tag from the pipeline. Go to [remove tags from pipeline](/harness-ai/use-harness-platform/tags/overview#remove-tags-from-pipelines) for detailed steps. The pipeline is automatically removed from the resource group without requiring you to edit the resource group.
***
### Tag behavior with Git-stored pipelines
When you work with tag-based resource groups, Harness uses the tag found in the Harness metadata for the pipeline.
When pipelines are stored in Git, tags behave in the following manner:
* **Different branches may have different tags**: Different versions of the pipeline stored in different branches may have different tags.
* **Direct Git updates do not sync tags**: Updating the tag in the pipeline directly in Git does not update it in Harness. You must save the pipeline through the Harness UI to sync the tags.
* **Saving a branch updates Harness tags**: When you save a different branch of the pipeline in the Harness UI, Harness updates the tags in the system to match the tags from that specific branch.
* **Pipeline editors control resource group membership**: The editor of the pipeline can add or remove it from the resource group by editing the tags. The editor does not need to edit the resource group directly or have access to it.
* **Expression tags are not resolved at rest**: Using expressions as tags means they are resolved only during runtime. Neither the pipeline executions nor the pipeline with expression tags will be added to the resource group.
This behavior can impact tag-based resource groups. Specifically, a pipeline may enter or exit a group based on the last saved branch from the UI.
***
### Related articles
* [Manage resource groups](/harness-platform/3.0/harness-platform-resources/platform-access-control/add-resource-groups): Understand how to create and configure resource groups.
* [Manage user groups](/harness-ai/use-harness-platform/platform-access-control/add-user-groups): Learn how to create and manage user groups in Harness.
{% @harness-feedback/feedback module="harness-ai" pagePath="harness-ai/use-harness-platform/platform-access-control/tag-based-rbac-for-pipelines" %}
# Delegates
{% content-ref url="/pages/tZCYmFmmnmK3aiGkUH5w" %}
[Delegate](/harness-ai/use-harness-platform/delegates/delegate)
{% endcontent-ref %}
{% content-ref url="/pages/ioeQA6i5k4Wnu8CCA3ky" %}
[Delegate 3.x (Closed Beta)](/harness-ai/use-harness-platform/delegates/delegate-3x-closed-beta)
{% endcontent-ref %}
{% @harness-feedback/feedback module="harness-ai" pagePath="harness-ai/use-harness-platform/delegates" %}
# Delegate
{% content-ref url="/pages/g4dFz3qLTSGEjoD5m3Pc" %}
[Delegate Concepts](/harness-ai/use-harness-platform/delegates/delegate/delegate-concepts)
{% endcontent-ref %}
{% content-ref url="/pages/C81AYGde6wCPoGBFr0Vz" %}
[Install Delegates](/harness-ai/use-harness-platform/delegates/delegate/install-delegates)
{% endcontent-ref %}
{% content-ref url="/pages/bPffkFcLrlDiq0nOwrfR" %}
[Manage delegates](/harness-ai/use-harness-platform/delegates/delegate/manage-delegates)
{% endcontent-ref %}
{% content-ref url="/pages/jUSiRpDRBLrPO52mP0HM" %}
[Secure Delegates](/harness-ai/use-harness-platform/delegates/delegate/secure-delegates)
{% endcontent-ref %}
{% content-ref url="/pages/b4hApTpDuJpPGlneqsTv" %}
[Delegate Reference](/harness-ai/use-harness-platform/delegates/delegate/delegate-reference)
{% endcontent-ref %}
{% content-ref url="/pages/xGO6cES9C5sGhzx4upEw" %}
[Troubleshooting](/harness-ai/use-harness-platform/delegates/delegate/troubleshooting)
{% endcontent-ref %}
{% @harness-feedback/feedback module="harness-ai" pagePath="harness-ai/use-harness-platform/delegates/delegate" %}
# Delegate Concepts
{% content-ref url="/pages/GB4hhrSnvBaw67nBA2eu" %}
[Overview](/harness-ai/use-harness-platform/delegates/delegate/delegate-concepts/delegate-overview)
{% endcontent-ref %}
{% content-ref url="/pages/gEVAVWJVWvc1KUatEp5v" %}
[System Requirements](/harness-ai/use-harness-platform/delegates/delegate/delegate-concepts/delegate-requirements)
{% endcontent-ref %}
{% content-ref url="/pages/2gVyDA70feeD3aHtoWcS" %}
[Image Types](/harness-ai/use-harness-platform/delegates/delegate/delegate-concepts/delegate-image-types)
{% endcontent-ref %}
{% content-ref url="/pages/5z0CLjewsm4JrxJHWbVV" %}
[Registration and Verification](/harness-ai/use-harness-platform/delegates/delegate/delegate-concepts/delegate-registration)
{% endcontent-ref %}
{% content-ref url="/pages/irQTdSMcdr1ij1ACpnvb" %}
[Graceful Delegate Shutdown](/harness-ai/use-harness-platform/delegates/delegate/delegate-concepts/graceful-delegate-shutdown-process)
{% endcontent-ref %}
{% @harness-feedback/feedback module="harness-ai" pagePath="harness-ai/use-harness-platform/delegates/delegate/delegate-concepts" %}
# Overview
Learn about Delegate, a service you run in your local network or VPC to connect your artifact, infrastructure, collaboration, verification, and other providers with Harness Manager.
Harness Delegate is a service you run in your local network or VPC to connect your artifacts, infrastructure, collaboration, verification, and other providers with Harness Manager. The first time you connect Harness to a third-party resource, Harness Delegate is installed in your target infrastructure, for example, a Kubernetes cluster. After the delegate is installed, you connect to third-party resources. The delegate performs all operations, including deployment and integration.
#### System requirements
Go to [Delegate system requirements](/harness-ai/use-harness-platform/delegates/delegate/delegate-concepts/delegate-requirements).
#### Communication with Harness Manager
Harness Delegate connects to Harness Manager over an outbound HTTPS/WSS connection.
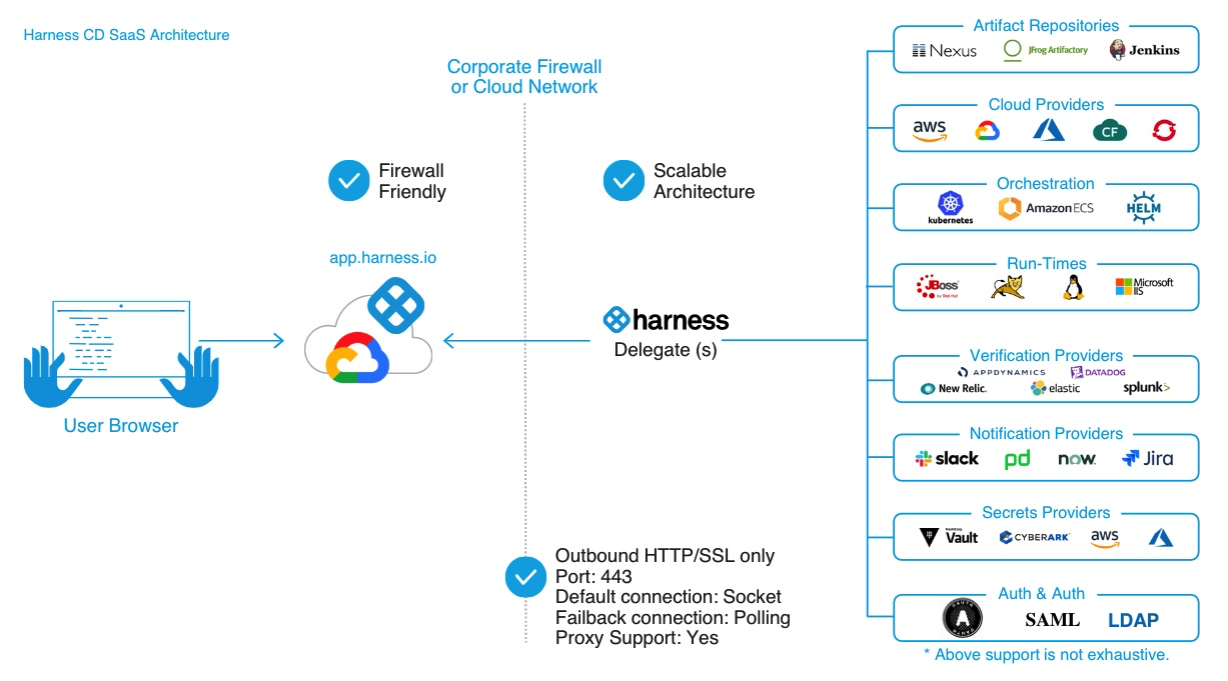
The delegate connects to Harness Manager (via SaaS) over a Secure WebSockets channel (WebSockets over TLS). The channel is used to send notifications of delegate task events and to exchange connection heartbeats. The channel is not used to send task data itself.
{% hint style="info" %}
By default, the Harness Delegate makes outbound calls to the Harness platform (app.harness.io) and Google's Stackdriver Logging API. When you configure a Harness Connector with providers such as artifact servers, deployment environments, and cloud providers, the Harness Delegate will also make outbound calls to these external providers.
Harness recommends installing the delegate behind your firewall. The delegate must have network access to the artifact servers, deployment environments, and cloud providers it needs to interact with.
If you want to prevent the delegate from sending its logs to the Harness platform, or if your firewall blocks access to Google's Stackdriver Logging API, you should set the `STACK_DRIVER_LOGGING_ENABLED` environment variable to `false` for the delegate. This will disable all remote logging and prevent connectivity issues.
{% endhint %}
Delegate communication includes the following functions:
* **Heartbeat:** The delegate sends a [heartbeat](https://en.wikipedia.org/wiki/Heartbeat_\(computing\)) to notify Harness Manager that it is running.
* **Deployment data:** The delegate sends information retrieved from API calls to Harness Manager for display on the **Deployments** page.
* **Time series and log data for Continuous Verification:** The delegate connects to the verification providers you configure and sends the data retrieved from those providers to Harness Manager for display in Harness Continuous Verification.
#### Where to install?
* **Evaluating Harness:** When evaluating Harness, you might want to install the delegate locally. Ensure that it has access to the artifact sources, deployment environments, and verification providers you want to use with Harness.
* **Development, QA, and Production:** The delegate should be installed behind your firewall and in the same VPC as the micro-services you are deploying. The delegate must have access to the artifact servers, deployment environments, and cloud providers it needs.
#### Delegate images
Harness Delegate does not have a root image. There are two non-root images that use similar tags. For example:
* `harness/delegate:yy.mm.verno`: Includes client tools like `kubectl`, Helm, and ChartMuseum.
* `harness/delegate:yy.mm.verno.minimal`: Does not include client tools. If you want to add tools to the image, Harness recommends that you create a custom image.
#### Install a delegate
The video below shows how to install a delegate.
{% embed url="" %}
For basic information on installing Harness Delegate, go to the following:
* [Delegate installation overview](/harness-ai/use-harness-platform/delegates/delegate/install-delegates/overview)
For advanced installation topics, go to the following:
* [Automate delegate installation](/harness-ai/use-harness-platform/delegates/delegate/install-delegates/automate-delegate-installation)
* [Install a delegate with third-party custom tool binaries](/harness-ai/use-harness-platform/delegates/delegate/install-delegates/install-a-delegate-with-3-rd-party-tool-custom-binaries)
#### Delegate sizes
{% hint style="danger" %}
**DELEGATE RESOURCES**
Memory and CPU requirements are for the delegate only. Your delegate host/pod/container requires additional computing resources for its operating system and other services, such as Docker or Kubernetes.
The resource requirements for the delegate container depend on the type of tasks or executions. For instance, CI-only delegates can handle hundreds of parallel pipelines. However, for CD Terraform tasks, a single task might require a 2Gi container due to Terraform's memory requirements. Each Terraform command needs at least 500MB of memory.
{% endhint %}
One delegate size does not fit all use cases, so Harness lets you pick from several options:
| Replicas | Required memory / CPU | Maximum parallel deployments and builds across replicas |
| :------: | :-------------------: | :-----------------------------------------------------: |
| 1 | 2 GB / 0.5 CPU | 10 |
| 2 | 4 GB / 1 CPU | 20 |
| 4 | 8 GB / 2 CPU | 40 |
| 8 | 16 GB / 4 CPU | 80 |
Remember that the memory and CPU requirements are for the delegate only. Your delegate host/pod/container will need more computing resources for its operations systems and other services, such as Docker or Kubernetes.
Harness recommends adhering to the below guidelines when using the delegate with Harness Cloud Cost Management (CCM).
**Baseline Configuration:** For clusters with up to 200 nodes and 4000 pods, each delegate should be configured with 2 vCPUs and 8 GB of memory.
**Incremental Scaling:** For every additional 50 nodes and 1000 pods, the delegate capacity should be increased by 0.5 vCPUs and 2 GB of memory. This scaling ensures that the delegate can handle the increased load and continue to collect metrics efficiently.
**Single replica requirement:**
All specified resource requirements pertain to a single replica of the delegate. Instead of utilizing Horizontal Pod Autoscaler (HPA) to increase the number of smaller-sized replicas Harness recommends provisioning each delegate with the necessary resources to handle the specified number of nodes and pods.
#### Delegates list page
You can view a list of your delegates at the account, project, and org level.
* In Harness, select an account, a project, or an organization, then select **Settings**. Under **Resources**, select **Delegates**. The Delegates list page opens.
Here's an Account Resources example:

The Delegates list page displays the following information:
* **Delegate:** The delegate name.
* **Connectivity Status:** The current connectivity status of the delegate. When Harness Manager receives the heartbeat, the **Connectivity Status** is **Connected**. If Harness Manager is not receiving a heartbeat from the installed delegate, the **Connectivity Status** is **Not Connected**.
* **Tags:** A delegate tag with the same name as your delegate is automatically added to your delegate during the configuration process. You can add additional tags. For more information, go to [Delegate tags](/harness-ai/use-harness-platform/delegates/delegate/manage-delegates/select-delegates-with-selectors#delegate-tags).
* **Version:** The delegate version. For delegates with an immutable image type, the version number format is *`yy.mm.verno`*, the release year, month, and version in dot-separated format. For more information, go to [Delegate image types](/harness-ai/use-harness-platform/delegates/delegate/delegate-concepts/delegate-image-types).
* **Instance Status:** Displays when your delegate expires. For more information, go to [Determine when your delegate expires](/harness-ai/use-harness-platform/delegates/delegate/install-delegates/delegate-upgrades-and-expiration#determine-when-your-delegate-expires).
* **Last Heartbeat:** Displays the time (in seconds) since Harness Manager received the last delegate heartbeat.
* **Auto Upgrade:** The auto upgrade status of the delegate. When the delegate is first installed, the Delegates list page displays an **Auto Upgrade** status of **SYNCHRONIZING**. For more information, go to [Determine if automatic upgrade is enabled](/harness-ai/use-harness-platform/delegates/delegate/install-delegates/delegate-upgrades-and-expiration#determine-if-automatic-upgrade-is-enabled).
#### How Harness Manager picks delegates
Harness uses delegates for all operations. For example:
* **Connectors:** Connectors are used for all third-party connections.
* **Pipeline Services and Infrastructure:** Connectors are used in Pipeline Service connections to repos and Pipeline Infrastructure connections to target environments (deployment targets, build farms, etc).
* **Pipeline Steps:** You can select a delegate in each pipeline step to ensure that the step only uses that delegate to perform its operation.
In the case of all these delegate uses, you can select one or more specific delegates to perform the operation (using delegate tags). If you do not specify specific delegates, Harness assigns the task to a delegate.
**Task assignment**
In cases where you select specific delegates to perform the task, Harness uses those delegates only. If the delegates cannot perform the task, Harness does not use another delegate.
In cases where you do not select specific delegates, Harness selects an available delegate to perform the task based on the following:
* **Heartbeats:** Running delegates send heartbeats to the Harness Manager in one minute intervals. If the Manager does not have a heartbeat for a delegate when a task is ready to be assigned, it does not assign the task to that delegate.
* **Tags:** For more information, go to [Delegate tags](/harness-ai/use-harness-platform/delegates/delegate/manage-delegates/select-delegates-with-selectors#delegate-tags).
* **Capability:** The delegate checks connectivity to your external systems to determine whether it can carry out the task. This process allows other delegates to assist in case access issues are found.
**Delegate selection in pipelines**
Delegates are selected in **Service** and **Infrastructure** connectors and in steps.
For example, in the **Infrastructure** section of a stage, there is a **Connector** setting. For Harness CD, this is the connector to the target infrastructure. For Harness CI, this is the connector to the build farm.

When you add connectors to Harness, you can select several or all delegates for the connector to use.
Each CD step in the stage execution has a **Delegate Selector** setting.

Here you use delegate tags to select the delegate(s) to use.
**Which delegate is used during pipeline execution?**
The delegates assigned to connectors and steps are used during pipeline execution.
If no delegates are selected, then the delegates are selected as described in [Task assignment](#task-assignment).
If no delegates are selected for a CD step in its **Delegate Selector** setting, Harness prioritizes the delegate used successfully for the infrastructure connector.
Harness will try this delegate first for the step task because this delegate has been successful in the target environment.
Delegate selectors do not override service infrastructure connectors. Delegate selectors only determine the delegate that executes the operations of your pipeline.
Most CI steps use connectors to pull the image of the container where the step will run. The delegates used for the step's connector are not necessarily used for running the step. In general, the delegate(s) used for the connector in the **Infrastructure** build farm is used to run the step.
#### Delegate high availability (HA)
You might need to install multiple delegates depending on how many Continuous Delivery tasks you do concurrently, and on the compute resources you are providing to each delegate. Typically, you will need one delegate for every 300-500 service instances across your applications.
In addition to compute considerations, you can enable HA for Harness Delegates. HA involves installing multiple delegates in your environment.
For example, your Kubernetes deployment could include two Kubernetes delegates, each running in its own pod in the same target cluster.
To add delegates to your deployment, increase the desired count of delegate replica pods in the **spec** section of the `harness-kubernetes.yaml` file that you download from Harness:
```yaml
---
apiVersion: apps/v1beta1
kind: Deployment
metadata:
labels:
harness.io/app: harness-delegate
harness.io/account: xxxx
harness.io/name: test
name: test-zeaakf
namespace: harness-delegate
spec:
replicas: 2
selector:
matchLabels:
harness.io/app: harness-delegate
```
You only need one Kubernetes delegate in a cluster. Do not install additional delegates to create HA. Instead, you should increase the number of replicas pods.
If you want to install Kubernetes delegates in separate clusters, make sure they do not use the same `harness-kubernetes.yaml` file and name. Download a new Kubernetes YAML `spec` from Harness for each delegate you want to install. This avoids name conflicts.
In every case, delegates must be identical in terms of permissions, keys, connectivity, and so on. With two or more delegates running in the same target environment, you get HA by default. One delegate can go down without impacting Harness' ability to perform deployments. If you want more availability, you can set up three delegates to handle the loss of two delegates, and so on.
Two delegates in different locations with different connectivity do not support HA. For example, if you have a delegate in a Dev environment and another in a Prod environment, there is no communication between the two delegates. If either delegate fails, Harness stops operating in that environment.
#### Delegate scope
Delegates are scoped in the following way:
**Project/Org/Accounts**
You can add delegates at the Project, Org, and Account level. Delegate availability then becomes subject to Harness implicit Project, Org, and Account hierarchy.
For example, let's look at two users, Alex and Uri, and the delegates (D*n*) available to them:

Alex's Pipelines can use delegates D1, D2, or D4.
Uri's Pipelines can use delegates D1, D3, or D5.
#### Delegate tags
When Harness makes a connection via its delegates, it selects the best delegate according to [How Harness Manager picks delegates](#how-harness-manager-picks-delegates).
To ensure a specific delegate is used by a Harness entity, you can add tags to delegates and then reference the tags in commands and connectors.
For more information, go to [Use delegate selectors](/harness-ai/use-harness-platform/delegates/delegate/manage-delegates/select-delegates-with-selectors).
#### Delegate logs
The delegate creates a new log daily, named `delegate.log`, and its maximum size is 50MB.
The log file is saved with the day's date. If a log file exceeds 50MB in a day, it is renamed with today's date, and a new log file is created.
Harness keeps log files for today and the previous 10 days (up to one 1GB).
The delegate logs are available in the Harness UI. When a pipeline runs and an error occurs due to the delegate, the **View Delegate Tasks Logs** option becomes available.

Delegate logs are also sent to Harness by default. These Stackdriver logs are stored in Harness's GCP account.
{% hint style="warning" %}
**Not Recommended:** If you want to prevent the delegate from sending its logs to the Harness platform, or if your firewall blocks access to Google's Stackdriver Logging API, you should set the `STACK_DRIVER_LOGGING_ENABLED` environment variable to `false` for the delegate. This will disable all remote logging and prevent connectivity issues.
{% endhint %}
You can configure the delegate logging level by setting the `LOGGING_LEVEL` environment variable. Valid values are `TRACE`, `DEBUG`, `INFO`, `WARN`, `ERROR`, and `OFF`. If an invalid value is specified, the logging level defaults to `DEBUG`. If no value is specified, the logging level defaults to `INFO`.
You can also customize delegate logging if the default setup doesn't fit your needs. For example, you can customize the layout, verbosity, and destination of the messages. For more information, go to [Customize delegate logging](/harness-ai/use-harness-platform/delegates/delegate/manage-delegates/customize-delegate-logging).
#### Delegate permissions
You can set permissions on delegates using [Harness RBAC](/harness-ai/use-harness-platform/platform-access-control).
You create roles and then assign them to Harness users.
Delegate role permissions are Create/Edit, Delete, and View.
{% hint style="info" %}
**NOTE**
You cannot disable the delegate View permission. Every user has the permission to view the delegate.
{% endhint %}
Access to a delegate can also be restricted by downstream resource types:
* **Pipelines:** Execute
* **Secrets:** Access
* **Connectors:** Access
This means that if a role does not have these permissions, the user with that role cannot use the related delegates in these pipelines, secrets, or connectors.
#### Delegate task capacity
{% hint style="info" %}
This functionality is currently behind the feature flag `DELEGATE_TASK_CAPACITY_CHECK` and is available for Harness NextGen only. Contact [Harness Support](mailto:support@harness.io) to enable the feature. When the feature flag is enabled, the task is broadcast every minute in Harness Manager until it expires.
{% endhint %}
Harness enables you to configure a maximum number of tasks for each delegate. This allows Harness Manager to use the task capacity to determine whether to assign a task to the delegate or queue it.
Delegate task capacity is only supported for CD tasks executed as child processes of a delegate (for example, it does not work for CI builds or CD Container step tasks that spin up new pods).
You can configure the maximum number of tasks using the environment variable, `DELEGATE_TASK_CAPACITY`.
```yaml
env:
- name: DELEGATE_TASK_CAPACITY
value: "2"
```
For example, if you set `DELEGATE_TASK_CAPACITY` to a value of 2 and execute 6 tasks in parallel, Harness Manager only executes 2 tasks at a time. If you don't configure `DELEGATE_TASK_CAPACITY`, Harness Manager executes all 6 tasks in parallel.
For more information about available delegate environment variables, go to [Delegate environment variables](/harness-ai/use-harness-platform/delegates/delegate/delegate-reference/delegate-environment-variables).
#### Third-party tools installed with the delegate
For details about the SDKs and third-party tools installed with the delegate, go to [Third-party tools included in the delegate image type](/harness-ai/use-harness-platform/delegates/delegate/delegate-concepts/delegate-image-types#third-party-tools-included-in-the-delegate-image-type).
{% @harness-feedback/feedback module="harness-ai" pagePath="harness-ai/use-harness-platform/delegates/delegate/delegate-concepts/delegate-overview" %}
# Delegate system requirements
Review the system requirements for installing and running the Harness Delegate, including supported operating systems, hardware specifications, and network prerequisites.
This topic lists the requirements for Harness Delegate.
### Important notes
Note the following important information about delegates:
* Deployment limits are set by account type.
* You might need to install multiple delegates, depending on how many continuous delivery tasks you do concurrently, and on the number of compute resources you provide to each delegate. Typically, you need one delegate for every 300 to 500 service instances across your applications.
A service instance is created when you use Harness to deploy the underlying infrastructure for the instance.
For example, an instance of a Kubernetes workload where Harness creates the pods, or an instance of an ECS task where Harness creates the service for the task.
* The delegate is installed in your network and connects to the Harness Manager.
{% hint style="danger" %}
**DELEGATE RESOURCES**
Memory and CPU requirements are for the delegate only. Your delegate host/pod/container requires additional computing resources for its operating system and other services, such as Docker or Kubernetes.
The resource requirements for the delegate container depend on the type of tasks or executions. For instance, CI-only delegates can handle hundreds of parallel pipelines. However, for CD Terraform tasks, a single task might require a 2Gi container due to Terraform's memory requirements. Each Terraform command needs at least 500MB of memory.
{% endhint %}
The delegate runs in a Linux/UNIX container.
* The minimum memory for the delegate must be provided in addition to enough memory for the host/node system. For example, an AWS EC2 instance type such as m5a.xlarge has 16GB of RAM; 8 for the delegate and 8 for the remaining operations.
* The Shell Script delegate requires cURL 7.64.1 or later.
* Access to artifact servers, deployment environments, and cloud providers is required, as shown in the following illustration:

### Allowlist Harness domains and IPs
Harness SaaS delegates only need outbound access to the Harness domain name, most commonly, **app.harness.io**, and optionally, to **logging.googleapis.com**. The URL **logging.googleapis.com** is used to provide logs to Harness Support.
Go to [Allowlist Harness Domains and IPs](/harness-ai/use-harness-platform/references/allowlist-harness-domains-and-ips).
### Network requirements
The following network requirements are for connectivity between the Harness Delegate you run in your network and the **Harness Manager** (SaaS or on-prem), and for your browser connection to the Harness Manager.
{% hint style="info" %}
**NOTE**
All network connections from your local network to Harness SaaS are outbound-only.
{% endhint %}
* HTTPS port 443 outbound from the delegate to Harness.
* Delegate requirements: The delegate needs API/SSH/HTTP access to the providers you add to Harness, such as:
* Cloud Providers.
* Verification Providers.
* Artifact Servers (repos).
* Source repositories.
* Collaboration providers
* SSH access to target physical and virtual servers
#### gRPC limitations
{% hint style="info" %}
**NOTE**
gRPC connections are not required for delegate version 23.12.81803 and later.
{% endhint %}
If you do not enable gRPC connections, the following limitation applies:
* [Cloud Cost Management (CCM)](https://app.gitbook.com/s/O2HVWkYMptNUG08jo8hr/README) does not collect events.
### Add certificates and other software to the delegate
For steps on adding certificates or other software to the delegate, go to [Common delegate initialization scripts](/harness-ai/use-harness-platform/delegates/delegate/delegate-reference/common-delegate-profile-scripts).
### Delegate access requirements
Harness Delegates do not require root account access. Kubernetes and Docker delegates do, however, run as root by default. If you do not need to install applications during the initialization process (`INIT_SCRIPT`), you can use a non-root account or install the application without the delegate. For more information, go to [Delegate installation overview](/harness-ai/use-harness-platform/delegates/delegate/delegate-concepts/delegate-overview).
If you do not run the delegate as root, you cannot use [delegate initialization scripts](/harness-ai/use-harness-platform/delegates/delegate/delegate-reference/common-delegate-profile-scripts) to install software.
{% @harness-feedback/feedback module="harness-ai" pagePath="harness-ai/use-harness-platform/delegates/delegate/delegate-concepts/delegate-requirements" %}
# Delegate image types
Learn about different Harness delegate image types including standard, minimal, and FIPS variants, their security considerations, third-party tools, and how to choose the right image for your deployme
The Delegate is a lightweight worker process packaged and distributed by Harness using different image types. Each Delegate image is identified by a delegate name, and the image type is specified using a tag.
| Image Type | Image Tag | Image Description |
| -------------------------------------------------------------------------------------------------------------------------------------------------------------------------------------------------------------------------------- | -------------------------- | --------------------------------------------------------------------------------------------------------------------------------------------------------- |
| DELEGATE | `yy.mm.xxxxx` | The release year, month, and version in dot-separated format. Supported on both NextGen and FirstGen Harness Platform. |
| DELEGATE-MINIMAL | `yy.mm.xxxxx.minimal` | The **minimal** tag is appended to the release year, month, and version in dot-separated format. Supported on both NextGen and FirstGen Harness Platform. |
| DELEGATE FIPS | `yy.mm.xxxxx-fips` | The release year, month, and version in dot-separated format. |
| FIPS (Federal Information Processing Standard) compliant images compatible only with [FIPS SMP](https://developer.harness.io/docs/self-managed-enterprise-edition/smp-fips-overview) and is not supported for SaaS environments. | | |
| DELEGATE FIPS-MINIMAL | `yy.mm.xxxxx.minimal-fips` | The **minimal-fips** tag is appended to the release year, month, and version in dot-separated format. |
| FIPS (Federal Information Processing Standard) compliant images compatible only with [FIPS SMP](https://developer.harness.io/docs/self-managed-enterprise-edition/smp-fips-overview) and is not supported for SaaS environments. | | |
| DELEGATE-LEGACY | `latest` | Delegate that auto upgrades with no flexibility to turn off auto upgrade (DEPRECATED) |
### Image type comparison
Harness gives you the option to select delegate images with or without third-party client tools. The use of a delegate packaged with third-party binaries speeds the construction of a CD pipeline; Harness CI and STO do not make use of these libraries. The inclusion of third-party binaries, however, increases attack vectors. When choosing delegate images, remember to prioritize both security and ease of use.
Harness rigorously scans delegate images for vulnerabilities. Harness cannot, however, guarantee the elimination of CVEs from delegate images that include third-party client tools. The vulnerabilities that third-party client tools introduce in delegate images cannot be eliminated until the vulnerabilities are repaired in the third-party tools.
The following table differentiates between delegate images based on key features and recommended use. For those images distributed with auto-upgrade enabled, Harness recommends accepting the auto-upgrade setting.
| | Third-party client tools | Minimum CVEs | Auto-upgrade enabled | Disable auto-upgrade | Notes |
| ---------------------------------------------------------------------------------------------------------------------------------------------------------------------------------------------------- | ------------------------ | ------------ | -------------------- | -------------------- | ----------------------------------------------------------------------------------------------- |
|
DELEGATE
Base image: Red Hat Universal Base Image (Red Hat/UBI8) Recommended use: Quick deployment of a pipeline
| ✓ | x | ✓ | ✓ |
Installed as a Kubernetes Deployment resource.
Renamed from "immutable delegate."
|
|
DELEGATE-MINIMAL
Recommended use: To minimize attack vectors, in the enterprise, or when you want to select and install different tools at build time or runtime
| x | ✓ | x | ✓ | |
|
DELEGATE FIPS
Base Image: Red Hat Universal Base Image (Red Hat UBI 9)
Recommended use: To minimize attack vectors, in the enterprise, or when you want to select and install different tools at build time or runtime
| x | ✓ | x | ✓ | |
|
DELEGATE-LEGACY
Deprecated: Not recommended for use in new Harness accounts
| ✓ | x | ✓ | x | |
{% hint style="info" %}
Harness Delegate is a Red Hat Enterprise Linux (RHEL)-based image. A Windows-based image is not available.
Harness Delegate images are multi-architecture under the same tag. If you navigate to a specific delegate tag, you will find a digest for each architecture. The correct digest is pulled depending on the host architecture.
{% endhint %}
### Third-party tools included in the DELEGATE image type
| **Third-party tool/SDK** | **78101 and earlier** | **78306 and later** |
| ------------------------ | :-------------------------------------------------------------------: | :-------------------------------------------------------------------: |
| kubectl | 1.13.2, 1.19.2 | 1.28.7 |
| go-template | 0.4, 0.4.1 | 0.4.5 |
| harness-pywinrm | 0.4-dev | 0.4-dev |
| Helm | 3.1.2, 3.8.0 | 3.15.4 |
| chartmuseum | 0.8.2, 0.12.0 | 0.15.0 |
| tf-config-inspect | 1.0, 1.1 | 1.2 |
| oc | 4.2.16 | 4.13.32 |
| Git | NA | 2.43.0 |
| SCM | The Harness-generated library and version are changed with every fix. | The Harness-generated library and version are changed with every fix. |
Latest Delegate image version and their respective SCM versions are listed below:
| Delegate version | SCM versions |
| ---------------- | ------------ |
| 24.08.83705 | a81c96813 |
| 24.08.83704 | e92737411 |
| 24.08.83701 | ffe83a057 |
| 24.07.83611 | 43baeda70 |
### Docker pull commands
The table below contains the pull commands for retrieving delegate images.
| Delegate | Docker command |
| --------------------- | -------------------------------------------------------------- |
| DELEGATE | `docker pull harness/delegate:` *``* |
| DELEGATE-MINIMAL | `docker pull harness/delegate:` *`.minimal`* |
| DELEGATE FIPS | `docker pull harness/delegate:` *`-fips`* |
| DELEGATE FIPS-MINIMAL | `docker pull harness/delegate:` *`.minimal-fips`* |
{% @harness-feedback/feedback module="harness-ai" pagePath="harness-ai/use-harness-platform/delegates/delegate/delegate-concepts/delegate-image-types" %}
# Delegate registration and verification
To set up a Harness Delegate, you install the delegate in your environment and the delegate automatically registers with your Harness account. The Delegate config file (for example, Kubernetes Delega…
To set up a Harness Delegate, you install the delegate in your environment and the delegate automatically registers with your Harness account.
The delegate config file (for example, Kubernetes delegate YAML file) contains your Harness account Id. That's how the delegate knows where to register.
#### Install and register delegates
To install a delegate, follow the steps in the delegate installation topic, such as [Install a Docker delegate](/harness-ai/use-harness-platform/delegates/delegate/install-delegates/overview).
Once you have installed the delegate in your environment, select **Verify** in the delegate wizard, and Harness will verify that it is receiving heartbeats from the delegate.

This means Harness is waiting for the delegate you installed to register. Registration can take a few minutes. Once the delegate registers, the **Verify** screen will indicate that the delegate is running.
{% hint style="danger" %}
**IMPORTANT NOTE**
After installation, if the delegate goes into a disconnected state, Harness applies a Time-To-Live (TTL) policy:
* Delegate – 6 hours: If a delegate remains disconnected and does not send heartbeats for 6 hours, it is considered expired and will no longer appear on the Delegate page in Harness.
* Delegate Group – 7 days: If no delegates in a group are active for 7 consecutive days, the entire group will be removed from the Delegate page in Harness.
{% endhint %}
#### Verify delegate registration manually
The Verify screen also includes troubleshooting steps. Here are a few of the steps for the Kubernetes delegate.
Check the status of the delegate on your cluster:
```
kubectl describe pod -n harness-delegate-ng
```
Check the delegate logs:
```
kubectl logs -f -n harness-delegate-ng
```
If the pod isn't up, you might see the following error in your cluster:
```
CrashLoopBackOff: Kubernetes Cluster Resources are not available.
```
Make sure the Kubernetes Cluster Resources (CPU, memory) are sufficient.
If the delegate didn't reach a healthy state, run the following:
```
kubectl describe pod -n harness-delegate-ng
```
#### Allowlist verification
{% hint style="info" %}
Currently, allowlist verification for delegate registration is behind the feature flag `PL_ENFORCE_DELEGATE_REGISTRATION_ALLOWLIST`. Contact [Harness Support](mailto:support@harness.io) to enable the feature.
{% endhint %}
With this feature flag enabled, delegates with an immutable image type can register if their IP/CIDR address is included in the allowed list received by Harness Manager.
Without this feature flag enabled, delegates with an immutable image type can register without allowlist verification.
The IP address/CIDR should be that of the delegate or the last proxy between the delegate and Harness Manager in the case of a proxy.
Harness Manager verifies registration requests by matching the IP address against an approved list and allows or denies registration accordingly. For more information, go to [Add and manage IP allowlists](/harness-ai/use-harness-platform/security/add-manage-ip-allowlist).
{% @harness-feedback/feedback module="harness-ai" pagePath="harness-ai/use-harness-platform/delegates/delegate/delegate-concepts/delegate-registration" %}
# Graceful delegate shutdown
Read about the process of graceful delegate shutdown.
Harness Delegate is designed to shut down gracefully.
### Shutdown without upgrade
The process of graceful delegate shutdown without upgrade is as follows:
* The delegate receives an instruction to quit.
* A grace period begins during which the delegate:
* Stops accepting new tasks.
* Works to complete running tasks.
* The grace period ends.
* Delegates that have not quit are force-terminated.
* Incomplete tasks are discarded.
### Shutdown with upgrade
The process of graceful delegate shutdown with `upgrader` is as follows:
* When `upgrader` updates the delegate image, it starts a new delegate and waits for a heartbeat and healthy state.
* When the delegate is connected, `upgrader` terminates the old pod. However, the old pod will not be terminated immediately. It will first
* Stop accepting new tasks.
* Wait for currently executing tasks to finish before terminating. The maximum time `upgrader` waits for tasks to finish before force-termination is 10 minutes.
{% hint style="info" %}
The wait time before force-termination is configured using `terminationGracePeriodSeconds` in the Kubernetes delegate YAML. When you download the YAML from Harness, it's set to 10 minutes by default.
{% endhint %}
### Grace period
{% hint style="warning" %}
**DELEGATE-LEGACY: END OF SUPPORT (EOS)**
***
Upgrade Delegate-Legacy to Delegate image
This is an End of Support (EOS) notice for the Delegate-Legacy image type. This image type reached End of Support (EOS) as of **January 31, 2024**.
End of Support means the following:
* Harness Support will no longer accept support requests for the Delegate-Legacy image type in both Harness FirstGen and Harness NextGen (including Harness Self-Managed Enterprise Edition (SMP)).
* Security fixes will still be addressed.
* Product defects will not be addressed.
Follow the below steps to upgrade Delegate-Legacy to Delegate image:
* Download new yaml from Harness by keeping the same name as the previous delegate
* Check if the existing delegate has any tags/selector, if yes then add them in DELEGATE\_TAGS
* Compare the permissions given to the legacy delegate in their yaml and give the same permissions to new delegates
* Check if custom image is used, if yes then build a new image with immutable delegate as base image and override the account setting to point to that image
* Ensure that auto upgrade is enabled for Kubernetes delegates
* Our delegate yaml ships with default HPA of min and max replicas to be 1, adjust the desired number of replicas in HPA
* Deploy the new yaml and see new replicas coming under the same delegate
* Scale down the old stateful set and verify that everything is correct
{% endhint %}
The length of the grace period is configurable.
| **Delegate type** | **Grace period** | **Default interval** |
| ----------------- | :--------------: | :--------------------------: |
| Immutable image | Yes | Configurable (details below) |
| Legacy image | No | 30 seconds |
{% hint style="info" %}
**NOTE**
The grace period is not currently configurable for Helm deployments.
{% endhint %}
#### Configure the default interval for a Kubernetes deployment
Open the delegate manifest file and locate the container `spec` (`spec.containers`). Change the `terminationGracePeriodSeconds` as shown in the following YAML. In the example below, `terminationGracePeriodSeconds` is set to 10 minutes.
```yaml
spec:
terminationGracePeriodSeconds: 600
restartPolicy: Always
containers:
- image: example/org:custom-delegate
imagePullPolicy: Always
name: delegate
securityContext:
allowPrivilegeEscalation: false
runAsUser: 0
```
#### Configure the default interval for an Amazon ECS deployment
Open the delegate manifest file and locate the container `containerDefinitions`. Change the `stopTimeout` as shown in the following JSON. In the example below, `stopTimeout` is set to 10 minutes.
{% hint style="info" %}
**NOTE**
For more information on `stopTimeout`, go to [Container timeouts](https://docs.aws.amazon.com/AmazonECS/latest/developerguide/task_definition_parameters.html#container_definition_timeout) in the Amazon ECS documentation.
{% endhint %}
```json
{
"containerDefinitions": [
{
"portMappings": [
{
"hostPort": 8080,
"protocol": "tcp",
"containerPort": 8080
}
],
"cpu": 1,
"environment": [
{
"name": "ACCOUNT_ID",
"value": ""
},
{
"name": "DELEGATE_TOKEN",
"value": ""
},
{
"name": "DELEGATE_TYPE",
"value": "DOCKER"
},
{
"name": "INIT_SCRIPT",
"value": ""
},
{
"name": "MANAGER_HOST_AND_PORT",
"value": ""
},
{
"name": "DELEGATE_NAME",
"value": ""
},
{
"name": "DELEGATE_TAGS",
"value": ""
},
{
"name": "NEXT_GEN",
"value": "true"
}
],
"memory": 2048,
"image": "harness/delegate:22.12.77802",
"essential": true,
"hostname": "",
"name": "",
"stopTimeout": 120
}
],
"memory": "2048",
"requiresCompatibilities": [
"EC2"
],
"cpu": "1024",
"family": "harness-delegate-task-spec"
}
```
#### Configure the default interval for a Docker deployment
For Docker deployments, you use the `docker stop` command to set the default interval. In the example below, the interval is set to 10 minutes.
```
docker container stop -t=600
```
{% hint style="info" %}
**NOTE**
In the syntax above, you can choose to use `--time` or `-t`.
{% endhint %}
### Graceful shutdown events
The event that initiates the graceful shutdown depends on delegate type.
| **Delegate environment** | **Trigger** |
| ------------------------ | :--------------------------------------------------: |
| Kubernetes | Pod termination, eviction, or user-initiated scaling |
| Docker | `docker stop` command |
| Shell | `./stop.sh` instruction |
{% @harness-feedback/feedback module="harness-ai" pagePath="harness-ai/use-harness-platform/delegates/delegate/delegate-concepts/graceful-delegate-shutdown-process" %}
# Install Delegates
{% content-ref url="/pages/WjUzaigw80isTOm4mDkN" %}
[Installation Options](/harness-ai/use-harness-platform/delegates/delegate/install-delegates/overview)
{% endcontent-ref %}
{% content-ref url="/pages/DMuNLCTkejUdjypS7U2D" %}
[Third-party Installation (Custom Binaries)](/harness-ai/use-harness-platform/delegates/delegate/install-delegates/install-a-delegate-with-3-rd-party-tool-custom-binaries)
{% endcontent-ref %}
{% content-ref url="/pages/Kcmgu38cpiogcaj41tuv" %}
[Build Custom Images](/harness-ai/use-harness-platform/delegates/delegate/install-delegates/build-custom-delegate-images-with-third-party-tools)
{% endcontent-ref %}
{% content-ref url="/pages/dXztb7wIOaokEOCLONS1" %}
[Enable Root User Privileges](/harness-ai/use-harness-platform/delegates/delegate/install-delegates/enable-root-user-privileges-to-add-custom-binaries)
{% endcontent-ref %}
{% content-ref url="/pages/UDmVdJZFiTGttsty8jug" %}
[Google Cloud Run](/harness-ai/use-harness-platform/delegates/delegate/install-delegates/install-delegate-on-google-cloud-run)
{% endcontent-ref %}
{% content-ref url="/pages/3KHrs7SIBLehKqCj393Z" %}
[Docker Delegate to ECS/Fargate](/harness-ai/use-harness-platform/delegates/delegate/install-delegates/docker-delegate-to-ecs-fargate)
{% endcontent-ref %}
{% content-ref url="/pages/CFpVU1oqoUAaLiwrc0Jv" %}
[Automate Delegate Installation](/harness-ai/use-harness-platform/delegates/delegate/install-delegates/automate-delegate-installation)
{% endcontent-ref %}
{% content-ref url="/pages/0cPCsNlnJEMlyH84iYxb" %}
[GKE with Workload Identity](/harness-ai/use-harness-platform/delegates/delegate/install-delegates/gke-workload-identity)
{% endcontent-ref %}
{% content-ref url="/pages/jk50jbPzfDWKFQeF0F7B" %}
[Upgrades and Expiration Policy](/harness-ai/use-harness-platform/delegates/delegate/install-delegates/delegate-upgrades-and-expiration)
{% endcontent-ref %}
{% @harness-feedback/feedback module="harness-ai" pagePath="harness-ai/use-harness-platform/delegates/delegate/install-delegates" %}
# Delegate installation options
Install Harness Delegates using Helm, Terraform, Kubernetes, or Docker
Expand the section below for instructions on installing the default delegate for your Harness account. It can be either a Kubernetes delegate installed using a Helm chart, Terraform Helm Provider, or Kubernetes manifest or a Docker delegate using the `docker run` command. For more information, go to [Install Harness Delegate on Kubernetes or Docker](/harness-ai/troubleshooting-and-resources/tutorials/install-delegate).
Install the default delegate on Kubernetes or Docker
The [Harness Delegate](/harness-ai/use-harness-platform/delegates/delegate/delegate-concepts/delegate-overview) is a lightweight worker process that is installed on your infrastructure and communicates only via outbound HTTP/HTTPS to the Harness Platform. This enables the Harness Platform to leverage the delegate to execute the CI/CD and other tasks on your behalf, without any of your secrets leaving your network.
You can install the Harness Delegate on either Docker or Kubernetes.
### Install the default Harness Delegate
#### Create a new delegate token
You can install delegates from the Account, Project, or Org scope. In this example, we'll create a new token in the Account scope.
To create a new delegate token, do the following:
1. In Harness, select **Account Settings**, then select **Account Resources**. The Account Resources page opens.
2. Select **Delegates**. The Delegates list page opens.
3. Select the **Tokens** tab, then select **+New Token**. The **New Token** dialog opens.
4. Enter a token name, for example `firstdeltoken`.
5. Select **Apply**. Harness generates a new token for you.
6. Select **Copy** to copy and store the token in a temporary file.
You will provide this token as an input parameter in the next installation step. The delegate will use this token to authenticate with the Harness Platform.
#### Get your Harness account ID
Along with the delegate token, you will also need to provide your Harness `accountId` as an input parameter during delegate installation. This `accountId` is present in every Harness URL. For example, in the following URL:
```
https://app.harness.io/ng/#/account/6_vVHzo9Qeu9fXvj-AcQCb/settings/overview
```
`6_vVHzo9Qeu9fXvj-AcQCb` is the `accountId`.
{% hint style="info" %}
**NOTE**
When you install a delegate via the Harness UI, several dependencies in this topic are prefilled for your convenience. This topic explains where to find the required information for CLI-based installation.
{% endhint %}
For more information, go to [View account info and subscribe to downtime alerts](/harness-ai/subscriptions-and-licenses/view-account-info-and-subscribe-to-alerts).
PrerequisiteEnsure that you have access to a Kubernetes cluster. For the purposes of this tutorial, we will use minikube.Install minikubeOn Windowschoco install minikubeFor Chocolatey installation instructions, go to Installing Chocolatey in the Chocolatey documentation.For additional options to install minikube on Windows, go to minikube start in the minikube documentation.On macOS:brew install minikubeFor Homebrew installation instructions, go to Installation in the Homebrew documentation.Now start minikube with the following config.minikube start --memory 4g --cpus 4Validate that you have kubectl access to your cluster.kubectl get pods -ANow that you have access to a Kubernetes cluster, you can install the delegate using any of the options below\.Install the Helm chartAs a prerequisite, you must have Helm v3 installed on the machine from which you connect to your Kubernetes cluster.You can now install the delegate using the delegate Helm chart. First, add the harness-delegate Helm chart repo to your local Helm registry.helm repo add harness-delegate repo updatehelm search repo harness-delegateWe will use the harness-delegate/harness-delegate-ng chart in this tutorial.NAME CHART VERSION APP VERSION DESCRIPTIONharness-delegate/harness-delegate-ng 1.0.8 1.16.0 A Helm chart for deploying harness-delegateNow we are ready to install the delegate. The following example installs/upgrades firstk8sdel delegate (which is a Kubernetes workload) in the harness-delegate-ng namespace using the harness-delegate/harness-delegate-ng Helm chart.You can install delegates from the Account, Project, or Org scope. In this example, we'll install a delegate in the Account scope.To install a delegate, do the following:In Harness, select Account Settings, then select Account Resources. The Account Resources page opens.Select Delegates. The Delegates list page opens.Select New Delegate. The New Delegate dialog opens.Under Select where you want to install your Delegate, select Kubernetes.Under Install your Delegate, select Helm Chart.Copy the helm upgrade command.The command uses the default values.yaml file located in the delegate Helm chart GitHub repo. To make persistent changes to one or more values, you can download and update the values.yaml file according to your requirements. Once you have updated the file, you can use it by running the upgrade command below. helm upgrade -i firstk8sdel --namespace harness-delegate-ng --create-namespace \ harness-delegate/harness-delegate-ng \ -f values.yaml \ --set delegateName=firstk8sdel \ --set accountId=PUT\_YOUR\_HARNESS\_ACCOUNTID\_HERE \ --set delegateToken=PUT\_YOUR\_DELEGATE\_TOKEN\_HERE \ --set managerEndpoint=PUT\_YOUR\_MANAGER\_HOST\_AND\_PORT\_HERE \ --set delegateDockerImage=harness/delegate:yy.mm.verno \ --set replicas=1 --set upgrader.enabled=trueNOTETo install a Helm delegate for Harness Self-Managed Enterprise Edition in an air-gapped environment, you must pass your certificate when you add the Helm repo.helm repo add harness-delegate --ca-file <.PEM\_FILE\_PATH> \For more information on requirements for air-gapped environments, go to Install in an air-gapped environment.Run the command.Create main.tf fileHarness uses a Terraform module for the Kubernetes delegate. This module uses the standard Terraform Helm provider to install the Helm chart onto a Kubernetes cluster whose config by default is stored in the same machine at the \~/.kube/config path. Copy the following into a main.tf file stored on a machine from which you want to install your delegate.module "delegate" { source = "harness/harness-delegate/kubernetes" version = "0.1.8" account\_id = "PUT\_YOUR\_HARNESS\_ACCOUNTID\_HERE" delegate\_token = "PUT\_YOUR\_DELEGATE\_TOKEN\_HERE" delegate\_name = "firstk8sdel" namespace = "harness-delegate-ng" manager\_endpoint = "PUT\_YOUR\_MANAGER\_HOST\_AND\_PORT\_HERE" delegate\_image = "harness/delegate:yy.mm.verno" replicas = 1 upgrader\_enabled = false # Additional optional values to pass to the helm chart values = yamlencode({ javaOpts: "-Xms64M" })}provider "helm" { kubernetes { config\_path = "\~/.kube/config" }}Now replace the variables in the file with your Harness account ID and delegate token values. Replace PUT\_YOUR\_MANAGER\_HOST\_AND\_PORT\_HERE with the Harness Manager Endpoint noted below. For Harness SaaS accounts, you can find your Harness Cluster Location on the Account Overview page under the Account Settings section of the left navigation.Run Terraform init, plan, and applyInitialize Terraform. This downloads the Terraform Helm provider to your machine.terraform initRun the following step to view the changes Terraform is going to make on your behalf.terraform planFinally, run this step to make Terraform install the Kubernetes delegate using the Helm provider.terraform applyWhen prompted by Terraform if you want to continue with the apply step, type yes, and then you will see output similar to the following.helm\_release.delegate: Creating...helm\_release.delegate: Still creating... \[10s elapsed]helm\_release.delegate: Still creating... \[20s elapsed]helm\_release.delegate: Still creating... \[30s elapsed]helm\_release.delegate: Still creating... \[40s elapsed]helm\_release.delegate: Still creating... \[50s elapsed]helm\_release.delegate: Still creating... \[1m0s elapsed]helm\_release.delegate: Creation complete after 1m0s \[id=firstk8sdel]Apply complete! Resources: 1 added, 0 changed, 0 destroyed.Download a Kubernetes manifest templatecurl -LO variables in the templateOpen the harness-delegate.yaml file in a text editor and replace PUT\_YOUR\_DELEGATE\_NAME\_HERE, PUT\_YOUR\_HARNESS\_ACCOUNTID\_HERE, and PUT\_YOUR\_DELEGATE\_TOKEN\_HERE with your delegate name (for example, firstk8sdel), Harness accountId, and delegate token values, respectively.Replace the PUT\_YOUR\_MANAGER\_HOST\_AND\_PORT\_HERE variable with the Harness Manager Endpoint noted below. For Harness SaaS accounts, you can find your Harness Cluster Location on the Account Overview page under the Account Settings section of the left navigation.Apply the Kubernetes manifestkubectl apply -f harness-delegate.yamlPrerequisitesEnsure that you have the Docker runtime installed on your host. If not, use one of the following options to install Docker:Docker for MacDocker for CentOSDocker for UbuntuDocker for DebianDocker for WindowsInstall on DockerYou can install delegates from the Account, Project, or Org scope. In this example, we'll install a delegate in the Project scope.To install a delegate, do the following:In Harness, select your project, then select Project Settings.Under Project-level resources, select Delegates.Select Install a Delegate to open the New Delegate dialog.Under Select where you want to install your Delegate, select Docker.Under Install your Delegate, enter a Delegate Name.Copy the docker run command.docker run --cpus=1 --memory=2g \ -e DELEGATE\_NAME=docker-delegate \ -e NEXT\_GEN="true" \ -e DELEGATE\_TYPE="DOCKER" \ -e ACCOUNT\_ID=YOUR\_HARNESS\_ACCOUNTID\_ \ -e DELEGATE\_TOKEN=YOUR\_DELEGATE\_TOKEN \ -e DELEGATE\_TAGS="" \ -e MANAGER\_HOST\_AND\_PORT=YOUR\_MANAGER\_HOST\_AND\_PORT \ harness/delegate:yy.mm.vernoThe docker run command doesn't allow you to select the delegate token. You can replace the token in the command with another token if required.Steps 6 and 7 are optional when installing a delegate using the CLI flow.(Optional) Replace the YOUR\_MANAGER\_HOST\_AND\_PORT\_HERE variable with the Harness Manager Endpoint noted below. For Harness SaaS accounts, to find your Harness cluster location, select Account Settings, and then select Overview. In Account Overview, look in Account Settings. It is listed next to Harness Cluster Hosting Account.For more information, go to View account info and subscribe to downtime alerts.For Harness CDCE, the endpoint varies based on the Docker vs. Helm installation options.Run the command.
### Ephemeral Storage in Delegate Helm Charts
To manage temporary disk space efficiently, you can configure ephemeral storage for the Harness Delegate using Helm charts. This guide walks you through defining custom volumes and applying the configuration during Helm installation.
The setup is cloud-agnostic and works across providers by adjusting the storage class as needed.
1. Create a `values.yaml` file and add the following configuration to it.
```yaml
custom_mounts:
- mountPath: "/scratch"
name: scratch-volume
custom_volumes:
- name: scratch-volume
ephemeral:
volumeClaimTemplate:
metadata:
labels:
type:
spec:
accessModes: [ "ReadWriteOnce" ]
storageClassName: ""
resources:
requests:
storage:
```
Before proceeding with installation, ensure a suitable StorageClass exists in your cluster. This is required for provisioning ephemeral volumes as defined in your values.yaml.
You can check the available storage classes using:
kubectl get storageclass
If your cluster doesn’t have a suitable StorageClass, you can create one using:
After creating the StorageClass, configure it in the Helm chart by setting: --set persistence.storageClass=<YOUR-STORAGE-CLASS-NAME>
2. Install the Helm chart using the example below, which applies the configuration from `values.yaml` file we created earlier:
```yaml
helm upgrade -i --namespace harness-delegate-ng --create-namespace \
harness-delegate/harness-delegate-ng \
--set delegateName= \
--set accountId=XXXXXXXXXXXXXXXX \
--set delegateToken=XXXXXXXXXXXXXXXXXXXXXX \
--set managerEndpoint=https://.harness.io \
--set delegateDockerImage=us-west1-docker.pkg.dev/gar-setup/docker/delegate: \
--set replicas=1 --set upgrader.enabled=true \
-f values.yaml
```
3. Verify that the ephemeral storage has been mounted correctly by inspecting the pod’s volume mounts.
* Get the Pod Name
```bash
kubectl get pods -n harness-delegate-ng
```
Output:
```bash
NAME READY STATUS RESTARTS AGE
delegate-ephemeral-storage 1/1 Running 0 2m
```
* Describe the Pod
```bash
kubectl describe pod delegate-ephemeral-storage -n harness-delegate-ng
```
Look for the similar section below in your output
```bash
Volumes:
scratch-volume:
Type: PersistentVolumeClaim (a reference to a PVC)
ClaimName: scratch-volume-delegate-ephemeral-storage
ReadOnly: false
Mounts:
/scratch from scratch-volume (rw)
```
This confirms that your ephemeral volume (scratch-volume) is mounted to /scratch in the pod.
IMPORTANT NOTE:
Ephemeral storage is automatically deleted when the pod is terminated, and a new volume is created when a new pod starts. This ensures the storage is tied to the pod’s lifecycle and is not persistent.
### Deploy using a custom role
During delegate installation, you have the option to deploy using a custom role. To use a custom role, you must edit the delegate YAML file.
Harness supports the following custom roles:
* `cluster-admin`
* `cluster-viewer`
* `namespace-admin`
* custom cluster roles
To deploy using a custom cluster role, do the following:
1. Open the delegate YAML file in your text editor.
2. Add the custom cluster role to the `roleRef` field in the delegate YAML.
```yaml
---
apiVersion: rbac.authorization.k8s.io/v1beta1
kind: ClusterRoleBinding
metadata:
name: harness-delegate-cluster-admin
subjects:
- kind: ServiceAccount
name: default
namespace: harness-delegate-ng
roleRef:
kind: ClusterRole
name: cluster-admin
apiGroup: rbac.authorization.k8s.io
---
```
In this example, the `cluster-admin` role is defined.
3. Save the delegate YAML file.
### Verify delegate connectivity
Select **Continue**. After the health checks pass, your delegate is available for you to use. Select **Done** and verify your new delegate is listed.
#### Helm chart & Terraform Helm provider
#### Kubernetes manifest
#### Docker
You can now route communication to external systems in Harness connectors and pipelines by selecting this delegate via a delegate selector.
### Troubleshooting
The delegate installer provides troubleshooting information for each installation process. If the delegate cannot be verified, select **Troubleshoot** for steps you can use to resolve the problem. This section includes the same information.
Harness asks for feedback after the troubleshooting steps. You are asked, **Did the delegate come up?**
If the steps did not resolve the problem, select **No**, and use the form to describe the issue. You'll also find links to Harness Support and to [Delegate docs](/harness-ai/use-harness-platform/delegates/delegate/delegate-concepts/delegate-overview).
Use the following steps to troubleshoot your installation of the delegate using Helm.Verify that Helm is correctly installed:Check for Helm:helmAnd then check for the installed version of Helm:helm versionIf you receive the message Error: rendered manifests contain a resource that already exists..., delete the existing namespace, and retry the Helm upgrade command to deploy the delegate.For further instructions on troubleshooting your Helm installation, go to Helm troubleshooting guide.Check the status of the delegate on your cluster:kubectl describe pods -n \If the pod did not start, check the delegate logs:kubectl logs -f \ -n \If the state of the delegate pod is CrashLoopBackOff, check your allocation of compute resources (CPU and memory) to the cluster. A state of CrashLoopBackOff indicates insufficient Kubernetes cluster resources.If the delegate pod is not healthy, use the kubectl describe command to get more information:kubectl describe \ -n \Use the following steps to troubleshoot your installation of the delegate using Terraform.Verify that Terraform is correctly installed:terraform -versionFor further instructions on troubleshooting your installation of Terraform, go to the Terraform troubleshooting guide.Check the status of the delegate on your cluster:kubectl describe pods -n \If the pod did not start, check the delegate logs:kubectl logs -f \ -n \If the state of the delegate pod is CrashLoopBackOff, check your allocation of compute resources (CPU and memory) to the cluster. A state of CrashLoopBackOff indicates insufficient Kubernetes cluster resources.If the delegate pod is not healthy, use the kubectl describe command to get more information:kubectl describe \ -n \Use the following steps to troubleshoot your installation of the delegate using Kubernetes.Check the status of the delegate on your cluster:kubectl describe pods -n \If the pod did not start, check the delegate logs:kubectl logs -f \ -n \If the state of the delegate pod is CrashLoopBackOff, check your allocation of compute resources (CPU and memory) to the cluster. A state of CrashLoopBackOff indicates insufficient Kubernetes cluster resources.If the delegate pod is not healthy, use the kubectl describe command to get more information:kubectl describe \ -n \Use the following steps to troubleshoot your installation of the delegate using Docker:Check the status of the delegate on your cluster:docker container ls -aIf the pod is not running, check the delegate logs:docker container logs \ -fRestart the delegate container. To stop the container:docker container stop \To start the container:docker container start \Make sure the container has sufficient CPU and memory resources. If not, remove the older containers:docker container rm \[container id]
This video shows how to install a delegate.
{% embed url="" %}
The default delegate image, denoted by the `yy.mm.verno` image tag, includes a set of pre-installed 3rd-party custom binaries for convenience. For the list of these binaries, go to [Third-party tools included in the delegate image type](/harness-ai/use-harness-platform/delegates/delegate/delegate-concepts/delegate-image-types#third-party-tools-included-in-the-delegate-image-type). If you are concerned about the security vulnerabilities that potentially come with these pre-installed binaries, Harness recommends that you use the minimal delegate explained below.
### Install minimal delegate with 3rd party custom binaries
The minimal delegate image, denoted by the `yy.mm.verno.minimal` image tag, does not include any pre-installed 3rd-party custom binaries for ensuring the lowest footprint and hence lowest number of security vulnerabilities.
#### Use INIT\_SCRIPT
This option installs the 3rd party custom binaries on a delegate container instance without changing the delegate image. Below is an inline tutorial that shows you how to use this option. You can also review the tutorial directly. Go to [Install a delegate with third-party tool custom binaries](/harness-ai/use-harness-platform/delegates/delegate/install-delegates/install-a-delegate-with-3-rd-party-tool-custom-binaries).
Use INIT_SCRIPT
The [Harness Delegate](/harness-ai/use-harness-platform/delegates/delegate/delegate-concepts/delegate-overview) is a lightweight worker process that is installed on your infrastructure and communicates only via outbound HTTP/HTTPS to the Harness Platform. This enables the Harness Platform to leverage the delegate for executing the CI/CD and other tasks on your behalf, without any of your secrets leaving your network.
The default delegates are packaged with third-party SDKs that support Kubernetes, Helm, and other Harness-integrated tools. The SDKs are included on the delegate image as binary files; depending on the tool, multiple versions are included. Harness also provides a "minimal" delegate image that doesn't include third-party SDKs.
You can modify the default and minimal Harness Delegate images. You might customize the delegate image if:
* You want to use binaries that reduce your attack surface. Vulnerability scans detect unresolved vulnerabilities in older binary versions.
* You want to use tools or versions of tools that Harness doesn't include on the default delegate image. You can install all kinds of tools, such as Git client, Helm, Terraform, PowerShell, Docker, AWS CLI, and so on.
* You need to modify where certain tools run. For example, connecting to external systems usually requires a third-party client tool or library to be present locally, and some of the Harness CD and Platform tasks require these client tools to be present in the same container instance where the delegate runs.
There are two primary ways to modify the Harness Delegate image:
* Install additional client tools along with the delegate by modifying the delegate YAML to install the tools and versions that you specify in the `INIT_SCRIPT` environment variable. This approach works best when you are still building your CI/CD pipelines and you don't yet have the final list of required client tools. This approach is explained in this topic.
* Create a custom delegate image (using the Harness-provided delegate image as a base image). This approach works best when you know all the client tools ahead of time. For instructions on building custom delegate images, go to [Build custom delegate images with third-party tools](/harness-ai/use-harness-platform/delegates/delegate/install-delegates/build-custom-delegate-images-with-third-party-tools).
{% hint style="info" %}
**NOTE**
You might need additional permissions to execute commands in delegate scripts and create Harness users.
{% endhint %}
### Edit the delegate YAML
To install a delegate, you download its YAML file and run it in your target environment, such as a Kubernetes cluster. For example purposes, this topic uses a delegate installed on a Kubernetes cluster created on Google Cloud.
To modify the delegate image, you need to edit the delegate YAML file to specify delegate environment variables, the delegate base image, [Harness-required SDKs](#add-harness-required-sdks) (depending on the selected base image), and [third-party tools to install](#add-your-custom-tools).
You can modify the delegate YAML before or after you install the delegate. To get the delegate YAML, follow the steps to [Install a delegate](/harness-ai/troubleshooting-and-resources/tutorials/install-delegate). To follow along with the examples in this topic, use the **Kubernetes Manifest** option for delegate installation.
Since the delegate is declaratively defined in YAML, it is easy to add custom scripts and customize the delegate in other ways too. SDKs and additional tools are specified in the `INIT_SCRIPT`, with the exception of [delegate Helm chart deployments](#delegate-helm-chart-deployments). For more examples, go to [Common delegate initialization scripts](/harness-ai/use-harness-platform/delegates/delegate/delegate-reference/common-delegate-profile-scripts).
#### Delegate Helm chart deployments
For delegate Helm chart deployments, add your third-party tool custom binaries to `initScript` in your `values.yaml` file to run them before delegate installation. You can find the default `values.yaml` file in the Delegate Helm chart [GitHub repo](https://github.com/harness/delegate-helm-chart/blob/main/harness-delegate-ng/values.yaml).
For example, the following `values.yaml` file entry installs Kubectl on amd64 architecture. The exact install URL depends on your architecture. For additional architecture installation commands, go to the Kubernetes documentation on [Installing kubectl](https://kubernetes.io/docs/tasks/tools/#kubectl).
```yaml
# Script to run before delegate installation
initScript: "
curl -L0 https://dl.k8s.io/release/v1.24.3/bin/linux/amd64/kubectl -o kubectl
chmod +x ./kubectl
mv kubectl /usr/local/bin/"
```
### Add Harness-required SDKs
The toolset you install on the delegate minimal image must include the SDKs that Harness requires to perform tasks.
In the delegate container `spec`, use the `INIT_SCRIPT` environment variable to download the certified SDK versions that Harness requires.
The SDKs you need to add depend on the type of deployment. For a list of SDK versions certified for different deployment types, go to [Delegate-required SDKs](/harness-ai/use-harness-platform/delegates/delegate/delegate-reference/delegate-required-sdks).
#### Private Cloud Foundry (PCF) deployments
PCF deployments require CLI 7. For installation instructions, go to [Install Cloud Foundry CLI versions on the Harness Delegate](https://developer.harness.io/harness-ai/use-harness-platform/delegates/delegate/install-delegates/pages/nMTQVskX4BjgZapkkE5B#cloud-foundry-cli).
### Add your custom tools
Open the delegate YAML file and locate the `INIT_SCRIPT` in the delegate container `spec`. To install additional tools on the delegate, add your custom scripts to the `INIT_SCRIPT`.
{% hint style="info" %}
**IMPORTANT**
Several tools require `unzip` in the manifest. Add the following YAML before you add any of the below scripts.
```yaml
- name: INIT_SCRIPT
value: |
microdnf install -y zip unzip
```
{% endhint %}
These examples show how to install some common tools.
The following INIT\_SCRIPT installs the AWS CLI: - name: INIT\_SCRIPT value: | microdnf install -y zip unzip curl "" -o "awscliv2.zip" unzip awscliv2.zip ./aws/installThe following INIT\_SCRIPT installs kubectl: - name: INIT\_SCRIPT value: | curl -L0 -o kubectl chmod +x ./kubectl mv kubectl /opt/harness-delegate/custom-client-tools/kubectlThe following INIT\_SCRIPT installs Terraform: - name: INIT\_SCRIPT value: | microdnf install -y zip unzip curl -O -L unzip terraform\_0.12.25\_linux\_amd64.zip mv ./terraform /usr/bin/The following INIT\_SCRIPT installs Helm 3: - name: INIT\_SCRIPT value: | curl -fsSL -o get\_helm.sh chmod 700 get\_helm.sh ./get\_helm.sh
#### Install Azure CLI
To install the Azure CLI, run the following.
```
## Install Azure CLI
rpm --import
rpm -ivh
microdnf install -y azure-cli
```
#### Install multiple tools at once
To install multiple tools, you can add all the install scripts to the `INIT_SCRIPT`, for example:
```yaml
- name: INIT_SCRIPT
value: |
microdnf install -y zip unzip
## Install AWS CLI
curl "https://awscli.amazonaws.com/awscli-exe-linux-x86_64.zip" -o "awscliv2.zip"
unzip awscliv2.zip
./aws/install
## Install kubectl
curl -L0 https://dl.k8s.io/release/v1.24.3/bin/linux/amd64/kubectl -o kubectl
chmod +x ./kubectl
mv kubectl /opt/harness-delegate/custom-client-tools/kubectl
## Install Terraform
curl -O -L https://releases.hashicorp.com/terraform/0.12.25/terraform_0.12.25_linux_amd64.zip
unzip terraform_0.12.25_linux_amd64.zip
mv ./terraform /usr/bin/
## Install Helm3
curl -fsSL -o get_helm.sh https://raw.githubusercontent.com/helm/helm/main/scripts/get-helm-3
chmod 700 get_helm.sh
./get_helm.sh
```
#### Install credentials plugin for GKE and AKS infrastructure types
Add the following install scripts to the `INIT_SCRIPT` to install the credentials plugin for GKE and AKS infrastructure types if you're using `kubectl` version 1.26.x or later.
{% hint style="info" %}
If you're using a custom delegate with `kubelogin` and certificate type of authentication, then you must install Azure CLI. Alternatively, you can install the `harness-credentials-plugin` to take care of this flow without Azure CLI.
{% endhint %}
```yaml
- name: INIT_SCRIPT
value: |
## for AKS
mkdir -m 777 -p client-tools/kubelogin/v0.1.1 \
&& curl -s -L -o client-tools/kubelogin/v0.1.1/kubelogin https://app.harness.io/public/shared/tools/kubelogin/release/v0.1.1/bin/linux/amd64/kubelogin
export PATH=/opt/harness-delegate/client-tools/kubelogin/v0.1.1/:$PATH
## for GKE or AKS with certificate auth type
mkdir -m 777 -p client-tools/harness-credentials-plugin/v0.1.0 \
&& curl -s -L -o client-tools/harness-credentials-plugin/v0.1.0/harness-credentials-plugin https://app.harness.io/public/shared/tools/harness-credentials-plugin/release/v0.1.0/bin/linux/amd64/harness-credentials-plugin
export PATH=/opt/harness-delegate/client-tools/harness-credentials-plugin/v0.1.0/:$PATH
```
### Apply the changes
You can modify the delegate YAML before or after you install the delegate.
If you haven't yet installed the delegate, finish [Installing the delegate](/harness-ai/troubleshooting-and-resources/tutorials/install-delegate) in your target environment.
If you already installed the delegate, you need to apply the updated delegate YAML and restart the delegate. For example, if your delegate is in a Kubernetes cluster, run the kubectl command to apply it:
```
kubectl apply -f harness-delegate.yml
```
Wait a few minutes for the delegate to start up. You can check the delegate status in the Harness Platform.

### Test your tools
You can either run an existing pipeline that requires one of the tools you installed, or create a test pipeline with a simple script to confirm that a tool was installed.
1. Create a pipeline and add a **Custom** stage.
2. Add a **Shell Script** step.
3. Enter a simple script, such as a version check, for the tool that you installed.
For example, if you installed the Git client, you could run `git --version`, or if you installed the AWS CLI, you could run `aws --version`.

You can modify this step to test any command for the tool. For example, if you installed Helm, you could run a test to deploy a Helm chart:
```
helm create my-new-chart
helm install my-new-chart ./my-new-chart
helm ls
```
4. Set the **Execution Target** to **On Delegate**.
5. On the **Advanced** tab, select the delegate you just modified.

6. Save and run the pipeline. If the tool was installed on the delegate successfully, you should see the output of your script in the execution logs.

#### Build a custom image
This option installs the 3rd party custom binaries on a new custom delegate image that uses the Harness minimal delegate image as its base image. Below is an inline tutorial that shows you how to use this option. You can also review the tutorial directly. Go to [Build custom delegate images with third-party tools](/harness-ai/use-harness-platform/delegates/delegate/install-delegates/build-custom-delegate-images-with-third-party-tools).
Build a custom image
Harness Manager installs and configures delegates with the binaries that most CI/CD pipelines require. In some cases, however, a preconfigured image isn't the right fit. For example, preconfigured images can:
* Introduce the vulnerabilities of the binaries they include.
* Restrict you to the use of the included third-party tools and versions.
This document explains how you can:
* Build and host a custom delegate image that includes the tools you select.
* Use your custom delegate in CI/CD pipelines.
{% hint style="info" %}
Delegates with an immutable image type (image tag `yy.mm.xxxxx`) include non-root user privileges and are compatible with OpenShift. For information on delegate types, go to [Delegate image types](/harness-ai/use-harness-platform/delegates/delegate/delegate-concepts/delegate-image-types).
{% endhint %}
### About the Harness Delegate minimal image
Harness recommends that you use the Harness Delegate minimal image (*`yy.mm.xxxxx.minimal`*) when you set up the Harness Platform for production use. This image has been thoroughly scanned and is free of any high or critical vulnerabilities. Users focused on security tend to prefer this option.
However, the minimal delegate image lacks some binaries that are required for Continuous Delivery (CD) steps to function properly and remain vulnerability-free from third-party tools. Consequently, using the minimal delegate image requires you to configure your delegates and install necessary binaries. For information on delegate types, go to [Delegate image types](/harness-ai/use-harness-platform/delegates/delegate/delegate-concepts/delegate-image-types).
The Harness Delegate minimal image (*`yy.mm.xxxxx.minimal`*) is a lighter, more secure version of the default Harness Delegate image. Its main purpose is to provide an enhanced security profile for users, especially those who prioritize their systems' security. The Harness Delegate minimal images includes the following features.
* **Security Scanned:** The image undergoes rigorous scanning processes to ensure that it is devoid of any high-risk or critical vulnerabilities. This makes it an optimal choice for organizations or users who have stringent security requirements. Harness aims to minimize critical/high vulnerabilities within this image. Achieving complete mitigation isn't always possible due to the continual discovery of vulnerabilities in third-party libraries/tools without immediate remediation.
* **Limited Binaries:** Unlike the standard delegate, the minimal image does not include all of the default binaries. While this contributes to its lightweight nature and security, it also means that users have additional responsibilities. They must manually configure and add any necessary binaries to make their setup functional.
* **User Responsibilities:** Because the minimal delegate image is devoid of the default binaries, users are in charge of tailoring it to their needs. This includes installing specific binaries essential for their CD steps. This level of control also allows users to maintain an updated environment. By installing the latest versions of necessary binaries, they can ensure that the delegate remains free from potential vulnerabilities found in outdated third-party tools.
* **Preferred by Security-Conscious Users:** Due to its clean security slate, many users who prioritize system security gravitate towards the minimal delegate image. By starting with a minimal setup and adding only what is necessary, they can maintain a tighter control over the software and tools present, thus minimizing potential security risks.
### Use the delegate minimal image to create a custom delegate image
#### Select the delegate minimal image
You can build on either of the following Harness-provided images.
| **Image** | **Description** |
| ------------------------------------- | -------------------------------------------------------------------------------------------------------- |
| Harness Delegate Docker image | A publicly available Docker image providing Harness Delegate. |
| Harness Minimal Delegate Docker image | A minimal delegate image is available in Docker Hub at . |
Use the last published `yy.mm.xxxxx` version of the minimal image from the Docker repository.

#### Build the delegate image
When you build a custom delegate image, you modify the image you select with user privileges and binaries. This section explains the build script used for the process. In this example, the script builds a custom image for deployment by Kubernetes and by Terraform.
The first lines of the script provide information about the base image and user privileges. This example uses the minimal image with delegate minor version 77029.
```
FROM harness/delegate:24.04.82804.minimal
USER root
```
The delegate container is granted root user privileges.
The first `RUN` block installs or updates the `unzip` and `yum-utils` tools. The `--nodocs` option prevents the installation of documentation on the image.
```
RUN microdnf update \
&& microdnf install --nodocs \
unzip \
yum-utils
```
The second `RUN` block uses the `yum` utility to create a configuration file for the HashiCorp repository, and then uses the `microdnf` package manager to install the required Terraform components:
```
RUN yum-config-manager --add-repo https://rpm.releases.hashicorp.com/RHEL/hashicorp.repo \
&& microdnf install -y terraform
```
The final `RUN` block retrieves the Kubernetes `kubectl` command-line tool that is required to manipulate clusters. The Linux `chmod +x` instruction makes the utility executable:
```
RUN mkdir /opt/harness-delegate/tools && cd /opt/harness-delegate/tools \
&& curl -LO "https://dl.k8s.io/release/$(curl> -L -s https://dl.k8s.io/release/stable.txt)/bin/linux/amd64/kubectl" && chmod +x kubectl
```
The `ENV` instruction defines the Linux `$PATH` environment variable that provides the location of the tools to be installed:
```
ENV PATH=/opt/harness-delegate/tools/:$PATH
```
The final instruction switches the user back to `harness` to ensure the custom image does not run as root:
```
USER harness
```
The complete script is as follows:
```
FROM harness/delegate:24.04.82804.minimal
USER root
RUN microdnf update \
&& microdnf install --nodocs \
unzip \
yum-utils
RUN yum-config-manager --add-repo https://rpm.releases.hashicorp.com/RHEL/hashicorp.repo \
&& microdnf install -y terraform
RUN mkdir /opt/harness-delegate/tools && cd /opt/harness-delegate/tools \
&& curl -LO "https://dl.k8s.io/release/$(curl -L -s https://dl.k8s.io/release/stable.txt)/bin/linux/amd64/kubectl" && chmod +x kubectl
ENV PATH=/opt/harness-delegate/tools/:$PATH
USER harness
```
The following example Dockerfile adds all the tools necessary for the Harness platform that are not part of the base image to the minimal delegate. You can remove tools for features you don't use or update versions for your requirements.
#### Upload the image to Docker Hub
The next step is to upload your custom image to Docker Hub. For information on working with Docker repositories, go to [Manage repositories](https://docs.docker.com/docker-hub/repos/) in the Docker documentation.
#### Modify the delegate manifest
Before you can deploy a delegate, you must:
* Update the image path to the repository location of the custom image.
* Suspend delegate auto-upgrade functionality.
Delegate auto-upgrade is not compatible with custom images.
**Upgrade the image path**
Open the delegate manifest file and locate the container `spec` (`spec.containers`). Change the image path to reflect the repository location of your uploaded image as shown in the following YAML.
```yaml
spec:
terminationGracePeriodSeconds: 600
restartPolicy: Always
containers:
- image: example/org:custom-delegate
imagePullPolicy: Always
name: delegate
securityContext:
allowPrivilegeEscalation: false
runAsUser: 0
```
For purposes of this example, the image was uploaded to `example/org:custom-delegate`.
**Suspend delegate auto-upgrade**
Before you deploy a custom delegate, you must suspend its auto-upgrade functionality. This step prevents your image from being automatically upgraded and the installed binaries removed.
To suspend auto-upgrade, in the delegate manifest, locate the `CronJob` resource. In the resource `spec`, set the `suspend` field to `true` as shown in the following YAML:
```yaml
apiVersion: batch/v1beta1
kind: CronJob
metadata:
labels:
harness.io/name: custom-del-upgrader-job
name: custom-del-upgrader-job
namespace: harness-delegate-ng
spec:
suspend: true
schedule: "0 */1 * * *"
concurrencyPolicy: Forbid
startingDeadlineSeconds: 20
```
#### Deploy the delegate
You can deploy the delegate from Harness Manager or by applying the modified delegate manifest file to your cluster.

You can confirm the successful deployment and registration of the delegate in Harness Manager. Check the delegate information to ensure that auto-upgrade is not enabled.
### Use your custom delegate image in pipelines
You can use your registered delegate to run Kubernetes and Terraform pipelines. It is a good idea to run a pipeline to validate the delegate image. Harness steps in your pipelines use the installed tooling on the delegate to perform builds or deployments.
For information about creating a Kubernetes pipeline, go to [Kubernetes deployment tutorial](/continuous-delivery/use-continuous-delivery/deploy-services-on-different-platforms/kubernetes/kubernetes-cd-quickstart).
For information about creating a Terraform Plan, go to [Provision with the Terraform Apply Step](/continuous-delivery/use-continuous-delivery/provision-infrastructure/terraform-infra/run-a-terraform-plan-with-the-terraform-apply-step).
### Configure options
#### Network proxy
For network proxy details, go to [Configure delegate proxy settings](/harness-ai/use-harness-platform/delegates/delegate/manage-delegates/proxy/configure-delegate-proxy-settings).
#### CI-specific variables
Delegate variables specific to CI are described where necessary, such as in [Set up a local runner build infrastructure](/continuous-integration/use-harness-ci/use-harness-ci/set-up-build-infrastructure/define-a-docker-build-infrastructure) and [Set up VM build infrastructures](/continuous-integration/use-harness-ci/use-harness-ci/set-up-build-infrastructure/vm-build-infrastructure).
#### Custom certificates
For custom certificates, go to [Install delegates with custom certificates](/harness-ai/use-harness-platform/delegates/delegate/secure-delegates/install-delegates-with-custom-certs).
#### Group names
The legacy delegate used `DELEGATE_GROUP_NAME` for group names. This environment is not valid in NextGen. Use `DELEGATE_NAME` for group names.
### Additional installation approaches
#### Install Docker delegate to Amazon ECS Fargate
You can install the Docker delegate into Amazon ECS Fargate. For more information, go to [Deploy a Docker delegate to Amazon ECS or AWS Fargate](/harness-ai/use-harness-platform/delegates/delegate/install-delegates/docker-delegate-to-ecs-fargate).
#### Install Docker delegate using Podman
You can install the Docker delegate using Podman by adding Podman commands to your Dockerfile.
To install the Docker delegate using Podman, do the following:
1. In Harness, select **Deployments**, then select your project.
2. Under **Project Setup**, select **Delegates**.
3. Select **Install a Delegate** to open the **New Delegate** dialog.

4. Under **Select where you want to install your Delegate**, select **Docker**.
5. Copy the Docker installation command.
6. Paste the Docker installation command from the UI in your CLI, and replace the `docker run` command with the `podman run` command below.
```bash
podman run --restart=always --hostname="$(hostname -f)"
-e DELEGATE_NAME=docker-delegate \
-e NEXT_GEN="true" \
-e DELEGATE_TYPE="DOCKER" \
-e ACCOUNT_ID= \
-e DELEGATE_TOKEN== \
-e MANAGER_HOST_AND_PORT=https://app.harness.io harness/delegate:yy.mm.verno
```
7. Run the command.
{% @harness-feedback/feedback module="harness-ai" pagePath="harness-ai/use-harness-platform/delegates/delegate/install-delegates/overview" %}
# Install a delegate with third-party tool custom binaries
Use environment variables to install a custom toolset on the delegate minimal image.
The [Harness Delegate](/harness-ai/use-harness-platform/delegates/delegate/delegate-concepts/delegate-overview) is a lightweight worker process that is installed on your infrastructure and communicates only via outbound HTTP/HTTPS to the Harness Platform. This enables the Harness Platform to leverage the delegate for executing the CI/CD and other tasks on your behalf, without any of your secrets leaving your network.
The default delegates are packaged with third-party SDKs that support Kubernetes, Helm, and other Harness-integrated tools. The SDKs are included on the delegate image as binary files; depending on the tool, multiple versions are included. Harness also provides a "minimal" delegate image that doesn't include third-party SDKs.
You can modify the default and minimal Harness Delegate images. You might customize the delegate image if:
* You want to use binaries that reduce your attack surface. Vulnerability scans detect unresolved vulnerabilities in older binary versions.
* You want to use tools or versions of tools that Harness doesn't include on the default delegate image. You can install all kinds of tools, such as Git client, Helm, Terraform, PowerShell, Docker, AWS CLI, and so on.
* You need to modify where certain tools run. For example, connecting to external systems usually requires a third-party client tool or library to be present locally, and some of the Harness CD and Platform tasks require these client tools to be present in the same container instance where the delegate runs.
There are two primary ways to modify the Harness Delegate image:
* Install additional client tools along with the delegate by modifying the delegate YAML to install the tools and versions that you specify in the `INIT_SCRIPT` environment variable. This approach works best when you are still building your CI/CD pipelines and you don't yet have the final list of required client tools. This approach is explained in this topic.
* Create a custom delegate image (using the Harness-provided delegate image as a base image). This approach works best when you know all the client tools ahead of time. For instructions on building custom delegate images, go to [Build custom delegate images with third-party tools](/harness-ai/use-harness-platform/delegates/delegate/install-delegates/build-custom-delegate-images-with-third-party-tools).
{% hint style="info" %}
**NOTE**
You might need additional permissions to execute commands in delegate scripts and create Harness users.
{% endhint %}
### Edit the delegate YAML
To install a delegate, you download its YAML file and run it in your target environment, such as a Kubernetes cluster. For example purposes, this topic uses a delegate installed on a Kubernetes cluster created on Google Cloud.
To modify the delegate image, you need to edit the delegate YAML file to specify delegate environment variables, the delegate base image, [Harness-required SDKs](#add-harness-required-sdks) (depending on the selected base image), and [third-party tools to install](#add-your-custom-tools).
You can modify the delegate YAML before or after you install the delegate. To get the delegate YAML, follow the steps to [Install a delegate](/harness-ai/troubleshooting-and-resources/tutorials/install-delegate). To follow along with the examples in this topic, use the **Kubernetes Manifest** option for delegate installation.
Since the delegate is declaratively defined in YAML, it is easy to add custom scripts and customize the delegate in other ways too. SDKs and additional tools are specified in the `INIT_SCRIPT`, with the exception of [delegate Helm chart deployments](#delegate-helm-chart-deployments). For more examples, go to [Common delegate initialization scripts](/harness-ai/use-harness-platform/delegates/delegate/delegate-reference/common-delegate-profile-scripts).
#### Delegate Helm chart deployments
For delegate Helm chart deployments, add your third-party tool custom binaries to `initScript` in your `values.yaml` file to run them before delegate installation. You can find the default `values.yaml` file in the Delegate Helm chart [GitHub repo](https://github.com/harness/delegate-helm-chart/blob/main/harness-delegate-ng/values.yaml).
For example, the following `values.yaml` file entry installs Kubectl on amd64 architecture. The exact install URL depends on your architecture. For additional architecture installation commands, go to the Kubernetes documentation on [Installing kubectl](https://kubernetes.io/docs/tasks/tools/#kubectl).
```yaml
# Script to run before delegate installation
initScript: "
curl -L0 https://dl.k8s.io/release/v1.24.3/bin/linux/amd64/kubectl -o kubectl
chmod +x ./kubectl
mv kubectl /usr/local/bin/"
```
### Add Harness-required SDKs
The toolset you install on the delegate minimal image must include the SDKs that Harness requires to perform tasks.
In the delegate container `spec`, use the `INIT_SCRIPT` environment variable to download the certified SDK versions that Harness requires.
The SDKs you need to add depend on the type of deployment. For a list of SDK versions certified for different deployment types, go to [Delegate-required SDKs](/harness-ai/use-harness-platform/delegates/delegate/delegate-reference/delegate-required-sdks).
Example Kubernetes manifest delegate YAML with required SDK downloads
The following delegate YAML contains examples of downloads for all Harness-required SDKs. You can edit the YAML to include only the SDKs and versions Harness requires for your deployment type. To modify the export `PATH`, run `export PATH=/opt/harness-delegate/custom-client-tools/:`.
```yaml
...
- name: DELEGATE_TYPE
value: "KUBERNETES"
- name: DELEGATE_NAMESPACE
valueFrom:
fieldRef:
fieldPath: metadata.namespace
- name: INIT_SCRIPT
value: |
## Kubectl
curl -L0 https://dl.k8s.io/release/v1.24.3/bin/linux/amd64/kubectl -o kubectl
chmod +x ./kubectl
mv kubectl /usr/local/bin/
## Helm V3
curl -L0 https://get.helm.sh/helm-v3.9.2-linux-amd64.tar.gz -o helm-v3.9.2.tar.gz
tar -xvzf helm-v3.9.2.tar.gz
chmod +x ./linux-amd64/helm
mv ./linux-amd64/helm /usr/local/bin/
## Kustomize
curl -L0 https://github.com/kubernetes-sigs/kustomize/releases/download/kustomize%2Fv4.5.4/kustomize_v4.5.4_linux_amd64.tar.gz -o kustomize_v4.5.4.tar.gz
tar -xvzf kustomize_v4.5.4.tar.gz
chmod +x ./kustomize
mv kustomize /usr/local/bin/
## OpenShift OC
curl -L0 https://mirror.openshift.com/pub/openshift-v4/clients/oc/latest/linux/oc.tar.gz -o oc.tar.gz
tar -xvzf oc.tar.gz
chmod +x ./oc
mv oc /usr/local/bin/
## go-template
mkdir -p /opt/harness-delegate/client-tools/go-template/v0.4.1/
curl -L0 https://app.harness.io/public/shared/tools/go-template/release/v0.4.1/bin/linux/amd64/go-template -o go-template
chmod +x ./go-template
mv go-template /usr/local/bin/
curl -L https://get.helm.sh/chartmuseum-v0.14.0-linux-amd64.tar.gz -o chartmuseum-v0.14.tar.gz
tar xzvf chartmuseum-v0.14.tar.gz
chmod +x ./linux-amd64/chartmuseum
mv ./linux-amd64/chartmuseum /usr/local/bin/
cd /opt/harness-delegate
...
```
#### Private Cloud Foundry (PCF) deployments
PCF deployments require CLI 7. For installation instructions, go to [Install Cloud Foundry CLI versions on the Harness Delegate](https://developer.harness.io/harness-ai/use-harness-platform/delegates/delegate/install-delegates/pages/nMTQVskX4BjgZapkkE5B#cloud-foundry-cli).
### Add your custom tools
Open the delegate YAML file and locate the `INIT_SCRIPT` in the delegate container `spec`. To install additional tools on the delegate, add your custom scripts to the `INIT_SCRIPT`.
{% hint style="info" %}
**IMPORTANT**
Several tools require `unzip` in the manifest. Add the following YAML before you add any of the below scripts.
```yaml
- name: INIT_SCRIPT
value: |
microdnf install -y zip unzip
```
{% endhint %}
These examples show how to install some common tools.
{% tabs %}
{% tab title="Install AWS CLI" %}
The following `INIT_SCRIPT` installs the AWS CLI:
```yaml
- name: INIT_SCRIPT
value: |
microdnf install -y zip unzip
curl "https://awscli.amazonaws.com/awscli-exe-linux-x86_64.zip" -o "awscliv2.zip"
unzip awscliv2.zip
./aws/install
```
{% endtab %}
{% tab title="Install kubectl" %}
The following `INIT_SCRIPT` installs kubectl:
```yaml
- name: INIT_SCRIPT
value: |
curl -L0 https://dl.k8s.io/release/v1.24.3/bin/linux/amd64/kubectl -o kubectl
chmod +x ./kubectl
mv kubectl /opt/harness-delegate/custom-client-tools/kubectl
```
{% endtab %}
{% tab title="Install Terraform" %}
The following `INIT_SCRIPT` installs Terraform:
```yaml
- name: INIT_SCRIPT
value: |
microdnf install -y zip unzip
curl -O -L https://releases.hashicorp.com/terraform/0.12.25/terraform_0.12.25_linux_amd64.zip
unzip terraform_0.12.25_linux_amd64.zip
mv ./terraform /usr/bin/
```
{% endtab %}
{% tab title="Install Helm" %}
The following `INIT_SCRIPT` installs Helm 3:
```yaml
- name: INIT_SCRIPT
value: |
curl -fsSL -o get_helm.sh https://raw.githubusercontent.com/helm/helm/main/scripts/get-helm-3
chmod 700 get_helm.sh
./get_helm.sh
```
{% endtab %}
{% endtabs %}
#### Install Azure CLI
To install the Azure CLI, run the following.
```
## Install Azure CLI
rpm --import
rpm -ivh
microdnf install -y azure-cli
```
#### Install multiple tools at once
To install multiple tools, you can add all the install scripts to the `INIT_SCRIPT`, for example:
```yaml
- name: INIT_SCRIPT
value: |
microdnf install -y zip unzip
## Install AWS CLI
curl "https://awscli.amazonaws.com/awscli-exe-linux-x86_64.zip" -o "awscliv2.zip"
unzip awscliv2.zip
./aws/install
## Install kubectl
curl -L0 https://dl.k8s.io/release/v1.24.3/bin/linux/amd64/kubectl -o kubectl
chmod +x ./kubectl
mv kubectl /opt/harness-delegate/custom-client-tools/kubectl
## Install Terraform
curl -O -L https://releases.hashicorp.com/terraform/0.12.25/terraform_0.12.25_linux_amd64.zip
unzip terraform_0.12.25_linux_amd64.zip
mv ./terraform /usr/bin/
## Install Helm3
curl -fsSL -o get_helm.sh https://raw.githubusercontent.com/helm/helm/main/scripts/get-helm-3
chmod 700 get_helm.sh
./get_helm.sh
```
#### Install credentials plugin for GKE and AKS infrastructure types
Add the following install scripts to the `INIT_SCRIPT` to install the credentials plugin for GKE and AKS infrastructure types if you're using `kubectl` version 1.26.x or later.
{% hint style="info" %}
If you're using a custom delegate with `kubelogin` and certificate type of authentication, then you must install Azure CLI. Alternatively, you can install the `harness-credentials-plugin` to take care of this flow without Azure CLI.
{% endhint %}
```yaml
- name: INIT_SCRIPT
value: |
## for AKS
mkdir -m 777 -p client-tools/kubelogin/v0.1.1 \
&& curl -s -L -o client-tools/kubelogin/v0.1.1/kubelogin https://app.harness.io/public/shared/tools/kubelogin/release/v0.1.1/bin/linux/amd64/kubelogin
export PATH=/opt/harness-delegate/client-tools/kubelogin/v0.1.1/:$PATH
## for GKE or AKS with certificate auth type
mkdir -m 777 -p client-tools/harness-credentials-plugin/v0.1.0 \
&& curl -s -L -o client-tools/harness-credentials-plugin/v0.1.0/harness-credentials-plugin https://app.harness.io/public/shared/tools/harness-credentials-plugin/release/v0.1.0/bin/linux/amd64/harness-credentials-plugin
export PATH=/opt/harness-delegate/client-tools/harness-credentials-plugin/v0.1.0/:$PATH
```
### Apply the changes
You can modify the delegate YAML before or after you install the delegate.
If you haven't yet installed the delegate, finish [Installing the delegate](/harness-ai/troubleshooting-and-resources/tutorials/install-delegate) in your target environment.
If you already installed the delegate, you need to apply the updated delegate YAML and restart the delegate. For example, if your delegate is in a Kubernetes cluster, run the kubectl command to apply it:
```
kubectl apply -f harness-delegate.yml
```
Wait a few minutes for the delegate to start up. You can check the delegate status in the Harness Platform.

### Test your tools
You can either run an existing pipeline that requires one of the tools you installed, or create a test pipeline with a simple script to confirm that a tool was installed.
1. Create a pipeline and add a **Custom** stage.
2. Add a **Shell Script** step.
3. Enter a simple script, such as a version check, for the tool that you installed.
For example, if you installed the Git client, you could run `git --version`, or if you installed the AWS CLI, you could run `aws --version`.

You can modify this step to test any command for the tool. For example, if you installed Helm, you could run a test to deploy a Helm chart:
```
helm create my-new-chart
helm install my-new-chart ./my-new-chart
helm ls
```
4. Set the **Execution Target** to **On Delegate**.
5. On the **Advanced** tab, select the delegate you just modified.

6. Save and run the pipeline. If the tool was installed on the delegate successfully, you should see the output of your script in the execution logs.

{% @harness-feedback/feedback module="harness-ai" pagePath="harness-ai/use-harness-platform/delegates/delegate/install-delegates/install-a-delegate-with-3-rd-party-tool-custom-binaries" %}
# Build custom delegate images with third-party tools
This document explains how to build and host custom delegate images that include the tools you select.
Harness Manager installs and configures delegates with the binaries that most CI/CD pipelines require. In some cases, however, a preconfigured image isn't the right fit. For example, preconfigured images can:
* Introduce the vulnerabilities of the binaries they include.
* Restrict you to the use of the included third-party tools and versions.
This document explains how you can:
* Build and host a custom delegate image that includes the tools you select.
* Use your custom delegate in CI/CD pipelines.
{% hint style="info" %}
Delegates with an immutable image type (image tag `yy.mm.xxxxx`) include non-root user privileges and are compatible with OpenShift. For information on delegate types, go to [Delegate image types](/harness-ai/use-harness-platform/delegates/delegate/delegate-concepts/delegate-image-types).
{% endhint %}
### About the Harness Delegate minimal image
Harness recommends that you use the Harness Delegate minimal image (*`yy.mm.xxxxx.minimal`*) when you set up the Harness Platform for production use. This image has been thoroughly scanned and is free of any high or critical vulnerabilities. Users focused on security tend to prefer this option.
However, the minimal delegate image lacks some binaries that are required for Continuous Delivery (CD) steps to function properly and remain vulnerability-free from third-party tools. Consequently, using the minimal delegate image requires you to configure your delegates and install necessary binaries. For information on delegate types, go to [Delegate image types](/harness-ai/use-harness-platform/delegates/delegate/delegate-concepts/delegate-image-types).
The Harness Delegate minimal image (*`yy.mm.xxxxx.minimal`*) is a lighter, more secure version of the default Harness Delegate image. Its main purpose is to provide an enhanced security profile for users, especially those who prioritize their systems' security. The Harness Delegate minimal images includes the following features.
* **Security Scanned:** The image undergoes rigorous scanning processes to ensure that it is devoid of any high-risk or critical vulnerabilities. This makes it an optimal choice for organizations or users who have stringent security requirements. Harness aims to minimize critical/high vulnerabilities within this image. Achieving complete mitigation isn't always possible due to the continual discovery of vulnerabilities in third-party libraries/tools without immediate remediation.
* **Limited Binaries:** Unlike the standard delegate, the minimal image does not include all of the default binaries. While this contributes to its lightweight nature and security, it also means that users have additional responsibilities. They must manually configure and add any necessary binaries to make their setup functional.
* **User Responsibilities:** Because the minimal delegate image is devoid of the default binaries, users are in charge of tailoring it to their needs. This includes installing specific binaries essential for their CD steps. This level of control also allows users to maintain an updated environment. By installing the latest versions of necessary binaries, they can ensure that the delegate remains free from potential vulnerabilities found in outdated third-party tools.
* **Preferred by Security-Conscious Users:** Due to its clean security slate, many users who prioritize system security gravitate towards the minimal delegate image. By starting with a minimal setup and adding only what is necessary, they can maintain a tighter control over the software and tools present, thus minimizing potential security risks.
### Use the delegate minimal image to create a custom delegate image
#### Select the delegate minimal image
You can build on either of the following Harness-provided images.
| **Image** | **Description** |
| ------------------------------------- | -------------------------------------------------------------------------------------------------------- |
| Harness Delegate Docker image | A publicly available Docker image providing Harness Delegate. |
| Harness Minimal Delegate Docker image | A minimal delegate image is available in Docker Hub at . |
Use the last published `yy.mm.xxxxx` version of the minimal image from the Docker repository.

#### Build the delegate image
When you build a custom delegate image, you modify the image you select with user privileges and binaries. This section explains the build script used for the process. In this example, the script builds a custom image for deployment by Kubernetes and by Terraform.
The first lines of the script provide information about the base image and user privileges. This example uses the minimal image with delegate minor version 77029.
```
FROM harness/delegate:24.04.82804.minimal
USER root
```
The delegate container is granted root user privileges.
The first `RUN` block installs or updates the `unzip` and `yum-utils` tools. The `--nodocs` option prevents the installation of documentation on the image.
```
RUN microdnf update \
&& microdnf install --nodocs \
unzip \
yum-utils
```
The second `RUN` block uses the `yum` utility to create a configuration file for the HashiCorp repository, and then uses the `microdnf` package manager to install the required Terraform components:
```
RUN yum-config-manager --add-repo https://rpm.releases.hashicorp.com/RHEL/hashicorp.repo \
&& microdnf install -y terraform
```
The final `RUN` block retrieves the Kubernetes `kubectl` command-line tool that is required to manipulate clusters. The Linux `chmod +x` instruction makes the utility executable:
```
RUN mkdir /opt/harness-delegate/tools && cd /opt/harness-delegate/tools \
&& curl -LO "https://dl.k8s.io/release/$(curl> -L -s https://dl.k8s.io/release/stable.txt)/bin/linux/amd64/kubectl" && chmod +x kubectl
```
The `ENV` instruction defines the Linux `$PATH` environment variable that provides the location of the tools to be installed:
```
ENV PATH=/opt/harness-delegate/tools/:$PATH
```
The final instruction switches the user back to `harness` to ensure the custom image does not run as root:
```
USER harness
```
The complete script is as follows:
```
FROM harness/delegate:24.04.82804.minimal
USER root
RUN microdnf update \
&& microdnf install --nodocs \
unzip \
yum-utils
RUN yum-config-manager --add-repo https://rpm.releases.hashicorp.com/RHEL/hashicorp.repo \
&& microdnf install -y terraform
RUN mkdir /opt/harness-delegate/tools && cd /opt/harness-delegate/tools \
&& curl -LO "https://dl.k8s.io/release/$(curl -L -s https://dl.k8s.io/release/stable.txt)/bin/linux/amd64/kubectl" && chmod +x kubectl
ENV PATH=/opt/harness-delegate/tools/:$PATH
USER harness
```
The following example Dockerfile adds all the tools necessary for the Harness platform that are not part of the base image to the minimal delegate. You can remove tools for features you don't use or update versions for your requirements.
Example Dockerfile with all tools
```
FROM harness/delegate:yy.mm.xxxxx.minimal
USER 0
ENV TARGETARCH=amd64
RUN microdnf install --nodocs git \
&& microdnf clean all \
&& rm -rf /var/cache/yum
RUN mkdir -m 777 -p client-tools/kubectl/v1.24.3 \
&& curl -s -L -o client-tools/kubectl/v1.24.3/kubectl https://app.harness.io/public/shared/tools/kubectl/release/v1.24.3/bin/linux/$TARGETARCH/kubectl \
&& mkdir -m 777 -p client-tools/helm/v2.13.1 \
&& curl -s -L -o client-tools/helm/v2.13.1/helm https://app.harness.io/public/shared/tools/helm/release/v2.13.1/bin/linux/$TARGETARCH/helm \
&& mkdir -m 777 -p client-tools/helm/v3.1.2 \
&& curl -s -L -o client-tools/helm/v3.1.2/helm https://app.harness.io/public/shared/tools/helm/release/v3.1.2/bin/linux/$TARGETARCH/helm \
&& mkdir -m 777 -p client-tools/helm/v3.8.0 \
&& curl -s -L -o client-tools/helm/v3.8.0/helm https://app.harness.io/public/shared/tools/helm/release/v3.8.0/bin/linux/$TARGETARCH/helm \
&& mkdir -m 777 -p client-tools/go-template/v0.4.2 \
&& curl -s -L -o client-tools/go-template/v0.4.2/go-template https://app.harness.io/public/shared/tools/go-template/release/v0.4.2/bin/linux/$TARGETARCH/go-template \
&& mkdir -m 777 -p client-tools/harness-pywinrm/v0.4-dev \
&& curl -s -L -o client-tools/harness-pywinrm/v0.4-dev/harness-pywinrm https://app.harness.io/public/shared/tools/harness-pywinrm/release/v0.4-dev/bin/linux/$TARGETARCH/harness-pywinrm \
&& mkdir -m 777 -p client-tools/chartmuseum/v0.15.0 \
&& curl -s -L -o client-tools/chartmuseum/v0.15.0/chartmuseum https://app.harness.io/public/shared/tools/chartmuseum/release/v0.15.0/bin/linux/$TARGETARCH/chartmuseum \
&& mkdir -m 777 -p client-tools/tf-config-inspect/v1.2 \
&& curl -s -L -o client-tools/tf-config-inspect/v1.2/terraform-config-inspect https://app.harness.io/public/shared/tools/terraform-config-inspect/v1.2/linux/$TARGETARCH/terraform-config-inspect \
&& mkdir -m 777 -p client-tools/oc/v4.2.16 \
&& curl -s -L -o client-tools/oc/v4.2.16/oc https://app.harness.io/public/shared/tools/oc/release/v4.2.16/bin/linux/$TARGETARCH/oc \
&& mkdir -m 777 -p client-tools/kustomize/v4.5.4 \
&& curl -s -L -o client-tools/kustomize/v4.5.4/kustomize https://app.harness.io/public/shared/tools/kustomize/release/v4.5.4/bin/linux/$TARGETARCH/kustomize \
&& mkdir -m 777 -p client-tools/scm/f1024c6b \
&& curl -s -L -o client-tools/scm/f1024c6b/scm https://app.harness.io/public/shared/tools/scm/release/f1024c6b/bin/linux/$TARGETARCH/scm \
&& chmod -R 775 /opt/harness-delegate \
&& chgrp -R 0 /opt/harness-delegate \
&& chown -R 1001 /opt/harness-delegate
ENV PATH=/opt/harness-delegate/client-tools/kubectl/v1.24.3/:$PATH
ENV PATH=/opt/harness-delegate/client-tools/go-template/v0.4.2/:$PATH
ENV PATH=/opt/harness-delegate/client-tools/chartmuseum/v0.15.0/:$PATH
ENV PATH=/opt/harness-delegate/client-tools/tf-config-inspect/v1.2/:$PATH
ENV PATH=/opt/harness-delegate/client-tools/kustomize/v4.5.4/:$PATH
USER 1001
```
#### Upload the image to Docker Hub
The next step is to upload your custom image to Docker Hub. For information on working with Docker repositories, go to [Manage repositories](https://docs.docker.com/docker-hub/repos/) in the Docker documentation.
#### Modify the delegate manifest
Before you can deploy a delegate, you must:
* Update the image path to the repository location of the custom image.
* Suspend delegate auto-upgrade functionality.
Delegate auto-upgrade is not compatible with custom images.
Example manifest file
```yaml
apiVersion: v1
kind: Namespace
metadata:
name: harness-delegate-ng
---
apiVersion: rbac.authorization.k8s.io/v1
kind: ClusterRoleBinding
metadata:
name: harness-delegate-ng-cluster-admin
subjects:
- kind: ServiceAccount
name: default
namespace: harness-delegate-ng
roleRef:
kind: ClusterRole
name: cluster-admin
apiGroup: rbac.authorization.k8s.io
---
apiVersion: v1
kind: Secret
metadata:
name: custom-del-account-token
namespace: harness-delegate-ng
type: Opaque
data:
DELEGATE_TOKEN: ""
---
apiVersion: apps/v1
kind: Deployment
metadata:
labels:
harness.io/name: custom-del
name: custom-del
namespace: harness-delegate-ng
spec:
replicas: 1
selector:
matchLabels:
harness.io/name: custom-del
template:
metadata:
labels:
harness.io/name: custom-del
annotations:
prometheus.io/scrape: "true"
prometheus.io/port: "3460"
prometheus.io/path: "/api/metrics"
spec:
terminationGracePeriodSeconds: 600
restartPolicy: Always
containers:
- image: foobar/org:custom-delegate
imagePullPolicy: Always
name: delegate
securityContext:
allowPrivilegeEscalation: false
runAsUser: 0
ports:
- containerPort: 8080
resources:
limits:
cpu: "0.5"
memory: "2048Mi"
requests:
cpu: "0.5"
memory: "2048Mi"
livenessProbe:
httpGet:
path: /api/health
port: 3460
scheme: HTTP
initialDelaySeconds: 10
periodSeconds: 10
failureThreshold: 2
startupProbe:
httpGet:
path: /api/health
port: 3460
scheme: HTTP
initialDelaySeconds: 30
periodSeconds: 10
failureThreshold: 15
envFrom:
- secretRef:
name: custom-del-account-token
env:
- name: JAVA_OPTS
value: "-Xms64M"
- name: ACCOUNT_ID
value:
- name: MANAGER_HOST_AND_PORT
value: https://app.harness.io/gratis
- name: DELEGATE_NAME
value: custom-del
- name: DELEGATE_TYPE
value: "KUBERNETES"
- name: DELEGATE_NAMESPACE
valueFrom:
fieldRef:
fieldPath: metadata.namespace
- name: INIT_SCRIPT
value: ""
- name: DELEGATE_DESCRIPTION
value: ""
- name: DELEGATE_TAGS
value: ""
- name: NEXT_GEN
value: "true"
---
apiVersion: v1
kind: Service
metadata:
name: delegate-service
namespace: harness-delegate-ng
spec:
type: ClusterIP
selector:
harness.io/name: custom-del
ports:
- port: 8080
---
kind: Role
apiVersion: rbac.authorization.k8s.io/v1
metadata:
name: upgrader-cronjob
namespace: harness-delegate-ng
rules:
- apiGroups: ["batch", "apps", "extensions"]
resources: ["cronjobs"]
verbs: ["get", "list", "watch", "update", "patch"]
- apiGroups: ["extensions", "apps"]
resources: ["deployments"]
verbs: ["get", "list", "watch", "create", "update", "patch"]
---
kind: RoleBinding
apiVersion: rbac.authorization.k8s.io/v1
metadata:
name: custom-del-upgrader-cronjob
namespace: harness-delegate-ng
subjects:
- kind: ServiceAccount
name: upgrader-cronjob-sa
namespace: harness-delegate-ng
roleRef:
kind: Role
name: upgrader-cronjob
apiGroup: ""
---
apiVersion: v1
kind: ServiceAccount
metadata:
name: upgrader-cronjob-sa
namespace: harness-delegate-ng
---
apiVersion: v1
kind: Secret
metadata:
name: custom-del-upgrader-token
namespace: harness-delegate-ng
type: Opaque
data:
UPGRADER_TOKEN: "YOUR_DELEGATE_TOKEN"
---
apiVersion: v1
kind: ConfigMap
metadata:
name: custom-del-upgrader-config
namespace: harness-delegate-ng
data:
config.yaml: |
mode: Delegate
dryRun: false
workloadName: custom-del
namespace: harness-delegate-ng
containerName: delegate
delegateConfig:
accountId: YOUR_ACCOUNT_ID
managerHost: https://app.harness.io/gratis
---
apiVersion: batch/v1beta1
kind: CronJob
metadata:
labels:
harness.io/name: custom-del-upgrader-job
name: custom-del-upgrader-job
namespace: harness-delegate-ng
spec:
suspend: true
schedule: "0 */1 * * *"
concurrencyPolicy: Forbid
startingDeadlineSeconds: 20
jobTemplate:
spec:
template:
spec:
serviceAccountName: upgrader-cronjob-sa
restartPolicy: Never
containers:
- image: harness/upgrader:latest
name: upgrader
imagePullPolicy: Always
envFrom:
- secretRef:
name: custom-del-upgrader-token
volumeMounts:
- name: config-volume
mountPath: /etc/config
volumes:
- name: config-volume
configMap:
name: custom-del-upgrader-config
```
**Upgrade the image path**
Open the delegate manifest file and locate the container `spec` (`spec.containers`). Change the image path to reflect the repository location of your uploaded image as shown in the following YAML.
```yaml
spec:
terminationGracePeriodSeconds: 600
restartPolicy: Always
containers:
- image: example/org:custom-delegate
imagePullPolicy: Always
name: delegate
securityContext:
allowPrivilegeEscalation: false
runAsUser: 0
```
For purposes of this example, the image was uploaded to `example/org:custom-delegate`.
**Suspend delegate auto-upgrade**
Before you deploy a custom delegate, you must suspend its auto-upgrade functionality. This step prevents your image from being automatically upgraded and the installed binaries removed.
To suspend auto-upgrade, in the delegate manifest, locate the `CronJob` resource. In the resource `spec`, set the `suspend` field to `true` as shown in the following YAML:
```yaml
apiVersion: batch/v1beta1
kind: CronJob
metadata:
labels:
harness.io/name: custom-del-upgrader-job
name: custom-del-upgrader-job
namespace: harness-delegate-ng
spec:
suspend: true
schedule: "0 */1 * * *"
concurrencyPolicy: Forbid
startingDeadlineSeconds: 20
```
#### Deploy the delegate
You can deploy the delegate from Harness Manager or by applying the modified delegate manifest file to your cluster.

You can confirm the successful deployment and registration of the delegate in Harness Manager. Check the delegate information to ensure that auto-upgrade is not enabled.
### Use your custom delegate image in pipelines
You can use your registered delegate to run Kubernetes and Terraform pipelines. It is a good idea to run a pipeline to validate the delegate image. Harness steps in your pipelines use the installed tooling on the delegate to perform builds or deployments.
For information about creating a Kubernetes pipeline, go to [Kubernetes deployment tutorial](/continuous-delivery/use-continuous-delivery/deploy-services-on-different-platforms/kubernetes/kubernetes-cd-quickstart).
For information about creating a Terraform Plan, go to [Provision with the Terraform Apply Step](/continuous-delivery/use-continuous-delivery/provision-infrastructure/terraform-infra/run-a-terraform-plan-with-the-terraform-apply-step).
{% @harness-feedback/feedback module="harness-ai" pagePath="harness-ai/use-harness-platform/delegates/delegate/install-delegates/build-custom-delegate-images-with-third-party-tools" %}
# Enable root user privileges to add custom binaries
Learn how to enable root user privileges for Harness delegates to install custom binaries and modify delegate images.
You can install Harness Delegate with or without root user privileges. By default, the Harness Delegate container runs as root user.
The delegate installer provides the option to install the delegate with non-root user privileges. Non-root user access supports the security principle of minimum access. But without root user access, you cannot modify the delegate image with custom binaries.
This topic explains how to use the delegate installer to install with or without root user privileges. This topic also explains how to modify an installed delegate to enable root user privileges and the installation of custom binaries.
{% hint style="info" %}
**NOTE**
You might need additional permissions to execute commands in delegate scripts and create Harness users.
{% endhint %}
#### Delegate images
Harness provides the following delegate images. Each image includes a set of tools that target a particular scenario.
| **Delegate Image** | **Description** |
| -------------------------------------- | ----------------------------------------------------------------------------------------------------------- |
| harness/delegate:*yy.mm.verno* | Includes the delegate and its dependencies. Includes client tools such as `kubectl`, Helm, and ChartMuseum. |
| harness/delegate:*yy.mm.verno*.minimal | Includes the delegate and its dependencies. |
For detailed information on Docker delegate installation, go to [Install a Docker delegate](/harness-ai/use-harness-platform/delegates/delegate/install-delegates/overview).
#### Set user privileges
{% tabs %}
{% tab title="Kubernetes" %}
You can set privileges in the Helm chart or the Kubernetes manifest.
#### Specify user privileges in delegate YAML
To add binaries to a delegate image that was installed without root user privileges, you can change the delegate manifest file to allow them. To do so, locate the container `spec` and ensure it includes the following `securityContext` object:
```yaml
spec:
containers:
- image: harness/delegate:ng
imagePullPolicy: Always
name: harness-delegate-instance
securityContext:
allowPrivilegeEscalation: false
runAsUser: 0
```
{% endtab %}
{% tab title="Amazon ECS or AWS Fargate" %}
You can set privileges in the task definition parameters with the `user` option. For more information, go to [Task definition parameters](https://docs.aws.amazon.com/AmazonECS/latest/developerguide/task_definition_parameters.html#container_definitions) in the AWS documentation.
{% endtab %}
{% tab title="Docker" %}
You can set privileges in the `docker run` command with the `--user` option. For more information, go to [docker run](https://docs.docker.com/engine/reference/commandline/run/) in the Docker documentation.
{% endtab %}
{% endtabs %}
#### Use INIT\_SCRIPT with the microdnf package manager
To add binaries, you must first install the `microdnf` package manager on the delegate image. This utility is required to run installations and other operations on images.
Use the `INIT_SCRIPT` environment variable to specify the custom binaries you want `microdnf` to install.
```
- name: INIT_SCRIPT
value: |-
microdnf install -y zip unzip
```
In this example, the value of `INIT_SCRIPT` is the `microdnf install` instruction that installs the `zip` and `unzip` packages.
Note that the `apt-get` command-line tool and profile scripts target an earlier Ubuntu-based image and are not supported for these images.
{% @harness-feedback/feedback module="harness-ai" pagePath="harness-ai/use-harness-platform/delegates/delegate/install-delegates/enable-root-user-privileges-to-add-custom-binaries" %}
# Install a delegate on Google Cloud Run
Learn how to install and configure a Harness delegate on Google Cloud Run.
Harness Delegate is essential for connecting your infrastructure with the Harness platform, enabling seamless deployments. Harness Delegates typically run on VMs, Kubernetes clusters, or ECS Fargate, but Google Cloud Run presents a lightweight, cost-efficient, and scalable alternative.
This guide provides step-by-step instructions to configure a Harness Delegate on Google Cloud Run.
#### Prerequisites
1. Ensure you have an active [Harness account](https://app.harness.io) with the necessary permissions.
2. A Google Cloud service account with appropriate IAM roles:
```bash
roles/run.admin # - Cloud Run Admin
roles/iam.serviceAccountUser # - Service Account User
roles/artifactregistry.reader # - For pulling images from GAR
```
#### Harness Delegate on Google Cloud Run
To configure a delegate on Google Cloud Run:
1. Login to [Google Cloud Run](https://console.cloud.google.com/run), Select an existing project or create a new one as needed.
* Check for Deploy container → Service as shown below:

2. To create a service, follow these steps:
2.1. Add Container Image URL. You can select it from [Artifact Registry](https://console.cloud.google.com/artifacts/docker/gar-prod-setup/us/harness-public/harness%2Fdelegate) or provide a [Docker Hub Image URL](https://hub.docker.com/r/harness/delegate/tags).
2.2. To configure a service, enter a name, select a region, choose a billing method (request-based or instance-based), and set up scaling. You can configure Auto Scaling by setting the minimum number of instances based on your requirements or switch to Manual Scaling.
```
For now, we will opt for Manual Scaling and set the number of instances to 1.
```
2.3. Configure Ingress to control access to Cloud Run services. For now, select "All" to allow direct access from the internet.
3. To edit container configuration, click **Container(s), Volumes, Networking, Security** section to expand the options and set the following details accordingly.
* Container Port: 3460
* Settings → Container Name: Set an appropriate name (this will be used as the container image name).
* Resources → Memory: At least 2Gi, CPU: 1
4. Click Add Health Checks, then configure the Startup Probe and Liveness Probe as follows:
* Select Protocol: HTTP
* Set Path: `/api/health`
* Startup Probe: Set an initial delay of 120s
* Liveness Probe: Set an initial delay of 0s (all other settings remain the same as Startup probe) as shown in image below.
* Click Add to proceed.
5. To configure Environment Variables, scroll up and select Variables & Secrets next to Settings.
These environment variables are the same as those in the delegate installation step available in the Harness UI, as shown below.
````
- Log in to your [Harness account](https://app.harness.io/). Navigate to Account Settings → Account-level Resources → Delegate.
- Click New Delegate to access the installation steps as show below:
```bash
docker run --cpus=1 --memory=2g \
-e DELEGATE_NAME=docker-delegate-demo \
-e NEXT_GEN="true" \
-e DELEGATE_TYPE="DOCKER" \
-e ACCOUNT_ID=gVcEXXXXXXXXA3JqA \
-e DELEGATE_TOKEN=ZmY5MXXXXBlMTIwOXXXXXXXQ2Zjc1NjI4MDQ= \
-e DELEGATE_TAGS="" \
-e MANAGER_HOST_AND_PORT=https://app.harness.io/gratis 24.10.84107
```
- Set the variables in Variables & Secrets by adding the following key-value pairs:
**KEEPING YOUR DELEGATE ALWAYS RUNNING ON GOOGLE CLOUD RUN**
Google Cloud Run automatically scales your service based on real-time traffic, which helps optimize resources but can affect services like delegates that need to stay up.
- You can set min and max replicas, but Google still manages the actual scaling based on demand.
- Each new revision gets 100% of the traffic by default, causing older ones to scale down.
- If there's no traffic, Cloud Run may stop the container.
To ensure your delegate remains active and is always available, add the following environment variables:
- `INIT_SCRIPT`: `nohup bash -c "while true; do curl -s https:///api/health; sleep 30; done" &`
- The INIT_SCRIPT ensures the container continuously runs the required startup logic. You can find the service URL, as shown in the GIF below.
- `HOST_NAME_COMMAND`: echo uniqdelegate-$(openssl rand -hex 3)
```bash
DELEGATE_NAME=""
NEXT_GEN="true"
DELEGATE_TYPE="DOCKER"
ACCOUNT_ID=""
DELEGATE_TOKEN=""
MANAGER_HOST_AND_PORT=""
HOST_NAME_COMMAND=`echo uniqdelegate-$(openssl rand -hex 3)`
INIT_SCRIPT=`nohup bash -c "while true; do curl -s https:///api/health; sleep 30; done" &`
# (Optional) Add delegate tags if needed
DELEGATE_TAGS="tag1"
```
````
6\. Click Create to complete the setup.
7. To confirm the delegate is created and running, check its status in the Harness UI on Delegate page as shown in image below.
{% @harness-feedback/feedback module="harness-ai" pagePath="harness-ai/use-harness-platform/delegates/delegate/install-delegates/install-delegate-on-google-cloud-run" %}
# Deploy a Docker delegate to Amazon ECS or AWS Fargate
Learn how to deploy a Docker delegate to Amazon ECS or AWS Fargate clusters with configuration examples and best practices.
Harness Delegate carries out the tasks in your Continuous Integration (CI) and Continuous Delivery (CD) pipelines. The delegate is a software component that installs in your environment and registers with Harness Manager. The delegate connects to Harness Manager for the assignment and completion of CI/CD tasks.
You can use Harness to deploy a Docker delegate to Amazon Elastic Container Service (ECS) or AWS Fargate.
### Considerations before using ECS-configured Docker delegates
Review the following information about using Harness ECS-configured Docker delegates to ensure seamless and secure deployment of your applications and services.
* **ECS-configured Docker delegates do not auto-update:** If you are using a delegate configured through ECS, auto-update of the delegate is not supported.
* **Concerns with auto-upgrading the delegate:** The convenience of automatic updates is obvious, but it raises certain security concerns. As delegates are updated, new binaries and tools may be introduced. There is no way to scan these additions, which can lead to potential vulnerabilities. Due to these concerns, Harness recommends using custom delegates for production use. If you use the Docker delegate on AWS ECS Fargate, Harness recommends that you manually update the delegate on a regular cadence, either every 3 or 6 months. This ensures a balance between security and feature updates.
* **Limitations with Docker delegate on an AWS ECS Fargate-backed instance:** When operating ECS delegates on AWS Fargate, it's critical to note that AWS Fargate will terminate the delegate if the tasks running on the delegate exceed the infrastructure's specified limits. This is a limitation inherent in using infrastructure not owned by the customer. Harness Delegate cannot circumvent this restriction. However, ECS delegates operating on an EC2 instance do not have this issue. To avoid this limitation, consider using Kubernetes delegates where the infrastructure and associated YAML definitions address these issues.
### Deploy a delegate to Amazon ECS
Use these steps to deploy a delegate to an ECS cluster as an ECS service. The installed delegate connects to your AWS resources.
This process requires a delegate with an immutable image type. For more information, go to [Delegate image types](/harness-ai/use-harness-platform/delegates/delegate/delegate-concepts/delegate-image-types).
{% hint style="info" %}
You can also [use a Terraform module to deploy a delegate to an ECS cluster](#deploy-a-delegate-using-terraform).
{% endhint %}
#### Create the cluster
Create an ECS cluster. Use an EC2 instance type with networking. For more information, go to [EC2 instance types](https://aws.amazon.com/ec2/instance-types/) in the AWS documentation.
#### Create the task definition
1. Copy the following task `spec` into a file. Save the file as `task-spec.json`.
```json
{
"containerDefinitions": [
{
"cpu": 1,
"environment": [
{
"name": "ACCOUNT_ID",
"value": ""
},
{
"name": "DELEGATE_TOKEN",
"value": ""
},
{
"name": "MANAGER_HOST_AND_PORT",
"value": ""
},
{
"name": "DELEGATE_NAME",
"value": ""
},
{
"name": "DELEGATE_TAGS",
"value": ""
},
{
"name": "INIT_SCRIPT",
"value": ""
},
{
"name": "DELEGATE_TYPE",
"value": "DOCKER"
},
{
"name": "NEXT_GEN",
"value": "true"
}
],
"memory": 2048,
"image": "",
"essential": true,
"hostname": "",
"name": ""
}
],
"memory": "2048",
"requiresCompatibilities": [
"EC2"
],
"cpu": "1024",
"family": "harness-delegate-task-spec"
}
```
2. Copy and paste the above JSON into task definition on Amazon ECS console. Refer the image below:

3. Enter the fields of the task definition as follows:
| **Field** | **Description** |
| ----------------------- | ---------------------------------------------------------------------------------------------------------------------------------------------------------------------------------------------------------- |
| `ACCOUNT_ID` | Your Harness account ID. |
| `DELEGATE_TOKEN` | The delegate token stored in your Harness account. |
| `MANAGER_HOST_AND_PORT` | Information about your manager host. This depends on the Harness production cluster you use: Prod1: , Prod2: , or Prod3: . |
| `DELEGATE_NAME` | The name you gave your delegate. This is usually the name you specified during delegate installation. |
| `IMAGE` | Use the most recent delegate image from . The correct image uses an image tag in the following format: `harness/delegate:yy.mm.xxxxx`. |
#### Create your services
Use the following steps to create a service.
1. Open AWS CLI. Use the following instruction to create your AWS services:
```
aws ecs create-service --service-name --task-definition harness-delegate-task-spec --cluster --desired-count 1
```
Replace `service-name` with the unique name of your service. Replace `task-definition` with the task definition that the service runs. For information on the specification of ECS service parameters, go to [`create-service`](https://docs.aws.amazon.com/cli/latest/reference/ecs/create-service.html).
2. Use the following instruction to increase the count of replica pods to the desired number:
```
harness-delegate-task-spec --cluster --desired-count 1
```
### Deploy a delegate to Amazon Fargate
Use the following steps to deploy a delegate to an Amazon Fargate cluster. This process requires a delegate with an immutable image. For more information, go to [Delegate image types](/harness-ai/use-harness-platform/delegates/delegate/delegate-concepts/delegate-image-types).
#### Create the cluster
Create a cluster on Amazon Fargate. Use an instance type with networking. For more information, go to [EC2 instance types](https://aws.amazon.com/ec2/instance-types/) in the AWS documentation.
#### Create the task definition
Use the following steps to create a task definition. For information about task definitions in Amazon ECS, go to [Task definition template](https://docs.aws.amazon.com/AmazonECS/latest/developerguide/task-definition-template.html).
1. Copy the following task `spec` into a file. Save the file as `task-spec.json`.
```json
{
"containerDefinitions": [
{
"cpu": 1,
"environment": [
{
"name": "ACCOUNT_ID",
"value": ""
},
{
"name": "DELEGATE_TOKEN",
"value": ""
},
{
"name": "MANAGER_HOST_AND_PORT",
"value": ""
},
{
"name": "DELEGATE_NAME",
"value": ""
},
{
"name": "DELEGATE_TAGS",
"value": ""
},
{
"name": "INIT_SCRIPT",
"value": ""
},
{
"name": "DELEGATE_TYPE",
"value": "DOCKER"
},
{
"name": "NEXT_GEN",
"value": "true"
}
],
"memory": 2048,
"image": "",
"essential": true,
"name": "ecs-delegate-im"
}
],
"executionRoleArn": "arn:aws:iam:::role/ecsTaskExecutionRole",
"memory": "6144",
"requiresCompatibilities": [
"FARGATE"
],
"networkMode": "awsvpc",
"cpu": "1024",
"family": "harness-delegate-task-spec"
}
```
2. Edit the fields of the task definition as follows.
| **Field** | **Description** |
| ----------------------- | ---------------------------------------------------------------------------------------------------------------------------------------------------------------------------------------------------------- |
| `ACCOUNT_ID` | Your Harness account ID. |
| `DELEGATE_TOKEN` | The delegate token stored in your Harness account. |
| `MANAGER_HOST_AND_PORT` | Information about your manager host. This depends on the Harness production cluster you use: Prod1: , Prod2: , or Prod3: . |
| `DELEGATE_NAME` | The name you gave your delegate. This is usually the name you specified during delegate installation. |
| `IMAGE` | Use the most recent delegate image from . The correct image uses an image tag in the following format: `harness/delegate:yy.mm.xxxxx`. |
| `AWS_ACCOUNT_ID` | Your AWS account ID. |
#### Create the service
1. Edit the `service.json` file as follows:
```json
{
"launchType": "FARGATE",
"cluster": "",
"serviceName": "",
"taskDefinition": "harness-delegate-task-spec",
"desiredCount": 1,
"loadBalancers": [],
"networkConfiguration": {
"awsvpcConfiguration": {
"subnets": [
""
],
"securityGroups": [
"SEC_GROUP"
],
"assignPublicIp": "ENABLED"
}
},
"platformVersion": "LATEST",
"schedulingStrategy": "REPLICA",
"enableECSManagedTags": true
}
```
2. After the service is created and modified, use the JSON files to register the task and service definitions.
3. From AWS CLI, use the following instructions to register the task definition:
```
aws ecs register-task-definition --cli-input-json file://task-spec.json
```
4. Then register the service definition:
```
aws ecs create-service --cli-input-json file://service.json
```
### Deploy a delegate using Terraform
The above steps to [deploy a delegate to ECS](#deploy-a-delegate-to-amazon-ecs) are also available in a Terraform module that you can reference directly or use as a starting point for your own automation. You can use an existing ECS cluster (EC2- or Fargate-based) or let the module create one for you.
To access the module, go to [Harness Community GitHub](https://github.com/harness-community/terraform-aws-harness-delegate-ecs-fargate).
{% hint style="warning" %}
**DISCLAIMER: COMMUNITY-MAINTAINED RESOURCE**
The [Terraform module](https://github.com/harness-community/terraform-aws-harness-delegate-ecs-fargate) for deploying a Harness delegate on ECS Fargate is hosted in a community-maintained GitHub repository and is provided as-is for reference.
* This solution is not officially supported or maintained by Harness.
* It may be outdated and might not support features like Auto-Upgrades.
* Users are advised to treat this as sample/example code only.
{% endhint %}
```terraform
module "delegate" {
source = "git::https://github.com/harness-community/terraform-aws-harness-delegate-ecs-fargate.git"
name = "ecs"
harness_account_id = ""
delegate_token_secret_arn = "arn:aws:secretsmanager:us-west-2:012345678901:secret:harness/delegate-zBsttc"
delegate_policy_arns = [
aws_iam_policy.delegate_aws_access.arn
]
security_groups = [
module.vpc.default_security_group_id
]
subnets = module.vpc.private_subnets
}
module "vpc" {
source = "terraform-aws-modules/vpc/aws"
version = "~> 3.0"
name = "this"
cidr = "10.0.0.0/16"
azs = ["us-west-2a", "us-west-2b"]
private_subnets = ["10.0.1.0/24", "10.0.2.0/24"]
public_subnets = ["10.0.4.0/24", "10.0.5.0/24"]
enable_nat_gateway = true
single_nat_gateway = true
enable_dns_hostnames = true
public_subnet_tags = {
"type" = "public"
}
private_subnet_tags = {
"type" = "private"
}
}
resource "aws_iam_policy" "delegate_aws_access" {
name = "delegate_aws_access"
description = "Policy for harness delegate aws access"
policy = <
HA does not require delegate automation. Automation can be useful, however, when multiple delegates are required to perform concurrent tasks, or depending on the compute resources you assign to delegates. A rule of thumb is one delegate for every 300 to 500 service instances.
In addition to compute considerations, you can implement HA for delegates. This means installing multiple delegates in your environment.
For example, in Kubernetes deployments, you can set up two delegates, each in its own pod in the same target Kubernetes cluster. To do so, edit the Kubernetes delegate `spec` you download from Harness to provide multiple replica pods.
```yaml
...
apiVersion: apps/v1beta1
kind: Deployment
metadata:
labels:
harness.io/app: harness-delegate
harness.io/account: xxxx
harness.io/name: test
name: test-zeaakf
namespace: harness-delegate
spec:
replicas: 2
selector:
matchLabels:
harness.io/app: harness-delegate
...
```
In this example, the `spec` section of the harness-kubernetes.yaml file was changed to provide two replica pods. HA is provided without automation.
A Kubernetes cluster requires only one delegate. To create HA in the cluster, you can increase the number of delegate replica pods. Do not add another delegate to the cluster.
If you want to install Kubernetes delegates in separate clusters, do not use the same `harness-kubernetes.yaml` file and name for both delegates. Download a new Kubernetes YAML `spec` from Harness for each delegate you want to install. This prevents name conflicts.
In every case, the delegates must be identical in terms of permissions, keys, connectivity, and so on. With two or more delegates running in the same target environment, HA is provided by default. The failure of a single delegate does not stop Harness from performing deployments. For greater availability, increase the number of replica pods to run three delegates in case you lose two, and so on.
#### Limitations
* Two delegates in different locations do not support HA. For example, if you have one delegate in a development environment and another in a production environment, the development delegate does not communicate with the production delegate. The reverse is also true. If the one delegate deployed to an environment stops running, Harness ceases operation in that environment.
#### Step 1: Duplicate the delegate configuration file
Duplicate the configuration file for a delegate that is installed and registered with your Harness account.
Ensure that the delegate environment variables are set correctly.
The delegate configuration file contains environment variables for account, organization, and project. The account variable is set to your Harness account ID.
If your delegate is registered at the account level, the Organization and Project variables will be empty. If your delegate is registered at the Organization level, the Project variable will be empty.
Before you duplicate the file, review the list of environment variables in the delegate `spec` to ensure they are appropriate for the second delegate. For more information, go to [Delegate environment variables](/harness-ai/use-harness-platform/delegates/delegate/delegate-reference/delegate-environment-variables).
#### Step 2: Rename the new delegate
The process that is used to rename a delegate depends on its type.
**Rename the Kubernetes delegate**
To change the name of a Kubernetes delegate, modify the following fields:
* `Secret.metadata.name`
* `Deployment.metadata.labels.harness.io/name`
* `Deployment.metadata.name`
* `Deployment.spec.selector.matchLabels.harness.io/name`
* `Deployment.spec.template.metadata.labels.harness.io/name`
* `Deployment.spec.containers.envFrom.secretRef`
* `Deployment.metadata.spec.template.spec.env.name: DELEGATE_NAME`
* `Service.metadata.selector.harness.io/name`
* `CronJob.metadata.labels.harness.io/name`
* `CronJob.metadata.name`
The `DELEGATE_NAME` environment variable is specified as a YAML list item:
```yaml
...
- name: DELEGATE_NAME
value: string
...
```
**Rename the Docker delegate**
To change the name of a Docker delegate, set the `DELEGATE_NAME` environment variable to the new name:
```yaml
...
- DELEGATE_NAME = my-new-delegate
...
```
#### Step 3: Install the new delegate
After you update the delegate names, you can apply the configuration file. The delegate installs and registers with Harness.
#### See also
* [Build custom delegate images with third-party tools](/harness-ai/use-harness-platform/delegates/delegate/install-delegates/build-custom-delegate-images-with-third-party-tools)
{% @harness-feedback/feedback module="harness-ai" pagePath="harness-ai/use-harness-platform/delegates/delegate/install-delegates/automate-delegate-installation" %}
# Install Harness Delegate on Google Kubernetes Engine (GKE) with Workload Identity
Deploy a Harness Delegate that uses Workload Identity to access Google Cloud Services
[Workload Identity](https://dev.to/kameshsampath/applying-workload-identity-with-a-demo-1bf9) allows a Kubernetes Service Account (KSA) in your Google Kubernetes Engine (GKE) cluster to act as a Google Identity and Access Management (IAM) Service Account. Pods that use the configured KSA automatically authenticate as the IAM service account when accessing Google Cloud APIs.
This topic explains how to enable Workload Identity on GKE and deploy a Harness Delegate onto Workload Identity-enabled GKE. To demonstrate this, the examples in this topic use Terraform pipelines to deploy GKE and Harness Delegate, and it also builds a simple CI pipeline to push an image to Google Artifact Registry (GAR) without using Google Cloud Platform (GCP) connectors or configuring secrets.
Using a Workload Identity-enabled Harness Delegate can help simplify and secure your pipelines. With this setup, pipelines can use any Google API services by configuring the GSA with the correct roles and permissions, and you no longer need to store or update the Google API credentials in Harness. For example, after deploying a Workload Identity-enabled delegate, you can also do [keyless signing](https://docs.sigstore.dev/cosign/overview/#keyless-signing-of-a-container) of your container images using Google Application Credentials using [cosign](https://sigstore.dev).
### Prerequisites
To use GKE with Workload Identity, you need a [Google Cloud account](https://cloud.google.com) with a Service Account with the following roles:
* `Kubernetes Engine Admin`to create a GKE cluster.
* `Compute Network Admin` to create the virtual private cloud (VPC) networks.
* `Service Account Admin` and `Service Account User` roles or the specific `Service Account` roles used to create, update, or delete a Service Account:
* *iam.serviceAccounts.actAs*
* *iam.serviceAccounts.get*
* *iam.serviceAccounts.create*
* *iam.serviceAccounts.delete*
* *iam.serviceAccounts.update*
* *iam.serviceAccounts.get*
* *iam.serviceAccounts.getIamPolicy*
* *iam.serviceAccounts.setIamPolicy*
To follow along with the examples in this topic, you need the following tools:
* [Google Cloud SDK](https://cloud.google.com/sdk)
* [Terraform](https://developer.hashicorp.com/terraform/downloads)
* [kubectl](https://kubernetes.io/docs/tasks/tools/)
* [Helm](https://helm.sh)
* [Taskfile](https://taskfile.dev)
The examples in this topic use Terraform pipelines to deploy GKE and Harness Delegate. If you want to follow along, clone the sources locally:
```shell
git clone https://github.com/harness-apps/workload-identity-gke-demo.git && cd "$(basename "$_" .git)"
export DEMO_HOME="$PWD"
```
### Configure Google Cloud
1. When working with Google Cloud, the following environment variables help set the Google Cloud context, like Service Account Key file, project, and so on. You can use [direnv](https://direnv.net) or set these variables on your shell:
```shell
export GOOGLE_APPLICATION_CREDENTIALS="the google cloud service account key json file to use"
export CLOUDSDK_ACTIVE_CONFIG_NAME="the google cloud cli profile to use"
export GOOGLE_CLOUD_PROJECT="the google cloud project to use"
export KUBECONFIG="$DEMO_HOME/.kube/config"
```
For more information about gcloud cli configurations, go to the [Google Cloud SDK documentation](https://cloud.google.com/sdk/docs/configurations).
2. You might need to override some Terraform variables that you don't want to check in to VCS. Add them to a file called `.local.tfvars` and set the following environment variable to be picked up by Terraform runs:
```shell
export TFVARS_FILE=.local.tfvars
```
Check the [Inputs](https://github.com/harness-apps/workload-identity-gke-demo#inputs) section for all possible Terraform variables that are configurable.
Example .local.tfvars
```hcl
project_id = "my-awesome-gcp-project"
region = "asia-south1"
cluster_name = "wi-demos"
kubernetes_version = "1.24."
harness_account_id = "REPLACE WITH YOUR HARNESS ACCOUNT ID"
harness_delegate_token = "REPLACE WITH YOUR HARNESS DELEGATE TOKEN"
harness_delegate_name = "wi-demos-delegate"
harness_delegate_namespace = "harness-delegate-ng"
harness_manager_endpoint = "https://app.harness.io/gratis"
```
2. Use Terraform to create a GKE cluster with `WorkloadIdentity` enabled for its nodes.
```shell
task init
```
3. Use Terraform apply to create a GKE Cluster.
```shell
task create_cluster
```
### Deploy the Harness Delegate
Deploy a Harness Delegate onto the GKE cluster.
1. To be able to successfully deploy a Harness Delegate, update the following values in the `.local.tfvars` file,
* `harness_account_id`: Set this to your Harness Account ID, which you can find on your **Account Overview** page in Harness or in any Harness app URL.
* `harness_delegate_token`: This is a [Harness Delegate token](/harness-ai/use-harness-platform/delegates/delegate/secure-delegates/secure-delegates-with-tokens).
* `harness_delegate_name`: Defaults to `harness-delegate`.
* `harness_delegate_namespace`: Defaults to `harness-delegate-ng`.
* `harness_manager_endpoint`: Use the **Harness Cluster Hosting Account** from your **Account Overview** page to find the matching endpoint URL for this value. For example, the endpoint URL for `prod-2` is `https://app.harness.io/gratis`. For more information, go to [Install delegate](/harness-ai/troubleshooting-and-resources/tutorials/install-delegate).
2. To deploy the Harness Delegate, run `task deploy_harness_delegate`, and then wait while the delegate connects.
You can check delegate status on the **Delegates** page in the Harness Platform.
For Kubernetes delegates, you can also use `kubectl get pods -n harness-delegate-ng`. For running delegates, the output is something like:
```
NAME READY STATUS RESTARTS AGE
your-delegate name 1/1 Running 0 2m23s
```
### Create Service Account and IAM binding
This section outlines the steps to configure GKE Workload Identity, allowing workloads to securely access Google Cloud services using IAM roles.
1. Create a namespace for the Kubernetes service account. Alternatively, you can use the default namespace or an existing one.
```bash
kubectl create namespace harness-delegate-ng
```
2. Create a Kubernetes service account for your application. You can use the default service account in the default namespace or an existing one.
```bash
kubectl create serviceaccount harness-builder --namespace harness-delegate-ng
```
3. Create an IAM service account for your application or use an existing one. You can use any IAM service account from any project in your organization. For Config Connector, apply the IAMServiceAccount object to the selected service account.
```bash
gcloud iam service-accounts create harness-delegate --project=your-gcp-project
```
4. Ensure that your IAM service account has the necessary [roles](https://cloud.google.com/iam/docs/understanding-roles). You can grant additional roles using the following command.
```bash
gcloud projects add-iam-policy-binding your-gcp-project \
--member "serviceAccount:harness-delegate@your-gcp-project.iam.gserviceaccount.com" \
--role "roles/artifactregistry.createOnPushRepoAdmin"
```
5. Allow the Kubernetes service account to impersonate the IAM service account by adding an [IAM policy binding](https://cloud.google.com/sdk/gcloud/reference/iam/service-accounts/add-iam-policy-binding) between them. This binding grants the Kubernetes service account permission to act as the IAM service account.
```bash
gcloud iam service-accounts add-iam-policy-binding harness-delegate@your-gcp-project.iam.gserviceaccount.com \
--role roles/iam.workloadIdentityUser \
--member "serviceAccount:your-gcp-project.svc.id.goog[harness-delegate-ng/harness-builder]" \
--project your-gcp-project
```
6. Annotate the Kubernetes service account with the IAM service account's email address.
```bash
kubectl annotate serviceaccount harness-builder \
--namespace harness-delegate-ng \
iam.gke.io/gcp-service-account=harness-delegate@your-gcp-project.iam.gserviceaccount.com
```
7. Update your Pod spec to schedule workloads on nodes with Workload Identity enabled and use the annotated Kubernetes service account.
```bash
spec:
serviceAccountName: ksa
nodeSelector:
iam.gke.io/gke-metadata-server-enabled: "true"
```
8. Redeploy the pod or delegate to apply the changes.
### Verify the Workload Identity configuration.
1. Create a Pod that uses the annotated Kubernetes service account and run a curl command against the service accounts endpoint. Save the following configuration as harness-test.yaml:
```yaml
apiVersion: v1
kind: Pod
metadata:
name: workload-identity-test
namespace: harness-delegate-ng
spec:
containers:
- image: google/cloud-sdk:slim
name: workload-identity-test
command: ["sleep","infinity"]
serviceAccountName: ksa
nodeSelector:
iam.gke.io/gke-metadata-server-enabled: "true"
```
2. Deploy the Pod:
```bash
kubectl apply -f harness-test.yaml
```
3. Start an interactive session in the Pod.
```bash
kubectl exec -it workload-identity-test \
--namespace harness-delegate-ng \
-- /bin/bash
```
4. Verify the identity by running the following command inside the Pod:
```bash
curl -H "Metadata-Flavor: Google" \
http://[metadata.google.internal]/computeMetadata/v1/instance/service-accounts/default/email
```
If Workload Identity is configured correctly, this command will return the email of the IAM service account associated with the Pod.
### Test it with a CI pipeline
Having deployed the Harness Delegate, you can use a CI pipeline to test the setup by building and pushing a [sample Go app](https://github.com/harness-apps/workload-identity-gke-demo/tree/main/app) to GAR.
This demo pipeline does the following:
* Builds a Go application. You can build any application, but Go is used as an example here.
* Packages the application build artifact as a container image.
* Pushes the image to GAR.
* Caches the build artifacts and dependencies (Go modules) onto GCS to make the build process faster in the future.
#### Import the template
The demo repository used for this topic has a [build stage template](https://github.com/harness-apps/workload-identity-gke-demo/blob/main/.harness/ko_gar_build_push_1.yaml) that you can use to create the demo pipeline.
1. In your Harness account, go to **Account Overview**, select **Organizations**, and then select the default organization.
2. From the Organization overview page, select **Templates**.
3. Select **New Template**, and then select the **Import From Git** option.
4. Populate the **Import Template From Git** fields as follows:
* Name: `ko_gar_build_push`
* Version Label: `1`
* Git Connector: Select or create a GitHub connector
* Repository: Use the public demo repo or your personal fork of the demo repo, `harness-apps/workload-identity-gke-demo`
* Git Branch: `main`
* YAML Path: `.harness/ko_gar_build_push_1.yaml`
5. Select **Import**
#### Create the pipeline
1. Go to the CI module (**Builds**), select **Pipeline**, and select **Create Pipeline**.
2. Select **Add Stage**, and then select **Use template**.
3. Select the `ko_gar_build_push` template you imported, and then select **Use template**.
4. Enter a **Stage Name**, select or create a codebase connector, and set the **Repository Name** to the public demo repo or your personal fork of the demo repo, `harness-apps/workload-identity-gke-demo`.
5. Select **Set Up Stage**, and then populate the **Template Inputs**:
* Kubernetes Cluster: Select or create a Kubernetes cluster connector.
* Namespace: `default`
* Service Account Name: `harness-builder` (The `harness-builder` KSA is mapped to Google IAM Service Account (GSA) `harness-delegate` to inherit the GCP roles, using Workload Identity in this case to push the images to Google Artifact Registry (GAR).)
* Environment Variable for Download Binaries step: Set the `REGISTRY_LIST` value as the path to your GAR registry list.
* Environment Variable for Build and Push step: Set the `KO_DOCKER_REPO` value to the GAR repo where you want to push the image, such as `REGION-docker.pkg.dev/YOUR_USERNAME/YOUR_REPO`
6. Save and run the pipeline to build and push the image to GAR. You can check the build logs to see where the image was pushed.
### Clean up resources
To clean up all the Google Cloud resources that were created as part of this demo, you can run the following task:
```shell
task destroy
```
{% @harness-feedback/feedback module="harness-ai" pagePath="harness-ai/use-harness-platform/delegates/delegate/install-delegates/gke-workload-identity" %}
# Delegate automatic upgrades and expiration policy
Explains the auto-upgrade feature and the delegate expiration policy.
The Harness Delegate supports automatic upgrades. It is recommended that you enable automatic upgrades for your delegate to ensure it remains updated with the latest version.
Delegate upgrades do not affect pipelines unless the shutdown timeout is reached. Before an upgrade is performed, the delegate finishes the tasks that are underway. The delegate then shuts down. As part of the shutdown process, there is a 10 minute timeout by default. You can configure this setting. For more information, go to [Graceful delegate shutdown](/harness-ai/use-harness-platform/delegates/delegate/delegate-concepts/graceful-delegate-shutdown-process).
{% hint style="info" %}
The automatic upgrade feature is enabled by default for the Kubernetes manifest, Terraform, and Helm installation options. For Docker delegates, you need to run a separate command to enable auto-upgrader.
{% endhint %}
### How automatic upgrade works
#### Kubernetes manifest Delegate
The Kubernetes manifest has a component called `upgrader`. The `upgrader` is a cron job that runs every hour by default. Every time it runs, it sends a request to Harness Manager to determine which delegate version is published for the account. The API returns a payload, such as `harness/delegate:yy.mm.verno`. If the delegate that was involved in this upgrade cron job does not have the same image as what the API returns, the `kubectl set image` command runs to perform a default rolling deployment of the delegate replicas with the newer image.
To prevent the installation of the automatic upgrade feature, remove the `CronJob` section before you apply the manifest.
You can also change the time when the upgrade cron job runs by updating the `schedule`. For configuration details, go to [Configure the delegate upgrade schedule](#configure-the-delegate-upgrade-schedule).
Example Kubernetes manifest
```yaml
kind: Role
apiVersion: rbac.authorization.k8s.io/v1
metadata:
name: upgrader-cronjob
namespace: harness-delegate-ng
rules:
- apiGroups: ["batch", "apps", "extensions"]
resources: ["cronjobs"]
verbs: ["get", "list", "watch", "update", "patch"]
- apiGroups: ["extensions", "apps"]
resources: ["deployments"]
verbs: ["get", "list", "watch", "create", "update", "patch"]
---
kind: RoleBinding
apiVersion: rbac.authorization.k8s.io/v1
metadata:
name: kubernetes-delegate-upgrader-cronjob
namespace: harness-delegate-ng
subjects:
- kind: ServiceAccount
name: upgrader-cronjob-sa
namespace: harness-delegate-ng
roleRef:
kind: Role
name: upgrader-cronjob
apiGroup: ""
---
apiVersion: v1
kind: ServiceAccount
metadata:
name: upgrader-cronjob-sa
namespace: harness-delegate-ng
---
apiVersion: v1
kind: Secret
metadata:
name: test-upgrader-token
namespace: harness-delegate-ng
type: Opaque
data:
UPGRADER_TOKEN: "DELEGATE_TOKEN"
---
apiVersion: v1
kind: ConfigMap
metadata:
name: test-upgrader-config
namespace: harness-delegate-ng
data:
config.yaml: |
mode: Delegate
dryRun: false
workloadName: DELEGATE_TO_AUTO_UPGRADE
namespace: harness-delegate-ng
containerName: delegate
delegateConfig:
accountId: ACCOUNT_ID
managerHost: HARNESS_MANAGE_ENDPOINT_URL
---
apiVersion: batch/v1
kind: CronJob
metadata:
labels:
harness.io/name: test-upgrader-job
name: test-upgrader-job
namespace: harness-delegate-ng
spec:
schedule: "0 */1 * * *"
concurrencyPolicy: Forbid
startingDeadlineSeconds: 20
jobTemplate:
spec:
template:
spec:
serviceAccountName: upgrader-cronjob-sa
restartPolicy: Never
containers:
- image: harness/upgrader:latest
name: upgrader
imagePullPolicy: Always
envFrom:
- secretRef:
name: test-upgrader-token
volumeMounts:
- name: config-volume
- mountPath: /etc/config
volumes:
- name: config-volume
- configMap:
name: test-upgrader-config
```
#### Docker Delegate
The Docker Delegate upgrader is responsible for two tasks: upgrading the Docker images used for running Docker delegates and performing health checks on those delegates.
{% hint style="info" %}
**NOTE**
Docker delegate upgrader is not supported if the delegate images are configured to be pulled from a private registry. If you attempt to run a Docker upgrader for these delegates, only health checks will be performed; automatic upgrades will not occur.
{% endhint %}
Example Docker delegate upgrader command
```
docker run --cpus=0.1 --memory=100m \
-v /var/run/docker.sock:/var/run/docker.sock \
-e ACCOUNT_ID= \
-e MANAGER_HOST_AND_PORT=https://app.harness.io \
-e UPGRADER_WORKLOAD_NAME=docker-delegate \
-e UPGRADER_TOKEN= \
-e SCHEDULE="0 */1 * * *" us-west1-docker.pkg.dev/gar-setup/docker/upgrader:latest
```
The Docker Delegate upgrader makes use of Docker volume mount `-v /var/run/docker.sock:/var/run/docker.sock \`. Through this it mounts the Docker socket file from the host to the same path inside the delegate upgrader container. This enables the delegate upgrader container to communicate with the Docker daemon and perform tasks related to upgrade.
The Docker upgrader is scheduled to upgrade the delegate every one hour by default. This is done through the SCHEDULE environment variable. `-e SCHEDULE="0 */1 * * *"`. According to the configured schedule, the upgrader searches for Docker delegates whose environment variable, `DELEGATE_NAME`, matches the value of the environment variable `UPGRADER_WORKLOAD_NAME`. When it identifies eligible Docker delegates where the latest version of the published image for the account differs from the delegate's current version, it proceeds to upgrade those delegates.
In case of a successful upgrade, the old container is stopped within a 1 hour timeout by default and a new container is brought up with the upgraded delegate version. If you would like to customize the timeout to a different value, set the `CONTAINER_STOP_TIMEOUT` environment variable in the `docker run` command for the upgrader. For example, pass the following as environment variable to configure Docker Delegate upgrader timeout to 45 minutes: `-e CONTAINER_STOP_TIMEOUT=2700`.
{% hint style="info" %}
User information is not propagated when a delegate is started from external sources. All delegate operations are recorded under the SYSTEM user in the audit trail, especially during the scale-up and scale-down processes. The **Action** column displays actions when a delegate is created, updated, or upserted. For more information about the audit trail, go to [View audit trail](/harness-ai/use-harness-platform/governance/audit-trail/audit-trail).
{% endhint %}
### Upgrade Delegate through Harness UI
{% hint style="info" %}
**FEATURE AVAILABILITY**
This feature is currently behind the `PL_ONE_CLICK_UPGRADE_DELEGATE` feature flag. To enable it, please contact [Harness Support](mailto:support@harness.io).
{% endhint %}
In addition to automatic upgrades, you can now upgrade delegates manually through the Harness UI, giving you full control while keeping all existing configurations and behaviors.
When a delegated is upgraded via the UI, the new delegate version automatically inherits all settings from the previous delegate, including:
* **Proxy settings**: All proxy configurations and routing rules remain intact
* **Security configurations**: Mutual TLS (mTLS) settings and other security configurations are preserved
* **Network settings**: All networking behaviors continue to function without modification
#### Steps to upgrade a delegate through the UI
1. Navigate to **Settings** in your account, project, or organization.
2. Under **Resources**, select **Delegates** to view the delegates list page.
3. Locate the delegate you want to upgrade in the list.
4. Click the vertical ellipsis (⋮) menu on the right side of the delegate row.
5. Select **Upgrade** from the dropdown menu.
The upgrade option will not be available in the following cases:
The delegate is not currently connected.
The delegate is already running the latest version.

The upgrade process will begin automatically, upgrading the delegate to the latest available version.
{% hint style="warning" %}
**LIMITATIONS**
The following limitations currently apply to delegate upgrades using the Harness UI:
* **Docker delegates**: Upgrading via the UI is not yet supported for Docker-based delegates.
* **Sequential upgrades only**: You can perform one upgrade at a time. Chained or simultaneous upgrades are not supported.
* **Latest version only**: UI upgrades can update only to the latest published delegate version; selecting a custom version is not currently available.
We’re actively working to address these limitations, and they will be removed in future releases.
{% endhint %}
### Determine if automatic upgrade is enabled
When a delegate is installed, it may take up to an hour by default to determine if the `upgrader` was removed during installation. During that time, the delegate shows a status of **DETECTING**.
Harness updates the status when `upgrader` makes its first API call to the Harness platform. The default schedule is one hour, but the schedule is configurable. If Harness doesn't detect the upgrader API call within 90 minutes, the upgrade status is updated from **DETECTING** to **AUTO UPGRADE: OFF**.
Let's say the `upgrader` schedule is configured to two hours. The upgrade status would change from **AUTO UPGRADE: OFF** to **AUTO UPGRADE: ON** and back to **AUTO UPGRADE: OFF**. Every 90 minutes that Harness doesn't detect the API call, the status is set to **AUTO UPGRADE: OFF**. As soon as Harness detects it again, the status is set to **AUTO UPGRADE: ON**. Harness recommends a default schedule of 60 minutes. For more information, go to [Configure the delegate upgrade schedule](#configure-the-delegate-upgrade-schedule).
To find the delegate status, select an account, a project, or an organization, then select **Settings**. Under resources, select **Delegates**. For more information, go to [Delegates list page](/harness-ai/use-harness-platform/delegates/delegate/delegate-concepts/delegate-overview#delegates-list-page).

When the delegate is first installed, the Delegates list page displays an **Auto Upgrade** status of **DETECTING** and then **SYNCHRONIZING**. After the first hour (for the default `upgrader` configuration) or your custom configured time, the delegate shows a status of **AUTO UPGRADE: ON** or **AUTO UPGRADE: OFF**.

### Disable automatic upgrade
If you disable automatic upgrades, then you have to manually upgrade the delegate regularly to prevent a loss of backward compatibility.
#### Kubernetes manifest Delegate
To disable auto-upgrade on an installed delegate image, do the following:
1. Run the following command to suspend auto-upgrade on the installed image.
```
kubectl patch cronjobs -p '{"spec" : {"suspend" : true }}' -n
```
2. In the delegate manifest, locate the **CronJob** resource. In the resource `spec`, set the `suspend` field to `true`.
```yaml
spec:
- suspend: true
```
#### Docker Delegate
The Docker Delegate upgrader can upgrade multiple Docker delegates. An upgrader is capable of upgrading Docker delegates whose value of the environment variable `DELEGATE_NAME` is same as the value of the upgrader’s `UPGRADER_WORKLOAD_NAME` environment variable.
If you do not need auto-upgrade capabilities, the upgrader can still be used to perform health checks on the delegate. This can be achieved by passing an environment variable `DISABLE_AUTO_UPGRADE` to the upgrader and setting it to true. By default this is set to false.
````
```
-e DISABLE_AUTO_UPGRADE=true
```
````
### Configure the delegate upgrade schedule
Harness recommends a default schedule of 60 minutes, but suggests a range between one and 90 minutes for optimal performance.
{% hint style="info" %}
**IMPORTANT**
If you set the value outside of this range, upgrades will still work as expected. However, if the frequency exceeds 90 minutes, Harness will not be able to detect any auto-upgrades, and the UI will display that auto-upgrades are turned `OFF`.
{% endhint %}
#### Kubernetes manifest Delegate
To configure the delegate upgrade schedule, do the following:
1. In the `delegate.yaml` manifest file, locate the `upgrader-cronjob` resource.
2. Configure the **CronJob** resource to your specific settings.
The `CronJob` YAML configuration should look something like the example below that runs the job every 15 minutes. The `spec.schedule` field defines when and how often the job should run.
```yaml
---
apiVersion: batch/v1
kind: CronJob
metadata:
labels:
harness.io/name: kubernetes-delegate-upgrader-job
name: kubernetes-delegate-upgrader-job
namespace: harness-delegate-ng
spec:
schedule: "0,15,30,45 * * * *"
concurrencyPolicy: Forbid
startingDeadlineSeconds: 20
jobTemplate:
spec:
template:
spec:
serviceAccountName: upgrader-cronjob-sa
restartPolicy: Never
containers:
- image: harness/upgrader:latest
name: upgrader
imagePullPolicy: Always
envFrom:
- secretRef:
name: kubernetes-delegate-upgrader-token
volumeMounts:
- name: config-volume
mountPath: /etc/config
volumes:
- name: config-volume
configMap:
name: kubernetes-delegate-upgrader-config
```
For more information on the schedule syntax, go to [Writing a CronJob spec](https://kubernetes.io/docs/concepts/workloads/controllers/cron-jobs/#writing-a-cronjob-spec) in the Kubernetes documentation.
3. Save the file.
4. Run the following.
```
kubectl apply -f harness-delegate.yaml
```
The schedule change for the cron job will take effect immediately, and the next upgrade run will follow the new schedule. If you have made any other changes to the YAML file, such as updating the image, configuration, environment variables, and so on, those changes will take effect during the next run.
#### Docker Delegate
To configure the delegate upgrade schedule for Docker delegates, do the following:
1. In the docker run command for the upgrader, locate the `SCHEDULE` environment variable.
2. Configure the time period after which you want the upgrader to check for upgrades as a cron expression. For example, if you want to check after every 15 minutes, update the cron expression in the `SCHEDULE` environment variable:
```
-e SCHEDULE="0 */15 * * *"
```
3. Run the docker run command for the Docker delegate upgrader with the updated value of `SCHEDULE` environment variable.
### Configure an optional registry mirror for delegate images
If you use Docker pull through registry cache (`https://docs.docker.com/docker-hub/mirror/`), you can configure `upgrader` to use an optional registry mirror for your delegate images.
When this feature is configured, Harness Delegate images are fetched from the designated mirror, instead of public Docker Hub.
```yaml
mode: Delegate
dryRun: false
workloadName: delegate-name
namespace: harness-delegate-ng
containerName: delegate
registryMirror: us.gsr.io/gcr-mirror
delegateConfig:
accountId:
managerHost:
```
During an upgrade, when `upgrader` seeks to update the delegate to `harness/delegate:verno`, it will utilize the image from `us.gsr.io/gcr-mirror/harness/delegate:verno`.
This option can be enabled by setting `upgrader.registryMirror` Helm value for Delegate Helm chart or by modifying Upgrader Kubernetes manifest.
### Use automatic upgrade with custom delegate images
You may choose to use a custom delegate image for the following reasons:
* You don't have access to Docker Hub, so you pull the Harness images and put them in your own container registry.
* You use the Harness Delegate as a base image and install tools, certificates, etc.
If automatic upgrade is enabled and you have a custom image, the following may occur:
* If the Kubernetes cluster does not have access to Docker Hub, then the upgrade fails.
* If the Kubernetes cluster has access to Docker Hub, then the new published image is deployed. This action causes the custom tooling to be lost.
To avoid these issues, you can set up the `upgrader` to use your custom delegate tag.
#### Latest supported delegate version
Use the [latest-supported-version](https://apidocs.harness.io/tag/Delegate-Setup-Resource/#operation/publishedDelegateVersion) API to determine the delegate number for your account:
```
curl --location 'https://app.harness.io/ng/api/delegate-setup/latest-supported-version?accountIdentifier=\' \
--header 'x-api-key: \'
```
````
The following example result is returned. It returns the tag of the delegate that is released to your account.
```json
{
"metaData": {},
"resource": {
"latestSupportedVersion": "24.04.82804",
"latestSupportedMinimalVersion": "24.04.82804.minimal"
},
"responseMessages": []
}
```
When the `upgrader` makes a request, it tries to change the image to `harness/delegate:24.04.82804`. You can take either the `harness/delegate:24.04.82804` image or the `harness/delegate:24.04.82804.minimal` image and build your own image by adding more tools and binaries, and then push it to your own container repository. For example, you might publish the image to a private repository, such as `artifactory-abc/harness/delegate:24.04.82804`.
````
#### Override delegate image version
**Create a delegate override**
Once the image is pushed, you can call the [override-delegate-tag](https://apidocs.harness.io/tag/Delegate-Setup-Resource/#operation/overrideDelegateImageTag) API to update delegate image version for one or more delegates using `accountIdentifier`, `orgIdentifier`, `projectIdentifier`, and `tags`.
```bash
curl -i -X PUT \
'https://app.harness.io/ng/api/delegate-setup/override-delegate-tag?accountIdentifier=&delegateTag=&orgIdentifier=&projectIdentifier=&tags=,tags=,tags=&validTillNextRelease=false&validForDays=180' \
-H 'x-api-key: YOUR_API_KEY_HERE'
```
{% hint style="info" %}
For updating delegates successfully through scope level delegate override, ensure both the delegate and the upgrader are running with the same token. In other words, ensure that the value of `DELEGATE_TOKEN` and `UPGRADER_TOKEN` is same.
{% endhint %}
**API Parameters**
| **Parameter** | **Required** | **Description** | **Use Case** |
| ---------------------- | ------------ | ------------------------------------------------------------------------------------------------------------------------------------------------------------------------------ | ----------------------------------------------------------------------- |
| `delegateTag` | Yes | Custom delegate image version to override the existing delegate version | - |
| `accountIdentifier` | Yes | Harness account Id (`Account Settings → Account Details → Account Id`) | Used to update all delegates in an Account, including child scopes |
| `orgIdentifier` | No | Id assigned when creating the organization | Used to updated all delegates in an organization including child scopes |
| `projectIdentifier` | No | Id assigned when creating the project | Used to update all delegates in a specific project |
| `tags` | No | Delegate name or [tag](/harness-ai/use-harness-platform/delegates/delegate/manage-delegates/select-delegates-with-selectors#delegate-tags) assigned when creating the delegate | Used to update delegates with specific name or tags |
| `validTillNextRelease` | No | If set to true, your custom image version will be overridden when new delegate is released | - |
| `validForDays` | No | Days after which your custom image version will be overridden | - |
{% hint style="info" %}
1. At max, there can only be two override entries corresponding to a combination of query params: `accountIdentifier`, `orgIdentifier` (if present), and `projectIdentifier`(if present): one with `tags` and one without `tags`. If the same combination of parameters is used with a different value of `tags` or `delegateTag`, then the existing entry will get updated. 2. When the Delegate upgrader runs, the system looks for a match as per the following criteria: - If delegate tags are not present:\
1\. The system first checks for an override entry at the same scope. If it doesn’t find one, it then looks for an override entry at a higher scope. This process continues up through higher levels. 2. If no match is found, the system defaults to using the latest version. - If delegate tags are present: 1. The system first checks for an override entry that has tags at the same scope. If it doesn’t find one, it then looks for an override entry with tags at a higher scope. This process continues up through higher levels. 2. If it still doesn't find a match with tags, it then searches for an override entry at the same scope without tags, again moving up to higher scopes until it either finds a match or exhausts all options. 3. If no match is found, the system defaults to using the latest version. 3. When tags are used, to find a match, tags present in a delegate override should be a subset of the actual delegate tags. Example: If a delegate has `DELEGATE_TAGS = t1, t2` and an override entry exists with `tags=t1`, then the delegate will get upgraded. But if the override entry has `tags=t1, t2, t3`, then the delegate will not get upgraded.
{% endhint %}
**Delete Delegate Override version**
If you wish to delete an existing [override](https://apidocs.harness.io/tag/Delegate-Setup-Resource/#operation/overrideDelegateImageTag), use the [delete-delegate-override](https://dummy.com) API.
```bash
curl -i -X DELETE \
'https://app.harness.io/ng/api/delegate-setup/delete-delegate-override?accountIdentifier=&orgIdentifier=&projectIdentifier=&tags=,tags=,tags=\
-H 'x-api-key: YOUR_API_KEY_HERE'
```
**API Parameters**
```
| **Parameter** | **Required** | **Description** |
|---------------------|--------------|------------------------------------------------------------------------------------------------------------------------------------|
| `accountIdentifier` | Yes | Harness account Id (`Account Settings → Account Details → Account Id`) |
| `orgIdentifier` | No | Id assigned when creating the organization |
| `projectIdentifier` | No | Id assigned when creating the project |
| `tags` | No | [Tag](../manage-delegates/select-delegates-with-selectors.md#delegate-tags) assigned when creating the delegate |
{% hint style="info" %}
Each Delete API call deletes only one override entry if an exact match is found with the provided query parameters.
{% endhint %}
```
### Delegate expiration support policy
Six months after a delegate image is released, the delegate reaches End of Support (EOS). Eight months after a delegate image is released, the delegate is End of Life (EOL).
When a delegate has been tagged as "expired", this does not stop a Delegate from continuing operations. It is a cosmetic flag to inform a customer that the delegate should be considered for an upgrade. Because delegates are only backward-compatible, they might have issues if the backend has moved too far ahead. Harness recommends that you upgrade your delegates before they expire.
| Release | EOS | EOL |
| ----------- | --------------------- | --------------------- |
| 24.04.verno | 23.10.verno and below | 23.08.verno and below |
| 24.05.verno | 23.11.verno and below | 23.09.verno and below |
EOS means the following:
* Harness Support will provide best-attempt support requests for the delegate, and would recommend a change to a newer version. This applies to both Harness FirstGen and Harness NextGen.
* Security fixes will still be addressed, but may be already addressed with a newer update.
* Product defects will not be addressed. Code Changes also will not be
* If delegates are past their EOS date, Harness does not support them. Expired delegates might continue to work, but it is recommended to upgrade to a newer delegate if the delegate does not work as intended.
EOL means the following:
* In addition to the EOS clauses, security fixes will not be addressed.
For a list of delegate images and their support status, go to [Delegate image version support status](/harness-ai/use-harness-platform/delegates/delegate/delegate-reference/delegate-image-version-status).
**Example delegate expiration**
For delegates with an immutable image type, the image tag is `yy.mm.verno`. A delegate version `24.05.84200` would reach EOS in November 2024 and EOL in January 2025.
{% hint style="info" %}
This policy applies to delegates with the `yy.mm.verno` image tag. It does not apply to legacy delegates. For information on delegate types, go to [Delegate image types](/harness-ai/use-harness-platform/delegates/delegate/delegate-concepts/delegate-image-types).
{% endhint %}
{% hint style="info" %}
Harness Self-Managed Enterprise Edition support is limited to the delegate version released with the most recent version. When you upgrade Harness Self-Managed Enterprise Edition, the supported delegate version is included.
{% endhint %}
#### Determine when your delegate expires
To determine when your delegate expires, do the following:
1. Select an account, a project, or an organization, and then select **Delegates**.
2. Locate your delegate in the list, and then check the **INSTANCE STATUS** column.
#### Update the delegate YAML
Harness does not recommend the use of delegate images that are not current. However, if you require an earlier image version, check the repository on [Docker Hub](https://hub.docker.com/r/harness/delegate/tags).
To update the delegate YAML, do the following:
* Select **New Delegate** > **Kubernetes** > **Kubernetes Manifest** > **Custom**, and then follow the instructions on the screen.
For an example of a complete Delegate YAML file, go to [Example Kubernetes manifest for Harness Delegate](/harness-ai/use-harness-platform/delegates/delegate/delegate-reference/yaml/example-kubernetes-manifest-harness-delegate).
{% @harness-feedback/feedback module="harness-ai" pagePath="harness-ai/use-harness-platform/delegates/delegate/install-delegates/delegate-upgrades-and-expiration" %}
# Manage delegates
{% content-ref url="/pages/xnWKYXa8IaQR0pDBRpYO" %}
[Overview](/harness-ai/use-harness-platform/delegates/delegate/manage-delegates/manage-delegates-overview)
{% endcontent-ref %}
{% content-ref url="/pages/pt6ShAGDPNjhuNJOP27a" %}
[Build Custom Images (Dockerfile)](/harness-ai/use-harness-platform/delegates/delegate/manage-delegates/build-custom-images-delegate-dockerfile)
{% endcontent-ref %}
{% content-ref url="/pages/s8PKnNDg0fUrhyZr9g5Q" %}
[Customize Delegate Logging](/harness-ai/use-harness-platform/delegates/delegate/manage-delegates/customize-delegate-logging)
{% endcontent-ref %}
{% content-ref url="/pages/1twBH6u2kCg2oL1jLD5v" %}
[Configure Metrics and Auto Scale](/harness-ai/use-harness-platform/delegates/delegate/manage-delegates/delegate-metrics)
{% endcontent-ref %}
{% content-ref url="/pages/SDyFmBzd2WthSodqsxHB" %}
[Proxy Configuration](/harness-ai/use-harness-platform/delegates/delegate/manage-delegates/proxy)
{% endcontent-ref %}
{% content-ref url="/pages/oVq8swj7tTbaYCJHgRqQ" %}
[Run All Pipeline Steps in One Pod](/harness-ai/use-harness-platform/delegates/delegate/manage-delegates/run-all-pipeline-steps-in-one-pod)
{% endcontent-ref %}
{% content-ref url="/pages/JmbTgMqwqx1dj40zGSwm" %}
[Delegate Selectors](/harness-ai/use-harness-platform/delegates/delegate/manage-delegates/select-delegates-with-selectors)
{% endcontent-ref %}
{% content-ref url="/pages/7XJ04FVlR5kkQGpV1DuP" %}
[Hide Logs with Regex](/harness-ai/use-harness-platform/delegates/delegate/manage-delegates/hide-logs-using-regex)
{% endcontent-ref %}
{% content-ref url="/pages/nsoF8UsjXN6EHa5dl8yA" %}
[Upgrade Legacy Delegate](/harness-ai/use-harness-platform/delegates/delegate/manage-delegates/upgrade-legacy-delegate)
{% endcontent-ref %}
{% content-ref url="/pages/TxvI3s33RQbiEqB2NEgR" %}
[Auto-upgrades for Docker Delegates](/harness-ai/use-harness-platform/delegates/delegate/manage-delegates/enable-auto-upgrade-for-running-docker-delegates)
{% endcontent-ref %}
{% content-ref url="/pages/tE0FkDFWKG47YAW5oVEa" %}
[Delete a Delegate](/harness-ai/use-harness-platform/delegates/delegate/manage-delegates/delete-a-delegate)
{% endcontent-ref %}
{% content-ref url="/pages/XU9Z1rRV8wvXdpZmk579" %}
[Stream pipeline logs](/harness-ai/use-harness-platform/delegates/delegate/manage-delegates/stream-pipeline-logs-to-observability-backend)
{% endcontent-ref %}
{% @harness-feedback/feedback module="harness-ai" pagePath="harness-ai/use-harness-platform/delegates/delegate/manage-delegates" %}
# Overview
Learn how to manage delegates based on their status, including monitoring health, updating versions, and troubleshooting issues.
{% hint style="info" %}
**FEATURE AVAILABILITY**
This feature is currently behind the `PL_SHOW_DELEGATE_STATUS_CARDS` feature flag. To enable it, please contact [Harness Support](mailto:support@harness.io).
{% endhint %}
Delegates are only backward compatible up to a certain version and may not support new features. Running outdated delegates can lead to task failures, caching issues, and inconsistent behavior.
To prevent such issues, proactively manage and upgrade delegates. Options to manage delegates include:
* [API to fetch the latest supported version](https://apidocs.harness.io/delegate-setup-resource/publisheddelegateversion)
* [Delegate version support status](/harness-ai/use-harness-platform/delegates/delegate/delegate-reference/delegate-image-version-status#reference-information)
* [Delegate overview page in your Harness account](#managing-delegates)
### Managing delegates
You can manage your delegate instances in your Harness account via the Delegate overview page. To access the Delegate overview page, navigate to your desired scope—Account, Organization, or Project—in your Harness account, and choose **Settings** > **Delegates**.
This page contains delegate-related information, including delegate installation, the latest version details, a search box, filters, [delegate health overview cards](#delegate-health-overview-cards), and a [list of delegates](#delegate-instance-overview) with their details as shown in the image below

#### Delegate health overview cards
There are four delegate health cards that display the status of delegate instances.
1. **Expired**: Delegates running beyond their [EOS/EOL](/harness-ai/use-harness-platform/delegates/delegate/delegate-reference/delegate-image-version-status#support-lifecycle-definitions) are no longer supported and might have limited functionality. These delegates should be upgraded immediately to prevent service disruption.
Use the steps below to view delegates that are in an expired state:
```
{% embed url="https://app.tango.us/app/embed/37a96947-55a6-4723-8e2b-05e0b6669b60" %}
```
2. **Near expiry**: Delegates that are about to expire. Ensure these delegates are upgraded before they reach [EOS/EOL](/harness-ai/use-harness-platform/delegates/delegate/delegate-reference/delegate-image-version-status#support-lifecycle-definitions).
Use the steps below to view delegates that are in near expiry state:
```
{% embed url="https://app.tango.us/app/embed/84dde8ac-3bcc-411a-a662-04c1ca1c9404" %}
```
3. **Unsupported**: Delegates running prior to [latest released version](/release-notes/delegate#delegate-image-release-notes). These delegate may cause task failures or incompatibility issues.
Use the steps below to view delegates that are unsupported:
```
{% embed url="https://app.tango.us/app/embed/6d951a35-6a2a-47a8-bfa5-dc64d09a2ad3" %}
```
4. **Auto-upgrade OFF**: Delegates with [auto-upgrade](/harness-ai/use-harness-platform/delegates/delegate/install-delegates/delegate-upgrades-and-expiration) OFF need manual updates. Enable auto-upgrade to keep them on the latest version.
Use the steps below to view delegates with Auto Upgrade OFF:
```
{% embed url="https://app.tango.us/app/embed/5a36ba33-b801-470a-acf3-d528193e5d66" %}
```
#### Delegate listing overview
The delegate within the scope are listed here with their details. Use the arrow to view each delegate's instances, shown as below
* Delegate - It is a delegate type featuring a logo such as Helm, Kubernetes, or Docker, a delegate name, and a unique identifier within the scope.
* Connectivity Status - Shows the current connection status for the delegate instance as “Connected” or “Not connected”.
* Tags - The delegate tag is automatically added to your delegate during configuration. You can assign one or more tags to your delegate instance.
* Version - Displays the running delegate version. Shows “N/A” if the delegate is not connected.
* Instance Status - Displays when the delegate expires. It is used to determine when a delegate needs to be updated or replaced.
* Last Heartbeat - It indicates when the delegate was last connected.
* Auto Upgrade - Displays whether Auto Upgrades are enabled(ON) or disabled(OFF) for the delegate.
The vertical three dots on the right provide options based on the delegate type: **Details** leading to the group overview page, a [**Delete**](/harness-ai/use-harness-platform/delegates/delegate/manage-delegates/delete-a-delegate#delete-a-delegate) option to remove the delegate from the listing (Note: this does not uninstall the delegate from your infrastructure), and an **Open Troubleshooter** option appears for Delegate Type Kubernetes.

To view details of a delegate, click any delegate in the list. This opens a group overview page showing delegate instances running for that group.
The delegate group overview page is similar to the delegate overview page, including delegate health overview cards and listing details, but has an additional "**Group Name**" field under overview tab which is similar to "Delegate Name" as shown below

### Related documentation
* [Auto upgrader for delegates](/harness-ai/use-harness-platform/delegates/delegate/install-delegates/delegate-upgrades-and-expiration)
* [Secure delegates](/harness-ai/use-harness-platform/delegates/delegate/secure-delegates)
* [Delegate tokens](/harness-ai/use-harness-platform/delegates/delegate/secure-delegates/secure-delegates-with-tokens)
* [Troubleshooting](/harness-ai/use-harness-platform/delegates/delegate/troubleshooting)
{% @harness-feedback/feedback module="harness-ai" pagePath="harness-ai/use-harness-platform/delegates/delegate/manage-delegates/manage-delegates-overview" %}
# Build custom delegate images using Dockerfile
This topic describes how to build custom delegate images using the Harness Delegate Dockerfile.
You can use the Harness Delegate Dockerfile to build custom delegate images. The [Dockerfile](https://docs.docker.com/engine/reference/builder/) is available in the [delegate Dockerfile repository](https://github.com/harness/delegate-dockerfile).
The repository includes the `Dockerfile-minimal` and `Dockerfile-ubuntu` versions.
{% hint style="info" %}
**NOTE**
If you build and use custom images, you can choose to enable or disable automatic upgrades for Kubernetes delegates. To learn more about automatic upgrades with custom images, go to [Use automatic upgrade with custom delegate images](/harness-ai/use-harness-platform/delegates/delegate/install-delegates/delegate-upgrades-and-expiration#use-automatic-upgrade-with-custom-delegate-images).
For more information on delegate automatic upgrades and the delegate expiration policy, go to [Delegate automatic upgrades and expiration policy](/harness-ai/use-harness-platform/delegates/delegate/install-delegates/delegate-upgrades-and-expiration).
{% endhint %}
### Dockerfile tools
You can include third party tools with your delegate when you use the delegate Dockerfile. The image includes default tools. For a list of default tools and their versions, go to the [delegate Dockerfile repository](https://github.com/harness/delegate-dockerfile).
{% hint style="info" %}
**NOTE**
While building custom delegate if you are not using delegate as base image [example](https://github.com/harness/delegate-dockerfile/blob/main/Dockerfile) then please ensure that you always package scm binary like below
```
RUN mkdir -m 777 -p client-tools/scm/ \
&& curl -f -s -L -o client-tools/scm//scm https://app.harness.io/public/shared/tools/scm/release//bin/linux/$TARGETARCH/scm
```
SCM\_VERSION should be coming from our [delegate to scm version mapping](/harness-ai/use-harness-platform/delegates/delegate/delegate-concepts/delegate-image-types#third-party-tools-included-in-the-delegate-image-type)
Example: If you're using delegate version 24.08.83705 then you should use scm version a81c96813, which gives below command
```
mkdir -m 777 -p client-tools/scm/a81c96813 \
&& curl -f -s -L -o client-tools/scm/a81c96813/scm https://app.harness.io/public/shared/tools/scm/release/a81c96813/bin/linux/$TARGETARCH/scm
```
{% endhint %}
### Dockerfile-minimal
Use `Dockerfile-minimal` to create delegate images without tools. This image includes only the SCM client tool.
### Dockerfile-ubuntu
Use `Dockerfile-ubuntu` to create Ubuntu-based delegate images. This image includes all the same tools as the default Dockerfile.
{% hint style="info" %}
**NOTE**
You can also replace the existing tools with your preferred CI/CD tools.
{% endhint %}
### Build the image
To build the image, you need two arguments:
1. TARGETARCH (amd64/arm64)
2. The delegate build version
The build version to use for your account is available in the [Harness API documentation](https://apidocs.harness.io/tag/Delegate-Setup-Resource/#operation/publishedDelegateVersion).
To learn about delegate version support expiration, go to [Delegate expiration policy](/harness-ai/use-harness-platform/delegates/delegate/install-delegates/delegate-upgrades-and-expiration#delegate-expiration-policy).
Here is an example script to get the version, which uses `curl` to fetch and `jq` to parse:
```
latest_version=$(curl -X GET 'https://app.harness.io/gateway/ng/api/delegate-setup/latest-supported-version?accountIdentifier=' -H 'x-api-key: ')
# Extract the build version using jq and string manipulation
build_version=$(echo $latest_version | jq -r '.resource.latestSupportedVersion' | cut -d '.' -f 3)
# Print the build version
echo $build_version
```
To build your custom image, use the `build_version` from above and the applicable command below:
#### Dockerfile
```
docker build -t {TAG} -f Dockerfile --build-arg TARGETARCH=amd64 --build-arg DELEGATEVERSION=
```
#### Dockerfile-minimal
```
docker build -t {TAG} -f Dockerfile-minimal --build-arg TARGETARCH=amd64 --build-arg DELEGATEVERSION=
```
### Build a custom image with non-root access that includes custom certificates
If the delegate cannot run the delegate container as a root user but requires a custom CA, you can add custom CA bundle files to the delegate image and run a `load_certificates.sh` script on the files.
The `load_certificates.sh` script ensures that your CA certificates are:
* Added to the delegate's Java truststore located at `$JAVA_HOME/lib/security/cacerts`.
* Added to the Red Hat OS trust store.
* Applied to Harness CI, STO, and delegate pipelines.
To build your custom delegate image, do the following:
1. Add all of your CA certificates to a local directory.
2. Add the lines below to your delegate Dockerfile after the `RUN curl -s -L -o delegate.jar $BASEURL/$DELEGATEVERSION/delegate.jar` line and before the `USER 1001` line because root access is required to run the script. Replace the directory paths with your local directory locations.
```yaml
USER root
RUN curl -s -L -o delegate.jar $BASEURL/$DELEGATEVERSION/delegate.jar
COPY
RUN bash -c "/opt/harness-delegate/load_certificates.sh "
USER 1001
```
This copies all the certificates from the local `./my-custom-ca` directory to `/opt/harness-delegate/my-ca-bundle/` directory inside the container.
WARNING
Don't copy your certificates to the folder /opt/harness-delegate/ca-bundle folder. This folder is reserved for storing additional certificates to install the delegate. For more information, go to Install with custom certificates.
Set the user to root before you run the load_certificates.sh script. Then set the user back to normal access after you run the script.
3. Run the `load_certificates.sh` script.
4. Build your custom image.
#### Examples
You can use the released delegate image as your base image. You can also use OS images like UBI or Ubuntu as a base to build a delegate image with custom certs.
**Use the released delegate image**
```
FROM docker.io/harness/delegate:
USER root
# This is only needed for running Harness CI module
ENV DESTINATION_CA_PATH=
# Please take the source scripts from this GitHub repo
RUN curl -o load_certificates.sh https://raw.githubusercontent.com/harness/delegate-dockerfile/main/immutable-scripts/load_certificates.sh
COPY
RUN bash -c "/opt/harness-delegate/load_certificates.sh "
USER 1001
CMD [ "./start.sh" ]
```
**Use a UBI base image**
```
# Copyright 2022 Harness Inc. All rights reserved.
# Use of this source code is governed by the PolyForm Free Trial 1.0.0 license
# that can be found in the licenses directory at the root of this repository, also available at
# https://polyformproject.org/wp-content/uploads/2020/05/PolyForm-Free-Trial-1.0.0.txt.
FROM redhat/ubi8-minimal:8.8
LABEL name="harness/delegate-minimal" \
vendor="Harness" \
maintainer="Harness"
RUN microdnf update --nodocs --setopt=install_weak_deps=0 \
&& microdnf install --nodocs \
procps \
hostname \
lsof \
findutils \
tar \
gzip \
shadow-utils \
glibc-langpack-en \
&& useradd -u 1001 -g 0 harness \
&& microdnf remove shadow-utils \
&& microdnf clean all \
&& rm -rf /var/cache/yum \
&& mkdir -p /opt/harness-delegate/
COPY immutable-scripts /opt/harness-delegate/
WORKDIR /opt/harness-delegate
ARG TARGETARCH
ARG BASEURL=https://app.harness.io/public/shared/delegates
ARG DELEGATEVERSION
COPY --from=eclipse-temurin:17.0.7_7-jre-ubi9-minimal /opt/java/openjdk/ /opt/java/openjdk/
ENV JAVA_HOME=/opt/java/openjdk/
RUN mkdir -m 777 -p client-tools/scm/93b3c9f1 \
&& curl -s -L -o client-tools/scm/93b3c9f1/scm https://app.harness.io/public/shared/tools/scm/release/93b3c9f1/bin/linux/$TARGETARCH/scm \
&& chmod -R 775 /opt/harness-delegate \
&& chown -R 1001 /opt/harness-delegate \
&& chown -R 1001 $JAVA_HOME/lib/security/cacerts
RUN mkdir -p /opt/harness-delegate/additional_certs_pem_split
ENV LANG=en_US.UTF-8
ENV HOME=/opt/harness-delegate
ENV CLIENT_TOOLS_DOWNLOAD_DISABLED=true
ENV INSTALL_CLIENT_TOOLS_IN_BACKGROUND=true
ENV PATH="$JAVA_HOME/bin:${PATH}"
ENV SHARED_CA_CERTS_PATH=/opt/harness-delegate/additional_certs_pem_split
RUN curl -s -L -o delegate.jar $BASEURL/$DELEGATEVERSION/delegate.jar
COPY
RUN bash -c "/opt/harness-delegate/load_certificates.sh "
USER 1001
CMD [ "./start.sh" ]
```
{% @harness-feedback/feedback module="harness-ai" pagePath="harness-ai/use-harness-platform/delegates/delegate/manage-delegates/build-custom-images-delegate-dockerfile" %}
# Customize delegate logging
This topic describes how to customize delegate logging.
The delegate automatically creates a new log daily, named `delegate.log`. You can customize delegate logging if the default setup doesn't fit your needs. For example, you can customize the layout, verbosity, and destination of the messages.
To create customized delegate logging for Kubernetes and Docker delegates, you can provide a custom `logback.xml` file to the delegate. You can accomplish this by mounting the file inside the delegate container or building it in your custom container. Then, update the delegate `JAVA_OPTS` with the logback option for the custom path to the configuration. This will enable you to customize the logging behavior of the delegate according to your specific needs.
For more information on default delegate logs, go to [Delegate logs](/harness-ai/use-harness-platform/delegates/delegate/delegate-concepts/delegate-overview#delegate-logs).
{% hint style="info" %}
You can configure Kubernetes and Docker delegates in various ways. Below is an example Kubernetes delegate configuration.
{% endhint %}
Let's look at an example Kubernetes delegate configuration.
To create a custom custom delegate log, do the following:
1. Create a ConfigMap containing your custom `logback.xml` file.
```
# This creates a new ConfigMap named custom-logback in a harness-delegate-ng namespace
kubectl create configmap custom-logback -n harness-delegate-ng --from-file=custom-logback.xml
```
2. Update your `delegate.yaml` file to mount the new ConfigMap.
```yaml
volumeMounts:
- name: config-volume
mountPath: /opt/harness-delegate/logback/
volumes:
- name: config-volume
configMap:
name: custom-logback
items:
- key: custom-logback.xml
path: custom-logback.xml
```
3. Update your `delegate.yaml` file with your new `JAVA_OPTS` value.
```yaml
- name: JAVA_OPTS
value: "-Dlogback.configurationFile=/opt/harness-delegate/logback/custom-logback.xml"
```
#### Default logging configuration
Here is the default logging configuration for the Harness Delegate.
{% hint style="info" %}
The following configurations were added by Harness to the default Logback XML.
* `io.harness.logging.ExpiringDuplicateMessageFilter`
* `io.harness.logging.remote.RemoteStackdriverLogAppender`
{% endhint %}
```xml
03003600THROTTLEDdelegate.logdelegate.%d{yyyy-MM-dd}.%i.log50MB101GBtrue%date{ISO8601} [%version] %process_id [%thread] %-5level %logger - %msg %replace(%mdc){'(.+)', '[$1]'} %ntrue%date{ISO8601} [%thread] %-5level %logger - %msg %replace(%mdc){'(.+)', '[$1]'} %nTRACE${MANAGER_HOST_AND_PORT}${ACCOUNT_ID}${DELEGATE_CLIENT_CERTIFICATE_PATH:- }${DELEGATE_CLIENT_CERTIFICATE_KEY_PATH:- }${TRUST_ALL_CERTIFICATES:-false}${DELEGATE_TOKEN:-${ACCOUNT_SECRET}}delegate
```
{% @harness-feedback/feedback module="harness-ai" pagePath="harness-ai/use-harness-platform/delegates/delegate/manage-delegates/customize-delegate-logging" %}
# Configure delegate metrics and auto scale
Learn how to configure delegate metrics collection with Prometheus and Grafana, and set up auto scaling using replicas.
Harness Delegates are responsible for executing various types of workloads, and the amount of resources consumed depends on the specific type of workload being performed. Harness cannot predict the specific resource requirements for a particular workload in advance.
This topic explains how to:
* Configure the Prometheus monitoring tool for the metrics collection.
* Configure the Grafana analytics tool to display metrics.
* Configure the delegate resource threshold.
* Auto scale using replicas.
### Delegate metrics
Harness captures delegate agent metrics for delegates with an immutable image type. This process requires a delegate an immutable image. For more information, go to [Delegate image types](/harness-ai/use-harness-platform/delegates/delegate/delegate-concepts/delegate-image-types).
The delegate is instrumented for the collection of the following delegate agent metrics.
{% hint style="info" %}
**NOTE**
All metrics reset when you restart the delegate.
{% endhint %}
| **Metric name** | **Description** |
| ----------------------------------------------------------------- | --------------------------------------------------------------------------------------------------------------------------------------------------------------------------------------------------------------------------------------------------------- |
| `io_harness_custom_metric_task_execution_time` | The amount of time it took to complete a task (in seconds). |
| `io_harness_custom_metric_tasks_currently_executing` | The number of tasks currently in an executing state. |
| `io_harness_custom_metric_task_timeout_total` # | The total number of tasks that timed out before completion. |
| `io_harness_custom_metric_task_completed_total` # | The total number of tasks completed. |
| `io_harness_custom_metric_task_failed_total` # | The total number of failed tasks. |
| `io_harness_custom_metric_task_rejected_total` \* # | The number of tasks rejected because of a high load on the delegate. |
| `io_harness_custom_metric_delegate_connected` | Indicates whether the delegate is connected. Values are 0 (disconnected) and 1 (connected). |
| `io_harness_custom_metric_delegate_reconnected_total` # | The number of times delegate websocket got reconnected. Note that this is only for WebSocket mode delegates. |
| `io_harness_custom_metric_resource_consumption_above_threshold`\* | Delegate CPU is above a threshold. Provide `DELEGATE_CPU_THRESHOLD` as the env variable in the delegate YAML to configure the CPU threshold. For more information, go to [Configure delegate resource threshold](#configure-delegate-resource-threshold). |
| `ldap_sync_group_flush_total` | Publishes the total count for a user group when the LDAP group sync returns 0 users for that group. The metric publishes the `accountIdentifier`, `GroupDN`, and the `count`. |
{% hint style="info" %}
**NOTE**
Metrics with \* above are only visible if you configure the resource threshold in your delegate YAML. Go to [Configure delegate resource threshold](#configure-delegate-resource-threshold) for more information.
Also note that the above metrics are available only if your delegate version is later than 23.05.79311.
{% endhint %}
{% hint style="info" %}
**NOTE**
Metrics with # above the include the suffix `_total` as of Harness Delegate 23.11.81403. Delegate versions earlier than 23.11.81403 do not include the suffix `_total` in the metric name.
{% endhint %}
This topic includes example YAML files you can use to create application manifests for your Prometheus and Grafana configurations.
#### General recommended metrics configuration
Below are the metrics settings recommended by Harness. Tailor these settings according to your organization's specific needs.
**CPU/Memory**
Configuring HPA based on CPU/Memory can be a bit complex for some use cases. However, if the calculations are possible, we believe 70-80% usage is the most effective HPA indicator. Ideally, this percentage should be slightly lower than `DELEGATE_CPU_THRESHOLD`, so that HPA is triggered before the delegate starts rejecting tasks to avoid task execution failures or slowdown.
{% hint style="info" %}
Using CPU-based HPA is not advisable unless CPU is limited for the delegate container (not limited by default). When CPU is unlimited, exceeding 100% is possible and should not be the sole reason to scale or reject tasks. CPU-based HPA should only be used when the CPU usage goes above 100% for a prolonged period. Instead, memory-based HPA is recommended for autoscaling purposes. Harness suggests using memory-based HPA for better performance and efficiency.
{% endhint %}
**io\_harness\_custom\_metric\_task\_execution\_time**
Utilize the P99 metric to establish a baseline after initiating pipeline runs and set an appropriate threshold.
Set a low severity alarm for significant deviations.
A significant change can indicate pipeline performance issues or the addition of a slow pipeline. While an alarm doesn't necessarily signify an issue, it's worth investigating.
HPA isn't suitable for this metric.
**io\_harness\_custom\_metric\_tasks\_currently\_executing**
HPA based on CPU/Memory provides better indicators. Utilize a count metric.
Create a low severity alarm for significant deviations (for example, a 30-50% change).
Set a high severity alarm for zero over a prolonged period (for example, 30 minutes) if delegates are consistently expected to perform tasks.
If the change is unexpected, the alarm could indicate a need to plan for scaling the delegate fleet due to increased usage. A sudden burst might cause downtime or indicate a problem with pipeline executions or downstream services.
**io\_harness\_custom\_metric\_task\_timeout\_total**
HPA isn't necessary. Ideally, this should be close to zero. Create a high severity alarm for a sufficiently low number.
An alarm might indicate misconfigured pipelines or disruptions in downstream services, but also overloaded delegate.
**io\_harness\_custom\_metric\_task\_completed\_total**
While possibly not highly informative, it can be added to the dashboard for insight into processed volume.
Plot count per delegate; all delegates should be similarly utilized.
**io\_harness\_custom\_metric\_task\_failed\_total**
HPA isn't necessary. Ideally, this should be close to zero, but intermittent failures occur and shouldn't trigger alarms.
Establish a baseline and set a high severity alarm for significant deviations. This would signify a serious issue such as a service outage or misconfiguration.
**io\_harness\_custom\_metric\_task\_rejected\_total**
HPA isn't necessary (as this indicates that CPU/Memory thresholds are already reached), but it provides an alternate observation of delegate utilization.
Create a low severity alarm for total unique task rejections. This alarm can indicate a need to scale up the delegate fleet.
**io\_harness\_custom\_metric\_resource\_consumption\_above\_threshold**
While this can serve as a simpler HPA metric, we advise to use CPU/Memory for HPA instead if possible. By the time this metric is triggered, rejection has likely already begun, making it too late for HPA adjustments. Fine-tuning CPU/Memory metrics provides a better HPA indicator, allowing scaling before task rejection occurs.
### Configure the Prometheus monitoring tool for the metrics collection
#### Apply the prometheus.yml file
The configuration of Prometheus requires the installation of a Prometheus workload and service in your Kubernetes cluster. Use the following example configuration file to install the `harness-delegate-prometheus-deployment` workload and a service named `harness-delegate-prometheus-service`. The configuration includes a load balancer with an IP address you can use to access the Prometheus UI.
Expand the section below to view a sample `prometheus.yml` file.
Example prometheus.yml file
```yaml
apiVersion: v1
kind: Namespace
metadata:
name: harness-delegate-ng
---
apiVersion: v1
kind: ConfigMap
metadata:
name: prometheus-delegate-conf
labels:
name: prometheus-delegate-conf
namespace: harness-delegate-ng
data:
CPU: "1"
MEMORY: "2048"
POD_MEMORY: "3072"
prometheus.yml: |-
global:
scrape_interval: 10s
evaluation_interval: 10s
scrape_configs:
- job_name: 'kubernetes-apiservers'
kubernetes_sd_configs:
- role: endpoints
scheme: http
metrics_path: '/api/metrics'
relabel_configs:
- source_labels: [__meta_kubernetes_namespace, __meta_kubernetes_service_name, __meta_kubernetes_endpoint_port_name]
action: keep
regex: default;kubernetes;https
- job_name: 'kubernetes-pods'
kubernetes_sd_configs:
- role: pod
relabel_configs:
- source_labels: [__meta_kubernetes_pod_annotation_prometheus_io_scrape]
action: keep
regex: true
- source_labels: [__meta_kubernetes_pod_annotation_prometheus_io_path]
action: replace
target_label: __metrics_path__
regex: (.+)
- source_labels: [__address__, __meta_kubernetes_pod_annotation_prometheus_io_port]
action: replace
regex: ([^:]+)(?::\d+)?;(\d+)
replacement: $1:$2
target_label: __address__
- action: labelmap
regex: __meta_kubernetes_pod_label_(.+)
- source_labels: [__meta_kubernetes_namespace]
action: replace
target_label: kubernetes_namespace
- source_labels: [__meta_kubernetes_pod_name]
action: replace
target_label: kubernetes_pod_name
- job_name: 'kubernetes-service-endpoints'
kubernetes_sd_configs:
- role: endpoints
relabel_configs:
- source_labels: [__meta_kubernetes_service_annotation_prometheus_io_scrape]
action: keep
regex: true
- source_labels: [__meta_kubernetes_service_annotation_prometheus_io_scheme]
action: replace
target_label: __scheme__
regex: (https?)
- source_labels: [__meta_kubernetes_service_annotation_prometheus_io_path]
action: replace
target_label: __metrics_path__
regex: (.+)
- source_labels: [__address__, __meta_kubernetes_service_annotation_prometheus_io_port]
action: replace
target_label: __address__
regex: ([^:]+)(?::\d+)?;(\d+)
replacement: $1:$2
- action: labelmap
regex: __meta_kubernetes_service_label_(.+)
- source_labels: [__meta_kubernetes_namespace]
action: replace
target_label: kubernetes_namespace
- source_labels: [__meta_kubernetes_service_name]
action: replace
target_label: kubernetes_name
---
apiVersion: v1
kind: Service
metadata:
name: harness-delegate-prometheus-service
namespace: harness-delegate-ng
spec:
selector:
app: prometheus-delegate
type: LoadBalancer
ports:
- port: 8084
targetPort: 9090
---
apiVersion: apps/v1
kind: Deployment
metadata:
name: harness-delegate-prometheus-deployment
namespace: harness-delegate-ng
spec:
replicas: 1
template:
metadata:
labels:
app: prometheus-delegate
spec:
containers:
- name: prometheus
image: prom/prometheus:v2.6.0
args:
- "--config.file=/etc/prometheus/prometheus.yml"
- "--storage.tsdb.path=/prometheus/"
ports:
- containerPort: 9090
volumeMounts:
- name: prometheus-config-volume
mountPath: /etc/prometheus/
- name: prometheus-storage-volume
mountPath: /prometheus/
volumes:
- name: prometheus-config-volume
configMap:
defaultMode: 420
name: prometheus-delegate-conf
- name: prometheus-storage-volume
emptyDir: {}
selector:
matchLabels:
app: prometheus-delegate
```
Use the following command to deploy the configuration file.
```
kubectl apply -f prometheus.yml
```
### Configure the Grafana analytics tool to display metrics
To set up Grafana, use the following example `grafana.yml` file.
Example `grafana.yml` file
```yaml
apiVersion: v1
kind: ConfigMap
metadata:
name: grafana-datasources
namespace: harness-delegate-ng
data:
prometheus.yaml: |-
{
"apiVersion": 1,
"datasources": [
{
"access":"proxy",
"editable": true,
"name": "prometheus",
"orgId": 1,
"type": "prometheus",
"url": "http://harness-delegate-prometheus-service:8084",
"version": 1
}
]
}
---
apiVersion: apps/v1
kind: Deployment
metadata:
name: grafana
namespace: harness-delegate-ng
spec:
replicas: 1
selector:
matchLabels:
app: grafana
template:
metadata:
name: grafana
labels:
app: grafana
spec:
containers:
- name: grafana
image: grafana/grafana:latest
ports:
- name: grafana
containerPort: 3000
resources:
limits:
memory: "1Gi"
cpu: "1000m"
requests:
memory: 500M
cpu: "500m"
volumeMounts:
- mountPath: /var/lib/grafana
name: grafana-storage
- mountPath: /etc/grafana/provisioning/datasources
name: grafana-datasources
readOnly: false
volumes:
- name: grafana-storage
emptyDir: {}
- name: grafana-datasources
configMap:
defaultMode: 420
name: grafana-datasources
---
apiVersion: v1
kind: Service
metadata:
name: grafana
namespace: harness-delegate-ng
annotations:
prometheus.io/scrape: 'true'
prometheus.io/port: '3000'
spec:
selector:
app: grafana
type: LoadBalancer
ports:
- port: 3000
targetPort: 3000
```
1. Copy the `grafana.yml` file.
2. If you're not using the default `harness-delegate-ng` namespace, replace it with the namespace into which you deployed your delegate.
3. Use the following command to apply the Grafana configuration file to your deployment:
```
kubectl apply -f grafana.yml
```
NOTE
This manifest also creates a load balancer and service in your Kubernetes cluster.
4. Select the exposed URL to access Grafana.
### Configure delegate resource threshold
You can set the delegate to reject new tasks when the configured resource threshold is reached. You can then spin up new delegates when resources are above the threshold.
{% hint style="info" %}
**NOTE**
The `io_harness_custom_metric_resource_consumption_above_threshold` metric is only visible if you configure resource threshold in your delegate YAML.
{% endhint %}
{% hint style="warning" %}
**CONFIGURATION DEPRECATION NOTICE**
Delegate configuration to control the task rejections `DYNAMIC_REQUEST_HANDLING` and `DELEGATE_RESOURCE_THRESHOLD` are now deprecated and will be removed in a future version of the delegate. The preferred method to configure a resource threshold is by using `DELEGATE_CPU_THRESHOLD` as described below.
{% endhint %}
To configure the delegate resource threshold, set the `DELEGATE_CPU_THRESHOLD` env variable to the CPU threshold in percentages. When the threshold is exceeded, the delegate rejects new tasks.
```yaml
env:
- name: DELEGATE_CPU_THRESHOLD
value: "80"
```
### Auto scale using replicas
Autoscaling Harness Delegate using replicas is a useful feature that can help ensure your deployments are executed efficiently, without downtime or resource overload.
#### Enable the usage threshold for delegate resources
You can set the delegate to reject new tasks when the configured resource threshold is reached. You can then spin up new delegates when resources are above the threshold. For more information, go to [Configure delegate resource threshold](#configure-delegate-resource-threshold).
#### Configure Harness Delegate autoscaling using replicas for Helm chart deployments
To access the default Helm chart for the `values.yaml` file, go to [Harness Delegate Helm chart](https://github.com/harness/delegate-helm-chart/blob/main/harness-delegate-ng/values.yaml).
{% hint style="info" %}
**NOTE**
You can also update the Harness Delegate YAML file in addition to the Helm chart.
{% endhint %}
To auto scale the delegate, do the following:
1. In your `values.yaml` file, go to `autoscaling` parameters.
```yaml
autoscaling:
enabled: false
minReplicas: 1
maxReplicas: 10
targetMemoryUtilizationPercentage: 80
# targetCPUUtilizationPercentage: 80
```
2. Set `enabled` to `true`.
3. Specify the minimum and maximum number of replicas you want to use in the `minReplicas` and `maxReplicas` parameters.
To fine-tune your autoscaling, you can set the `targetMemoryUtilizationPercentage` to add a new replica when memory utilization exceeds this percentage.
4. (Optional) Set the `targetCPUUtilizationPercentage` to add a new replica when CPU utilization exceeds this percentage.
5. Save the file, and upgrade your deployment.
Using CPU-based HPA is not advisable unless CPU is limited for the delegate container (not limited by default). When CPU is unlimited exceeding 100% is common and should not be the sole reason to scale or reject tasks. CPU-based HPA should only be used when the CPU usage goes above 100% for a prolonged period. Instead, memory-based HPA is recommended for autoscaling purposes. Harness suggests using memory-based HPA for better performance and efficiency.
#### Configure Harness Delegate autoscaling using replicas for Kubernetes 1.23 and later
The HPA configuration setting is included in the default Kubernetes delegate YAML file. Harness updated the default HPA in the Harness Delegate YAML versions 24.02.82302 and later to use `autoscaling/v2` instead of `autoscaling/v1`, which was used in earlier delegate versions.
Since `autoscaling/v2` has been GA with Kubernetes 1.23 and higher, if you have a Kubernetes version lower than 1.23 and a delegate version 24.02.82302 or later, you must manually change the `apiVersion` in the `HorizontalPodAutoscaler` section of your delegate YAML to `autoscaling/v1`. For more information, go to [Configure Harness Delegate autoscaling using replicas for Kubernetes versions lower than 1.23](#configure-harness-delegate-autoscaling-using-replicas-for-kubernetes-versions-earlier-than-123).
To auto scale the delegate for Kubernetes 1.23 and higher, do the following:
1. In your `harness-delegate.yml` file, go to `autoscaling` parameters.
2. Specify the minimum and maximum number of replicas you want to use in the `minReplicas` and `maxReplicas` parameters.
To fine-tune your autoscaling, you can set the `memory` `averageUtilization` to add a new replica if memory utilization exceeds this percentage. Below is an example of autoscaling the delegate if the memory usage of delegates goes above 70% (the default YAML setting).
Sample autoscaling YAML
```yaml
---
apiVersion: autoscaling/v2
kind: HorizontalPodAutoscaler
metadata:
name: kubernetes-delegate-hpa
namespace: harness-delegate-ng
labels:
harness.io/name: kubernetes-delegate
spec:
scaleTargetRef:
apiVersion: apps/v1
kind: Deployment
name: kubernetes-delegate
minReplicas: 1
maxReplicas: 1
metrics:
- type: Resource
resource:
name: memory
target:
type: Utilization
averageUtilization: 70
---
```
3. (Optional) Set the `cpu` `averageUtilization`to add a new replica if CPU utilization exceeds this percentage.
4. Save the file, and deploy it to your Kubernetes cluster.
#### Configure Harness Delegate autoscaling using replicas for Kubernetes versions earlier than 1.23
The HPA configuration setting is included in the default Kubernetes delegate YAML file.
{% hint style="warning" %}
**IMPORTANT VERSION INFO**
Harness updated the default HPA in the Harness Delegate YAML to use `autoscaling/v2` instead of `autoscaling/v1` which was used in earlier delegate versions.
Since `autoscaling/v2` has been GA with Kubernetes 1.23 and higher, if you have a Kubernetes version earlier than 1.23 and a delegate version 24.02.82302 or later, you must manually change the `apiVersion` in the `HorizontalPodAutoscaler` section of your delegate YAML to `autoscaling/v1`.
{% endhint %}
To auto scale the delegate for Kubernetes versions lower than 1.23, do the following:
1. In your `harness-delegate.yml` file, go to `autoscaling` parameters.
2. Replace the `apiVersion` in the `HorizontalPodAutoscaler` section of your delegate YAML to `autoscaling/v1`.
```yaml
---
apiVersion: autoscaling/v1
kind: HorizontalPodAutoscaler
metadata:
name: harness-delegate-hpa
namespace: harness-delegate-ng
labels:
harness.io/name: harness-delegate
spec:
scaleTargetRef:
apiVersion: apps/v1
kind: Deployment
name: harness-delegate
minReplicas: 2
maxReplicas: 10
targetMemoryUtilizationPercentage: 70
---
```
3. Specify the minimum and maximum number of replicas you want to use in the `minReplicas` and `maxReplicas` parameters.
To fine-tune your autoscaling, you can set the `targetMemoryUtilizationPercentage` to add a new replica if Memory utilization exceeds this percentage. Below is an example of autoscaling the delegate if the Memory usage of delegates goes above 70%.
4. (Optional) Set the `targetCPUUtilizationPercentage` to add a new replica if CPU utilization exceeds this percentage.
5. Save the file, and restart your pods.
When you create a deployment, Harness automatically spins up new replicas of your delegate as needed to ensure the deployment is completed.
**Example delegate YAML**
Here's an example YAML file that configures delegates to have a minimum of 2 replicas. New tasks won't be accepted if the Memory usage goes above 80%. Once the Memory usage hits 70%, a new pod will be created to handle the load, up to a maximum of 10 replicas. When the Memory usage goes down below 70%, the number of replicas will be scaled back down to a minimum of 2.
Example delegate YAML
```yaml
apiVersion: v1
kind: Namespace
metadata:
name: harness-delegate-ng
---
apiVersion: rbac.authorization.k8s.io/v1
kind: ClusterRoleBinding
metadata:
name: harness-delegate-ng-cluster-admin
subjects:
- kind: ServiceAccount
name: default
namespace: harness-delegate-ng
roleRef:
kind: ClusterRole
name: cluster-admin
apiGroup: rbac.authorization.k8s.io
---
apiVersion: v1
kind: Secret
metadata:
name: kubernetes-delegate-account-token
namespace: harness-delegate-ng
type: Opaque
data:
DELEGATE_TOKEN: "YOUR_DELEGATE_TOKEN"
---
# If delegate needs to use a proxy, please follow instructions available in the documentation
# https://developer.harness.io/docs/platform/delegates/manage-delegates/configure-delegate-proxy-settings/
apiVersion: apps/v1
kind: Deployment
metadata:
labels:
harness.io/name: kubernetes-delegate
name: kubernetes-delegate
namespace: harness-delegate-ng
spec:
replicas: 2
minReadySeconds: 120
selector:
matchLabels:
harness.io/name: kubernetes-delegate
template:
metadata:
labels:
harness.io/name: kubernetes-delegate
annotations:
prometheus.io/scrape: "true"
prometheus.io/port: "3000"
prometheus.io/path: "/api/metrics"
spec:
terminationGracePeriodSeconds: 600
restartPolicy: Always
containers:
- image: example/org/delegate:yy.mm.verno
imagePullPolicy: Always
name: delegate
securityContext:
allowPrivilegeEscalation: false
runAsUser: 0
ports:
- containerPort: 9090
resources:
limits:
memory: "2Gi"
requests:
cpu: "0.5"
memory: "2Gi"
livenessProbe:
httpGet:
path: /api/health
port: 3460
scheme: HTTP
initialDelaySeconds: 10
periodSeconds: 10
failureThreshold: 3
startupProbe:
httpGet:
path: /api/health
port: 3460
scheme: HTTP
initialDelaySeconds: 30
periodSeconds: 10
failureThreshold: 15
envFrom:
- secretRef:
name: kubernetes-delegate-account-token
env:
- name: JAVA_OPTS
value: "-Xms64M"
- name: ACCOUNT_ID
value: YOUR_ACCOUNT_ID
- name: MANAGER_HOST_AND_PORT
value: https://app.harness.io
- name: DELEGATE_NAME
value: kubernetes-delegate
- name: DELEGATE_TYPE
value: "KUBERNETES"
- name: DELEGATE_NAMESPACE
valueFrom:
fieldRef:
fieldPath: metadata.namespace
- name: INIT_SCRIPT
value: ""
- name: DELEGATE_DESCRIPTION
value: ""
- name: DELEGATE_TAGS
value: ""
- name: NEXT_GEN
value: "true"
---
apiVersion: autoscaling/v2
kind: HorizontalPodAutoscaler
metadata:
name: kubernetes-delegate-hpa
namespace: harness-delegate-ng
labels:
harness.io/name: kubernetes-delegate
spec:
scaleTargetRef:
apiVersion: apps/v1
kind: Deployment
name: kubernetes-delegate
minReplicas: 1
maxReplicas: 1
metrics:
- type: Resource
resource:
name: memory
target:
type: Utilization
averageUtilization: 70
---
kind: Role
apiVersion: rbac.authorization.k8s.io/v1
metadata:
name: upgrader-cronjob
namespace: harness-delegate-ng
rules:
- apiGroups: ["batch", "apps", "extensions"]
resources: ["cronjobs"]
verbs: ["get", "list", "watch", "update", "patch"]
- apiGroups: ["extensions", "apps"]
resources: ["deployments"]
verbs: ["get", "list", "watch", "create", "update", "patch"]
---
kind: RoleBinding
apiVersion: rbac.authorization.k8s.io/v1
metadata:
name: kubernetes-delegate-upgrader-cronjob
namespace: harness-delegate-ng
subjects:
- kind: ServiceAccount
name: upgrader-cronjob-sa
namespace: harness-delegate-ng
roleRef:
kind: Role
name: upgrader-cronjob
apiGroup: ""
---
apiVersion: v1
kind: ServiceAccount
metadata:
name: upgrader-cronjob-sa
namespace: harness-delegate-ng
---
apiVersion: v1
kind: Secret
metadata:
name: kubernetes-delegate-upgrader-token
namespace: harness-delegate-ng
type: Opaque
data:
UPGRADER_TOKEN: "YOUR_UPGRADER_TOKEN"
---
apiVersion: v1
kind: ConfigMap
metadata:
name: kubernetes-delegate-upgrader-config
namespace: harness-delegate-ng
data:
config.yaml:
mode: Delegate
dryRun: false
workloadName: kubernetes-delegate
namespace: harness-delegate-ng
containerName: delegate
delegateConfig:
accountId: YOUR_ACCOUNT_ID
managerHost: https://app.harness.io
---
apiVersion: batch/v1
kind: CronJob
metadata:
labels:
harness.io/name: kubernetes-delegate-upgrader-job
name: kubernetes-delegate-upgrader-job
namespace: harness-delegate-ng
spec:
schedule: "0 */1 * * *"
concurrencyPolicy: Forbid
startingDeadlineSeconds: 20
jobTemplate:
spec:
template:
spec:
serviceAccountName: upgrader-cronjob-sa
restartPolicy: Never
containers:
- image: example/org/delegate:yy.mm.verno
name: upgrader
imagePullPolicy: Always
envFrom:
- secretRef:
name: kubernetes-delegate-upgrader-token
volumeMounts:
- name: config-volume
mountPath: /etc/config
volumes:
- name: config-volume
configMap:
name: kubernetes-delegate-upgrader-config
```
#### Scale down delegate pods
You can use `terminationGracePeriodSeconds` or `preStopHook` to scale down your delegate pods.
* `terminationGracePeriodSeconds`: This is used to allow the delegate to delay the shutdown so that this process can perform some cleanup. The container shutdown is delayed the specified duration.
If there are no tasks running on the delegate pod, it terminates immediately. If the delegate pod is running one or more tasks, it will stop accepting new tasks and terminate as soon as all running tasks complete.
For example, if `terminationGracePeriodSeconds` is set to 7200 (two hours), there are three possible scenarios:
* No tasks: The delegate container terminates immediately.
* Short tasks: For example, if tasks require 10 minutes to complete, the delegate will delay shutdown until tasks are complete (10 minutes), and then shutdown. In this example, the total delay is 10 minutes, not two hours.
* Long tasks: For example, if tasks require five hours to complete, the delegate will delay the shutdown, up to the maximum grace period configured (two hours), then Kubernetes sends SIGKILL signal, force killing the delegate and tasks. Tasks will show up as timed out/failed in the UI.
* `preStopHook`: This is used to allow any other kind of cleanup outside of the main process, for example, if you want to save files. This hook runs in parallel to the `terminationGracePeriodSeconds`, but before the delegate process shutdown is triggered (before the delegate process receives SIGTERM). If the hook's grace period ends, it is terminated. The delegate enters draining mode and only runs tasks already in progress. It will try doing this until all tasks are completed or until it is interrupted by Kubernetes with the SIGKILL signal when the grace period expires.
{% hint style="info" %}
**CAUTION**
There are some drawbacks of using a longer `terminationGracePeriodSeconds`. Harness recommends that you evaluate your requirements and determine the maximum waiting time for task completion. If there is a long task that is pending completion, it can potentially bring down the entire delegate instance as it will be unable to process any new tasks while draining. It is crucial to consider the duration of tasks and ensure that they are distributed evenly to prevent such situations.
During delegate upgrade scenarios, this is not a major issue, since Harness performs rolling updates by default. Rolling updates bring up new delegate instances before shutting down the old ones (this uses additional resources, but your tasks will finish). During a long task, if the delegate container requires a restart, it will result in one less delegate instance, which could impact other tasks that might fail to schedule due to a lack of available delegates.
{% endhint %}
{% @harness-feedback/feedback module="harness-ai" pagePath="harness-ai/use-harness-platform/delegates/delegate/manage-delegates/delegate-metrics" %}
# Proxy configuration
Configure delegate connectivity through a proxy, using Basic or Kerberos/SPNEGO authentication.
{% content-ref url="/pages/rUPvd68H31iJvBl4GXj8" %}
[Proxy Configuration Guide](/harness-ai/use-harness-platform/delegates/delegate/manage-delegates/proxy/configure-delegate-proxy-settings)
{% endcontent-ref %}
{% content-ref url="/pages/MnUyZ4u1dLf5PlV9dzG6" %}
[Kerberos Proxy Authentication](/harness-ai/use-harness-platform/delegates/delegate/manage-delegates/proxy/configure-delegate-kerberos-proxy)
{% endcontent-ref %}
{% @harness-feedback/feedback module="harness-ai" pagePath="harness-ai/use-harness-platform/delegates/delegate/manage-delegates/proxy" %}
# Proxy configuration guide
Learn how to manage connectivity in environments where outbound traffic must go through a proxy.
This article explains how to configure proxy settings to manage connectivity in environments where outbound traffic is restricted.
By default, HTTP and HTTPS proxy schemes are supported with Basic authentication (`PROXY_USER` and `PROXY_PASSWORD`). If your proxy requires Kerberos/SPNEGO authentication instead, go to [Kerberos/SPNEGO authentication](#kerberos-spnego-authentication).
{% hint style="warning" %}
**IMPORTANT NOTE**
When using a HTTP Helm repositories, the [default setting](/harness-ai/use-harness-platform/settings/default-settings) `Ignore status code for HTTP connections` must be set to `true` as socket connection tests conducted by Harness from the delegate do not account for proxy details.
{% endhint %}
### Proxy Settings for Delegate
#### Kubernetes
The proxy settings are in the `harness-delegate.yaml` file:
```yaml
...
- name: PROXY_HOST
value: ""
- name: PROXY_PORT
value: ""
- name: PROXY_SCHEME
value: ""
- name: NO_PROXY
value: ""
- name: PROXY_MANAGER
value: "true"
- name: PROXY_USER
valueFrom:
secretKeyRef:
name: doc-example-proxy
key: PROXY_USER
- name: PROXY_PASSWORD
valueFrom:
secretKeyRef:
name: doc-example-proxy
key: PROXY_PASSWORD
...
```
The `PROXY_MANAGER` setting determines whether the delegate bypasses proxy settings to reach the Harness Manager in the cloud. If you want to bypass, enter `false`.
**In-Cluster Kubernetes delegate with proxy**
If an in-cluster Kubernetes delegate has a proxy configured, then `NO_PROXY` must contain the cluster master IP. This enables the delegate to skip the proxy for in-cluster connections.
#### Kerberos/SPNEGO authentication
If your outbound proxy requires Kerberos/SPNEGO (Negotiate) authentication instead of Basic auth, the delegate can authenticate using a Kerberos keytab. No `PROXY_USER` or `PROXY_PASSWORD` is needed. This applies to any infrastructure that can reach your KDC over the network, including Kubernetes, EC2, and ECS-hosted delegates, not just Kubernetes.
Set `PROXY_AUTH_TYPE=KERBEROS` on the delegate, along with `KRB5_CONFIG` and `KRB5_JAAS_CONFIG` pointing to a `krb5.conf` file and a JAAS login config file that defines a `HarnessKrb5` entry.
Example delegate manifest with Kerberos proxy authentication
```yaml
env:
- name: PROXY_HOST
value: "proxy.example.com"
- name: PROXY_PORT
value: "3128"
- name: PROXY_SCHEME
value: "http"
- name: PROXY_MANAGER
value: "true"
- name: PROXY_AUTH_TYPE
value: "KERBEROS"
- name: KRB5_CONFIG
value: "/etc/harness/kerberos/krb5.conf"
- name: KRB5_JAAS_CONFIG
value: "/etc/harness/kerberos/jaas/jaas.conf"
volumeMounts:
- name: kerberos-config
mountPath: /etc/harness/kerberos/krb5.conf
subPath: krb5.conf
readOnly: true
- name: kerberos-jaas
mountPath: /etc/harness/kerberos/jaas/jaas.conf
subPath: jaas.conf
readOnly: true
- name: kerberos-keytab
mountPath: /etc/harness/kerberos/keytab
readOnly: true
```
Kerberos proxy authentication covers delegate-to-Harness Manager traffic only. Calls to third-party systems (Terraform Cloud, Jira, Jenkins, HTTP pipeline steps) continue to use Basic authentication.
Go to [Kerberos proxy authentication](/harness-ai/use-harness-platform/delegates/delegate/manage-delegates/proxy/configure-delegate-kerberos-proxy) for the full `krb5.conf` and JAAS configuration reference, the complete manifest, keytab rotation, and troubleshooting.
#### Docker
The following script installs a Docker delegate with an HTTP proxy scheme.
```bash
docker run --cpus=1 --memory=2g \
-e DELEGATE_NAME=docker-delegate \
-e RUNNER_URL=https:// \
-e DELEGATE_TAGS=macos-amd64 \
-e PROXY_HOST=YOUR_PROXY_HOST_IP \
-e PROXY_PORT=YOUR_PROXY_PORT \
-e PROXY_SCHEME=http \
-e NEXT_GEN="true" \
-e DELEGATE_TYPE="DOCKER" \
-e ACCOUNT_ID=YOUR_ACCOUNT_ID \
-e DELEGATE_TOKEN=YOUR_DELEGATE_TOKEN \
-e MANAGER_HOST_AND_PORT=https:///delegate:23.09.80505
```
### Proxy Settings for Delegate Upgrader
{% hint style="info" %}
**FEATURE AVAILABILITY**
This feature is available from Delegate Upgrader [1.7.0](/release-notes/delegate#version-170-) and later.
{% endhint %}
#### Kubernetes
To configure proxy for your Kubernetes Delegate Upgrader, add the proxy settings to the Delegate upgrader config in the manifest file. Below is an example for the same:
```yaml
apiVersion: v1
kind: ConfigMap
metadata:
name: kubernetes-delegate-upgrader-config
namespace: harness-delegate-ng
data:
config.yaml: |
mode: Delegate
dryRun: false
workloadName: kubernetes-delegate
namespace: harness-delegate-ng
containerName: delegate
delegateConfig:
accountId: XXXX_XXXXXXX_XXXX
managerHost: https://
proxyHost: XX.XX.XX.XX
proxyPort: 3128
proxyManager: true
proxyUser: MYUSER
proxyPassword: ******
```
Once updated, apply the configuration using the command below.
```bash
kubectl apply -f harness-delegate.yaml
```
#### Docker
To run the Docker Delegate Upgrader with proxy settings, set the required environment variables in the Docker command as shown in the example below.
```bash
docker run --cpus=0.1 --memory=100m \
-v /var/run/docker.sock:/var/run/docker.sock \
-e ACCOUNT_ID=XXXX_XXXXXXX_XXXX \
-e MANAGER_HOST_AND_PORT=https:// \
-e UPGRADER_WORKLOAD_NAME=docker-delegate \
-e PROXY_HOST=YOUR_PROXY_HOST_IP \
-e PROXY_PORT=YOUR_PROXY_PORT \
-e PROXY_USER=MYUSER \
-e PROXY_PASSWORD=****** \
-e UPGRADER_TOKEN=XXXXXXXXXXXXXXXXXXXXXXXX \
-e CONTAINER_STOP_TIMEOUT=3600 \
-e SCHEDULE="0 */1 * * *" us-west1-docker.pkg.dev/gar-setup/docker/upgrader:1.7.0
```
### Subnet masks not supported
You cannot use delegate proxy settings to specify the Cluster Service Network CIDR notation and make the delegate bypass the proxy to talk to the Kubernetes API.
Harness does not allow any methods of representing a subnet mask.
The mask should be set in the cluster itself. For example:
```
kubectl -n default get service kubernetes -o json | jq -r '.spec.clusterIP'
```
{% hint style="info" %}
Harness supports mTLS authentication on a case-by-case basis. Contact [Harness Support](mailto:support@harness.io) to enable it.
{% endhint %}
{% @harness-feedback/feedback module="harness-ai" pagePath="harness-ai/use-harness-platform/delegates/delegate/manage-delegates/proxy/configure-delegate-proxy-settings" %}
# Kerberos proxy authentication
Configure Harness Delegate to authenticate to a Kerberos-enabled proxy using SPNEGO/Negotiate authentication.
If your outbound HTTP proxy requires Kerberos/SPNEGO (Negotiate) authentication instead of Basic authentication, the delegate can authenticate to it using a Kerberos keytab you provide. No `PROXY_USER` or `PROXY_PASSWORD` is needed.
For standard proxy configuration with Basic authentication, go to [Proxy configuration guide](/harness-ai/use-harness-platform/delegates/delegate/manage-delegates/proxy/configure-delegate-proxy-settings).
## What you will learn from this topic
* How to understand the [scope of Kerberos proxy authentication](#scope) in this release
* How to configure [environment variables](#environment-variables) for Kerberos authentication
* How to author a [JAAS login configuration](#jaas-login-configuration) file
* How to configure [Kerberos settings](#kerberos-configuration) in `krb5.conf`
* How to deploy a delegate with [Kerberos proxy authentication](#example-manifest) using a complete Kubernetes manifest
* How to [rotate keytabs](#rotate-keytabs) without restarting the delegate
* How to [troubleshoot](#troubleshooting) common authentication failures
## Before you begin
Before you configure Kerberos proxy authentication, ensure you have the following:
* **Kubernetes cluster**: You need kubectl access to deploy and configure the delegate. For more information, go to [Delegate installation options](/harness-ai/use-harness-platform/delegates/delegate/install-delegates/overview).
* **Delegate installed**: A Harness Delegate must be installed in your Kubernetes cluster. For more information, go to [Delegate overview](/harness-ai/use-harness-platform/delegates/delegate/delegate-concepts/delegate-overview) and [Delegate system requirements](/harness-ai/use-harness-platform/delegates/delegate/delegate-concepts/delegate-requirements).
* **Kerberos keytab**: Obtain a keytab file for the delegate principal from your Kerberos administrator.
* **Kerberos configuration**: Your organization's `krb5.conf` configuration file with realm and KDC (Key Distribution Center) details.
* **Network access**: The delegate pod must be able to reach your KDC over the network.
* **Proxy configuration**: A proxy server configured to accept Kerberos/Negotiate authentication (not just Basic auth). For Basic authentication proxy setup, go to [Proxy configuration guide](/harness-ai/use-harness-platform/delegates/delegate/manage-delegates/proxy/configure-delegate-proxy-settings).
## Scope
Kerberos proxy authentication in this release covers delegate-to-Harness Manager traffic only:
* REST API calls (heartbeat, task polling, task acknowledgement)
* WebSocket tunnel connections
Everything else continues to use Basic authentication (`PROXY_USER`/`PROXY_PASSWORD`), for example:
* Shell script tasks that run locally on the delegate or over SSH/WinRM
* Outbound calls to third-party systems (Terraform Cloud, Jira, Jenkins, HTTP pipeline steps)
{% hint style="warning" %}
**Third-party integration limitation**
If your corporate proxy requires Kerberos authentication for all outbound traffic, calls to third-party systems will fail with HTTP 407 until Kerberos support is extended to those integrations in a future release.
{% endhint %}
## Set up Kerberos proxy authentication
Setting up Kerberos proxy authentication requires no UI configuration, no API toggle, and no additional volumes rendered by Harness. You configure everything directly in the delegate manifest yourself.
Perform the following steps to set up Kerberos proxy authentication:
1. Set the standard proxy environment variables in your delegate manifest (these are the same as for Basic auth): `PROXY_HOST`, `PROXY_PORT`, and `PROXY_SCHEME`.
2. Set `PROXY_AUTH_TYPE=KERBEROS` on the delegate container to enable Kerberos authentication.
3. Provide your own `krb5.conf` file and point `KRB5_CONFIG` to its path.
4. Author a JAAS login config file (defining a `HarnessKrb5` entry) and point `KRB5_JAAS_CONFIG` to its path.
5. Ensure the delegate pod can reach your KDC, and that your proxy is configured to accept Kerberos/Negotiate authentication (not just Basic).
The following sections provide detailed configuration instructions for each component.
### Environment variables
Configure the following environment variables in your delegate manifest:
| Variable | Required | Description |
| ------------------ | -------- | ------------------------------------------------------------------------------------------------------------------------ |
| `PROXY_HOST` | Yes | Proxy hostname or IP address. Go to [Select PROXY\_HOST value](#select-proxy_host-value) for Kerberos-specific guidance. |
| `PROXY_PORT` | Yes | Proxy port number (for example, 3128). |
| `PROXY_SCHEME` | Yes | Proxy scheme (`http` or `https`). |
| `PROXY_AUTH_TYPE` | Yes | Set to `KERBEROS` to enable Kerberos authentication. |
| `PROXY_MANAGER` | Yes | Set to `true` to route Manager traffic through the proxy. |
| `KRB5_CONFIG` | Yes | Path to your `krb5.conf` file (for example, `/etc/harness/kerberos/krb5.conf`). |
| `KRB5_JAAS_CONFIG` | Yes | Path to your JAAS login config file (for example, `/etc/harness/kerberos/jaas/jaas.conf`). |
| `NO_PROXY` | No | Comma-separated list of hosts or domains to bypass the proxy. |
{% hint style="danger" %}
**Boot failure on missing configuration**
The delegate fails to start if `PROXY_AUTH_TYPE=KERBEROS` is set but `KRB5_CONFIG` or `KRB5_JAAS_CONFIG` is unset or points to an unreadable file. For more information on delegate environment variables, go to [Delegate environment variables](/harness-ai/use-harness-platform/delegates/delegate/delegate-reference/delegate-environment-variables).
{% endhint %}
### JAAS login configuration
Create a JAAS login config file that defines a `HarnessKrb5` entry. This file specifies the keytab location and principal to use for authentication.
The entry **must** be named `HarnessKrb5` exactly:
```java
HarnessKrb5 {
com.sun.security.auth.module.Krb5LoginModule required
useKeyTab=true
keyTab="/etc/harness/kerberos/keytab/proxy.keytab"
principal="delegate@EXAMPLE.COM"
storeKey=true
refreshKrb5Config=true
doNotPrompt=true;
};
```
Replace the following values with your actual configuration:
* **keyTab**: Path where your keytab is mounted in the container.
* **principal**: Your delegate's Kerberos principal (must match an entry in the keytab).
### Kerberos configuration
Your `krb5.conf` file defines the Kerberos realm, KDC location, and domain mappings. Here is a recommended configuration:
```ini
[libdefaults]
default_realm = EXAMPLE.COM
dns_lookup_realm = false
dns_lookup_kdc = false
dns_canonicalize_hostname = false
rdns = false
forwardable = true
[realms]
EXAMPLE.COM = {
kdc = kdc.example.com
admin_server = kdc.example.com
}
[domain_realm]
.example.com = EXAMPLE.COM
example.com = EXAMPLE.COM
```
The following are key settings to understand:
* `dns_canonicalize_hostname = false` and `rdns = false` prevent hostname rewriting before deriving the service principal.
* `dns_lookup_realm = false` and `dns_lookup_kdc = false` disable DNS-based KDC discovery.
* Do **not** set `default_keytab_name`. The keytab path is specified in your JAAS config.
### Select PROXY\_HOST value
The Service Principal Name (SPN) sent to the KDC is `HTTP/@`, where `` depends on your `PROXY_HOST` value and `krb5.conf` DNS settings.
The following table shows how different `PROXY_HOST` values and DNS settings affect the SPN hostname:
| PROXY\_HOST | rdns | dns\_canonicalize\_hostname | SPN hostname |
| ------------------- | ------- | --------------------------- | ---------------------------------------- |
| `proxy.example.com` | `false` | `false` | `proxy.example.com` (verbatim) |
| `proxy.example.com` | `false` | `true` | Forward DNS canonical name |
| `proxy.example.com` | `true` | any | PTR record of resolved IP |
| `10.2.204.25` | `false` | any | `10.2.204.25` (rarely registered at KDC) |
| `10.2.204.25` | `true` | any | PTR record of that IP |
Recommendation: Use the proxy hostname in `PROXY_HOST` and set `rdns = false` and `dns_canonicalize_hostname = false` in your `krb5.conf`. This ensures the SPN matches what your KDC administrator registered.
## Example manifest
The following is a complete Kubernetes manifest example that demonstrates how to configure a delegate with Kerberos proxy authentication.
This example uses the standard Harness Delegate image. If you need to customize the delegate image with additional tools or configurations, go to [Build custom delegate images using Dockerfile](/harness-ai/use-harness-platform/delegates/delegate/manage-delegates/build-custom-images-delegate-dockerfile).
{% code overflow="wrap" %}
```yaml
apiVersion: v1
kind: Namespace
metadata:
name: harness-delegate-ng
---
apiVersion: v1
kind: ConfigMap
metadata:
name: kerberos-config
namespace: harness-delegate-ng
data:
krb5.conf: |
[libdefaults]
default_realm = EXAMPLE.COM
dns_lookup_realm = false
dns_lookup_kdc = false
rdns = false
dns_canonicalize_hostname = false
forwardable = true
[realms]
EXAMPLE.COM = {
kdc = kdc.example.com
admin_server = kdc.example.com
}
[domain_realm]
.example.com = EXAMPLE.COM
example.com = EXAMPLE.COM
---
apiVersion: v1
kind: ConfigMap
metadata:
name: kerberos-jaas-config
namespace: harness-delegate-ng
data:
jaas.conf: |
HarnessKrb5 {
com.sun.security.auth.module.Krb5LoginModule required
useKeyTab=true
keyTab="/etc/harness/kerberos/keytab/proxy.keytab"
principal="delegate@EXAMPLE.COM"
storeKey=true
refreshKrb5Config=true
doNotPrompt=true;
};
---
apiVersion: apps/v1
kind: Deployment
metadata:
name: harness-delegate
namespace: harness-delegate-ng
spec:
replicas: 1
selector:
matchLabels:
harness.io/name: harness-delegate
template:
metadata:
labels:
harness.io/name: harness-delegate
spec:
securityContext:
fsGroup: 100
fsGroupChangePolicy: OnRootMismatch
containers:
- name: delegate
image: harness/delegate:latest
securityContext:
allowPrivilegeEscalation: false
runAsUser: 0
env:
- name: ACCOUNT_ID
value: "YOUR_ACCOUNT_ID"
- name: DELEGATE_TOKEN
valueFrom:
secretKeyRef:
name: delegate-token
key: token
- name: MANAGER_HOST_AND_PORT
value: https://app.harness.io
- name: PROXY_HOST
value: "proxy.example.com"
- name: PROXY_PORT
value: "3128"
- name: PROXY_SCHEME
value: "http"
- name: PROXY_MANAGER
value: "true"
- name: PROXY_AUTH_TYPE
value: "KERBEROS"
- name: KRB5_CONFIG
value: "/etc/harness/kerberos/krb5.conf"
- name: KRB5_JAAS_CONFIG
value: "/etc/harness/kerberos/jaas/jaas.conf"
volumeMounts:
- name: kerberos-config
mountPath: /etc/harness/kerberos/krb5.conf
subPath: krb5.conf
readOnly: true
- name: kerberos-jaas
mountPath: /etc/harness/kerberos/jaas/jaas.conf
subPath: jaas.conf
readOnly: true
- name: kerberos-keytab
mountPath: /etc/harness/kerberos/keytab
readOnly: true
# Keytab sidecar - fetches keytab from KDC and writes to shared volume
- name: keytab-sidecar
image: your-keytab-sidecar-image:latest
volumeMounts:
- name: kerberos-keytab
mountPath: /shared
securityContext:
runAsNonRoot: true
runAsUser: 10001
runAsGroup: 10001
resources:
requests:
memory: "32Mi"
cpu: "10m"
limits:
memory: "64Mi"
cpu: "50m"
volumes:
- name: kerberos-config
configMap:
name: kerberos-config
- name: kerberos-jaas
configMap:
name: kerberos-jaas-config
- name: kerberos-keytab
emptyDir:
medium: Memory
```
{% endcode %}
{% hint style="info" %}
**Keytab sidecar container**
This example includes a `keytab-sidecar` container that automatically fetches the keytab from the KDC and writes it to the shared `emptyDir` volume. The delegate container reads the keytab from this shared volume.
The sidecar runs continuously and can refresh the keytab, enabling rotation without restarting the delegate. For more information on keytab rotation, go to [Use a sidecar for rotation](#use-a-sidecar-for-rotation).
**Important:** Mount the keytab volume as a **directory** (no `subPath`), not as a file. If you use `subPath` and the keytab does not exist when the pod starts, Kubernetes creates an empty directory that permanently masks the file.
{% endhint %}
## Rotate keytabs
If you rotate keytabs periodically (for example, using a sidecar container), the delegate picks up the new keytab automatically on the next proxy challenge. No restart is required.
### Use a sidecar for rotation
You can share the keytab between containers using an `emptyDir` volume. The following example shows how to configure a keytab rotation sidecar:
```yaml
spec:
containers:
- name: delegate
volumeMounts:
- name: kerberos-keytab
mountPath: /etc/harness/kerberos/keytab
readOnly: true
- name: keytab-sidecar
image: your-keytab-rotation-image:latest
volumeMounts:
- name: kerberos-keytab
mountPath: /etc/harness/kerberos/keytab
readOnly: false
volumes:
- name: kerberos-keytab
emptyDir:
medium: Memory
```
In this configuration:
* The sidecar writes the keytab to the shared volume.
* The delegate reads the keytab from the shared volume.
* If the keytab is not yet present when the delegate starts, authentication attempts fail and log a warning, but subsequent attempts succeed once the sidecar has written the keytab.
## Troubleshooting
Delegate fails to start with PROXY_AUTH_TYPE=KERBEROS requires KRB5_CONFIG
Verify that both `KRB5_CONFIG` and `KRB5_JAAS_CONFIG` environment variables are set and point to readable files. The delegate boot process fails fast if either variable is unset or points to an unreadable file.
Authentication fails with HTTP 407 responses
This can occur due to several configuration or connectivity issues:
* Keytab not readable at the path specified in your JAAS config.
* Principal in JAAS config does not match any entry in the keytab.
* Delegate pod cannot reach the KDC.
* Proxy is not configured for Negotiate/SPNEGO authentication.
* DNS or hostname mismatch breaks the `HTTP/` service ticket.
Perform the following steps to diagnose and resolve the issue:
1. Verify keytab is mounted and readable.
2. Confirm principal matches keytab entries exactly.
3. Test KDC connectivity from the pod.
4. Confirm proxy advertises `Negotiate` in 407 responses.
5. Set `dns_canonicalize_hostname=false` and `rdns=false` in `krb5.conf`.
Authentication works briefly then fails before recovering
A proxy challenge triggered re-authentication while the KDC was briefly unreachable or the keytab was mid-rotation. Check delegate logs for `Kerberos: JAAS login failed for entry HarnessKrb5`. If the issue self-recovers, no action is needed.
Need to enable detailed Kerberos debugging
Enable detailed Kerberos debugging by adding the following to your delegate's `JAVA_OPTS`:
```yaml
env:
- name: JAVA_OPTS
value: "-Xms64M -Dsun.security.krb5.debug=true"
```
Look for the following log messages to confirm successful authentication:
* `Kerberos: cached Subject initialized via JAAS entry HarnessKrb5`
* `Kerberos: refreshed cached Subject via JAAS entry HarnessKrb5`
Want to test keytab and proxy connectivity independently
Run the following commands from a pod that has access to the same keytab and network configuration:
```bash
# Test keytab with kinit
kinit -kt /path/to/proxy.keytab delegate@EXAMPLE.COM
# Test proxy with curl
curl -x http://proxy.example.com:3128 \
--proxy-negotiate -U : \
https://app.harness.io
```
These commands help isolate configuration issues by testing keytab and proxy authentication separately from the delegate.
## Additional considerations
### In-cluster Kubernetes delegate
If the delegate runs in-cluster and needs to access Kubernetes APIs, add the cluster master IP to `NO_PROXY` to bypass the proxy for in-cluster connections.
The following example shows how to configure `NO_PROXY`:
```yaml
env:
- name: NO_PROXY
value: "kubernetes.default.svc,10.0.0.1"
```
### mTLS support
Harness supports mTLS authentication on a case-by-case basis. Contact [Harness Support](mailto:support@harness.io) to enable it.
## Next steps
* Go to [Proxy configuration guide](/harness-ai/use-harness-platform/delegates/delegate/manage-delegates/proxy/configure-delegate-proxy-settings) to learn how to configure proxy settings with Basic authentication.
* Go to [Delegate overview](/harness-ai/use-harness-platform/delegates/delegate/delegate-concepts/delegate-overview) to understand delegate architecture, lifecycle, and operational capabilities.
{% @harness-feedback/feedback module="harness-ai" pagePath="harness-ai/use-harness-platform/delegates/delegate/manage-delegates/proxy/configure-delegate-kerberos-proxy" %}
# Run all pipeline steps in one pod
Learn how to configure pipelines to run all steps in a single delegate pod for improved performance and consistency.
Harness uses delegates for all operations. To select specific delegates pods to perform the task, Harness uses those delegate pods only. If you don't select specific delegates, Harness manager picks the delegate. For more information, go to [How Harness Manager picks delegates](/harness-ai/use-harness-platform/delegates/delegate/delegate-concepts/delegate-overview#how-harness-manager-picks-delegates).
This topic describes how to run all pipeline steps in a single delegate pod.
### Configure pipelines to run steps in the same pod
When you have multiple steps in your pipeline, you can configure your delegate to run all the steps in the same pod.
To run all the steps in the same pod, do the following:
1. Create the first step that will select one delegate from the list of eligible delegates, and store it in an output variable.
2. Provide the output variable in step 1 as a dynamic delegate selector in the consecutive steps/stages to pick one individual delegate among the delegate group.
For example, in the below pipeline, the `select_delegate` step stores the delegate hostname as an output variable named `HOST_SELECTOR` and then provides that as a delegate selector in the `use_delegate` step.
#### Example pipeline
```yaml
pipeline:
name: test
identifier: test
projectIdentifier: harness-test
orgIdentifier: default
tags: {}
stages:
- stage:
name: shell
identifier: shell
description: ""
type: Custom
spec:
execution:
steps:
- step:
type: ShellScript
name: select_delegate
identifier: select_delegate
spec:
shell: Bash
onDelegate: true
source:
type: Inline
spec:
script: |
echo $HOSTNAME
HOST_SELECTOR=$HOSTNAME
environmentVariables: []
outputVariables:
- name: HOST_SELECTOR
type: String
value: HOST_SELECTOR
timeout: 10m
- step:
type: ShellScript
name: use delegate
identifier: use_delegate
spec:
shell: Bash
onDelegate: true
source:
type: Inline
spec:
script: echo <+execution.steps.select_delegate.output.outputVariables.HOST_SELECTOR>
environmentVariables: []
outputVariables: []
delegateSelectors:
- <+execution.steps.select_delegate.output.outputVariables.HOST_SELECTOR>
timeout: 10m
failureStrategies: []
tags: {}
```
{% @harness-feedback/feedback module="harness-ai" pagePath="harness-ai/use-harness-platform/delegates/delegate/manage-delegates/run-all-pipeline-steps-in-one-pod" %}
# Use delegate selectors
Learn how to use delegate selectors and tags to target specific delegates for pipelines, connectors, and infrastructure tasks.
Harness runs tasks by using Harness Delegate to connect your environment to resources. Harness selects the best delegate based on the current number of tasks getting executed on delegates, delegate executing the least number of tasks will be selected first. For more information, go to [How Harness Manager picks delegates](/harness-ai/use-harness-platform/delegates/delegate/delegate-concepts/delegate-overview#how-harness-manager-picks-delegates).
In some cases, you might want Harness to select specific delegates. In these cases, you can use the **Delegate Selector** settings in pipelines, connectors, and so on, with corresponding delegate tags.
{% hint style="info" %}
**NOTE**
If no delegate is selected for a CD step's **Delegate Selector** setting, Harness prioritizes the delegate that was successfully used for the infrastructure definition connector.
For more information, go to [Which delegate is used during pipeline execution?](/harness-ai/use-harness-platform/delegates/delegate/delegate-concepts/delegate-overview#which-delegate-is-used-during-pipeline-execution).
{% endhint %}
#### Delegate tags
A delegate tag with the same name as your delegate is automatically added to your delegate during the configuration process. You can add one or more comma-separated tags on the `helm` command line or in the Kubernetes YAML file, as shown in the following example.
```yaml
...
env:
....
- name: DELEGATE_TAGS
value: "tag1,tag2"
...
```
For Docker delegates, you can add tags using the following flag for your `docker run` command.
```
-e DELEGATE_TAGS="tag1, tag2, tag3"
```
You can also add tags to the **Tags** field during the setup process:

For detailed information on how delegates are selected during execution, go to [Delegate overview](/harness-ai/use-harness-platform/delegates/delegate/delegate-concepts/delegate-overview).
You can select a delegate based on its tags in the **Delegate Selector** settings of Harness entities like pipelines and connectors.
**How does Harness handle multiple tags?**
When you use multiple delegate tags in the **Delegate Selector** settings of a step, Harness selects only the delegate(s) that have all the selectors.
This means that if there are multiple tags, the delegate must match all of them to be selected. For instance, if you have a delegate with three tags and you only provide two of them in the **Delegate Selector** settings, the delegate is still eligible for selection as long as the two tags are present for that delegate.
#### Delegate selector priority
You can use delegate selectors at multiple places, such as the pipeline, stage, and step levels.
It's important to know which delegate selectors are given priority so that you ensure the correct delegate is used when you want it used.
The delegate selector priority is:
1. Step
2. Step Group
3. Stage
4. Pipeline
5. Connector

The step level has the highest priority. Any delegate selected in a step's **Delegate Selector** setting overrides any delegates selected in 2-5 above.
A connector can be used in multiple places in a pipeline, such as a stage infrastructure's **Cloud Provider** setting or even in certain step settings.
#### Step and step group delegate selector
Delegates can be selected for steps and [step groups](/continuous-delivery/use-continuous-delivery/cd-building-blocks/cd-steps/step-groups) in their **Advanced** settings.
Here is a step example:

Here is a step group example:

{% hint style="info" %}
Step and step group delegator selectors are not available for [Harness CI](https://app.gitbook.com/s/qKtVmwAGTfGQS1MVC97G/README) because CI stages run in self-contained build pods.
{% endhint %}
#### Select a delegate for a connector using tags
When you add a connector, you are given the option of connecting to your third-party account using any available delegate or specific delegates.

You select specific delegates using their tags.
You only need to select one of a delegate's tags to select it. All delegates with the tag are selected.
Here, the tag is **test1**, and you can see multiple delegates match it:

{% hint style="info" %}
**DELEGATE SELECTORS AND SECRET RESOLUTION**
When configuring connectors that use secrets from an external secret manager, the delegate selector on the connector and the secret manager must be compatible. For more information, go to [Can I access a secret manager with a different delegate selector than my connector's delegate selector?](/harness-ai/knowledge-base-and-faqs/harness-platform-faqs#can-i-access-a-secret-manager-with-a-different-delegate-selector-than-my-connectors-delegate-selector)
{% endhint %}
#### Pipeline delegate selector
Delegates can be selected for an entire pipeline in the pipeline **Advanced Options** settings.

#### Stage delegate selector
Delegates can be selected for an entire stage in the stage **Advanced** settings.

#### Infrastructure connector
Delegates can be selected for the connector used in a stage's **Infrastructure** settings, such as a CD stage's **Cluster Details** > **Connector** setting.

#### Select a delegate for a step using tags
You can select one or more delegates for each pipeline step.
In each step, in **Advanced**, in the **Delegate Selector** option:

You only need to select one of a delegate's tags to select it. All delegates with the tag are selected.
#### Delegate selectors usage in deployments
For deployments, a delegate can help determine the deployment target when it's connector configuration is marked as **Inherit from Delegate**. This configuration means the delegate is in the target cluster for the deployment. This delegate is typically defined in the deployment stage's [environment](/continuous-delivery/use-continuous-delivery/cd-building-blocks/environments/environment-overview) or [infrastructure definition](/continuous-delivery/use-continuous-delivery/deploy-services-on-different-platforms/kubernetes/define-your-kubernetes-target-infrastructure). Specifically, it's defined in the connector that is configured within the infrastructure definition.
However, it is also possible to set a delegate at the step level using the **Delegate Selectors** advanced option. Choosing a selector in this method described above will *override* any previously selected delegate selector, including selections from the pipeline, stage, step group or infrastructure definition (via connector). This can lead to unexpected behavior.
For example, if a delegate for a non-prod environment was selected at the stage level, but a delegate for a prod environment was chosen at the step level, then you face a scenario where a non prod artifact is deployed directly to prod.
**Delegate selector best practices**
* Do not use delegate selectors in deployment steps because the security boundary for deployments should be at the infrastructure definition and environment level.
* Do not expose delegate selectors as inputs for steps unless the intent of exposing the delegate selector to the pipeline executor is clear.
* Do not hard code delegate selector selections into templates.
* Make sure to review connector configurations in the infrastructure definition.
**When should I use a delegate selector?**
Delegate selectors are a powerful tool, but should be used carefully and only when necessary. A good use case for using this advanced setting is to target delegates that have access to a third party systems that you may not want your deployment specific delegates to use.
Examples include:
* Shell Script Step: Use a delegate selector to choose a delegate that has permissions to perform the job.
* CV Step Execution: Use a delegate selector to choose a delegate that has access to your CV health provider.
* Terraform Steps
* Tanzu Steps
Delegate selectors can also be used with a [custom artifact source](/continuous-delivery/use-continuous-delivery/cd-building-blocks/services/add-a-custom-artifact-source-for-cd). A custom artifact source allows a delegate that has access to an artifact repo to fetch metadata about it. Using a delegate selector allows you to choose the delegate that has access to the artifact repo and then pass the information to the delegate that has the ability to deploy.
#### Modify tags using Harness API
Go to [Delegate Group Tags Resource](https://harness.io/docs/api/tag/Delegate-Group-Tags-Resource/).
#### Define delegate selectors as a fixed value, runtime input, or expression
Delegate selectors in pipeline, stage, step, and step group can be defined as a fixed value, runtime input, or expression.
If you're using expressions, there are two options, either the entire list of delegate selectors can be an expression or elements of delegate selectors can be expressions.
In this example, we'll define a delegate selector in a step as an expression.
To define a delegate selector in a step as an expression:
1. Open your pipeline and select your step.
2. Select **Advanced**.
3. Expand the **Delegate Selector** option.
4. Select the **Define Delegate Selector** pencil icon. Harness displays the **Fixed value**, **Runtime input**, or **Expression** options. In this example, we'll define an expression.
5. Select **Expression**.
NOTE
Under Define Delegate Selector, the Delegate Selector option is selected by default. You can also use Delegate Selection Expression List to use the entire list of delegate selectors as an expression. In this example, we'll use the default Define Delegate Selector option.
6. Enter your expression, for example `<+org.description>`.
NOTE
You can also select a built-in expression from the list Harness generates as you type.
7. (Optional) Select **Add** to enter additional expressions.
8. (Optional) Select \***YAML** to view your updated pipeline YAML.
9. Select **Save**.
#### See also
* [Delegate overview](/harness-ai/use-harness-platform/delegates/delegate/delegate-concepts/delegate-overview)
{% @harness-feedback/feedback module="harness-ai" pagePath="harness-ai/use-harness-platform/delegates/delegate/manage-delegates/select-delegates-with-selectors" %}
# Hide log information based on regex patterns
Learn how to mask sensitive information in delegate logs using custom regex patterns for enhanced security.
Harness sanitizes deployment logs and any script outputs to mask text secret values and JSON web tokens (JWTs) by default. For more information, go to [Secrets and log sanitization](/harness-ai/use-harness-platform/secrets/secrets-management/secrets-and-log-sanitization). You can mask other sensitive information from log streams using regular expressions based on your needs. This will remove the information you define from logs in the Harness UI.
{% hint style="info" %}
Harness Delegate version 24.01.82110 or later is required to use this feature.
{% endhint %}
To hide log information based on regex, do the following:
1. Create a `sanitize-patterns.txt` file in your local that contains all of the regexes that you want to hide in logs.
This file can contain multiple regexes. Add each regex on a new line. In the example below, we have added two expressions.
```
.*?.*?
```
2. Create the ConfigMap in the same namespace where you are installing the delegate.
```
kubectl create configmap --from-file sanitize-patterns.txt -n
```
3. Mount the volume under the `/opt/harness-delegate` path in your delegate YAML file.
```yaml
volumeMounts:
- name: "config"
mountPath: "/opt/harness-delegate/sanitize-patterns.txt"
subPath: sanitize-patterns.txt
volumes:
- name: "config"
configMap:
name: ""
```
4. Apply the Kubernetes YAML.
{% @harness-feedback/feedback module="harness-ai" pagePath="harness-ai/use-harness-platform/delegates/delegate/manage-delegates/hide-logs-using-regex" %}
# Upgrade Legacy Delegate to Delegate
Learn how to upgrade from deprecated legacy delegate to the latest delegate image with step-by-step instructions.
{% hint style="warning" %}
**DELEGATE-LEGACY END OF SUPPORT (EOS) NOTICE**
This is an End of Support (EOS) notice for the Delegate-Legacy image type. This image type reached End of Support (EOS) as of **January 31, 2024**.
End of Support means the following:
* Harness Support will no longer accept support requests for the Delegate-Legacy image type in both Harness FirstGen and Harness NextGen (including Harness Self-Managed Enterprise Edition (SMP)).
* Security fixes will still be addressed.
* Product defects will not be addressed.
{% endhint %}
**Follow the below steps to upgrade Delegate-Legacy to Delegate image**
1. Download new yaml from Harness by keeping the same name as the previous delegate.
2. Check if the existing delegate has any tags/selector, if yes then add them in DELEGATE\_TAGS.
3. Compare the permissions given to the legacy delegate in their yaml and give the same permissions to new delegates.
4. Check if custom image is used, if yes then build a new image with immutable delegate as base image and override the account setting to point to that image.
5. Ensure that auto upgrade is enabled for Kubernetes delegates.
6. The delegate yaml ships with default HPA of min and max replicas to be 1, adjust the desired number of replicas in HPA.
7. Deploy the new yaml and see new replicas coming under the same delegate.
8. Scale down the old stateful set and verify that everything is correct.
9. Contact [Harness Support](mailto:support@harness.io) if you need any assistance with upgrading of Delegate-Legacy.
{% @harness-feedback/feedback module="harness-ai" pagePath="harness-ai/use-harness-platform/delegates/delegate/manage-delegates/upgrade-legacy-delegate" %}
# Enable auto-upgrades for existing Docker Delegates
Learn how to migrate existing Docker delegates to enable automatic upgrades using the Docker Delegate Upgrader script.
Harness now supports [automatic upgrades for Docker delegates](/harness-ai/use-harness-platform/delegates/delegate/install-delegates/delegate-upgrades-and-expiration#docker-delegate) using the **Docker Delegate Upgrader**. If you have already running Docker delegates, you can use the script provided below to enable the upgrader for your delegates.
{% hint style="info" %}
The following approach will only be applicable to Docker delegates that were brought up directly using the `docker run` command and not for the ones that were started using **Docker Compose**, **Docker Swarm** etc.
{% endhint %}
## How It Works
This script performs the following actions:
1. Identifies Harness delegates with the `DELEGATE_NAME` environment variable. If this environment variable is not set, upgrader will not be able to upgrade such delegates.
2. Starts a lightweight upgrader container for each eligible delegate. The script will run one upgrader for every unique value of `DELEGATE_NAME` environment variable.
3. Publishes the status of upgrade for every eligible Docker Delegate.
Once run, the upgrader enables periodic checks and automatic updates (if available) for each delegate.
## Run the helper Script
Save the following script to a file. Let's say `enable-upgrader.sh`:
Script
```
#!/bin/bash
echo "🔍 Scanning all running containers for Harness delegates with DELEGATE_NAME..."
running_containers=$(docker ps --filter "status=running" --format "{{.ID}}")
started_upgraders=()
patched_count=0
for container_id in $running_containers; do
env_vars=$(docker inspect "$container_id" --format '{{range .Config.Env}}{{println .}}{{end}}')
DELEGATE_NAME=$(echo "$env_vars" | grep '^DELEGATE_NAME=' | cut -d'=' -f2-)
DELEGATE_TOKEN=$(echo "$env_vars" | grep '^DELEGATE_TOKEN=' | cut -d'=' -f2-)
ACCOUNT_ID=$(echo "$env_vars" | grep '^ACCOUNT_ID=' | cut -d'=' -f2-)
MANAGER_HOST_AND_PORT=$(echo "$env_vars" | grep '^MANAGER_HOST_AND_PORT=' | cut -d'=' -f2-)
if [ -z "$DELEGATE_NAME" ]; then
echo "🚫 Container $container_id skipped: no DELEGATE_NAME found."
continue
fi
if [[ " ${started_upgraders[@]} " =~ " ${DELEGATE_NAME} " ]]; then
echo "🔁 Upgrader for DELEGATE_NAME='$DELEGATE_NAME' already handled. Skipping..."
continue
fi
if docker ps --format '{{.Names}}' | grep -q "^${DELEGATE_NAME}-upgrader$"; then
echo "⚠️ Upgrader container '${DELEGATE_NAME}-upgrader' already running. Skipping creation."
else
echo "🚀 Starting upgrader container for '$DELEGATE_NAME'..."
docker run -d --cpus=0.1 --memory=100m \
-v /var/run/docker.sock:/var/run/docker.sock \
-e ACCOUNT_ID="$ACCOUNT_ID" \
-e MANAGER_HOST_AND_PORT="$MANAGER_HOST_AND_PORT" \
-e UPGRADER_WORKLOAD_NAME="$DELEGATE_NAME" \
-e UPGRADER_TOKEN="$DELEGATE_TOKEN" \
-e SCHEDULE="0 */1 * * *" \
us-docker.pkg.dev/gar-prod-setup/harness-public/harness/upgrader:latest
echo "✅ Upgrader started for '$DELEGATE_NAME'"
patched_count=$((patched_count + 1))
fi
started_upgraders+=("$DELEGATE_NAME")
done
echo "🎉 Finished. Total new upgraders started: $patched_count"
```
Make the script executable and run it:
```
chmod +x enable-upgrader.sh
./enable-upgrader.sh
```
***
Example Output
```bash
🔍 Scanning all running containers for Harness delegates with DELEGATE_NAME...
🚀 Starting upgrader container for 'my-delegate'...
Unable to find image 'us-west1-docker.pkg.dev/gar-setup/docker/upgrader:STO_SCAN' locally
STO_SCAN: Pulling from gar-setup/docker/upgrader
42b08cdb6b32: Pull complete
0d5086ce5582: Pull complete
Digest: sha256:ef4df5e448b10e5702f0a4fb6c199f50bd2e3592271272b6f2c55c5e0cb71625
Status: Downloaded newer image for us-west1-docker.pkg.dev/gar-setup/docker/upgrader:latest
1543159cab2f300d3aab3b9446cd5172916a395463f6c4d6f8304e55fc0361ca
✅ Upgrader started for 'my-delegate'
🔁 Upgrader for DELEGATE_NAME='docker-delegate' already handled. Skipping...
🎉 Finished. Total new upgraders started: 1
```
{% @harness-feedback/feedback module="harness-ai" pagePath="harness-ai/use-harness-platform/delegates/delegate/manage-delegates/enable-auto-upgrade-for-running-docker-delegates" %}
# Delete a delegate
Learn how to safely delete Harness delegates from Kubernetes clusters and remove them from your Harness account.
This topic describes how to delete a delegate from your Kubernetes cluster and Harness installation.
#### Identify the delegate type
{% hint style="warning" %}
**DELEGATE-LEGACY: END OF SUPPORT (EOS)**
***
Upgrade Delegate-Legacy to Delegate image
This is an End of Support (EOS) notice for the Delegate-Legacy image type. This image type reached End of Support (EOS) as of **January 31, 2024**.
End of Support means the following:
* Harness Support will no longer accept support requests for the Delegate-Legacy image type in both Harness FirstGen and Harness NextGen (including Harness Self-Managed Enterprise Edition (SMP)).
* Security fixes will still be addressed.
* Product defects will not be addressed.
Follow the below steps to upgrade Delegate-Legacy to Delegate image:
* Download new yaml from Harness by keeping the same name as the previous delegate
* Check if the existing delegate has any tags/selector, if yes then add them in DELEGATE\_TAGS
* Compare the permissions given to the legacy delegate in their yaml and give the same permissions to new delegates
* Check if custom image is used, if yes then build a new image with immutable delegate as base image and override the account setting to point to that image
* Ensure that auto upgrade is enabled for Kubernetes delegates
* Our delegate yaml ships with default HPA of min and max replicas to be 1, adjust the desired number of replicas in HPA
* Deploy the new yaml and see new replicas coming under the same delegate
* Scale down the old stateful set and verify that everything is correct
{% endhint %}
Harness Delegate is installed as a Kubernetes [Deployment](https://kubernetes.io/docs/reference/kubernetes-api/workload-resources/deployment-v1/) object. A legacy delegate, on the other hand, is installed as a Kubernetes [StatefulSet](https://kubernetes.io/docs/reference/kubernetes-api/workload-resources/stateful-set-v1/) object. This means that the process used to delete a legacy delegate differs from the process used to delete Harness Delegate.
You can verify the delegate you're using by looking at its manifest file or by running `kubectl get all -n harness-delegate-ng`.
To delete a legacy delegate, go to the [Delete a legacy delegate](#delete-a-legacy-delegate) section.
#### Delete a delegate
Use the following process to delete a delegate.
**Step 1: Delete the deployment for the delegate**
To delete a delegate from your Kubernetes cluster, you delete the **Deployment** object that represents its deployment.
`kubectl delete deployment -n harness-delegate-ng `
Use the following command to retrieve a list of deployments:
`kubectl get deployments`
The deployment name is specified in the `metadata.name` field of the Kubernetes manifest you used to install the delegate.
```yaml
...
apiVersion: apps/v1
kind: Deployment
metadata:
labels:
harness.io/name: doc-demos
name: doc-demos
namespace: harness-delegate-ng
...
```
In this example, the `name` field is specified as `doc-demos`.
Next, delete the Updater **CronJob**:
`kubectl delete cronjob -n harness-delegate-ng -upgrader-job`
For example, if the **Deployment** name is `quickstart-delegate`:
`kubectl delete cronjob -n harness-delegate-ng quickstart-delegate-upgrader-job`
**Step 2: Delete the delegate in Harness**
Locate the delegate in the Harness account/Project/Org, select more options (⋮), and then select **Delete**.

#### Delete replica pods
Deleted replica pods unregister and clear out during shutdown after they complete all running tasks if the graceful shutdown period is sufficient. The grace period is configurable. For more information on graceful shutdown, go to [Graceful delegate shutdown](/harness-ai/use-harness-platform/delegates/delegate/delegate-concepts/graceful-delegate-shutdown-process).
If you do not delete the delegate in the UI, Harness automatically removes it after six hours.
#### Delete a legacy delegate
Use the following process to delete a legacy delegate.
**Step 1: Delete the StatefulSet for the delegate**
To delete a legacy delegate from your Kubernetes cluster, you delete the **StatefulSet** object that represents its deployment.
A **StatefulSet** resource is ensures that the desired number of pods are running and available at all times. If you delete a pod that belongs to a **StatefulSet** without deleting the **StatefulSet** itself, the pod is recreated.
For example, you can use the following command to delete the **StatefulSet** that created a delegate pod named `quickstart-vutpmk-0`:
`$ kubectl delete statefulset -n harness-delegate-ng quickstart-vutpmk`
The name of the delegate pod includes the name of the **StatefulSet** followed by the pod identifier `-0`.
**Step 2: Delete the delegate in Harness**
Locate the delegate in the Harness account/Project/Org, select more options (⋮), and then select **Delete**.

{% @harness-feedback/feedback module="harness-ai" pagePath="harness-ai/use-harness-platform/delegates/delegate/manage-delegates/delete-a-delegate" %}
# Stream pipeline logs
Stream build and deploy pipeline stage execution logs from a self-managed Harness Delegate to your observability backend using OpenTelemetry or another supported log collector.
When enabled, Harness streams build and deploy pipeline stage execution logs to stdout as structured JSON, in parallel with the standard Harness Log Service. A log collector such as OpenTelemetry Collector, Fluent Bit, or Vector then captures these logs and forwards them to your observability backend.
This functionality offers the following benefits:
* Consolidate build and deploy logs with existing observability data.
* Enable sophisticated search and analytics.
* Configure alerts and custom dashboards.
* Manage log retention and meet compliance requirements.
***
### What you will learn in this topic
* How [log streaming architecture](#log-streaming-architecture) works.
* Which [delegate and infrastructure combinations](#supported-infrastructure) are supported.
* How to [enable log streaming](#step-1-enable-log-streaming) on your delegate.
* How to [configure log collection](#step-2-configure-log-collection) with OpenTelemetry or other collectors.
* How to [verify log streaming](#step-3-verify-log-streaming) in your observability backend.
* The [log format and schema](#log-format-reference) Harness emits.
* [Example queries](#query-examples) for Loki, Splunk, and Elasticsearch
***
### Before you begin
Before you configure log streaming, ensure that you have:
* A Harness account with access to the **Deploy** stage, **Build** stage, or both.
* A **supported self-managed Delegate** with access to the infrastructure where your build and deploy pipeline stages execute.
* Permission to update the Delegate configuration and set the `HARNESS_LOG_STREAMING_STDOUT_ENABLED` environment variable.
* For Kubernetes deployments, access to the cluster where the Delegate and build stage workloads run.
* A log collector, such as OpenTelemetry Collector, Fluent Bit, Vector, or Promtail, configured to collect logs from the appropriate build and/or deploy stage log paths.
* An observability backend capable of receiving the collected logs, such as Grafana Loki, Splunk, Datadog, or Elasticsearch.
***
### Supported infrastructure
Support for log streaming depends on your delegate type and execution infrastructure:
| Delegate | Execution infrastructure | Status | How logs are collected |
| ------------------------------------------- | ------------------------ | -------------- | ----------------------------------------------------------------------------------------------------------------------------- |
| Self-managed Legacy Delegate | Kubernetes cluster | Supported | A node-level log collector DaemonSet tails build stage pod logs and delegate execution logs, including deploy execution logs. |
| Self-managed Kubernetes Delegate | Kubernetes cluster | Not supported | Kubernetes-based builds on Delegate 3.x do not currently support log streaming. |
| Harness Cloud (hosted build infrastructure) | N/A | Not applicable | Logs are managed by Harness and are not exposed for external collection. |
{% hint style="info" %}
**KUBERNETES BUILD SUPPORT ON NEW DELEGATES**
For Kubernetes build infrastructures, log streaming currently supports the **self-managed Legacy Delegate**.
{% endhint %}
***
### Log streaming architecture
When log streaming is enabled, Harness writes execution logs as structured JSON to stdout.
The log source differs slightly between build and deploy stage:
* **Build stage**: The delegate propagates the log-streaming flag to the containers in build stage pods. The orchestrator container writes stage-level lines, such as setup, step dispatch, and teardown, while each step container writes its execution output as JSON to stdout.
* **Deploy stage**: Deploy execution logs are emitted by the delegate process as structured JSON execution logs.
Because build and deploy stages logs originate from different workloads, the OTel Collector must include the appropriate paths for both log sources.
For Kubernetes:
* Build stage pod logs: `/var/log/pods/_harnessci-*/**/*.log`
* Delegate execution logs, including deploy stage task execution: `/var/log/pods/_-*/**/*.log`
The log-streaming enablement is the same for build and deploy stages, but logs are collected from different Kubernetes pod paths.
The example OTel configuration in this topic includes both the build stage pod path and the delegate path required for deploy execution logs.
```mermaid
flowchart TD
DelK8s["Legacy Delegate
HARNESS_LOG_STREAMING_STDOUT_ENABLED=true"]
DelK8s -->|"Propagates env"| BuildPod["Build Pod (harnessci-*)
Orchestrator + Step containers"]
DelK8s -->|"Emits execution logs"| DeployLogs["Deploy Execution Logs
Delegate process"]
BuildPod -->|"JSON lines to stdout"| NodeFiles["Node filesystem
/var/log/pods/.../*.log"]
DeployLogs -->|"JSON lines to stdout"| NodeFiles
NodeFiles -->|"DaemonSet tails log paths"| CollectorK8s["Log Collector
(OTel, Fluent Bit, Vector...)"]
CollectorK8s -->|"OTLP or HTTP"| Backend["Observability Backend
(Loki, Splunk, Datadog, Elasticsearch...)"]
```
{% hint style="info" %}
**HARNESS EMITS JSON, NOT OTLP**
The Harness execution engine only writes structured JSON to container stdout. It does not speak OTLP natively. The choice of log collector (such as OpenTelemetry Collector, Fluent Bit, Vector, or Promtail) and downstream protocol is entirely yours.
{% endhint %}
***
### Step 1: Enable log streaming
Enable log streaming by setting `HARNESS_LOG_STREAMING_STDOUT_ENABLED=true`. The same delegate configuration is used for build and deploy stages.
#### For Kubernetes environments (Legacy Delegate)
Edit your delegate Deployment manifest and add the environment variable `HARNESS_LOG_STREAMING_STDOUT_ENABLED=true` to the delegate container:
```yaml
apiVersion: apps/v1
kind: Deployment
metadata:
name: harness-delegate
namespace: harness-delegate-ng
spec:
template:
spec:
containers:
- name: harness-delegate-instance
env:
- name: HARNESS_LOG_STREAMING_STDOUT_ENABLED
value: "true"
```
Apply the manifest and wait for the rollout to complete:
```bash
kubectl apply -f delegate.yaml
kubectl rollout status deploy/harness-delegate -n harness-delegate-ng
```
#### For Docker-based delegates
Add the environment variable to your `docker run` command:
```bash
# Replace the placeholders below with your actual delegate environment variables.
docker run -d \
-e HARNESS_LOG_STREAMING_STDOUT_ENABLED=true \
-e ACCOUNT_ID= \
harness/delegate:
```
After the delegate restarts with log streaming enabled, the setting applies to supported build and deploy pipeline stage executions handled by that delegate. No changes to individual pipeline YAML definitions are required.
***
### Step 2: Configure log collection
Once log streaming is enabled, you can configure your log collector of choice to tail and forward the log records.
For Kubernetes environments, deploy an OpenTelemetry (OTel) Collector DaemonSet in your cluster to tail the node container logs. The `filelog` receiver tails container logs under `/var/log/pods`, and a parser extracts the JSON envelope emitted by Harness.
For deploy and build environments, configure the collector to include:
* Build stage pod logs under `harnessci-*`.
* Delegate pod logs for deploy stage and other delegate-level execution logs.
Below is an example snippet for the OTel Collector configuration. Replace `` and `` with your actual values:
```yaml
receivers:
filelog:
# Tail build stage pods (prefixed with harnessci-) and delegate execution logs
include:
- /var/log/pods/_harnessci-*/**/*.log # For build stage
- /var/log/pods/_-*/**/*.log # For deploy stage
start_at: end
include_file_path: true
operators:
# Parse CRI log format:
 MODULES
 Continuous Delivery
 Continuous Integration
 Code Repository
 Feature Management & Experimentation
 Database DevOps
 Infrastructure as Code Management
 Artifact Registry
 Resilience Testing
 AI Test Automation
 Security Testing Orchestration
 Supply Chain Security
 SAST & SCA
 Application & API Security Testing
 Application & API Runtime Protection
 Application & API Discovery
 AI Security
 Internal Developer Portal
 Cloud & AI Cost Management
 AI SRE
 AI DLC Insights


 Code Repository
 1 Certifications
 Instructor-Led Training Available
 Self Paced Training Available
 Continuous Delivery & GitOps
 Continuous Integrations
 Infrastructure as Code Management
 Database DevOps
 Feature Management & Experimentation
 Resilience Testing - CE
 API & Application Discovery
 Application & API Runtime Protection
 Application & API Security Testing
 Application Security Testing - STO
 Application Security Testing - SCS
 Internal Developer Portal
 Cloud & AI Cost Management
 AI DLC Insights


 | `alpine-logo.svg` |
|
| `alpine-logo.svg` |
|  | `aws-cloud-provider-logo.svg` |
|
| `aws-cloud-provider-logo.svg` |
|  | `aws-logo.svg` |
|
| `aws-logo.svg` |
|  | `azure-logo.svg` |
|
| `azure-logo.svg` |
|  | `cdk-logo.svg` |
|
| `cdk-logo.svg` |
|  | `conan-logo.svg` |
|
| `conan-logo.svg` |
|  | `conda-logo.svg` |
|
| `conda-logo.svg` |
|  | `cran-logo.svg` |
|
| `cran-logo.svg` |
|  | `dart-logo.svg` |
|
| `dart-logo.svg` |
|  | `debian-logo.svg` |
|
| `debian-logo.svg` |
|  | `docker-logo.svg` |
|
| `docker-logo.svg` |
|  | `gcp-cloud-provider-logo.svg` |
|
| `gcp-cloud-provider-logo.svg` |
|  | `gcp-logo.svg` |
|
| `gcp-logo.svg` |
|  | `generic-logo.svg` |
|
| `generic-logo.svg` |
|  | `github-logo.svg` |
|
| `github-logo.svg` |
|  | `go-logo.svg` |
|
| `go-logo.svg` |
|  | `harness-code-logo.svg` |
|
| `harness-code-logo.svg` |
|  | `helm-http-logo.svg` |
|
| `helm-http-logo.svg` |
|  | `helm-logo.svg` |
|
| `helm-logo.svg` |
|  | `hugging-face-logo.svg` |
|
| `hugging-face-logo.svg` |
|  | `kubernetes-logo.svg` |
|
| `kubernetes-logo.svg` |
|  | `maven-logo.svg` |
|
| `maven-logo.svg` |
|  | `npm-logo.svg` |
|
| `npm-logo.svg` |
|  | `nuget-logo.svg` |
|
| `nuget-logo.svg` |
|  | `opentofu-logo.svg` |
|
| `opentofu-logo.svg` |
|  | `php-composer-logo.svg` |
|
| `php-composer-logo.svg` |
|  | `puppet-logo.svg` |
|
| `puppet-logo.svg` |
|  | `python-logo.svg` |
|
| `python-logo.svg` |
|  | `rpm-logo.svg` |
|
| `rpm-logo.svg` |
|  | `ruby-logo.svg` |
|
| `ruby-logo.svg` |
|  | `rust-logo.png` |
|
| `rust-logo.png` |
|  | `swift-logo.svg` |
|
| `swift-logo.svg` |
|  | `terraform-logo.svg` |
|
| `terraform-logo.svg` |
|  | `terragrunt-logo.svg` |
|
| `terragrunt-logo.svg` |
|  | `wolfi-logo.svg` |
{% @harness-feedback/feedback module="home" pagePath="home/provider-logos" %}
# Platform
Harness Platform provides the shared foundation for all Harness modules. Manage user access, authentication, secrets, delegates, governance, and audit trails from a single control plane. With built-in role-based access control (RBAC), single sign-on (SSO), and policy enforcement, Harness Platform gives your organization the security and visibility it needs to scale DevOps across teams and environments.
Knowledge BaseRelease Notes
| `wolfi-logo.svg` |
{% @harness-feedback/feedback module="home" pagePath="home/provider-logos" %}
# Platform
Harness Platform provides the shared foundation for all Harness modules. Manage user access, authentication, secrets, delegates, governance, and audit trails from a single control plane. With built-in role-based access control (RBAC), single sign-on (SSO), and policy enforcement, Harness Platform gives your organization the security and visibility it needs to scale DevOps across teams and environments.
Knowledge BaseRelease Notes