Remove Infrastructure with the Terraform Destroy step
This topic describes how to add a Terraform Destroy step to remove any provisioned infrastructure, just like running the terraform destroy command. Go to destroy from Terraform to learn about the Terraform destroy command.
The Terraform Destroy step is independent of any other Terraform provisioning steps. It is not restricted to removing the infrastructure deployed in its stage. It can remove any infrastructure you have provisioned using Harness.
What will you learn?
- Add Terraform Destroy steps: Configure destroy steps in pipeline execution, dynamic provisioning, or rollback sections.
- Reference Provisioner Identifiers: Link destroy steps to the infrastructure provisioned by Plan and Apply steps.
- Preview destroy plans: Use Terraform Plan with destroy command to review what will be removed before execution.
Before you begin
Before using the Terraform Destroy step, ensure you have the following:
- Terraform provisioning knowledge: Familiarity with how Harness provisions infrastructure using Terraform. Go to Terraform provisioning overview to understand the provisioning workflow.
- Provisioner Identifier: The same Provisioner Identifier used in your Terraform Apply step. Go to Provision with the Terraform Apply step to learn how to set up provisioning.
- Terraform installation: Terraform must be installed on your delegates. Go to Build custom delegate images with third-party tools to install Terraform on delegates.
What gets destroyed?
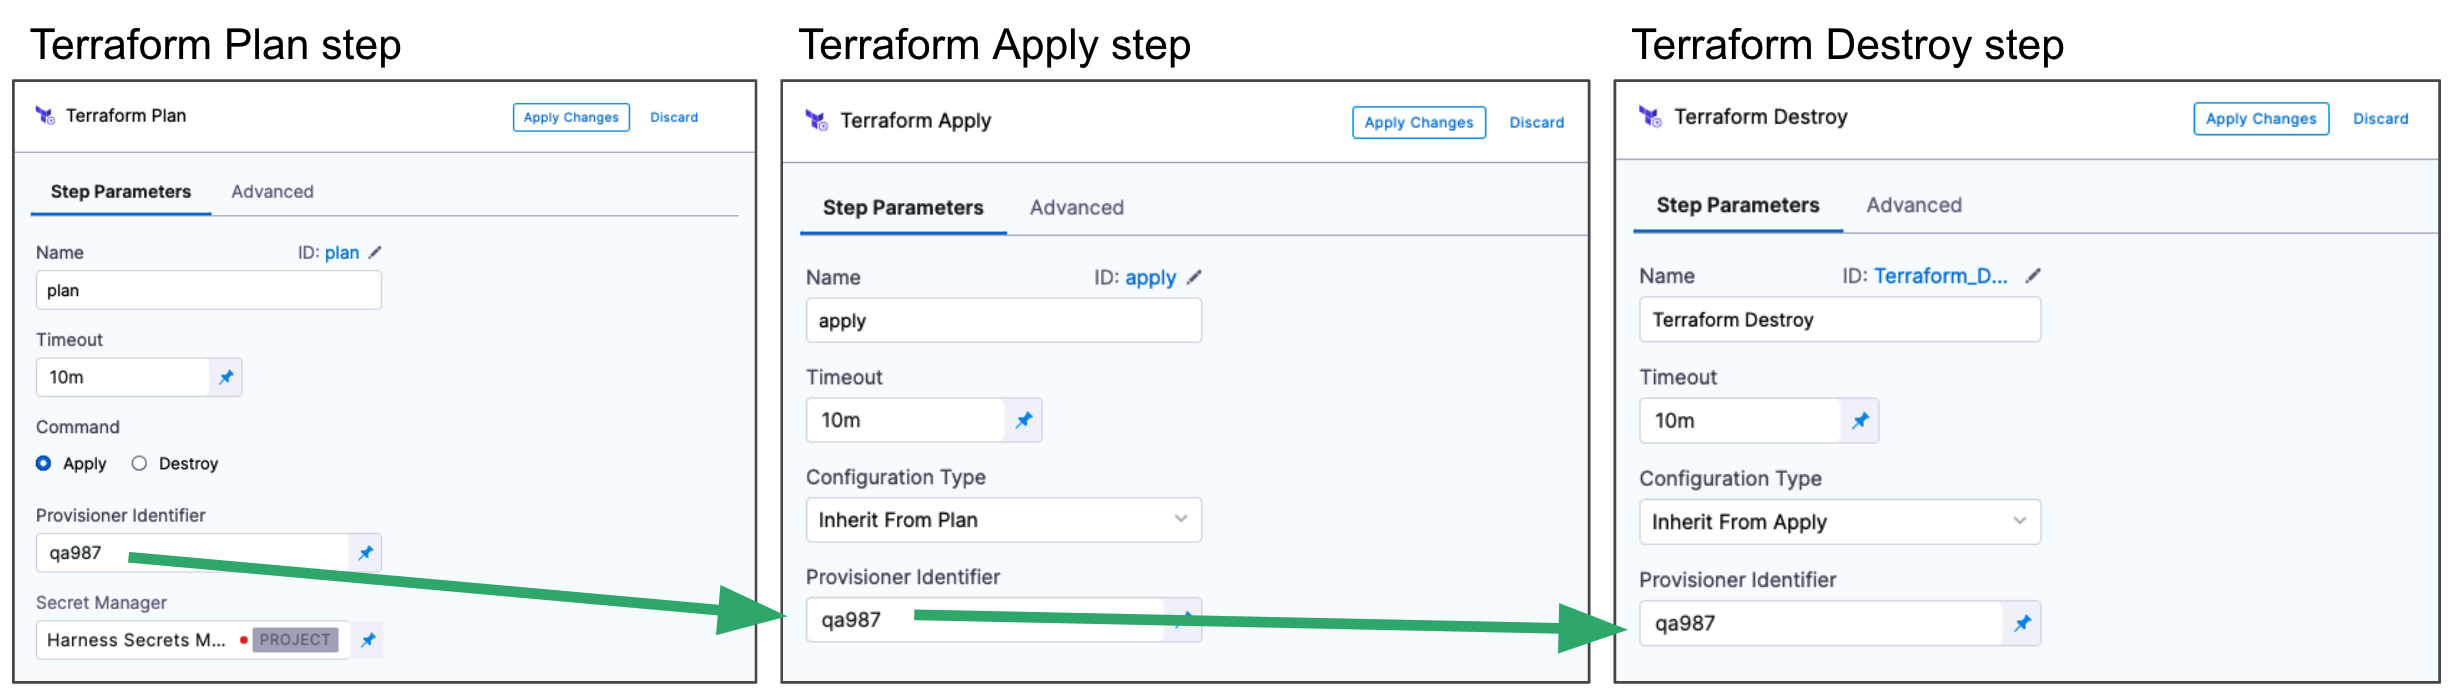
When you add Terraform Plan and Apply steps, you specify the Terraform script that Harness will use for provisioning. You add a Provisioner Identifier to each step to identify the provisioning. The Provisioner Identifier is a unique label that links Terraform Plan, Apply, and Destroy steps to the same configuration.
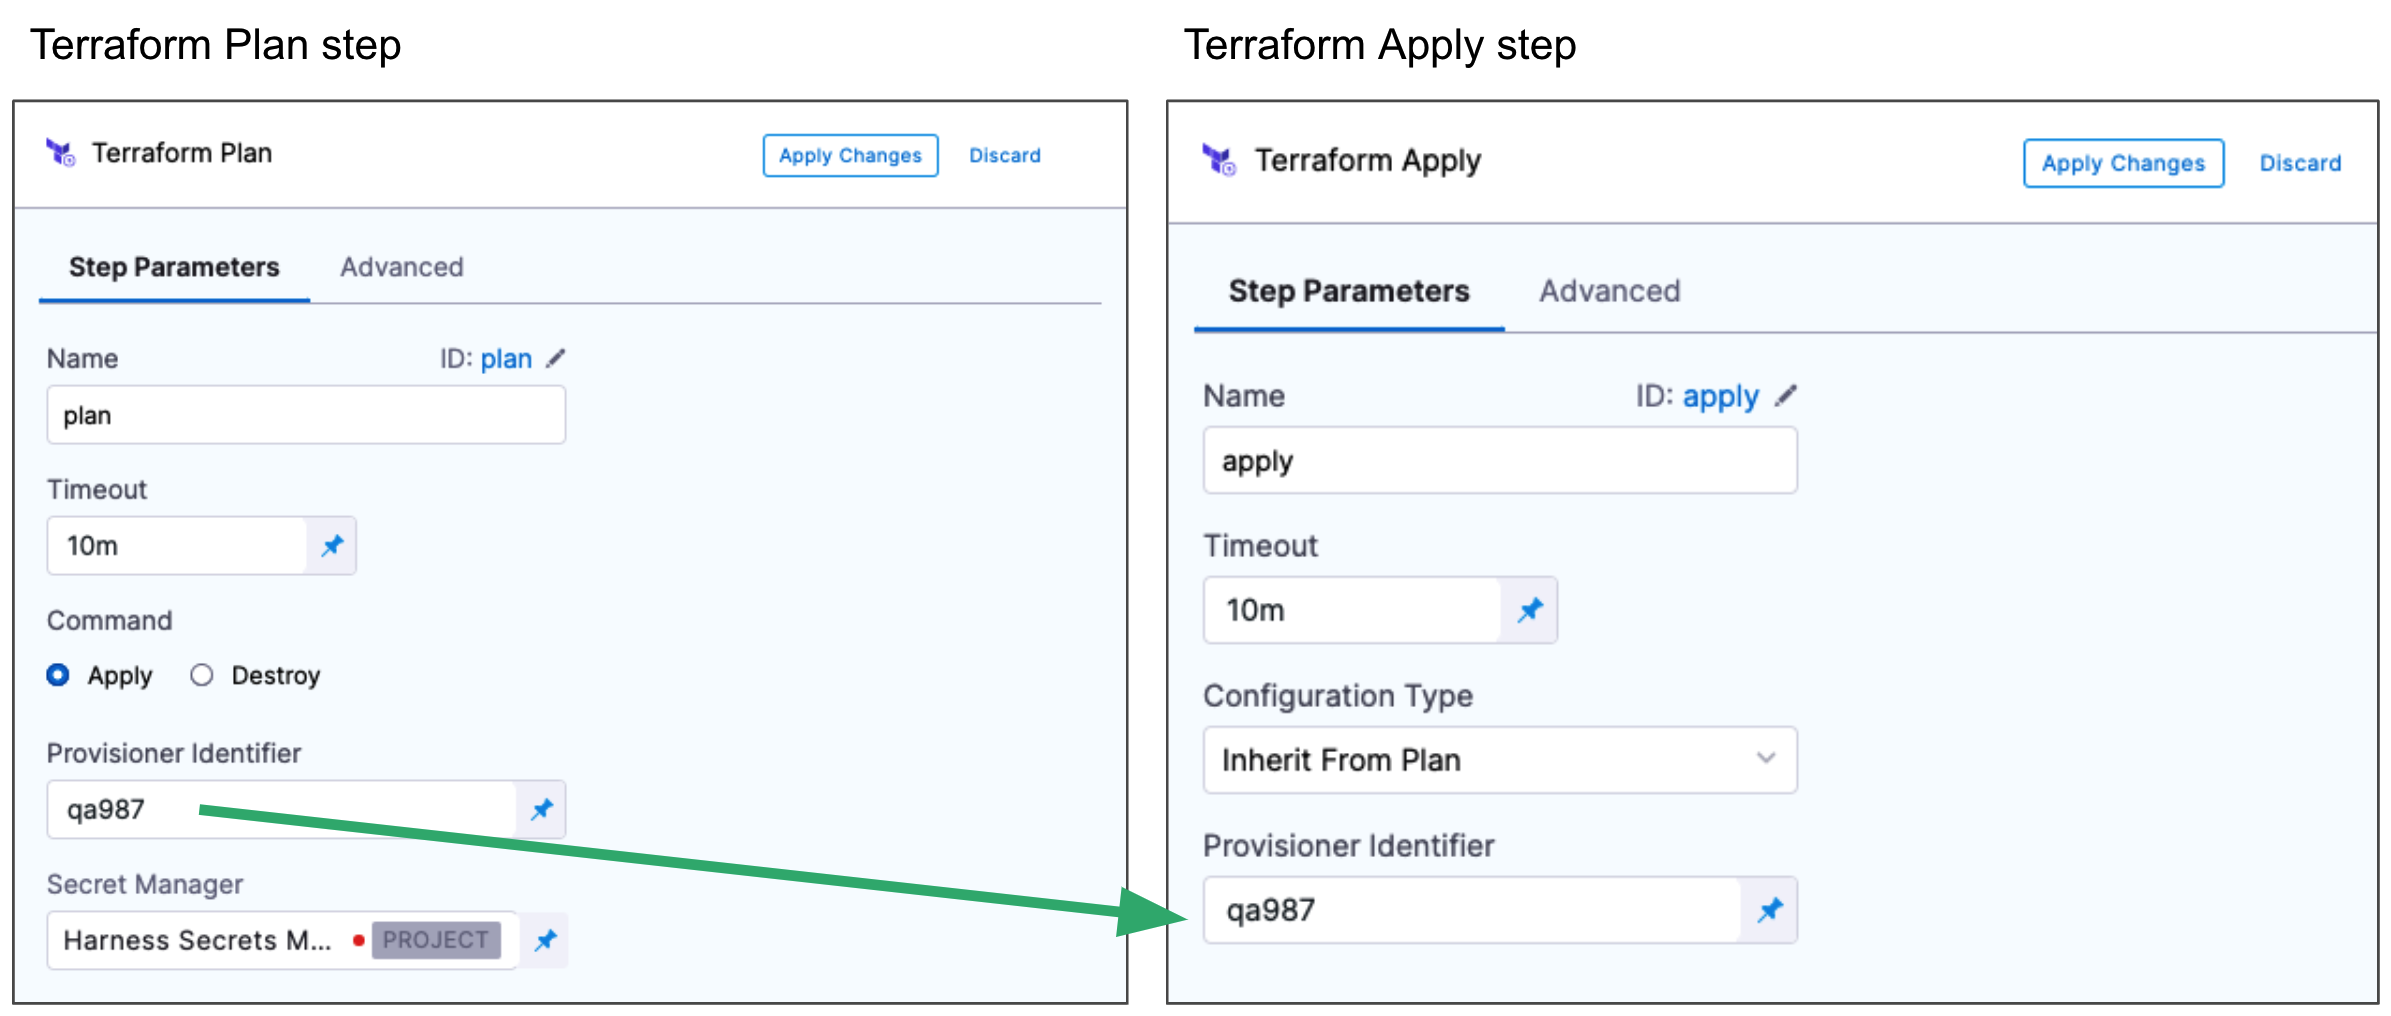
When you destroy the provisioned infrastructure, you specify the same Provisioner Identifier in the Terraform Destroy step. The Provisioner Identifier enables Harness to locate the same Terraform script used for provisioning.
View destroy plan logs before execution
To review what will be destroyed before executing a Terraform Destroy step, you can configure your pipeline with the following steps:
-
Add a Terraform Plan Step:
- Configure the plan step with the
destroycommand. - Fetch the configuration from a specific commit or branch in your repository.
- This allows you to view the destroy plan logs directly within the Harness UI.
- Configure the plan step with the
-
Add an Approval Step:
- Include an approval step after the Terraform Plan step to allow teams to review the destroy plan logs before proceeding with execution.
-
Add a Terraform Destroy Step:
- Configure the destroy step with the
inlinecommand. - Use the same commit or branch configuration as the Terraform Plan step.
- Execute the destroy step once the plan has been reviewed and approved.
- Configure the destroy step with the
The destroy step behaves similarly to the apply step but is specifically designed for removing provisioned infrastructure. After running a destroy step, view execution logs in the Harness pipeline execution details page to confirm resources were destroyed.
Add the Terraform Destroy step
You can add the Terraform Destroy step in the following places:
- Go to Pipelines > select a pipeline > Execution steps of a stage.
- Go to Pipelines > select a pipeline > select a stage > Infrastructure > Dynamic Provisioning section.
- Go to Pipelines > select a pipeline > Rollback steps of a stage's Execution or Infrastructure using Dynamic Provisioning.
In Name, enter a name for the step. You can use the name to reference the Terraform Destroy settings.
Select a configuration type
Select how the Terraform Destroy step determines which resources to remove:
- Inline: Removes the provisioned resources you identify using Provisioner Identifier and other settings.
- Inherit from Plan: Removes the resources defined in the Harness Terraform Plan step that you identify using Provisioner Identifier. Similar to
terraform plan -destroy. - Inherit from Apply: Removes the resources defined in the Harness Terraform Apply step that you identify using Provisioner Identifier. Similar to
terraform destroy.
Reference the Provisioner Identifier
In Provisioner Identifier, enter the same Provisioner Identifier you used in the Terraform Apply step that provisioning the resources you want to destroy.
Click Apply Changes.
The Terraform Destroy step is added.
Command line options
Currently, the Terraform command line option is behind the feature flag CDS_TERRAFORM_CLI_OPTIONS_NG. Contact Harness Support to enable the feature.
This setting allows you to set the Terraform CLI options for Terraform commands depending on the Terraform step type. For example: -lock=false, -lock-timeout=0s.
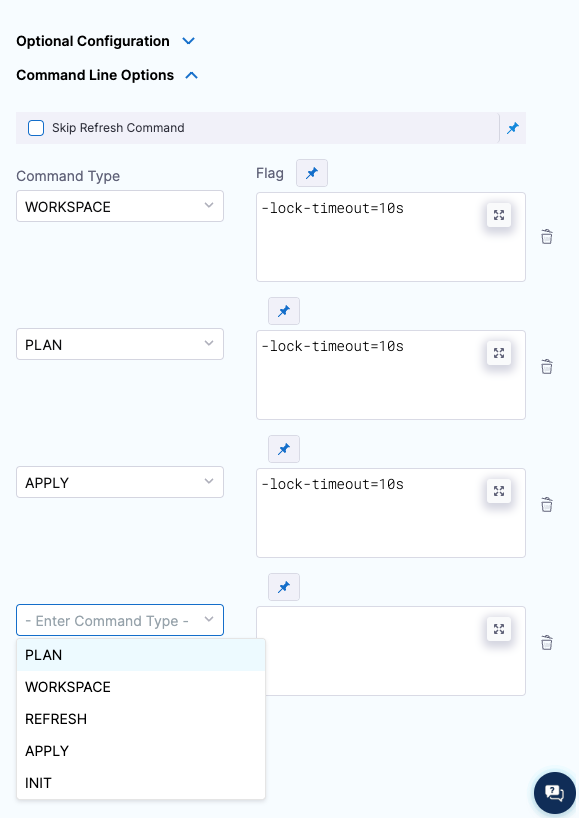
Skip Terraform refresh
Terraform refresh command will not run when this setting is selected.
Create remote workspace with prefix
This setting is only available when the Configuration Type is Inline.
This option is available only on delegate version 86400 or later.
Enable this option to automatically create or select a remote workspace when using a workspace prefix in your backend configuration.
When using a Terraform remote backend with a prefix, Terraform does not create the workspace automatically if it does not exist. This can lead to pipeline failures with errors like:
Error: Currently selected workspace "my-app-dev" does not exist
When this option is enabled:
- If the remote workspace does not exist, Harness creates it during execution.
- If the remote workspace already exists, Harness exports it to the
TF_WORKSPACEenvironment variable so that Terraform uses it. - If both the step configuration and environment variable specify a workspace, the step configuration takes precedence.
To enable automatic workspace selection when a workspace is configured in the step settings, this flag must be enabled.
If you prefer not to use this flag, you can manually configure the workspace using the TF_WORKSPACE environment variable.
This is how the YAML would look like
- step:
    type: TerraformDestroy
    name: Terraform Destroy
    identifier: Terraform_Destroy
    spec:
      provisionerIdentifier: test
      configuration:
        type: Inline
        createRemoteWorkspaceWithPrefix: true
        spec:
          configFiles: {}
Working directory cleanup
Each Terraform step runs in a specific working directory on the delegate.
The Terraform working directory is located at /opt/harness-delegate/./terraform-working-dir/.
To that directory path, Harness adds additional directories that are named after the organization, account, project, and provisionerId (from the step) such that the final working directory is /opt/harness-delegate/./terraform-working-dir/org-name/account-name/project-name/provisionerId/.
In this final working directory, Harness stores the Terraform configuration and all fetched files such as var-files and backend-config.
Once the Terraform step execution is complete, Harness cleans up the main working directory /opt/harness-delegate/./terraform-working-dir/.
If you generate any local resources on the delegate in the directory where Terraform configurations are located, those resources are also removed. If you need those resources, make sure to generate them outside the Terraform working directory.
Terraform variable files
You can specify Terraform variables inline and fetch remote variable files during run time. Go to Specify Terraform variables to configure variable files.
Troubleshooting
Terraform destroy fails with state lock error in Harness CD pipeline
Ensure no other process is holding a state lock. Terraform automatically retries lock acquisition. Check backend configuration for lock timeout settings.
Permission denied when destroying infrastructure with Terraform Destroy step
Verify the connector used in the destroy step has permissions to delete the target resources. Check cloud provider IAM roles and policies.
Terraform destroy step reports resources still exist after completion
Check execution logs for partial destroy errors. Some resources may have dependencies preventing deletion. Review Terraform state file for remaining resources.
Destroy plan shows different resources than expected
Verify the Provisioner Identifier matches the Apply step that created the infrastructure. Check the Terraform configuration files are the same version used during provisioning.
Next steps
You have configured a Terraform Destroy step to remove provisioned infrastructure. You can now add destroy steps to rollback sections or execution workflows.
- Go to Provision with the Terraform Apply step to understand the Apply workflow.
- Go to Plan Terraform provisioning with the Terraform Plan step to preview changes before destroying.
- Go to Rollback infrastructure with the Terraform Rollback step to rollback failed provisioning.