Add WinRM keys
Use these steps to add a WinRM credential key that can be referenced in Harness entities.
You can add WinRM credentials when creating connectors and other account or project resources. Or, you can select Secrets under Account/Organization/Project Setup and create a WinRM credential secret. In this example, we'll create a WinRM credential secret at the account scope.
To configure WinRM Credential settings:
-
In Harness, select Account Settings. The Account Settings page opens.
-
Under Account-level resources, select Secrets. The Secrets list page opens.
-
Select + New Secret, then select WinRM Credential. The WinRM Details pane opens. Enter a Name for the WinRM credential and select Continue.
-
Under Select an Auth Scheme, select one of the following:
-
Enter the following authentication details:
-
Domain: Enter the Active Directory domain name with which the user account in the credential is registered.
-
Username: Enter the user name for this connection. The user must belong to the same Active Directory domain as the Windows instances that this connection uses. These are the same user account credentials you would use when logging in to the VM through an application such as Microsoft Remote Desktop.
-
Password: Create or select an existing encrypted file secret that contains the relevant WinRM key file.
-
Use SSL: (Recommended) Select to enable an HTTPS connection instead of an HTTP connection.
-
Skip Cert Check: Select to skip the certificate check. When connected over HTTPS, the client doesn't validate the server certificate.
-
WinRM Port: Leave the default port or enter a new port if needed.
infoThe default port for SSL is 5986. If you haven't selected the Use SSL option, the default port is 5985. Harness switches ports depending on whether or not SSL is enabled.
-
-
Kerberos (recommended)
infoYou must add the Kerberos startup script to the Harness Delegate YAML for the connection to succeed.
Add the Kerberos startup script to the delegate YAML
-
Open
delegate.yamlin a text editor. -
Locate the environment variable
INIT_SCRIPTin theDeploymentobject.- name: INIT_SCRIPTvalue: "" -
Replace
value: ""with the following script:infoMake sure to use the actual Kerberos domain values, host IP, and password in the following script.
- name: INIT_SCRIPTvalue: |-# Set up kerberosmicrodnf updatemicrodnf install vimmicrodnf install yummicrodnf install -y yum-utilsyes | yum install krb5-workstation krb5-libstruncate -s 0 /etc/krb5.confcat <<EOT >> /etc/krb5.conf[logging]default = FILE:/var/log/krb5libs.logkdc = FILE:/var/log/krb5kdc.logadmin_server = FILE:/var/log/kadmind.log[libdefaults]default_realm = KERBEROS.DOMAINdns_lookup_realm = trueticket_lifetime = 24hrenew_lifetime = 7dforwardable = truerdns = false[realms]KERBEROS.DOMAIN = {kdc = "SERVER_NAME.KERBEROS.DOMAIN"admin_server = "SERVER_NAME.KERBEROS.DOMAIN"default_domain = "KERBEROS.DOMAIN"master_kdc = "SERVER_NAME.KERBEROS.DOMAIN"}[domain_realm].KERBEROS.DOMAIN = KERBEROS.DOMAINEOTecho 'host_ip host_name SERVER_NAME.KERBEROS.DOMAIN' >> /etc/hostsecho 'password' | kinit USERNAME@KERBEROS.DOMAINklist
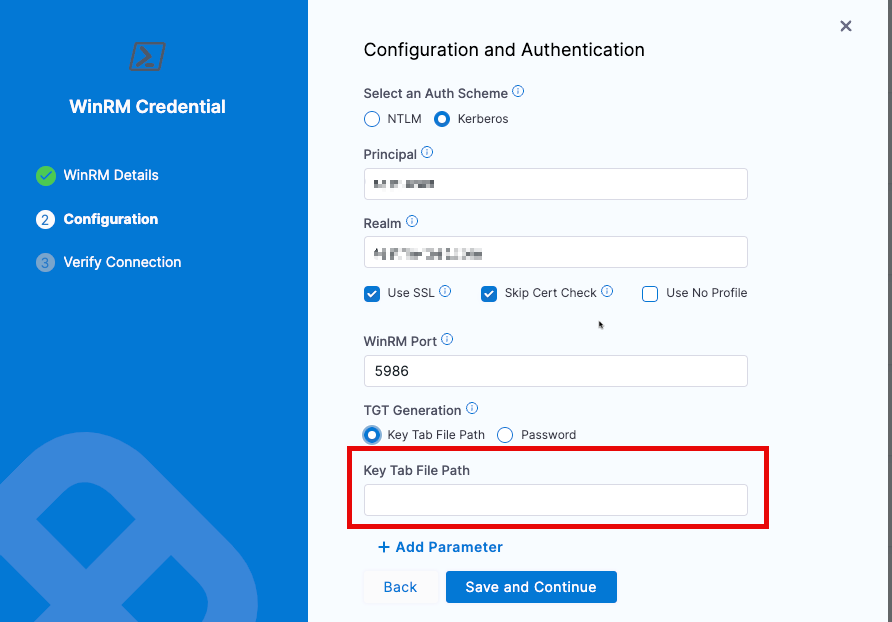
Enter the following authentication details:
-
Principal: Enter the account name associated with the Kerberos account.
-
Realm: Enter a realm. A realm is a logical network served by a single Kerberos database and a set of Key Distribution Centers (KDCs).
-
Use SSL: (Recommended) Select to enable an HTTPS connection instead of an HTTP connection.
-
Skip Cert Check: Select to skip certificate check. When connected over an HTTPS connection, the client doesn't validate the server certificate.
-
WinRM Port: Leave the default port or enter a new port if needed
infoThe default port for SSL is 5986. If you haven't selected the Use SSL option, the default port is 5985. Harness switches ports depending on whether or not SSL is enabled.
-
TGT Generation: Select one of the following options:
- Key Tab File: Generates a new TGT from KDC every time you authenticate with the service. For more information, please see below
- Password: Use Harness encrypted text secrets to save the password and refer to it using this option.
-
-
Select Save and Continue.
-
Enter the Host Name of the remote server you want to connect to. For example, if the server is an AWS EC2 instance, the host name might be similar to
ec2-54-175-135-106.compute-1.amazonaws.com. -
Select Test Connection.
If a message appears stating that no Harness Delegate could reach the host, or that a credential is invalid, verify that your settings are correct, and your Harness Delegate is able to connect to the server.
-
After the test succeeds, select Finish to save the WinRM credential.
Generating KeyTab Files
There are multiple methods to generate KeyTab files. The following is an example from the MIT Kerberos Documentation
As a note, when utilizing KeyTab files, the file will need to be included/distributed to all delegates which may be establishing the connection. The KeyTab will also need to be updated with rotations. Because KeyTab files are encrypted tokens, they will not contain password data, or the special characters that may cause problems in password data.
- Ensure
ktutilis available. ktutil Documentation. The machine executing thektutilcommands must also have access to the Key Distribution Center (KDC) database. - In terminal/bash, enter the
ktutilCLI - Run
addent -password -p <principalName> -k 1 -e aes256-cts-hmac-sha1-96to pull the token - Run
wkt ./<username>.keytabto write the keytab/keylist file to the location - Add the keytab to the appropriate delegates. This can be done in multiple methods, but an example would be to do a
kubectl cpcommand. - Provide the file location to the WinRM Secret