Enforce SBOM policies
The creation of a Software Bill of Materials (SBOM) significantly enhances software transparency. The comprehensive view not only brings visibility but also opens up the opportunity to improve security and ensure compliance. It enables organizations to define and implement specific rules governing the use of open source components, including the criteria to allow or deny components. By applying these rules, organizations can effectively mitigate security risks, comply with licensing obligations, and exert greater control over their software supply chain.
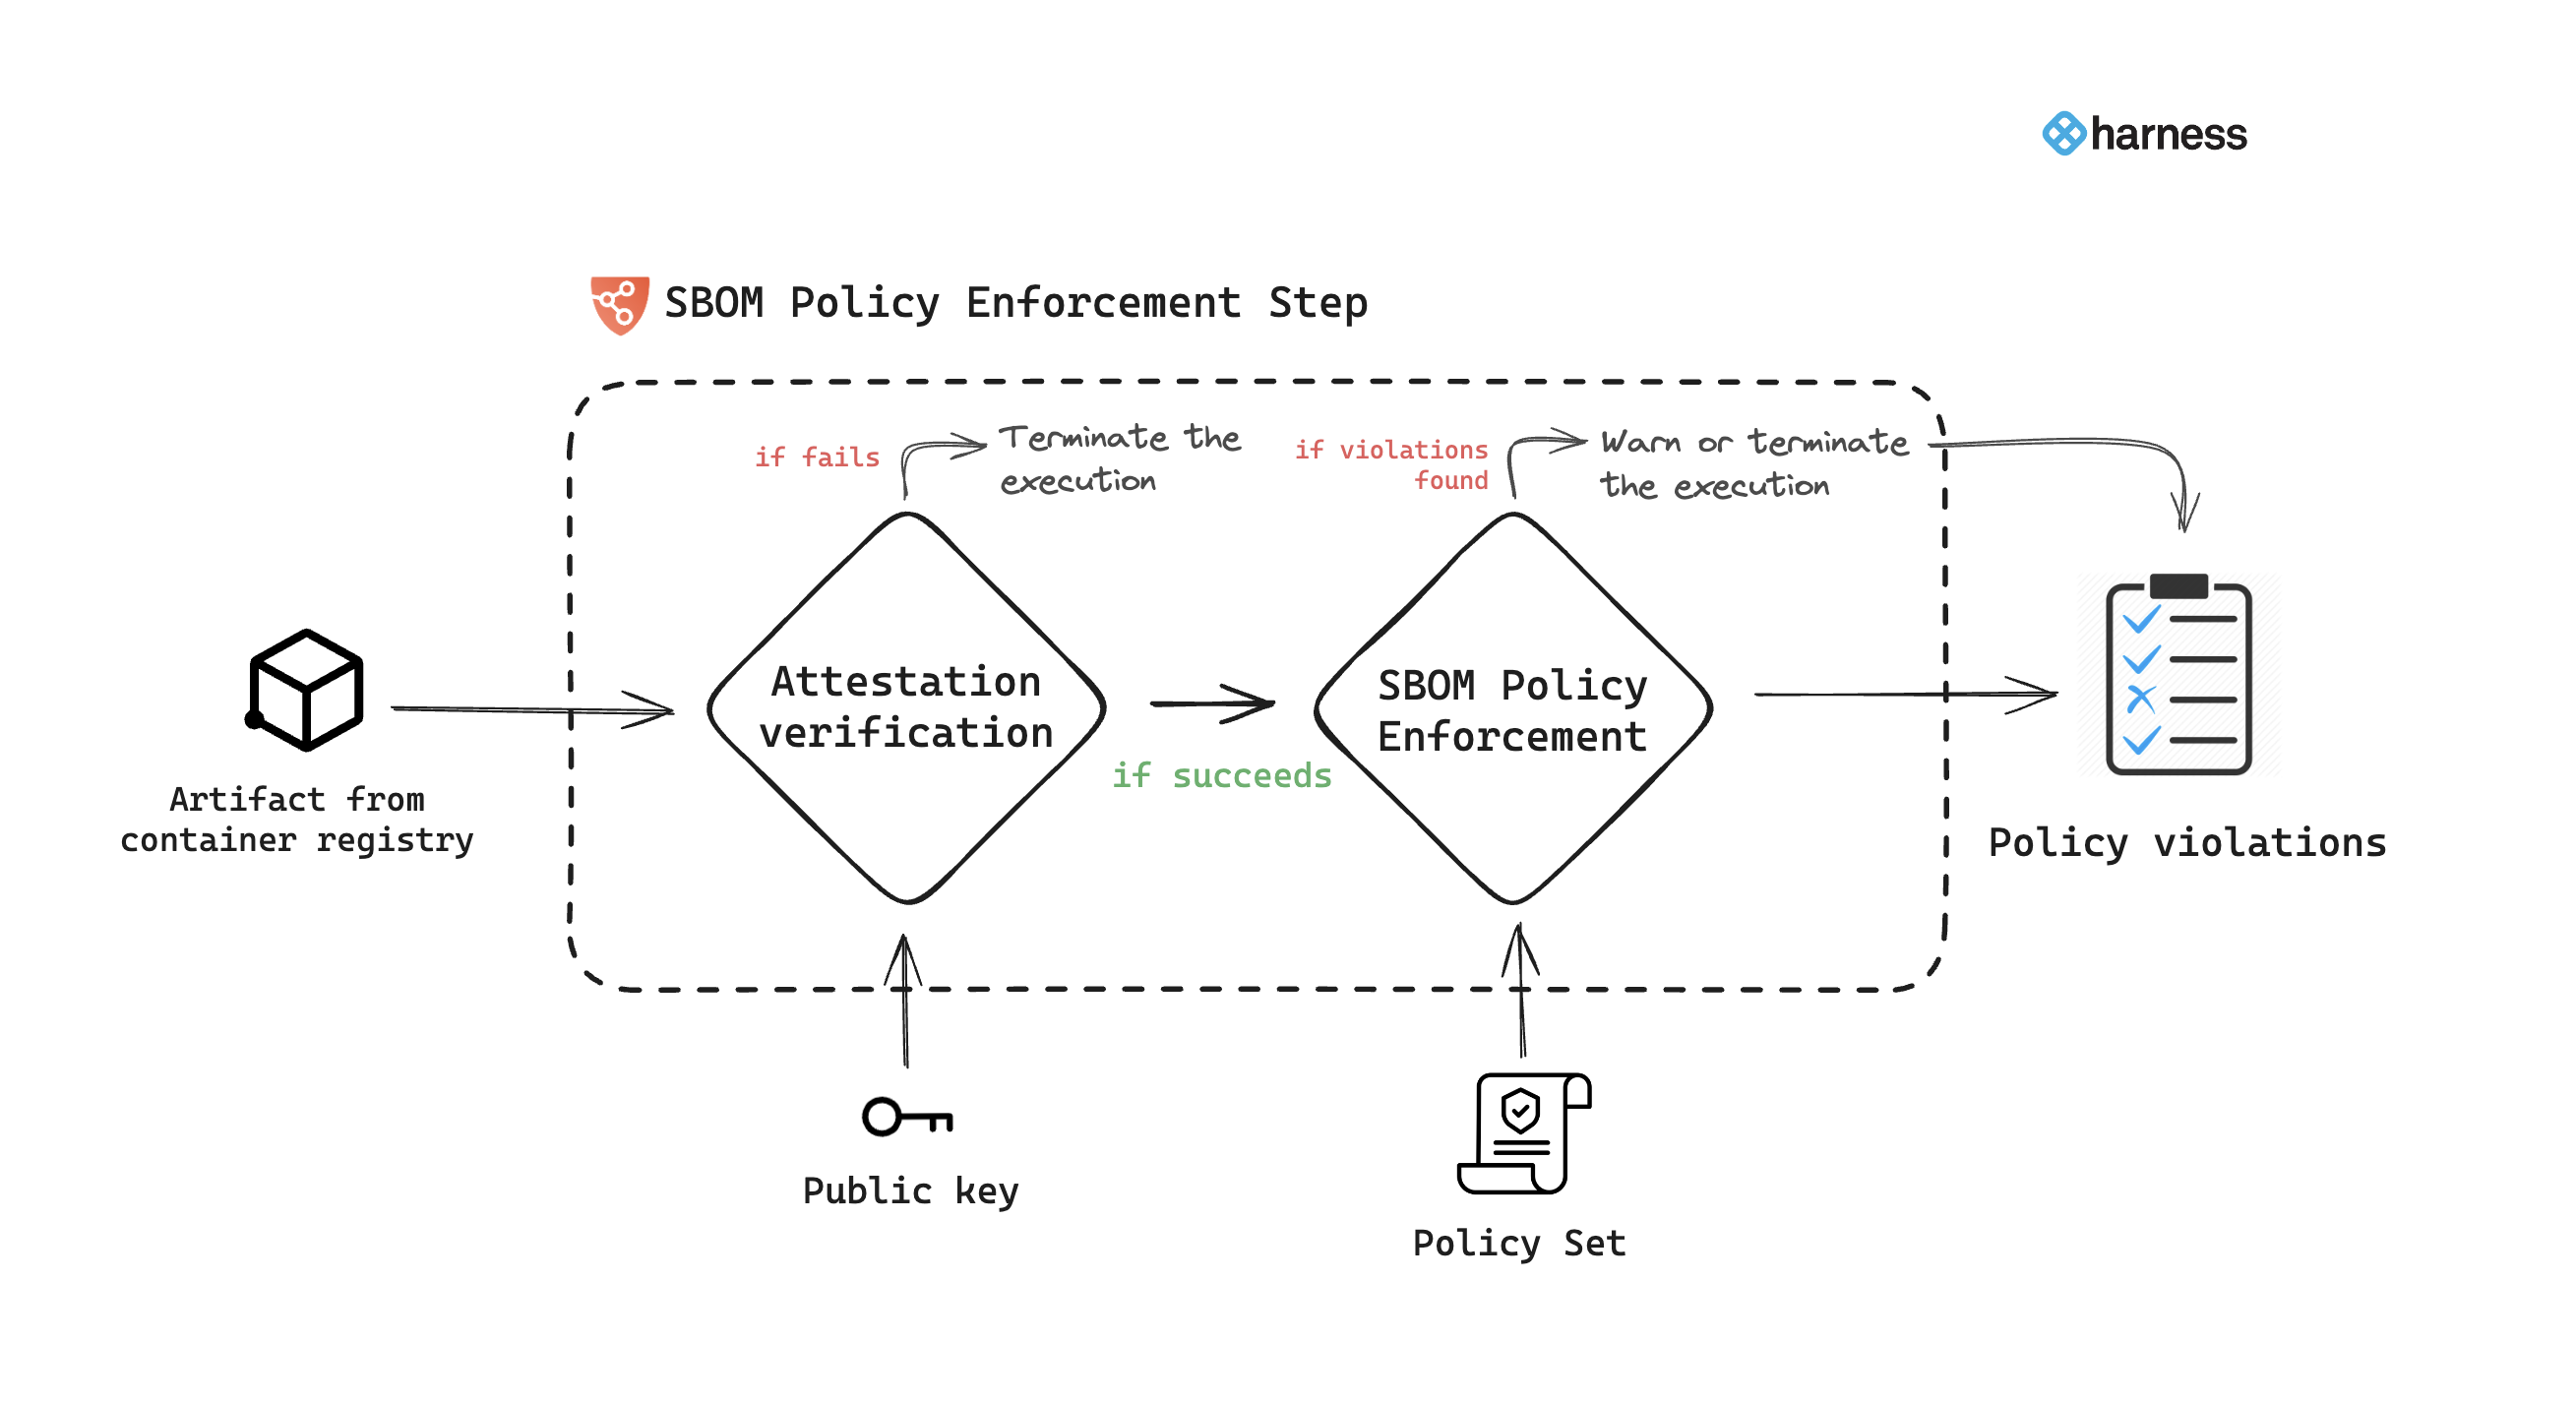
The Harness SCS module enables you to create these rules as policies that align with your organization's security regulations and legal compliance requirements. These policies can then be enforced on SBOMs. This entire process is facilitated through the SBOM Policy Enforcement step.
Enforce SBOM policies in the CI and CD stages of your Harness pipelines to ensure that your artifacts only contain approved components.

Here's a breakdown of the overall steps involved:
- Create an OPA policy set
- Write policy definitions
- Enforce the policies on SBOM
- View policy violations and take actions
Requirements
To enforce SBOM policies in a Harness pipeline, you need:
- A pipeline with a CI (build) stage, a CD (deploy) stage, or both. You'll add the SBOM Enforcement step to one of these stages.
- SBOM OPA policies that you want to enforce.
- SBOM to compare policies against. For example, you can use SCS to generate SBOM or import SBOM.
- A Harness file secret containing the public key from the key pair used to sign and attest the SBOM.
For SBOM Policy Enforcement, an SBOM needs to be generated or ingested beforehand through the SBOM Orchestration step. Refer to the dedicated SBOM generation document for further details.
Add SBOM Policy Enforcement step

You can add the SBOM Policy Enforcement step to either the Build or Deploy stage of a Harness pipeline.
- In a Build stage, add the step after the SBOM generation step.
- In a Deploy stage, add the step before the deployment step.
SBOM Orchestration and Enforcement steps in deploy stage can only be used in the Containerized Step Groups and ensure you enable the container based execution.
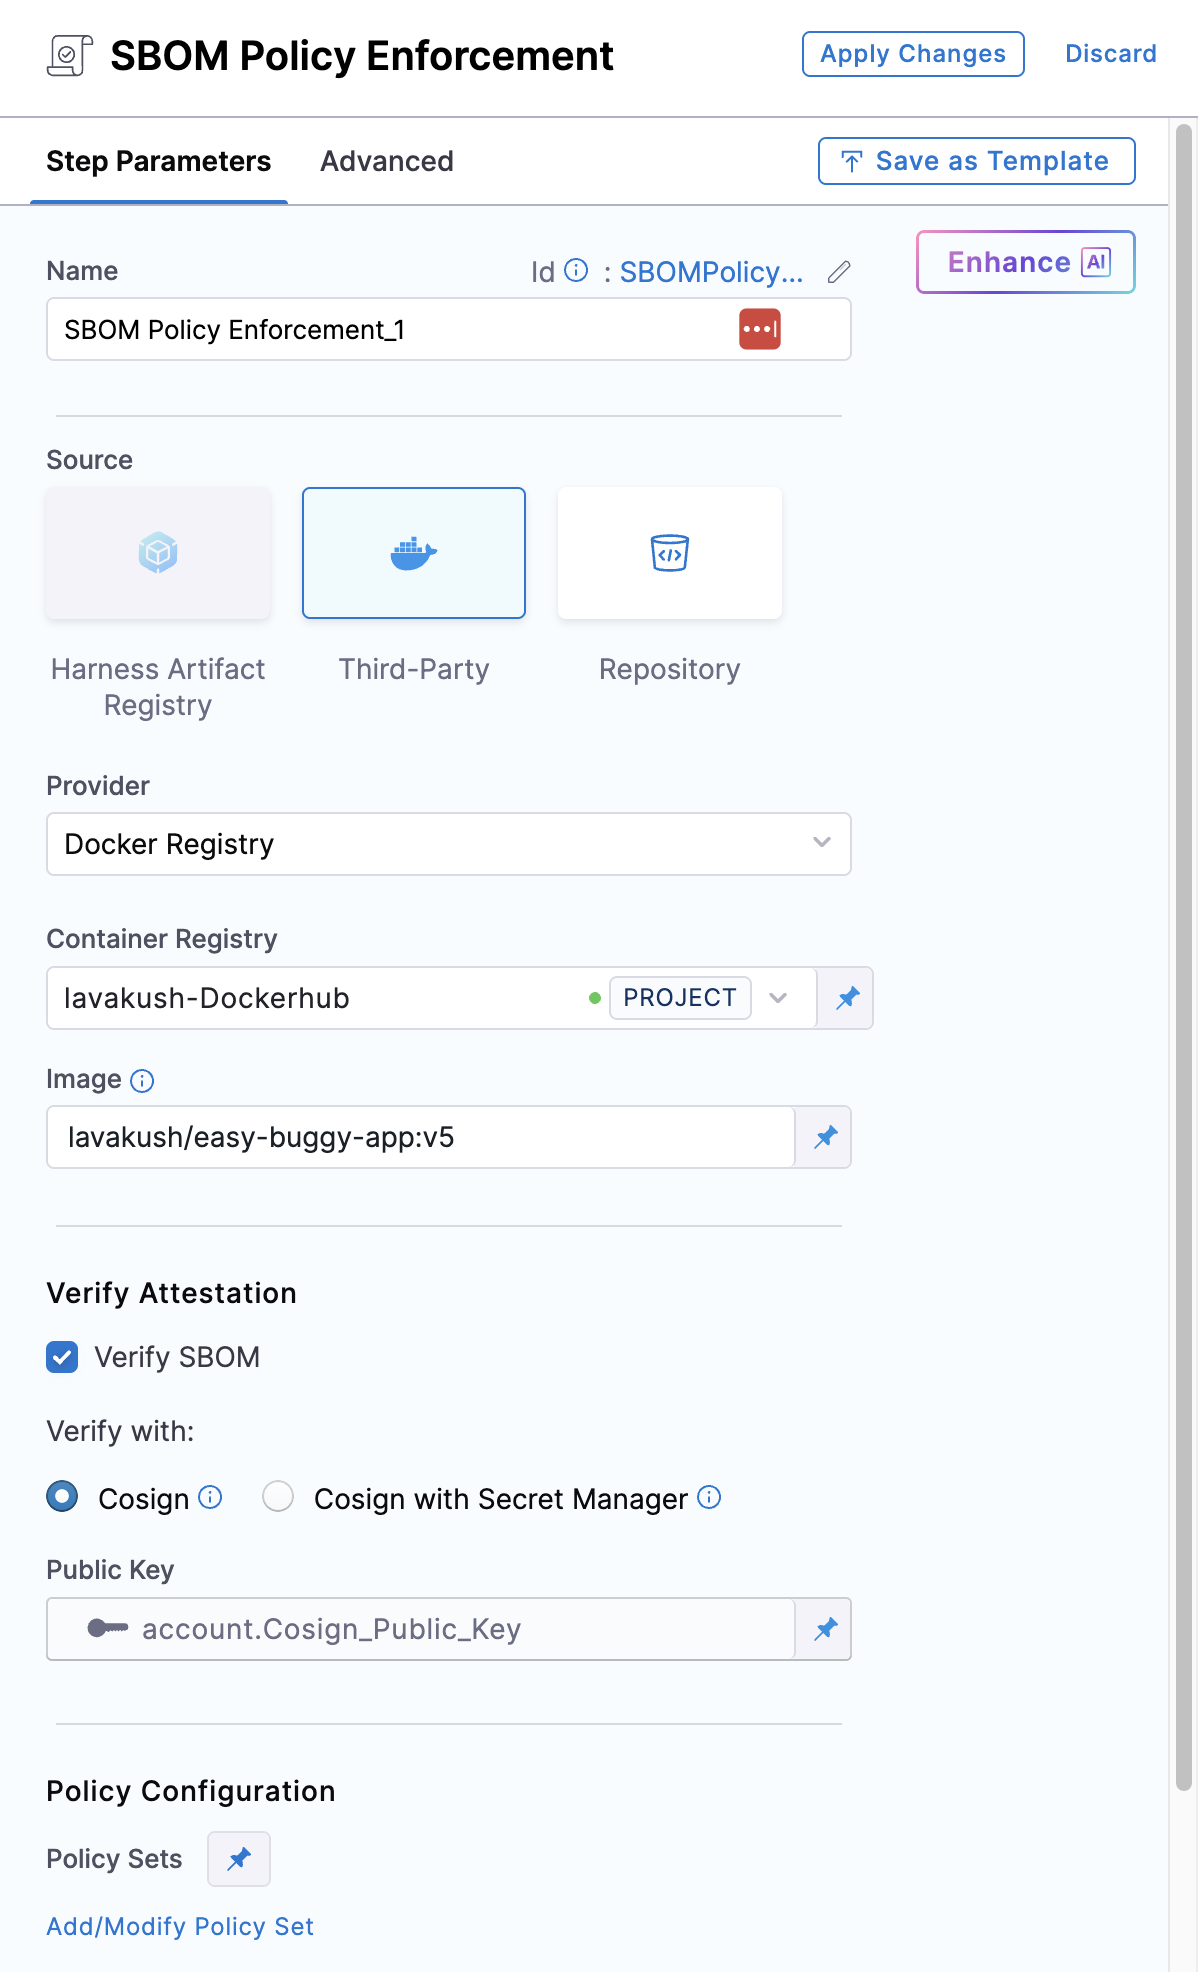
The SBOM Policy Enforcement step has the following settings:
-
Name: Enter a name for the step.
-
Source: Select the Source by choosing either a supported container registry from the list or Repository.
- HAR
- Docker Registry
- ECR
- GAR
- ACR
-
Registry: Select the Harness Registry configured for the Harness Artifact Registry where your artifact is stored.
-
Image: Enter the name of your image with tag or digest, such as
imagename:tagorimagename:digest.
-
Container Registry: Select the Docker Registry connector that is configured for the DockerHub container registry where the artifact is stored.
-
Image: Enter the name of your image using either a tag or a digest. For example:
my-docker-org/repo-name:tagormy-docker-org/repo-name@sha256:<digest>
Unlike other artifact sources, JFrog Artifactory requires additional permissions for attestation. The connector’s user or token must have Read, Annotate, Create/Deploy, and Delete permissions.
-
Container Registry: Select the Docker Registry connector that is configured for the Elastic container registry where the artifact is stored.
-
Image: Enter the name of your image with tag or digest for the image for which you're generating an SBOM, such as
my-docker-repo/my-artifact:latestormy-docker-repo/my-artifact@sha256:<digest>. -
Region: The geographical location of your ECR repository.
-
Account ID: The unique identifier associated with your AWS account.
-
Container Registry: Select the Docker Registry connector that is configured for the Google artifact registry where the artifact is stored.
-
Image: Enter the name of your image with tag or digest for which you're generating the SBOM, example
repository-name/image:tagorrepository-name/image@sha256:<digest>. -
Host: Enter your GAR Host name. The Host name is regional-based. For example,
us-east1-docker.pkg.dev. -
Project ID: Enter the unique identifier of your Google Cloud Project. The Project-ID is a distinctive string that identifies your project across Google Cloud services. example:
my-gcp-project
OIDC Auth type is not supported.
-
Container Registry: Select the Docker Registry connector that is configured for the Azure container registry where the artifact is stored.
-
Image: Enter your image details with a tag or digest in the format
<registry-login-server>/<repository>:<tag>or<registry-login-server>/<repository>@sha256:<digest>. The<registry-login-server>is a fully qualified name of your Azure Container Registry. It typically follows the format<registry-name>.azurecr.io, where<registry-name>is the name you have given to your container registry instance in Azure. Example input:automate.azurecr.io/acr:test -
Subscription Id: Enter the unique identifier that is associated with your Azure subscription.
OIDC Auth type is not supported.
Verify the SBOM Attestation
To verify the SBOM attestation, in addition to the above configuration, you need to enable the Verify SBOM Attestation checkbox in the SBOM Policy Enforcement step. Enabling this is optional and not required for SBOM policy enforcement.
The attestation verification process requires the corresponding public key of the private key used for SBOM attestation. You can perform the verification by providing the public key through the Cosign option or Cosign with Secret Manager
- Cosign
- Cosign with Secret Manager
To perform the attestation verification with Cosign selected, you need to pass the key from the Harness Secret Manager
- Public Key: Input your Public key from the Harness file secret.
If you used HashiCorp Vault as your Secret Manager for attestation, you can also use it for verifying the attestation.
- Connector: Select the same HashiCorp Vault connector that was used during the attestation process.
- Key: Enter the path to the Transit Secrets Engine in your HashiCorp Vault where your public key is stored. This should be the same path used for the attestation process. Note that HashiCorp Vault does not allow viewing the private key directly.
Policy Configuration
You can configure the step to enforce policies on the SBOM by selecting the appropriate policy set.
- Policy Sets: Choose the policy sets you want to use for enforcement. You can select multiple policy sets from the Account, Org, or Project levels. For more details, refer to Creating SBOM Policies and Writing SBOM Policy Definitions.
Run the pipeline
When the pipeline runs, the SBOM Policy Enforcement step does the following:
- With the artifact details, the step verifies the authenticity of the attestation.
- Applies policies defined in the specified policy set.
- If violations are detected based on the policy evaluation criteria, the pipeline may issue a warning and proceed, or it may generate an error and terminate.
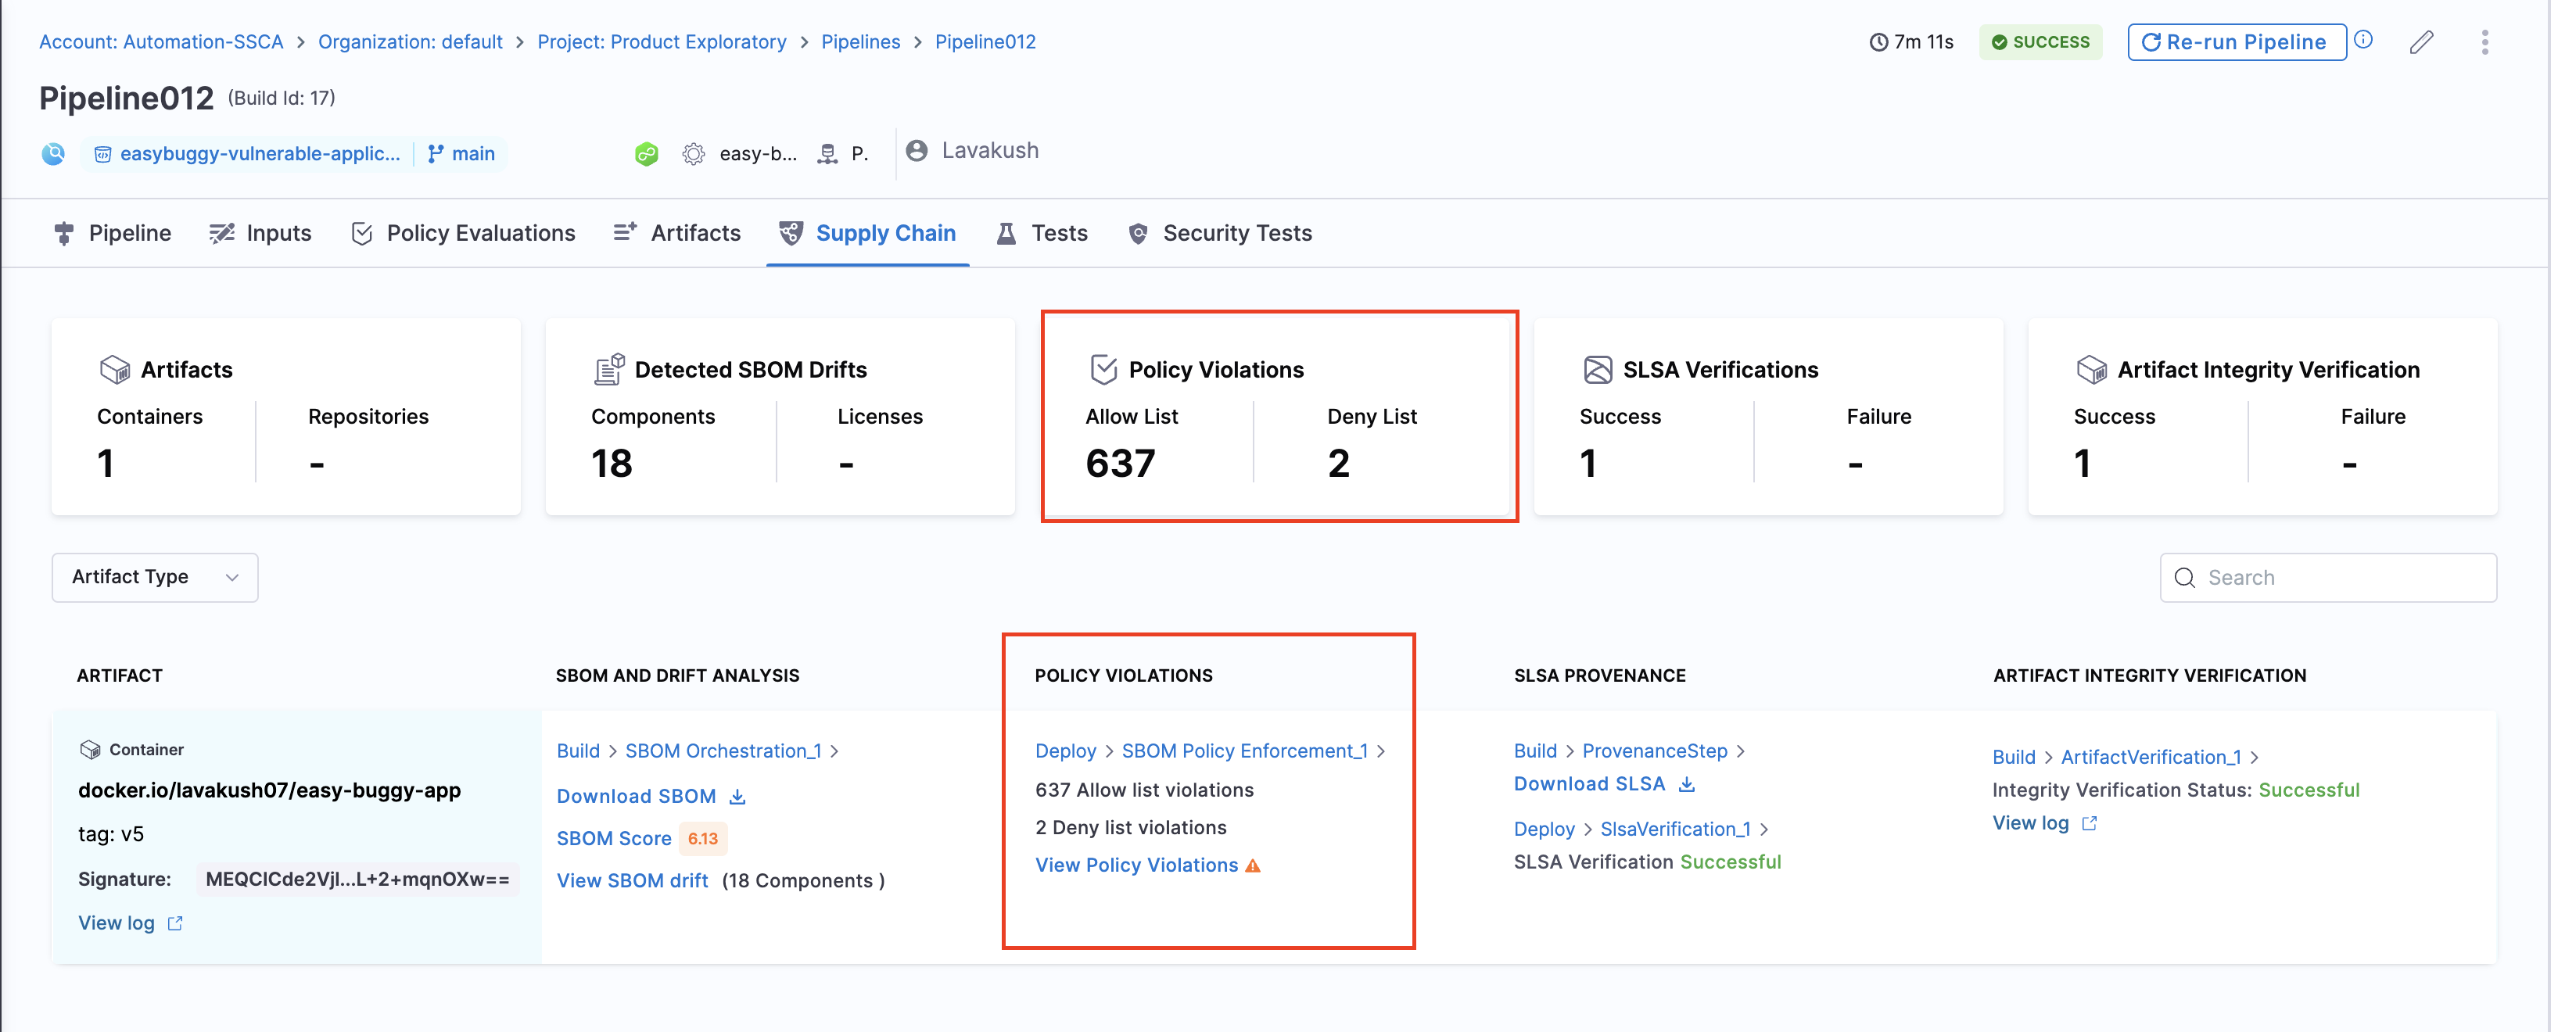
- Records policy violations and shows them on the Supply Chain tab on the Execution details page.
SCS evaluates the components described in the artifact's SBOM against your policy definitions. For a component to pass the evaluation, it must meet these conditions:
- The component must not be denied based on the rules in the
deny_list. - The component must be allowed based on the rules in the
allow_list. - If the
allow_listhas multiple sections, the component must be allowed by all sections. For example, if theallow_listhaslicensesandsupplierssections, then the component's license must be allowed according to thelicensessection, and the component's supplier must be allowed according to thesupplierssection. If the component fails to pass either section, the policy evaluation fails for that component.
All components must meet the conditions described in both the allow_list and deny_list to fully pass the policy evaluation.
View Policy Violations
The policy violations arising from the SBOM Policy Enforcement step in your pipeline are accessible under the "Policy Violations" section of the artifact list. Also, the Policy Violations card in the overview displays a cumulative count of all the allow list and deny list items across all artifacts.
