Set up a local runner build infrastructure
You can configure CI build infrastructure on a Linux, macOS, or Windows host by installing a Harness Docker Delegate and local Harness Docker Runner. When the pipeline runs, the Harness Docker Runner runs the build actions in the environment where it is installed. The delegate handles communication between the Harness Platform and the Harness Docker Runner.
- Set up a Linux local runner build infrastructure
- Set up a macOS local runner build infrastructure
- Set up a Windows local runner build infrastructure
Local runner build infrastructure is recommended for small, limited builds, such as a one-off build on your local machine. Consider other build infrastructure options for builds-at-scale.
You can also use a Kubernetes delegate instead of a Docker delegate.
Set up a Linux local runner
Prepare machines
Review the following requirements for local runner build infrastructures:
- There is a one-to-one relationship between Harness Docker Runners and Harness Delegates. If you need to run three local hosts, each host needs a runner and a delegate.
- The Harness Docker Delegate is limited by the total amount of memory and CPU on the local host. Builds can fail if the host runs out of CPU or memory when running multiple builds. The Harness Docker Delegate has the following system requirements:
- Default 0.5 CPU.
- Default 1.5GB. Ensure that you provide the minimum memory for the delegate and enough memory for the host/node system.
- The machine where the delegate runs must have Docker installed.
Install the delegate
-
In Harness, go to Account Settings, select Account Resources, and then select Delegates.
You can also create delegates at the project scope. In your Harness project, select Project Settings, and then select Delegates.
-
Select New Delegate or Install Delegate.
-
Select Docker.
-
Enter a Delegate Name.
-
Copy the delegate install command and modify it as follows:
- Add
--net=hostto the first line. - Add
-e DELEGATE_TAGS="DELEGATE_OS_ARCH", and replaceDELEGATE_OS_ARCHwith the tag corresponding to your Docker environment's architecture:linux-amd64orlinux-arm64.
Here's an example of an install script for Linux arm64:
docker run --cpus=1 --memory=2g --net=host \
  -e DELEGATE_NAME=docker-delegate \
  -e NEXT_GEN="true" \
  -e DELEGATE_TYPE="DOCKER" \
  -e ACCOUNT_ID=H5W8iol5TNWc4G9h5A2MXg \
  -e DELEGATE_TOKEN=YOUR_API_TOKEN \
  -e LOG_STREAMING_SERVICE_URL=https://app.harness.io/log-service/ \
  -e DELEGATE_TAGS="linux-arm64" \
-e MANAGER_HOST_AND_PORT=https://app.harness.io/ harness/delegate:23.02.78306 - Add
-
Run the modified install command on your build host machine.
The delegate install command uses the default authentication token for your Harness account. If you want to use a different token, you can create a token and then specify it in the delegate install command:
- In Harness, go to Account Settings, then Account Resources, and then select Delegates.
- Select Tokens in the header, and then select New Token.
- Enter a token name and select Apply to generate a token.
- Copy the token and paste it in the value for
DELEGATE_TOKEN.
For more information about delegates and delegate installation, go to Delegate installation overview.
Install the Harness Docker Runner
The Harness Docker Runner service performs the build work. The delegate needs the runner to run CI builds.
-
Download a Harness Docker Runner executable corresponding to your build farm's OS and architecture.
-
(Optional) To use self-signed certificates, export
CI_MOUNT_VOLUMESalong with a comma-separated list of source paths and destination paths formatted aspath/to/source;path/to/destination:export CI_MOUNT_VOLUMES="path/to/local/cert;/etc/ssl/certs/ca-certificates.crt,path/to/local/cert2;/etc/ssl/certs/cacerts.pem"infoIf your pipelines have STO scan steps, review the additional requirements for adding custom artifacts to STO pipelines.
-
Enable execution permissions for the Runner, for example:
sudo chmod +x harness-docker-runner-linux-arm64 -
Start the runner binary, for example:
sudo ./harness-docker-runner-linux-arm64 server
Define build infrastructure
After configuring the host machine, you need to set the pipeline's build infrastructure.
Set up a macOS local runner
Prepare machines
Review the following requirements for local runner build infrastructures:
- There is a one-to-one relationship between Harness Docker Runners and Harness Delegates. If you need to run three local hosts, each host needs a runner and a delegate.
- The Harness Docker Delegate is limited by the total amount of memory and CPU on the local host. Builds can fail if the host runs out of CPU or memory when running multiple builds. The Harness Docker Delegate has the following system requirements:
- Default 0.5 CPU.
- Default 1.5GB. Ensure that you provide the minimum memory for the delegate and enough memory for the host/node system.
- The machine where the delegate runs must have Docker installed.
Install the delegate
-
In Harness, go to Account Settings, select Account Resources, and then select Delegates.
You can also create delegates at the project scope. In your Harness project, select Project Settings, and then select Delegates.
-
Select New Delegate or Install Delegate.
-
Select Docker.
-
Enter a Delegate Name.
-
Copy the delegate install command and modify it as follows:
- Add
-e DELEGATE_TAGS="DELEGATE_OS_ARCH", and replaceDELEGATE_OS_ARCHwith the tag corresponding to your Docker environment's architecture:macos-amd64ormacos-arm64. - Add
-e RUNNER_URL=http://host.docker.internal:3000.
Here's an example of an install script for macOS amd64:
docker run --cpus=1 --memory=2g \
  -e DELEGATE_NAME=docker-delegate \
  -e NEXT_GEN="true" \
  -e DELEGATE_TYPE="DOCKER" \
  -e ACCOUNT_ID=H5W8iol5TNWc4G9h5A2MXg \
  -e DELEGATE_TOKEN=YOUR_API_TOKEN \
  -e LOG_STREAMING_SERVICE_URL=https://app.harness.io/gratis/log-service/ \
  -e DELEGATE_TAGS="macos-amd64" \
  -e RUNNER_URL=http://host.docker.internal:3000 \
-e MANAGER_HOST_AND_PORT=https://app.harness.io/gratis harness/delegate:23.02.78306 - Add
-
Run the modified install command on your build host machine.
The delegate install command uses the default authentication token for your Harness account. If you want to use a different token, you can create a token and then specify it in the delegate install command:
- In Harness, go to Account Settings, then Account Resources, and then select Delegates.
- Select Tokens in the header, and then select New Token.
- Enter a token name and select Apply to generate a token.
- Copy the token and paste it in the value for
DELEGATE_TOKEN.
For more information about delegates and delegate installation, go to Delegate installation overview.
Install the Harness Docker Runner
The Harness Docker Runner service performs the build work. The delegate needs the runner to run CI builds.
-
Download a Harness Docker Runner executable corresponding to your build farm's OS and architecture.
-
(Optional) To use self-signed certificates, export
CI_MOUNT_VOLUMESalong with a comma-separated list of source paths and destination paths formatted aspath/to/source:path/to/destination:export CI_MOUNT_VOLUMES="path/to/local/cert;/etc/ssl/certs/ca-certificates.crt,path/to/local/cert2;/etc/ssl/certs/cacerts.pem"infoIf your pipelines have STO scan steps, review the additional requirements for adding custom artifacts to STO pipelines.
-
Enable execution permissions for the Runner, for example:
sudo chmod +x harness-docker-runner-darwin-amd64 -
Start the runner binary, for example:
./harness-docker-runner-darwin-amd64 server -
If macOS Gatekeeper stops the installation because it can't check for malicious software, you need to modify Security & Privacy settings to allow this app to run.
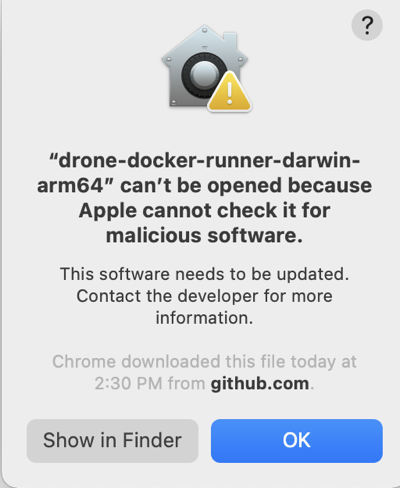
Allow the runner binary app to run
- Go to System Preferences and select Security & Privacy.
- On the General tab, select the lock to make changes.
- Select Allow next to the
an app was blocked from loadingmessage. - Select OK.
- Select Open Anyway next to the
not from an identified developermessage.
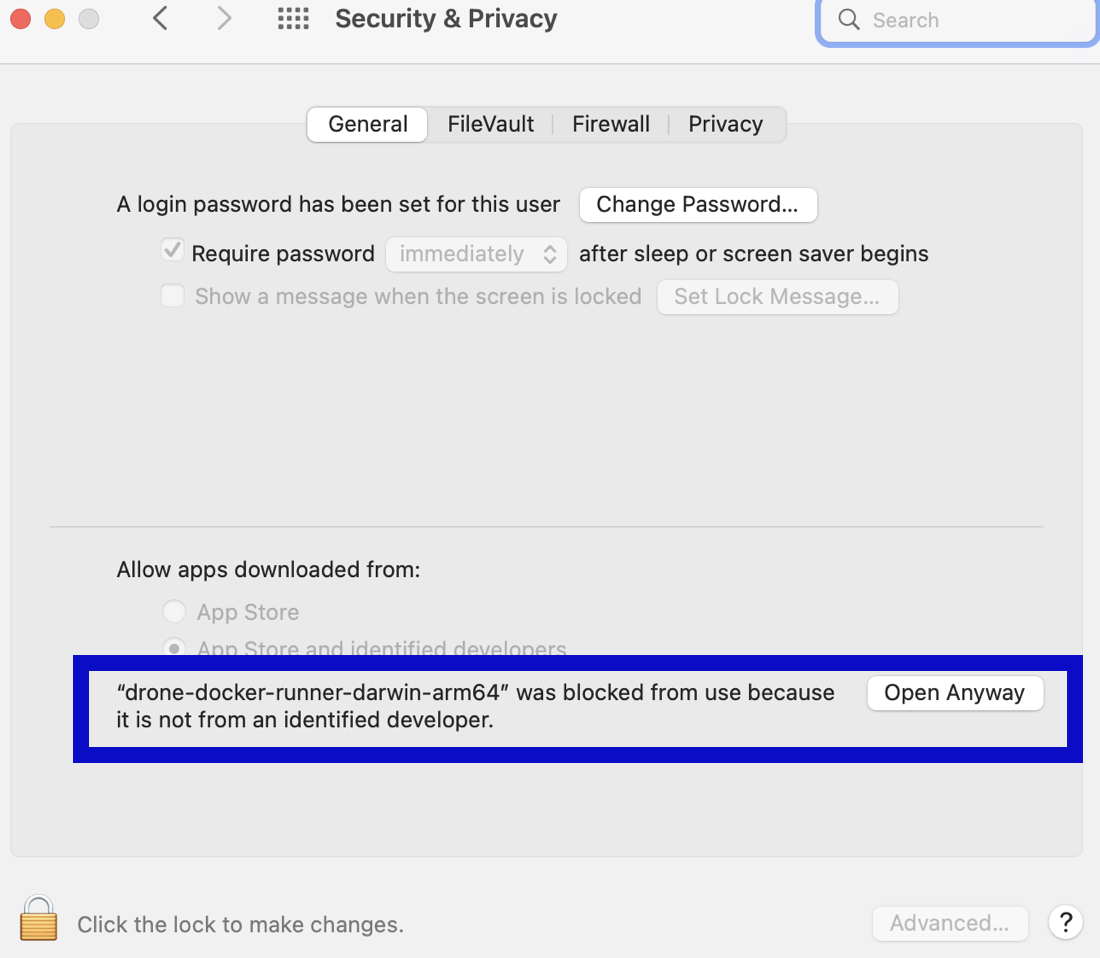
- Select Open to confirm that you want to run the binary. If this window doesn't appear, rerun the binary start command.
Define build infrastructure
After configuring the host machine, you need to set the pipeline's build infrastructure.
Set up a Windows local runner
Prepare machines
Review the following requirements for Windows local runner build infrastructures:
- You need two machines for each build host:
- A Windows machine where the Harness Docker Runner will run. This machine must have Docker for Windows installed. The Harness Docker Runner runs as an executable.
- A Linux or macOS machine where the Harness Delegate will run. This machine must have Docker installed. The delegate runs as a container.
- There is a one-to-one relationship between Harness Docker Runners and Harness Delegates. If you need to run three local hosts, each host needs a runner machine and a delegate machine.
- The Harness Docker Delegate is limited by the total amount of memory and CPU on the local host. Builds can fail if the host runs out of CPU or memory when running multiple builds. The Harness Docker Delegate has the following system requirements:
- Default 0.5 CPU.
- Default 1.5GB. Ensure that you provide the minimum memory for the delegate and enough memory for the host/node system.
Install the delegate
-
In Harness, go to Account Settings, select Account Resources, and then select Delegates.
You can also create delegates at the project scope. In your Harness project, select Project Settings, and then select Delegates.
-
Select New Delegate or Install Delegate.
-
Select Docker.
-
Enter a Delegate Name.
-
Copy the delegate install command and modify it as follows:
- Add
-e DELEGATE_TAGS="windows-amd64". - Add
-e RUNNER_URL=http://WINDOWS_MACHINE_HOSTNAME_OR_IP:3000.
warningThe
RUNNER_URLmust point to the Windows machine where the Harness Docker Runner will run.Here's an example of the delegate install script for a local runner Windows build infrastructure:
docker run --cpus=1 --memory=2g \
  -e DELEGATE_NAME=docker-delegate \
  -e NEXT_GEN="true" \
  -e DELEGATE_TYPE="DOCKER" \
  -e ACCOUNT_ID=H5W8iol5TNWc4G9h5A2MXg \
  -e DELEGATE_TOKEN=YOUR_API_TOKEN \
  -e LOG_STREAMING_SERVICE_URL=https://app.harness.io/gratis/log-service/ \
  -e DELEGATE_TAGS="windows-amd64" \
  -e RUNNER_URL=http://WINDOWS_MACHINE_HOSTNAME_OR_IP:3000 \
-e MANAGER_HOST_AND_PORT=https://app.harness.io/gratis harness/delegate:23.02.78306 - Add
-
Run the modified install command on the Linux or macOS machine where you want to run the delegate.
The delegate install command uses the default authentication token for your Harness account. If you want to use a different token, you can create a token and then specify it in the delegate install command:
- In Harness, go to Account Settings, then Account Resources, and then select Delegates.
- Select Tokens in the header, and then select New Token.
- Enter a token name and select Apply to generate a token.
- Copy the token and paste it in the value for
DELEGATE_TOKEN.
For more information about delegates and delegate installation, go to Delegate installation overview.
Install the Harness Docker Runner
The Harness Docker Runner performs the build work. The delegate needs the runner to run CI builds.
On Windows platforms, you can install the Docker Runner as a process (using a .exe) or a service (using a .msi). The advantage to installing the Docker Runner as a service is that the service automatically starts when the runner machine restarts.
Install the Harness Docker Runner on the Windows machine that you specified in the delegate's RUNNER_URL.
- Install as a process (.exe)
- Install as a service (.msi)
-
Download the Windows Harness Docker Runner executable on the Windows machine where you want to run the Harness Docker Runner. This should be the Windows machine that you specified in the delegate's
RUNNER_URL. -
Use PowerShell to run these commands. Open a terminal with Administrator privileges.
-
(Optional) To use self-signed certificates, set
CI_MOUNT_VOLUMESalong with a comma-separated list of source paths and destination paths formatted aspath/to/source:path/to/destination, for example:$env:CI_MOUNT_VOLUMES="C:\Users\installer\Downloads\certs;C:/Users/ContainerAdministrator/.jfrog/security/certs"info- With Windows, volume mapping must be folder-to-folder.
- If your pipelines have STO scan steps, review the additional requirements for adding custom artifacts to STO pipelines.
-
Start the runner binary:
harness-docker-runner-windows-amd64.exe server
The advantage to installing the Docker Runner as a Windows service is that the service restarts when the runner machine restarts. This can be helpful if your workflow requires the runner machine to restart on a schedule or after certain events.
-
Download the Windows Harness Docker Runner MSI file (
harness-docker-runner-svc.msi) on the Windows machine where you want to run the Harness Docker Runner. This should be the machine that you specified in the delegate'sRUNNER_URL. -
Launch the downloaded
harness-docker-runner-svc.msifile to start the installation process. Then accept the license, select Next, and finish the installation.Troubleshoot Windows Security issuesBy default, Windows Security doesn't trust external or unrecognized MSI files. To proceed with installation, you might need to authorize/trust the application or change permissions on the file.
Error codes 2502 or 2503 occur if the Windows MSI installation service isn't authorized to write to the
C:\windows\Tempfolder during the installation process. To resolve this, do the following:-
In File Explorer, go to
C:\Windows. -
Right-click the
Tempfolder, and select Properties. -
Select the Security tab, and then select Advanced.
-
Make sure an appropriate user is selected for Principal, such as an Administrator, and then select Full control for Basic permissions.
-
Select OK and then select Apply.
-
If a warning message appears, select Yes and Continue.
-
Restart or continue the installation process.
If you get the error message
This installation package could not be opened, you might need to change ownership of the file to Administrators, allow full control, and then restart or continue the installation process. If you're not already an administrator, you might need to elevate your permissions using User Account Control (UAC). -
-
(Optional) To test the service availability, open a terminal with Administrator privileges and run:
curl http://localhost:3000/healthz
Windows Docker Runner service logs are located at C:\Windows\system32\harness-docker-runner-TIMESTAMP.log. If your Windows installation doesn't use the default C:\Windows\system32 file path, you can find the log files at INSTALL_DIRECTORY\harness-docker-runner-TIMESTAMP.log.
Don't manually start, stop, or delete the Runner service. This can cause problems with orphaned files or subprocesses.
If you need to remove the service, follow the uninstall instructions in the Windows Harness Docker Runner MSI Readme.
Define build infrastructure
After configuring the host machines, you need to set the pipeline's build infrastructure.
Set the pipeline's build infrastructure
Edit the CI pipeline where you want to use the local runner build infrastructure.
- Visual
- YAML
- In the pipeline's Build stage, select the Infrastructure tab.
- Select Local for the Infrastructure.
- Select the relevant Operating System and Architecture.
- Save your pipeline.
In the pipeline's build stage (type: CI), insert platform and runtime specifications, for example:
    - stage:
        name: build
        identifier: build
        description: ""
        type: CI
        spec:
          cloneCodebase: true
          platform:
            os: Linux
            arch: Amd64
          runtime:
            type: Docker
            spec: {}
platform:os: SpecifyLinux,MacOS, orWindowsarch: SpecifyAmd64orArm64
runtime:type:Dockerspec:{}
Although you must install a delegate to use the local runner build infrastructure, you can choose to use a different delegate for executions and cleanups in individual pipelines or stages. To do this, use pipeline-level delegate selectors or stage-level delegate selectors.
Delegate selections take precedence in the following order:
- Stage
- Pipeline
- Platform (build machine delegate)
This means that if delegate selectors are present at the pipeline and stage levels, then these selections override the platform delegate, which is the delegate that you installed on the build machine. If a stage has a stage-level delegate selector, then it uses that delegate. Stages that don't have stage-level delegate selectors use the pipeline-level selector, if present, or the platform delegate.
For example, assume you have a pipeline with three stages called alpha, beta, and gamma. If you specify a stage-level delegate selector on alpha and you don't specify a pipeline-level delegate selector, then alpha uses the stage-level delegate, and the other stages (beta and gamma) use the platform delegate.
Early access feature: Use delegate selectors for codebase tasks
Currently, delegate selectors for CI codebase tasks is behind the feature flag CI_CODEBASE_SELECTOR. Contact Harness Support to enable the feature.
By default, delegate selectors aren't applied to delegate-related CI codebase tasks.
With this feature flag enabled, Harness uses your delegate selectors for delegate-related codebase tasks. Delegate selection for these tasks takes precedence in order of pipeline selectors over connector selectors.
Troubleshoot local runner build infrastructure
Go to the CI Knowledge Base for questions and issues related to using a local runner build infrastructure, such as:
- How do I check the runner status?
- How do I check the delegate status?
- How do I check that the Docker daemon is running?
- Clone codebase fails due to missing plugin
- Runner can't find an available, non-overlapping IPv4 address pool
- Runner process quits after terminating SSH connection
- Can I use self-signed certs with local runner build infrastructure?
- Git connector SCM connection errors when using self-signed certificates
- Step continues running for a long time after the command is complete
- Is a Docker image required to use the Run step on local runner build infrastructure?
- Docker daemon fails with invalid working directory path on Windows