Store STO images in a private registry
Harness maintains its own set of scan images for STO-supported scanners. By default, a Harness pipeline pulls scan images from the Harness project on GCR.
This topic describes how to override the default image pull behavior and use your own private registry instead of pulling directly from the public Harness GCR project. You can download the scan images you need, perform your own security checks on the images, upload them to a private registry, and then set up your STO steps to download images from your private registry.
To do this, you need to:
- (Optional) Create scanner images with your own SSL certificates.
- Create a connector for your private registry.
- Configure the pipeline to download images from your registry.
Create STO scanner images with your own SSL certificates (optional)
Harness STO supports three workflows for running scans with custom certificates.
In this workflow, you set up your STO scan images and pipelines to run scans as non-root and establish trust for your own proxies using custom certificates. This workflow supports any STO-compatible scanner that can run natively without root access. This workflow also supports build environments that use a self-signed proxy server between the Harness Delegate and Harness Manager.
Running container image scans as a non-root user is not currently supported.
-
Save a copy of the following Dockerfile into a folder along with the certificates you want to copy to the image.
-
Update the
FROM,COPY, andUSERcommands as described in the Dockerfile comments. -
Build the new image and then publish it to your private registry.
-
Update the scan step in your pipeline as follows:
- Update the Image setting to point to the new image in your registry.
- If you specified a
USERin your Dockerfile, set the Run as User (runAsUser) setting to the user you specified in your Dockerfile.
Dockerfile template for adding certificates to an STO scanner image
# STEP 1
# Specify the STO scanner image where you want to add your certificates
# For a list of all images in the Harness Container Registry, run the following:
#     curl -X  GET https://app.harness.io/registry/_catalog
FROM harness/twistlock-job-runner:latest as scanner

# FYI Root access is required to load and trust certificates
USER root

# STEP 2
# Copy your certificates to the engine
# You can copy multiple ca from completely different paths into SHARE_CA_PATH
COPY ./CERTIFICATE_1.pem ../another-folder/CERTIFICATE_2.pem /shared/customer_artifacts/certificates/


# FYI establishes trust for certificates in Python and the OS
RUN sto_plugin --trust-certs
# Optional: To trust certificates for Java for tools such as
# - Black Duck Hub
# - Checkmarx
# - Sonarqube
# - Veracode
# - NexusIQ
# RUN sh /bin/setup.sh

# STEP 3 (optional)
# Create a user and assume limited permission user
# If you set this, you need to add runAsUser setting in the scan step
#     i.e., runAsUser: "1000"
USER 1000
Create a connector to your private registry
You need a Docker connector that points to your private container registry. For more information, go to Docker Connector Settings Reference.
Configure the pipeline to download images from your registry
-
Download the scan images you need from the Harness project on GCR, test and validate the images, and store them in your private registry.
warningDo not change the image names in your private registry. The image names must match the names specified by Harness.
-
If your registry automatically downloads the latest images from the public Harness registry, you might want to specify the images to use in your pipelines. This ensures that your pipelines use specific image versions. You must update this specification when you want to adopt a new version of an image.
-
Set up your pipeline to download the images from your private registry. Configuration requirements depend on the type of step you're using to run your scans:
Scanner step setup
Do the following if you're using a scanner step such as Black Duck Hub or Snyk rather than a generic Custom Scan step.
-
In the stage where you're setting up the step, go to the Infrastructure tab.
-
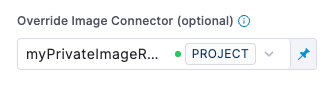
Under Advanced, go to Override Image Connector (optional) and select the connector to your private registry. You might need to scroll down to see this option.
-
If you specified a
USERin the Dockerfile for your scan image, configure the scan step to run as the user:-
Open the scanner step and expand Additional Configuration.
-
Set the Run as User (
runAsUser) setting to the user you specified in your Dockerfile.
-
Custom Scan step setup
Do the following if you're using a generic Custom Scan step for your scan:
-
Open the step and add these settings:
-
runner_registry_domain— The URL of the registry where the images are stored.The supported format is
<_domain_>/<_directory_>(such as,gcr.io/gcr-prod).Do not include the scheme (such as
http://orhttps://). -
runner_registry_image_prefix : harness— Do not change this setting. -
runner_registry_username— As needed -
runner_registry_token— As needed
-
These settings are supported by the Custom Scan step only. They are not supported by scanner-specific steps such as Semgrep or Trivy.
-
If you need to use a proxy server, you must also specify the following:
-
http_proxy— The hostname and port to use for proxied HTTP requests -
https_proxy— The hostname and port to use for proxied HTTPS requests -
no_proxy— A comma-separated list of hosts to bypass the proxy
-
-
If you specified a
USERin the Dockerfile for your scan image, configure the scan step to run as the user:-
Open the scanner step and expand Additional Configuration.
-
Set the Run as User (
runAsUser) setting to the user you specified in your Dockerfile.
-