Create Harness GitOps PR pipelines
This topic shows you how to create a Harness PR pipeline in Harness GitOps to make changes to one of an ApplicationSet's target environments.
Often, even though your ApplicationSet syncs one microservice/application to multiple target environments, you might want to change a microservice in just one of the target environments, such as a dev environment. A Harness PR Pipeline enables you to do this.
This topic builds on the ApplicationSet created in Harness GitOps ApplicationSets. Ensure you have read that topic and, ideally, have set up an ApplicationSet in Harness before creating a PR pipeline.
It is also recommended that you go through the basics of Harness PR pipelines before proceeding further.
When you deploy a Harness PR pipeline, you indicate the target environment application and the config.json keys/values you want changed. Harness creates the pull request in your Git repo and merges it for you. Once complete, the target environment application has the new keys/values.

For the PR Pipeline, we'll create two Harness environments, dev and prod. These names are the same as the folder names in the repo:
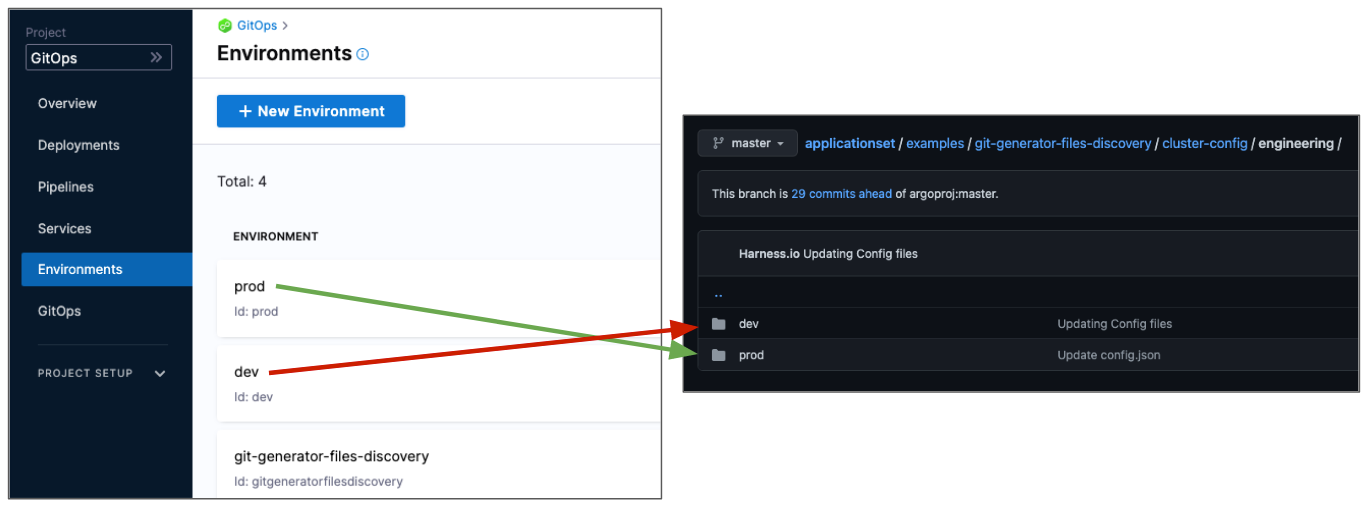
We use the same names so that when we select a Harness environment we can pass along the same name as the target folder. The path to your two config.json files would be the following-
examples/git-generator-files-discovery/cluster-config/engineering/dev/config.jsonexamples/git-generator-files-discovery/cluster-config/engineering/prod/config.json
Now, let's create Harness environments for each of the target environments - dev and prod.
Create Harness environments for each target environment
An environment logically corresponds to your dev, staging, or production environments. Ideally, your ApplicationSet configuration files would differ on the basis of the environments they would deploy to.
To create a dev environment, do the following:
- In your Harness project, select Environments.
- Select New Environment.
- Do the following, and then select Save:
- Name Enter
dev. - Environment Type: Select Pre-Production.
- Name Enter
The new environment is created. Similarly, create another environment prod and select Environment Type as Production.
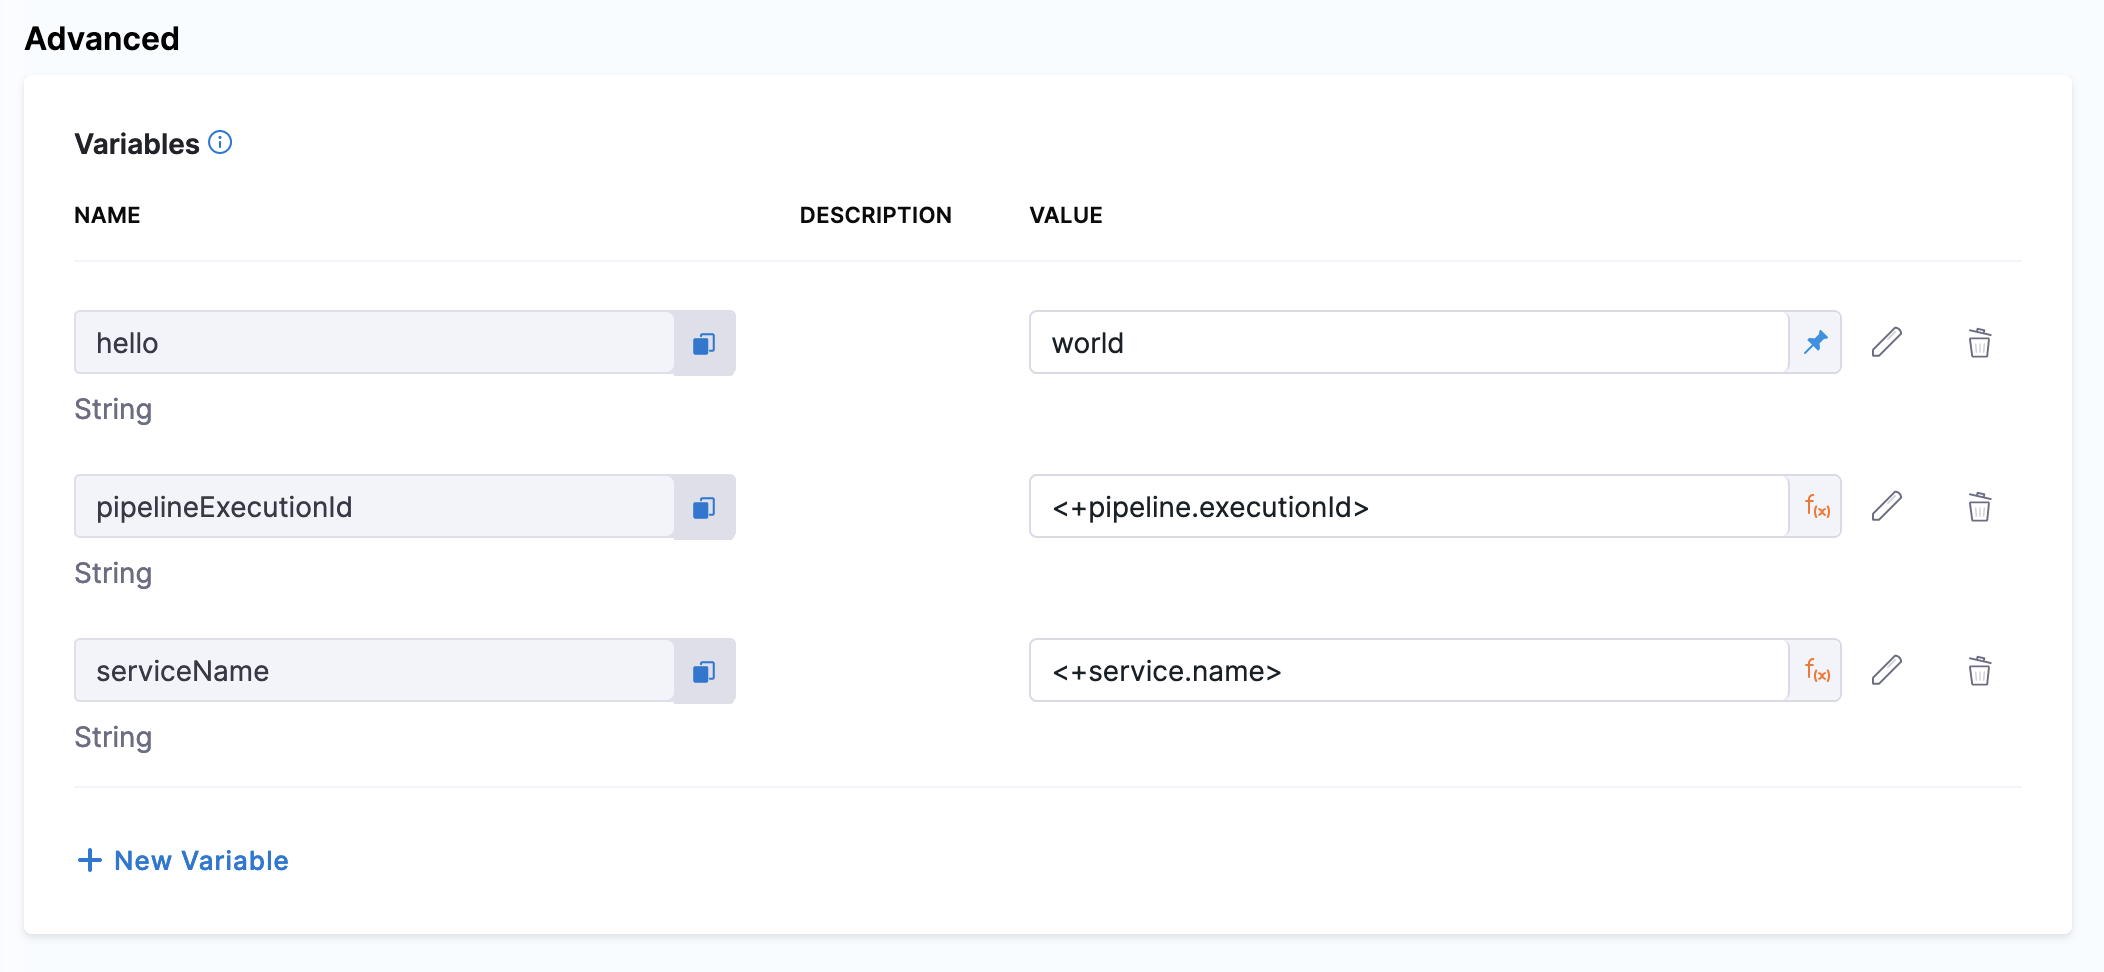
Create a variable for JSON key-value pair to be updated
Next, we'll add a variable for the JSON key-value we will be updating.
-
In Advanced, in Variables, click New Variable Override.
-
In the variable Name, enter asset_id and click Save.
The
asset_idname is a key-value in theconfig.jsonfiles for both dev and prod: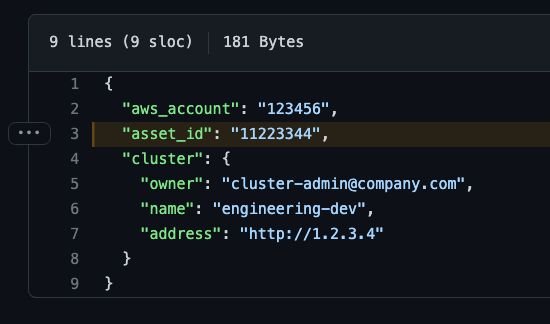
-
For variable Value, select Runtime Input:

Later, when you run the pipeline, you'll provide a new value for this variable, and that value will be used to update the
config.jsonfile.
Repeat this process for the prod environment.
Linking GitOps clusters to the Harness environments
Before updating your application's config.json values, Harness also resolves the GitOps clusters in which your application is deployed. The referenced cluster is the same cluster you created when you deployed your application. You do not need to create any new entities in Harness.
Once you link GitOps clusters to an environment, whenever you select an environment in a pipeline, you can select the environment's linked GitOps clusters. This ensures that you can control where applications are to be updated even within the same environment.
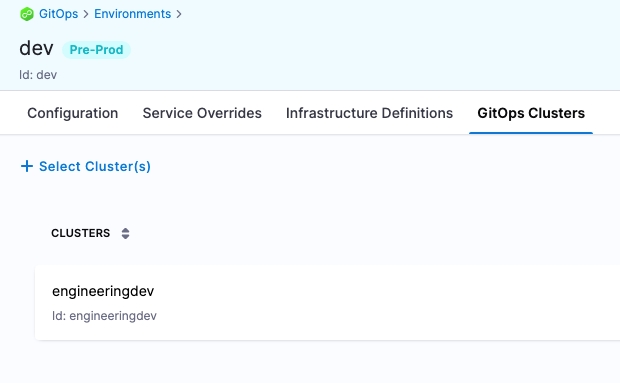
Link the engineering-dev GitOps cluster to the dev environment and engineering-prod GitOps cluster to the prod environment.
To link the Harness GitOps clusters with the dev environment, do the following:
- Click GitOps Clusters.
- Click Select Cluster(s).
- Select engineering-dev.
- Click Add.

The Harness GitOps cluster is now linked to the environment.
Similarly, link the engineering-prod GitOps cluster to the prod environment.
You can link multiple clusters to a single environment.
Create a Harness service
A Harness service logically corresponds to a microservice/application template in an ApplicationSet. Together with the environment and cluster entities, Harness resolves application config.json files in a Git repository to update manifest values through PR pipelines.
The path to the config.json files will be specified in the service and will use the expression <+env.name>.
examples/git-generator-files-discovery/cluster-config/engineering/<+env.name>/config.json
At runtime, this expression resolves to the Harness environment you selected. When you run the pipeline, you'll select which environment to use, dev or prod, and Harness will use the corresponding Git folder and update that application only.
Optionally, you can also specify the config.json path in your ApplicationSet and service to resolve based on clusters:
examples/git-generator-files-discovery/cluster-config/engineering/<+env.name>/<+cluster.name>/config.json
Your actual directories in Git, say within your environment folder dev, would then need to look like this:
examples/git-generator-files-discovery/cluster-config/engineering/dev/cluster1/config.json
examples/git-generator-files-discovery/cluster-config/engineering/dev/cluster2/config.json
Harness can then resolve which directory to traverse during runtime and update only those applications that are deployed in a particular cluster, for example cluster1. This is similar to how environments are resolved using the <+env.name> expression.
Next, we'll create a Harness service that points to the config.json files in the Git directories.
- In your Harness project, select the Services tab.
- Select New Service.
- In Name, enter PR Example.
- In Manifests, select Add Release Repo Manifest.
- In Release Repo Store, select the Harness Git connector to the repository which contains your
config.jsonfiles. If you do not already have this configured, you will need to create a connector to your repository.
For information on setting up a Harness Git connector, go to Connect to a Git repository.
Specify Release Repo manifest details
Now we'll define the manifest to use for the PR pipeline. We'll use the path to the config.json files. We'll use the expression <+env.name> in the path so that we can dynamically select the path based on the Harness environment we select: dev or prod.
In Manifest Details, enter the following settings and then click Submit.
-
Manifest Name: enter config.json.
-
Git Fetch Type: select Latest from Branch.
-
Branch: enter the name of the main branch (master, main, etc).
-
File Path: enter
examples/git-generator-files-discovery/cluster-config/engineering/<+env.name>/config.json.Note the use of
<+env.name>.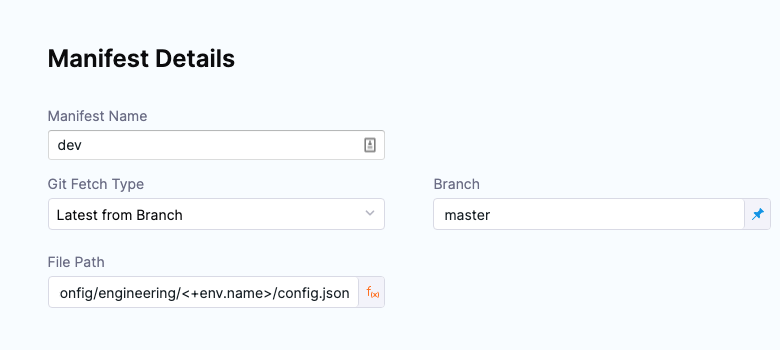
-
Select Submit.
-
In the top-right corner, select Save.
Specify Deployment Repo manifest details
Follow these steps once the Release Repo manifests are correctly configured to specify the path to your ApplicationSet template.
In Manifest Details, enter the following settings and then click Submit.
- Manifest Name: enter Application Set.
- Git Fetch Type: select Latest from Branch.
- Branch: enter the name of the main branch (master, main, etc).
- File Path: enter
examples/git-generator-files-discovery/git-generator-files.yaml. - Select Submit.
- In the top-right corner, select Save.
You have now successfully configured a Harness service for your PR pipeline.
Configure variables in a Harness service/environment (optional)
For updating the config.json or config.yaml values, Harness supports variables in the Update Release Repo step. If you want to enforce common values at the service or environment level of your ApplicationSet, you can use service or environment variables.
Values from the Update Release Repo step have a higher priority than service or environment variables.
For checking the override priority for these service and environment variables, go to Override Priority.
The following process is applicable to both services and environments. This example uses services:
-
In your Harness project, select Services.
-
Select your service, and then select Configuration.
-
Under Advanced, select New Variable.
-
Enter the name and value for your variable, and then select Save.
These variables are now part of your PR pipeline and manifests will be updated accordingly.
Create the PR pipeline
Finally, create the Harness PR pipeline by following these steps-
-
In your Harness project, click Pipelines.
-
Click Create a Pipeline.
-
In Create new Pipeline, enter the name PR Pipeline, and then click Start.
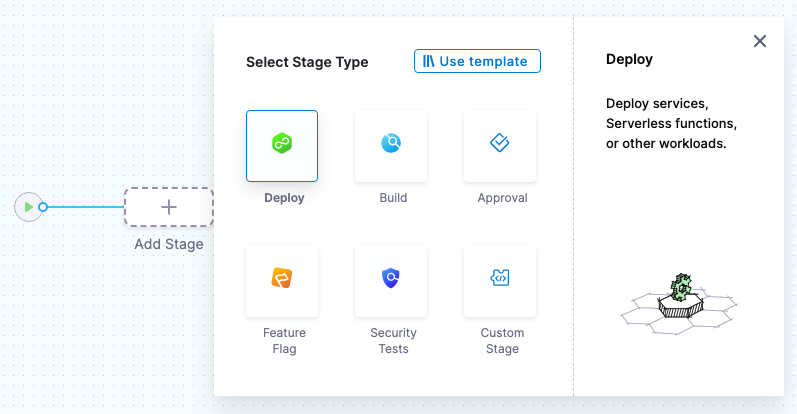
-
Click Add Stage, and select Deploy.
-
Enter the following and click Set Up Stage:
- Stage Name: enter PR Example.
- Deployment Type: select Kubernetes.
- Enable the GitOps option.
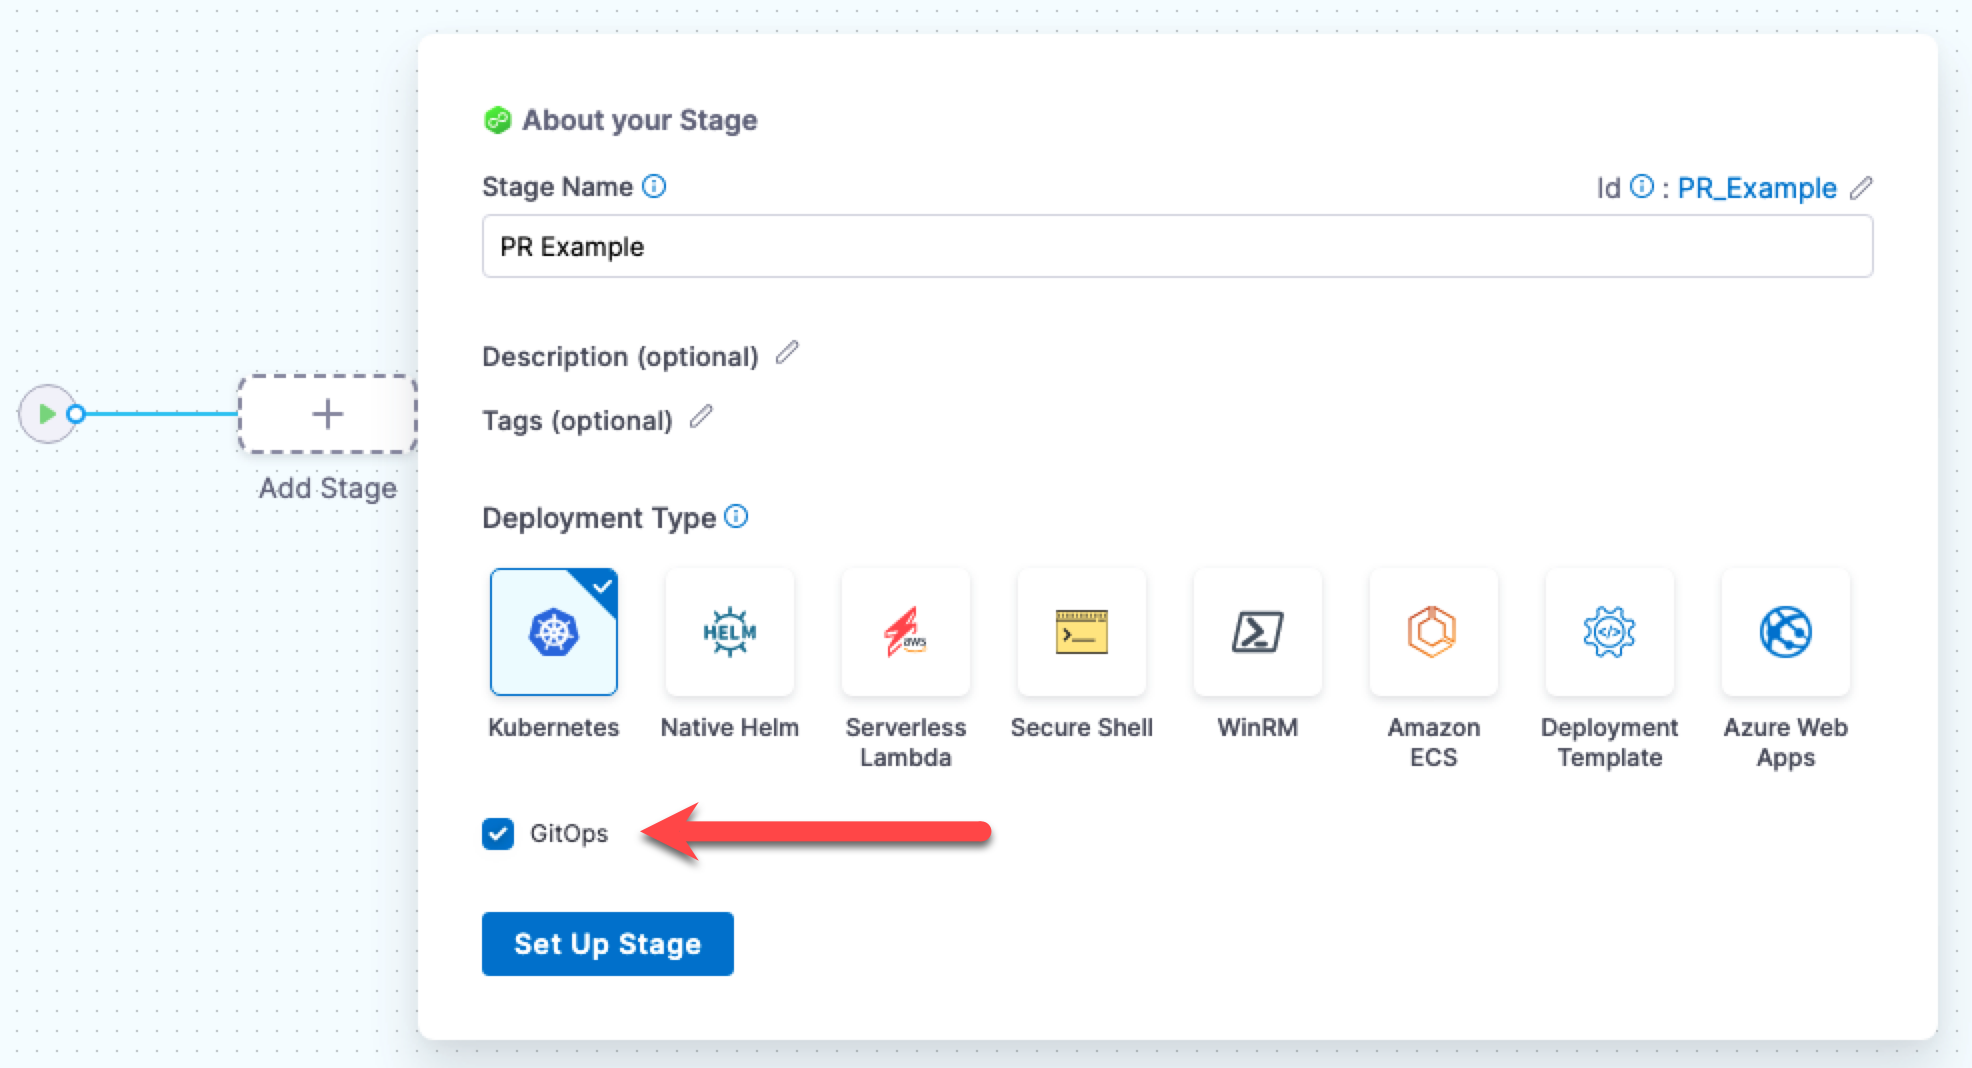
The stage is created and the service settings appear.
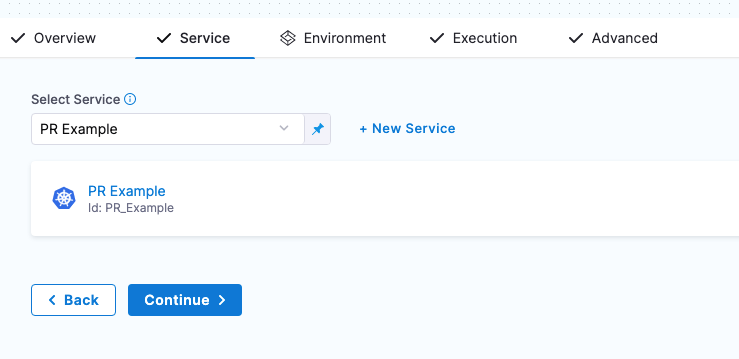
-
Please select the service that you have already configured.
-
For the stage environment, we'll use a Harness runtime input. When you run the pipeline, Harness will prompt you for a value for the environment. You can select the environment you want to use for the PR.
-
Set Specify environment or environment group as a runtime input.
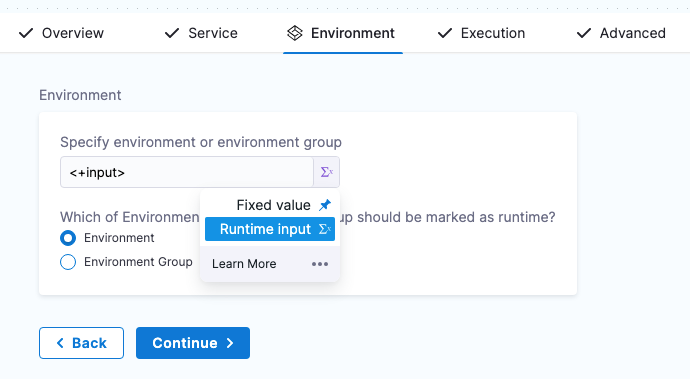
-
Click Continue.
-
Review execution steps
In Execution, Harness automatically adds a few common PR pipeline steps. These steps and other PR pipeline steps, are briefly described below.
Harness automatically adds the Update Release Repo, Merge PR and Fetch Linked Apps Steps, which are ready to be run without any configuration. However, to further customize these steps or add other optional steps, please refer to Harness GitOps pipeline steps.
Update Release Repo step
This step fetches your JSON files, updates them with your changes, performs a commit and push, and then creates a PR.
You can also enter variables in this step to update key-value pairs in the config file you are deploying.
If there is a matching variable name in the variables of the Harness service or environment used in this pipeline, the variable entered in this step will override them.
For more information, please refer to Update Release Repo step.

Merge PR step
This step simply merges the new PR.
Fetch Linked Apps step
The Fetch Linked Apps step provides app information, such as the app name, agent identifier, and URL to the Harness GitOps app.
Configuring the Deployment Repo manifest in your service is required for this step to execute correctly.
This information is displayed on the Output tab of the step.
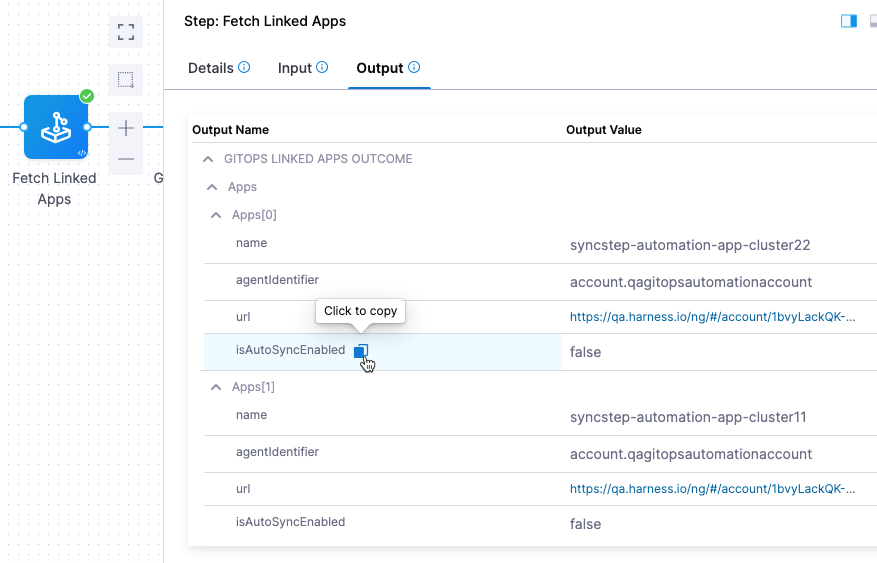
You can copy the expression for any output in the Output Name column and use it to reference the output value in a subsequent Shell Script step or step setting.
Revert PR
This step reverts the commit passed and creates a new PR. Use this step if you want to run any tests or automation on the pipeline and then revert the commit done by the Update Release Repo step.
The Revert PR step uses the commitId of the Update Release Repo step as input. The commitId can be an expression, runtime input, or a static value. For example, <+pipeline.stages.deploy.spec.execution.steps.updateReleaseRepo.updateReleaseRepoOutcome.commitId>.
The Revert PR step creates a new branch and creates a commit to revert the changes done in the Update Release Repo step commit.
You can create another Merge PR step to merge the Revert PR step.
You can create a maximum of two Merge PR steps in a stage.
Run and verify the PR pipeline
Now your PR pipeline is ready.
-
Click Save, and then click Run.
-
In Run Pipeline, in Specify Environment, select the dev Environment.
-
In Environment Variables, for asset_id, enter the value
12345678. -
In Specify GitOps Clusters, select the engineeringdev cluster.
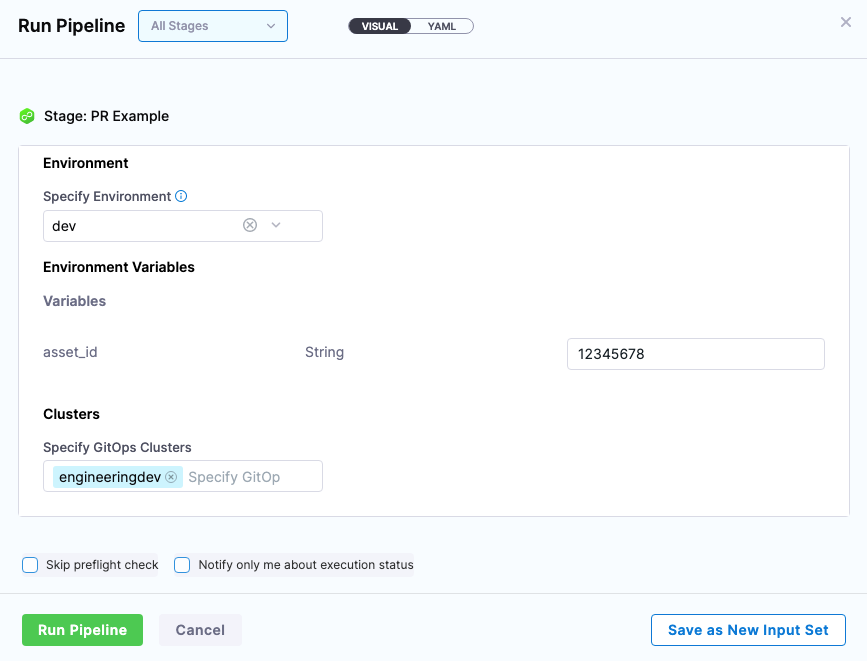
-
Click Run Pipeline.
You can review the deployment steps in real-time.

Here's an example of each step:
- Service:
Starting service step...
Processing service variables...
Applying environment variables and service overrides
Processed service variables
Processed artifacts and manifests
Completed service step
- GitOps Clusters:
Environment(s): {dev}

Processing clusters at scope PROJECT
Following 1 cluster(s) are present in Harness Gitops
Identifiers: {engineeringdev}

Following 1 cluster(s) are selected after filtering
Identifiers: {engineeringdev}

Completed
- Update Release Repo:
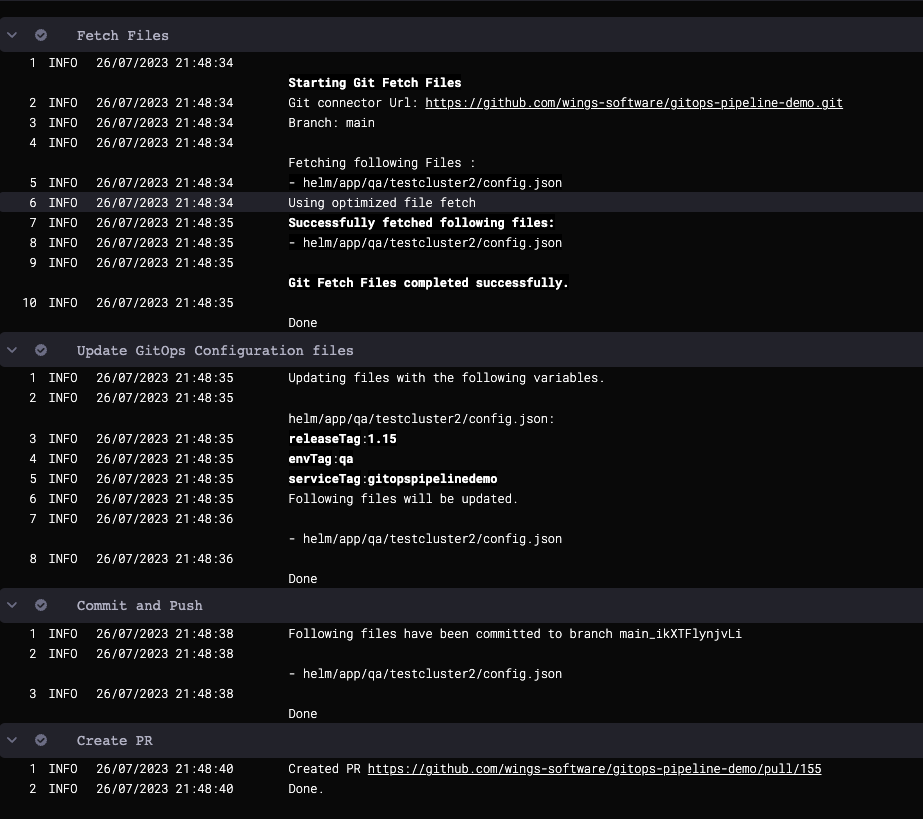
- Merge PR:
PR Link: https://github.com/wings-software/gitops-pipeline-demo/pull/155
Pull Request successfully merged
Commit Sha is bcd4f2f73a47b74dba54habbcd10a6679ed99a
Done.
- Revert PR:
Setting git configs
Using optimized file fetch
Created revert PR https://github.com/wings-software/gitops-pipeline-demo/pull/156
Done.
- Merge PR_1:
PR Link: https://github.com/wings-software/gitops-pipeline-demo/pull/156
Pull Request successfully merged
Commit Sha is da3c393560bf5e831a7b4fa123456c1eafb989ac
Done.
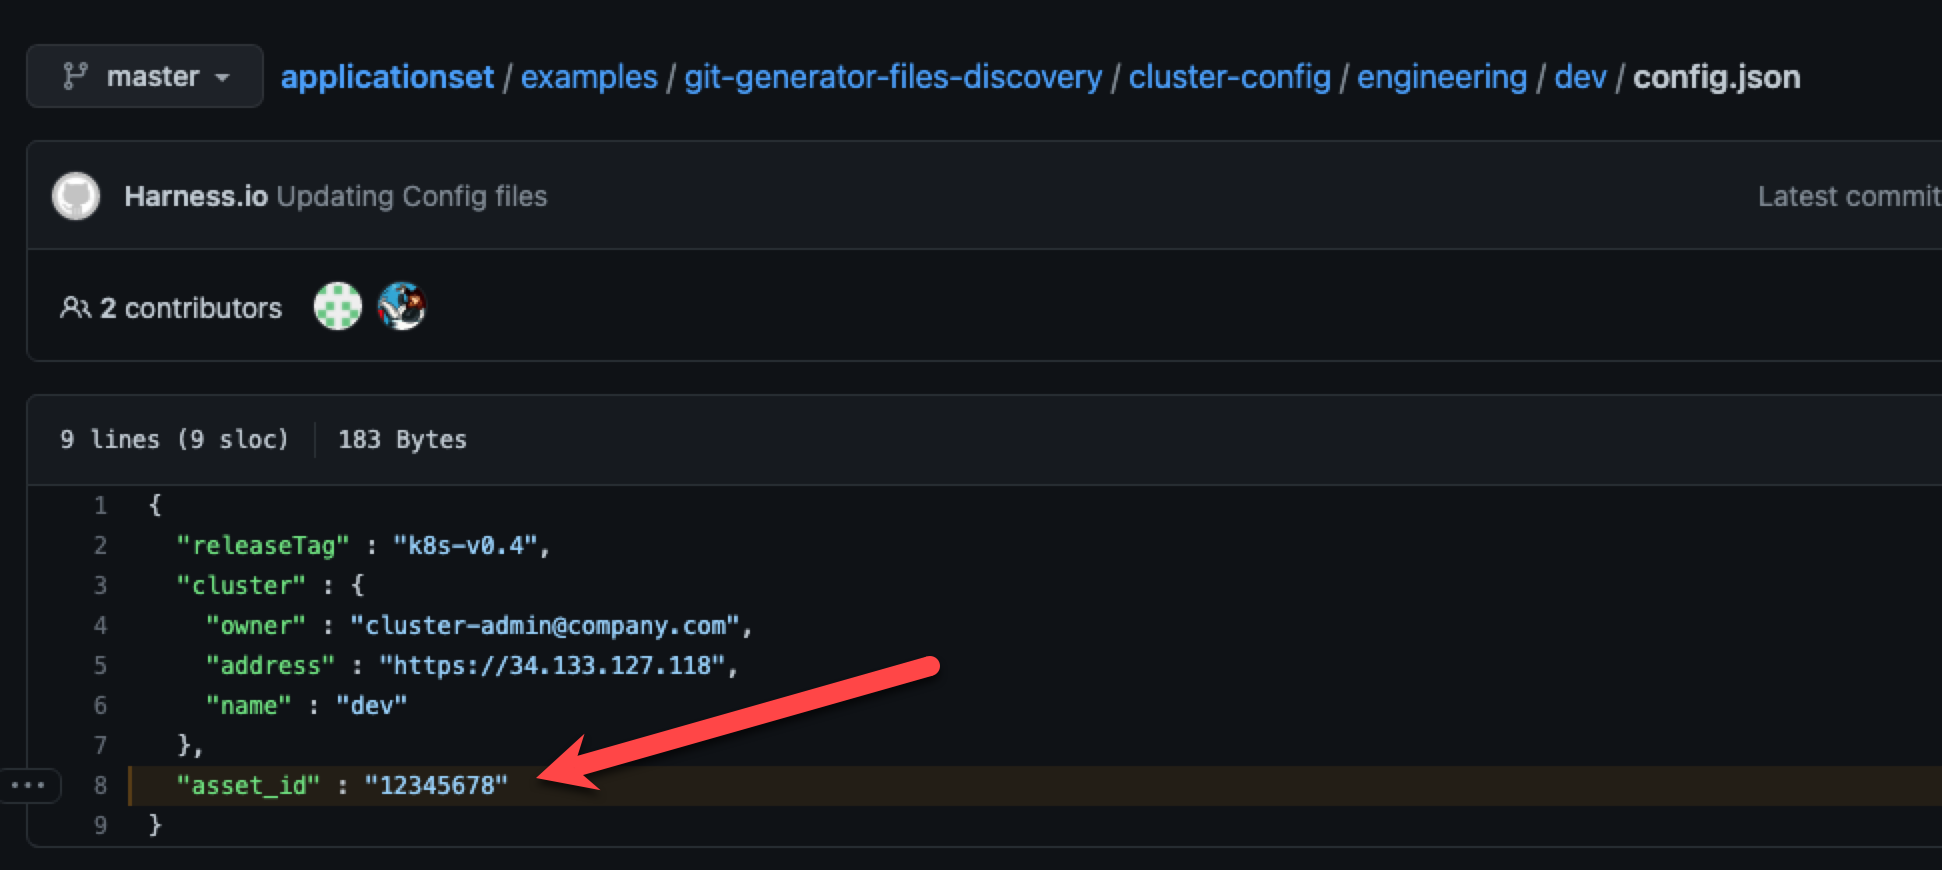
- Check the repo to see that the
config.jsonfile for the dev environment has been updated with the new asset_id value:
Congratulations! Your PR Pipeline was successful.