Command step
The Command step can be used in SSH and WinRM deployments to run commands on all target hosts.
You can run a script on all hosts, download the deployment artifact, or copy the artifact or config.
You can also use the Command step on deployment template deployments. Since a deployment template can be used on any host type, the Command step can only be run on the delegate.
The Command step mandates the use of a repeat looping strategy even if you want to deploy to a single server.
Command step summary
Let's review the details of the Command step.
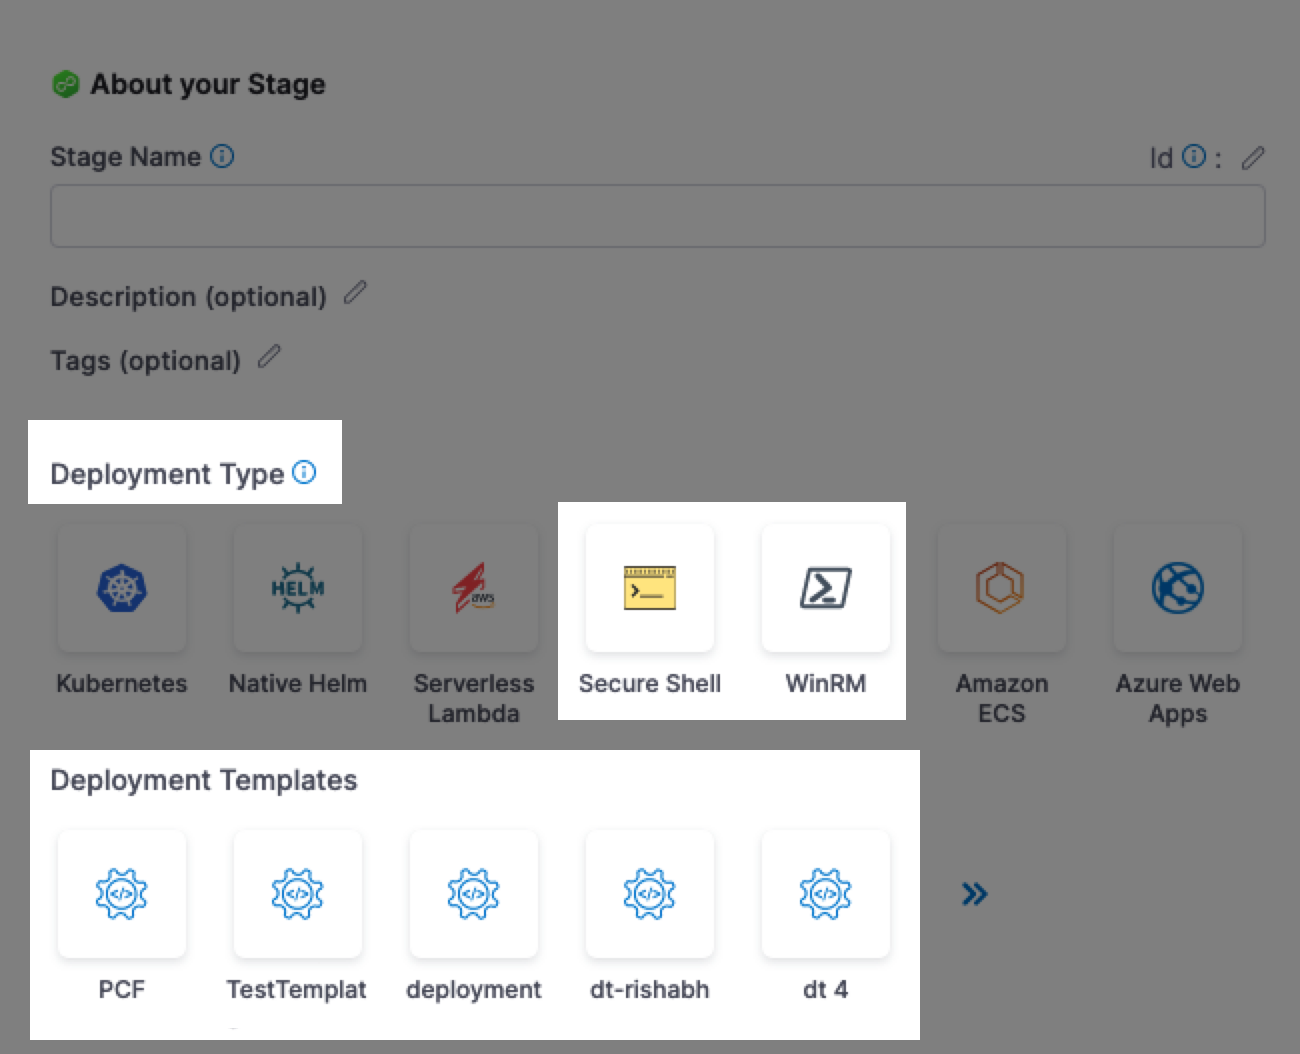
Deployment types
The Command step can be added to SSH, WinRM, and deployment template deployment types.
SSH and WinRM
For SSH and WinRM, the Command step(s) is added automatically when you select the deployment strategy.
Also, the looping strategy needed to run the Command step on each target host is set automatically to Repeat.
The Command step only supports the Repeat looping strategy. This includes scenarios where you only want to deploy to a single server.
You can edit or add any automatically-added Command step.
For more information, go to:
Deployment templates
For deployment templates, you can add a Command step to the template itself or anywhere in the execution.
Since a deployment template can be used on any host type, the Command step can only be run on the delegate. You must use the Run on Delegate option in the step.
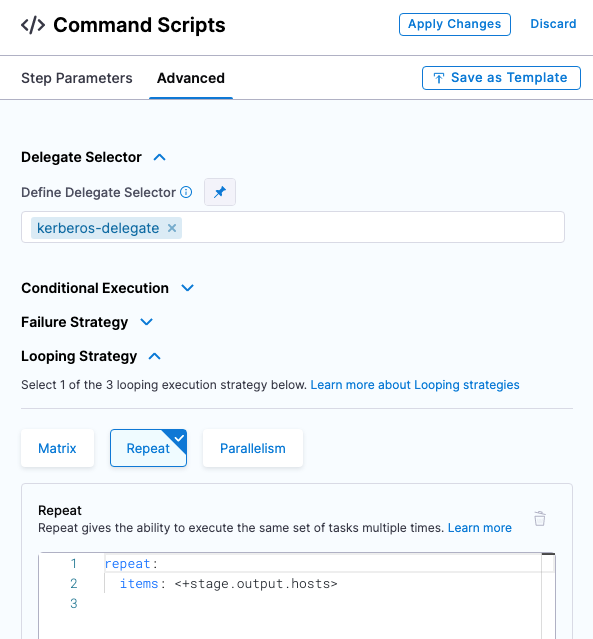
To run the Command step on all the fetched hosts, you must put the Command step after the Fetch Instances step and use the repeat looping strategy and expression <+stage.output.hosts>:
repeat:
  items: <+stage.output.hosts>

If you want to deploy to a single server, you can:
Specify your host explicitly:
repeat:
  items: ["0.0.0.0"]
Or with runtime values:
repeat:
  items: <+pipeline.variables.test123>.split(",")
For the download artifact and copy the artifact/config commands, you do not need the looping strategy. These commands should be run once on the delegate. These commands will download the artifact and copy the artifact/config to the delegate only, not the target hosts.
For a script command, you might want to run the script for each instance that was output from the Fetch Instance step. In this case, using the looping strategy.
Command types
The following command types are supported:
- Download artifact
- Copy artifact or config
- Script
The WinRM deployment type supports Download Artifact only. You cannot use the Copy command type with Artifact in WinRM deployments.
These are discussed in detail below.
Artifact metadata only
Harness services allows you to identify artifacts using their metadata. At deployment runtime, Harness uses the metadata to copy or download the artifact to the target hosts/containers.
Copy vs download
Let's review the differences between the copy artifact/config and download commands.
- Download: At deployment runtime, the Harness Delegate executes commands on the target host(s) to download the artifact directly to the target host(s). The delegate must have access to the target host(s) and the target host(s) must have network connectivity to the artifact server.
- Copy: During deployment runtime, Harness uses the metadata to download the artifact to the Harness Delegate. The delegate then copies the artifact to the target host(s).
The delegate must have network connectivity to the artifact server and target hosts.
Here is the difference in how Harness performs a copy and download.

Add the Command step
The Command step can be added to SSH, WinRM, and deployment template deployment types.
-
In the stage Execution, select Add Step.
-
Select Command.
-
In Name, enter a name for the command.
-
In Timeout, enter how long Harness should wait before failing this step and initiating the failure strategy.
-
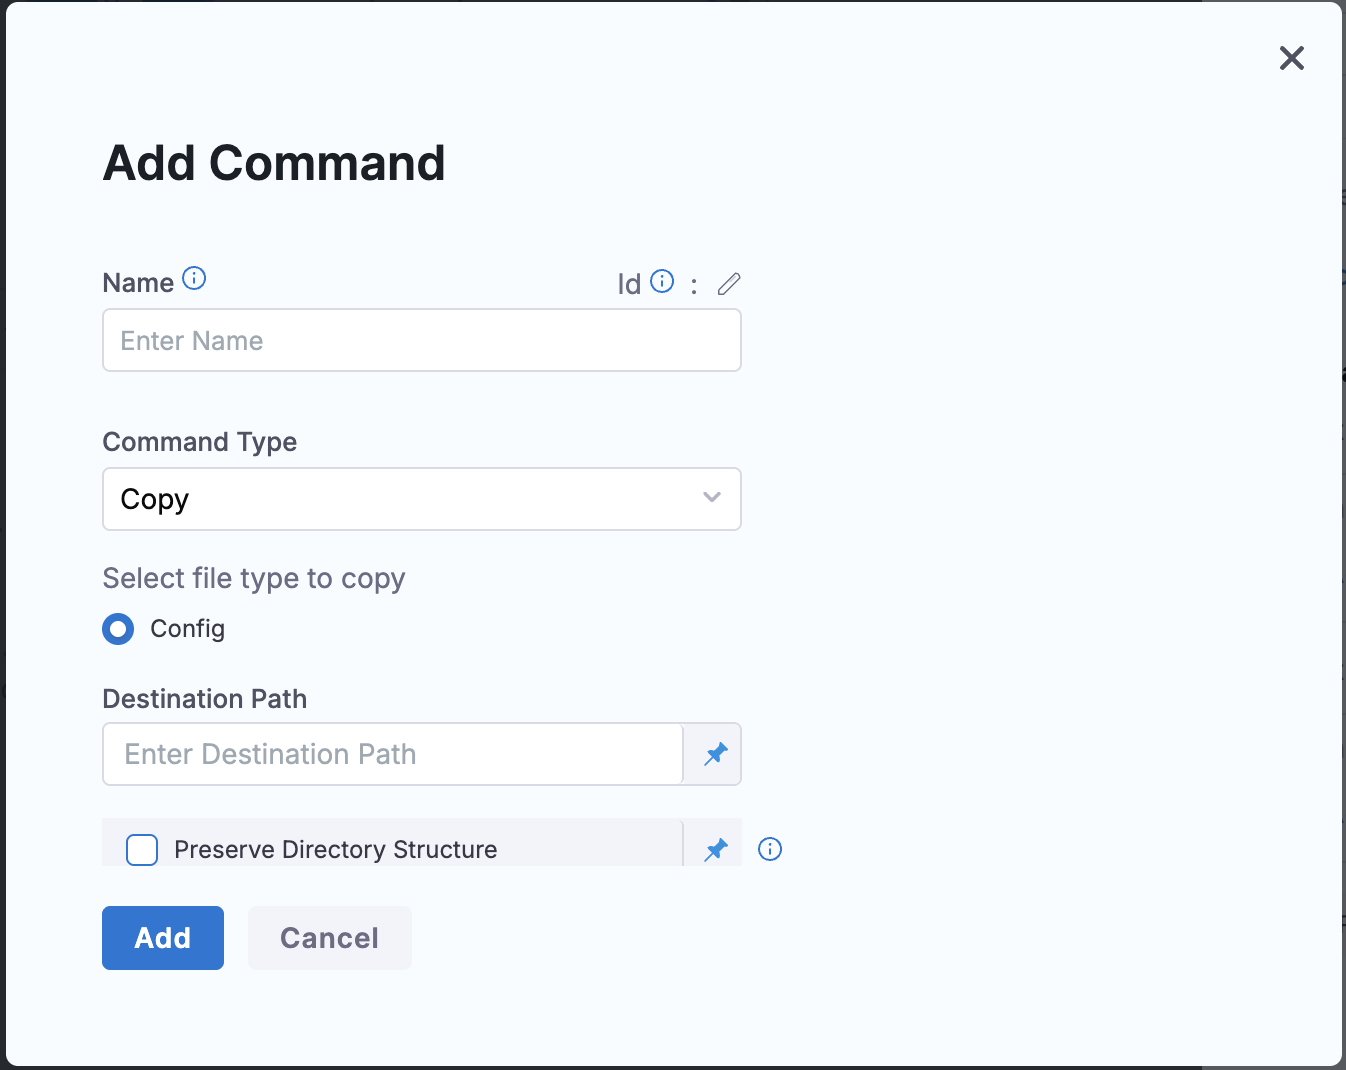
In Run the following commands, select Add Command.
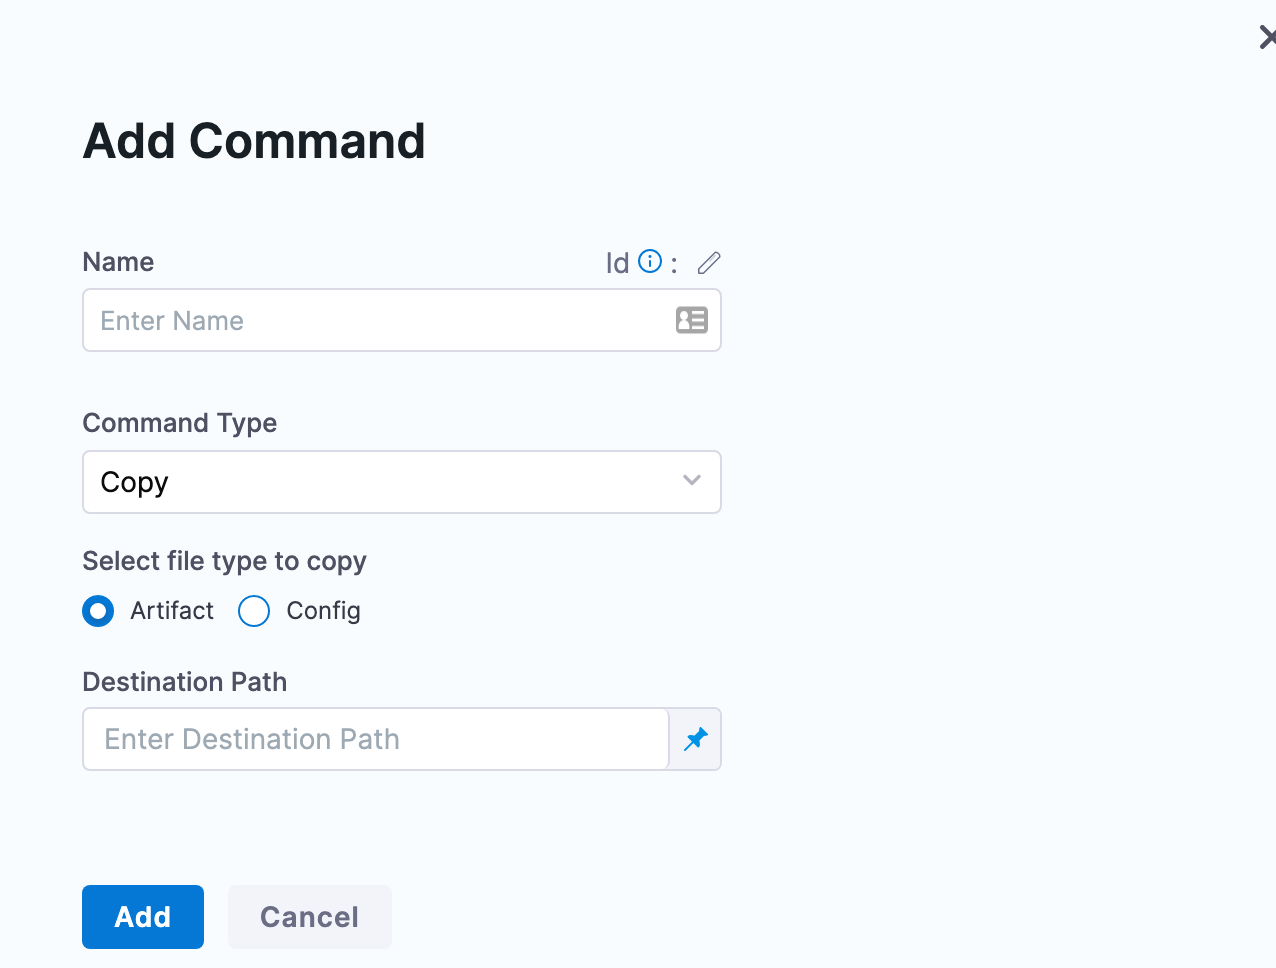
-
Name the command and then select the Command Type.
The settings for the different command types are described below.
Download an artifact
The deployment artifact for the stage is set in the Service of the stage.
Using the Download command type, you can download the deployment artifact onto the target hosts of the deployment.
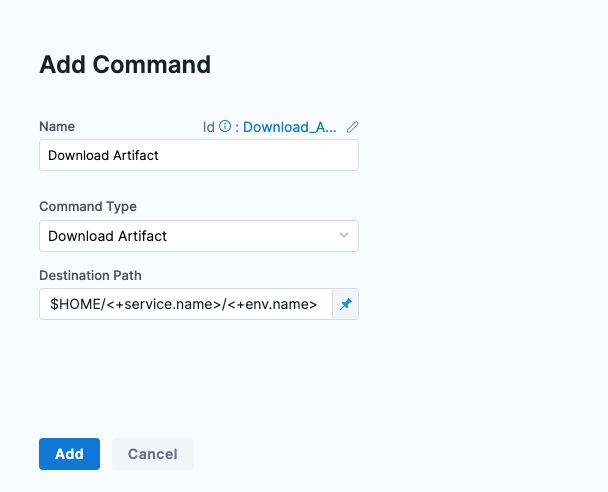
You can set where you want to download the artifact in Destination Path.
Ensure the directory mentioned in the Destination Path exists before executing the step to avoid step failure.
For SSH or WinRM deployments, the path $HOME/<+service.name>/<+env.name> is added automatically when you select the execution strategy for the stage.
For example, a destination path for a stage that deploys todolist.war using a service named tutorial-service-ssh2 to an environment named ssh-tutorial-env will look like this:
$HOME/tutorial-service-ssh2/ssh-tutorial-env/todolist.war
- Always use
$in the beginning of the path when you reference an environment variables in a Command step. - Harness pipeline and stage variables are automatically added as environment variables during execution in the Command step.
You can use any path on the target hosts you want. Harness will not create the path if it does not exist.
Here's an example of the results of a download command:
Downloading artifact prepares the script to run on host instances using curl. In case of Bash and Invoke-WebRequest for PowerShell, the configured artifact file path must not contain any spaces.
Deployment Templates: to run the download command on the target hosts, add the command after the Fetch Instances step. Go to looping strategy and target hosts below for more information
Download artifacts with a proxy
In order to support the download artifacts by using the proxy settings on remote hosts, the follow environment variables needs to be set on the target machine (host).
HARNESS_ENV_PROXY: boolean value for whether or not the proxy is used.HTTP_PROXY: the proxy URL.

In Harness, the artifact should be added to the Harness service and the Download Artifact command type in the Command step.
The Destination Path should be set to the location where the artifacts will be downloaded on the target machine. The destination path should exist on the target machine.

While the pipeline is running, you will see Using HTTP_PROXY environment variable log message for the Download Artifact command type. This message indicates that the proxy is used on the target machine.

Copy an artifact or config
The WinRM deployment type supports Download Artifact only. You cannot use the Copy command type with Artifact in WinRM deployments.
The following section is for SSH deployments only.
The deployment artifact for the stage is set in the service definition Artifacts section.
Using the Copy command type, you can copy the deployment artifact onto the target hosts of the deployment.
The deployment config file(s) for the stage is set in the service definition Config Files section.
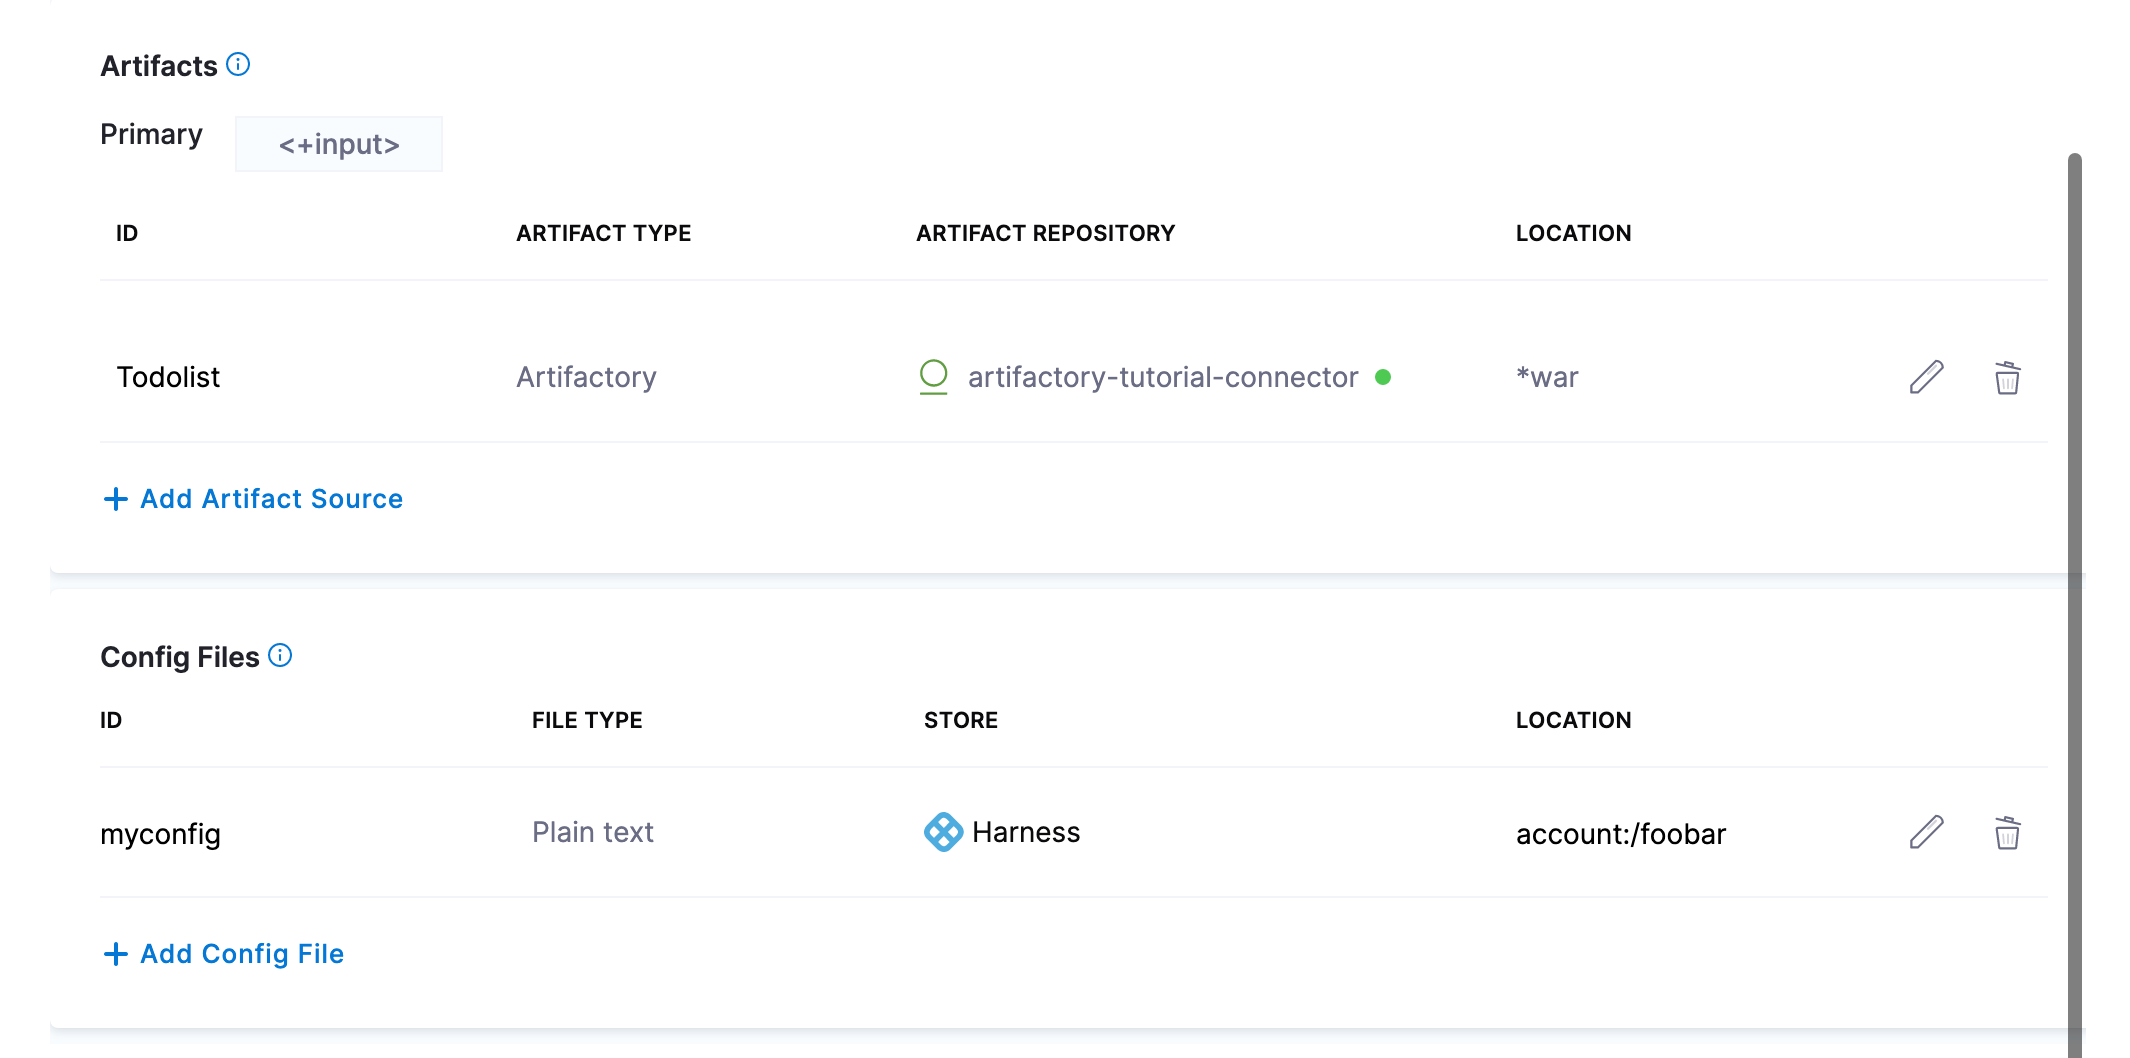
- In Select file type to copy, select Artifact or Config.
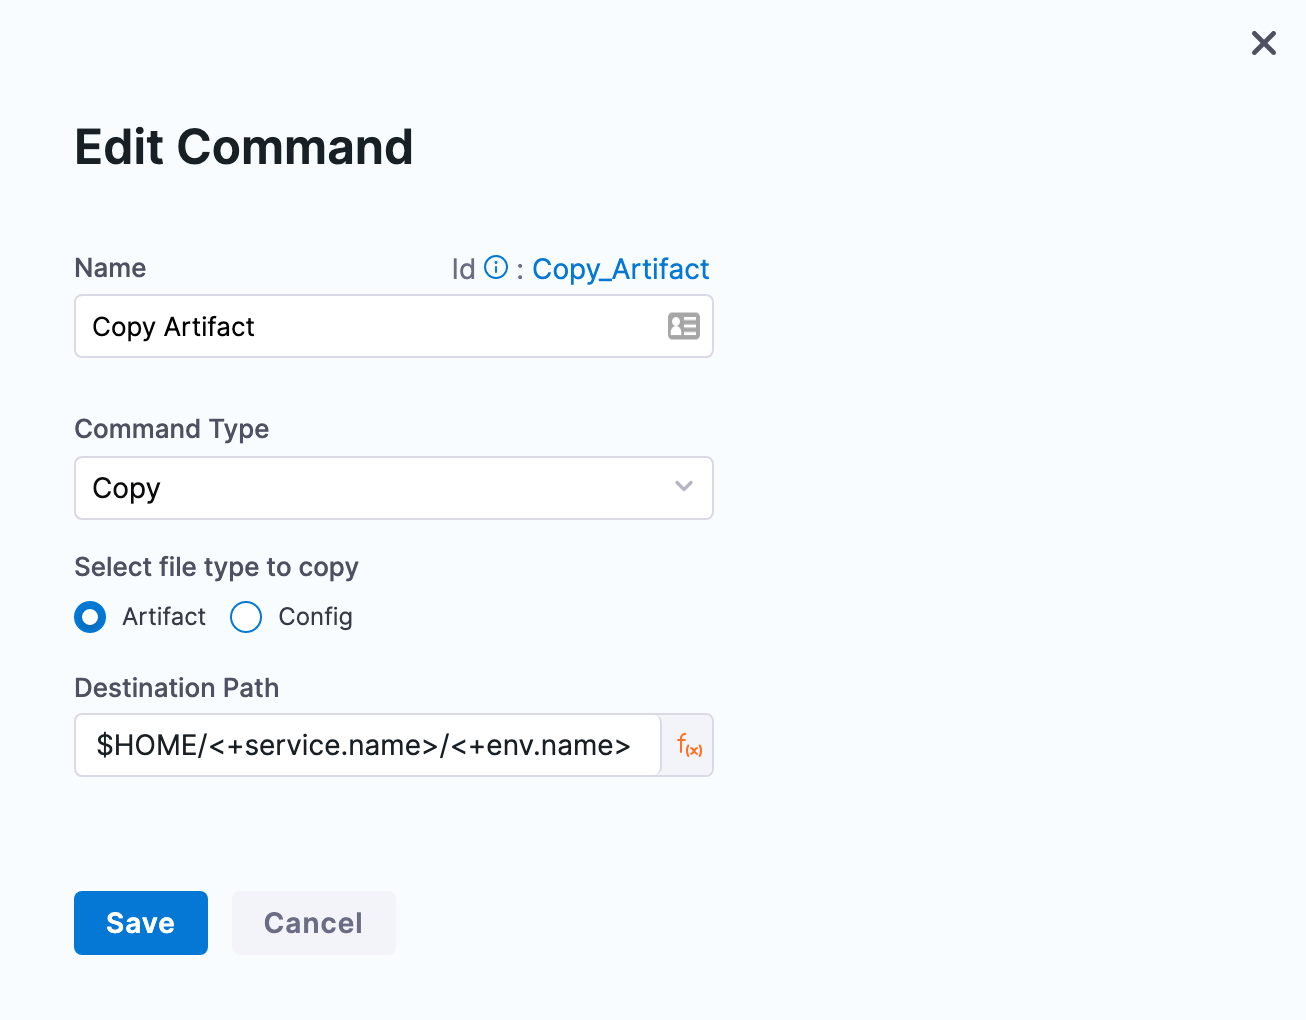
You can set where you want to download the artifact in Destination Path.
For SSH or WinRM deployments, the path $HOME/<+service.name>/<+env.name> is added automatically when you select the execution strategy for the stage.
For example, a destination path for a stage that deploys todolist.war using a service named tutorial-service-ssh2 to an environment named ssh-tutorial-env will look like this:
$HOME/tutorial-service-ssh2/ssh-tutorial-env/todolist.war
You can use any path on the target hosts you want. If the parent directory of the path exists, then the sub-directory will be created. However, if the parent directory does not exist, the command will fail.
For example, if the path given was /parent-dir/sub-dir, then it would create /sub-dir if /parent-dir existed but would fail if /parent-dir did not exist.
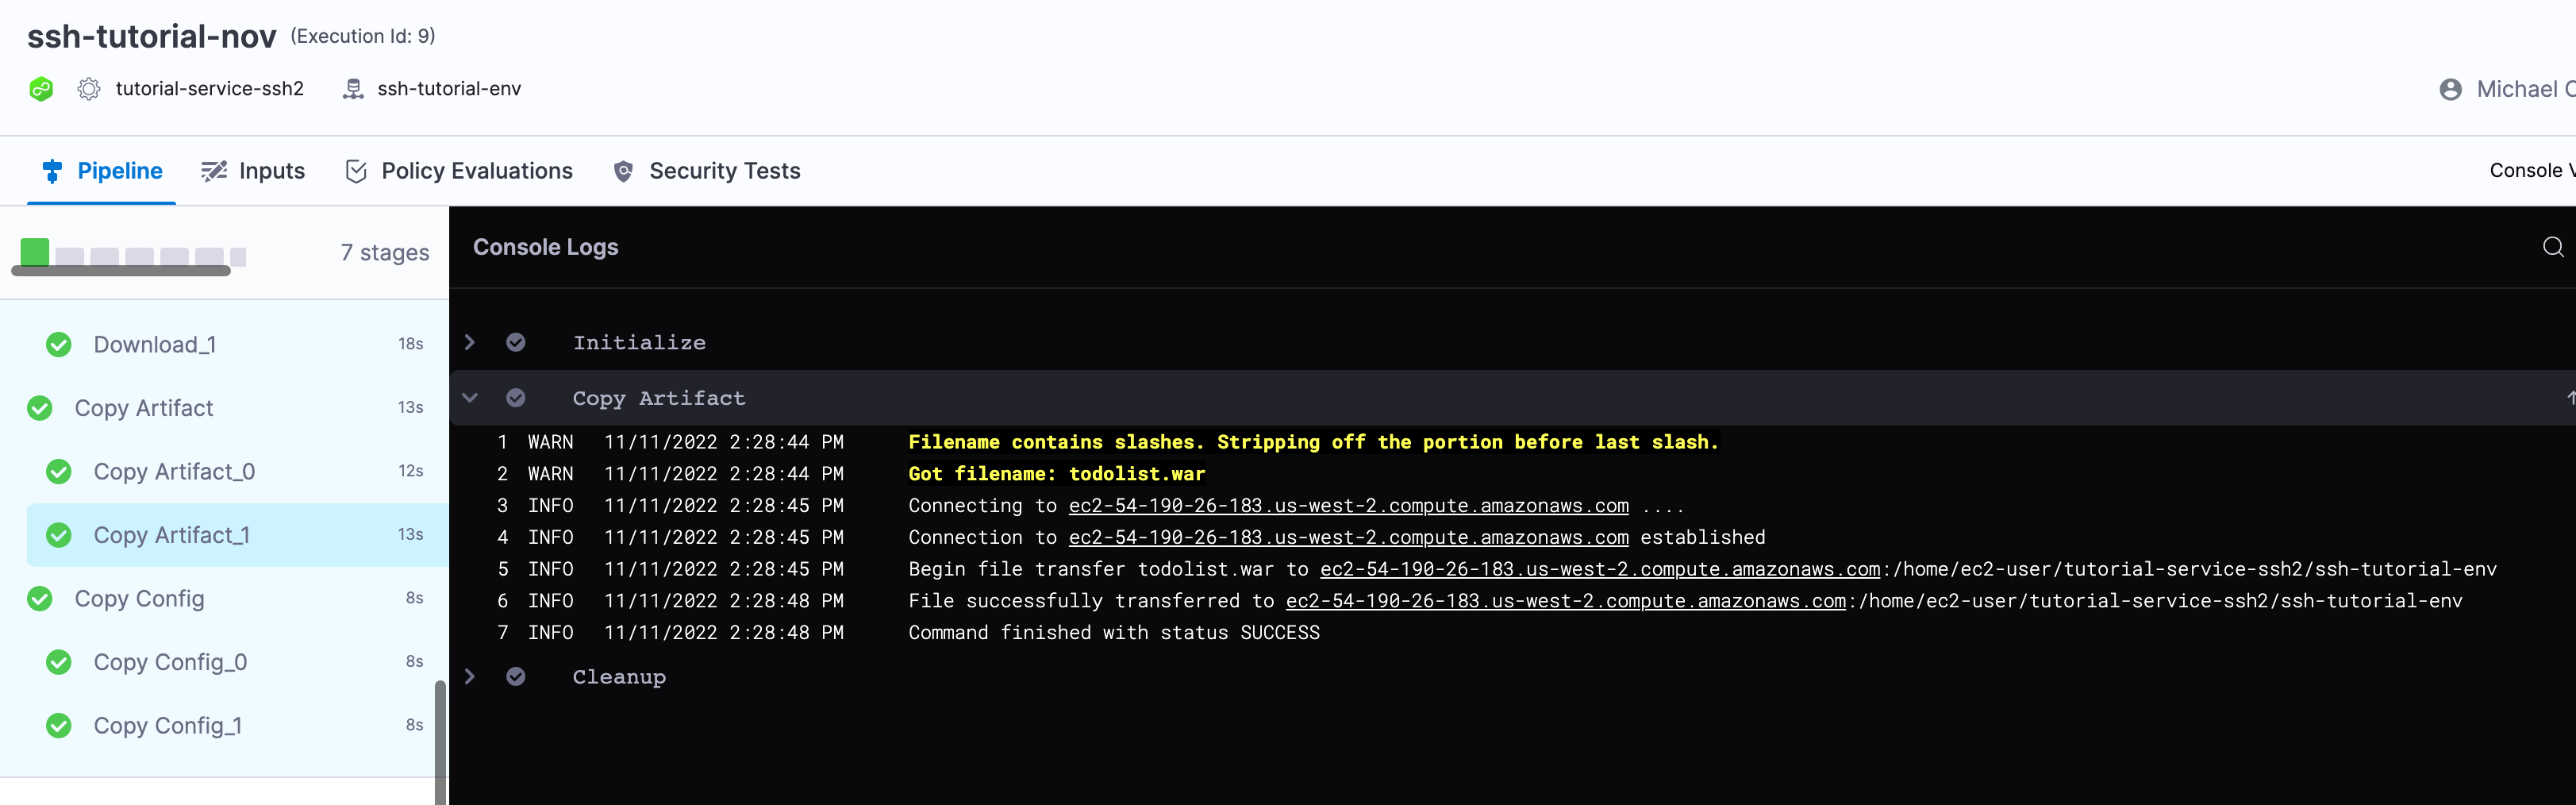
Here's an example of the results of a copy artifact command:
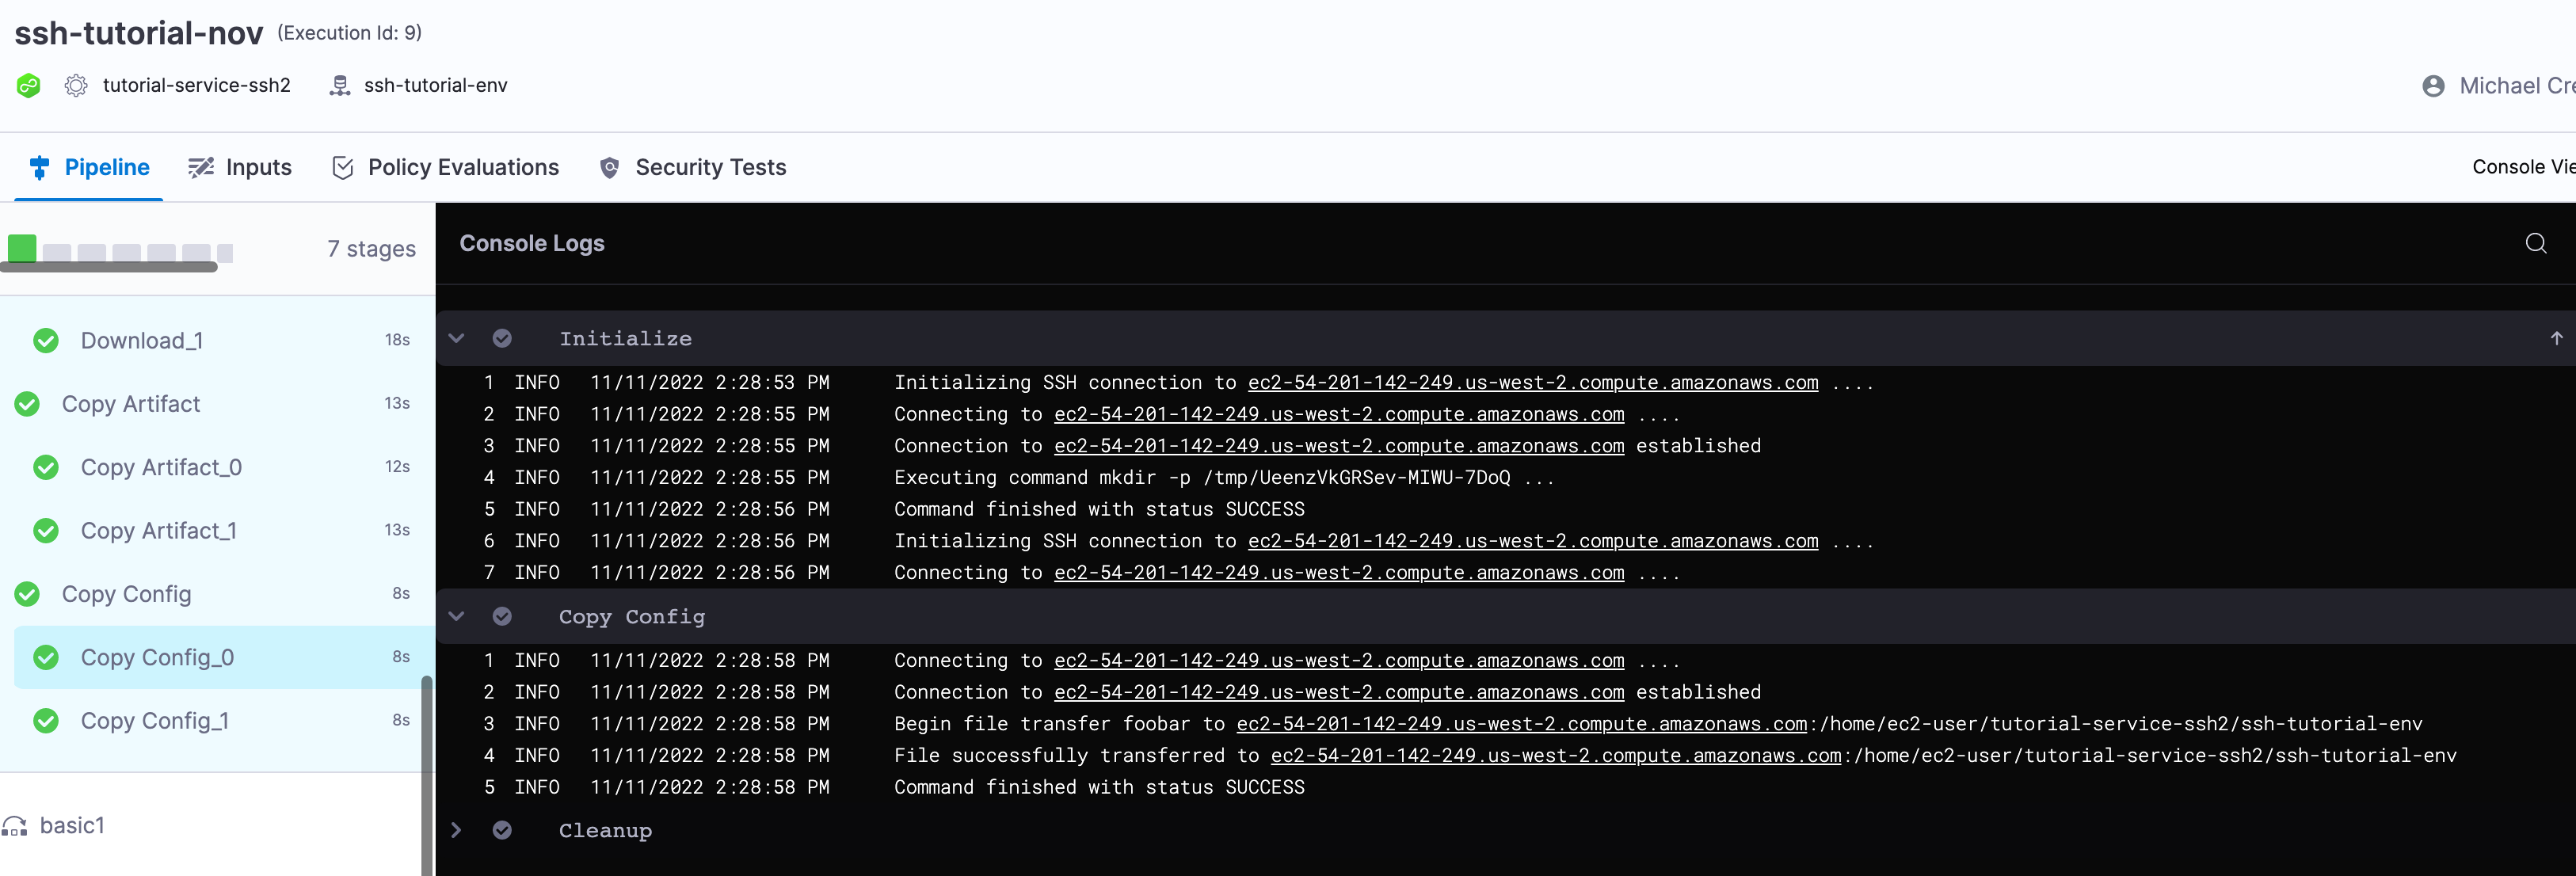
Here's an example of the results of a copy config command:
Deployment Templates: to run the download command on the target hosts, add the command after the Fetch Instances step. Go to looping strategy and target hosts below for more information.
Preserve directory structure when copying config files
When you copy config files that contain nested directories, you can control whether Harness preserves the original directory structure at the destination or copies all files into a single directory.
Prior to this enhancement, the Copy command always flattened all files into a single destination directory. This caused data loss when multiple files shared the same name but existed in different subdirectories.
How it works
The Copy command includes a Preserve Directory Structure checkbox that controls directory structure handling when you copy config files:
- Checked (default): The full directory structure from the source is recreated at the destination. The hierarchy is preserved and file name conflicts are avoided.
- Unchecked: All files are copied directly to the destination directory without subdirectories (flattened structure).
Example: Environment-specific configuration files
Consider a config file directory structure with environment-specific property files:
configs/
└── root/
    ├── env1/
    │   └── env.properties
    ├── env2/
    │   └── env.properties
    ├── env3/
    │   └── env.properties
    ├── log4j2.xml
    └── log4j2.txt
With directory structure preserved (Preserve Directory Structure checked):
The destination maintains the original hierarchy:
<destination-path>/
└── root/
    ├── env1/
    │   └── env.properties
    ├── env2/
    │   └── env.properties
    ├── env3/
    │   └── env.properties
    ├── log4j2.xml
    └── log4j2.txt
Each env.properties file is preserved in its respective subdirectory without conflicts.
With directory structure flattened (Preserve Directory Structure unchecked):
All files are copied to a single directory:
<destination-path>/
├── env.properties   (overwritten - only the last copy remains)
├── log4j2.xml
└── log4j2.txt
Multiple env.properties files overwrite each other, and only the final copy survives.
Configure directory structure preservation
The Preserve Directory Structure checkbox appears in the Add Command dialog when you select Copy as the command type and Config File as the file type.
In YAML, the preserveDirectoryStructure field controls how Harness copies files. Set it to true (the default) to keep the original directory hierarchy, or false to copy all files into a single flat directory.
Copy command with directory structure preservation
steps:
  - step:
      type: Command
      name: Copy Config Files
      identifier: CopyConfigFiles
      spec:
        onDelegate: false
        environmentVariables: []
        outputVariables: []
        commandUnits:
          - identifier: CopyConfigs
            name: CopyConfigs
            type: Copy
            spec:
              sourceType: Config
              destinationPath: /opt/app/config
              preserveDirectoryStructure: true
      timeout: 10m
      strategy:
        repeat:
          items: <+stage.output.hosts>
When you set preserveDirectoryStructure to true, Harness creates subdirectories automatically at the destination.
When to preserve directory structure
Preserve directory structure when your deployment requires hierarchical organization of config files:
- Environment-based configurations: Separate config files for dev, staging, and production environments that share the same filename but contain different values.
- Multi-tenant applications: Configuration files organized by tenant or customer with identical filenames in each tenant directory.
- Modular applications: Component-specific config files stored in separate subdirectories (for example,
auth/config.yaml,database/config.yaml,cache/config.yaml). - Host-level configurations: Group-specific or host-specific settings organized in a directory tree.
Use the flattened structure when you need all config files in a single directory at the destination and file name uniqueness is already guaranteed.
Use a script
You can run a script on all of the target hosts. This is the same as the shell script step.
-
In Working Directory, enter the working directory on the target host(s) from which the Harness Delegate will run the script, such as /tmp on Linux and %TEMP% on Windows. By default, if Working Directory is left empty, the script is executed in the home directory.
-
In Select script location, select Harness File Store or Inline.
-
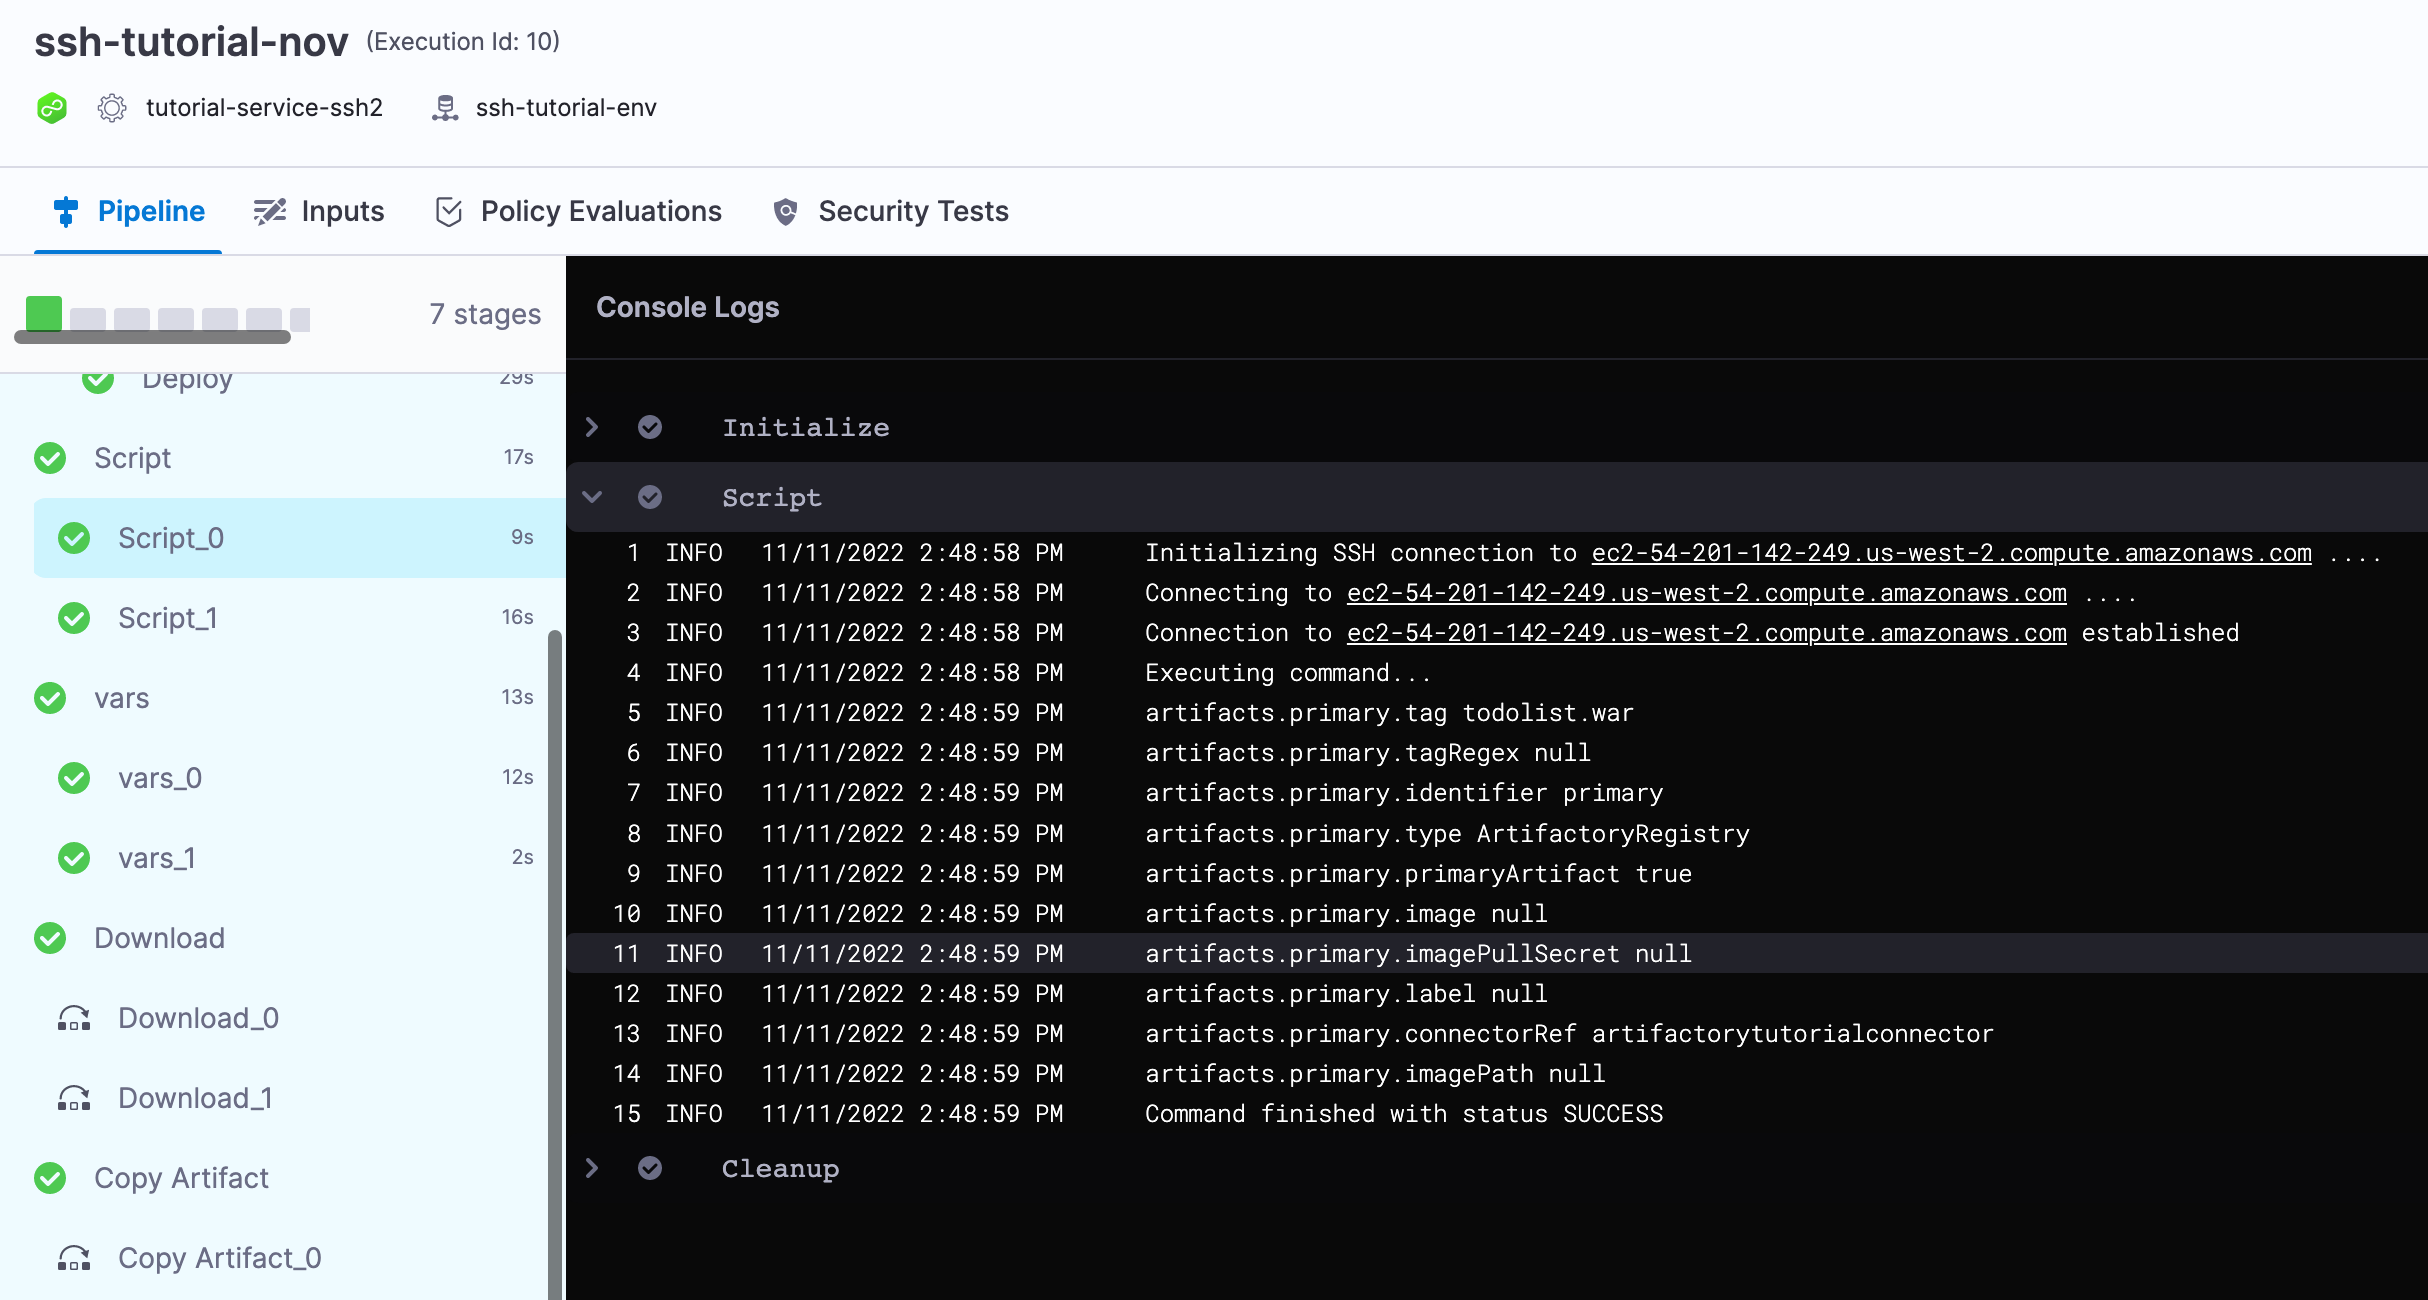
In Command, enter your script. For example, this script echoes artifact information using Harness expressions:
echo "artifacts.primary.tag" <+artifacts.primary.tag>echo "artifacts.primary.tagRegex" <+artifacts.primary.tagRegex>echo "artifacts.primary.identifier" <+artifacts.primary.identifier>echo "artifacts.primary.type" <+artifacts.primary.type>echo "artifacts.primary.primaryArtifact" <+artifacts.primary.primaryArtifact>echo "artifacts.primary.image" <+artifacts.primary.image>echo "artifacts.primary.imagePullSecret" <+artifacts.primary.imagePullSecret>echo "artifacts.primary.label" <+artifacts.primary.label>echo "artifacts.primary.connectorRef" <+artifacts.primary.connectorRef>echo "artifacts.primary.imagePath" <+artifacts.primary.imagePath>Here's an example of an executed script command:
-
Use Files and Patterns to tail files and use the results in your script. For example, check logs and see if a process started successfully and, if so, exit the script.
You specify the file to tail, such asauth.log, and the pattern to search (grep filter), such as198.51.100.1and then in your script you perform an action when the tail output is matched. -
For File to Tail, enter the name of a file in the Working Directory to tail, such as a log file.
-
For Pattern to search, enter the pattern to search for in the file. Harness uses grep on the pattern.
-
Use Deployment Templates to run the download command on the target hosts, add the command after the Fetch Instances step. Go to looping strategy and target hosts below for more information.
Notes on working directory
The working directory for the Command and Shell Script steps is where Harness stores the temporary script files used for running commands on the Harness Delegate and remote hosts. When the execution of the step is complete, the files are deleted.
The default location of the working directory depends on the deployment type of the pipeline stage where the step is run.
Here are the default locations:
%USERPROFILE%: Command step in a WinRM deployment for the Initialize section of the deployment.%TEMP%: The PowerShell Shell Script step for the Initialize section of the deployment, run on the remote host./tmp: PowerShell Shell Script step for the Initialize section of the deployment, run on the Harness Delegate.- /
tmp: Bash Shell Script step for the Initialize section of the deployment, run on the remote host. /tmp: Bash Shell Script step for the Initialize section of the deployment, run on the Harness Delegate.
If you specify a working directory in the script unit in the Command step or in the Working Directory of the Shell Script step, the temporary files with executable scripts will be stored there.
Input variables
While you can declare a variable in your command script using a Harness expression or string for its value, using input variables provides some additional benefits:
- You can more easily identify and manage the Harness expressions used in your script.
- You can template your script.
You can declare the variable using Name and Value in Script Input Variables and then reference the variable in the script just as you would any other variable: $var_name.
You can also use expressions in Value. For example, if you have an output variable from a previous Shell Script step, you can copy it from the executed step Outputs.
In Script Input Variables, you simply select Expression and paste the expression in Value.
In your script, you declare the variable using the Name value.
At deployment runtime, Harness will evaluate the expression and the variable will contain its output.
When using Script Input Variables in a Command Step, avoid setting values that contain newlines.
Harness retrieves environment variables using the printenv command and splits them by newline characters.
If an input variable includes newlines, this parsing may break, leading to unexpected behavior during execution.
Output variables
Output Variables have a maximum size of 512KB. To export variables from the script to other steps in the stage, you use the Script Output Variables option.
Let's look at an example of a script with the variable name:
name=123
The name variable cannot be used outside the script unless you use Script Output Variables.
You do not need to use export for the variables to use them with Script Output Variables. You can simply declare them, like name="123". Export is for using the variables in child processes within the script.In Script Output Variables, in Value, you enter the name of the script variable you want to output (name).
In Name, enter a name to use in other steps that will reference this variable. This is the output variable name that will be used in a Harness expression for referencing the output variable.
The format to reference the output variable can be one of the following:
- Within the stage:
- Referencing the step output:
<+steps.STEP_ID.output.outputVariables.OUTPUT_VARIABLE_NAME>.
- Referencing the step output execution:
<+execution.steps.STEP_ID.output.outputVariables.OUTPUT_VARIABLE_NAME>
- Referencing the step output:
- Anywhere in the pipeline:
<+pipeline.stages.STAGE_ID.spec.execution.steps.STEP_ID.output.outputVariables.OUTPUT_VARIABLE_NAME>
For example, it could be <+steps.Deploy_0.output.outputVariables.newname>.
Output variable notes
- Secret output variables: Harness supports String and Secret output variables in the Command step. Secret output variables are masked in console logs and in step outputs.
- Rollback output variables: If output variables are configured on a Command step in the stage Rollback section, those output variables are used during stage rollback only.
Run on delegate
Use this option to run the command on the delegate instead of the target hosts.
Download and copy commands aren't typically run on the delegate, but a script is not uncommon.
If you do run the step on the delegate, ensure the Destination Path exists on the delegate.
Deployment templates
For deployment templates, use Run on Delegate.
Since a deployment template can be used on any host type, the Command step can only be run on the delegate. You must use the Run on Delegate option in the step.
Looping strategy and target hosts
To run the Command step on all the target hosts, you must use the repeat looping strategy and expression <+stage.output.hosts>:
repeat:
  items: <+stage.output.hosts>
If you want to deploy to a single server, you can:
Specify your host explicitly:
repeat:
  items: ["0.0.0.0"]
Or with runtime values:
repeat:
  items: <+pipeline.variables.test123>.split(",")
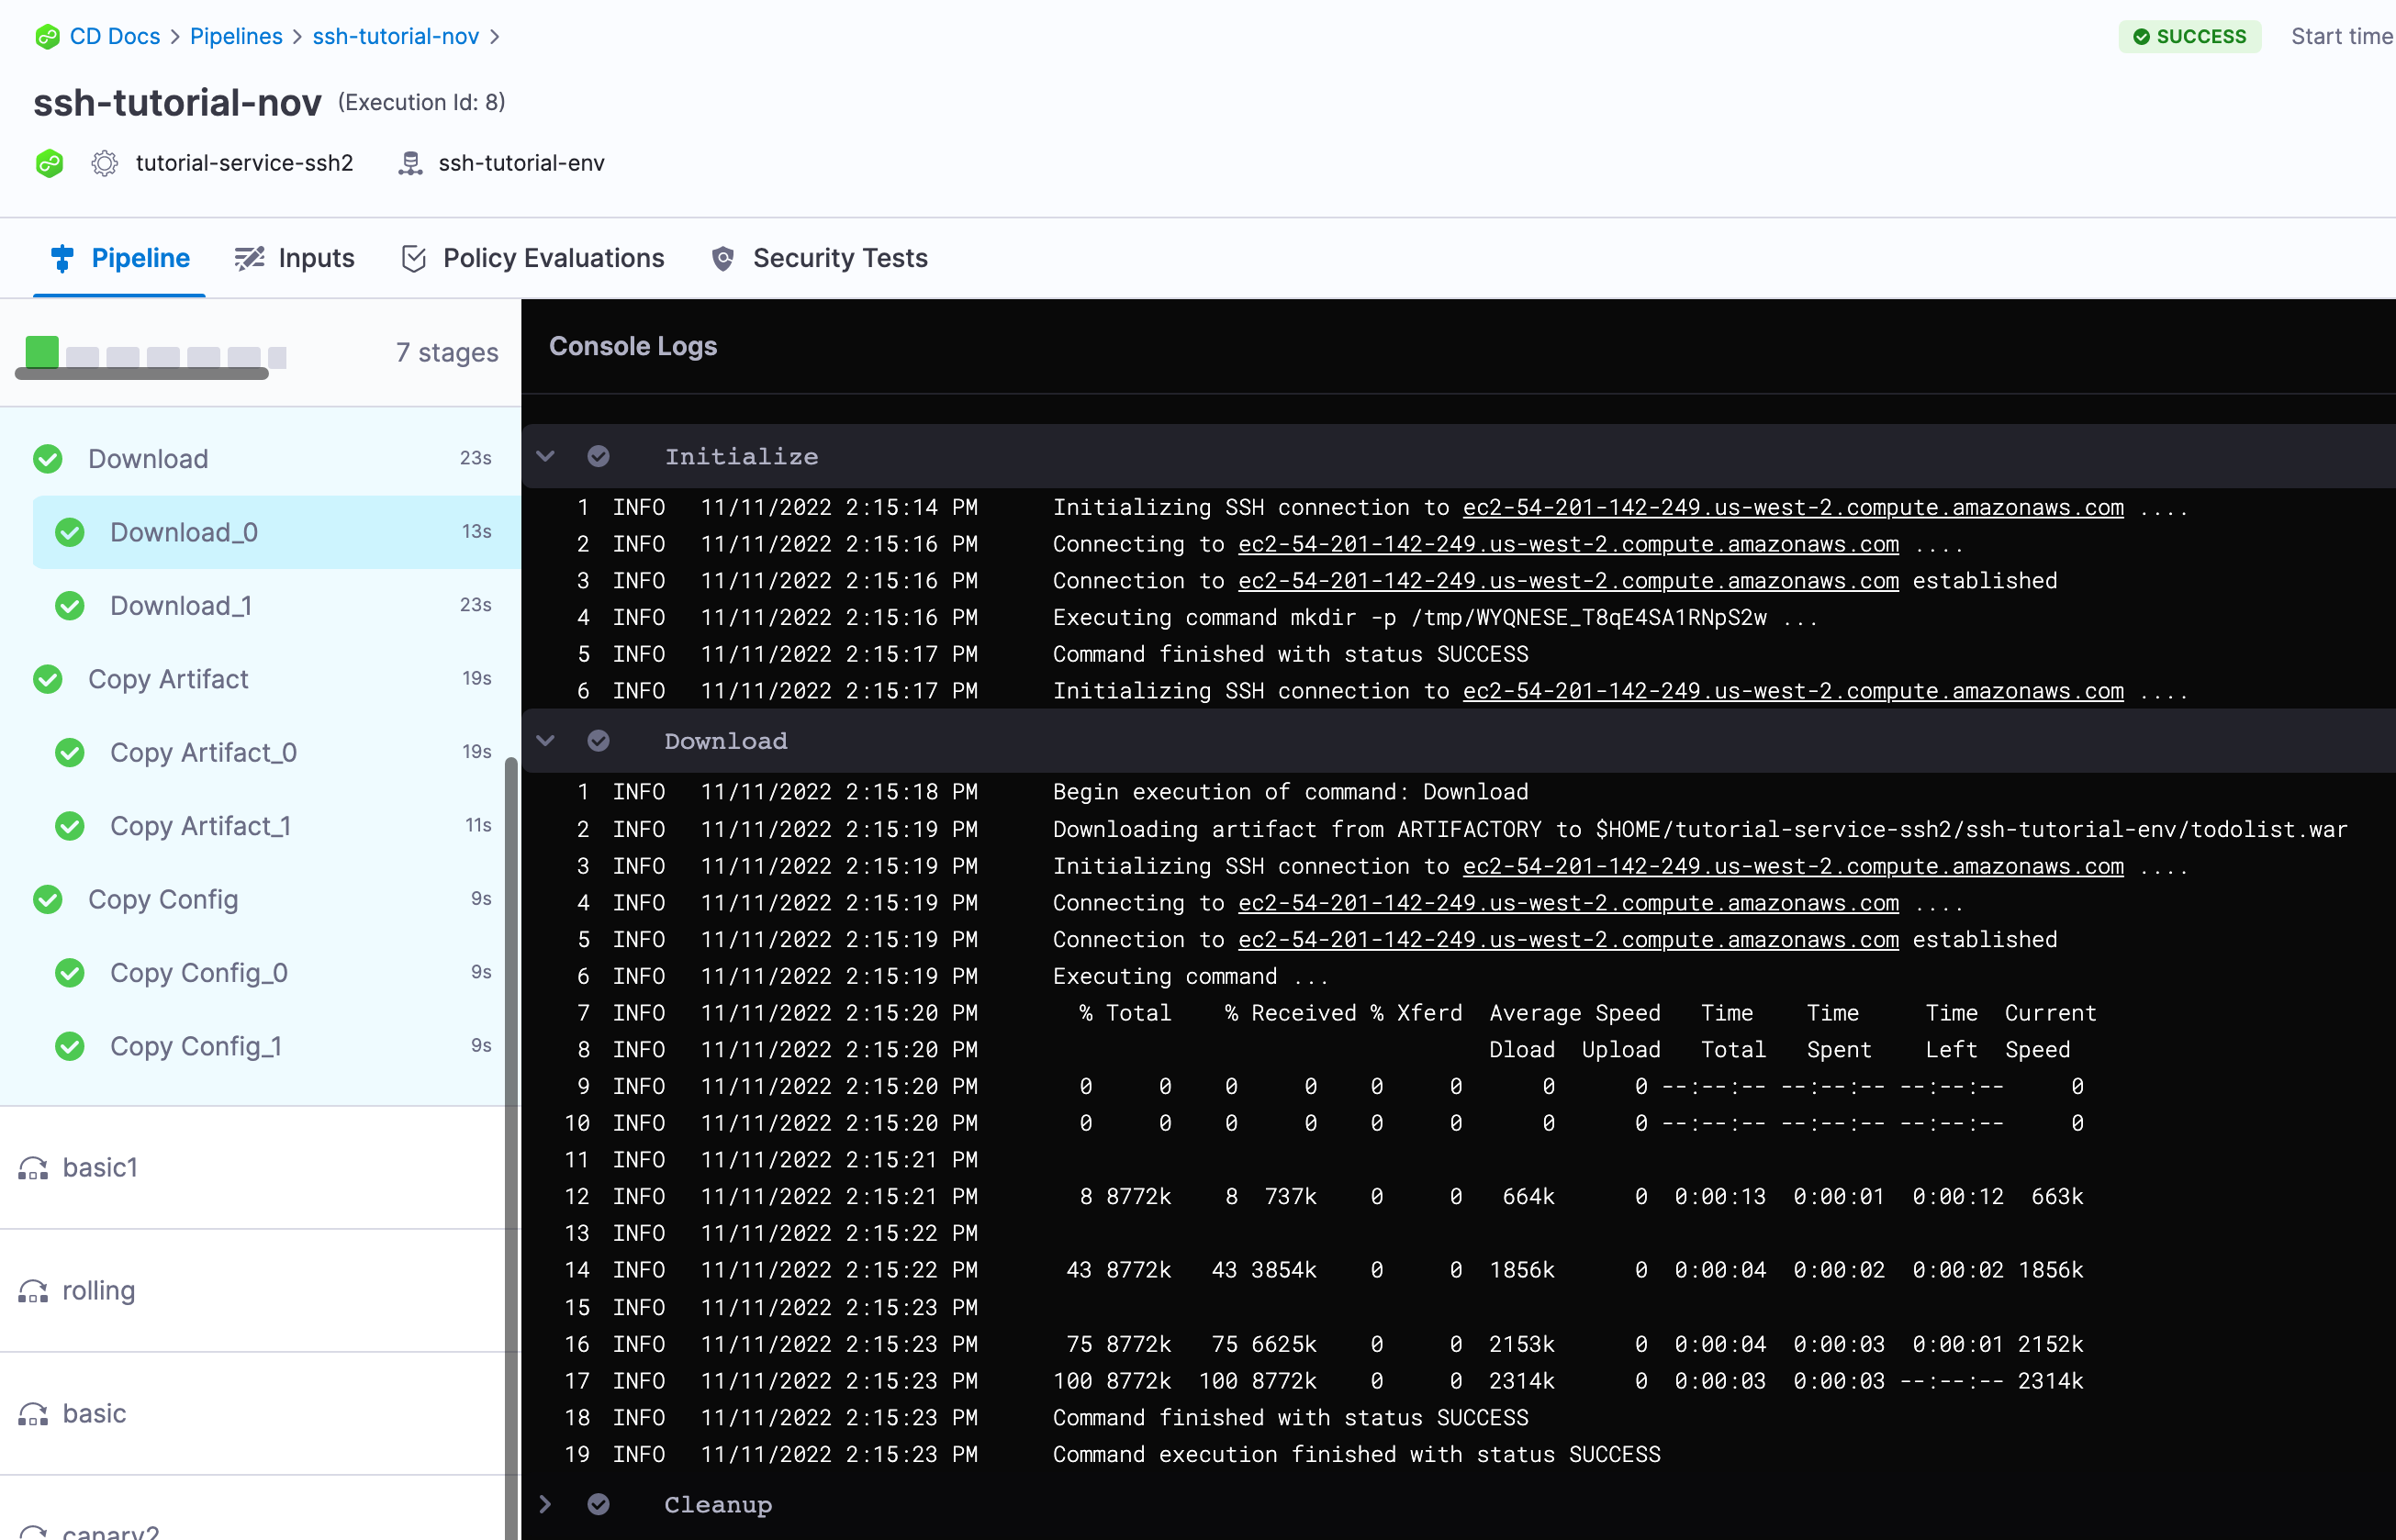
When you run the pipeline, you will see the Command step run on each host. For example, here is an SSH deployment where download, copy artifact, and copy config Command steps are run using the looping strategy:
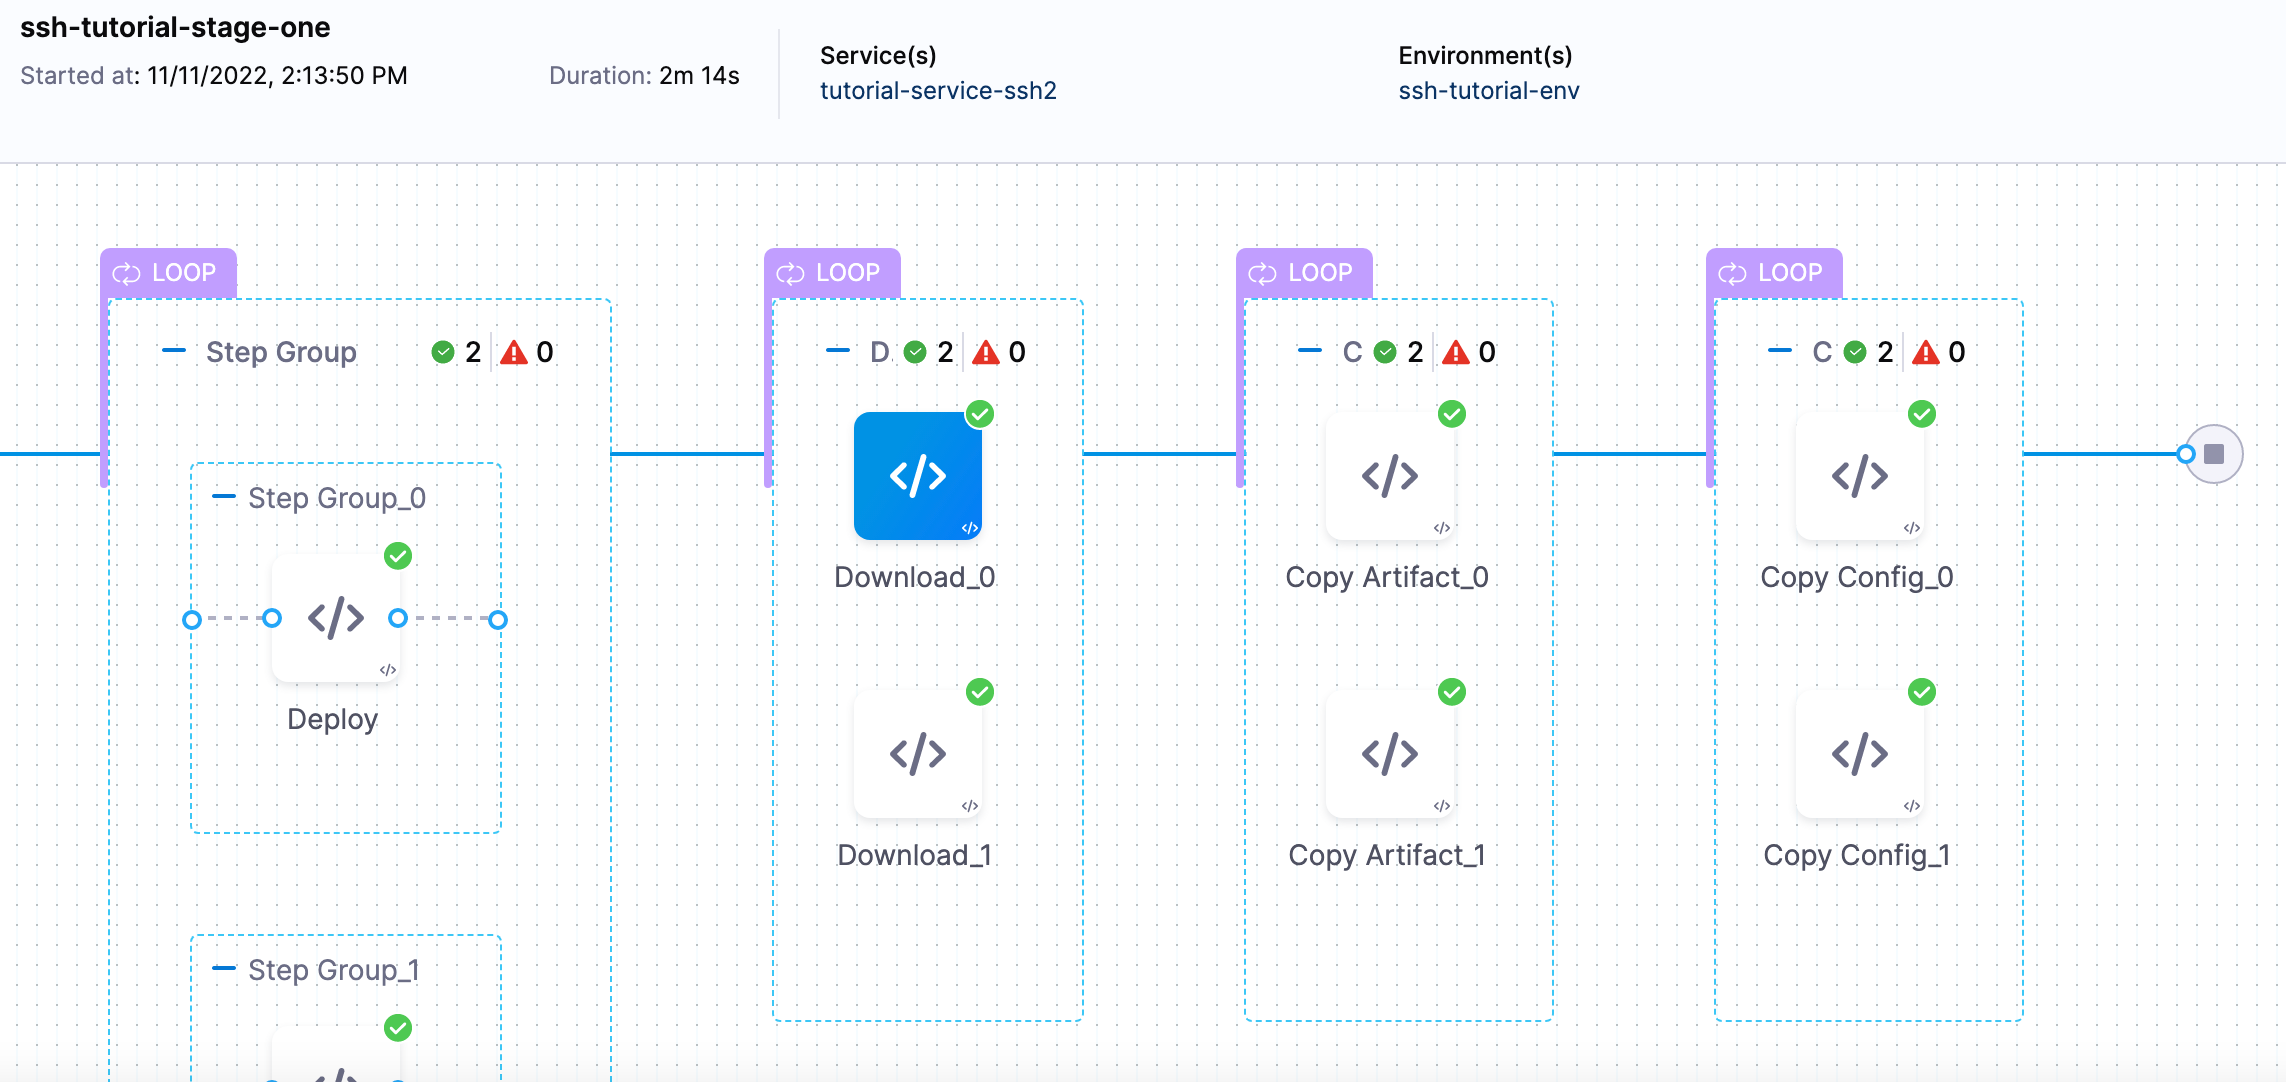
The suffix `_N` is used to identify each host.
Deployment templates
Since a deployment template can be used on any host type, the Command step can only be run on the delegate. You must use the Run on Delegate option in the step.
Consequently, there is no reason to use a looping strategy when using the Command step with deployment templates.
Copy and download artifact provider support
The following table lists the providers supported by the copy and download commands in a Command step.
Legend:
- Y: Yes
- N: No
- N/A: Not Applicable
The WinRM deployment type supports Download Artifact only. You cannot use the Copy command type with Artifact in WinRM deployments.
| Provider | Repository/Package Types | Download Artifact (WinRM or SSH deployment types only) | Copy Artifact SSH deployment type only) |
|---|---|---|---|
| AWS S3 | All | Y | Y |
| Artifactory (JFrog) | Non-Docker | Y | Y |
| Docker | N/A | N/A | |
| SMB | IIS related | Y | N/A |
| SFTP | IIS related | Y | N/A |
| Jenkins | All | Y | Y |
| Docker Registry | Docker | N/A | N/A |
| AWS ECR | Docker | N/A | N/A |
| Google Cloud Storage | All | N/A | N/A |
| Google Container Registry | Docker | N/A | N/A |
| Nexus 2.x/ 3.x | Maven 2.0 | Y | Y |
| NPM | Y | Y | |
| NuGet | Y | Y | |
| Docker | N/A | N/A | |
| Nexus 2.x/ 3.x | Maven 2.0 | Y | Y |
| NPM | Y | Y | |
| NuGet | Y | Y | |
| Docker | N/A | N/A | |
| Azure Artifacts | Maven 2.0, NuGet | Y | Y |
| Custom Repository | All | N/A | N (use the Exec script to use the metadata to copy artifact to target host) |
Use case: Send emails from a server with an attachment
-
Install
postfixon the target host using the following command:$ sudo apt-get install postfix mailutils libsasl2-2 ca-certificates libsasl2-modules -
Create a deployment stage with an SSH type service and infrastructure definition.
-
Add a Command step under the Executions tab.
-
In Step Parameters, enter a name and timeout duration.
-
In Run the following commands, select Add Command.
-
Enter a command name.
-
Set the Command Type to Script.
-
Enter the Working Directory path where the attachment resides. The path can be a fixed value, runtime input, or an expression.
-
In Select script location, select Inline.
-
In Script Type, select Bash and enter the following command:
sudo tee -a /etc/postfix/main.cf > /dev/null <<EOTrelayhost = [smtp.gmail.com]:587smtp_sasl_auth_enable = yessmtp_sasl_password_maps = hash:/etc/postfix/sasl_passwdsmtp_sasl_security_options =smtp_tls_CAfile = /etc/ssl/certs/ca-certificates.crtsmtp_use_tls = yesEOTsudo chmod 600 /etc/postfix/sasl_passwdsudo postmap /etc/postfix/sasl_passwdsudo systemctl restart postfix.serviceecho "This is the body of an encrypted email" | mail -A hello.jar -s "log file" johndoe@xyz.ioThe
relayhosthost configuration in the above command can be any SMTP port and server.You can define the body of the message with an echo statement like this,
echo "This is the body of an encrypted email" | mail -A hello.jar -s "log file" johndoe@xyz.io. You can provide harness expressions to resolve the body of the message. The email address can be provided as a user's email or a Distribution List email.The
mail -A hello.jarwill send the JAR on the host as an attachment. The-scommand will provide the subject of the email. The email address is the last argument in the mail command.For more information on sending emails with
postfix, go to AskUbuntu solution. -
Select Add.
-
-
Select Apply Changes.
-
Run the pipeline.
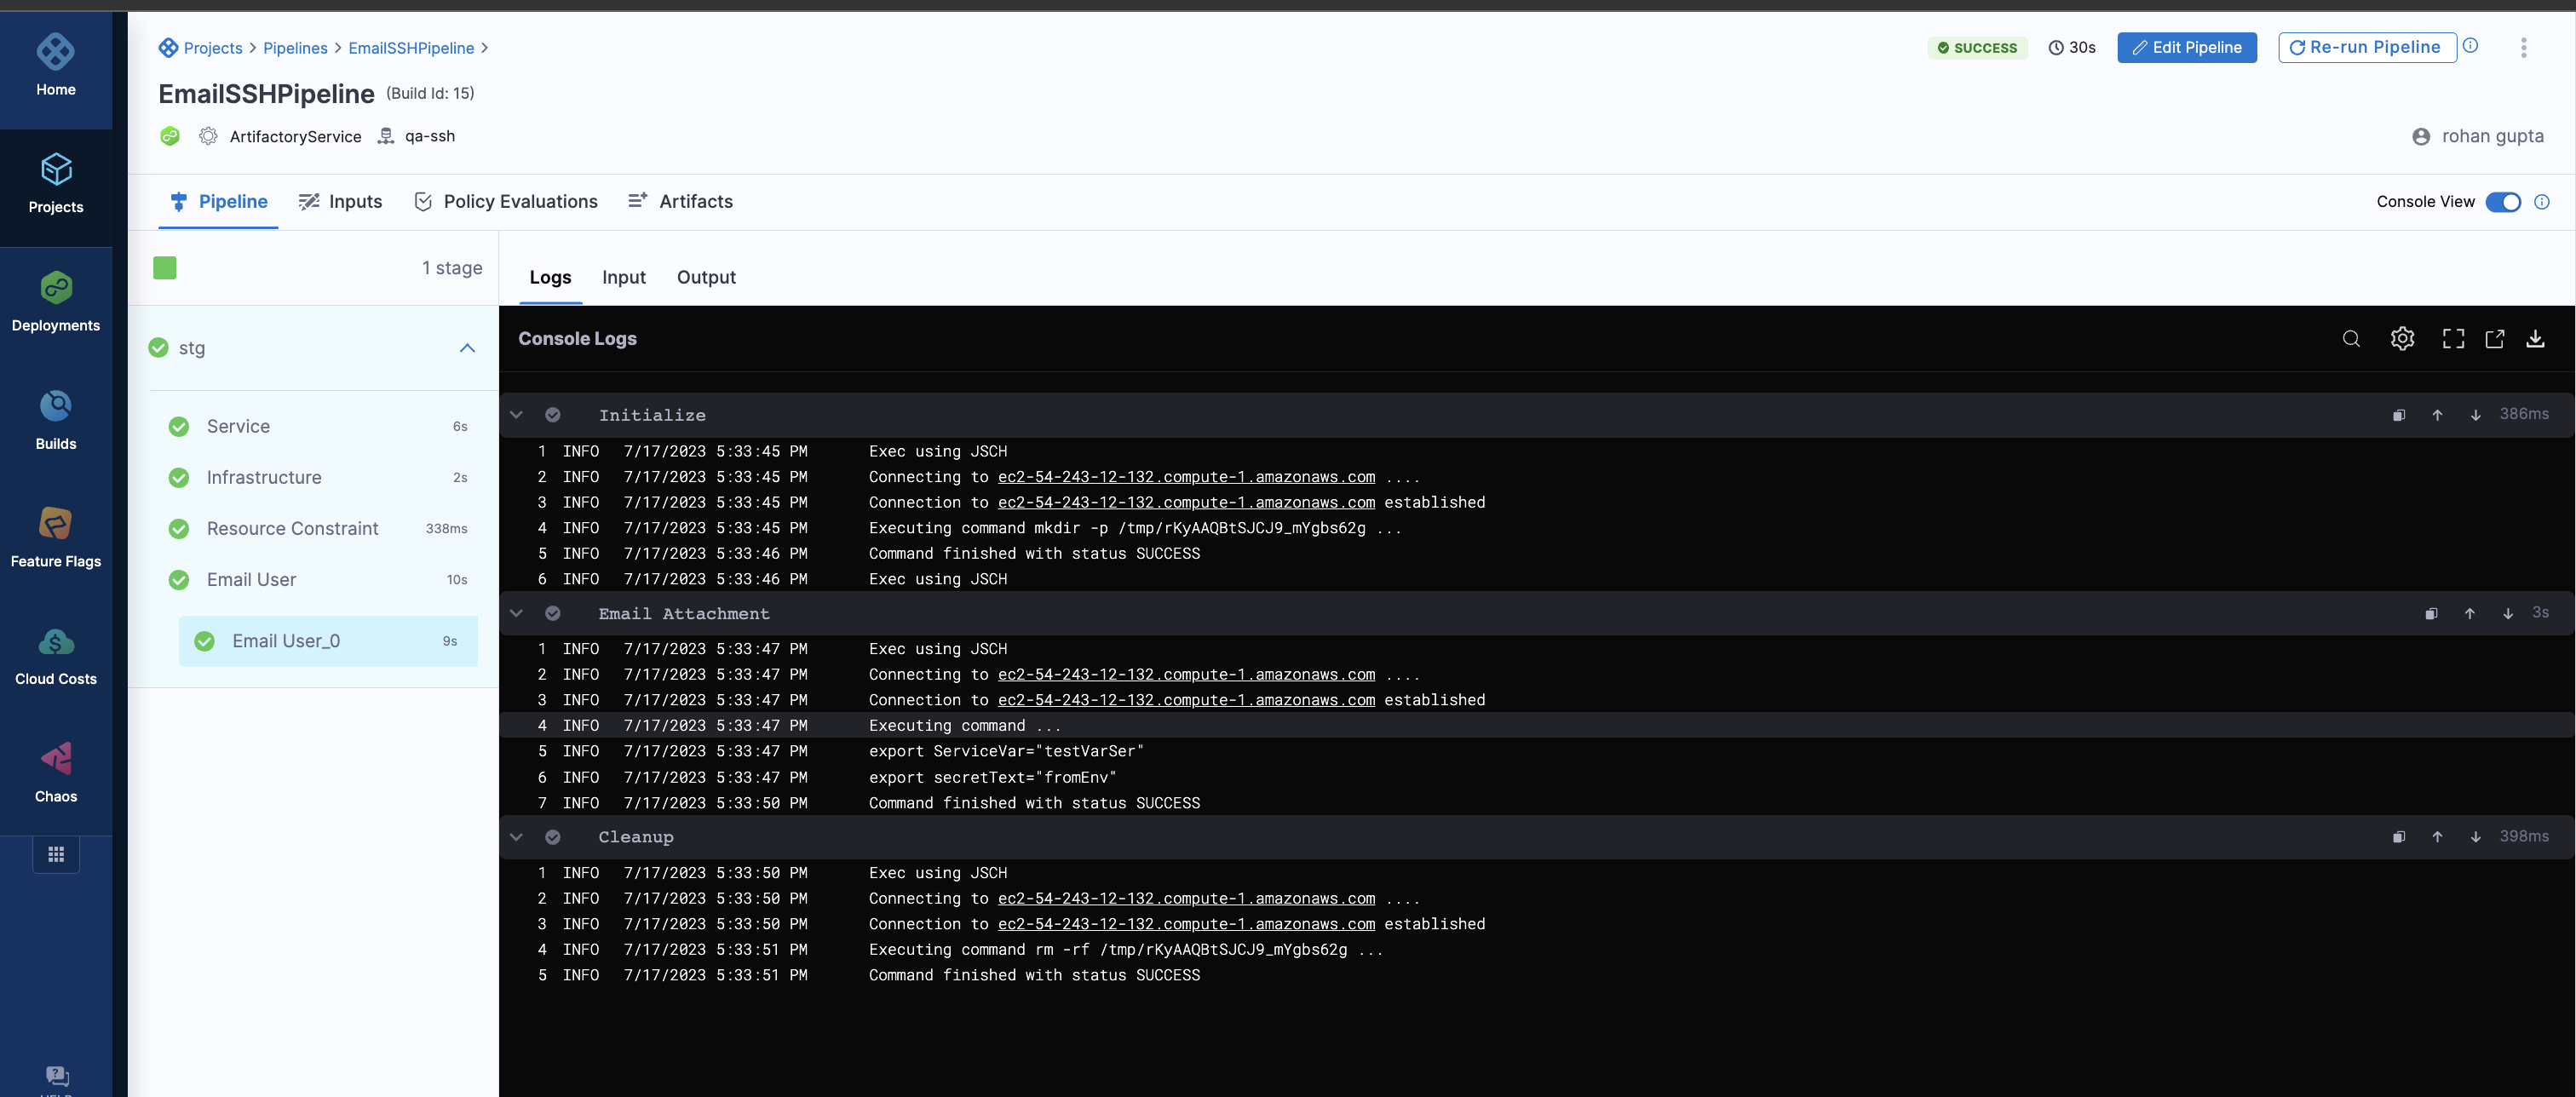
Sample pipeline YAML
pipeline:
name: EmailSSHPipeline
identifier: EmailSSHPipeline
projectIdentifier: default
orgIdentifier: default
tags: {}
stages:
- stage:
name: stg
identifier: stg
description: ""
type: Deployment
spec:
deploymentType: Ssh
service:
serviceRef: ArtifactiryService
environment:
environmentRef: qa
deployToAll: false
infrastructureDefinitions:
- identifier: pdcinfra
execution:
steps:
- step:
type: Command
name: Email User
identifier: Command_1
spec:
onDelegate: false
environmentVariables: []
outputVariables: []
commandUnits:
- identifier: test
name: Email Attachment
type: Script
spec:
workingDirectory: /home/ubuntu
shell: Bash
source:
type: Inline
spec:
script: |-
sudo tee -a /etc/postfix/main.cf > /dev/null <<EOT
relayhost = [smtp.gmail.com]:587
smtp_sasl_auth_enable = yes
smtp_sasl_password_maps = hash:/etc/postfix/sasl_passwd
smtp_sasl_security_options =
smtp_tls_CAfile = /etc/ssl/certs/ca-certificates.crt
smtp_use_tls = yes
EOT
sudo chmod 600 /etc/postfix/sasl_passwd
sudo postmap /etc/postfix/sasl_passwd
sudo systemctl restart postfix.service
echo "This is the body of an encrypted email" | mail -A hello.jar -s "log file"  johndoe@xyz.io
timeout: 10m
strategy:
repeat:
items: <+stage.output.hosts>
rollbackSteps:
- step:
name: Rollback
identifier: Rollback
timeout: 10m
strategy:
repeat:
items: <+stage.output.hosts>
template:
templateRef: account.Default_Install_War_Bash
templateInputs:
type: Command
spec:
environmentVariables:
- name: DestinationDirectory
type: String
value: $HOME/<+service.name>/<+env.name>
tags: {}
failureStrategies:
- onFailure:
errors:
- AllErrors
action:
type: StageRollback