Get Started with Workflows
Introduction
This quickstart tutorial will guide you through setting up a Workflow in IDP to automate GitHub repository onboarding for users. While this tutorial uses GitHub as the git provider, the same steps can be applied to other git providers as well.
We now have a new Workflows homepage which is behind a Feature Flag IDP_ENABLE_WORKFLOWSV2. To enable the feature flag, please contact Harness Support
Pre-requisite
Add Connector
A connector with Git credentials that has appropriate write permissions is required to create a repository in your GitHub organization.
- Go to Admin -> Git Integrations.
- Add a New Git Integration with type as GitHub.
- Now Select the GitHub Connector and Save Changes, follow the steps to add a new connector
Make sure the Connector URL used here is pointed towards the org where you want to create the new repo and the token used have write permission for the repo also Enable the API while creating connector.
Create Harness Pipeline with IDP Stage
A Harness Pipeline serves as an orchestrator for IDP Workflows.
- Go to Admin -> Select Project.
- Now start with Create a Pipeline.
- Add a Name, select the type as Inline and Continue.

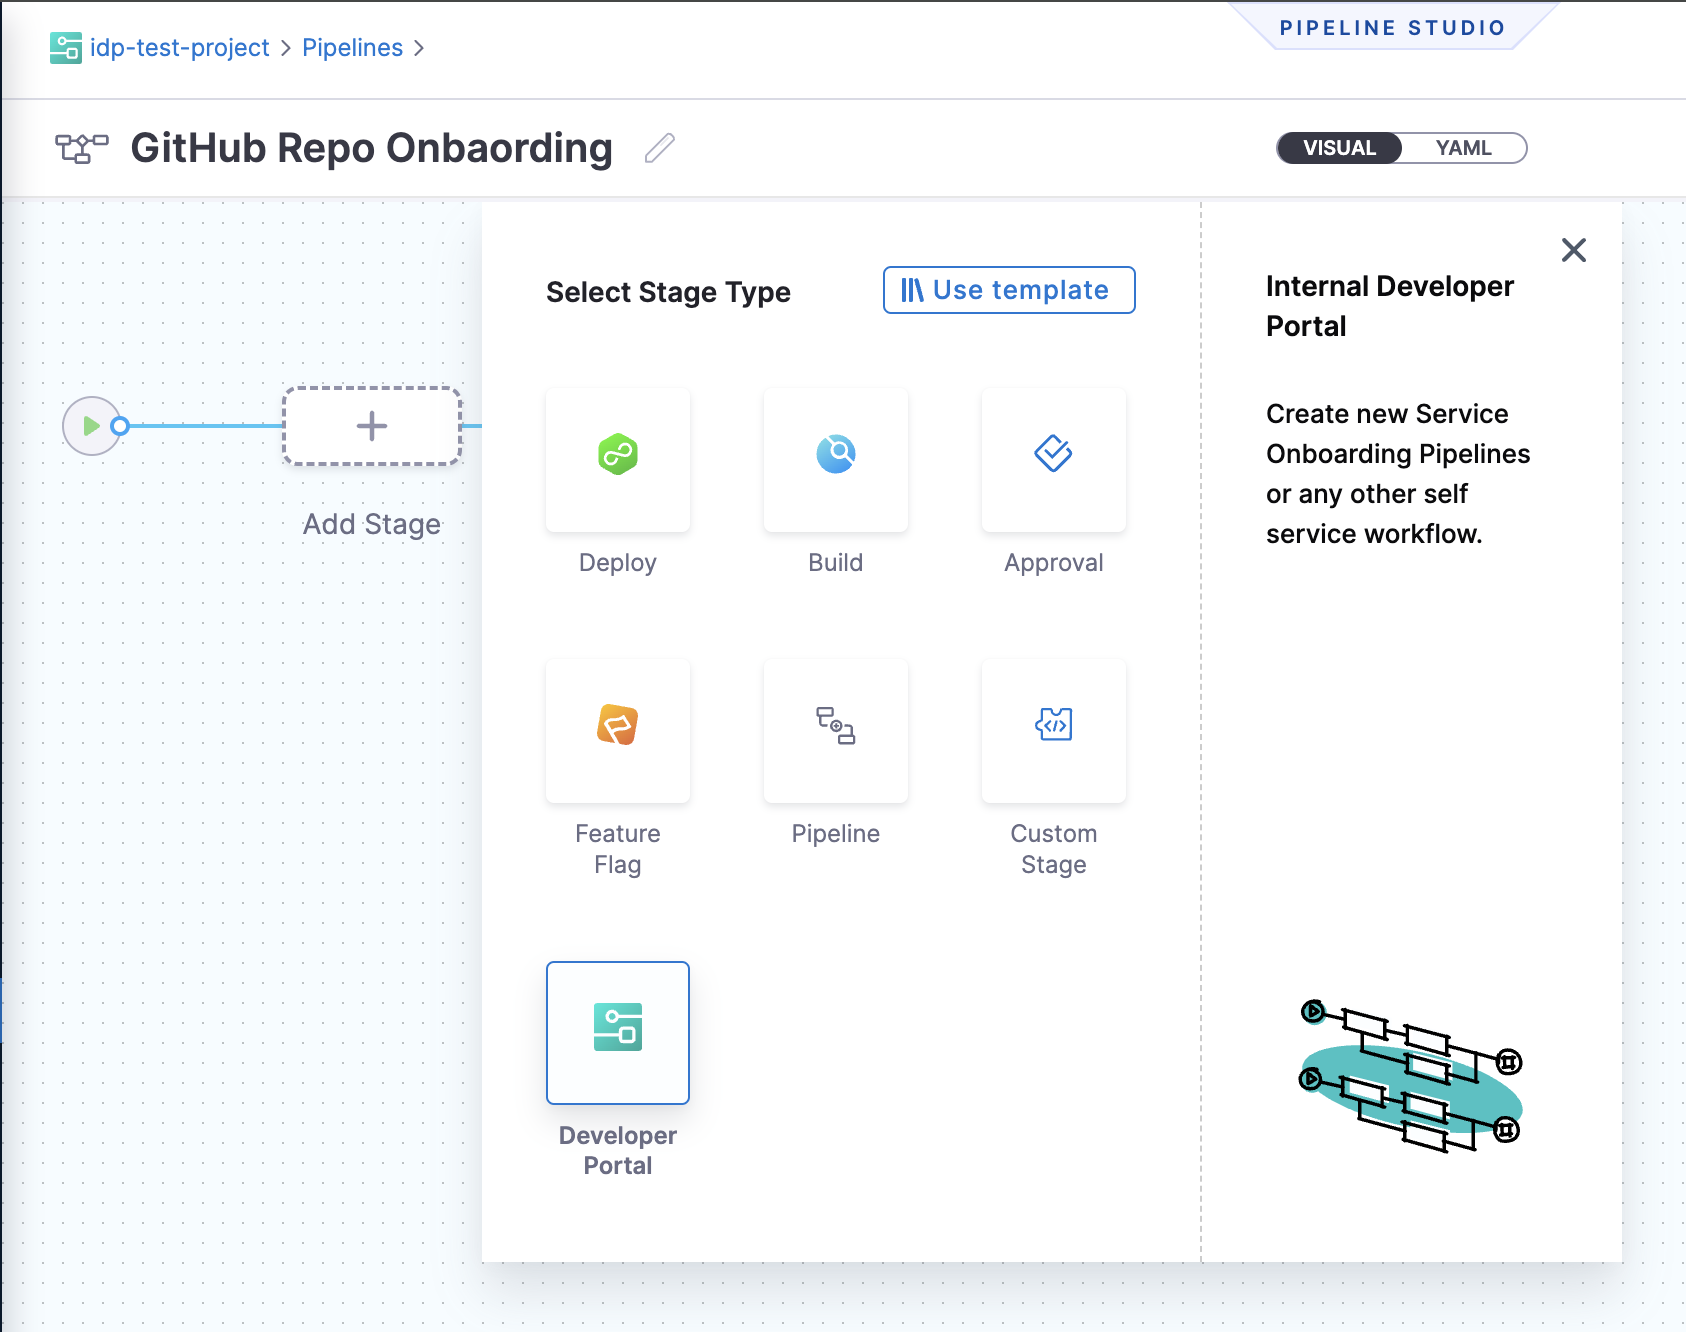
- Add Stage and Select Stage Type as Developer Portal.
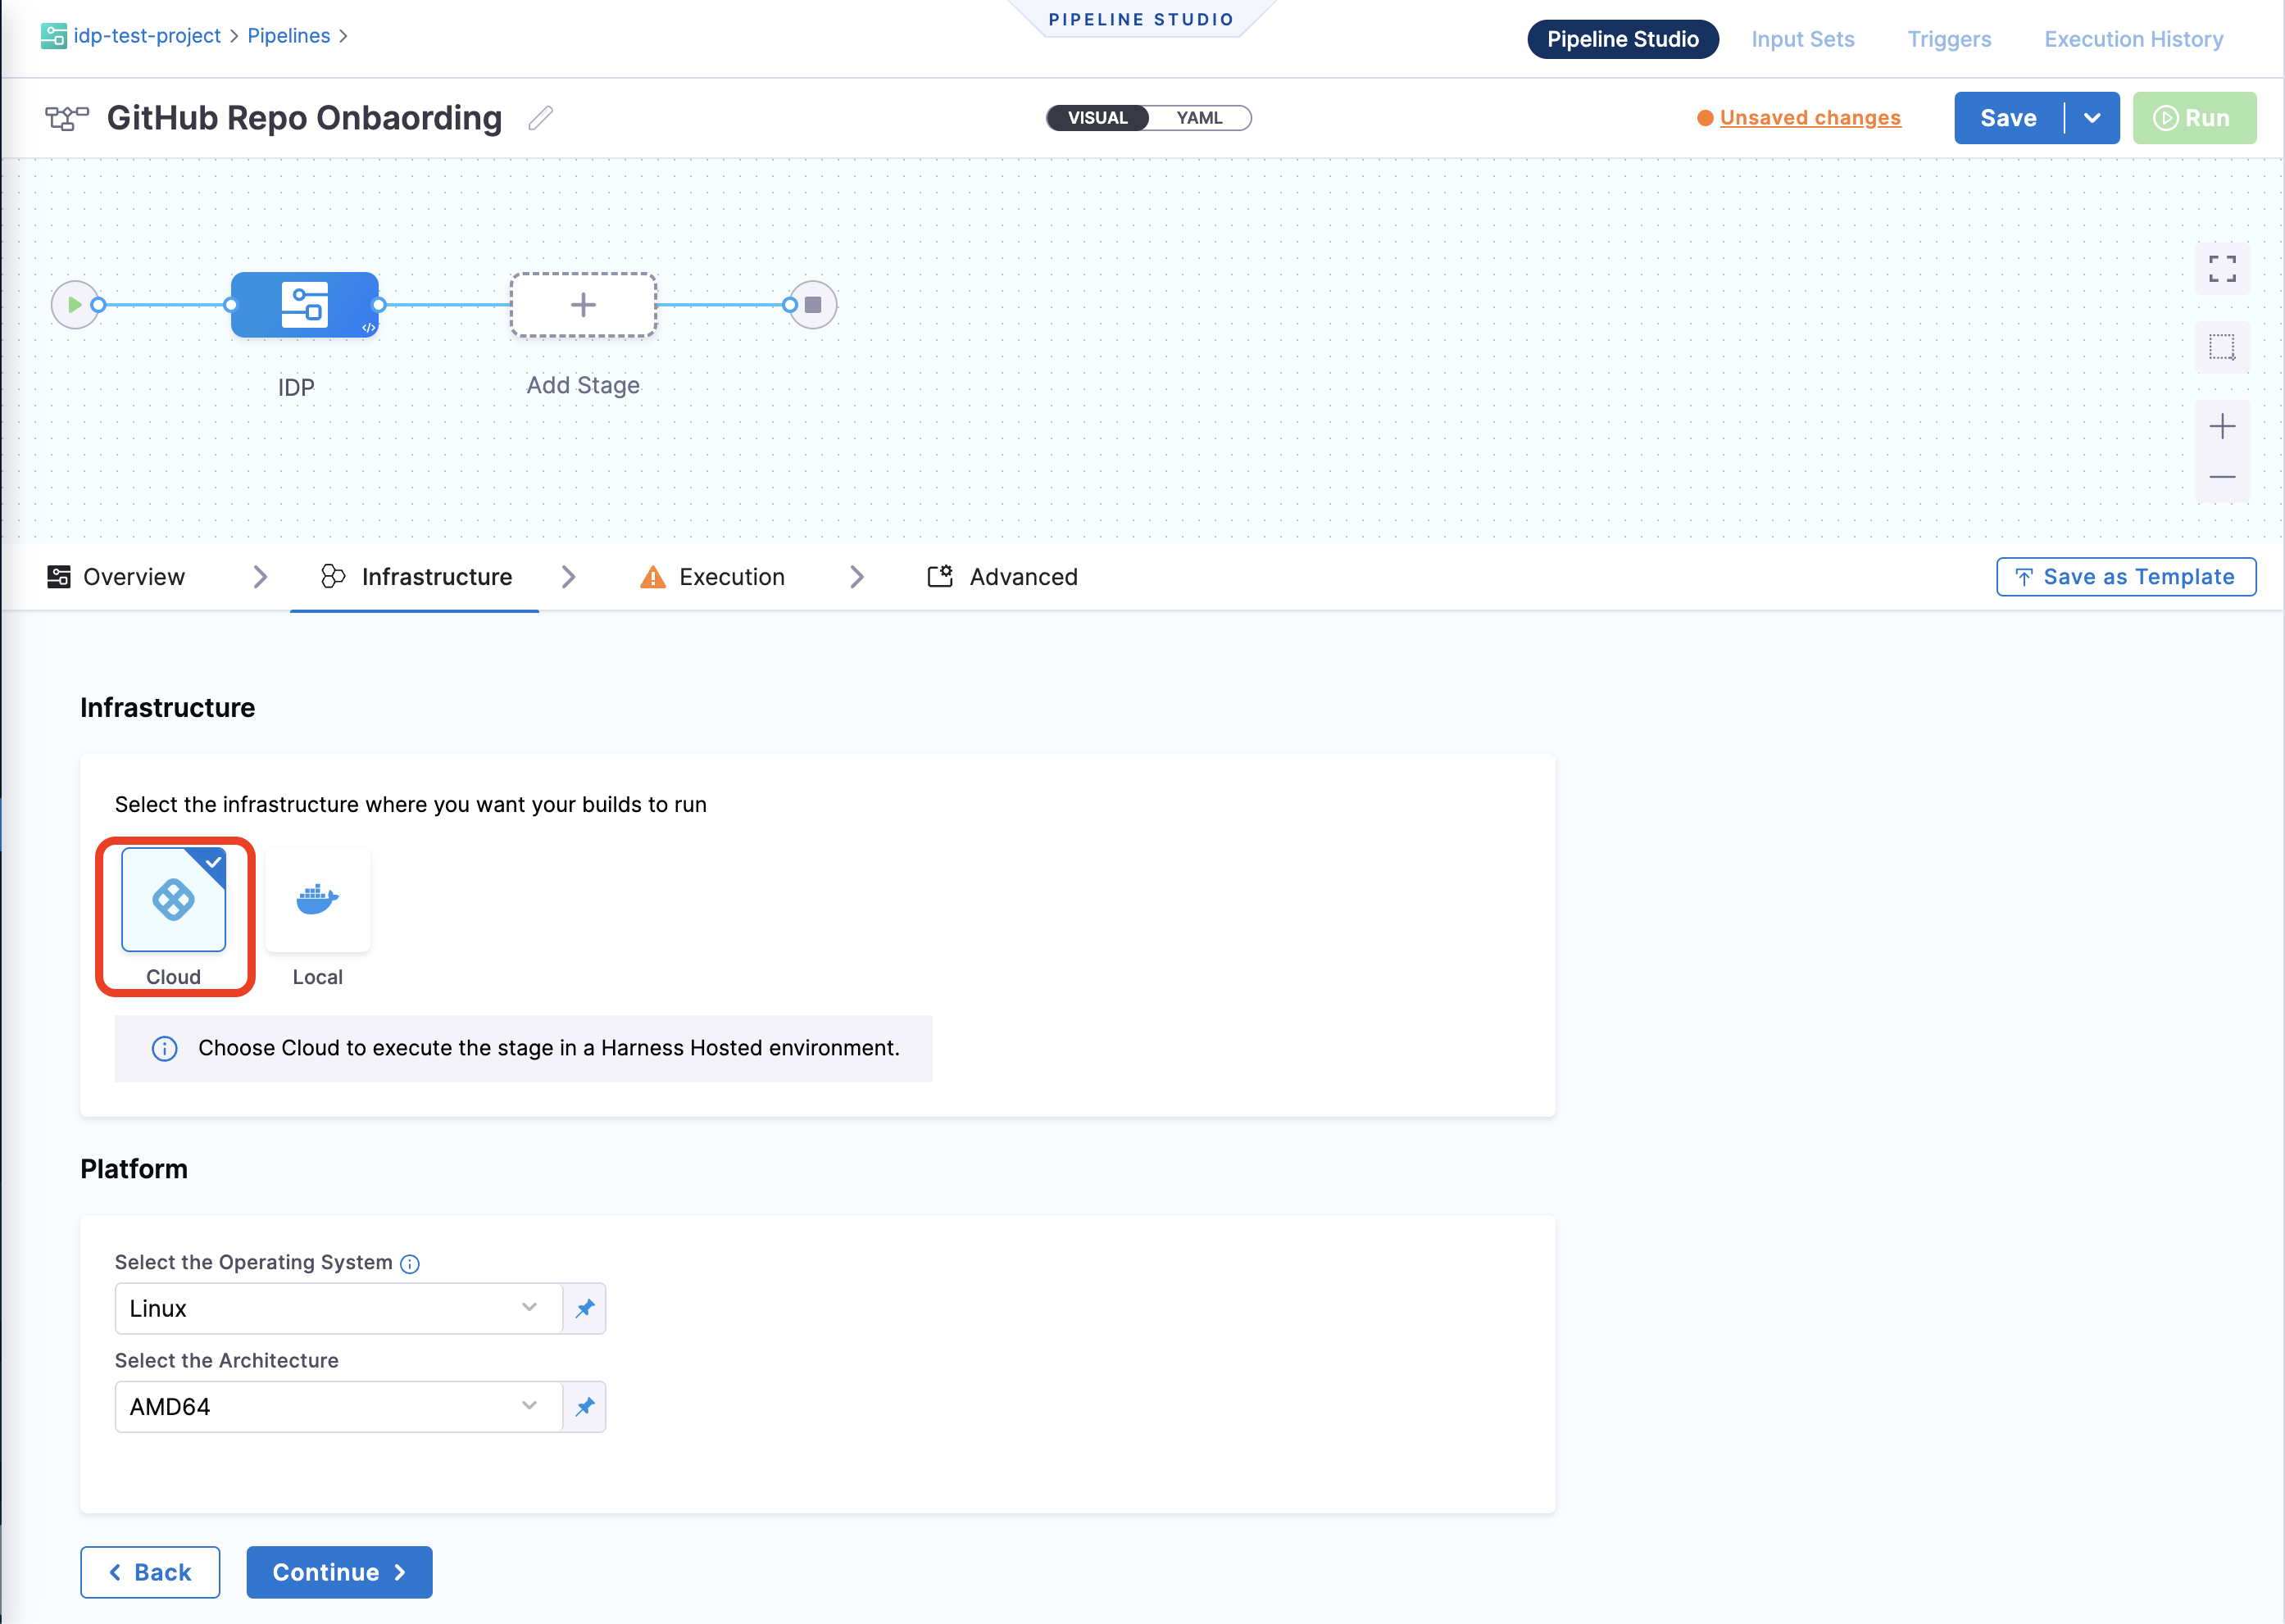
- Select the infrastructure as Harness Cloud.
- Now let's create some variables that we will use in further steps. Navigate to the Variables tab in the right corner of the Pipeline Studio, and add the following Custom Variables (stick to the exact naming convention for variables as provided, as these will be used as a reference to input values into the pipeline). The variables are of Type
String, and their Values are set toRuntime Input.github_orggithub_repogithub_username
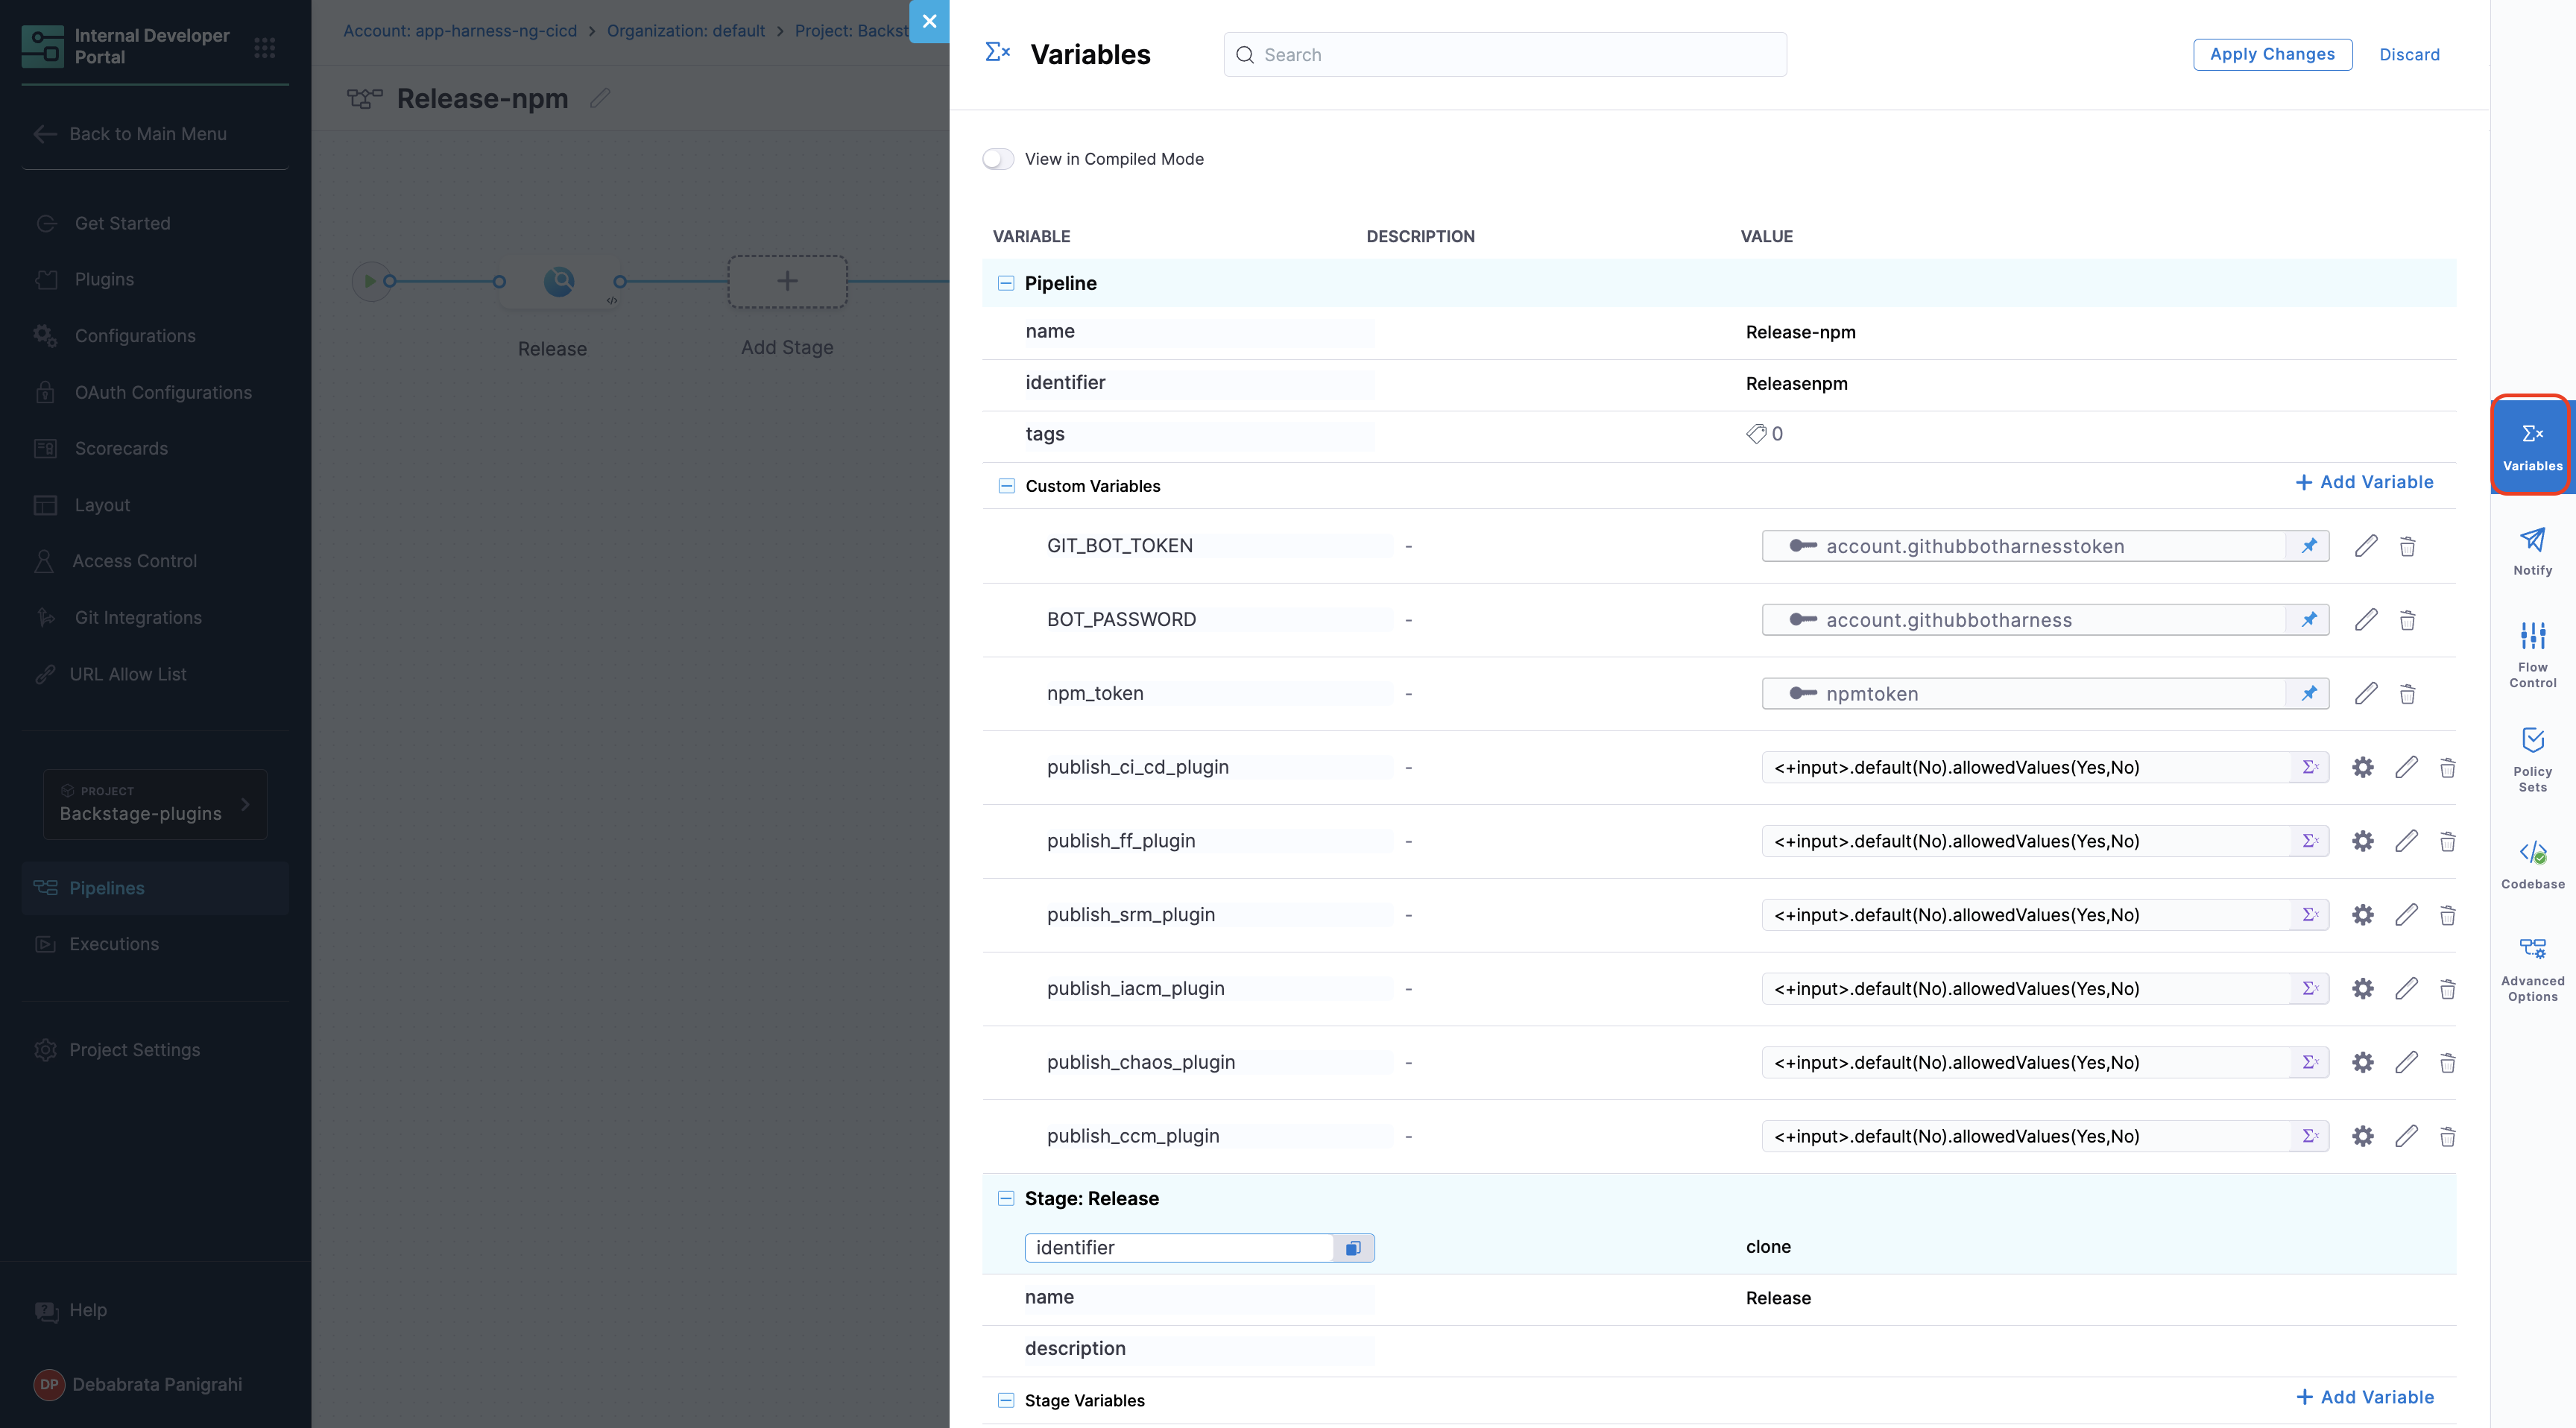
Add another variable github_token as Type Secret and add the GitHub PAT for Values.
Apply the changes

- Now Continue to Execution and Add Step, under Git Repository Setup select Create Repo.
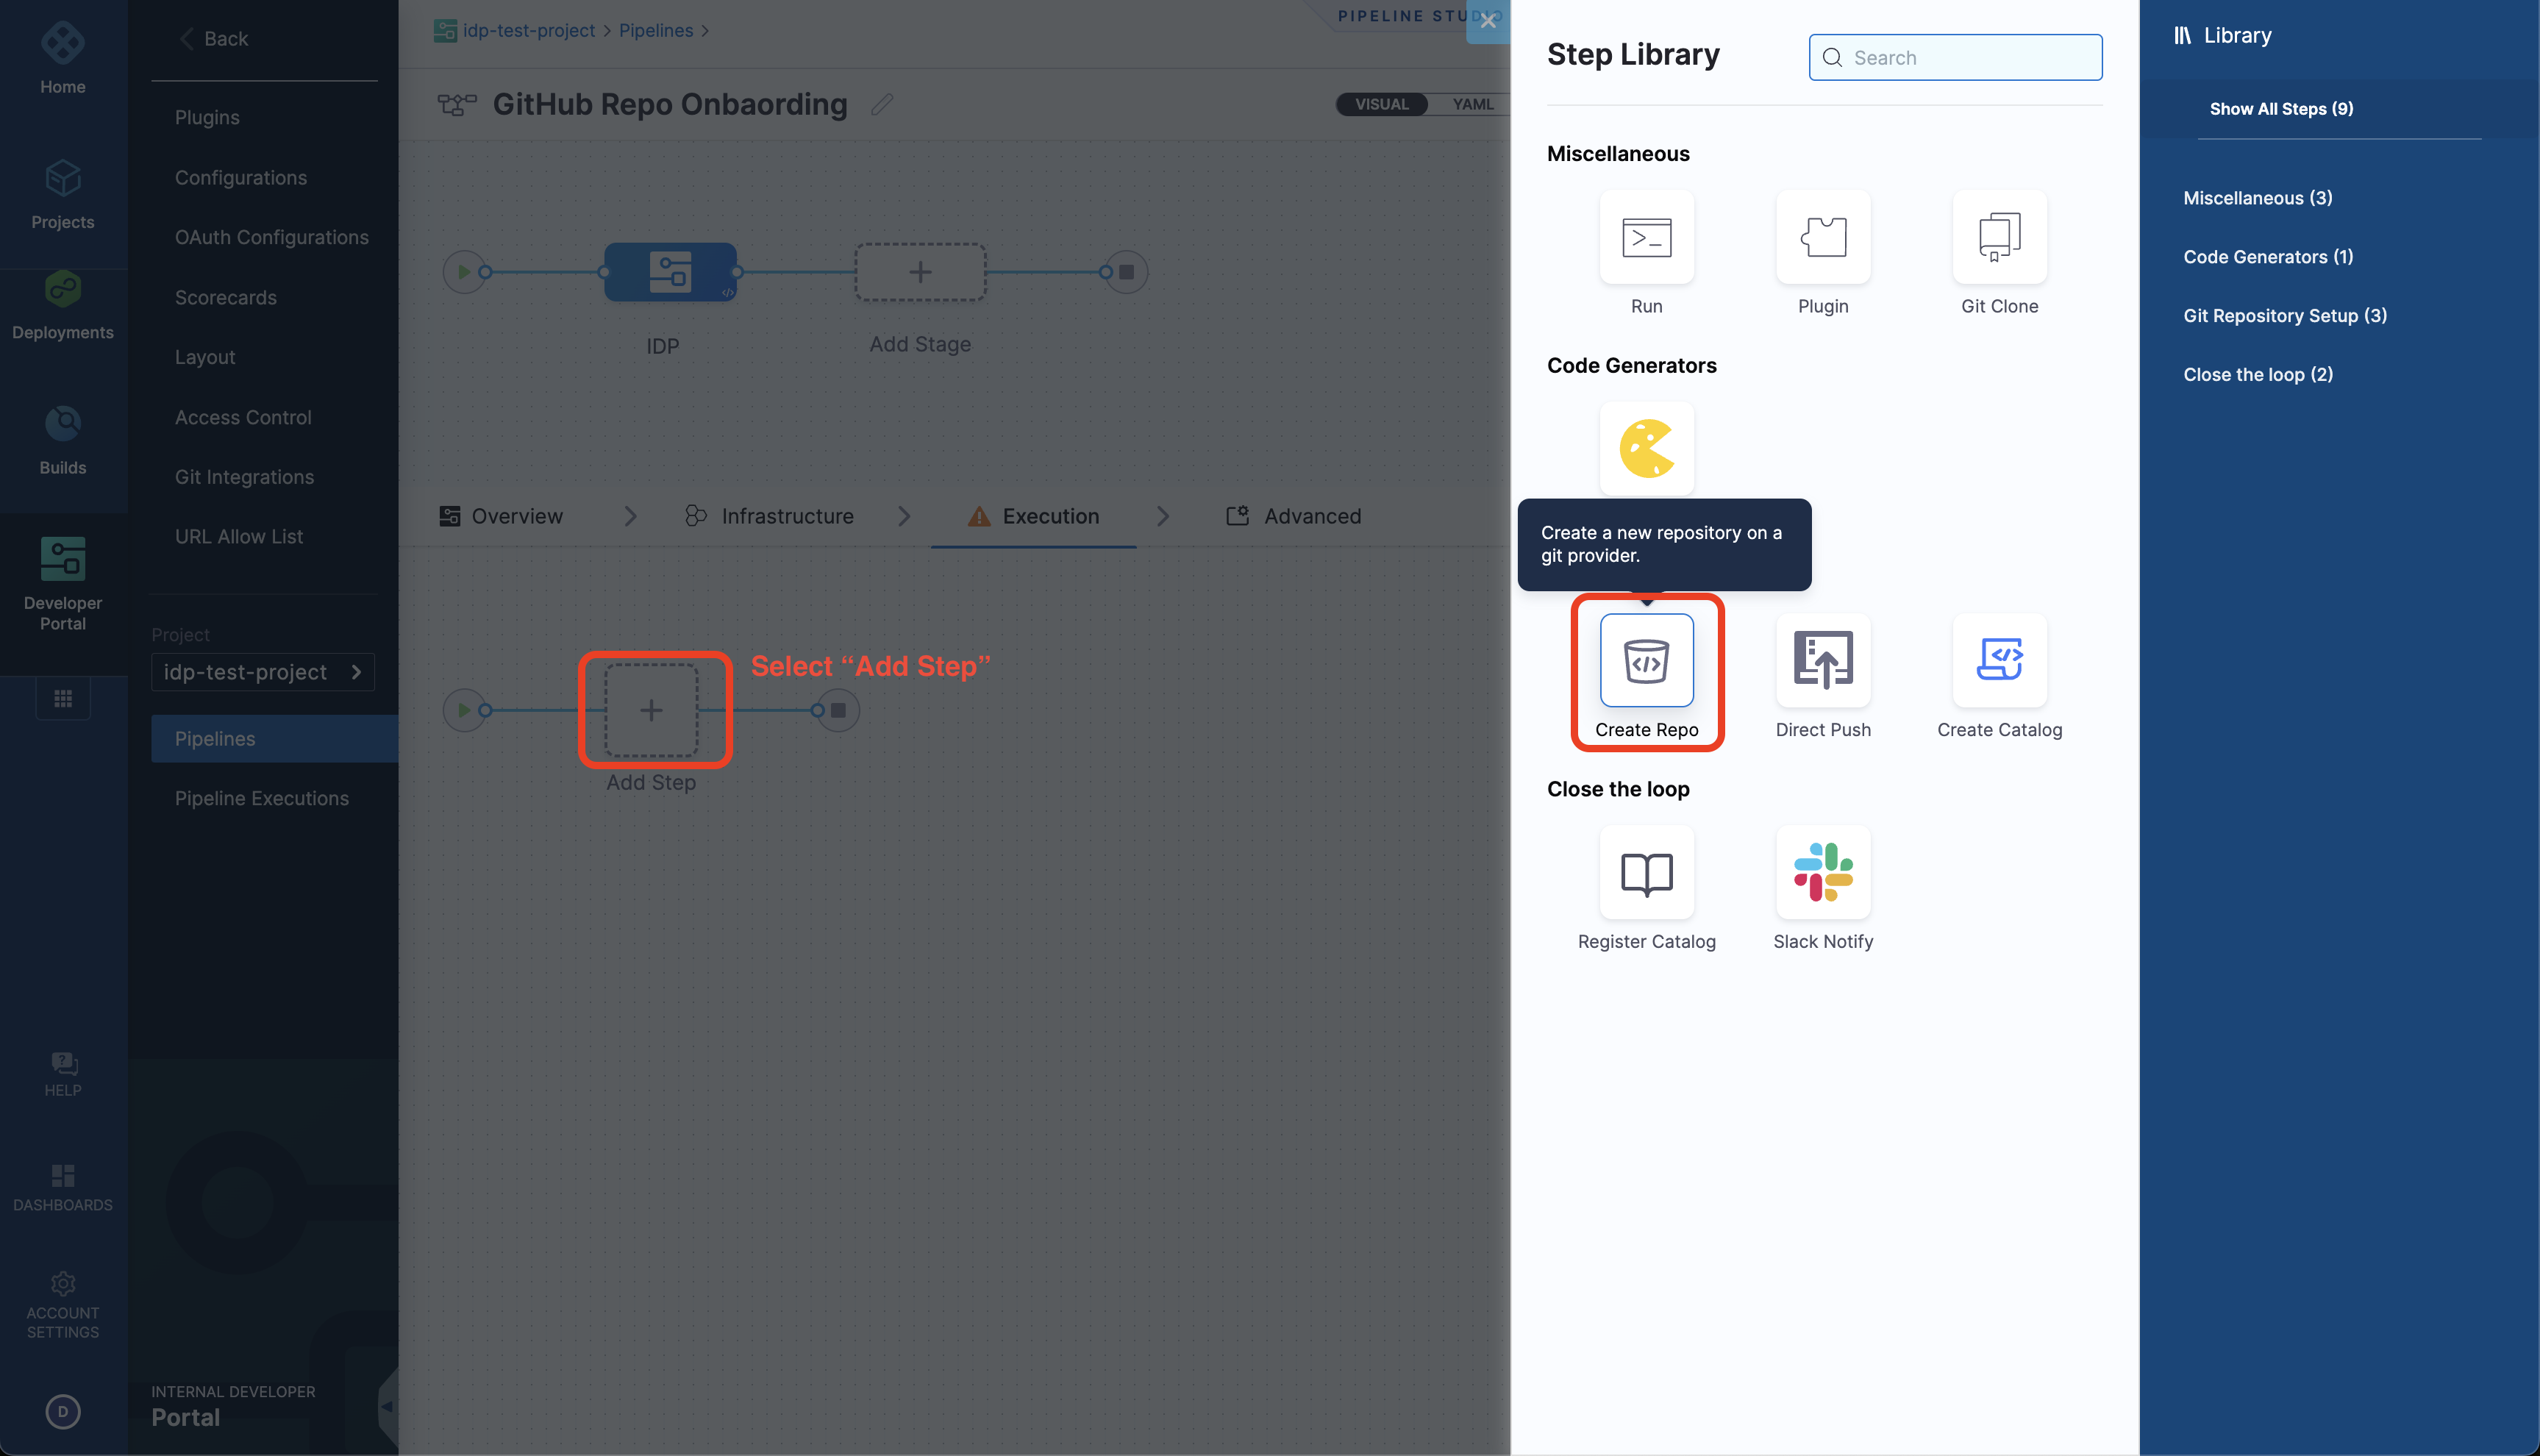
-
Under Step Parameters, select the Repository Type as Public if the connector you have created use a token generated by your GitHub admin, else you might not have access to the private repo created.
-
Add the Connector you created above.
-
Now under Organization and Repository Name add the variables you created as Expressions (
<+pipeline.variables.github_org>and<+pipeline.variables.github_repo>). -
Add a Repository Description, Apply Changes.

- Now add a Run Step to add your username as an admin to the repo created, with the following curl command, make sure to add a container registry and image, under optional configuration. Container Registry is a Harness Docker Registry Connector used to specify the image on which Harness will run commands, such as images from Docker Hub.
curl -L \
  -X PUT \
  -H "Accept: application/vnd.github+json" \
  -H "Authorization: Bearer <+pipeline.variables.github_token>" \
  -H "X-GitHub-Api-Version: 2022-11-28" \
  https://api.github.com/repos/<+pipeline.variables.github_org>/<+pipeline.variables.github_repo>/collaborators/<+pipeline.variables.github_username> \
  -d '{"permission":"admin"}'
Create Workflow
The Workflow is defined in a YAML file named workflow.yaml. The syntax of the template definition is owned by backstage.io while the workflow runs on a Harness pipeline of your choice.
The following is the example Workflow with Workflows Action to create a new repository.
apiVersion: scaffolder.backstage.io/v1beta3
kind: Template
# some metadata about the template itself
metadata:
  name: Workflows-Quickstart
  title: Create a New GitHub Repository
  description: Creates a new GitHub Repository
spec:
  owner: service.owner
  type: service
  # these are the steps which are rendered in the frontend with the form input
  parameters:
    - title: Fill in the repo details
      required:
        - github_org_name
        - github_repo_name
        - github_username
      properties:
        github_org_name:
          title: GitHub Organization
          type: string
          description: Name the org where you want to add the new repository
        github_repo_name:
          title: Repository Location
          type: string
          description: Name the new repository that you want to create
        github_username:
          title: GitHub Username
          type: string
          description: Add Your GitHub Username
        token:
          title: Harness Token
          type: string
          ui:widget: password
          ui:field: HarnessAuthToken
  # here's the steps that are executed in series in the scaffolder backend
  steps:
    - id: trigger
      name: Onboarding a New GitHub Repository
      action: trigger:harness-custom-pipeline
      input:
        url: "URL_of_the_Harness_Pipeline_Created_Above"
        inputset:
          github_org: ${{ parameters.github_org_name }}
          github_repo: ${{ parameters.github_repo_name }}
          github_username: ${{parameters.github_username}}
        apikey: ${{ parameters.token }}
    # The final step is to register our new component in the catalog.

  output:
    links:
      - title: Pipeline Details
        url: ${{ steps.trigger.output.PipelineUrl }}
In the above Workflow we have used the Harness Trigger Workflow Action, which takes the exact variable name github_org and github_repo you created for your pipeline as input and a token as apikey
The token property used to fetch the Harness Auth Token is hidden on the Review Step using ui:widget: password. However, for this to function correctly in a multi-page workflow, the token property must be included under the first page.
parameters:
  - title: <PAGE-1 TITLE>
    properties:
      property-1:
        title: title-1
        type: string
      property-2:
        title: title-2
    token:
      title: Harness Token
      type: string
      ui:widget: password
      ui:field: HarnessAuthToken
  - title: <PAGE-2 TITLE>
    properties:
      property-1:
        title: title-1
        type: string
      property-2:
        title: title-2
  - title: <PAGE-n TITLE>
- Copy the above Workflow file in your git provider, replace the value of
input.urlunderstepswith the Harness pipeline URL you created and save it asworkflow.yaml.
Register Workflow in IDP
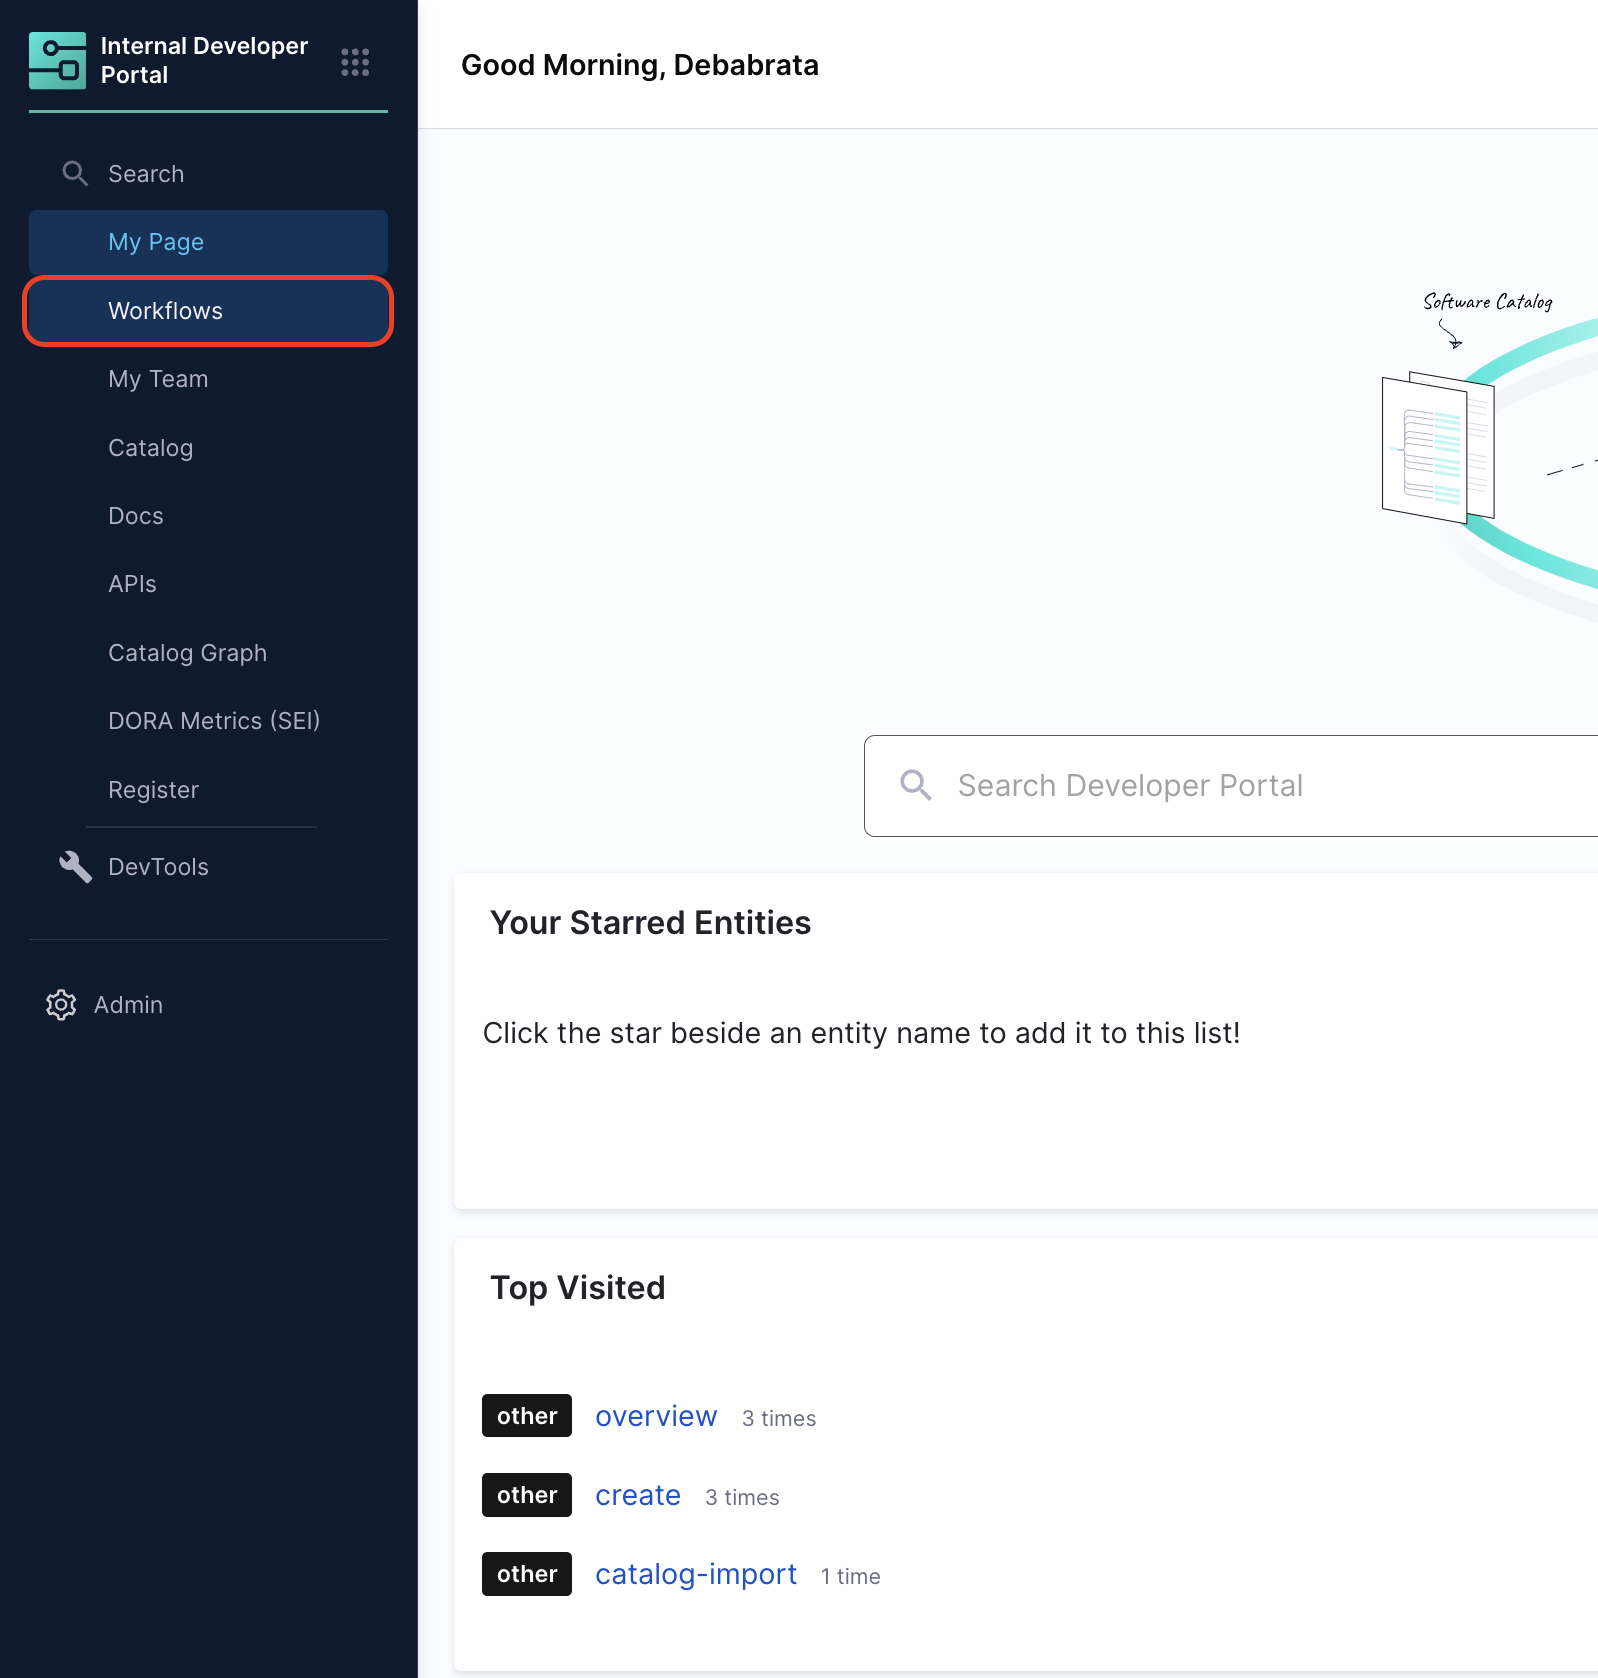
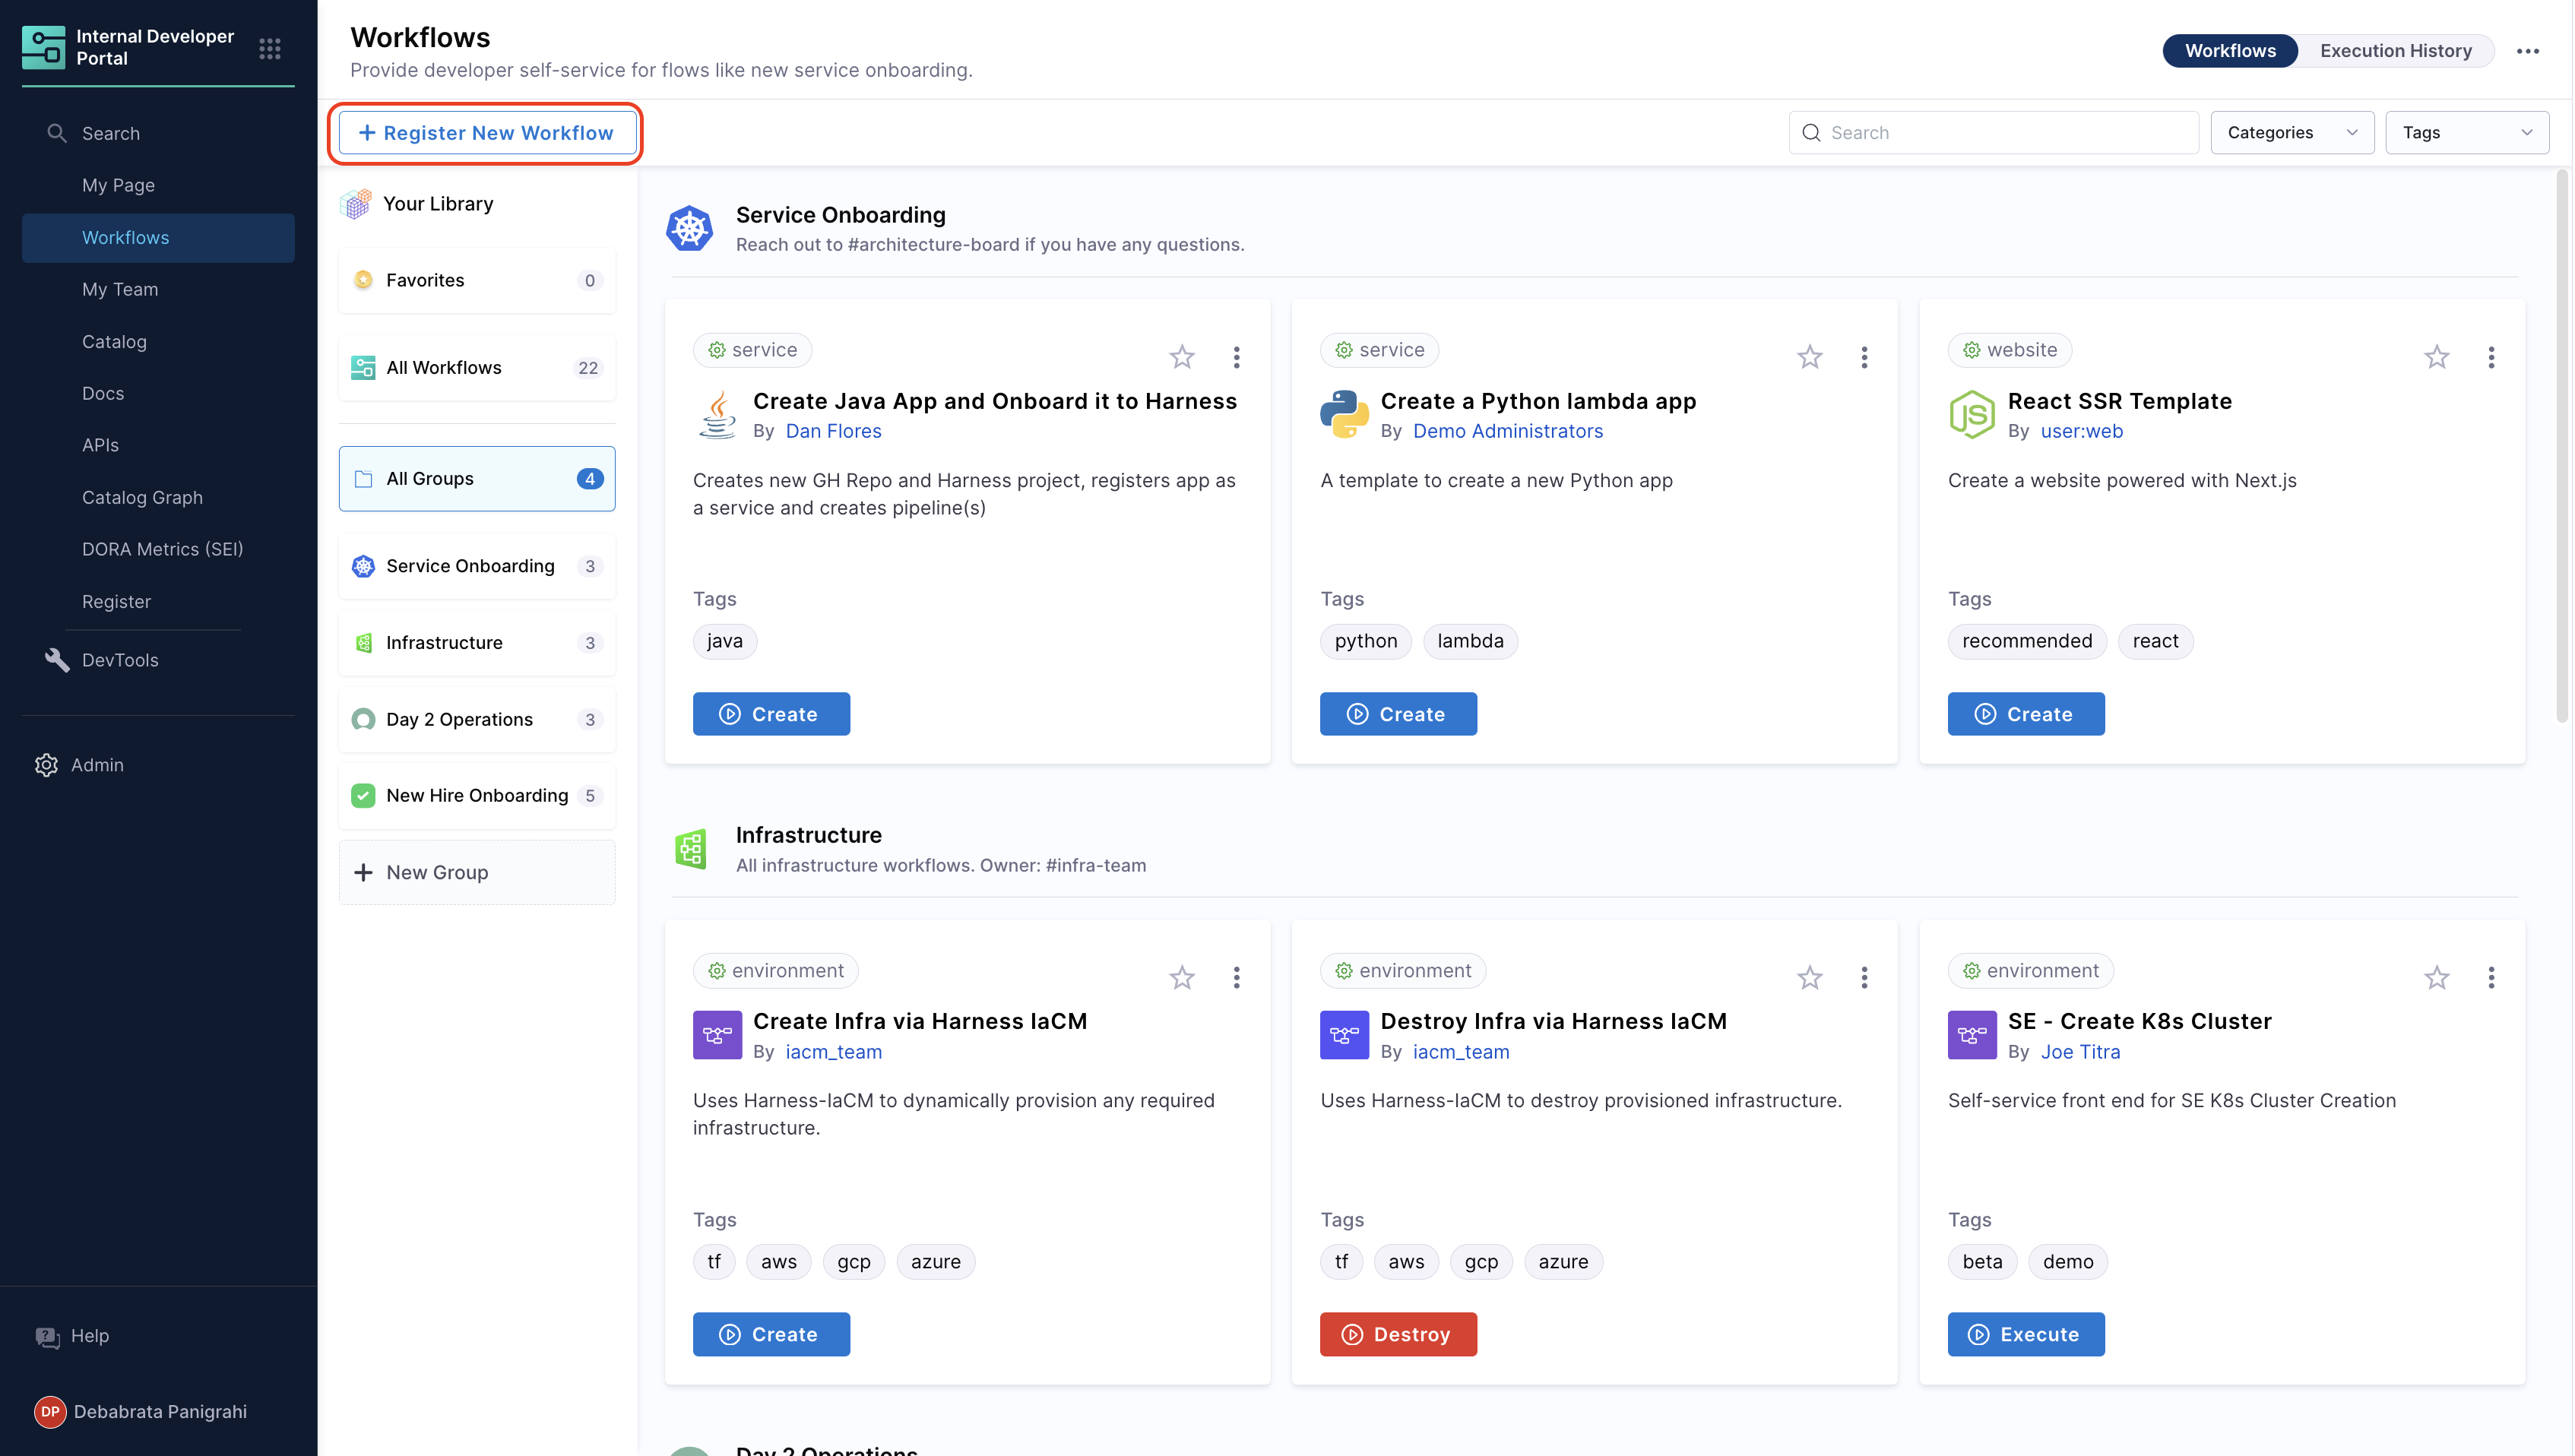
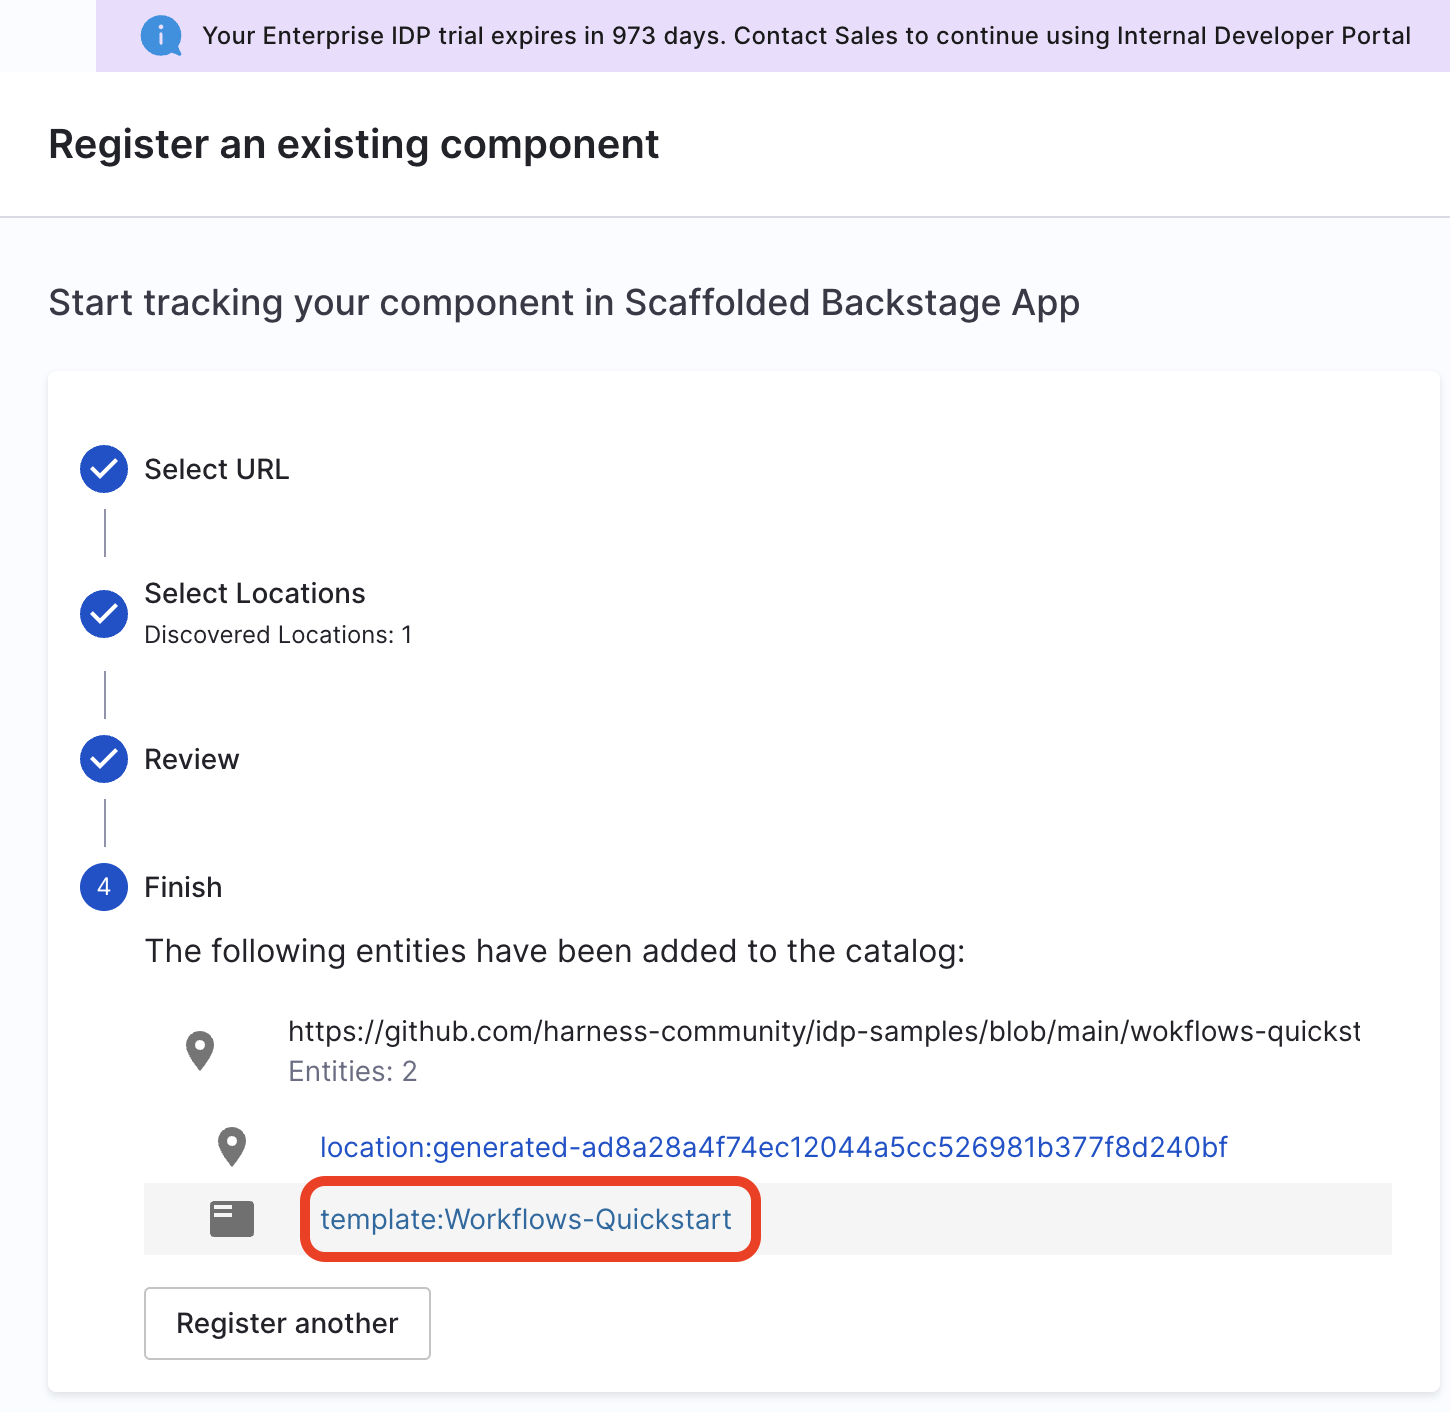
- In the left navigation, select Workflows, and then select Register New Workflow.
-
Enter the URL to your new
workflow.yaml.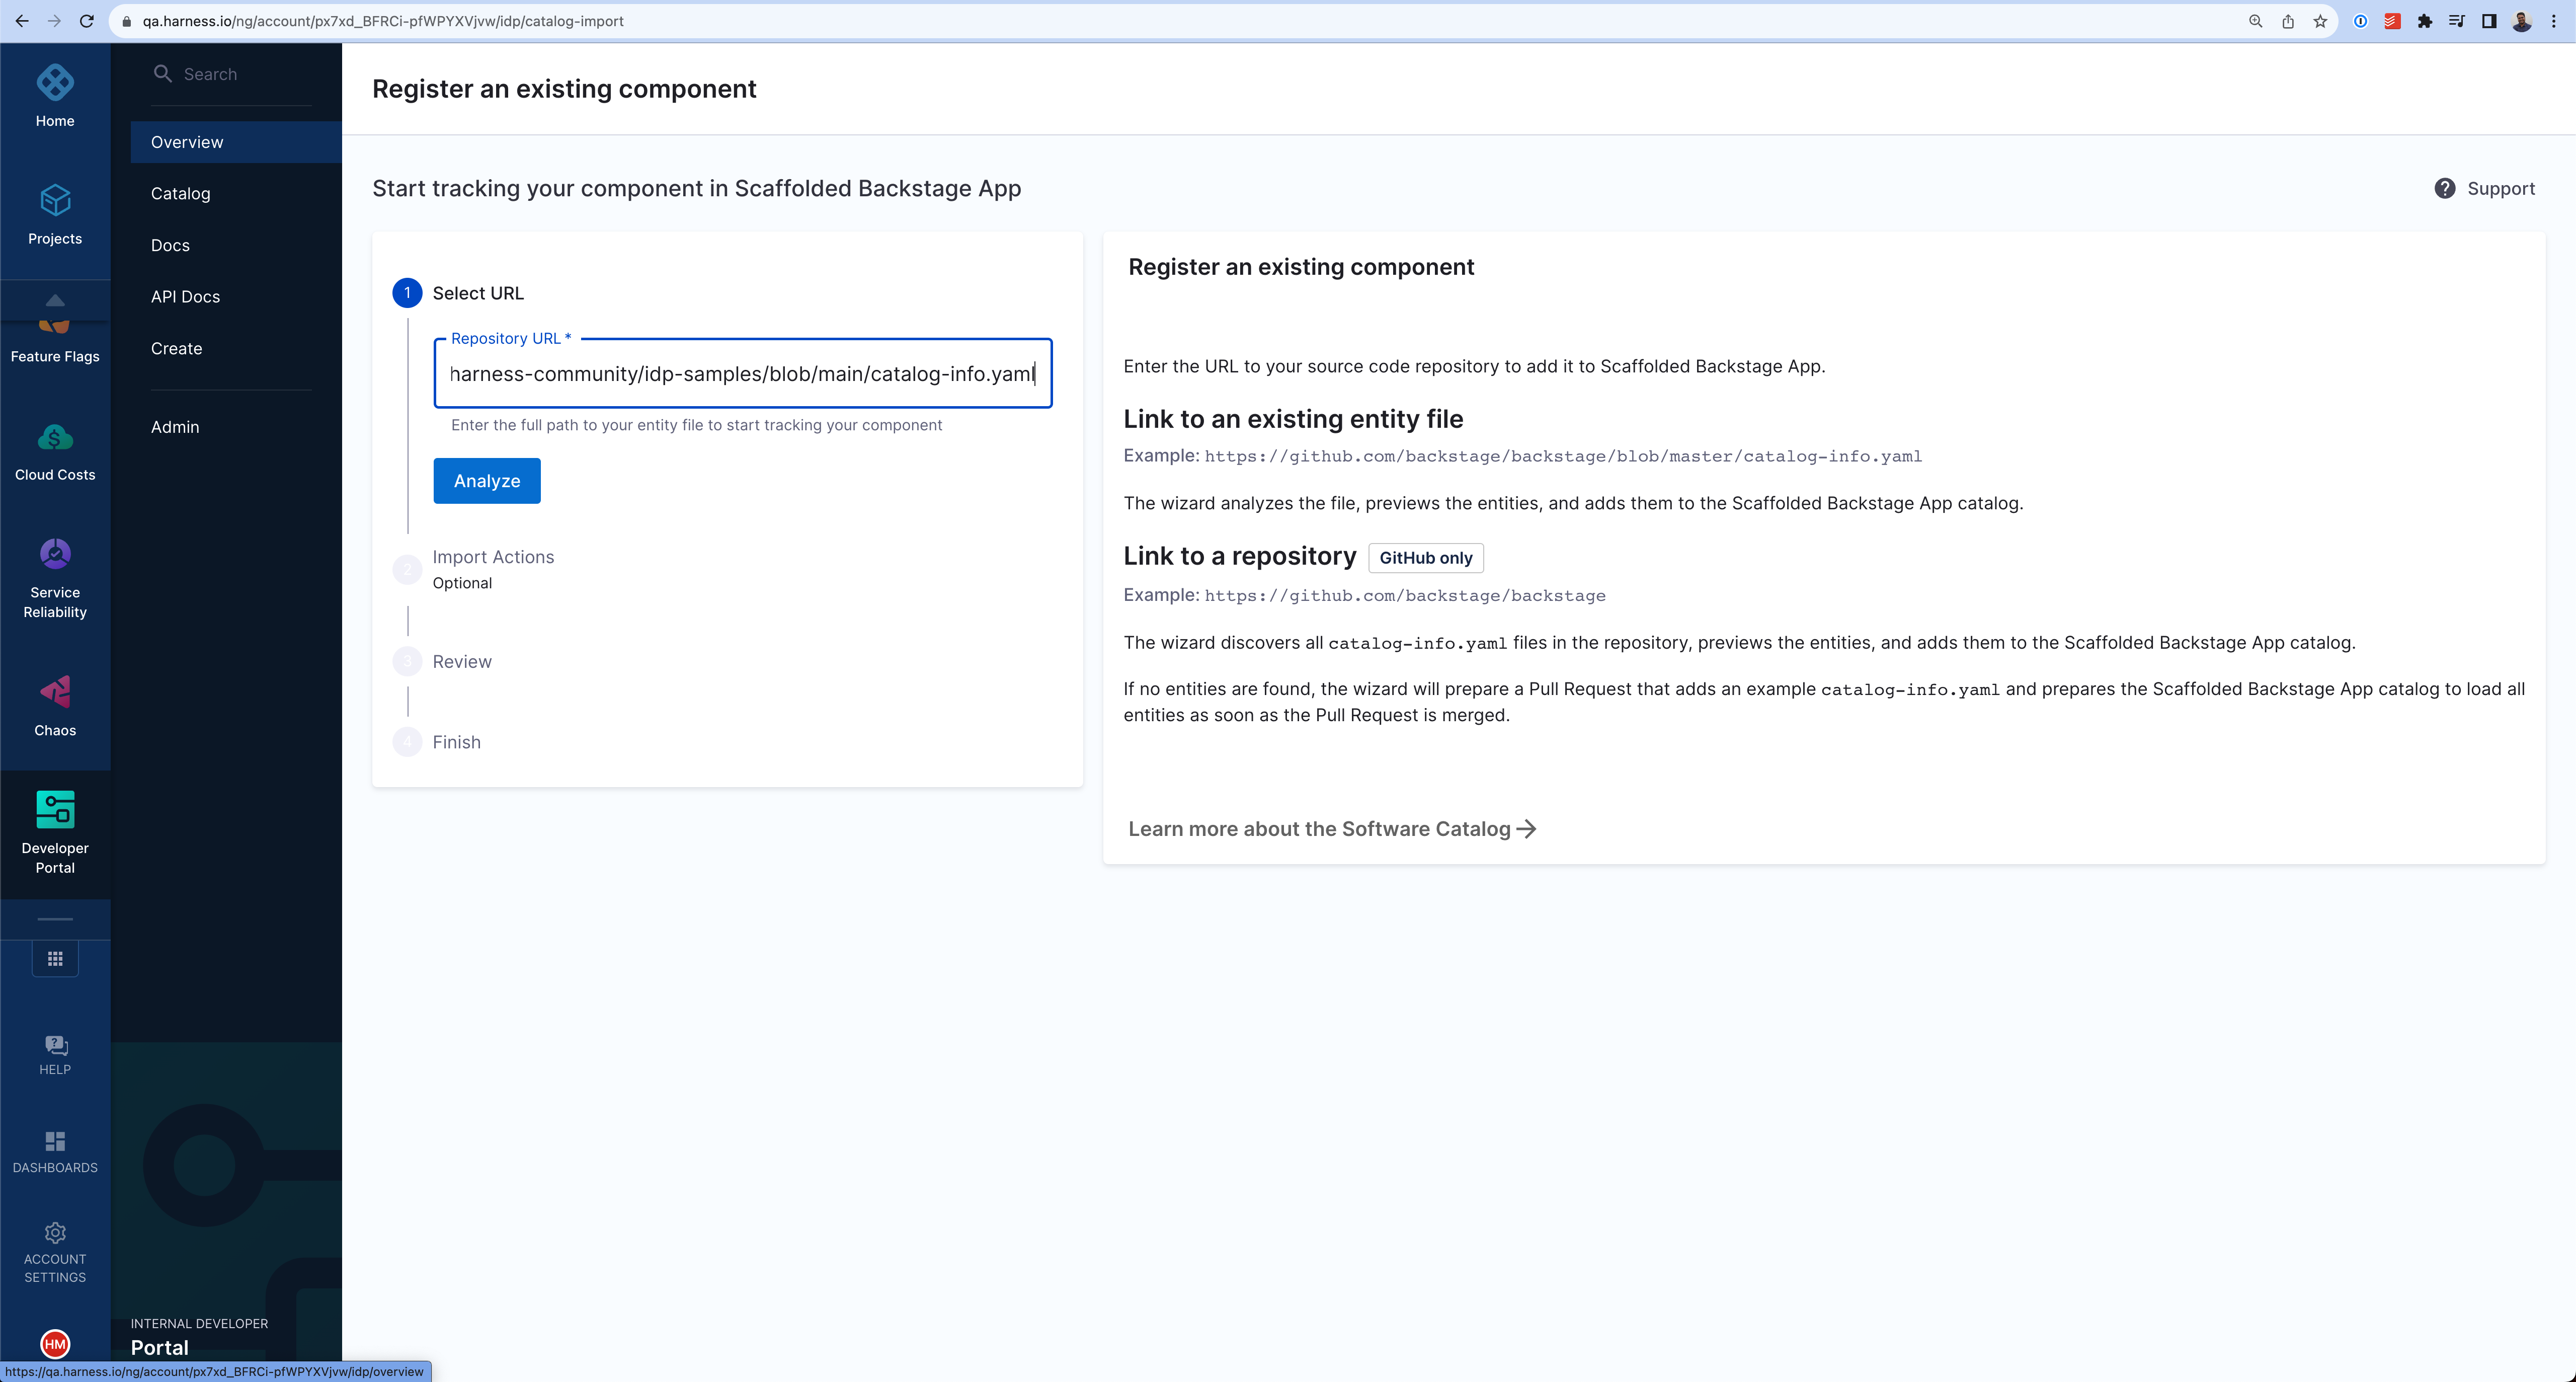
-
Select Import.

- Now click on the Workflow name
Use Workflows to Create a Repo
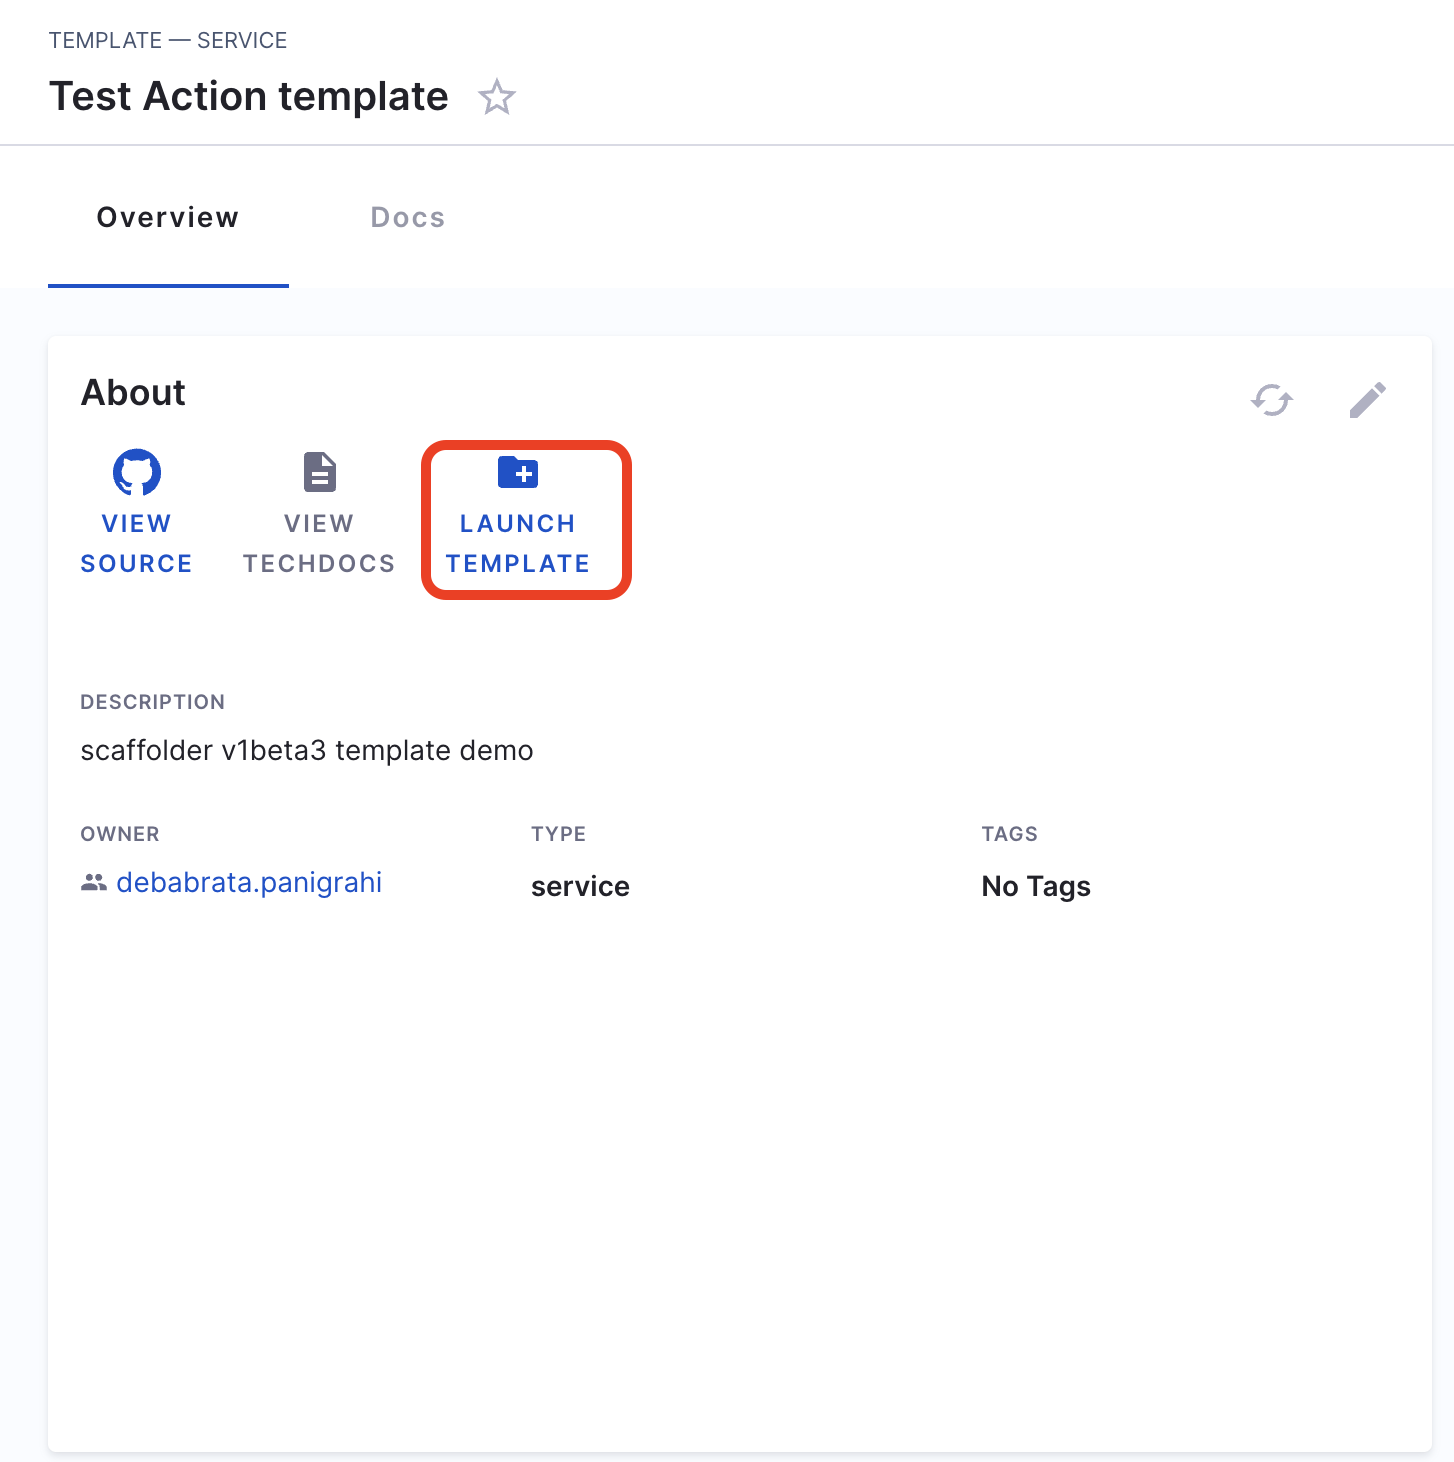
- Once you're on the entity page for Workflow, Launch the Workflow.
- Now fill the fields as:
- Repository Location: Add a name for the repository you wanted to create.
- GitHub Organization: Add the org where you want to add your new repository, usually GitHub URL are of the format
https://github.com/org_name/repo_name/
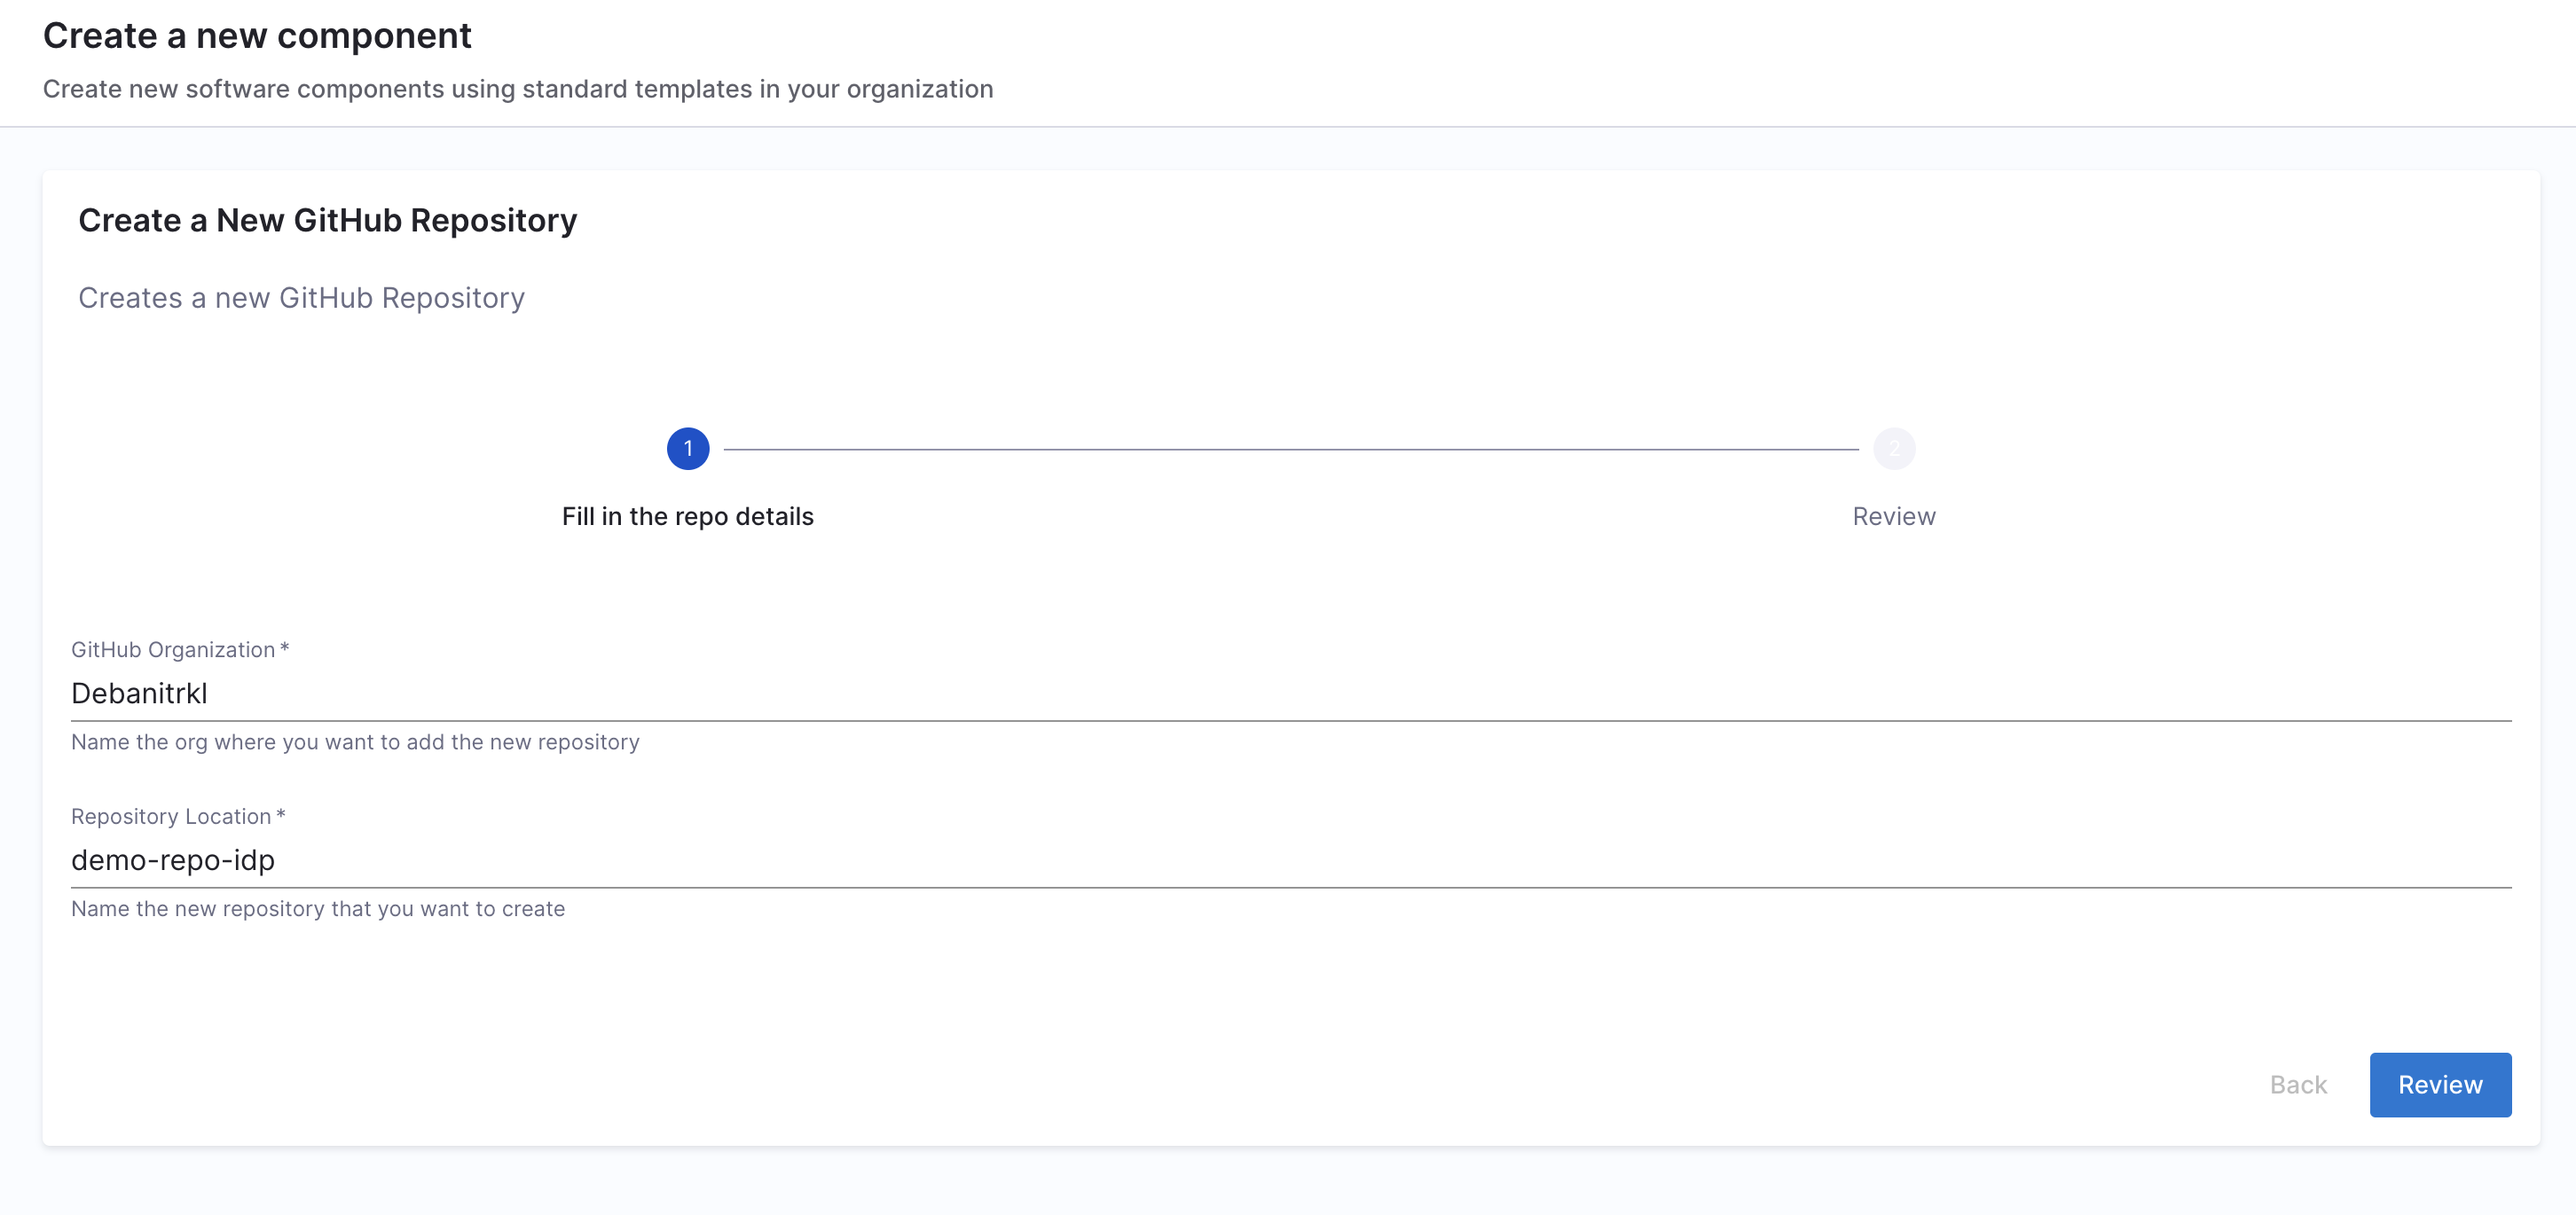
- Now Trigger the flow, it will create a new GitHub repo.

Delete the Workflow
If you want to unregister or delete the Workflow follow the steps mentioned here.