GitHub connector settings reference
This topic provides settings and permissions for the GitHub connector. For instructions and more information about code repo connectors, go to Connect to a Git repository.
Overview settings
- Name: The unique name for this connector. Harness generates an Id (Entity Identifier) based on the Name. You can edit the Id during initial connector creation. Once you save the connector, the Id is locked.
- Description: Optional text string.
- Tags: Optional labels you can use for filtering. For details, go to the Tags reference.
Details settings
The Details settings specify which GitHub account or repository you want this connector to connect to, whether to connect over HTTP or SSH, and the URL to use.
URL Type
Select Account to connect an entire GitHub account (or organization). This option lets you use one connector to connect to all repositories in the specified GitHub account. Make sure you have at least one repo in the account; you need a repo to test the connection and save the connector.
Select Repository to connect to a single, specific GitHub repository.
Connection Type
Select the protocol, HTTP or SSH, to use for cloning and authentication. The Connection Type determines the URL format required for the GitHub Account/Repository URL field. It also determines the Authentication method you must use in the Credentials settings.
GitHub Account/Repository URL
Enter the URL for the GitHub account or repository that you want to connect to. The required value is determined by the URL Type and Connection Type.
- URL Type: Account
- URL Type: Repository
In the GitHub Account URL field, provide only the account-identifying portion of the GitHub URL, such as https://github.com/YOUR_ACCOUNT_NAME/. Do not include a repo name. The URL format depends on the Connection Type:
- HTTP:
https://github.com/YOUR_ACCOUNT_NAME/orhttps://github.com - SSH:
git@github.com:YOUR_ACCOUNT_NAME/
Test Repository
This field is only required if the URL Type is Account. Provide the name of a repo in your GitHub account that Harness can use to test the connector. Harness uses this repo to validate the connection only. When you use this connector in a pipeline, you'll specify a true code repo in your pipeline configuration or at runtime.
In the GitHub Repository URL field, provide the complete URL to the GitHub repository that you want this connector to point to. The URL format depends on the Connection Type:
- HTTP:
https://github.com/YOUR_ACCOUNT_NAME/YOUR_REPO_NAME.git - SSH:
git@github.com:YOUR_ACCOUNT_NAME/YOUR_REPO_NAME.git
For Github Enterprise, the URL must include your hostname and the organization name, such as https://mygithub.com/harness/repo-name.git or git@mygithub.com:harness/repo-name.git. In these examples mygithub.com is the hostname and harness is the organization name.
Credentials settings
Provide authentication credentials for the connector.
Authentication
Authentication is required for all accounts and repos, including read-only repos. The Connection Type you chose in the Details settings determines the available Authentication methods:
- For HTTP connections, you can use Username and Token, OAuth, or GitHub App authentication.
- For SSH connections, you must use SSH Key authentication.
Whenever possible, Harness recommends using GitHub Apps with GitHub connectors for increased rate limits.
- Username and Token
- OAuth
- SSH Key
- GitHub App (Recommended)
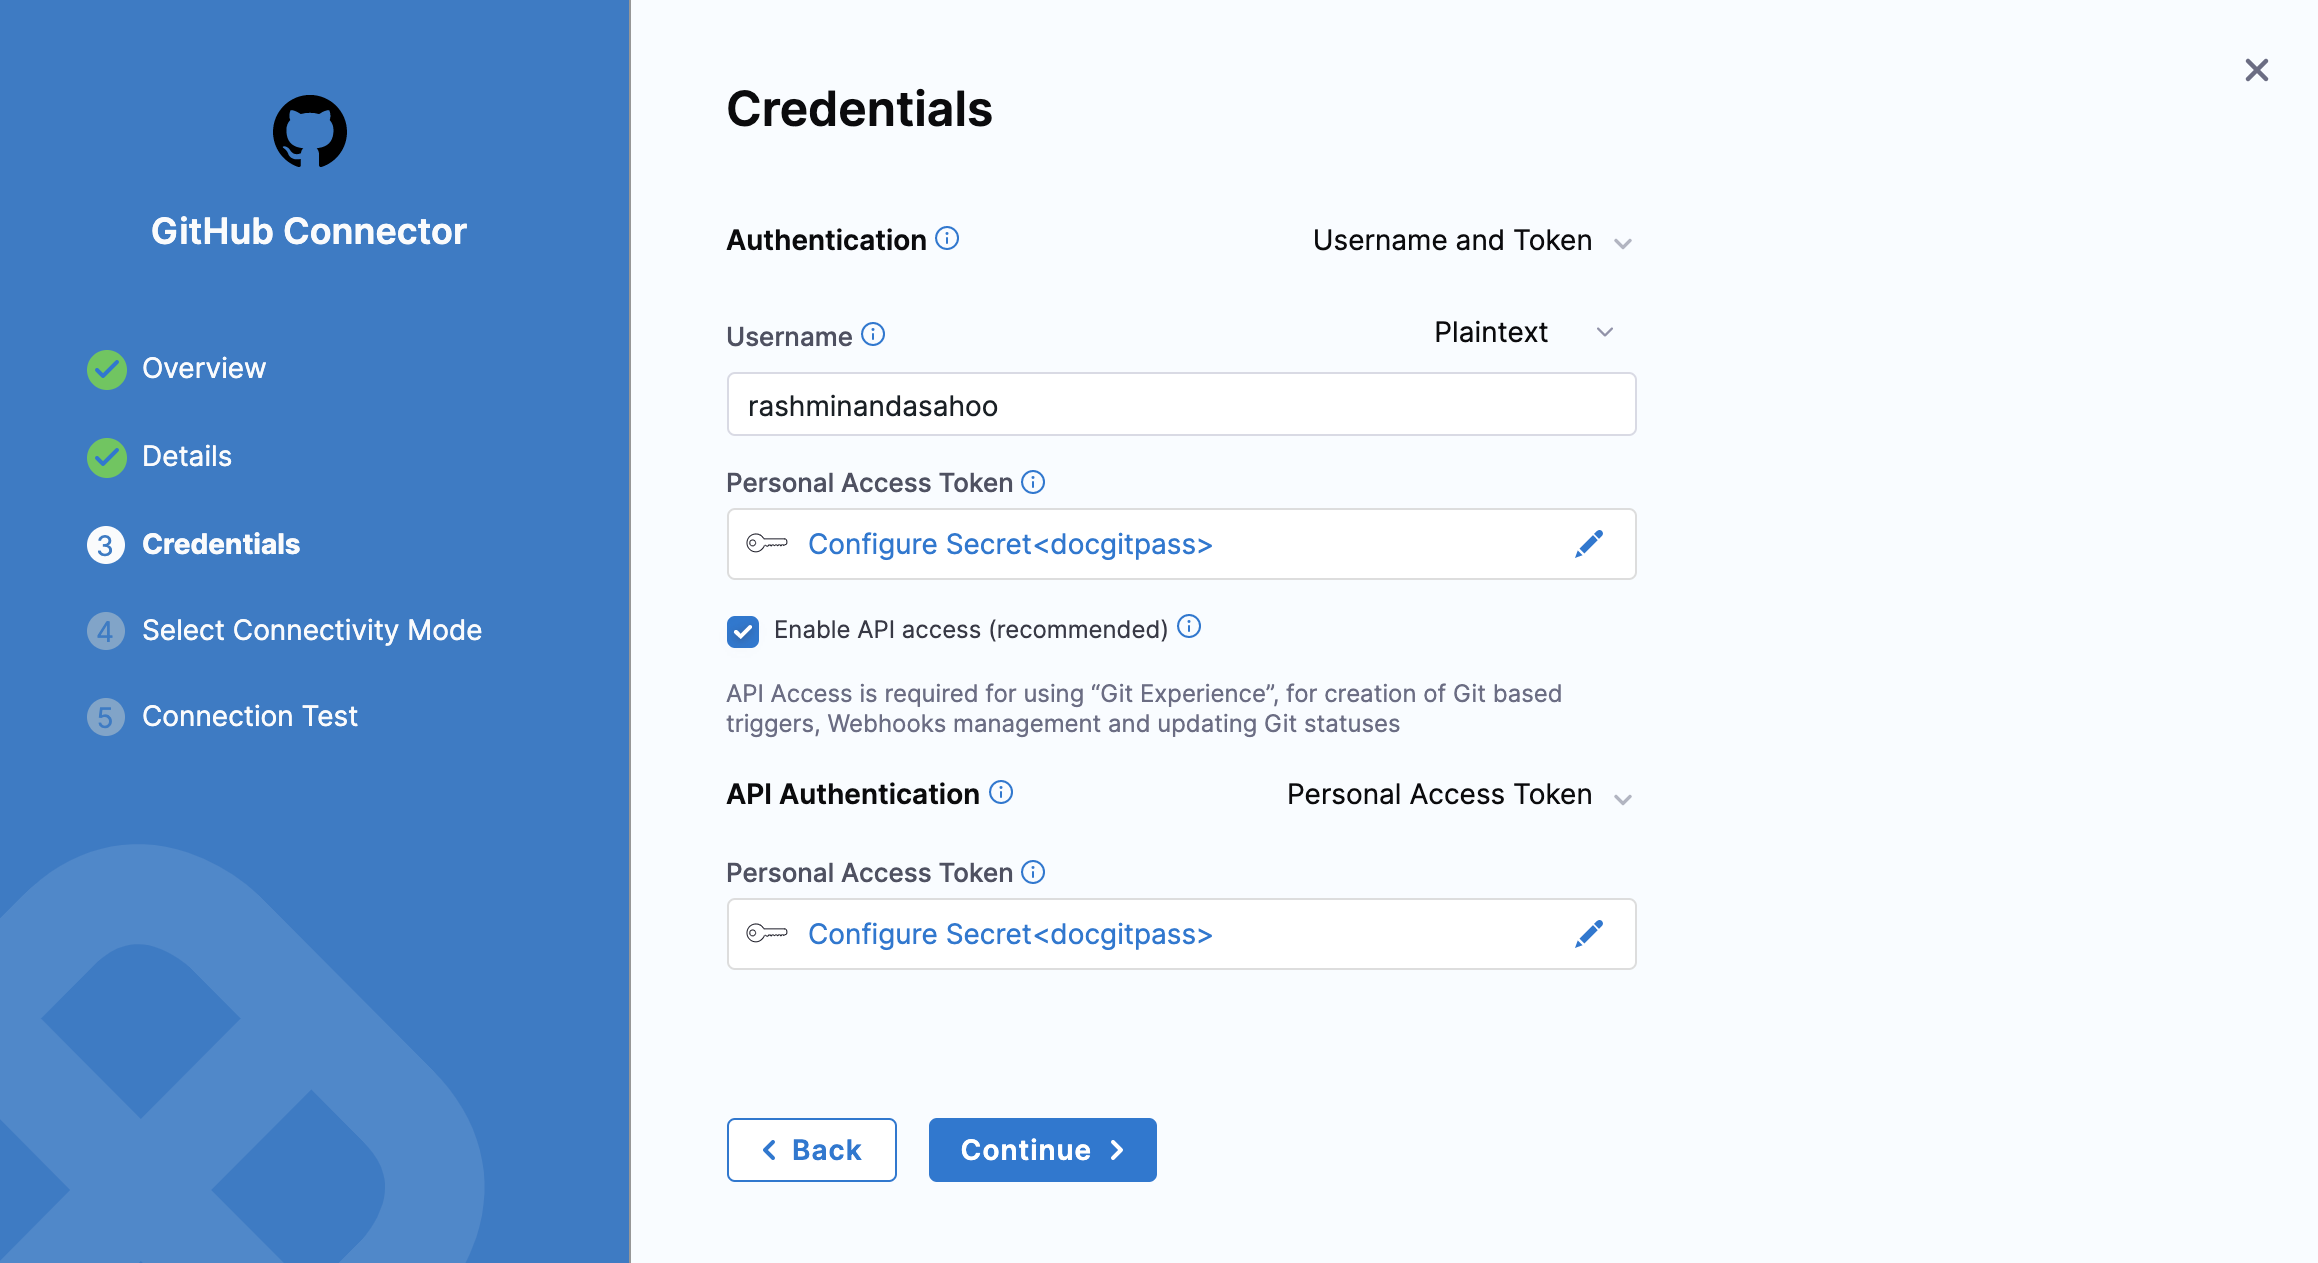
- For Authentication, select Username and Token.
- In the Username field, enter your personal GitHub account name. You can use either plaintext or a Harness encrypted text secret.
- In the Personal Access Token field, provide a GitHub personal access token as a Harness encrypted text secret.
- The GitHub user account that you use to create the token must have admin permissions on the repo.
- For GitHub organizations that use SAML single sign-on (SSO), you must authorize the token for use with SAML single sign-on.
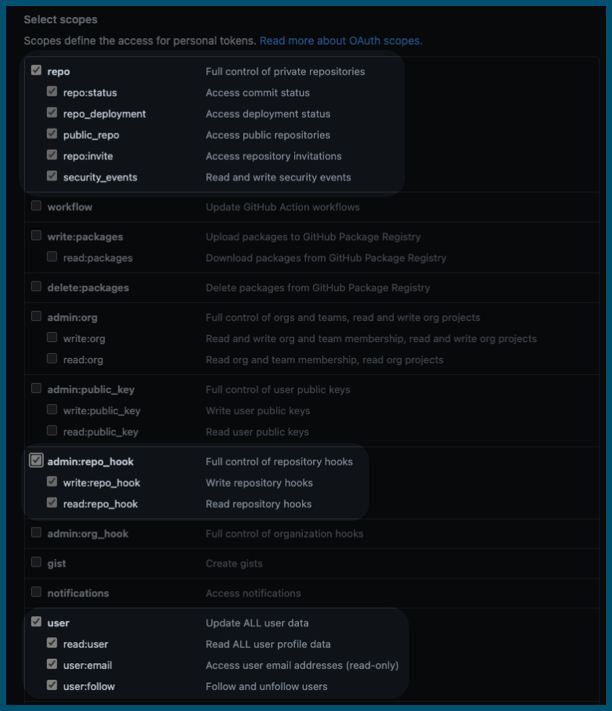
- The token must have all
repo,user, andadmin:repo_hookscopes. GitHub doesn't provide a way to scope tokens for read-only access to repos.

You can validate your token from the command line before using it in Harness. For example:
curl -i https://api.github.com -u <username>:<token>
Currently, OAuth for GitHub connectors is behind a feature flag. Contact Harness Support to enable the feature.
- For Authentication, select OAuth.
- Select Link to GitHub to open a new browser tab and authorize access to your GitHub organization/account.
SSH connections require an SSH key or a GitHub deploy key.
GitHub deploy keys grant access to a single repo. Using a deploy key ensures that the connector only works with the specific repo you defined in the Details settings.
SSH keys must be in PEM format. OpenSSH keys are not supported. For details on creating SSH keys and adding them to your GitHub account, go to the GitHub documentation about adding a new SSH Key. In Harness, SSH Keys are stored as Harness SSH credential secrets. When creating an SSH credential secret for a code repo connector, the SSH credential's Username must be git. Always save the ssh key as a file secret.
If you use the keygen command to generate an SSH key, include arguments such as rsa and -m PEM to ensure your key is properly formatted and uses the RSA algorithm. For example, this command creates an SSHv2 key:
ssh-keygen -t rsa -m PEM
Make sure to follow the prompts to finish creating the key. For more information, go to the Linux ssh-keygen man page.
For GitHub repos, your SSH key must use ECDSA or Ed25519 instead of RSA. As an example, the following ssh-keygen command generates a PEM-formatted SSH key in ECDSA:
ssh-keygen -t ecdsa -b 256 -f /home/user/Documents/ECDSA/key -m pem
For more information about GitHub's deprecation of RSA support, go to the GitHub announcement on Improving Git protocol security on GitHub.
You can use a GitHub App to authenticate a Harness GitHub connector. To use this authentication method, you need to create and install a GitHub App, get the app's installation ID and app ID, and create a private key for the app. For instructions, go to Use a GitHub App in a GitHub connector.
Harness recommends using GitHub Apps with GitHub connectors for increased rate limits.
-
For Authentication, select GitHub App.
-
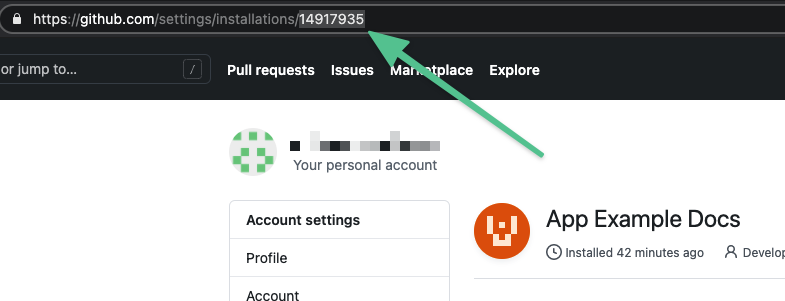
Enter the GitHub Installation Id. You can find the installation ID in the URL of your installed GitHub App, such as:
https://github.com/settings/installations/INSTALLATION_ID
-
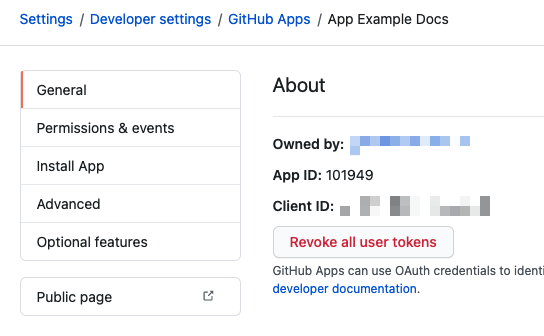
Enter the GitHub Application Id. You can find the app ID on the General tab when viewing your GitHub App in GitHub.

-
For GitHub Private Key, provide your GitHub App's PEM key file as a Harness encrypted file secret.
Enable API access
This setting is only available for connection types and authentication methods where it is not already enabled by default.
API access is required for any operations that require Harness to call GitHub APIs, such as using the Harness Git Experience, cloning codebases from PRs, automatically detecting branch names when you manually run pipelines, using Git webhook triggers, and updating Git statuses.
Enabling API access requires configuring an API authentication method, either a personal access token or a GitHub App.
- Personal Access Token
- GitHub App
-
For API Authentication, select Personal Access Token.
-
In the Personal Access Token field, provide a GitHub personal access token as a Harness encrypted text secret.
With Username and Token authentication, use the same personal access token secret for both Personal Access Token fields.

Personal access token permissions
- The GitHub user account that you use to create the token must have admin permissions on the repo.
- For GitHub organizations that use SAML single sign-on (SSO), you must authorize the token for use with SAML single sign-on.
- The token must have all
repo,user, andadmin:repo_hookscopes. GitHub doesn't provide a way to scope tokens for read-only access to repos.

To use this authentication method, you need to create and install a GitHub App, get the app's installation ID and app ID, and create a private key for the app. For instructions, go to Use a GitHub App in a GitHub connector.
-
For API Authentication, select GitHub App.
-
Enter the GitHub Installation Id. You can find the installation ID in the URL of your installed GitHub App, such as:
https://github.com/settings/installations/INSTALLATION_ID
-
Enter the GitHub Application Id. You can find the app ID on the General tab when viewing your GitHub App in GitHub.

-
For GitHub Private Key, provide your GitHub App's PEM key file as a Harness encrypted file secret.
Ensure your private key is in the correct format. For detailed steps, refer to Generate a private key.
Using an incorrect format will result in errors such as: Invalid request: Failed to generate token
Connectivity Mode settings
Select whether you want Harness to connect directly to your GitHub account or repo, or if you want Harness to communicate with your GitHub account or repo through a delegate. If you plan to use this connector with Harness Cloud build infrastructure, you must select Connect through Harness Platform.
About connectivity modes
If you select Connect through the Harness Platform, the Harness Manager exchanges a key pair with the Secrets Manager configured in Harness using an encrypted connection. Next, the Harness Manager uses the encrypted key and the encrypted secret and then discards them. The keys never leave the Harness Manager. Secrets are always encrypted in transit, in memory, and in the Harness database.
Connect through a Harness Delegate, a Harness Delegate handles the connection. This option is often used for Harness Self-Managed Enterprise Edition Overview.
For private network connectivity options with Harness Cloud, see Private network connectivity options.
Delegates Setup
If you select Connect through a Harness Delegate, you can select Use any available Delegate or Only use Delegates with all of the following tags.
If you want to use specific delegates, you must identify those delegates. For more information, go to Use delegate selectors.
Kubernetes delegate with self-signed certificates
If your codebase connector allows API access and connects through a Harness Delegate that uses self-signed certificates, you must specify ADDITIONAL_CERTS_PATH in the delegate pod, as described in Configure a Kubernetes build farm to use self-signed certificates.