Autocreation of Entities in Harness
Autocreation is a feature that allows you to automatically create entities in Harness when files are added remotely within your Git Repository. The files, in this case, are created within Git, so the object is initiated and created within your repository in the correct directory.
This differs from moving inline entities to Git and enabling bidirectional sync as for this case, customers would be initially creating objects from the Harness UI rather than initiating from Git, and do not have to follow a directory structure for the objects being saved in the Git Repo.
Pre-requisites of Autocreation
- Register the webhook for your repository where you are adding your files remotely. The scope of the webhook should match the entity it's trying to create. For example, a project-level webhook can only create entities within the same project, whereas an account-level webhook can create entities across multiple projects and the organizations.
- Added files should follow a specific file path convention based on the entity type. The file paths would be created manually and can be created on an as-needed-basis.
Files that are added only in the default branch(main, master etc) of the Git Repo are autocreated.
Limitations
Autocreation is not supported for Harness Code Repository. This is because autocreation relies on webhooks to detect when files are pushed to your repository, and Harness Code Repository does not currently support webhooks.
If you are using Harness Code Repository to store your YAML files, you will need to create entities manually through the Harness UI or use alternative Git Experience features. Go to move inline entities to Git to migrate existing entities, or go to enable bidirectional sync to configure automatic two-way synchronization.
For autocreation to work, use a supported Git provider that supports webhooks, such as GitHub, GitLab, Bitbucket, or Azure Repos.
File Path Convention
We need to follow a specific file convention for each entity for auto-creation. This is required to infer the scope of the entity as well as type of entity from the filepath.
Files under .harness folder are only used for auto-creation as of now. Therefore, to create files automatically via remote, all file paths must begin with .harness. Webhooks will, by default, track the .harness folder.
We will discuss the file path convention for each entity with an example:-
The file path name of the entity YAML can be anything, as the name and identifier of the entity are picked up from the YAML itself that you are pushing to your Git repository. If the name and identifier are not provided in the YAML, then the file name will be used as the name and identifier.
Pipelines
File path for storing your pipelines should follow the following naming convention:
.harness/orgs/<org_identifier>/projects/<project_identifier>/pipelines/<file_path_name>.yaml
- Folder name should be
pipelines.
For example :- .harness/orgs/test_org/projects/test_project/pipelines/demo_autocreation_pipeline.yaml
- Organization directory:
orgs - Organization identifier:
test_org - Projects directory:
projects - Project identifier:
test_project - Pipelines directory:
pipelines - Pipeline File Path name:
demo_autocreation_pipeline
Input Sets
File path for storing your input set should follow the following naming convention:
.harness/orgs/<org_identifier>/projects/<project_identifier>/pipelines/<pipeline_identifier>/input_sets/<file_path_name>.yaml
- Folder name should be
input_sets.
Input sets belonging to a pipeline will reside in the directory of pipeline identifier.
For example :- .harness/orgs/test_org/projects/test_project/pipelines/demo_autocreation_pipeline/input_sets/demo_autocreation_inputSet.yaml
- Organizations directory:
orgs - Organization identifier:
test_org - Projects directory:
projects - Project identifier:
test_project - Pipelines directory:
pipelines - Pipeline identifier:
demo_autocreation_pipeline - Input sets directory:
input_sets - Input Set File Path name:
demo_autocreation_inputSet
Templates
- Account Level
File path for storing template at Account level should follow the following naming convention:
.harness/templates/<template_identifier>/<file_path_name>.yaml
- Folder name should be
templates. - All version labels belonging to a template will reside in the directory of template identifier.
For example:- .harness/templates/test_template/v1.yaml
- Templates directory:
templates - Template identifier:
test_template - Version label/Version File Path name:
v1
- Organization Level
File path for storing template at Organization level should follow the following naming convention:
.harness/orgs/<org_identifier>/templates/<template_identifier>/<file_path_name>.yaml
For example:- .harness/orgs/test_org/templates/test_template/v1.yaml
- Organizations directory:
orgs - Organization identifier:
test_org - Templates directory:
templates - Template identifier:
test_org - Version label/Version File Path name:
v1
- Project Level
File path for storing template at Project level should follow the following naming convention:
.harness/orgs/<org_identifier>/projects/<project_identifier>/templates/<template_identifier>/<file_path_name>.yaml
For example:- .harness/orgs/test_org/projects/test_project/templates/template_autocreation_project_level/v1.yaml
- Organizations directory:
orgs - Organization identifier:
test_org - Projects directory:
projects - Project identifier:
test_project - Templates directory:
templates - Template identifier:
template_autocreation_project_level - Version label:
v1
Services
- Account Level
File path for storing Services at Account level should follow the following naming convention:
.harness/services/<file_path_name>.yaml.
- Folder name should be
services.
For example:- .harness/services/service_deploy_nginx_account.yaml
- Services directory:
services - Service File Path Name:
service_deploy_nginx_account
- Organization Level
File path for storing services at Organization level should follow the following naming convention:
.harness/orgs/<org_identifier>/services/<file_path_name>.yaml
For example:- .harness/orgs/test_org/services/service_deploy_nginx_org.yaml
- Organizations directory:
orgs - Organization identifier:
test_org - Services directory:
services - Service File Path Name:
service_deploy_nginx_org
- Project Level
File path for storing services at Project level should follow the following naming convention:
.harness/orgs/<org_identifier>/projects/<project_identifier>/services/<file_path_name>.yaml
- folder name should be
services.
For example:- .harness/orgs/test_org/projects/test_project/services/service_deploy_nginx_project.yaml
- Organizations directory:
orgs - Organization identifier:
test_org - Projects directory:
projects - Project identifier:
test_project - Services directory:
services - Service File Path Name:
service_deploy_nginx_project
Environments
- Account Level
File path for storing Environment at Account level should follow the following naming convention:
.harness/envs/<environment_type>/<file_path_name>.yaml
- Folder name should be
envsfollowed by the type of environmentproductionorpre_production.
For example:- .harness/envs/pre_production/qa.yaml
- Environment directory:
envs - Environment type:
pre_production - Environment File Path name:
qa
- Organization Level
File path for storing Environment at Organization level should follow the following naming convention:
.harness/orgs/<org_identifier>/envs/<environment_type>/<file_path_name>.yaml
For example:- .harness/orgs/test_org/envs/pre_production/qa_org.yaml
- Organization directory:
orgs - Organization identifier:
test_org - Environment directory:
envs - Environment type:
pre_production - Environment File Path name:
qa_org
- Project Level
File path for storing Environment at Project level should follow the following naming convention:
.harness/orgs/<org_identifier>/projects/<project_identifier>/envs/<environment_type>/<file_path_name>.yaml
For example:- .harness/orgs/test_org/projects/test_project/envs/pre_production/Pre_Prod_qa_project_level.yaml
- Organizations directory:
orgs - Organization identifier:
test_org - Projects directory:
projects - Project identifier:
test_project - Environment directory:
envs - Environment type:
pre_production - Environment File Path name:
qa_project_level
Infrastructures
- Account Level
File path for storing Infrastructure at Account level should follow the following naming convention:
.harness/envs/<environment_type>/<environment_identifier>/infras/<file_path_name>.yaml
- All infrastructures belonging to an environment will reside in the directory of type of environment followed by environment identifier.
- Folder name should be
infras
For example:- .harness/envs/pre_production/qa/infras/infra_account_level.yaml
- Environments directory:
envs - Environment type:
pre_production - Environment identifier:
qa - Infrastructure directory:
infras - Infrastructure File Path name:
infra_account_level
- Project Level
File path for storing Infrastructure at Project level should follow the following naming convention:
.harness/orgs/<org_identifier>/projects/<project_identifier>/envs/<environment_type>/<environment_identifier>/infras/<file_path_name>.yaml
For example:- .harness/orgs/test_org/projects/test_project/envs/pre_production/qa_project_level/infras/infra_project_level.yaml
- Organization directory:
orgs - Organization identifier:
test_org - Projects directory:
projects - Project identifier:
test_project - Environment directory:
envs - Environment type:
pre_production - Environment identifier:
qa_project_level - Infrastructure directory:
infras - Infrastructure File Path name:
infra_project_level
Overrides
Overrides allow for specific configurations at different scope levels, such as Account, Organization, and Project, for various Harness entities like Environment, Service, and Infrastructure. The file path conventions for these overrides vary depending on the scope level.
Global Environment Overrides
- Account Level
To create a global environment override at the account level, use the following file path convention:
.harness/overrides/[ENV_REF]/<file_path_name>.yaml
For example:- .harness/overrides/account.pre_production/overrides.yaml
- Overrides directory:
overrides - ENV_REF:
account.pre_production - Overrides File Path name:
overrides
- Organization Level
To create a global environment override at the organization level, use the following file path convention:
.harness/orgs/<org_identifier>/overrides/[ENV_REF]/<file_path_name>.yaml
For example:- .harness/orgs/test_org/overrides/org.pre_prod/overrides.yaml
- Organization directory:
orgs - Organization identifier:
test_org - Overrides directory:
overrides - ENV_REF:
org.pre_prod - Overrides File Path name:
overrides
- Project Level
To create a global environment override at the project level, use the following file path convention:
.harness/orgs/<org_identifier>/projects/<project_identifier>/overrides/[ENV_REF]/<file_path_name>.yaml
For example:- .harness/orgs/test_org/projects/test_project/overrides/test_environment/overrides.yaml
- Organization directory:
orgs - Organization identifier:
test_org - Projects directory:
projects - Project identifier:
test_project - Overrides directory:
overrides - ENV_REF:
test_environment - Overrides File Path name:
overrides
Services and Environment Overrides
- Account Level
To create a Services and Environment Overrides at the Account level, use the following file path convention:
.harness/overrides/[ENV_REF]/services/[SERVICE_REF]/<file_path_name>.yaml
For example:- .harness/overrides/account.pre_production/services/account.test_demo/overrides.yaml
- Overrides directory:
overrides - ENV_REF:
account.pre_production - Service directory:
services - SERVICE_REF:
account.test_demo - Overrides File Path name:
overrides
- Organization Level
To create a Services and Environment Overrides override at the organization level, use the following file path convention:
.harness/orgs/<org_identifier>/overrides/[ENV_REF]/services/[SERVICE_REF]/<file_path_name>.yaml
For example:- .harness/orgs/test_org/overrides/org.pre_prod/services/org.test_demo/overrides.yaml
- Organization directory:
orgs - Organization identifier:
test_org - Overrides directory:
overrides - ENV_REF:
org.pre_prod - Service directory:
services - SERVICE_REF:
org.test_demo - Overrides File Path name:
overrides
In this example, both the service (org.test_demo) and environment (org.pre_prod) are from the organization level. However, the path can represent different combinations, such as an organization-level service with an account-level environment or vice versa
- Project level
To create a Services and Environment Overrides override at the project level, use the following file path convention:
.harness/orgs/<org_identifier>/projects/test_project/overrides/test_environment/services/[SERVICE_REF]/<file_path_name>.yaml
For example:- .harness/orgs/test_org/projects/<project_identifier>/overrides/[ENV_REF]/services/test_demo/overrides.yaml
- Organization directory:
orgs - Organization identifier:
test_org - Projects directory:
projects - Project identifier:
test_project - Overrides directory:
overrides - Service directory:
services - SERVICE_REF:
test_demo - ENV_REF:
test_environment - Overrides File Path name:
overrides
Environment and Infrastructure Overrides
- Account Level
To create an Environment and Infrastructure Overrides at the Account Level, use the following file path convention:
.harness/overrides/[ENV_REF]/infras/[INFRA_ID]/<file_path_name>.yaml
For example:-.harness/overrides/account.pre_production/infras/infra_test/overrides.yaml
- Overrides directory:
overrides - ENV_REF:
account.pre_production - Infrastructure directory:
infras - INFRA_ID:
infra_test - Overrides File Path name:
overrides
- Organization Level
To create an Environment and Infrastructure Overrides at the Organization level, use the following file path convention:
.harness/orgs/<org_identifier>/overrides/[ENV_REF]/infras/[INFRA_ID]/<file_path_name>.yaml
For example:-.harness/orgs/test_org/overrides/org.pre_production/infras/infra_test/overrides.yaml
- Organization directory:
orgs - Organization identifier:
test_org - Overrides directory:
overrides - ENV_REF:
org.pre_production - Infrastructure directory:
infras - INFRA_ID:
infra_test - Overrides File Path name:
overrides
- Project Level
To create an Environment and Infrastructure Overrides at the Project level, use the following file path convention:
.harness/orgs/<org_identifier>/projects/<project_identifier>/overrides/[ENV_REF]/infras/[INFRA_ID]/<file_path_name>.yaml
For example:- .harness/orgs/test_org/projects/test_project/overrides/pre_production/infras/infra_test/overrides.yaml
- Organization directory:
orgs - Organization identifier:
test_org - Project directory:
projects - Project identifier:
test_project - Overrides directory:
overrides - ENV_REF:
pre_production - Infrastructure directory:
infras - INFRA_ID:
infra_test - Overrides File Path name:
overrides
Service and Infrastructure Overrides
- Account Level
To create a Service and Infrastructure Overrides at the Account Level, use the following file path convention:
.harness/overrides/[ENV_REF]/services/[SERVICE_REF]/infras/[INFRA_ID]/<file_path_name>.yaml
For example:- .harness/overrides/account.pre_production/services/account.test_demo/infras/infra_test/overrides.yaml
- Overrides directory:
overrides - ENV_REF:
account.pre_production - Service directory:
services - SERVICE_REF:
account.test_demo - Infrastructure directory:
infras - INFRA_ID:
infra_test - Overrides File Path name:
overrides
- Organization Level
To create a Service and Infrastructure Overrides at the Organization Level, use the following file path convention:
.harness/orgs/<org_identifier>/overrides/[ENV_REF]/services/[SERVICE_REF]/infras/[INFRA_ID]/<file_path_name>.yaml
For example:- .harness/orgs/test_org/overrides/org.pre_production/services/org.test_demo/infras/infra_test/overrides.yaml
- Organization directory:
orgs - Organization identifier:
test_org - Overrides directory:
overrides - ENV_REF:
org.pre_production - Service directory:
services - SERVICE_REF:
org.test_demo - Infrastructure directory:
infras - INFRA_ID:
infra_test - Overrides File Path name:
overrides
- Project Level
To create a Service and Infrastructure Overrides at the Project Level, use the following file path convention:
.harness/orgs/<org_identifier>/projects/<project_identifier>/overrides/[ENV_REF]/services/[SERVICE_REF]/infras/[INFRA_ID]/<file_path_name>.yaml
For example:- .harness/orgs/test_org/projects/test_project/overrides/pre_production/services/test_demo/infras/infra_test/overrides.yaml
- Organization directory:
orgs - Organization identifier:
test_org - Project directory:
projects - Project identifier:
test_project - Overrides directory:
overrides - ENV_REF:
pre_production - Service directory:
services - SERVICE_REF:
test_demo - Infrastructure directory:
infras - INFRA_ID:
infra_test - Overrides File Path name:
overrides
Creation of Entities
GitHub's API returns at most 300 modified files in a webhook event. For commits that modify 300 or more files, Harness automatically switches to extracting file paths directly from the webhook payload instead of relying on GitHub's API. This ensures that all modified files are detected and processed for autocreation, regardless of commit size.
This behavior is controlled by the feature flag PIPE_GITX_DISABLE_WEBHOOK_PAYLOAD_PROCESSING. By default, webhook payload processing is enabled for large commits. If you need to disable it, contact Harness Support to enable this feature flag.
Entity creation limit
To protect system performance and avoid hitting Git provider rate limits, Harness enforces a limit of 500 entities that can be created from a single webhook event.
When a commit contains more than 500 entity files:
- The first 500 entities are created normally.
- Remaining files are skipped and tracked as unprocessed.
- The webhook event status is set to WARNING with a message listing the unprocessed files.
Example warning message:
Maximum entity creation limit of 500 exceeded. X files were not processed: [file list]
Example hint:
Please avoid creating too many files in a single commit. Break them into smaller commits for a seamless experience.
The entity creation limit is controlled by the feature flag PIPE_GITX_DISABLE_AUTO_CREATION_LIMIT. By default, the 500-entity limit is active. If you need to disable this limit, contact Harness Support to enable this feature flag.
Break large commits into batches of fewer than 500 entity files to ensure all entities are created successfully. You can track the status of webhook events — including any warnings about unprocessed files — on the Webhooks > Events page in your project or account settings.
Since we have discussed the file path conventions for each entities let's see how to create entities with help of autocreation. We are going to discuss creation of Pipeline and Input set in these examples, similar approach can be followed for creating other entities like Services, Environments, Templates and Infrastructure.
You can refer to YAML schema for creating Harness entities via YAML.
Pipelines
In this example, we are going to follow the same names that we have discussed while discussing file path examples of different entities.
Let's create a pipeline under organization default and project Krishika_test_autocreation.
We have our pipeline yaml stored under pipeline directory :-
.harness/orgs/default/projects/Krishika_test_autocreation/pipelines/demo_autocreation_pipeline.yaml
Let's consider this example yaml that we are going to put under demo_autocreation_pipeline.yaml:
pipeline:
  name: demo_autocreation_pipeline
  identifier: demo_autocreation_pipeline
  projectIdentifier: Krishika_test_autocreation
  orgIdentifier: default
  tags: {}
  stages:
    - stage:
        name: custom
        identifier: custom
        description: ""
        type: Custom
        spec:
          execution:
            steps:
              - step:
                  type: ShellScript
                  name: ShellScript_1
                  identifier: ShellScript_1
                  spec:
                    shell: Bash
                    executionTarget: {}
                    source:
                      type: Inline
                      spec:
                        script: |
                          input_variable=<+pipeline.variables.input_variable>
                          echo "the value is:$input_variable"
                    environmentVariables: []
                    outputVariables: []
                  timeout: 10m
        tags: {}
  variables:
    - name: input_variable
      type: String
      description: ""
      required: false
      value: <+input>
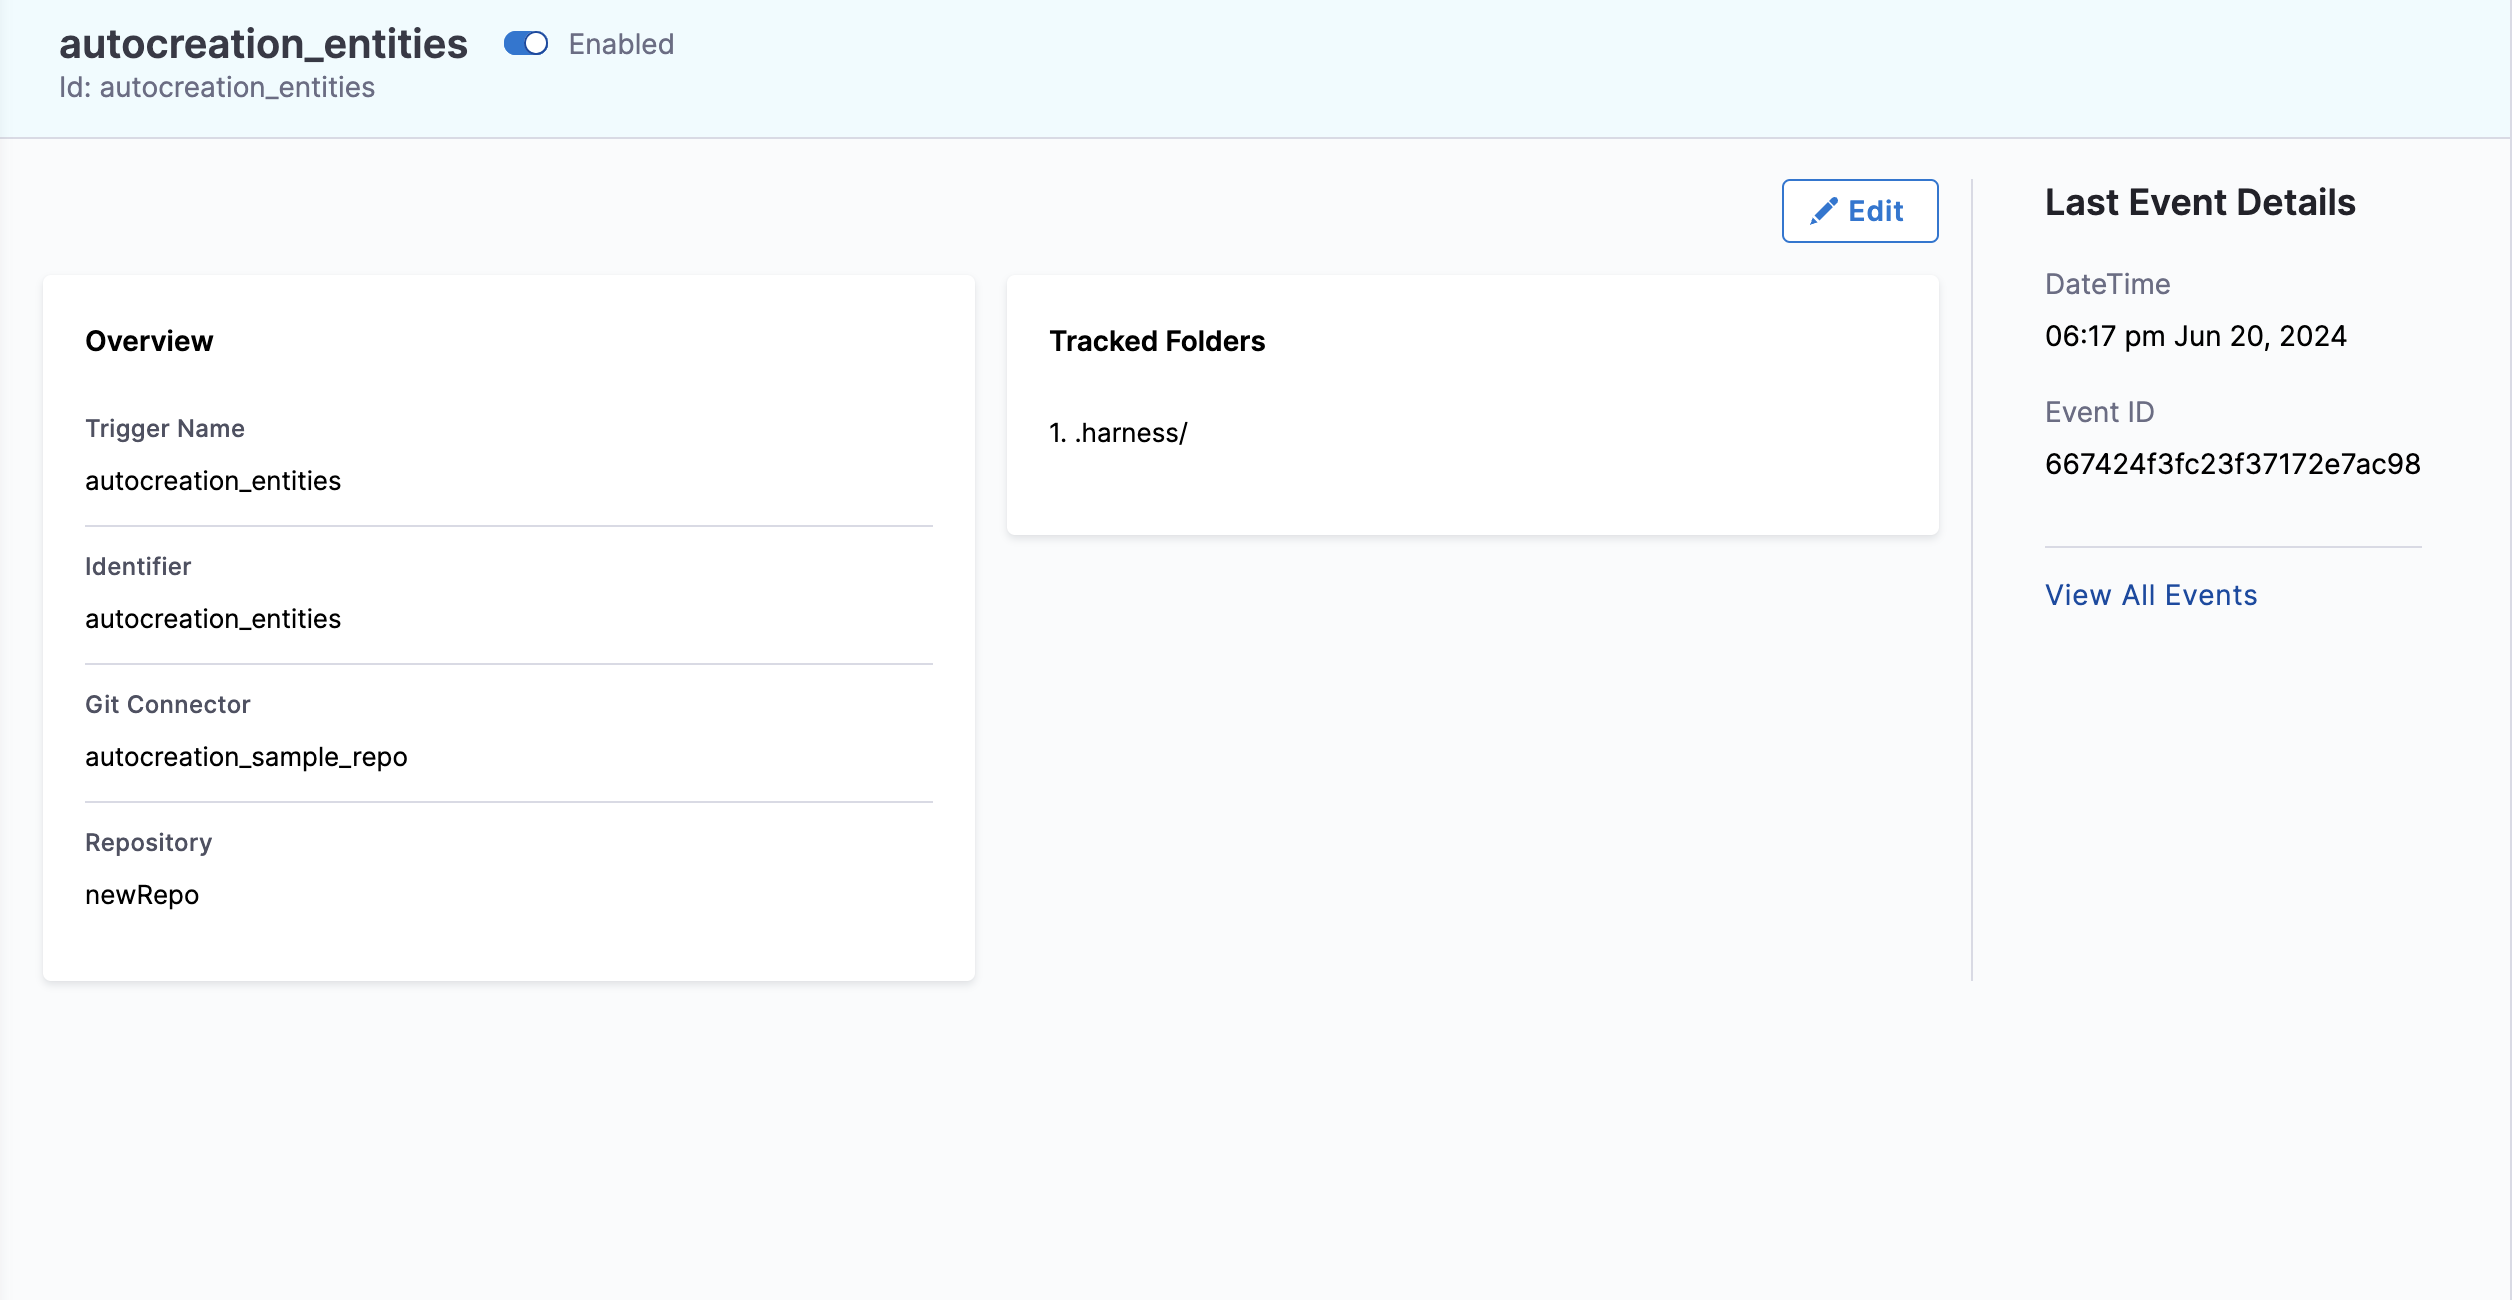
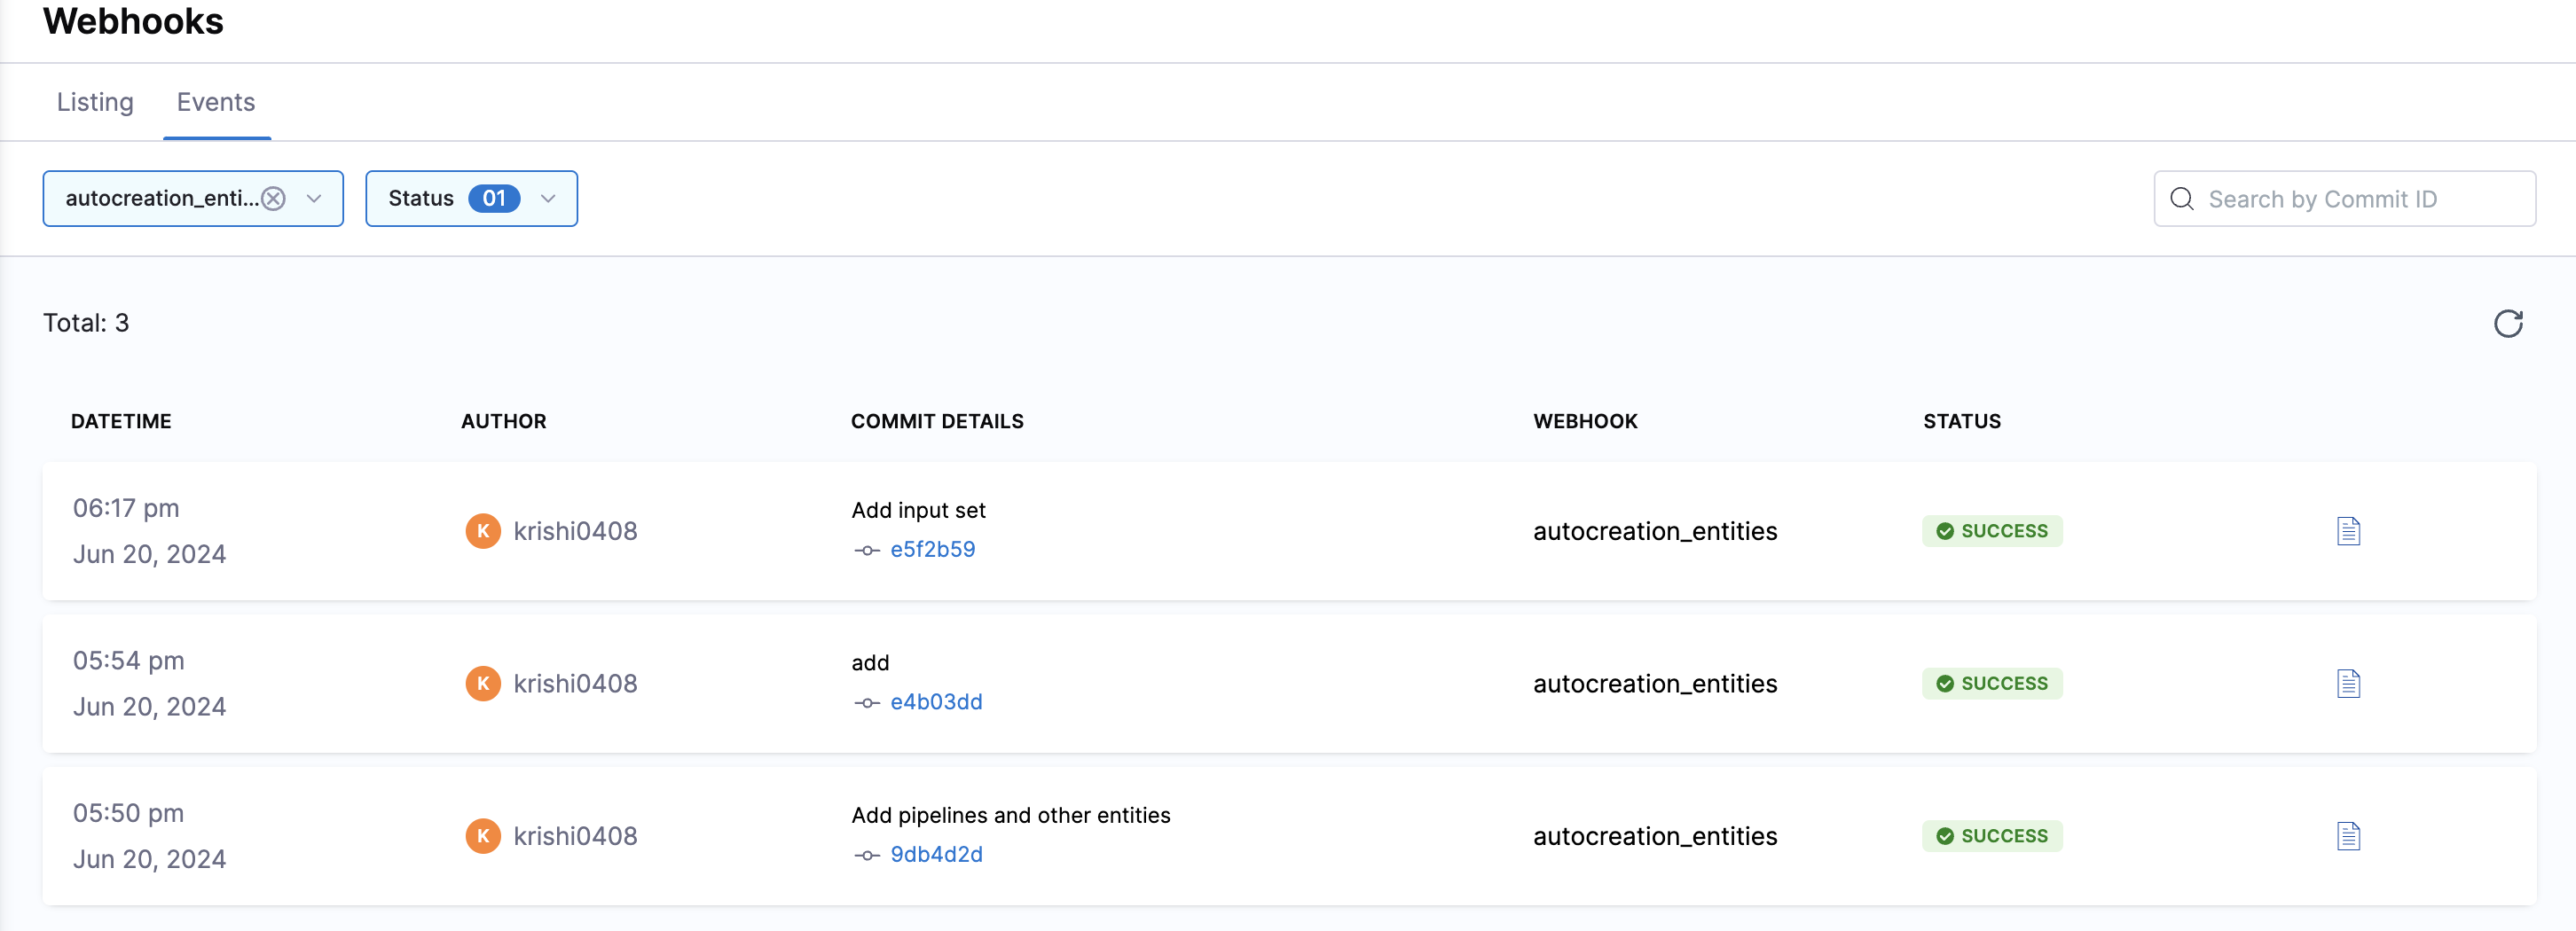
After saving this YAML file, we will push it to our Git repository, for which we have registered the webhook in Harness. We can then view this event on our Webhook Events page.
git add .harness/orgs/default/projects/Krishika_test_autocreation/pipelines/demo_autocreation_pipeline.yaml
git commit -m "Add pipeline yaml"
git push
After pushing the changes, pipeline named as demo_autocreation_pipeline is created in Organization default under the Project Krishika_test_autocreation .

Input Sets
Let's create an Input set that we are going to use inside our Pipeline demo_autocreation_pipeline.
We have our input set YAML stored under the directory of the pipeline identifier demo_autocreation_pipeline, specifically under the input_sets directory :
.harness/orgs/default/projects/Krishika_test_autocreation/pipelines/demo_autocreation_pipeline/input_sets/demo_autocreation_inputSet.yaml
Let's consider this example yaml that we are going to put under demo_autocreation_inputSet.yaml:
inputSet:
  name: input_set
  tags: {}
  identifier: input_set
  orgIdentifier: default
  projectIdentifier: Krishika_test_autocreation
  pipeline:
    identifier: demo_autocreation_pipeline
    variables:
      - name: input_variable
        type: String
        value: hello
After saving this YAML file, we will push it to our Git repository, for which we have registered the webhook in Harness. We can then view this event on our Webhook Events page.
git add .harness/orgs/default/projects/Krishika_test_autocreation/pipelines/demo_autocreation_pipeline/demo_autocreation_inputSet.yaml
git commit -m "Add input set yaml"
git push
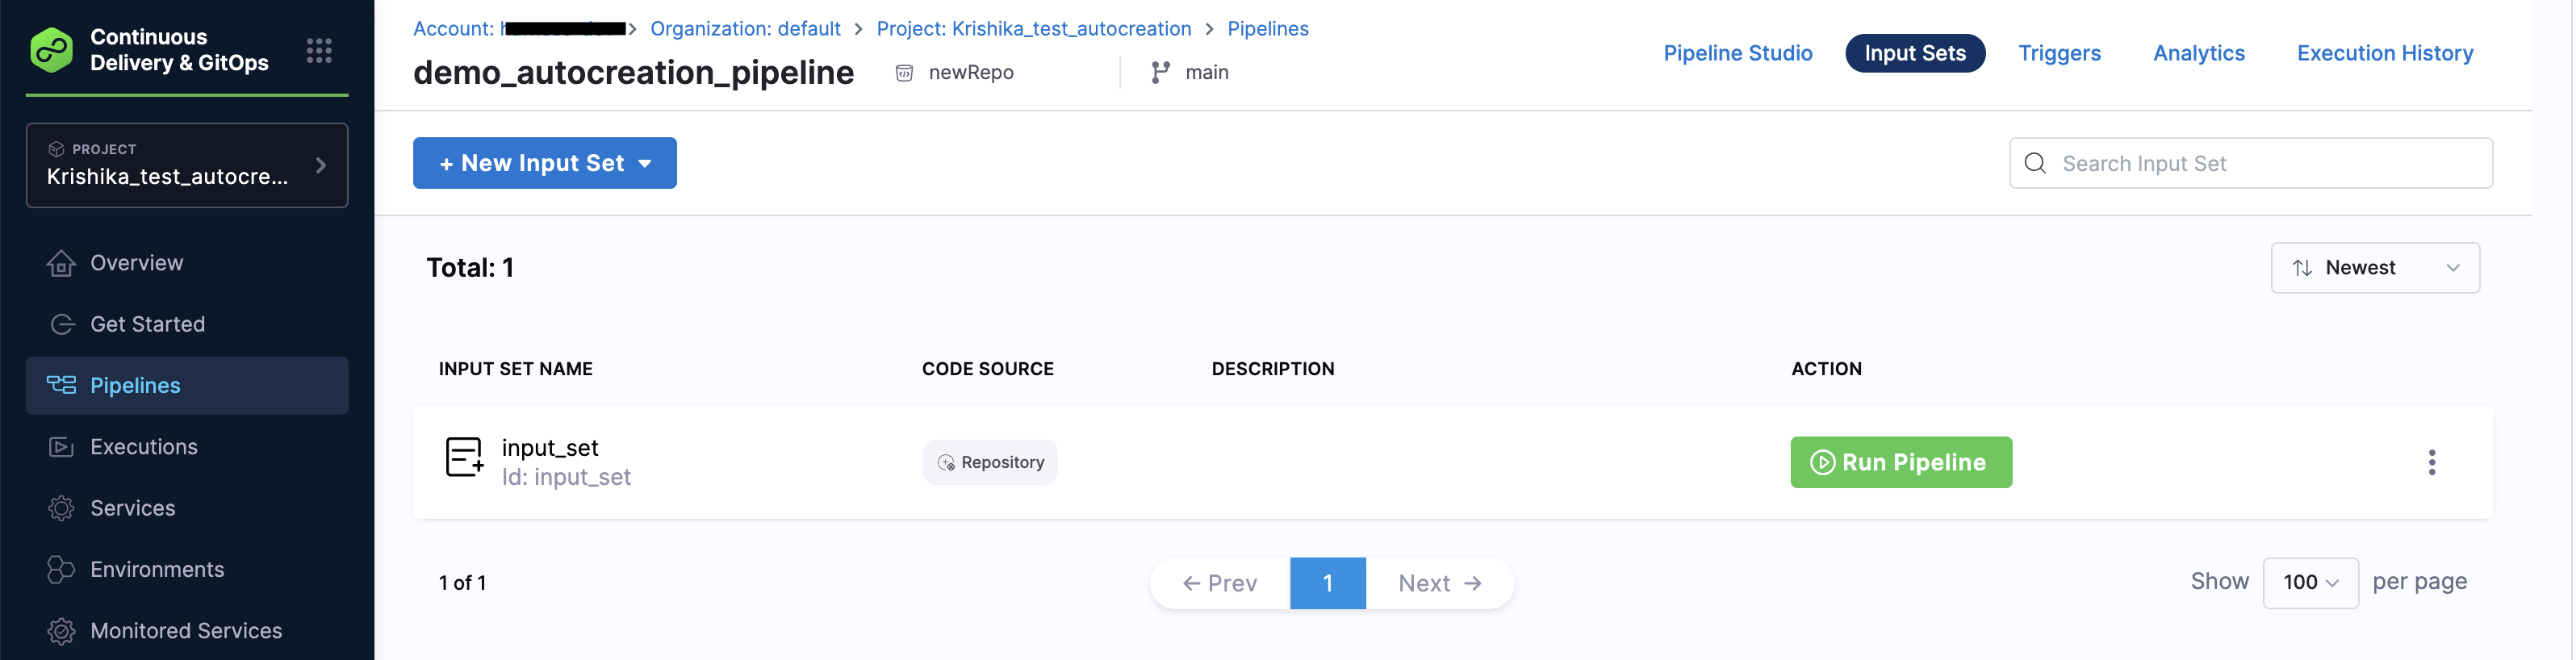
After pushing the changes, we will see that Input set named as input_set is created for the pipeline demo_autocreation_pipeline.
- Harness RBAC is not applicable in Autocreation. The scope of the webhook should match the entity it's trying to create. For example, a project-level webhook can only create entities within the same project, whereas an account-level webhook can create entities across multiple projects and the organizations. If you are able to push to the default branch, you will be able to create the entity in Harness.
- When files are deleted in Git, the corresponding entity is not removed; instead, it's just an automatic creation process, not a complete Git sync.
Control auto-creation with OPA policies
Harness integrates OPA "on save" policy evaluation into the GitX auto-creation flow. You can use OPA policies to selectively allow or block specific entity types from being auto-created when a webhook event fires — for example, blocking Infrastructure definitions while still allowing Pipelines and Services.
Because Harness exposes principalType in the policy evaluation context — SERVICE for webhook-triggered auto-creation and USER for manual UI or API actions — you can also write policies that block webhook-based creation for a repo while leaving manual creation unaffected.
How it works
When a webhook event triggers auto-creation, Harness processes the pushed YAML files and determines which entities to create. Before creating each entity, Harness evaluates any applicable "On Save" OPA policy sets. If a policy denies the operation, entity creation is blocked and the webhook event is marked as warning. If no policy denies the operation, the entity is created normally.
Supported entities and feature flags
Contact Harness Support to enable the relevant feature flag for your account.
| Feature flag | Applies to |
|---|---|
PIPE_ENABLE_OPA_GOVERNANCE_FOR_AUTO_CREATION | Pipelines, Templates |
CDS_OPA_GOVERNANCE_FOR_WEBHOOK | Services, Infrastructure definitions, Environments, Overrides |
Write a policy to block auto-creation
The following fields are available during policy evaluation for auto-creation events:
| Field | Description |
|---|---|
input.metadata.principalType | SERVICE for webhook-triggered auto-creation; USER for manual UI or API actions. |
input.pipeline.gitConfig.repoName | The repository name where the push originated. |
Example: Block auto-creation by repo and principal type
This policy blocks pipeline auto-creation for a specific repository when triggered by a webhook. Manual creation through the Harness UI or API is unaffected because those actions carry principalType == "USER".
package pipeline.policy

deny[msg] {
  repo := input.pipeline.gitConfig.repoName
  principalType := input.metadata.principalType

  repo == "my-repo"
  principalType == "SERVICE"

  msg := sprintf(
    "Auto-creation via webhooks is blocked for repo '%s'.",
    [repo]
  )
}
Configure a policy set for auto-creation
After writing your policy, create a policy set and attach it to the On Save event for the target entity type. For step-by-step instructions, go to OPA Policy for CD Entities.