Gitleaks step configuration
You can scan your code repositories using Gitleaks and ingest your results into Harness STO.
Important notes
This section describes recommended best practices and references to useful information.
Update your allowlist with inactive secrets
You can specify an allowlist of secrets that are inactive, rotated, deactivated, or false positives. Gitleaks ignores these secrets during a scan. Set up your allowlist in a .gitleaks.toml file and place it at the root of your repository.
It is best practice to update your allowlist with secrets that are inactive, rotated, deactivated, or false positives. Otherwise, Gitleaks will continue to detect these secrets in your commit history even after they have been updated in your code.
The following steps outline the recommended workflow:
-
Run a Gitleaks scan and review the detected passwords, tokens, and other secrets.
-
Rotate or deactivate all secrets that are currently active.
-
Compile a list of all secrets that are now inactive, rotated, deactivated, or false positives.
-
Update the allowlist in
.gitleaks.tomlto include these secrets.
Harness recommends that you add your secrets as plain text to the regexes array, as shown in this example. This is the most reliable method to ensure that Gitleaks detects only active secrets when you run another scan.
.gitleaks.toml example
title = "example gitleaks config"

[extend]
# useDefault will extend the base configuration with the default gitleaks config:
# https://github.com/zricethezav/gitleaks/blob/master/config/gitleaks.toml
useDefault = true

[allowlist]
# Recommended practice is to add your secrets to a regexes array,
# not to a commits array.
regexTarget = "match"
description = "whitelist public and test secrets"
regexes = [
  '''1234567890abcdef1234567890abcdef''',
  '''abcdef1234567890abcdef1234567890''',
]
Redact secrets
Harness recommends that you configure the Gitleaks step to redact secrets in the log output.
Speed up your scans
To speed up your scan times, you can configure the Gitleaks step to limit the number of commits to scan. By default, Gitleaks scans the entire commit history.
Write custom detection rules
You can also write your own custom detection rules.
- For examples, go to the default Gitleaks config.
- If you want to contribute to the default configuration, go to the Contributing guidelines.
- For information about advanced configurations, go to Stop leaking secrets - configuration.
For more information
The following topics contain useful information for setting up scanner integrations in STO:
Gitleaks step settings for STO scans
The recommended workflow is to add a GitLeaks step to a Security or Build stage and then configure it as described below.
Scan Mode
- Ingestion Configure the step to read scan results from a data file and then ingest, normalize, and deduplicate the data.
- Orchestration Configure the step to run a scan and then ingest, normalize, and deduplicate the results.
Scan Configuration
The predefined configuration to use for the scan. All scan steps have at least one configuration.
Target
Type
-
Repository Scan a codebase repo.
In most cases, you specify the codebase using a code repo connector that connects to the Git account or repository where your code is stored. For information, go to Configure codebase.
Target and variant detection
When Auto is enabled for code repositories, the step detects these values using git:
- To detect the target, the step runs
git config --get remote.origin.url. - To detect the variant, the step runs
git rev-parse --abbrev-ref HEAD. The default assumption is that theHEADbranch is the one you want to scan.
Note the following:
- Auto is not available when the Scan Mode is Ingestion.
- By default, Auto is selected when you add the step. You can change this setting if needed.
Name
The identifier for the target, such as codebaseAlpha or jsmith/myalphaservice. Descriptive target names make it much easier to navigate your scan data in the STO UI.
It is good practice to specify a baseline for every target.
Variant
The identifier for the specific variant to scan. This is usually the branch name, image tag, or product version. Harness maintains a historical trend for each variant.
Workspace (repository)
The workspace path on the pod running the scan step. The workspace path is /harness by default.
You can override this if you want to scan only a subset of the workspace. For example, suppose the pipeline publishes artifacts to a subfolder /tmp/artifacts and you want to scan these artifacts only. In this case, you can specify the workspace path as /harness/tmp/artifacts.
Additionally, you can specify individual files to scan as well. For instance, if you only want to scan a specific file like /tmp/iac/infra.tf, you can specify the workspace path as /harness/tmp/iac/infra.tf
Ingestion File
The path to your scan results when running an Ingestion scan, for example /shared/scan_results/myscan.latest.sarif.
-
The data file must be in a supported format for the scanner.
-
The data file must be accessible to the scan step. It's good practice to save your results files to a shared path in your stage. In the visual editor, go to the stage where you're running the scan. Then go to Overview > Shared Paths. You can also add the path to the YAML stage definition like this:
- stage:spec:sharedPaths:- /shared/scan_results
Log Level
The minimum severity of the messages you want to include in your scan logs. You can specify one of the following:
- DEBUG
- INFO
- WARNING
- ERROR
Additional CLI flags
Use this field to run the gitleaks scanner with additional CLI flags such as:
--redact --log-opts="-n 1000"
-
--redactredacts secrets in the log output. -
--log-optsnarrows the range of commits that Gitleaks scans in a Pull Request. For example,-n 1000limits the scan to the last 1000 commits. You can also scan a range of commits using a command such as:tool_args : --log-opts=="--all commitA..commitF"
Passing additional CLI flags is an advanced feature. Harness recommends the following best practices:
-
Test your flags and arguments thoroughly before you use them in your Harness pipelines. Some flags might not work in the context of STO.
-
Don't add flags that are already used in the default configuration of the scan step.
To check the default configuration, go to a pipeline execution where the scan step ran with no additional flags. Check the log output for the scan step. You should see a line like this:
Command [ scancmd -f json -o /tmp/output.json ]In this case, don't add
-for-oto Additional CLI flags.
Fail on Severity
Every STO scan step has a Fail on Severity setting. If the scan finds any vulnerability with the specified severity level or higher, the pipeline fails automatically. You can specify one of the following:
CRITICALHIGHMEDIUMLOWINFONONE— Do not fail on severity
The YAML definition looks like this: fail_on_severity : critical # | high | medium | low | info | none
Settings
You can use this field to specify environment variables for your scanner.
You can also use this field to speed up your Gitleaks scans.
Additional Configuration
The fields under Additional Configuration vary based on the type of infrastructure. Depending on the infrastructure type selected, some fields may or may not appear in your settings. Below are the details for each field
- Override Security Test Image
- Privileged
- Image Pull Policy
- Run as User
- Set Container Resources
- Timeout
Advanced settings
In the Advanced settings, you can use the following options:
Configure GitLeaks as a Built-in Scanner
The GitLeaks scanner is available as a built-in scanner in STO. Configuring it as a built-in scanner enables the step to automatically perform scans using the free version without requiring any licenses. Follow these steps to set it up:
- Search for Secret Detection in the step palette or navigate to the Built-in Scanners section and select the Secret Detection step.
- Expand the Additional CLI Flags section if you want to configure optional CLI flags.
- Click Add Scanner to save the configuration.
The scanner will automatically use the free version, detect scan targets, and can be further configured by clicking on the step whenever needed.
Proxy settings
This step supports private network connectivity if you're using Harness Cloud infrastructure. For information on connectivity options, see Private network connectivity options. When using proxy configurations, the HTTPS_PROXY and HTTP_PROXY variables are automatically set to route traffic through the secure tunnel. If there are specific addresses that you want to bypass the proxy, you can define those in the NO_PROXY variable. This can be configured in the Settings of your step.
If you need to configure a different proxy, you can manually set the HTTPS_PROXY, HTTP_PROXY, and NO_PROXY variables in the Settings of your step.
Definitions of Proxy variables:
HTTPS_PROXY: Specify the proxy server for HTTPS requests, examplehttps://sc.internal.harness.io:30000HTTP_PROXY: Specify the proxy server for HTTP requests, examplehttp://sc.internal.harness.io:30000NO_PROXY: Specify the domains as comma-separated values that should bypass the proxy. This allows you to exclude certain traffic from being routed through the proxy.
Gitleaks step configuration example for STO
Here's an example of a configured Gitleaks step.
- step:
    type: Gitleaks
    name: gitleaks
    identifier: gitleaks
    spec:
      mode: ingestion
      config: default
      target:
        name: nodegoat
        type: repository
        variant: dev
      advanced:
        log:
          level: debug
      ingestion:
        file: /path/of/file.sarif
    description: gitleaks step
Gitleaks ingestion pipeline example for STO
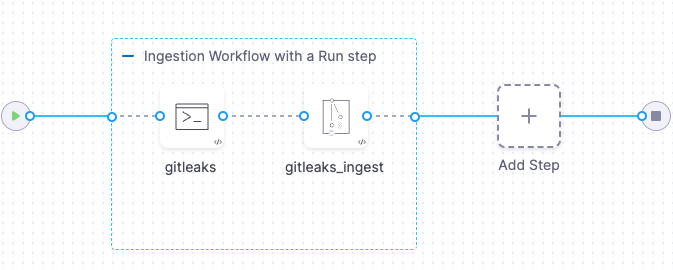
The following pipeline shows an end-to-end ingestion workflow. The pipeline consists of a Build stage with two steps:
-
A Run step that sends a
gitleaks detectcommand to the local Gitleaks container to scan the codebase specified for the pipeline. This command specifies the output file for the scan results:/shared/scan_results/sarif_simple.sarif. -
A Gitleaks step that auto-detects the data file type (SARIF) and then ingests and normalizes the data from the output file.
pipeline:
  projectIdentifier: STO
  orgIdentifier: default
  tags: {}
  stages:
    - stage:
        name: gitleaks-build-stage
        identifier: gitleaksbuildstage
        type: CI
        spec:
          cloneCodebase: true
          execution:
            steps:
              - stepGroup:
                  name: Ingestion Workflow with a runs step
                  identifier: Generation
                  steps:
                    - step:
                        type: Run
                        name: gitleaks
                        identifier: Run_1
                        spec:
                          connectorRef: CONTAINER_IMAGE_REGISTRY_CONNECTOR
                          image: zricethezav/gitleaks:latest
                          shell: Sh
                          command: |
                            gitleaks detect --source /harness --report-path /shared/scan_results/ingest-data.sarif --report-format 'sarif' --exit-code 0 --redact -v
                          resources:
                            limits:
                              memory: 2048Mi
                              cpu: 2000m
                        when:
                          stageStatus: Success
                    - step:
                        type: Gitleaks
                        name: gitleaks_ingest
                        identifier: gitleaks_ingest
                        spec:
                          mode: ingestion
                          config: default
                          target:
                            name: gitleaks-example
                            type: repository
                            variant: master
                          advanced:
                            log:
                              level: info
                          ingestion:
                            file: /shared/scan_results/ingest-data.sarif
          sharedPaths:
            - /shared/scan_results
          caching:
            enabled: false
            paths: []
          infrastructure:
            type: KubernetesDirect
            spec:
              connectorRef: K8S_DELEGATE_CONNECTOR
              namespace: harness-delegate-ng
              automountServiceAccountToken: true
              nodeSelector: {}
              os: Linux
  properties:
    ci:
      codebase:
        connectorRef: CODEBASE_CONNECTOR
        repoName: dvpwa
        build: <+input>
  identifier: Gitleaks_docsexample_INGESTION
  name: Gitleaks_docsexample_INGESTION
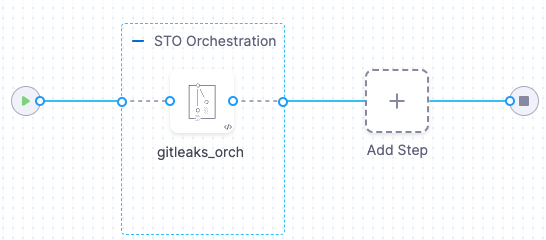
Gitleaks orchestration pipeline example for STO
The following pipeline illustrates an orchestration workflow where the Gitleaks step scans the codebase and ingests the results in one step.
pipeline:
  projectIdentifier: STO
  orgIdentifier: default
  tags: {}
  stages:
    - stage:
        name: gitleaks-build-stage
        identifier: gitleaksbuildstage
        type: CI
        spec:
          cloneCodebase: true
          execution:
            steps:
              - stepGroup:
                  name: "STO Orchestration "
                  identifier: Orchestration
                  steps:
                    - step:
                        type: Gitleaks
                        name: gitleaks_orch
                        identifier: gitleaks_orch
                        spec:
                          mode: orchestration
                          config: default
                          target:
                            name: gitleaks-example
                            type: repository
                            variant: master
                          advanced:
                            log:
                              level: info
                          settings:
                            tool_args: "--log-opts=\"-n 1000\"`"
                          resources:
                            limits:
                              memory: 2048Mi
                              cpu: 2000m
          sharedPaths:
            - /shared/scan_results
          caching:
            enabled: false
            paths: []
          infrastructure:
            type: KubernetesDirect
            spec:
              connectorRef: K8S_DELEGATE_CONNECTOR
              namespace: harness-delegate-ng
              automountServiceAccountToken: true
              nodeSelector: \{}
              os: Linux
  properties:
    ci:
      codebase:
        connectorRef: CODEBASE_CONNECTOR
        repoName: dvpwa
        build: <+input>
  identifier: gitleaks_docs_example_ORCHESTRATION
  name: gitleaks_docs_example_ORCHESTRATION