Checkmarx scanner reference for STO
Checkmarx offers an extensive suite of tools to support secure application development. Harness STO makes it easy to:
- Run automated Checkmarx scans of your code repositories, web applications, open-source components, and other targets.
- Ingest, correlate, and deduplicate your scan results.
- Use STO's extensive array of tools to discover and fix vulnerabilities quickly.
With Harness STO, you can do the following:
- Run local SAST scans using the CxConsole CLI (orchestration mode).
- Extract results from a CxSAST server (extraction mode).
- Ingest results from any Checkmarx scanner that can publish to SARIF.
Important notes for running Checkmarx scans in STO
Supported Checkmarx workflows
-
Harness STO supports the following:
-
Orchestration mode — The Checkmarx step runs SAST scans using the CxConsole CLI.
-
Extraction mode — The Checkmarx step can extract and ingest scan results for Checkmarx SAST (CxSAST).
-
Ingestion mode — The Checkmarx step can ingest results from any Checkmarx scanner that can publish results in SARIF format.
-
A common and very flexible workflow is to run your Checkmarx scan using a GitHub Action or Drone Plugin step and then ingest your scan results using a Checkmarx step.
-
For Checkmarx SAST (CxSAST), Checkmarx SCA (CxSCA), and Checkmarx Flow (CxFlow) scans, you can use a Checkmarx CxFlow Github Action.
-
For Checkmarx One scans, you can use a Checkmark AST Github Action.
-
As part of the setup process, you need to verify your login information for the Checkmarx product that you want to use, and then specify this information in the GitHub Action or Drone Plugin step.
-
Review the documentation for the Checkmarx CxFlow or Checkmark One action thoroughly and verify that you’ve configured it correctly in Harness.
-
For a general description and example of an end-to-end ingestion pipeline, go to Run an ingestion scan in an STO Pipeline.
-
If you want to generate multiple results files in one scan, add a separate Checkmarx step to ingest each results file after the scan step.
-
-
Root access requirements
If you want to add trusted certificates to your scan images at runtime, you need to run the scan step with root access.
You can set up your STO scan images and pipelines to run scans as non-root and establish trust for your proxies using custom certificates. For more information, go to Configure STO to Download Images from a Private Registry.
For more information
The following topics contain useful information for setting up scanner integrations in STO:
Checkmarx step settings for STO scans
The recommended workflow is add a Checkmarx step to a Security Tests or CI Build stage and then configure it as described below.
Scan
Scan Mode
- Orchestration Configure the step to run a scan and then ingest, normalize, and deduplicate the results.
- Extraction Configure the step to extract scan results from an external SaaS service and then ingest, normalize, and deduplicate the data.
- Ingestion Configure the step to read scan results from a data file and then ingest, normalize, and deduplicate the data.
Scan Configuration
The predefined configuration to use for the scan. All scan steps have at least one configuration.
Target
Type
-
Repository Scan a codebase repo.
In most cases, you specify the codebase using a code repo connector that connects to the Git account or repository where your code is stored. For information, go to Configure codebase.
Target and variant detection
When Detect is enabled for code repositories, the step detects these values using git:
- To detect the target, the step runs
git config --get remote.origin.url. - To detect the variant, the step runs
git rev-parse --abbrev-ref HEAD. The default assumption is that theHEADbranch is the one you want to scan.
Note the following:
- Detect is not available when the Scan Mode is Ingestion.
- Detect is the default selection for new pipelines. Manual is the default for old pipelines, but you might find that neither radio button is selected in the UI.
Name
The identifier for the target, such as codebaseAlpha or jsmith/myalphaservice. Descriptive target names make it much easier to navigate your scan data in the STO UI.
It is good practice to specify a baseline for every target.
Variant
The identifier for the specific variant to scan. This is usually the branch name, image tag, or product version. Harness maintains a historical trend for each variant.
Workspace
The workspace path on the pod running the scan step. The workspace path is /harness by default.
You can override this if you want to scan only a subset of the workspace. For example, suppose the pipeline publishes artifacts to a subfolder /tmp/artifacts and you want to scan these artifacts only. In this case, you can specify the workspace path as /harness/tmp/artifacts.
Ingestion File
The path to your scan results when running an Ingestion scan, for example /shared/scan_results/myscan.latest.sarif.
-
The data file must be in a supported format for the scanner.
-
The data file must be accessible to the scan step. It's good practice to save your results files to a shared path in your stage. In the visual editor, go to the stage where you're running the scan. Then go to Overview > Shared Paths. You can also add the path to the YAML stage definition like this:
    - stage:
      spec:
        sharedPaths:
          - /shared/scan_results
Authentication
Domain
The fully-qualified URL to the scanner.
Enforce SSL
The step and the scanner communicate over SSL by default. Set this to false to disable SSL (not safe).
Access ID
The username to log in to the scanner.
Access Token
The access token to log in to the scanner. This is usually a password or an API key.
You should create a Harness text secret with your encrypted token and reference the secret using the format <+secrets.getValue("project.my-access-token")>. For more information, go to Add and Reference Text Secrets.
Scan Tool
Team Name
The Checkmarx team name. Use the format /<server-name>/<team-name> — for example, /server1.myorg.org/devOpsEast.
Project Name
The name of the scan project as defined in the scanner. This is the also the target name in the Harness UI (Security Tests > Test Targets).
Log Level
The minimum severity of the messages you want to include in your scan logs. You can specify one of the following:
- DEBUG
- INFO
- WARNING
- ERROR
Additional CLI flags
Use this field to run the Checkmarx plugin with flags such as:
-incremental— Run an incremental scan.-LocationPathExclude— Exclude one or more paths from the scan.-LocationFilesExclude— Exclude one or more paths from the scan.-OsaPathExclude— Exclude matching paths from the scan.-OsaFilesExclude— Exclude matching files from the scan.
Passing additional CLI flags is an advanced feature. Harness recommends the following best practices:
-
Test your flags and arguments thoroughly before you use them in your Harness pipelines. Some flags might not work in the context of STO.
-
Don't add flags that are already used in the default configuration of the scan step.
To check the default configuration, go to a pipeline execution where the scan step ran with no additional flags. Check the log output for the scan step. You should see a line like this:
Command [ scancmd -f json -o /tmp/output.json ]In this case, don't add
-for-oto Additional CLI flags.
Running incremental scans with Checkmarx
In some cases, you might want to run an incremental rather than a full scan with Checkmarx due to time or licensing limits. An incremental scan evaluates only new or changed code in a merge or pull request. Incremental scans are faster than full scans, but become less accurate over time.
Consider carefully when to run incremental vs. full scans. See When should I use Incremental Scans vs Full Scans in CxSAST? in the Checkmarx documentation.
Fail on Severity
Every Security step has a Fail on Severity setting. If the scan finds any vulnerability with the specified severity level or higher, the pipeline fails automatically. You can specify one of the following:
CRITICALHIGHMEDIUMLOWINFONONE— Do not fail on severity
The YAML definition looks like this: fail_on_severity : critical # | high | medium | low | info | none
Settings
You can use this field to provide environment variables to be used during the execution of the step. For example, if you need to access your Checkmarx server through a proxy, you can add this setting:
- key =
JAVA_TOOL_OPTIONS - value =
-DproxySet=true -Dhttp.proxyHost=MY_PROXY_ADDRESS -Dhttp.proxyPort=MY_PROXY_PORT
Replace MY_PROXY_ADDRESS with your proxy address or proxy FQDN, and MY_PROXY_PORT with your proxy port.
If you want to go through an HTTPS proxy, replace -Dhttp with -Dhttps.
Exclude issues marked as Not Exploited
You can configure the Checkmarx ingestion step to exclude issues detected by Checkmarx but flagged as Not Exploitable. To enable this setting, add the following key-value pair under Settings:
hide_not_exploitable : True
Additional Configuration
In the Additional Configuration settings, you can use the following options:
Advanced settings
In the Advanced settings, you can use the following options:
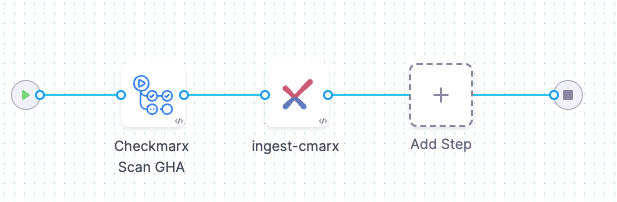
Example workflow: Ingest SARIF data from a Checkmarx GitHub Action scan
The following pipeline example illustrates an ingestion workflow. It consists of two steps:
- An Action step scans a code repo using a Checkmarx GitHub Action and export the scan results to a SARIF data file.
- A Checkmarx step that ingests the SARIF data.
pipeline:
  projectIdentifier: STO
  orgIdentifier: default
  tags: {}
  properties:
    ci:
      codebase:
        connectorRef: GITHUB_CONNECTOR
        repoName: https://github.com/OWASP/NodeGoat
        build: <+input>
  stages:
    - stage:
        name: CheckmarxSCA
        identifier: checkmarxone
        type: CI
        spec:
          cloneCodebase: true
          execution:
            steps:
              - step:
                  type: Action
                  name: Checkmarx Scan GHA
                  identifier: CxFlow
                  spec:
                    uses: checkmarx-ts/checkmarx-cxflow-github-action@v1.6
                    with:
                      project: SampleProject
                      team: /CxServer/nzsouth
                      scanners: sca
                      checkmarx_url: <+secrets.getValue("my-checkmarx-url")>
                      checkmarx_username: zeronorth
                      checkmarx_password:  <+secrets.getValue("my-checkmarx-password")>
                      checkmarx_client_secret: <+secrets.getValue("my-checkmarx-client-secret")>
                      sca_username: harness
                      sca_password:  <+secrets.getValue("my-sca-passeword")>
                      sca_tenant: cxIntegrations
                      break_build: false
              - step:
                  type: Checkmarx
                  name: ingest-cmarx
                  identifier: Checkmarx_1
                  spec:
                    mode: ingestion
                    config: default
                    target:
                      name: <+pipeline.name>
                      type: repository
                      variant: dev
                    advanced:
                      log:
                        level: debug
                    runAsUser: "1001"
                    ingestion:
                      file: /harness/cx.sarif
          platform:
            os: Linux
            arch: Amd64
          runtime:
            type: Cloud
            spec: {}
          sharedPaths:
            - /shared/scan_results/
  identifier: CheckmarxGitAction
  name: CheckmarxGitAction