Tutorial: SAST code scans using Semgrep

This tutorial shows you how to scan your codebases using Semgrep, a popular SAST tool for detecting vulnerabilities in application code. Semgrep can scan a wide variety of languages and includes a free version for individuals who want to scan files locally.

In this tutorial, you'll set up a simple ingestion-only workflow with two steps. The first step runs the scan; the second step ingests the results.

ingestion-only workflow

Prerequisites
  • This tutorial uses the free version of Semgrep to run simple SAST scans. More advanced workflows are possible but are outside the scope of this tutorial.

  • Semgrep scans use an agent that uploads data to the Semgrep cloud by default. Semgrep uses this data to improve the user experience. Therefore this tutorial is not suitable for air-gapped environments.

  • This tutorial has the following prerequisites:

Set up your codebase

To do this tutorial, you need a codebase connector to your Git repository and an access token. A connector can specify a Git account (http://github.com/my-account) or a specific repository (http://github.com/my-account/my-repository).

This tutorial uses the dvpwa repository as an example. The simplest setup is to fork this repository into your Git account and scan the fork. However, you can run your scans on any codebase that uses a language supported by Semgrep.

Set up your pipeline

Do the following:

  1. Select Security Testing Orchestration (left menu, top) > Pipelines > Create a Pipeline. Enter a name and click Start.

  2. In the new pipeline, select Add stage > Security Tests.

  3. Set up your stage as follows:

    1. Enter a Stage Name.

    2. In Select Git Provider, select the connector to your Git provider account.

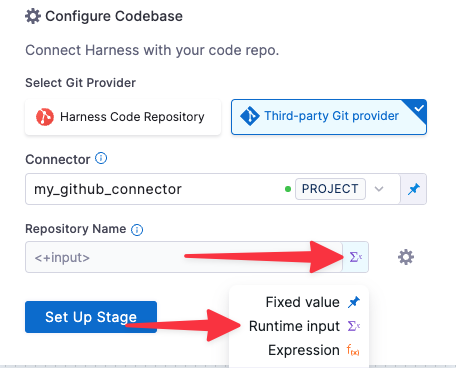
    3. In Repository Name, click the value type select (tack button) and select Runtime Input.

  4. Go to Overview and add the following Shared Path: /shared/scan_results

  5. Go to Infrastructure and select Cloud, Linux, and AMD64 for the infrastructure, OS, and architecture.

    You can also use a Kubernetes or Docker build infrastructure, but these require additional work to set up. For more information, go to Set up a build infrastructure for STO.

Add the scan step

Now you will add a step that runs a scan using the local Semgrep container image maintained by Harness.

  1. Go to Execution and add a Run step.

  2. Configure the step as follows:

    1. Name = run_semgrep_scan

    2. Command = semgrep /harness --sarif --config auto -o /shared/scan_results/semgrep.sarif

      This command runs a Semgrep scan on your code repo and outputs the results to a SARIF file.

    3. Open Optional Configuration and set the following options:

      1. Container Registry — When prompted, select Account and then Harness Docker Connector. The step uses this connector to download the scanner image.

      2. Image = returntocorp/semgrep

      3. Add the following environment variable:

        • Key : SEMGREP_APP_TOKEN

        • Value : Click the type selector (right), set the value type to Expression, and enter the value <+secrets.getValue("YOUR_SEMGREP_TOKEN_SECRET")>.

          set the value type

      4. Limit Memory = 4096Mi

        You might want to reserve more memory to speed up the scan. This setting applies to Kubernetes and Docker infrastructures only.

Add the Semgrep (ingest) step

Now that you've added a step to run the scan, it's a simple matter to ingest it into your pipeline. Harness provides a set of customized steps for popular scanners such as Semgrep.

  1. In Execution, add a Semgrep step after your Run step.

  2. Configure the step as follows:

    1. Name = ingest_semgrep_data

    2. Type = Repository

    3. Under Target:

      1. Name = Select Runtime Input as the value type.

      2. Variant = Select Runtime Input as the value type.

    4. Ingestion File = /shared/scan_results/semgrep.sarif

    5. Fail on Severity = Critical

Run the pipeline and check your results

  1. In the Pipeline Studio, select Run (top right).

  2. When prompted, enter your runtime inputs.

    • Under Codebase, enter the repository and branch to scan.

    • Under Stage: <stage_name>, enter the target name and variant you want to use.

    If you're scanning the example repository mentioned above, enter dvpwa for the repository and target, and master for the branch and variant.

    • In most cases, you want to use the repository for the target and the branch for the variant.

    • When you scan a codebase for the first time, the standard practice is to scan the root branch. This is usually the main or master branch.

  3. Run the pipeline and then wait for the execution to finish.

    If you used the example repository mentioned above, you'll see that the pipeline failed for an entirely expected reason: the Semgrep step is configured to fail the pipeline if the scan detected any critical vulnerabilities. The final log entry for the Semgrep step reads: Exited with message: fail_on_severity is set to critical and that threshold was reached.
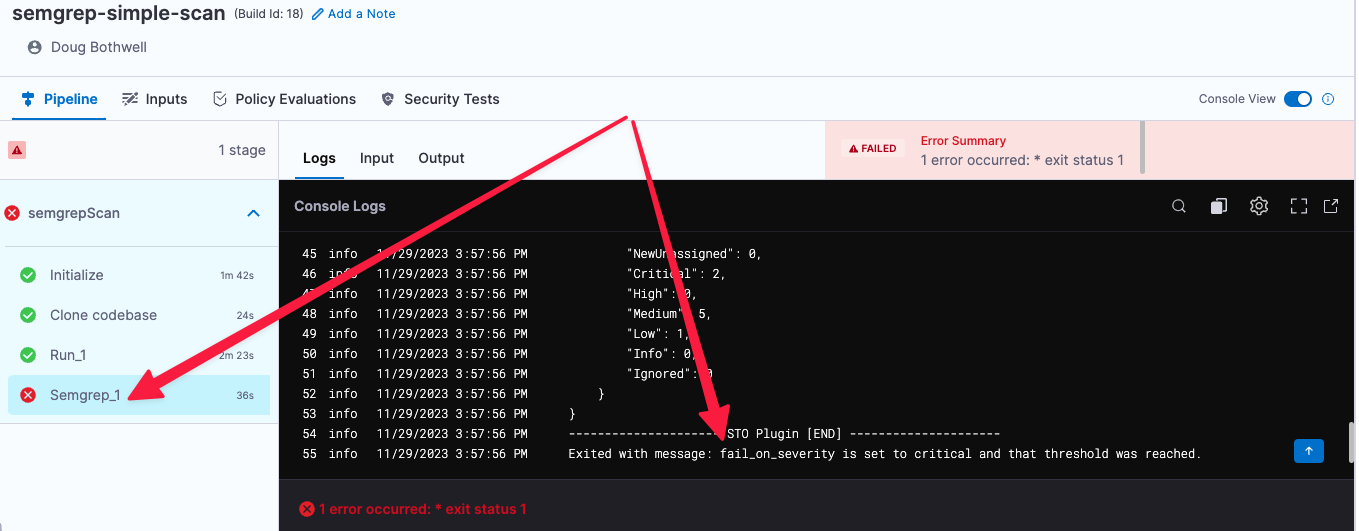
    pipeline failed, critical issues found

  4. Select Security Tests and examine any issues detected by your scan.
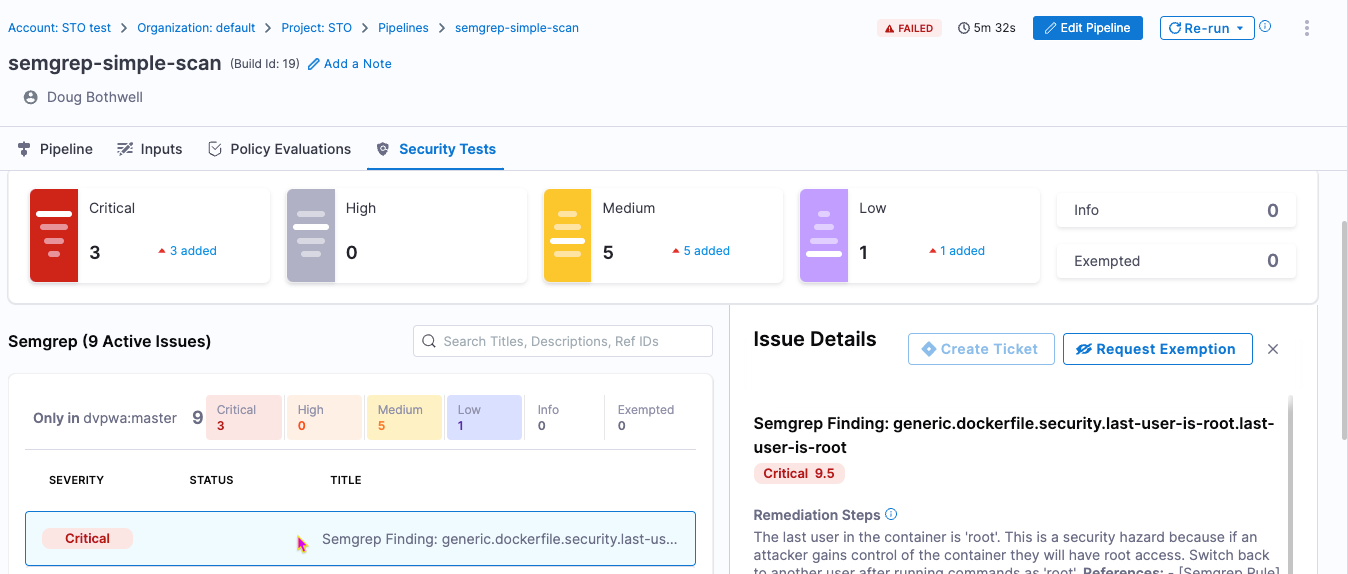
    view scan results

Specify the baseline

tip

It is good practice to specify a baseline for every target. Defining a baseline makes it easy for developers to drill down into "shift-left" issues in downstream variants and security personnel to drill down into "shift-right" issues in the baseline.

  1. Select Test Targets (left menu).

  2. Select the baseline you want for your target.
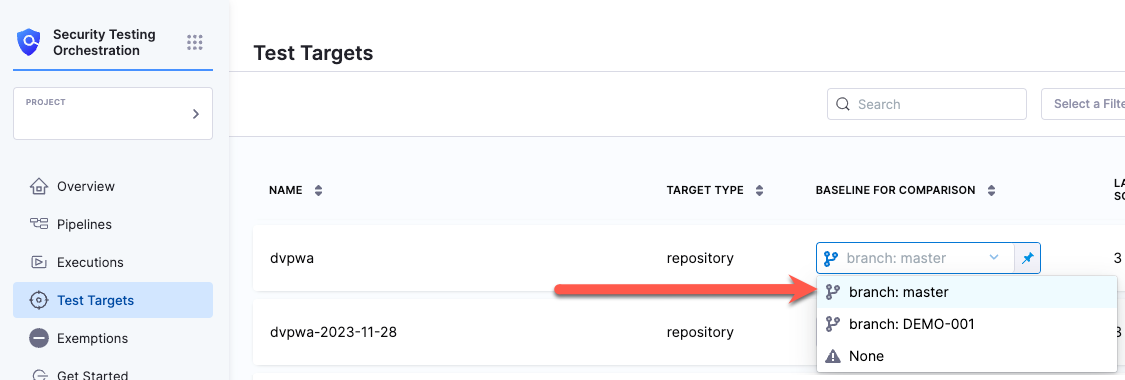
set the baseline

YAML pipeline example

Here's an example of the pipeline you created in this tutorial. If you copy this example, replace the placeholder values with appropriate values for your project, connectors, and access token.

pipeline:
projectIdentifier: YOUR_PROJECT_ID
orgIdentifier: default
tags: {}
stages:
- stage:
name: semgrep_tutorial_test_stage
identifier: semgrep_tutorial_test_stage
description: ""
type: SecurityTests
spec:
cloneCodebase: true
execution:
steps:
- step:
type: Run
name: run_semgrep_scan
identifier: run_semgrep_scan
spec:
connectorRef: account.harnessImage
image: returntocorp/semgrep
shell: Sh
command: |-
semgrep --version
semgrep /harness --sarif --config auto -o /shared/scan_results/semgrep.sarif
envVariables:
SEMGREP_APP_TOKEN: <+secrets.getValue("YOUR_SEMGREP_APP_TOKEN")>
resources:
limits:
memory: 4096Mi
- step:
type: Semgrep
name: ingest_semgrep_data
identifier: ingest_semgrep_data
spec:
mode: ingestion
config: default
target:
type: repository
name: <+input>
variant: <+input>
advanced:
log:
level: debug
fail_on_severity: none
ingestion:
file: /shared/scan_results/semgrep.sarif
infrastructure:
type: KubernetesDirect
spec:
connectorRef: YOUR_KUBERNETES_CLUSTER_CONNECTOR_ID
namespace: YOUR_NAMESPACE
automountServiceAccountToken: true
nodeSelector: {}
os: Linux
sharedPaths:
- /shared/scan_results
caching:
enabled: false
paths: []
slsa_provenance:
enabled: false
timeout: 10m
properties:
ci:
codebase:
connectorRef: YOUR_CODE_REPO_CONNECTOR_ID
repoName: <+input>
build: <+input>
identifier: semgrepsimplescan
name: semgrep-simple-scan