Tutorial: Container image scans with Aqua Trivy
This tutorial shows you how to scan your container images using Aqua Trivy, a popular open-source scanning tool.
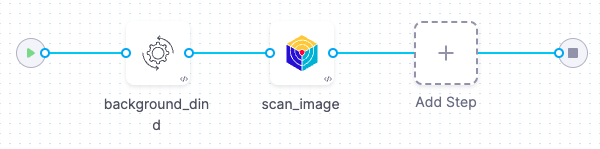
In this tutorial, you'll set up a simple orchestration workflow with two steps:
-
A Background step that runs Docker-in-Docker as a service. This is required for any orchestrated or dataload scan of a container image.
-
An Aqua-Trivy step that runs the scan and ingests the results into STO.
-
This tutorial has the following prerequisites:
- A Harness account and STO module license.
- You must have a Security Testing Developer or AppSec role assigned.
- A basic understanding of key STO concepts and good practices is highly recommended. Here are some good resources:
- A Harness connector to the Docker v2-compliant registry with the image you want to scan. This tutorial uses an example image on Docker Hub that contains known vulnerabilities.
Set up your pipeline
Do the following:
-
Select Security Testing Orchestration (left menu, top) > Pipelines > Create a Pipeline. Enter a name and click Start.
-
In the new pipeline, select Add stage > Security.
-
Set up your stage as follows:
-
Enter a Stage Name.
-
Disable Clone Codebase. You don't need a code repository for this tutorial.
-
-
In the Pipeline Editor, go to Infrastructure and select Cloud, Linux, and AMD64 for the infrastructure, OS, and architecture.
You can also use a Kubernetes or Docker build infrastructure, but these require additional work to set up. For more information, go to Supported Infrastructures documentation.
The following step is required only for Kubernetes or Docker infrastructures. If you're using Harness Cloud, go to Add the Aqua-Trivy scan step.
Add a Docker-in-Docker background step
The following use cases require a Docker-in-Docker background step in your pipeline:
- Container image scans on Kubernetes and Docker build infrastructures
- Required for Orchestration and Dataload scan modes
- Custom Scan steps on Kubernetes and Docker build infrastructures
- Required for all target types and Orchestration/DataLoad modes
The following use cases do not require a Docker-in-Docker background step:
- Harness Cloud AMD64 build infrastructures
- SAST/DAST/configuration scans that use a scanner-specific step and not a Custom Scan step.
- Ingestion scans where the data file has already been generated
Set up a Docker-in-Docker background step
-
Go to the stage where you want to run the scan.
-
In Overview, add the shared path
/var/run. -
In Execution, do the following:
- Click Add Step and then choose Background.
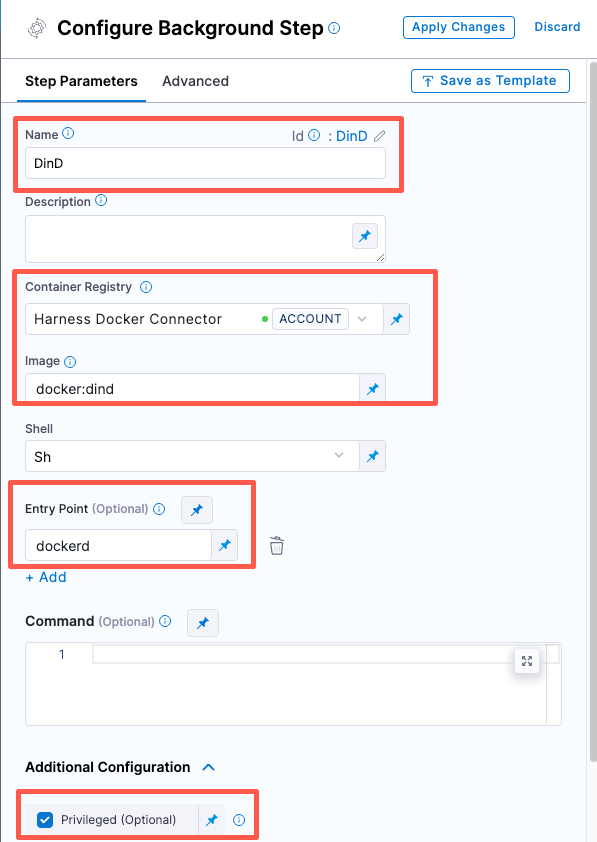
- Configure the Background step as follows:
-
Dependency Name =
dind -
Container Registry = The Docker connector to download the DinD image. If you don't have one defined, go to Docker connector settings reference.
-
Image =
docker:dind -
Under Entry Point, add the following:
dockerdIn most cases, using
dockerdis a faster and more secure way to set up the background step. For more information, go to the TLS section in the Docker quick reference.If the DinD service doesn't start with
dockerd, clear the Entry Point field and then run the pipeline again. This starts the service with the default entry point. -
Under Additional Configuration, select the Privileged checkbox.
-
- Visual setup
- YAML setup
Add a Background step to your pipeline and set it up as follows:
- step:
   type: Background
   name: background-dind-service
   identifier: Background_1
   spec:
      connectorRef: CONTAINER_IMAGE_REGISTRY_CONNECTOR
      image: docker:dind
      shell: Sh
      entrypoint:
         - dockerd
      privileged: true
Add the Aqua-Trivy scan step
- Visual
- YAML
Add an Aqua Trivy step to your pipeline after the DinD background step and configure it as follows:
-
Scan Mode = Orchestration
-
Target name — Click the Value Selector button on the right side of the input field and select Runtime Input.
-
Target variant — Select Runtime Input.
-
Container image Type = Docker v2
-
Container image Domain = docker.io
-
Container image name — Select Runtime Input.
-
Container image tag — Select Runtime Input.
-
Fail on Severity = Critical
Add an Aqua Trivy step to your pipeline after the DinD background step and configure it as follows:
type:AquaTrivyname:A name for the step.identifier:A unique step ID.spec :mode :orchestrationIn orchestrated mode, the step runs the scan and ingests the results in one step.config: defaulttarget :name : <+input>type : containervariant : <+input>You will specify the target name and variant when you run the pipeline. When scanning a repository, you will generally use the repository name and branch for these fields.advanced :log :level : infofail_on_severity: critical
privileged: trueimage:
Here's an example:
              - step:
                  type: AquaTrivy
                  name: scan_container_image
                  identifier: scan_container_image
                  spec:
                    mode: orchestration
                    config: default
                    target:
                      name: <+input>
                      type: container
                      variant: <+input>
                    advanced:
                      log:
                        level: info
                    privileged: true
                    image:
                      type: docker_v2
                      name: <+input>
                      domain: docker.io
                      tag: <+input>
Run the pipeline and check your results
-
In the Pipeline Studio, select Run (top right).
-
When prompted, enter your runtime inputs.
-
Under Target, enter the target name and variant.
-
Under Image, enter the [image name] and [tag] you want to use. In most cases, you want to use the repository for the target and the branch for the variant.
If you're scanning the codebase for the first time, enter the root branch of your repo. This is usually the
mainormasterbranch.If you're scanning the example image mentioned above, enter
snyklabs/gooffor the target and image name, andlatestfor the target variant and image tag. -
-
Run the pipeline and then wait for the execution to finish.
If you used the example image, you'll see that the pipeline failed for an entirely expected reason: you configured the Trivy step to fail the pipeline if the scan detected any critical vulnerabilities. The final log entry for the Semgrep step reads:
Exited with message: fail_on_severity is set to critical and that threshold was reached.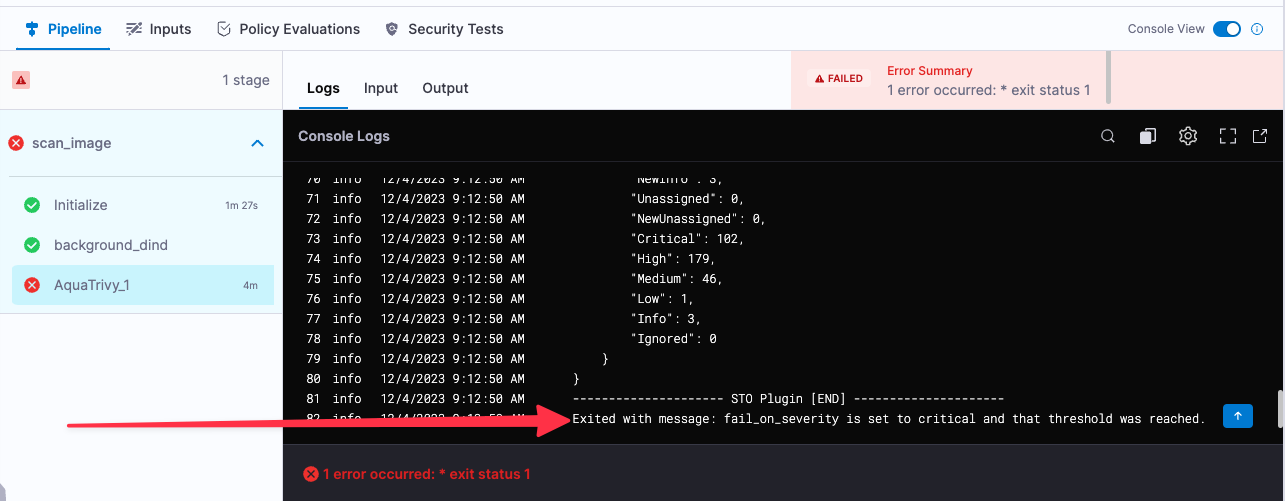
-
Select Vulnerabilities tab and examine any issues detected by your scan.

Specify the baseline
It is good practice to specify a baseline for every target. Defining a baseline makes it easy for developers to drill down into "shift-left" issues in downstream variants and security personnel to drill down into "shift-right" issues in the baseline.
-
Select Test Targets (left menu).
-
Select the baseline you want for your target.

YAML pipeline example
Here's an example of the pipeline you created in this tutorial. If you copy this example, replace the placeholder values with appropriate values for your project, organization, and connectors.
pipeline:
  name: tutorial-test-container-image-scan-v1
  identifier: tutorialtestcontainerimagescanv1
  projectIdentifier: YOUR_HARNESS_PROJECT_ID
  orgIdentifier: YOUR_HARNESS_ORGANIZATION_ID
  tags: {}
  stages:
    - stage:
        name: scan_image
        identifier: scan_image
        description: ""
        type: SecurityTests
        spec:
          cloneCodebase: false
          platform:
            os: Linux
            arch: Amd64
          runtime:
            type: Cloud
            spec: {}
          execution:
            steps:
              - step:
                  type: Background
                  name: background_dind
                  identifier: background_dind
                  spec:
                    connectorRef: YOUR_IMAGE_REGISTRY_CONNECTOR
                    image: docker:dind
                    shell: Sh
                    entrypoint:
                      - dockerd
              - step:
                  type: AquaTrivy
                  name: scan_image
                  identifier: scan_image
                  spec:
                    mode: orchestration
                    config: default
                    target:
                      name: <+input>
                      type: container
                      variant: <+input>
                    advanced:
                      log:
                        level: info
                      fail_on_severity: critical
                    privileged: true
                    image:
                      type: docker_v2
                      name: <+input>
                      domain: docker.io
                      tag: <+input>
                    sbom:
                      format: spdx-json
          caching:
            enabled: false
            paths: []
          slsa_provenance:
            enabled: false
          sharedPaths:
            - /var/run